Deploying site on Heroku. Secrets of use.
(Workshop)
Oleg Rovenskyi
April, 2017
Agenda
- Heroku
- Starting
- Deploy
- Prevent Your Heroku Node App From Sleeping
- Heroku is a cloud Platform-as-a-Service (PaaS) supporting several programming languages that is used as a web application deployment model.
- Heroku, one of the first cloud platforms, has been in development since June 2007, when it supported only the Ruby programming language, but now supports Java, Node.js, Scala, Clojure, Python, PHP, and Go.
- Heroku uses OS Debian or Ubuntu.
Heroku
- Register https://github.com/
- Register
https://signup.heroku.com/login - Install Heroku CLI
https://devcenter.heroku.com/articles/heroku-cli - Install https://nodejs.org/uk/ (v6 stable)
- Clone https://github.com/vladotesanovic/angular2-express-starter
- Install https://github.com/angular/angular-cli
Starting
Heroku CLI
// OS X Homebrew:
$ brew install heroku

// Windows:
32-bit - https://cli-assets.heroku.com/branches/stable/heroku-windows-386.exe
64-bit - https://cli-assets.heroku.com/branches/stable/heroku-windows-amd64.exe

// Debian/Ubuntu:
$ sudo apt-get install software-properties-common # debian only
$ sudo add-apt-repository "deb https://cli-assets.heroku.com/branches/stable/apt ./"
$ curl -L https://cli-assets.heroku.com/apt/release.key | sudo apt-key add -
$ sudo apt-get update
$ sudo apt-get install heroku
(Toolbelt)
The Heroku Command Line Interface (CLI), formerly known as the Heroku Toolbelt, is a tool for creating and managing Heroku apps from the command line / shell of various operating systems.
Heroku dyno
Heroku provides you with virtual "Dyno" that launches your application. In short, one dyno means one running instance of your application.
Dyno Configuration
-
Web: Web dynos are dynos of the “web” process type that is defined in your Procfile. Only web dynos receive HTTP traffic from the routers.
-
Worker: Worker dynos can be of any process type declared in your Procfile, other than “web”. Worker dynos are typically used for background jobs, queueing systems, and timed jobs. You can have multiple kinds of worker dynos in your application. For example, one for urgent jobs and another for long-running jobs. For more information, see Worker Dynos, Background Jobs and Queueing.
Dyno Info
Dyno types
Heroku provides a number of different dyno types each with a set of unique properties and performance characteristics. Free, Hobby, Standard and Performance dynos.
Scalability
To scale horizontally (scale out), add more dynos. For example, adding more web dynos allows you to handle more concurrent HTTP requests
To scale vertically (scale up), use bigger dynos. The maximum amount of RAM available to your application depends on the dyno type you use.
Create app and deploy to Heroku
The first option:
web: node ./dist/server/bin/www.js2. Deploy the app
$ heroku login

$ heroku create
    or
$ heroku create <name app>

$ git push heroku master

$ heroku ps:scale web=1

$ heroku open
3. View logs
$ heroku logs --tail$ git clone https://github.com/vladotesanovic/angular2-express-starter$ cd angular2-express-starter1. Prepare the app
Create app and deploy to Heroku
Scale the app:
1. Check how many dynos are running
$ heroku ps2. Scale
$ heroku ps:scale web=0 // off app

$ heroku ps:scale web=1
Create app and deploy to Heroku
Update project:
1. Add some changes
2. Fix changes
$ git add .

$ git commit -m "Demo"

$ git push heroku master

$ heroku open
3. Additional https://github.com/heroku/heroku-repo
Create app and deploy to Heroku
The second option. When we don't have server:
1. Prepare the app
$ https://github.com/angular/angular-cli //open

$ npm install -g @angular/cli

$ ng new PROJECT-NAME

$ cd PROJECT-NAME
Create app and deploy to Heroku
2. Edit package.json
"scripts": {
  ...

  "heroku-prebuild": "npm install -g http-server",
  "heroku-postbuild": "ng build --prod",
  "start": "http-server dist/"
},
"dependencies": {
...
moved here these devDependencies
"@angular/cli": "1.4.4",
"@angular/compiler-cli": "^4.2.4",
"@angular/language-service": "^4.2.4",
"@types/jasmine": "~2.5.53",
"@types/jasminewd2": "~2.0.2",
"@types/node": "~6.0.60",
"typescript": "~2.3.3"
},
or
$ heroku config:set NPM_CONFIG_PRODUCTION=falseCreate app and deploy to Heroku
3. Deploy app
$ heroku login

$ heroku create
    or
$ heroku create <name app>

// fix changes
$ git add .

$ git commit -m "Demo"

// deploy to heroku
$ git push heroku master

$ heroku open
Heroku statuses
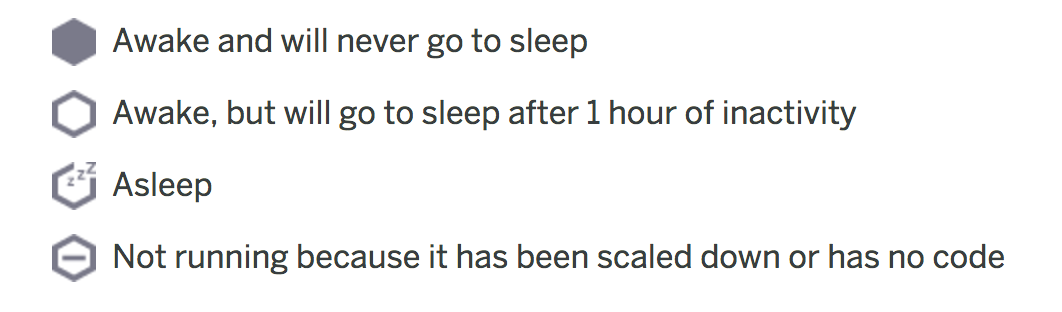
- When an app on Heroku has only one web dyno and that dyno doesn't receive any traffic in 1 hour, the dyno goes to sleep.
- When someone accesses the app, the dyno manager will automatically wake up the web dyno to run the web process type. This causes a short delay for this first request, but subsequent requests will perform normally.
- Apps that have more than 1 web dyno running never go to sleep and worker dynos (or other process types) are never put to sleep.
Secrets

1. Timer
var http = require("http");
setInterval(function() {
    http.get("http://<your app name>.herokuapp.com");
}, 300000); // every 5 minutes (300000)
2. Simple setInterval
3. KeepAwake is a site that pings your free Heroku apps for you.
https://keep-awake.herokuapp.com/
4. If you install the NewRelic Heroku Addon you can set up availability monitoring. You provide a URL which NewRelic pings every 30 seconds, therefore keeping your app awake.
5. Pingdom, Uptime Robot, Kaffeine
Use timer
1. $ git clone https://github.com/dynamis/heroku-clock

2. create app
   $ heroku create <app name>

3. edit clock.rd

    ping_uri_list = [
      "https://ts-heroku.herokuapp.com/"
    ]

4. $ git add .
   $ git commit -m "msg"
   $ git push heroku master

5. $ heroku ps:scale clock=1
Statuses
Bonus
deploy from github

Bonus
heroku local web
$ git clone https://github.com/heroku/node-js-getting-started.git
$ cd node-js-getting-started

$ npm i

$ heroku local web
Bonus
addons: These are applications developed by third-party developers. They can be conveniently embedded in your own
$ heroku addons

$ heroku addons:add newrelic:standard
web-interface: https://devcenter.heroku.com/articles/managing-add-ons
New Relic - Is an application that monitors and analyzes your application
PGBackups -This addon allows you to backup your database
SendGrid - Is a postal service
More addons: Heroku Addons Center

Links
- https://en.wikipedia.org/wiki/Heroku
- https://blog.heroku.com/app_sleeping_on_herokuBullet Two
- https://quickleft.com/blog/6-easy-ways-to-prevent-your-heroku-node-app-from-sleeping/
- https://devcenter.heroku.com/articles/heroku-cli#debian-ubuntu
- https://paucls.wordpress.com/2016/11/25/deploy-angular-2-cli-app-to-heroku/
- https://devcenter.heroku.com/articles/nodejs-support#build-behavior
- http://codenamecrud.ru/ruby-on-rails/deployment
- https://domainr.com/
- https://devcenter.heroku.com/articles/custom-domains