Web Design 2:
Week # 4
Project Update 3 Check
Set up a git repository in your project folder on your local machine and make your first commit. Instructions on how to set up a git repository can be found in the lecture slides for Week 3.
Guidelines:
-
Install Git on your computer
-
Initiate a git repository in your project folder
-
Stage your changes
- Commit your changes
Git Review
We went over a lot of stuff last time. Let's see if we can recall anything
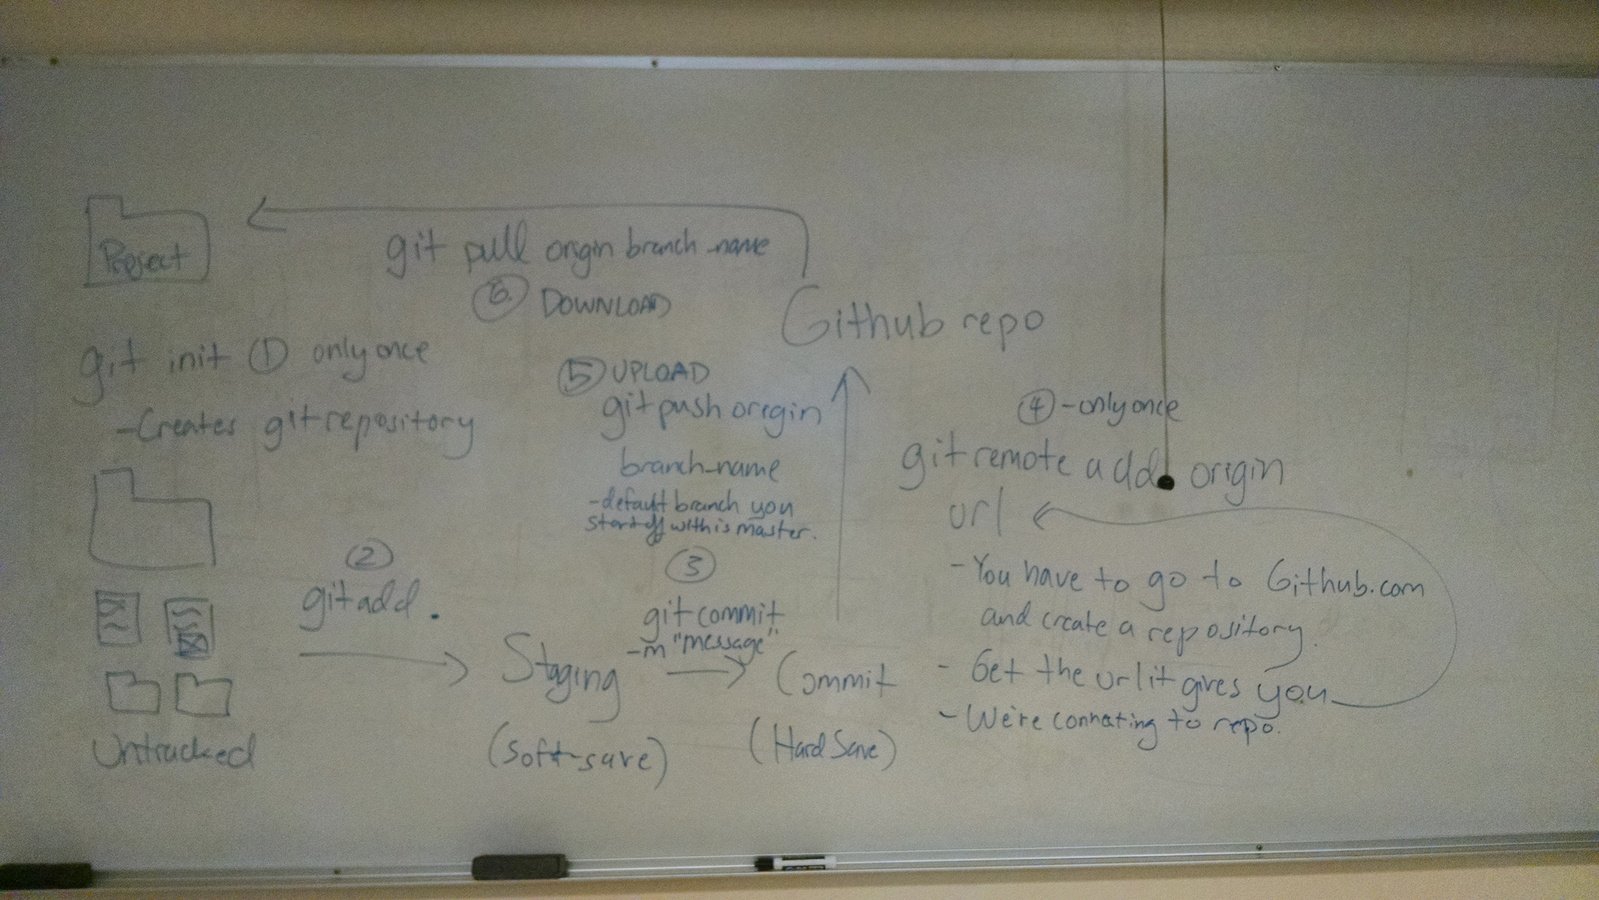
Git WorkFlow
Notes
- box model: Every HTML element operates as a box element in CSS. That is, every HTML element is actually composed of 4 CSS properties: Content, padding, border, and margin. Here is a diagram depicting the elements:
Margin
Content
border
padding
Notes
- box model (continued):
- margin: CSS property for determining space around an element.
- padding: CSS property for determining the space within an element.
- border: CSS property for determining the border color, size, and type around an element.
- content: The actual HTML within the element. For example, the text inside of a p element.
border
padding
p {

padding: 1px;
border: 2px solid black;
margin: 0px 2px;

}
border
padding
Start using jQuery
jQuery is a Javascript library used to make life with JavaScript easier for developers. This works by creating shortcut methods made using JavaScript.
border
padding
How Does jQuery Work?
jQuery works by being included as a single file either in your directory or stored on a server. Either way, you must link to the file somewhere in your HTML. Once you link to the file, you'll have access to all that jQuery has to offer. Plus, it's free.
You can download jQuery and check out any of the jQuery documentation (basically, what any of the methods do) at http://jquery.com/
or use the CDN from Google:
<script src="https://ajax.googleapis.com/ajax/libs/jquery/2.2.2/jquery.min.js"></script>
Where Do I get it?
border
padding
Let's learn jQuery by using it
https://goo.gl/9Gx802
Video Notes
https://youtu.be/s7KaCotn46E
border
padding
Let's learn jQuery by using it
- <script></script> : The script element is used to either link a JavaScript file to the HTML file or to add some JavaScript directly into the HTML document. For example,
<script src="js/jquery.js"></script>
<script>

var something = 43;

</script>- $ : The bling operator is used to tell JavaScript that you're about to use jQuery and that the following object is going to be selected. For example, the following would add text to all p elements. This works for other CSS selectors as well, including ids and classes.
$("p").text("Hey, I'm just some text being added");
$("#some_container").text("Adding some text.");
$(".gato").text("meow");
padding
Let's learn jQuery by using it
$( document ).ready(function() {

});$("div");$(".someElement");$("#someOtherElement");Discussion

Try implementing what you learned into your project. That is:
- Create a script.js file and link to it in any of your html files
- Target 3 different elements in your html file using an element selector, an id selector, and a class selector.
- Discuss your progress with your partner and try and explain the concepts to each other in your own words.
border
padding
Let's learn jQuery by using it
$("div").addClass("someClass");$("div").removeClass("someClass");$("div").css("color", "purple");$( "div" ).prop( "disabled", true );Discussion
Try implementing what you learned into your project. That is, In your existing script.js file:
- Add a class to an element using the "addClass" method.
- Remove the class that was added to an element using the "removeClass" method.
- Change the CSS of any of your elements using the "css" method
- Use the "prop" method on an element
border
padding
Let's learn jQuery by using it
$("div").html("<p>Replacing whatever content that was inside this div with this</p>");$("div").remove();$("p").clone().appendTo("div");$( "div" ).prop( "disabled", true );Discussion
Try implementing what you learned into your project. That is, In your existing script.js file:
- Change the text inside an element using the "html" method.
- Remove an element inside your project using the "remove" method.
- Append one element to another element.
- Clone an element and append it to another element.
border
padding
Let's learn jQuery by using it
$(".someElement").parent().css("color", "purple");$(".someElement").children().css("background", "orange");$(".someElement:nth-child(4)").addClass("someClass");$(".someClass:even").addClass("anotherClass");
$(".someClass:odd").addClass("anotherClass");$("body").css("background", "grey");Discussion
Try implementing what you learned into your project. That is, In your existing script.js file:
- Change a parent element's css using the "parent" method and the "css" method.
- Change a child element's css using the "children" method and the "css" method.
- Use the "nth-child" selector and the "html" method to change the html of an element.
- Use the "even" and "odd" selector and the "html" method to change the html of an element.
Popular ways of using jQuery
Snippets (jQuery code that you can copy/paste)
- https://css-tricks.com/snippets/jquery/
- http://www.catswhocode.com/blog/10-handy-and-reusable-jquery-code-snippets
- http://blog.teamtreehouse.com/14-handy-jquery-code-snippets-for-developers
Plugins (functionality that you can use)
- https://plugins.jquery.com/
- How to create your own: https://learn.jquery.com/plugins/basic-plugin-creation/
- http://www.unheap.com/

Update 4
Continue building the HTML and CSS for your project. Have at least 50% of the styling to your web application using CSS.
Instead of FCC module, either:
- Implement a plugin of your choice into your project. Be sure that it works!
OR - Implement a jQuery code snippet into your project. Again, make sure it works!
OR - Implement your own functionality using jQuery into your project or create your own plugin.
Whichever route you choose, be sure that the functionality makes sense for what you are building.