DES471: Dynamic Web 1
Week # 7
Upload your Challenge and Assignment to D2L. This will be located in Content -> Week 7 -> Graded Activities
Reviewing Database Connections
Last week, we went over using SQL queries to Create, Read, Update, and Destroy (CRUD) data from a database.
Debugging Made Easy
We're first going to cover a very short amount about debugging. Now, debugging can be done a variety of ways in PHP. You can:
1. Use an IDE like PHPStorm, which has its own built-in PHP debugger
2. Use a free debugger like Xdebug (usually comes with Macs)
3. Add a chrome extension or Firefox extension for debugging
4. Add a couple of lines of code to your php file and include it wherever you need it.
Debugging Made Easy
Let's go through the options:
1. PHPStorm is great, but it costs a ton of money, so we're not going with that option.
2. This is surprisingly technical, so I'd rather not try to implement this one.
3. Another great option, but again, very technical and prone to error.
4. Not as robust, but tends to get the job done.
The lines of code for debugging are as simple as adding the following to your php pages at the very top:
This comes from the built-in error reporting from PHP: http://php.net/manual/en/function.error-reporting.php
<?php
ini_set('display_errors', 'On');
error_reporting(E_ALL | E_STRICT);
?>
CRUD
For the next few weeks, we're going to concentrate on the following topics:
- CMS Login, Log Out User login and log out
- CMS Insert, Update, and Delete The ability to add records to a DB table of your choosing.
- Exported DB and Link to Live Site Exported SQL database. A link to the live, functioning version of your website (Published to your web host, database synched, and db connection made).
Notice that these are all guidelines within your final project.
CRUD
Creating a Login System
This week and next week, we're going to be creating a login and registration system, collectively known as an authentication system.
An authentication system is seen across most major sites and allows you and the user to have control over the data and who can access what/where. It also provides personalization, making the user more attached to the application.
Now, this might be a bit tricky, so I've found a video that can help, along with the slides:
https://www.youtube.com/watch?v=6Z3zlt31Fl0
Again, note that the video might be different than the code I have. This is due to the video being somewhat out-of-date, so I'll be implementing some functionality differently.
CRUD
First off, please download the template I've created for this project:
https://goo.gl/EdNLQ2
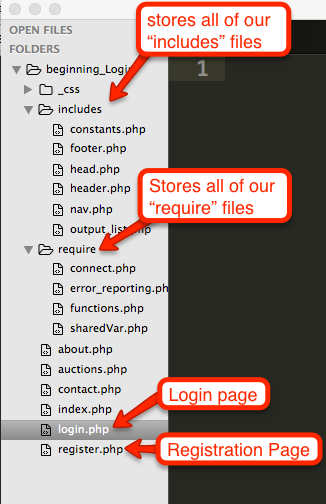
The first thing you'll notice about the directory is that there are a lot more files. Don't be scared! Most of these files just contain code you've already done before. However, instead of putting the code in each file, I've split up the code and put them into different files. That way, if I want to make changes in the header, footer, head, etc., the I can go to the file I need and change it for all of them. This is especially helpful when you start creating larger projects.
On the next page, we'll take a look at the project structure that now exists.
CRUD
CRUD
Go through each file and make sure you understand what's happening. The only files that have new concepts in them are the "functions.php" file and the "constants.php" file.
Let's go over the "constants.php" file first.
Constants are like variables, except that they can't be changed (given a new value somewhere else), they are automatically given a global scope, and they are always in capital case. Now, that might sound confusing, but just think of them as variables that contain a value that you don't want changed throughout your program.
An example of this would be the database name or database password. This is exactly what we have done in our constants.php file.
Take a look at the constants.php file and you should see that we define a constant using the "define" keyword, which takes a constant name that we define and then what the value of the constant will be.
We use these constants to store our database information in our "connect.php" file.
CRUD
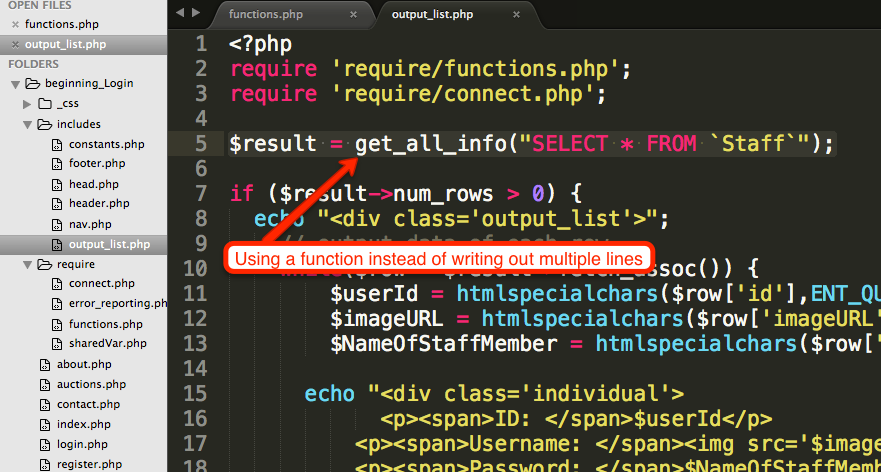
Next up is our "functions.php" file, which contains a bunch of functions I created to help us out and reduce the amount of code we want to duplicate. Take a look at each function and you should notice that there is nothing new. I've just wrapped the functionality that we had and put them into functions. That way, instead of calling 5 lines of code, we just use 1! We're going to follow this procedure throughout the course.
For instance, in our "output_list.php" file, I have used the "get_all_info()" function in order to perform a Read query. All I do is pass in the SQL query to the function and I get a result back!
CRUD
Alright, so now that we have our structure out of the way, let's get back creating a login and registration page. Again, we're splitting this up into 2 weeks, this week and next week.
- Start off by opening up the login.php page. A login page generally has a way to log in.
- Begin by building a basic HTML form (like we've been doing before) and be sure to create a field for "username", "password" (be sure to set the type to "password" in order for the field to hide the password as it's being typed), and a submit button with a name as "login" and a value as "Login". The method will be "POST" and the action will be an empty string. This information is going to be used to send the information the user gives us and send it to the database. If the name and password exist, we're going to authenticate the user. If not, we'll give a warning message to the user that their name and password are incorrect.
- See if you can do this on your own and then take a look at the next page to see if it's similar to what I have.
CRUD
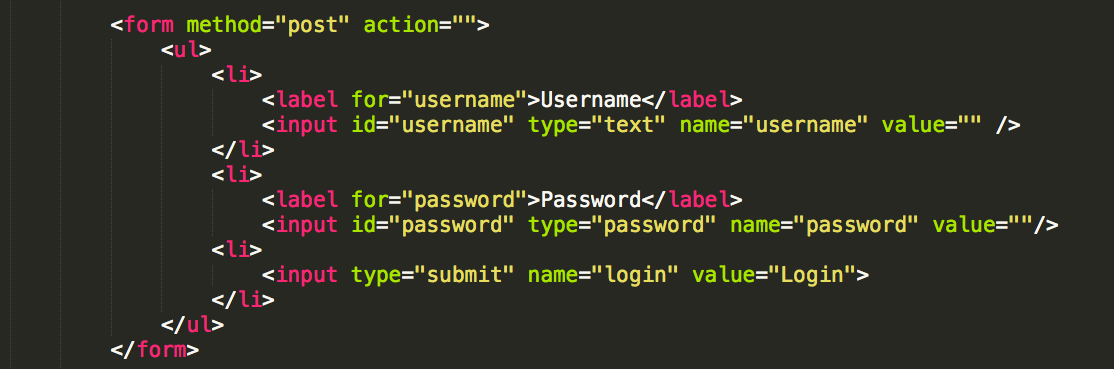
Login Form
CRUD
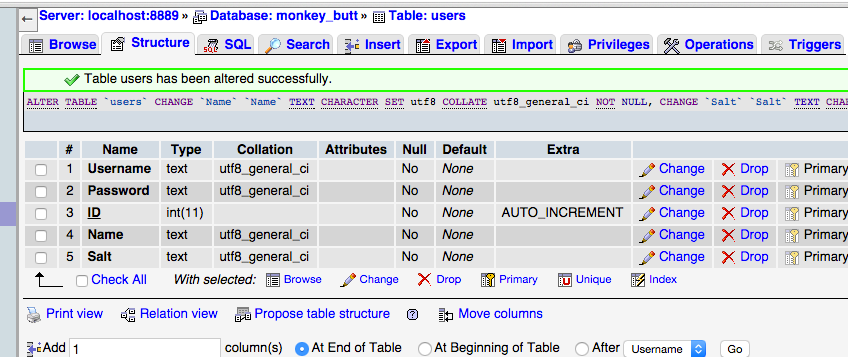
Next, we're going to go to our phpMyAdmin and create some data for us to check a login with.
- Create a table named "users"
- Add fields for "id", "username", "password", "salt", and "name". The Username field is going to be of type "Text", the password field of type "Text", the "ID" field of type int (make sure it's auto-incrementing), "salt" field of type "Text", and "name" field of type "Text".
- Then, create a user and only add a username and password for that user (leave the other fields blank). Again, nothing new here. We're just adding a table, creating the structure for it, and adding some data.
- See if you can do this on your own and then check the result on the next page to see if it was done correctly.
CRUD
CRUD
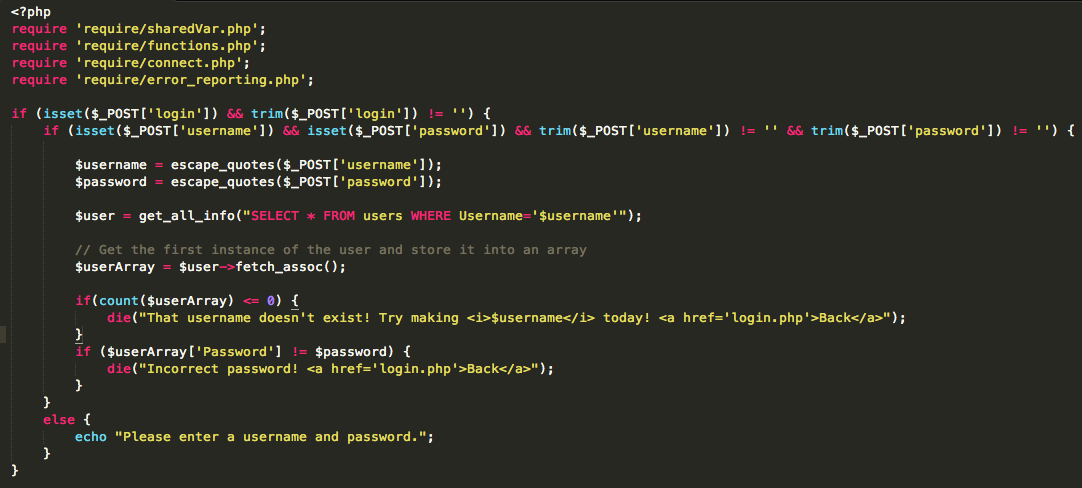
OK, now we're going to create some programming to make sure that when the form is sent, it actually checks against the login information that we have and then returns a correct result.
- First, we're going to check if the user has sent the form using an "if statement" on the "login" value (this is the value from the submit button). If the value exists and is not null, we can proceed to the next step.
- Next, we create another if statement to check if the value of the username and password fields were set and are not null. If the values don't exist or are null, we have an else statement that tells the user to enter a username or password.
- We are now going to store the username and password that was sent in by the user into variables. We can use our function "escape_quotes" to escape any quotes that might be in the username or password.
- Next, we're going to query the database to make sure the username and password exist. Do this by using another one of our helper functions that we created "get_all_info()". This finds the record using the username.
- Let's get the first instance of the record that comes up and store it into an array.
- We're going to check to see if the record exists by seeing if the array length is less than or equal to zero. If it is <= 0, then we are going to kill the connection and then tell the user that the username doesn't exist and that they can create the username if they want to.
- Next, we're going to check to see if the password matches the user. If it doesn't, then we give a similar message to the one for the username.
- Let's check this code on the next page.
Challenge Time!
Login Form
- Using this week's code:
- Make sure you have a login page in some kind of project and that it works.
Assignment 7
Login Form
- Not using this week's project
- Create another login page on a different project and style it (I suggest using the one you're going to turn in for your final).
- Create another table named "users", add the same fields that we did today, and then create a "user" with a username and password.
- Try logging in to the system to see if the login system works. Try making it not work by putting in a wrong username, and then try making a wrong password.