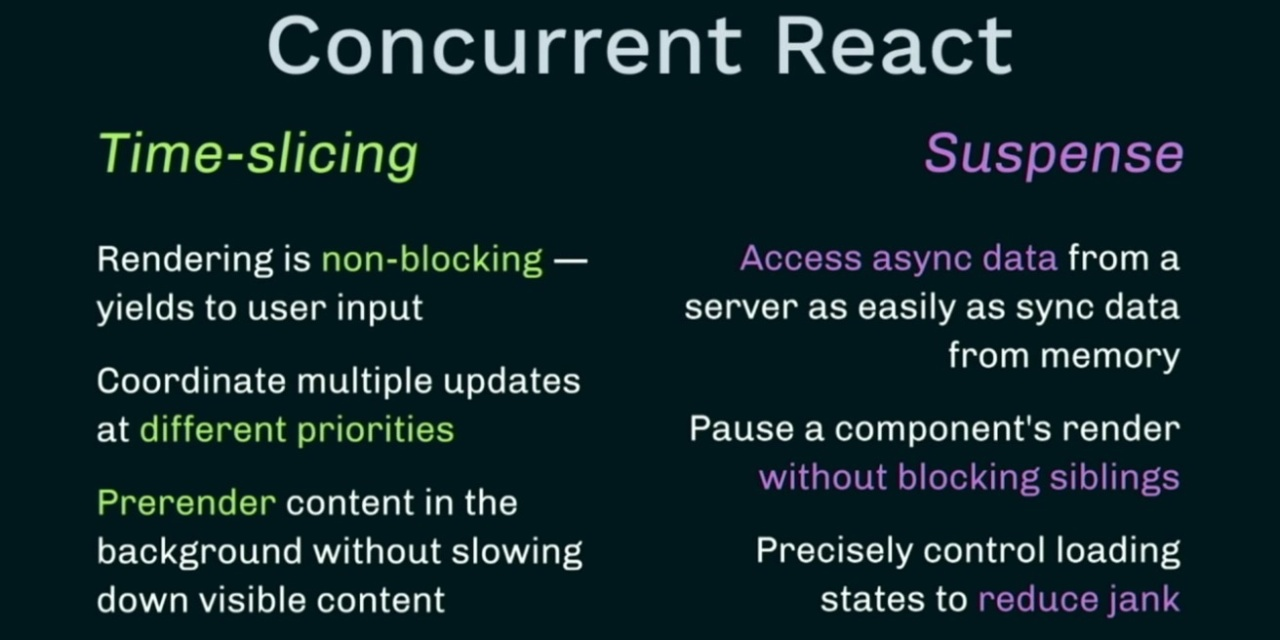
再戰 React Concurrent Mode
Concurrent Mode 的第一站:Fiber
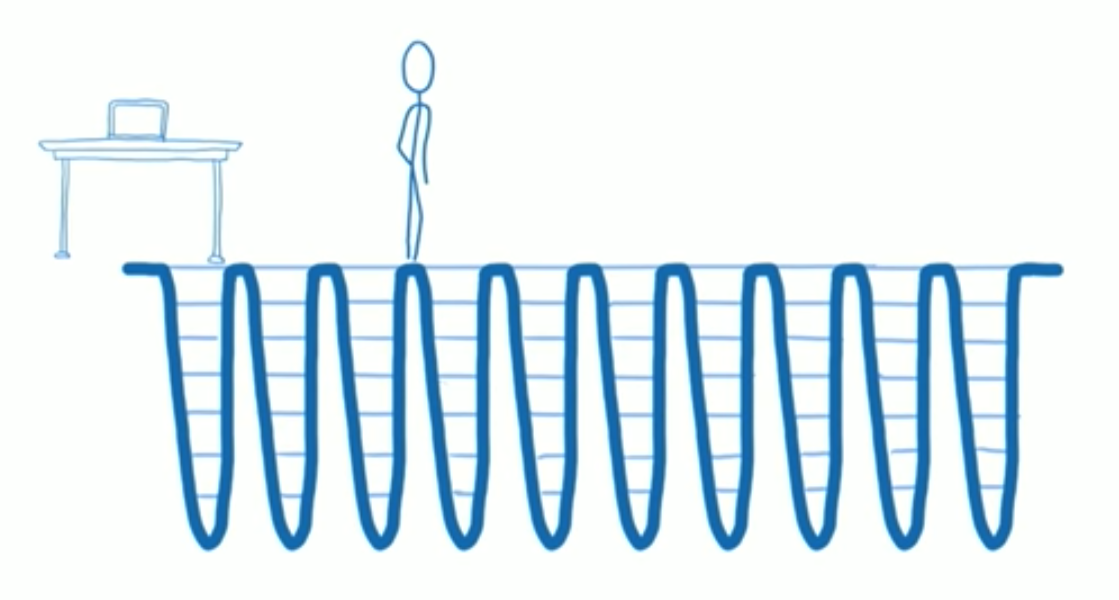
在 Fiber 出現之前:
-
瀏覽器是單線程操作
- 一次性大量更新時
main thread 就會卡住。
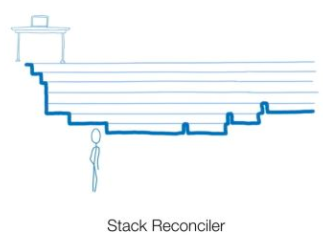
Fiber:
-
把一次性更新拆分成 一個個小更新
- 每次更新之間的空檔去處理別的事情
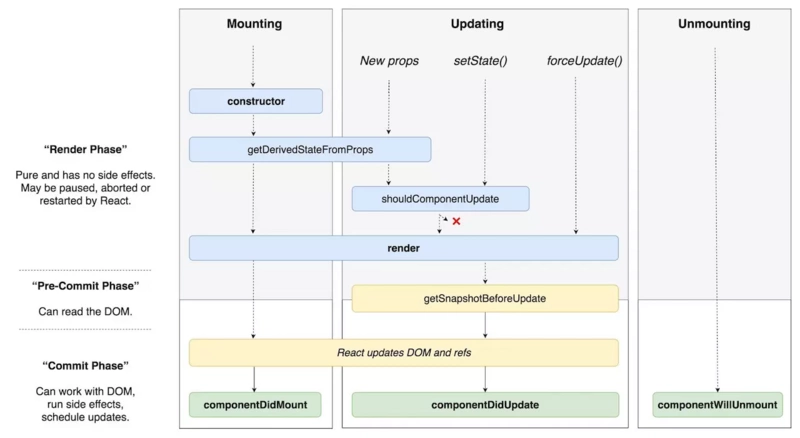
偵錯:componentDidCatch 和 getDerivedStateFromError
getDerivedStateFromError
componentDidCatch
更進一步 的 Concurrent Mode

不同裝置的體驗
不同網速的體驗
useTransition
Suspense
Suspense for Data fetching
💡「延遲」 非同步操作,等非同步操作同步後,才開始 Render。
import {unstable_createResource as createResource} from 'react-cache';

const resource = createResource(fetchDataApi);

const Foo = () => {
  const result = resource.read();
  return (
    <div>{result}</div>
  );

// ...

<Suspense>
   <Foo />
</Suspense>};
實作原理
const wrapPromise = promise => {
  let status = "pending";
  let result = "";
  let suspender = promise.then(
    r => {
      status = "success";
      result = r;
    },
    e => {
      status = "error";
      result = e;
    }
  );

  return {
    read() {
      if (status === "pending") {
        throw suspender;
      } else if (status === "error") {
        throw result;
      }

      return result;
    }
  };
};

Suspense
ErrorBoundary
- 捕捉 Promise 回傳的 Error
- 包在 Suspense 外層,Literally 像個邊界
- 以 Class Component 的方式實現
import React from "react";

export class ErrorBoundary extends React.Component {
  state = { hasError: false, error: null };

  static getDerivedStateFromError(error) {
    return { hasError: true, error };
  }

  componentDidCatch(error, errorInfo) {
    console.log(error, errorInfo);
  }

  render() {
    if (this.state.hasError) {
      // You can render any custom fallback UI
      return (
        <div>
          Something went wrong: {this.state.error.message}
        </div>
      );
    }

    return this.props.children;
  }
}
<ErrorBoundary>
<Suspense fallback={null}>
<ComponentThatThrowError />
</Suspense>
</ErrorBoundary>SuspenseList
<SuspenseList tails="collapsed" revealOrder="together">
  <Suspense fallback={<h1>loading num...</h1>}>
    <ComponentOne />
  </Suspense>
  <Suspense fallback={<h1>loading person...</h1>}>
    <ComponentTwo />
  </Suspense>
</SuspenseList>- revealOrder 實現 載入順序
- 如:forwards、backwards、together
- tail 管理 fallback 狀態
- 強制關閉其下的 fallback ( loading state )
- 壓縮他們。
Normal
forwards
together
tail: collapsed
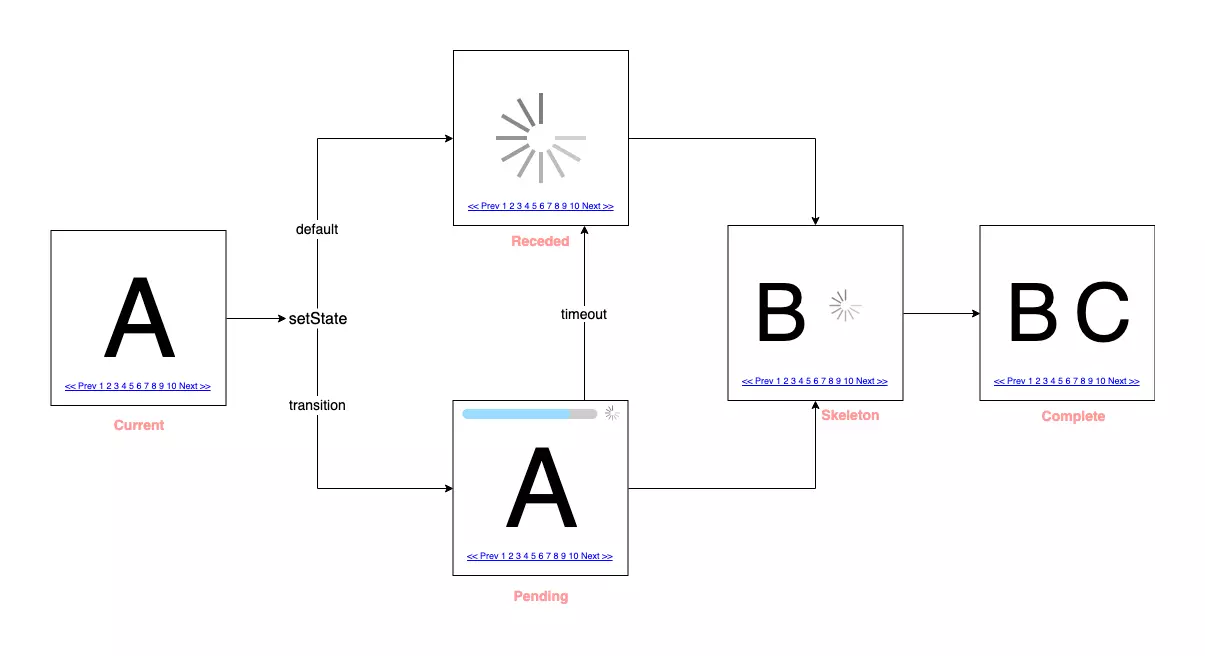
why useTransition?
Default : Receded → Skeleton → Complete
useTransition : Pending → Skeleton → Complete
Default
useTransition
再進一步延遲 : useTransition
集中 管理 和 延遲 頁面 更新
(其實在後台繼續 render 但延遲 commit 到真正畫面上的時間)
function ProfilePage() {
  const [
    startTransition,
    isPending
  ] = useTransition({
    // Wait 10 seconds before fallback
    timeoutMs: 10000
  });
  const [resource, setResource] = useState(
    initialResource
  );

  function handleRefreshClick() {
    startTransition(() => {
      setResource(fetchProfileData());
    });
  }

  return (
    <Suspense
      fallback={<h1>Loading profile...</h1>}
    >
      <ProfileDetails resource={resource} />
      <button
        onClick={handleRefreshClick}
        disabled={isPending}
      >
        {isPending ? "Refreshing..." : "Refresh"}
      </button>
      <Suspense
        fallback={<h1>Loading posts...</h1>}
      >
        <ProfileTimeline resource={resource} />
      </Suspense>
    </Suspense>
  );
}
流程:
1. 將 Suspense 變更為 Pending 狀態
2. 為 Pending 狀態的更新都會被延遲
(此時都還在上一個畫面)
3. 拉完資料 or 超時( 進入 fallback )
4. Render 新畫面
實作原理
function updateTransition(
  config: SuspenseConfig | void | null,
): [(() => void) => void, boolean] {
  const [isPending, setPending] = updateState(false); // = useState
  const startTransition = updateCallback(             // = useCallback
    callback => {
      setPending(true); //  pending: true
      // 調降執行的優先級
      Scheduler.unstable_next(() => {
        // 設定 suspenseConfig
        const previousConfig = ReactCurrentBatchConfig.suspense;
        ReactCurrentBatchConfig.suspense = config === undefined ? null : config;
        try {
          // 還原 pending: false
          setPending(false);

          // 執行 fetch OR sth else...
          callback();

        } finally {
          // 還原 suspenseConfig
          ReactCurrentBatchConfig.suspense = previousConfig;
        }
      });
    },
    [config, isPending],
  );
  return [startTransition, isPending];
}- unstable_next : 調降更新的優先次序
- suspenseConfig : 計算自己的優先次序
- scheduler : React 內部的更新順序
useDeferredValue
相較於 useTransition 是延遲更新
useDeferredValue 則是取上一個值
function ProfilePage({ resource }) {
  const deferredResource = useDeferredValue(
    resource,
    {
      timeoutMs: 1000
    }
  );
  return (
    <Suspense
      fallback={<h1>Loading profile...</h1>}
    >
      <ProfileDetails resource={resource} />
      <Suspense
        fallback={<h1>Loading posts...</h1>}
      >
        <ProfileTimeline
          resource={deferredResource}
          isStale={deferredResource !== resource}
        />
      </Suspense>
    </Suspense>
  );
}
實作原理
function useDeferredValue<T>(
  value: T,
  config: TimeoutConfig | void | null,
): T {
  const [prevValue, setValue] = useState(value);
  const [startTransition] = useTransition(config)

  useEffect(
    () => {
      startTransition(() => {
	  setValue(value);
	})
  },
  [value, config],
 );

  return prevValue;
}
1.用 useEffect 監聽 value 的變化
2. 在 startTransition 中更新 value
小結
- 讓非同步操作看起來像同步
- 依此大幅減少 Loading (等資料) 的“感覺”
- 可以安排頁面載入順序,讓UI更好維護
謝謝大家!
參考資料
- https://www.lizenghai.com/archives/47192.html#SuspenseListuseDeferredValue
- https://medium.com/@chentsulin/%E7%90%86%E8%A7%A3-react-%E7%9A%84%E4%B8%8B%E4%B8%80%E6%AD%A5-concurrent-mode-%E8%88%87-suspense-327b8a3df0fe
- https://juejin.im/post/5c7f6106e51d45055e26df9a
- https://juejin.im/post/5db65d87518825648f2ef899
- https://zh-hant.reactjs.org/docs/error-boundaries.html
- https://juejin.im/post/5dbee8e7e51d4558040f0830
- https://www.zhihu.com/question/268028123/answer/332182059
- https://zhuanlan.zhihu.com/p/34210780
- https://www.youtube.com/watch?v=fTFoBr5LJGE&list=PLN3n1USn4xln7sHUudKJEmMe7gFKtuNww