Plugin development in PhoneGap
About PhoneGap

Building applications for each device–iPhone, Android, Windows Mobile and
more–requires different frameworks and languages.


PhoneGap solves this by using standards-based web technologies to bridge web
applications and mobile devices.
How it actually works?

Think of this as a "chrome-less" web browser. It renders HTML content, without the "chrome" or window decoration of a regular web browser. You build your application to take advantage of this space, and you build navigational/interactive/content elements and application chrome into your HTML and CSS based user interface.
The web view used by PhoneGap is the same web view used by the native operating system. On iOS, this is the Objective-C UIWebView class; on Android, this is android.webkit.WebView. Since there are differences in the web view rendering engines between operating systems, make sure that you account for this in your UI implementation.
Plugins!??

Plugin Architecture

- Allows you to expose native APIs
- PhoneGap itself is built on the plugin architecture
- PhoneGap plugins allow you to extend the existing PhoneGap functionality to add your own custom features via exposing native code. The plugins are able to communicate via a bridge between the JavaScript and native code.
Plugin Call Mapping
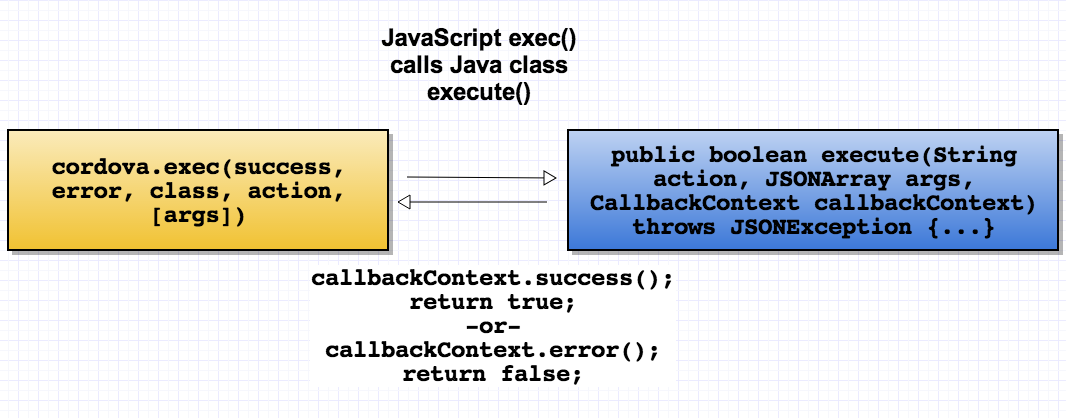
A Cordova plugin bridges a bit of functionality between the WebView powering a Cordova application and the native platform the Cordova application is running on. Plugins are composed of a single JavaScript interface used across all platforms, and native implementations following platform-specific Plugin interfaces that the JavaScript calls into.
- Android plugins extend CordovaPlugin , iOS plugins extend CDVPlugin
- On iOS, the action from cordova.exec() maps directly to functions in the native class
- Threading should be considered if you're doing a lot of processing and don't want to block the main thread
- onReset() - should be implemented if you have long-running processes (called on WebView location change or refresh)
Cont..
Native Side:
1. Define a class called MyPlugin.java that extends the CordovaPlugin class.
2. Still in CalendarPlugin.java, add the following execute function signature. This method is inherited from the CordovaPlugin class so we’ll add the @Override annotation
Here is a list of steps that has to be followed:
public class MyPlugin extends CordovaPlugin {
}
@Override
public boolean execute(String action, JSONArray args, CallbackContext callbackContext) throws JSONException {
// Your Implementation Code
}
3. Before going further we should add the necessary imports for the classes used so far and add a package name to MyPlugin.java
package com.example.myplugin;

import org.apache.cordova.api.CallbackContext;
import org.apache.cordova.api.CordovaPlugin;
Note that in addition to the CordovaPlugin class we’ll also need to import the cordova CallbackContext to use for sending back success or error messages
JavaScript Interface
The JavaScript interface for our plugin. This is how way the application will communicate across the internal JavaScript-to-native bridge to execute native code.
var MyPlugin = {
    createEvent: function(title, location, notes, startDate, endDate, successCallback, errorCallback) {
        cordova.exec(
            successCallback, // success callback function
            errorCallback, // error callback function
            'MyPlugin', // mapped to our native Java class called "CalendarPlugin"
            'add', // with this action name
            [{                  // and this array of custom arguments to create our entry
                }]
        );
     }
}References
