Infrastructure as Code with Terraform
Start with Why
The Rise of DevOps
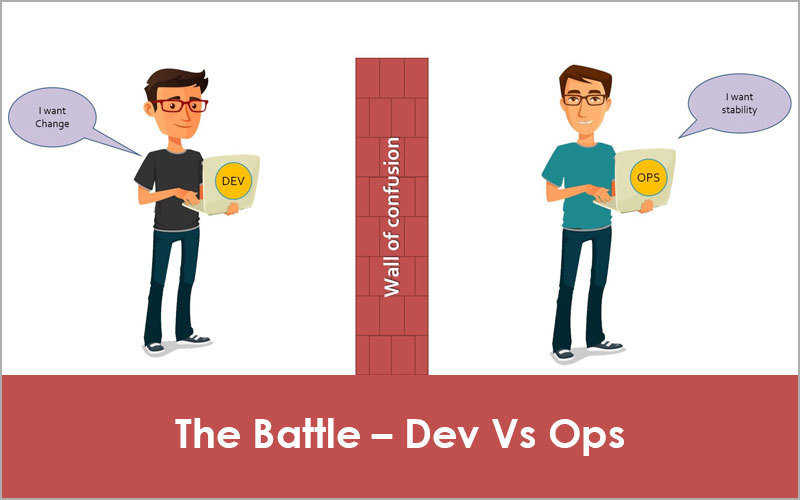
But, What is DevOps?
DevOps is not a job title, a division, or a particular technology.
It's a set of processes, ideas, and values to make software delivery vastly more efficient.
DevOps Core Values
Four core values of DevOps are:
- Culture
- Automation
- Measurement
- Sharing
Infrastructure as Code contributes to one of four DevOps core values, that is automation.

Different Flavors of Infrastructure as Code
Ad Hoc Scripts
Simple bash, python, or ruby scripts such as:
# Update the apt-get cache
sudo apt-get update

# Install PHP
sudo apt-get install -y php

# Install Apache
sudo apt-get install -y apache2

# Copy the code from the repository
sudo git clone https://github.com/brikis98/php-app.git /var/www/html/app

# Start Apache
sudo service apache2 start
Configuration Management Tools (1)
Chef, Puppet, Ansible, or OpenStack code, for instance:
- name: Update the apt-get cache
  apt:
    update_cache: yes

- name: Install PHP
  apt:
    name: php

- name: Install Apache
  apt:
    name: apache2

- name: Copy the code from the repository
  git: repo=https://github.com/brikis98/php-app.git dest=/var/www/html/app

- name: Start Apache
  service: name=apache2 state=started enabled=yes
Configuration Management Tools (2)
With configuration management tools, we have much better advantages than using ad hoc scripts:
- Code conventions
- Idempotence
- Distribution
Server Templating Tools
Docker, Packer, or Vagrant manifest, such as:
{
  "builders": [{
    "ami_name": "packer-example",
    "instance_type": "t2.micro",
    "region": "us-east-1",
    "type": "amazon-ebs",
    "source_ami": "ami-40d28157",
    "ssh_username": "ubuntu"
  }],
  "provisioners": [{
    "type": "shell",
    "inline": [
      "sudo apt-get update",
      "sudo apt-get install -y php",
      "sudo apt-get install -y apache2",
      "sudo git clone https://github.com/brikis98/php-app.git /var/www/html/app"
    ]
  }]
}
Server Provisioning Tools
Terraform, CloudFormation, and Open Stack manifests, ex:
resource "aws_instance" "app" {
  instance_type     = "t2.micro"
  availability_zone = "us-east-1a"
  ami               = "ami-40d28157"

  user_data = <<-EOF
              #!/bin/bash
              sudo service apache2 start
              EOF
}
Benefits of Infrastructure as Code
Self-service
Entire deployment process can be automated and engineers can write their own deployment codes when necessary.
Speed and Safety
Computer can provision multiple infrastructure with codes faster than human can.
Proper infrastructure as code technology enable consistency and repeatability, make it less prone to error.
Documentation
As long as everyone in your team can read the code, you don't have to guess how the existing infrastructure was provisioned.
Version Control
You can see the history of your infrastructure evolution simply by taking a look at your IaC git commits.
Validation
If you build your infrastructure with code, you can do review, automated tests, or any other practices aimed at reducing defects on your code.
Reuse
You can package your deployments into modules and enable your team to reuse documented and battle tested code instead of starting from scratch every time.
Happiness
IaC allows you to do what you do best (writing code) and computer to do what it does best (automation).
Comparing Different Flavors of IaC
CM
- Chef
- Puppet
- Ansible
- SaltStack
Provisioning
- Terraform
- CloudFormation
- OpenStack
Mutable
Changes to code will update existing infrastructure.
Immutable
Changes to code will create new infrastructure, most of the time.
Procedural
You write code to tell computer how to do something.
Declarative
You write code to tell computer what needs to be done and let it figure out by itself how to achieve that.
Master
Require a master server to store the state of your infrastructure and distribute updates.
Masterless
May also require a master server (for instance, AWS/GCP API server does act like a master server when you run Terraform codes), but does not require you to manage it.
Agent
Require you to install an agent software on the nodes you want to configure.
Agentless
Does not require you to install an agent software on nodes you want to configure.
| Type | Mutabililty | Language | Master | Agent | |
|---|---|---|---|---|---|
| Ansible | CM | Mutable | Procedural | No | No |
| Chef | CM | Mutable | Procedural | Yes | Yes |
| CloudFormation | Provisioning | Immutable | Declarative | No | No |
| Puppet | CM | Mutable | Declarative | Yes | Yes |
| SaltStack | CM | Mutable | Declarative | Yes | Yes |
| Terraform | Provisioning | Immutable | Declarative | No | No |
Sample Terraform Manifest
Layout
Terraform does not enforce any file structure. In fact, you can write the whole manifest of your infrastructure in one single file.
However, since Infrastructure as Code is a *code*, let's treat it as we treat our application code and put a proper structure.
This is my standard Terraform layout:
.
├── backend.tf
├── data.tf
├── provider.tf
├── terraform.tfvars
├── var.tf
└── [resource_files.tf]
Provider
The first file we create, this determines what provider we run our Terraform against. Can be GCP, AWS, or any providers listed here.
provider "aws" {
  access_key = "${var.aws_access_key}"
  secret_key = "${var.aws_secret_key}"
  region = "ap-southeast-1"
}
Documentation on provider for AWS can be found here.
Backend
Backend stores the state of our infrastructure. When we first initialize Terraform, it will look for backend configuration, if it doesn't find one, it will create one.
When we run `terraform plan` or `terraform apply`, it will compare the desired state with existing state based on information stored in terraform.state.
terraform {
  backend "s3" {
    bucket = "qbl-terraform"
    key    = "dt-demo/terraform.tfstate"
    region = "ap-southeast-1"
  }
}
Variables
In Terraform, we can use variables. There are three kinds of variable in Terraform: string, numeric, and list. If a variable does not have a default value, it will prompt user to input the value.
variable "aws_access_key" { type = "string" }
variable "aws_secret_key" { type = "string" }

variable "server_port" {
  description = "The port we use for HTTP requests is: "
  default = 8080
}
Secret Variables
Often times, we don't want to store some variables to our code repository. These variables usually are secret variables containing keys to our account. For these kinds of variables, we store them in `terraform.tfvars` with format as follow:
aws_access_key = "<access key here>"
aws_secret_key = "<secret key here>"
Data
Use of data sources allows a Terraform configuration to build on information defined outside of Terraform, or defined by another separate Terraform configuration.
For example, put the following in our `data.tf`:
data "aws_availability_zones" "all" {}Resources
Now that we have everything set, let's provision a simple web cluster with Terraform. For this exercise, we are going to create three resources:
- AWS security group
- AWS launch configuration
- AWS autoscaling group
- AWS elastic load balancer
Security Group (1)
Write the following code in `aws_security_group.tf`:
resource "aws_security_group" "instance" {
  name = "terraform-example-instance"

  ingress {
    from_port = "${var.server_port}"
    to_port = "${var.server_port}"
    protocol = "tcp"
    cidr_blocks = ["0.0.0.0/0"]
  }

  lifecycle {
    create_before_destroy = true
  }
}

# to be continued in the next page...
Security Group (2)
Write the following code in `aws_security_group.tf`:
# ...continued from previous page

resource "aws_security_group" "elb" {
  name = "terraform-example-elb"

  ingress {
    from_port   = 80
    to_port     = 80
    protocol    = "tcp"
    cidr_blocks = ["0.0.0.0/0"]
  }

  egress {
    from_port   = 0
    to_port     = 0
    protocol    = "-1"
    cidr_blocks = ["0.0.0.0/0"]
  }
}
Launch Configuration
Write the following code in `aws_launch_configuration.tf`:
resource "aws_launch_configuration" "example" {
  image_id = "ami-52d4802e"
  instance_type = "t2.micro"
  security_groups = ["${aws_security_group.instance.id}"]

  user_data = <<-EOF
              #!/bin/bash
              echo "Hello, World" > index.html
              nohup busybox httpd -f -p ${var.server_port} &
              EOF

  lifecycle {
    create_before_destroy = true
  }
}
Autoscaling Group
Write the following code in `aws_launch_configuration.tf`:
resource "aws_autoscaling_group" "example" {
  launch_configuration = "${aws_launch_configuration.example.id}"
  availability_zones = ["${data.aws_availability_zones.all.names}"]

  load_balancers = ["${aws_elb.example.name}"]
  health_check_type = "ELB"

  min_size = 2
  max_size = 10

  tag {
    key = "Name"
    value = "terraform-asg-example"
    propagate_at_launch = true
  }
}
Elastic Load Balancer
Write the following code in `aws_elb.tf`:
resource "aws_elb" "example" {
  name               = "terraform-asg-example"
  availability_zones = ["${data.aws_availability_zones.all.names}"]
  security_groups    = ["${aws_security_group.elb.id}"]

  listener {
    lb_port           = 80
    lb_protocol       = "http"
    instance_port     = "${var.server_port}"
    instance_protocol = "http"
  }

  health_check {
    healthy_threshold   = 2
    unhealthy_threshold = 2
    timeout             = 3
    interval            = 30
    target              = "HTTP:${var.server_port}/"
  }
}
Run It!
Init
To initialize Terraform in our directory, simply run the following command:
terraform initPlan
To see what resources will be created by Terraform, run the following command:
terraform planApply
To actually apply the desired changes, run the following command:
terraform planDestroy
To clean up everything we build we Terraform, run the following command:
terraform destroy