The Driving-a-Car Philosophy
It’s like learning to drive a car. In the beginning, you don’t really want to know what’s under the hood. You first want to learn how to drive it from point A to point B. Only after you learn how to do that do you become interested in how a car makes that possible. After all, knowing what’s under the hood may someday help you get the car moving again after it breaks down and leaves you stranded at the side of the road.

Let's Ride!

Getting Started (1)
Run these command in your console:
rails new go-food
cd go-food
ruby bin/about
You should see something like this:
About your application's environment
Rails version             5.0.6
Ruby version              2.3.1-p112 (x86_64-darwin15)
RubyGems version          2.5.1
Rack version              2.0.3
JavaScript Runtime        Node.js (V8)
Middleware                Rack::Sendfile, ActionDispatch::Static, ActionDispatch::Executor, ActiveSupport::Cache::Strategy::LocalCache::Middleware, Rack::Runtime, Rack::MethodOverride, ActionDispatch::RequestId, Sprockets::Rails::QuietAssets, Rails::Rack::Logger, ActionDispatch::ShowExceptions, WebConsole::Middleware, ActionDispatch::DebugExceptions, ActionDispatch::RemoteIp, ActionDispatch::Reloader, ActionDispatch::Callbacks, ActiveRecord::Migration::CheckPending, ActionDispatch::Cookies, ActionDispatch::Session::CookieStore, ActionDispatch::Flash, Rack::Head, Rack::ConditionalGet, Rack::ETag
Application root          /Users/iqbalfarabi/Workspace/src/go-food
Environment               development
Database adapter          sqlite3
Database schema version   0
Getting Started (2)
To start your application, run this command:
rails server
# or you can shorten it to: rails s
You can access your app in http://localhost:3000/
Your First Commit
First, commit all your code to local git:
git init
git add .
git commit -m "Initial commit"
Creating a Repository
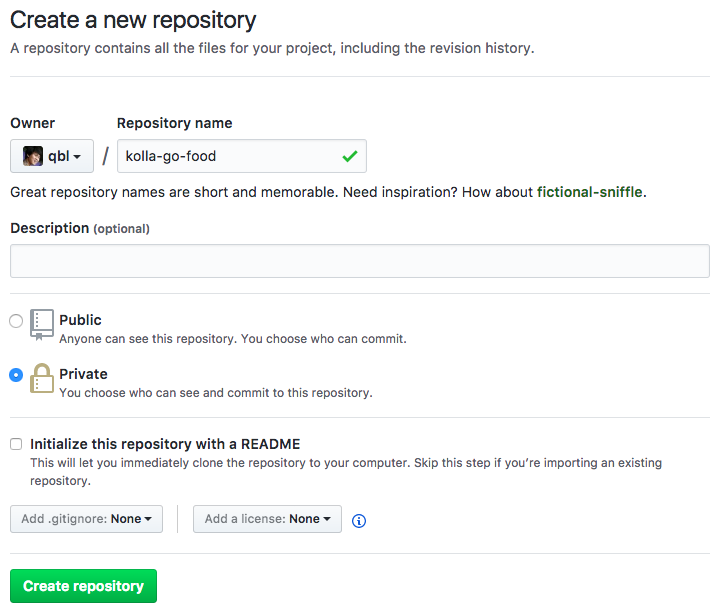
Now, we need a repository. We can create a free one in Github. Go to https://github.com/new
Push It Out
Now that we have our remote repository set, we can push our local commit to our Github repository.
# This is just an example, fill it with your own git repository
git remote add origin git@github.com:qbl/kolla-go-food.git
git push -u origin master
Congratulations!
You've just made your first Rails app and push it to a Github repository!
Your First Controller
Now, let's create your first controller. This command will generate a controller named Home with one method name "hello".
rails generate controller Home helloYou can access your newly generated controller in: http://localhost:3000/home/hello
But What Just Happened?
When you executed the command to generate controller earlier, Rails told you that it created the followings:
Running via Spring preloader in process 54130
      create  app/controllers/home_controller.rb
       route  get 'home/hello'
      invoke  erb
      create    app/views/home
      create    app/views/home/hello.html.erb
      invoke  test_unit
      create    test/controllers/home_controller_test.rb
      invoke  helper
      create    app/helpers/home_helper.rb
      invoke    test_unit
      invoke  assets
      invoke    coffee
      create      app/assets/javascripts/home.coffee
      invoke    scss
      create      app/assets/stylesheets/home.scss
Inside The Controller
Open your app/controllers/home_controller.rb file. You should see something like this:
class HomeController < ApplicationController
  def hello
  end
end
Don't Forget to Commit
Commit your current progress and push it to your Github repository.
Inside The View
Now open app/views/home/hello.html.erb file. You should see something like this:
<h1>Home#hello</h1>
<p>Find me in app/views/home/hello.html.erb</p>
And change it into:
<h1>Hello from Go-Food!</h1>
Dynamic Content
Static texts are boring. Let's add some dynamic content to our page.
In Rails, you can execute Ruby code in html templates by putting it between "<%=" and "%>"
<h1>Hello from Go-Food!</h1>
<p>
  It is now <%= Time.now %>
</p>
Passing Variables from Controller
We need to be able to pass variables from our Controller to View. Here, instance variables come in handy.
Now, we can access that instance variable from our view.
class HomeController < ApplicationController
  def hello
    @time = Time.now
  end
end
<h1>Hello from Go-Food!</h1>
<p>
  It is now <%= @time %>
</p>
Commit It Again!
Commit your current progress and push it to your Github repository.
What We Just Learned
You've just learned to:
1. Create your first Rails app
2. Create your first controller
3. Create your first view
4. Passing variables from controller and view