The Simplified Go Food Web App - Iteration 1
Scaffolding The Food
We have understood that our Go Food web app is going to used to order foods from restaurants. The first thing we need may be a basic feature that enables us to store foods data and view it to users.
For this, we do a simple scaffold:
rails generate scaffold Food \
  name:string description:text image_url:string price:decimal
Redefining The Migration
As you can see in your console, Rails generate a lot of files for us. However, right now we only want to modify the migration file. To do this, under "db/migrate/" folder, find a file with name like "_create_foods.rb" and modify the line defining ":price" column as follow:
class CreateFoods < ActiveRecord::Migration[5.0]
  def change
    create_table :foods do |t|
      t.string :name
      t.text :description
      t.string :image_url
      t.decimal :price, precision: 8, scale: 2

      t.timestamps
    end
  end
end
Apply The Migration
To apply the database migration, we execute this command in our console:
rake db:migrateYou can see the result of the scaffold by navigating to http://localhost:3000/foods. Play with it a little bit. Add some foods, and then edit or delete them.
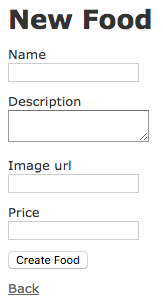
Take a Look at The Form
Your "New Food" form may look like this:
The Form Helper
When you scaffold the whole MVC for Food object, Rails provided you with a lot of template views. One of them is the default form template that you can find in "/app/views/foods/_form.html.erb"
<%= form_for(food) do |f| %>
  <% if food.errors.any? %>
    <div id="error_explanation">
      <h2>
        <%= pluralize(food.errors.count, "error") %> prohibited this food from being saved:
      </h2>

      <ul>
      <% food.errors.full_messages.each do |message| %>
        <li><%= message %></li>
      <% end %>
      </ul>
    </div>
  <% end %>

  <div class="field">
    <%= f.label :name %>
    <%= f.text_field :name %>
  </div>

  <!-- Continued to the next slide -->
<!-- Continued from the previous slide -->
<div class="field">
<%= f.label :name %>
<%= f.text_field :name %>
</div>
<div class="field">
<%= f.label :description %>
<%= f.text_area :description %>
</div>
<div class="field">
<%= f.label :image_url %>
<%= f.text_field :image_url %>
</div>
<div class="field">
<%= f.label :price %>
<%= f.text_field :price %>
</div>
<div class="actions">
<%= f.submit %>
</div>
<% end %>
Slight Modification
Now, we can change how our form looks like. For instance, we can make the text area for our food description.
# -cut-

  <div class="field">
    <%= f.label :description %>
    <%= f.text_area :description, rows: 10, cols: 60 %>
  </div>

# -cut-
Save your changes and then reload your "New Food" form to see the result.
Seeding The Data (1)
We can seed initial data to our app. To do this, edit your "db/seeds.rb" file:
Food.delete_all

Food.create!(
  name: "Tenderloin Steak",
  description:
    %{<p>
      Tenderloin hanya terdapat di bagian tengah sapi.
      </p>},
  image_url: "Tenderloin.png",
  price: 95000.00
)

# Continued to the next slide
# Continued from the previous slide

Food.create!(
  name: "Sirloin Steak",
  description:
    %{<p>
      <em>Best Seller</em>
      Sirloin adalah daging bagian atas dari sapi yang ada jalur lemaknya di sisi atas.
      </p>},
  image_url: "Sirloin.png",
  price: 85000.00
)

Food.create!(
  name: "Rib Eye Steak",
  description:
    %{<p>
      <em>Paling Populer dan Paling Juicy</em>
      Rib Eye adalah bagian daging sapi yang berasal dari daging di sekitar tulang iga atau tulang rusuk.
      </p>},
  image_url: "Rib Eye.png",
  price: 90000.00
)
Seeding The Data (2)
After finish adding script to seed your data, execute this in your console:
rake db:seedDon't forget to add image files for your seed data in "app/assets/images" folder.
Adding Some Style
We have added some initial data to our app. Great. But right now it looks so plain and needs a little makeover. For this, we need to add some stylesheet. Rails provides a way to add stylesheet to our app.
What we need to do now is to edit our stylesheet file in "app/assets/stylesheets/foods.scss"
// Place all the styles related to the Foods controller here.
// They will automatically be included in application.css.
// You can use Sass (SCSS) here: http://sass-lang.com/

.foods {
  table {
    border-collapse: collapse;
  }

  table tr td {
    padding: 5px;
    vertical-align: top;
  }

  .list_image {
    width: 60px;
    height: 70px;
  }

  // Continued to the next slide
// Continued from the previous slide
.list_description {
width: 60%;
dl {
margin: 0;
}
dt {
color: #244;
font-weight: bold;
font-size: larger;
}
dd {
margin: 0;
}
}
.list_actions {
font-size: x-small;
text-align: right;
padding-left: 1em;
}
// Continued to the next slide // Continued from the previous slide
.list_line_even {
background: #e0f8f8;
}
.list_line_odd {
background: #f8b0f8;
}
}Modifying Layout
After we add some stylesheet, we need to modify the basic html files provided by Rails. First, we change our layout file found in "app/views/layout/application.html.erb"
<!DOCTYPE html>
<html>
  <head>
    <title>GoFood</title>
    <%= csrf_meta_tags %>

    <%= stylesheet_link_tag 'application', media: 'all', 'data-turbolinks-track': 'reload' %>
    <%= javascript_include_tag 'application', 'data-turbolinks-track': 'reload' %>
  </head>

  <body class="<%= controller.controller_name %>">
    <%= yield %>
  </body>
</html>
Changing Foods Index Page
Then, we change html template provided by Rails for our Foods index page in "app/views/products/index.html.erb" to look like the code in the next slide.
<p id="notice"><%= notice %></p>

<h1>Foods</h1>

<table>
  <% @foods.each do |food| %>
    <tr class="<%= cycle('list_line_odd', 'list_line_even') %>">
      <td>
        <%= image_tag(food.image_url, class: 'list_image') %>
      </td>
      <td class="list_description">
        <dl>
          <dt><%= food.name %></dt>
          <dd><%= truncate(strip_tags(food.description), length: 80) %></dd>
        </dl>
      </td>
      <td class="list_actions">
        <%= link_to 'Show', food %><br/>
        <%= link_to 'Edit', edit_food_path(food) %><br/>
        <%= link_to 'Destroy', food, method: :delete, data: { confirm: 'Are you sure?' } %>
      </td>
    </tr>
  <% end %>
</table>

<br/>

<%= link_to 'New Food', new_food_path %>
Rails Helper
In the previous code, we have used several Rails Helper methods:
- We used "cycle" method to help alternating style between odd rows and even rows in our html table
- We used "truncate" method to display only the first n characters from our food's description.
- We used "strip_tags" method to remove all html tags from our food's description.
- We used "data: { confirm: 'Are you sure?' }" parameter in the "link_to" method to show a confirmation pop up whenever user clicks on "Destroy" link.
What We Just Learned
In this session, we just learned:
- Scaffolding a complete MVC
- Using Rails migration to create and modify database schema
- Seeding initial data to our app
- Updating application-wide layout
- Modifying controller-specific view by modifying its CSS and HTML files