

REACT
Ecosystem


REACT
- React is fast. Apps made in React can handle complex updates and still feel quick and responsive.
-
React is modular. Instead of writing large, dense files of code, you can write many smaller, reusable files.
-
React is scalable. Large programs that display a lot of changing data are where React performs best.
-
React is flexible. You can use React for interesting projects that have nothing to do with making a web app. And lets you have the freedom to use whatever libraries and ideas you want to use without compromising.
React is a JavaScript library for building user interfaces.
It is developed and maintained by Facebook and open-sourced. https://github.com/facebook/react
It lets you compose complex UIs from small and isolated pieces of code called “components”.
Hello World
const element = <h1>Hello, world!</h1>;JSX
It is a syntax extension to JavaScript and it comes with the full power of JavaScript. JSX produces React “elements”.
const name = 'Josh Perez';
const element = <h1>Hello, {name}</h1>;
function formatName(user) {
return user.firstName + ' ' + user.lastName;
}
const user = {
firstName: 'Harper',
lastName: 'Perez'
};
const element = (
<h1>
Hello, {formatName(user)}!
</h1>
);JSX
const element = (
  <h1 className="greeting">
    Hello, world!
  </h1>
);
const element = React.createElement(
'h1',
{className: 'greeting'},
'Hello, world!'
);const panda = <img
src="images/panda.jpg"
alt="panda"
width="500px"
height="500px" />;If a tag is empty, you may close it immediately with />
A single JSX element can have many attributes, just like in HTML:
When defining styles we should use className
REACT DOM
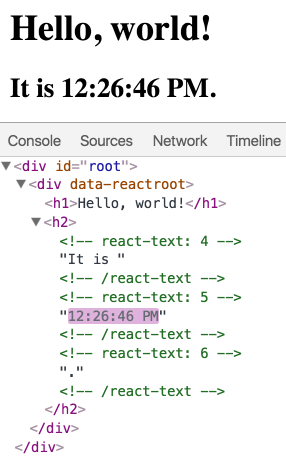
function tick() {
  const element = (
    <div>
      <h1>Hello, world!</h1>
      <h2>It is {new Date().toLocaleTimeString()}.</h2>
    </div>
  );
  ReactDOM.render(element, document.getElementById('root'));
}

setInterval(tick, 1000);
React only updates what’s necessary
React DOM compares the element and its children to the previous one, and only applies the DOM updates necessary to bring the DOM to the desired state.
REACT DOM
import React from 'react';
import ReactDOM from 'react-dom';
import App from './App';

ReactDOM.render(
  <App />
  document.getElementById('root')
);
<div id="root"></div>Applications built with just React usually have a single root DOM node. If you are integrating React into an existing app, you may have as many isolated root DOM nodes as you like.
Components
Components let you split the UI into independent, reusable pieces, and think about each piece in isolation.
Components are JavaScript functions. They accept “props” and return React elements describing what should appear on the screen.
class Welcome extends React.Component {
  render() {
    return <h1>Hello, {this.props.name}</h1>;
  }
}
const Welcome = (props) => {
return <h1>Hello, {props.name}</h1>;
}Class Component
Function Component
These components are equivalent from React’s point of view.
Props
-
Way to pass data/functionality between components (down)
-
Read only
class Welcome extends React.Component {
render() {
return <h1>Hello, {this.props.name}</h1>;
}
}const Welcome = (props) => {
return <h1>Hello, {props.name}</h1>;
}From the instance, this.
From argument
class Welcome extends React.Component {
// ...
}
Welcome.defaultProps = {
name: 'Mary'
};Default Props
Class Component
import React from 'react';
class Welcome extends React.Component {
render() {
return <h1>Hello, {this.props.name}</h1>;
}
}
export default Welcome;import Welcome from './Welcome'
const el =
<div>
<Welcome name="Ruben" />
<Welcome name="Bar" />
<Welcome name="Foo" />
</div>
Function Component
import React from 'react';
const Welcome = (props) => {
  return <h1>Hello, {props.name}</h1>;
}
export default Welcome;import Welcome from './Welcome'
const el =
<div>
<Welcome name="Ruben" />
<Welcome name="Bar" />
<Welcome name="Foo" />
</div>
Exercise I


git clone https://github.com/hexis-hub/react-learning.git
yarn && yarn startnpm install && npm start
Thinking in React - Components
Challenge 1
git checkout exercise-1-componentsPassing Data Through Props
export default class Square extends React.Component {
  render() {
    return (
      <button className="square">
          {this.props.value}
      </button>
    );
  }
}
export default class Board extends React.Component {
  renderSquare(i) {
    return <Square value={i} />;
  }
  ...
}
Challenge 2
Component State
export default class Square extends React.Component {
  state = {
    value: null,
  };

  render() {
    return (
      <button
        className="square"
        onClick={() => this.setState({value: 'X'})}
      >
        {this.state.value}
      </button>
    );
  }
}
Challenge 3
State
class Clock extends React.Component {
  constructor(props) {
    super(props);
    this.state = {date: new Date()};
  }
  ....
}
class Clock extends React.Component {
state = {date: new Date()};
....
}When state changes, the component responds by re-rendering.
state is an object that represents the parts of the app that can change. Each component can maintain its own state, which lives in an object.
Using State Correctly
Do Not Modify State Directly
Instead, use setState()
// Wrong
this.state.comment = 'Hello';
// Correct
this.setState({comment: 'Hello'});Using State Correctly
State Updates May Be Asynchronous
use a second form of setState() that accepts a function rather than an object
// Wrong
this.setState({
  counter: this.state.counter + this.props.increment,
});
// Correct
this.setState((state, props) => ({
counter: state.counter + props.increment
}));React may batch multiple setState() calls into a single update for performance.
Because this.props and this.state may be updated asynchronously, you should not rely on their values for calculating the next state.
Using State Correctly
State Updates are Merged
// ...
this.setState({
  posts: response.posts
});

//...
this.setState({
  comments: response.comments
});
this.state = {
  posts: [],
  comments: [],
}
When you call setState(), React merges the object you provide into the current state.
The merging is shallow, so this.setState({comments}) leaves this.state.posts intact, but completely replaces this.state.comments.
Handling Events
Handling events with React elements is very similar to handling events on DOM elements. There are some syntax differences
- React events are named using camelCase, rather than lowercase.
-
With JSX you pass a function as the event handler, rather than a string.
// html
<button onclick="activateLasers()">
  Activate Lasers
</button>
<button onClick={activateLasers}>
Activate Lasers
</a>React supports every html event
Handling Events
class LoggingButton extends React.Component {
  // This syntax ensures `this` is bound within handleClick.
  handleClick = () => {
    console.log('this is:', this);
  }

  render() {
    return (
      <button onClick={this.handleClick}>
        Click me
      </button>
    );
  }
}
Examples
Handling Events
class LoggingButton extends React.Component {
  handleClick(id, e) {
    console.log('this is:', this);
  }

  render() {
    // This syntax ensures `this` is bound within handleClick
    // and pass aditional arguments
    return (
      <button onClick={(e) => this.handleClick(id, e)}>
        Click me
      </button>
    );
  }
}
Examples
Exercise II
The shared state should be in their most above parent component instead.
The parent component can pass the state back down to the children by using props and keep the child components in sync.
export default class Square extends React.Component {
  state = {
    value: null,
  };

  render() {
    return (
      <button
        className="square"
        onClick={() => this.setState({value: 'X'})}
      >
        {this.state.value}
      </button>
    );
  }
}
Challenge 2.1
Lifting State Up
export default class Board extends React.Component {
  state = {
    squares: Array(9).fill(null),
  };
//...
}
[
'O', null, 'X',
'X', 'X', 'O',
'O', null, null,
]objective
renderSquare(i) {
  return (
    <Square
      value={this.state.squares[i]}
      onClick={() => this.handleClick(i)}
    />
  );
}
Challenge 2.2
Refactor
change the Square to be a function component.
const Square = ({value, onClick}) =>(
  <button className="square" onClick={onClick}>
    {value}
  </button>
);
Instead of defining a class which extends React.Component, we can write a function that takes props as input and returns what should be rendered.
Challenge 2.3
Update Board State
<Square
  value={this.state.squares[i]}
  onClick={() => this.handleClick(i)}
/>
create the handle click function and update state accordingly
handleClick(i) {
  const squares = [...this.state.squares];
  squares[i] = 'X';
  this.setState({squares: squares});
}
Challenge 2.4
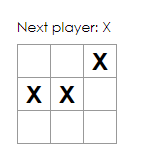
Taking Turns
Make the game interactive, switching turns between 'X' and 'O'
handleClick(i) {
  const squares = [...this.state.squares];

  squares[i] = this.state.xIsNext ? 'X' : 'O';

  this.setState({
    squares: squares,
    xIsNext: !this.state.xIsNext,
  });
}
state = {
squares: Array(9).fill(null),
xIsNext: true,
};render() {
const status = `Next player: ${this.state.xIsNext ? 'X' : 'O'}`;
...
}Challenge 2.5
Declaring a Winner
Check the winning conditions and declare a winner, show it on the screen!
// utils/gameChecker.js
export const calculateWinner = (squares) => {
  const lines = [
      [0, 1, 2],
      [3, 4, 5],
      [6, 7, 8],
      [0, 3, 6],
      [1, 4, 7],
      [2, 5, 8],
      [0, 4, 8],
      [2, 4, 6],
  ];
  for (let i = 0; i < lines.length; i++) {
      const [a, b, c] = lines[i];

      if (squares[a] && squares[a] === squares[b] && squares[a] === squares[c]) {
        const winner = squares[a];

        return winner;
      }
  }

  return null;
}
Challenge 2.5
Declaring a Winner
getStatus = () => {
  const winner = calculateWinner(this.state.squares);

  return winner ?
      `Winner: ${winner}` :
      `Next player: ${this.state.xIsNext ? 'X' : 'O'}`;
}

// ...

render() {
  const status = this.getStatus();
  //...
}
handleClick(i) {
  const squares = [...this.state.squares];
  if (calculateWinner(squares) || squares[i]) {
    return;
  }

  squares[i] = this.state.xIsNext ? 'X' : 'O';

  this.setState({
    squares: squares,
    xIsNext: !this.state.xIsNext,
  });
}
import { calculateWinner } from '../utils/gameChecker';Boss Challenges
B.2 Add Undo & Redo
B.1 Reset Game
Add the ability to move back and forward in time.
The sky is the limit
Add a way to start the game from scratch.
Conditional Rendering
In React, you can create distinct components that encapsulate behavior you need. Then, you can render only some of them, depending on the state of your application
const UserGreeting = (props) => {
  return <h1>Welcome back!</h1>;
}

const GuestGreeting = (props) => {
  return <h1>Please sign up.</h1>;
}
const Greeting = ({ isLoggedIn }) => {
return isLoggedIn ? <UserGreeting /> : <GuestGreeting />;
}
ReactDOM.render(
// Try changing to isLoggedIn={true}:
<Greeting isLoggedIn={false} />,
document.getElementById('root')
);Preventing Component from Rendering
A component can be avoided to render. To do this return null instead of its render output.
const WarningBanner = ({warn}) => {
  if (!warn) {
    return null;
  }

  return (
    <div className="warning">
      Warning!
    </div>
  );
}
Returning null from a component’s render method does not affect the firing of the component’s lifecycle methods.
Logical && Operator
const Mailbox = ({ unreadMessages }) => {
  return (
    <div>
      <h1>Hello!</h1>
      {unreadMessages.length > 0 &&
        <h2>
          You have {unreadMessages.length} unread messages.
        </h2>
      }
    </div>
  );
}
You may embed expressions in JSX by wrapping them in curly braces. This includes the logical && operator. It is use to conditionally including an element
It works because in JavaScript, true && expression always evaluates to expression, and false && expression always evaluates to false. Therefore, if the condition is true, the element right after && will appear in the output. If it is false, React will ignore and skip it.
Lists and Keys
const NumberList = (props) => {
  const numbers = props.numbers;
  const listItems = numbers.map((number) =>
    <li>{number}</li>
  );
  return (
    <ul>{listItems}</ul>
  );
}

const numbers = [1, 2, 3, 4, 5];
ReactDOM.render(
  <NumberList numbers={numbers} />,
  document.getElementById('root')
);
When you run this code, you’ll be given a warning that a key should be provided for list items.
Keys
const NumberList = (props) => {
  const numbers = props.numbers;
  const listItems = numbers.map((number) =>
    <li key={number.toString()}>
      {number}
    </li>
  );
  return (
    <ul>{listItems}</ul>
  );
}

const numbers = [1, 2, 3, 4, 5];
ReactDOM.render(
  <NumberList numbers={numbers} />,
  document.getElementById('root')
);
Keys help React identify which items have changed, are added, or are removed. Keys should be given to the elements inside the array to give the elements a stable identity
Keys Must Only Be Unique Among Siblings
Keys
The best way to pick a key is to use a string that uniquely identifies a list item among its siblings. Most often you would use IDs from your data as keys
const todoItems = todos.map((todo) =>
  <li key={todo.id}>
    {todo.text}
  </li>
);
When you don’t have stable IDs for rendered items, you may use the item index as a key as a last resort
const todoItems = todos.map((todo, index) =>
  // Only do this if items have no stable IDs
  <li key={index}>
    {todo.text}
  </li>
);
Incorrect Key Usage
const ListItem = ({ value }) => {
  return (
    // Wrong! There is no need to specify the key here:
    <li key={value.toString()}>
      {value}
    </li>
  );
}

const NumberList = ({ numbers }) {
  const listItems = numbers.map((number) =>
    // Wrong! The key should have been specified here:
    <ListItem value={number} />
  );
  return (
    <ul>
      {listItems}
    </ul>
  );
}
A good rule of thumb is that elements inside the map() call need keys.
const ListItem = ({ value }) => {
return (
// Correct! There is no need to specify the key here:
<li>
{value}
</li>
);
}
const NumberList = ({ numbers }) {
const listItems = numbers.map((number) =>
// Correct! Key should be specified inside the array.
<ListItem value={number} key={number.toString()}/>
);
return (
<ul>
{listItems}
</ul>
);
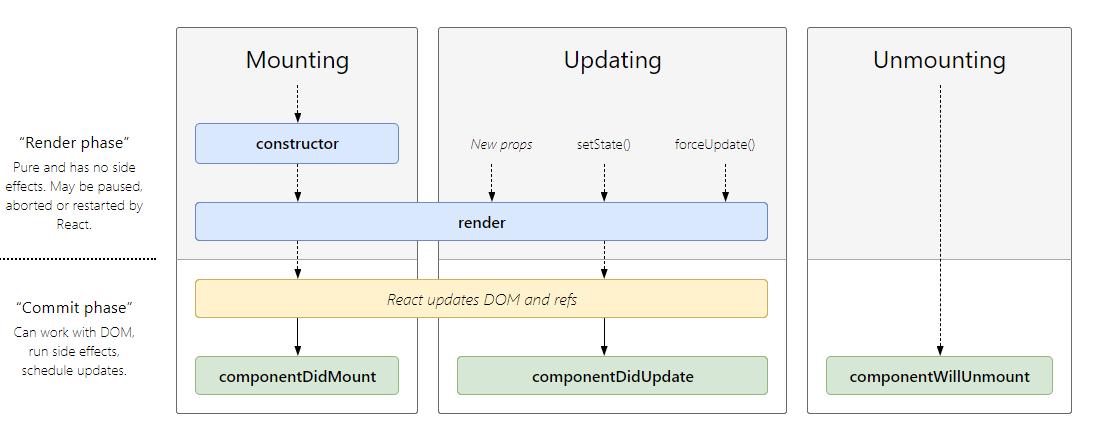
}Component Lifecycle
Lifecycle methods are custom functionality that gets executed during the different phases of a component.
There are methods available when the component gets created and inserted, updated and removed from the DOM.
These methods occur in a specific order and with this we can leverage this into our advantage.
constructor()
static getDerivedStateFromProps()
render()
componentDidMount()
shouldComponentUpdate()
render()
getSnapshotBeforeUpdate()
componentDidUpdate()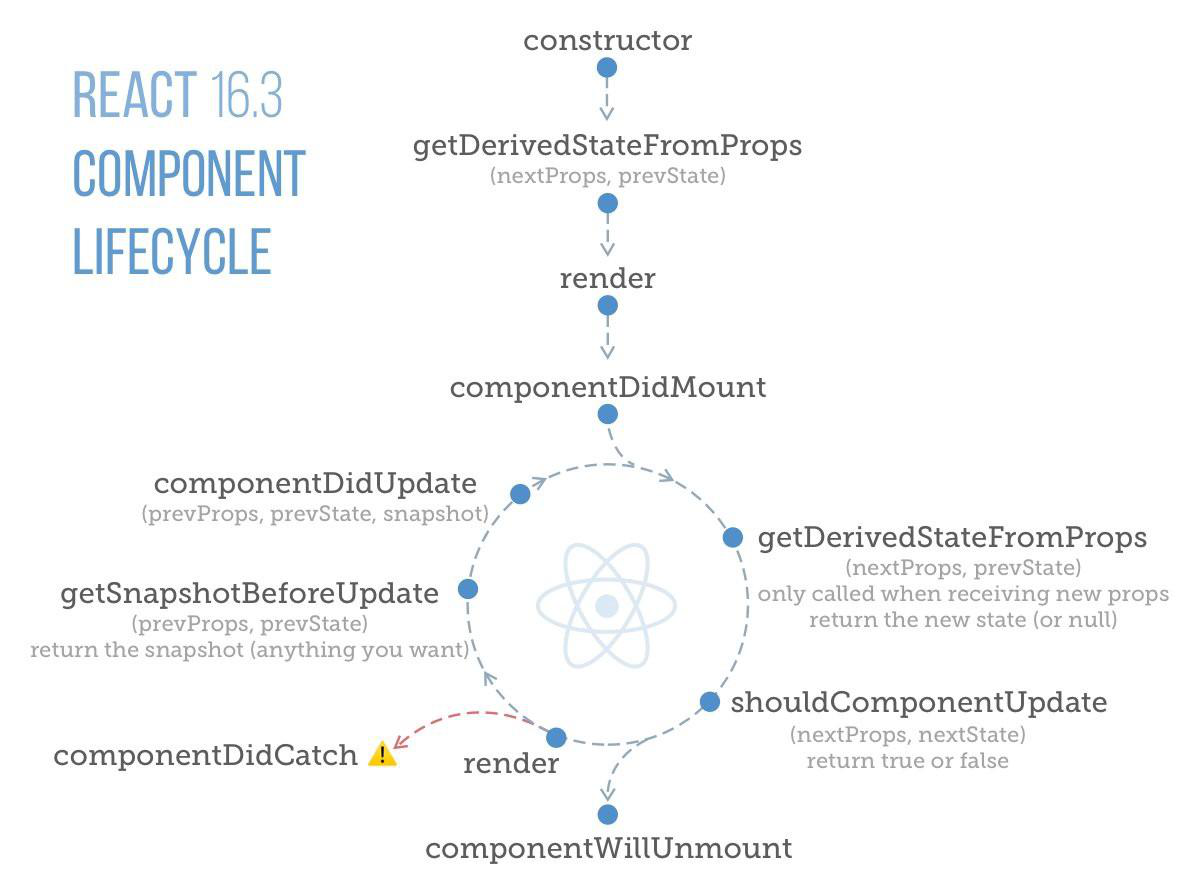
Component Lifecycle
Most important methods
constructor()
If you don’t initialize state and you don’t bind methods, you don’t need to implement a constructor for your React component.
Constructors are only used for two purposes:
- Initializing local state by assigning an object to this.state.
- Binding event handler methods to an instance.
constructor(props) {
  super(props);
  // Don't call this.setState() here!
  this.state = { counter: 0 };
}
render()
You cannot modify the component state within the render().
It is a pure function.
The render() is the most used lifecycle method.
class Hello extends Component {
   render(){
      return <div>Hello {this.props.name}</div>
   }
}
componentDidMount()
class Hello extends Component {
   async componentDidMount() {
    const ... = await fetch("https://api.example.com/items")
    this.setState({...})
   }
}
componentDidMount() is called as soon as the component is mounted and ready. This is a good place to initiate API calls.
You can modify the component state within the componentDidMount(), but use it with caution.
componentDidUpdate()
componentDidUpdate(prevProps) {
 //Typical usage, don't forget to compare the props
 if (this.props.userName !== prevProps.userName) {
   this.fetchData(this.props.userName);
 }
}componentDidUpdate() is invoked immediately after updating occurs. This method is not called for the initial render.
You can call setState() in this lifecycle, but keep in mind that you will need to wrap it in a condition to check for state or prop changes from previous state. Incorrect usage of setState() can lead to an infinite loop.
Note: componentDidUpdate() will not be invoked if shouldComponentUpdate() returns false.
shouldComponentUpdate()
shouldComponentUpdate() is invoked before rendering when new props or state are being received. Defaults to true.
shouldComponentUpdate(nextProps, nextState) {
 return this.props.title !== nextProps.title ||
  this.state.input !== nextState.input }
This lifecycle should always return a boolean value to the question:
“Should I re-render my component?
The default behavior is to re-render on every state change, and in the vast majority of cases you should rely on the default behavior.
componentWillUnmount()
componentWillUnmount() {
 window.removeEventListener('resize', this.resizeListener)
}
componentWillUnmount() is invoked immediately before a component is unmounted and destroyed.
You should not call setState() in componentWillUnmount() because the component will never be re-rendered.
Use this lifecycle to cleanup, such as invalidating timers, canceling network requests, or cleaning up any subscriptions.
getDerivedStateFromProps()
static getDerivedStateFromProps(props, state) {
  if (props.currentRow !== state.lastRow) {
    return {
      isScrollingDown: props.currentRow > state.lastRow,
      lastRow: props.currentRow,
    };
  }
  // Return null to indicate no change to state.
  return null;
}
This is a static function that does not have access to “this“. getDerivedStateFromProps() returns an object to update state in response to prop changes. It can return a null if there is no change to state.
It is called just before calling the render() method.
This method exists for rare use cases where the state depends on changes in props over time.
getSnapshotBeforeUpdate()
getSnapshotBeforeUpdate(prevProps, prevState) {
    // ...
  }
The value that is returned from getSnapshotBeforeUpdate() is passed on to componentDidUpdate().
getSnapshotBeforeUpdate() is invoked right before the most recently rendered output is committed to the DOM.
Exercise III

Challenge 3.1
git fetch && git checkout exercise-3-lifecyclesApply lifecycles
Create a setInterval every 5 seconds, to update this value on mount.
Apply state to App.js with a property called "save", a boolean.
yarn && yarn start // npm i && npm startPass this "save" as a prop to Tags
Add Unmount lifecycle to Tag.js to check component destruction
class App extends React.Component {
  state = {
    save: false,
  };

  componentDidMount() {
    console.log('mounted');
    setInterval(() => {
      this.setState({
        save: true
      });
    }, 5000);
  }

  render() {
    return (
      <div className='App'>
        <Tags save={this.state.save} />
      </div>
    );
  }
}
export default class Tag extends React.Component {
componentWillUnmount() {
console.log('This tag was removed', this.props.item);
}
//...
}App.js
Tag.js
Challenge 3.2
Bonus: Create a ref to the input and on mount focus the input
On Mount "fetch" tagsFromJson.js
On Component Update check the "save" prop and saveToServer.js
Tags.js
Tags.js
import { saveToServer } from '../utils/utils.js';
import tagsFromJson from '../utils/tags.json';

//...
  addInput = React.createRef();

  componentDidMount() {
    this.setState({ tags: tagsFromJson });
    this.addInput.current.focus();
  }

  componentDidUpdate(prevProps) {
    const { tags } = this.state;

    if (prevProps.save) {
      saveToServer(tags);
    }
  }


  render() {
    const { tags } = this.state;

    return (
      <div className='Container'>
        <div className='Input'>
          Add Tag <input ref={this.addInput} onKeyUp={this.handleKeyUp} />
        </div>
//...
Boss Challenge II
Find Bugs and solve them
Apply the key concept where it applies

React-Hooks
Hooks are functions that let you “hook into” React state and lifecycle features from function components.
Hooks don’t work inside classes — they let you use React without classes.
const ExampleWithManyStates = () => {
  // Declare multiple state variables!
  const [age, setAge] = useState(42);
  const [fruit, setFruit] = useState('banana');
  const [todos, setTodos] = useState([{ text: 'Learn Hooks' }]);
  // ...
}
Example:
useState allows you to have state inside a functional component.
class Screen extends React.Component {
  state = {
    size: {
      width: '500px',
      height: '500px'
    }
  }
  ...
}
import React, { useState } from 'react';
const Screen = () => {
const [size,setSize] = useState({
width: '500px',
height: '500px'
});
...
}class Screen extends React.Component {
resize(){
this.setState({
size: {
width: '200px',
height: '200px'.
}
});
}
...
}import React, { useState } from 'react';
const Screen = () => {
const resize = () => {
setSize({
width: '200px',
height: '200px'
})
}
...
}import React, { useEffect } from 'react';
// [] = dependencies
useEffect(fn, []); The useEffect() comes to replace componentDidMount, componentDidUpdate and componentWillUnmount.
Dependencies are used to tell when the useEffect should run.
By setting it to [], will only run on mount.
Let's say you have to update some text on dom every time a prop is updated would be something like [prop.count]
By using this Hook, you tell React that your component needs to do something after render.
import React, { useState, useEffect } from 'react';

function Example() {
  const [count, setCount] = useState(0);

  useEffect(() => {
    document.title = `You clicked ${count} times`;
  });

  return (
    <div>
      <p>You clicked {count} times</p>
      <button onClick={() => setCount(count + 1)}>
        Click me
      </button>
    </div>
  );
}
Example:
This runs on mount and every update!
No dependency is passed.
Example:
import React, { useState, useEffect } from 'react';

function Example() {
  const [count, setCount] = useState(0);

  useEffect(() => {
    document.title = `You clicked ${count} times`;
  }, [count]);

  return (
    <div>
      <p>You clicked {count} times</p>
      <button onClick={() => setCount(count + 1)}>
        Click me
      </button>
    </div>
  );
}
This runs on every update when count is changed!
The dependency is count variable.
Example:
import React, { useState, useEffect } from 'react';

function Example() {
  const [count, setCount] = useState(0);

  useEffect(() => {
    document.title = `You clicked ${count} times`;
  }, []);

  return (
    <div>
      <p>You clicked {count} times</p>
      <button onClick={() => setCount(count + 1)}>
        Click me
      </button>
    </div>
  );
}
This runs only on mount!
The dependencies are defined as empty - []
Lifecycles VS useEffect()
class DataTester extends React.Component{
  componentDidMount(){
    fetchData();
  }

  componentWillUnmount(){
    closeConnection();
  }

  componentDidUpdate(prevProps){
    if(prevProps.id !== this.props.id){
      saveData();
    }
  }
  ...
}
const DataTester = () => {
  useEffect(() => {
    fetchData();
    return () => closeConnection();
  }, [fetchData,closeConnection]);
  ...
}
const DataTester = ({id}) => {
  useEffect(() => {
    saveData();
  }, [id, saveData]);
  ...
}
useCallBack() & useMemo()
Both return Memoized data, useCallback returns a memoized function and useMemo save the return of a function
import React, { useCallback } from 'react';

const handleRemoveText = useCallback(fn, deps);
import React, { useMemo } from 'react';
const processedData = useMemo(fn, deps);Same as useEffect, dependencies are used in order to control when it should update.
If no array is provided, a new value will be computed on every render.
This is useful when passing callbacks to optimized child components that rely on reference equality to prevent unnecessary renders (e.g. shouldComponentUpdate).
useCallBack() VS useMemo()
function foo() {
  return 'bar';
}

const memoizedCallback = useCallback(foo, []);
const memoizedResult = useMemo(foo, []);

memoizedCallback;
// ƒ foo() {
//   return 'bar';
// }
memoizedResult; // 'bar'
memoizedCallback(); // 'bar'
memoizedResult(); // 🔴 TypeError
const MyComponent = ({ foo, initial }) => {
// ...
const memoizedCallback = useCallback(() => {
someFunc(foo, bar);
}, [foo, bar]);
const memoizedResult = useMemo(() => {
return someFunc(foo, bar);
}, [foo, bar]);
// ...
}With useCallback you can define a function that has referential equality between renders.
With useMemo() you calculate a value that has referential equality between renders.
const Page = () => {
  const [clicked,setClicked] = useState(0);
  const handleInputChange = () => ....;

  return <>
    <Button onClick={() => setClicked(clicked+1)}
    <Input onChange={handleInputChange} />
  </>
};

const Input ({onChange}) => {
  return ...;
};
const Page = () => {
const [clicked,setClicked] = useState(0);
const handleInputChange = useCallback(() => {
....,
}, []);
return <>
<Button onClick={() => setClicked(clicked+1)}
<Input onChange={handleInputChange} />
</>
};
const Input ({onChange}) => {
return ...;
};useCallBack()
Returns a memoized callback.
useCallback(fn, deps) is equivalent to useMemo(() => fn, deps)
useCallback will return a memoized version of the callback that only changes if one of the dependencies has changed.
useMemo()
const ListView = ({ data, foo, bar }) => {
  // ...
  const list = data.map(item => ({
    ...item,
    itemProp1: expensiveFunction(foo),
    itemProp2: anotherPriceyFunction(bar)
  });

  return <>
    <Table
      {
        list.map(item =>
      	  <TableEntry prop1={item.itemProp1} />)
      }
    </Table>
  </>
};
const ListView = ({ data, foo, bar }) => {
// ...
const list = useMemo(() =>
data.map(item => ({
...item,
itemProp1: expensiveFunction(foo),
itemProp2: anotherPriceyFunction(bar)
})), [data]);
return <>
<Table
{
list.map(item =>
<TableEntry prop1={item.itemProp1} />)
}
</Table>
</>
};Returns a memoized value.
useMemo() will only recompute the memoized value when one of the dependencies has changed. This optimization helps to avoid expensive calculations on every render.
useRef()
useRef returns a mutable ref object whose .current property is initialized to the passed argument (initialValue). The returned object will persist for the full lifetime of the component.
import React, {useEffect, useRef } from 'react';

const Page = () => {
  const input = useRef()

  useEffect(()=> input.focus(),[]);

  return () => {
    <input type="text" ref={input} />
  }
}
Additional Resources
Other Hooks
Custom Hooks
export default () => {
  const [scrollPosition, setScrollPosition] = useState(null);
  useEffect(() => {
    const handleScroll = () => setScrollPosition(window.scrollY);
    document.addEventListener('scroll', handleScroll);
    return () =>
      document.removeEventListener('scroll', handleScroll);
  }, []);
  return scrollPosition;
}
export default () => {
const scrollPosition = useBodyScrollPosition();
return (
<div>
<div>
{scrollPosition !== null ? scrollPosition : 0}
</div>
</div>
)
}React now allows development of custom hooks.
Exercise IV

Challenge 4.1
- Refactor all lifecycles for HOOKS.
- Refactor all components to functional components
import React, { useState, useEffect } from 'react';
import './App.css';
import Tags from './tags/Tags';

const App = () => {
  const [save, setSave] = useState(false);

  useEffect(() => {
    setTimeout(() => {
      setSave(true);
    }, 5000);
  }, []);

  return (
    <div className='App'>
      <Tags save={save} />
    </div>
  );
};

export default App;
const Tag = ({ item, onTagRemove }) => {
useEffect(() => {
return () => console.log('This tag was removed', item);
}, [item]);
...
}App.js
Tag.js
Tags.js
import React, { useState, useEffect, useRef, useCallback } from 'react';

import { saveToServer } from '../utils/utils.js';
import tagsFromJson from '../utils/tags.json';

const Tags = ({ save }) => {
  const [tags, setTags] = useState([]);
  const addInput = useRef();

  useEffect(() => {
    setTags(tagsFromJson);
    addInput.current.focus();
  }, []);

  useEffect(() => {
    if (save) {
      saveToServer(tags);
    }
  }, [save, tags]);

  const handleRemoveTag = (item) => {
    setTags(tags.filter((el) => el !== item));
  };

  const handleKeyUp = useCallback(
    ({ target: { value }, keyCode }) => {
      if (keyCode === 13) {
        setTags([...tags, value]);
      }
    },
    [tags]
  );

  return (
    <div className='Container'>
      <div className='Input'>
        Add Tag <input ref={addInput} onKeyUp={handleKeyUp} />
      </div>
      <div className='Tags'>
        {tags.map((el, idx) => (
          <Tag item={el} key={`${el}-${idx}`} onTagRemove={handleRemoveTag} />
        ))}
      </div>
    </div>
  );
};
Exercise V - The End

App Example


Github user search
- Should be able to search users in the Github API
- Should be able see a listing with the search results
- Should be able to see the profile of one of the users and some of their details.
Github user search
- Use create react app - https://reactjs.org/docs/create-a-new-react-app.html
- Use react router for handling multiple routes - https://reactrouter.com/
- Recommended Project Structures - https://reactjs.org/docs/faq-structure.html
Github user search
OPTIONALS:
Http Client:
Additional resources