egg & egg-core
- egg.js是为企业级框架和应用而生
- 奉行约定大于配置
- 提供定制上层框架的能力
- 基于koa
- 内置多进程管理
egg是什么
是一个 node.js web framework

内置多进程模型 egg-cluster
egg在启动进程时会先启动master进程,master进程中会先启动agent进程,agent进程启动成功后再启动worker进程,都启动成功后,整个服务才处于对外可用状态。
master为主进程,agent和worker都是master的子进程。
多个进程之间的通信
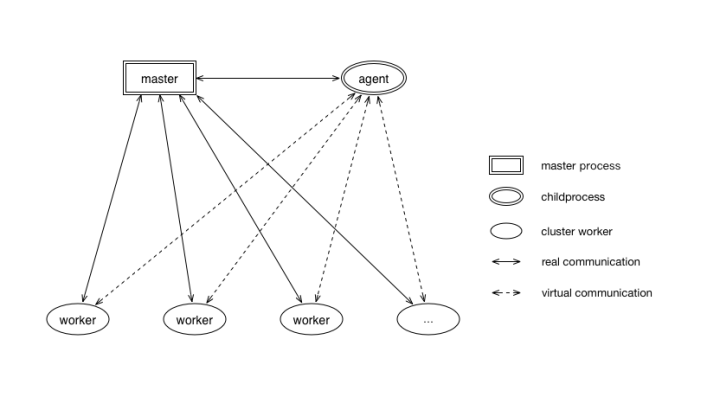
事实上,master进程最主要的工作就是负责启动agent和worker,和后续它们之间的通信。因为agent和worker都是master的子进程,没法直接通信,所以要通过master中转一下,为了让这一过程尽量无感知,messenger中有一个默认的消息转发规则。
class Msssenger {
    send(){
        // 默认的消息发送方向:
        // master为egg-bin, egg-script这些,一般和master交互,输出一些log信息
        if (!data.to) {
          if (data.from === 'agent') data.to = 'app';
          if (data.from === 'app') data.to = 'agent';
          if (data.from === 'parent') data.to = 'master';
        }
    }
}
egg-cluster 中的 forkAgentWorker 方法和 forkAppWorker 方法用来衍生 agent 和 worker 进程,对应的子进程文件 agent_worker.js 和 app_worker.js 中的内容都很少,分别创建了 framework.Agent,和framework.Application 的实例,并在实例上绑定了ready 钩子,当应用初始化完成后通过事件通知master,至于 Agent 和 Application 是如何初始化的,这些都在 egg 和egg-core 这两个包中。
egg-cluster只负责衍生子进程
egg-core&& egg
- egg-core 是对 koa 的增强,在 koa 的基础上,增加了 Controller 和 Service 的概念,还添加了很重要的 loader 和生命周期流程。
- egg 是基于 egg-core 开发的最基本的开箱即用的web框架,包括中间件,路由,Controller,Service,插件这些功能,egg 通过约定和 egg-core 提供的 API,让开发者只要遵循 egg 的约定就能轻松写出易维护的代码。
egg里大部分内容是继承自egg-core的,并在egg-core的基础上增加或重写了一些方法和属性。
agent是如何初始化的
第一步是创建 Agent 实例,父类 EggApplication 也是 egg 包中定义的。Agent 构造函数在执行完父类构造函数后,还执行了 this.loader.load() 和 this.dumpConfig 两个方法。另外可以看到 Agent 里自定义了自己的 loader 文件。
// egg/lib/agent.js
const AgentWorkerLoader = require('./loader').AgentWorkerLoader;
const EGG_LOADER = Symbol.for('egg#loader');

class Agent extends EggApplication {
  constructor(options = {}) {
    options.type = 'agent';
    super(options);

    this._wrapMessenger();

    this.loader.load();

    // dump config after loaded, ensure all the dynamic modifications will be recorded
    const dumpStartTime = Date.now();
    this.dumpConfig();
  }
  get [EGG_LOADER]() {
    return AgentWorkerLoader;
  }
}
app是如何初始化的
// egg/lib/application.js
const AppWorkerLoader = require('./loader').AppWorkerLoader;
const EGG_LOADER = Symbol.for('egg#loader');

class Application extends EggApplication {
  constructor(options = {}) {
    options.type = 'application';
    super(options);
    this.server = null;

    try {
      this.loader.load();
    }

    this.dumpConfig();

    this[WARN_CONFUSED_CONFIG]();
    this[BIND_EVENTS]();
  }

  get [EGG_LOADER]() {
    return AppWorkerLoader;
  }
}
app 和 agent 行为基本一致,继承自 EggApplication,执行完父类构造函数后执行 this.loader.load(),this.dumpConfig,app的 loader 也是重写过的。
EggApplication
// egg/lib/egg.js

class EggApplication extends EggCore {
  constructor(options) {
    super(options);

    // export context base classes, let framework can impl sub class and over context extend easily.
    this.ContextCookies = ContextCookies;
    this.ContextLogger = ContextLogger;
    this.ContextHttpClient = ContextHttpClient;
    this.HttpClient = HttpClient;
    // 在 app 和 agent 中执行 loader.load 之前,在这里已经实现加载好了配置
    this.loader.loadConfig();
    this.messenger = new Messenger();

    this.messenger.once('egg-ready', () => {
      this.lifecycle.triggerServerDidReady();
    });

    // dump config after ready, ensure all the modifications during start will be recorded
    // make sure dumpConfig is the last ready callback
    this.ready(() => process.nextTick(() => {
      const dumpStartTime = Date.now();
      this.dumpConfig();
      this.dumpTiming();
    }));
    this._setupTimeoutTimer();

    this[CLUSTER_CLIENTS] = [];

    this.cluster = (clientClass, options) => {
      options = Object.assign({}, this.config.clusterClient, options, {
        // cluster need a port that can't conflict on the environment
        port: this.options.clusterPort,
        // agent worker is leader, app workers are follower
        isLeader: this.type === 'agent',
        logger: this.coreLogger,
      });
      const client = cluster(clientClass, options);
      this._patchClusterClient(client);
      return client;
    };

    this.BaseContextClass = BaseContextClass;
    this.Controller = BaseContextClass;
    this.Service = BaseContextClass;
    this.Subscription = BaseContextClass;
  }
  curl(url, opts) {
    return this.httpclient.request(url, opts);
  }
  get httpclient() {
    if (!this[HTTPCLIENT]) {
      if (this.config.httpclient.enableDNSCache) {
        this[HTTPCLIENT] = new DNSCacheHttpClient(this);
      } else {
        this[HTTPCLIENT] = new this.HttpClient(this);
      }
    }
    return this[HTTPCLIENT];
  }
  dumpConfig() {

  }
  get [EGG_PATH]() {
    return path.join(__dirname, '..');
  }
  createAnonymousContext(req) {
    const request = {
      headers: {
        'x-forwarded-for': '127.0.0.1',
      },
      query: {},
      querystring: '',
      host: '127.0.0.1',
      hostname: '127.0.0.1',
      protocol: 'http',
      secure: 'false',
      method: 'GET',
      url: '/',
      path: '/',
      socket: {
        remoteAddress: '127.0.0.1',
        remotePort: 7001,
      },
    };
    if (req) {
      for (const key in req) {
        if (key === 'headers' || key === 'query' || key === 'socket') {
          Object.assign(request[key], req[key]);
        } else {
          request[key] = req[key];
        }
      }
    }
    const response = new http.ServerResponse(request);
    return this.createContext(request, response);
  }

}``
App 和 Agent 都继承自 EggApplication,EggApplication又继承自EggCore,EggApplication的构造函数中挂载了一些context的基类,执行了this.loader.loadConfig(),初始化了一个messenger,注册了'egg-ready'事件,在进程启动完成后,还会重新dumpConfig(没太懂为什么)。最后还挂载了BaseContextClass, Controller, Service, Subscription这些关键类。
那么,egg-core到底做了什么呢
const KoaApplication = require('koa');

class EggCore extends KoaApplication {
  constructor(options = {}) {
    options.baseDir = options.baseDir || process.cwd();
    options.type = options.type || 'application';

    super();

    this._options = this.options = options;
    this.console = new EggConsoleLogger();

    this.BaseContextClass = BaseContextClass;
    const Controller = this.BaseContextClass;
    this.Controller = Controller;
    const Service = this.BaseContextClass;
    this.Service = Service;

    this.lifecycle = new Lifecycle({
      baseDir: options.baseDir,
      app: this,
      logger: this.console,
    });
    this.lifecycle.on('error', err => this.emit('error', err));
    this.lifecycle.on('ready_timeout', id => this.emit('ready_timeout', id));
    this.lifecycle.on('ready_stat', data => this.emit('ready_stat', data));

    const Loader = this[EGG_LOADER];
    assert(Loader, 'Symbol.for(\'egg#loader\') is required');
    this.loader = new Loader({
      baseDir: options.baseDir,
      app: this,
      plugins: options.plugins,
      logger: this.console,
      serverScope: options.serverScope,
    });
  }

  /**
   * override koa's app.use, support generator function
   */
  use(fn    assert(is.function(fn), 'app.use() requires a function');
    debug('use %s', fn._name || fn.name || '-');
 ) {
   this.middleware.push(utils.middleware(fn));
    return this;
  }
  ready(flagOrFunction) {
    return this.lifecycle.ready(flagOrFunction);
  }
  readyCallback(name, opts) {
    return this.lifecycle.legacyReadyCallback(name, opts);
  }
}- EggCore继承自koa,并在koa的基础上,扩展了console, BaseContextClass, Controller, Service等基类。除此之外实例化了两个更重要的属性,分别是 lifecycle 和 loader。
- ready,readyCallback 只是对 lifecycle 上的方法的代理。
关于egg的loader
loader 是 egg 中的重点,egg 将应用,框架和插件都称为 loadUnit,它们在代码结构上基本一致,有了这个约定,egg 就能将 loadUnit 中的内容加载到正确的地方。
当然 loader 是 可以重写的,egg 里对可重写的部分都使用了 Symbol.for() 作为属性的 key,因为Symbol.for() 的值是共享的。
// egg-core/lib/egg.js
const EGG_LOADER = Symbol.for('egg#loader')
class EggCore {
    get[EGG_LOADER](){
        return require('./loader/egg_loader')
    }
}
// egg/lib/agent.js
const EGG_LOADER = Symbol.for('egg#loader')
class Agent {
    get[EGG_LOADER](){
        return AgentWorkerLoader;
    }
}
// egg/lib/application.js
const EGG_LOADER = Symbol.for('egg#loader')
class Application {
    get[EGG_LOADER](){
        return AppLoader;
    }
}
egg-core 与 egg 中 loader 的不同
egg-core 和 egg 中都有 lib/loader 目录,放了loader相关的代码:
egg-core 中提供的是底层API,比如 egg-core 的 Loader 类中实现了 loadToApp, loadToContext, getLoadUnits, loadFile 这些基础方法。
egg 的 loader 则是实现了 loadConfig 和 load 两个方法,本质是对 egg-core loader 基础 API 的组合,因此 egg 中虽然重写了 [EGG_LOADER],依旧需要继承 egg-core 的 loader。
agent 和 app 的 loadConfig 没什么区别, load 方法根据自身特性有所不同。
// egg/lib/loader/agent_worker_loader.js
class AgentWorkerLoader extends EggLoader {

  /**
   * loadPlugin first, then loadConfig
   */
  loadConfig() {
    this.loadPlugin();
    super.loadConfig();
  }

  load() {
    this.loadAgentExtend();
    this.loadCustomAgent();
  }
}
// egg/lib/loader/app_worker_loader.js
class AppWorkerLoader extends EggLoader {
loadConfig() {
this.loadPlugin();
super.loadConfig();
}
load() {
// app > plugin > core
this.loadApplicationExtend();
this.loadRequestExtend();
this.loadResponseExtend();
this.loadContextExtend();
this.loadHelperExtend();
this.loadCustomApp();
this.loadService();
this.loadMiddleware();
this.loadController();
this.loadRouter(); // Dependent on controllers
}
}
load${name}Extend
load${name}Extend 的实现在 egg-core/lib/loader/mixin/extend.js 下。主要是获取每个${loadUnit}/app/extend/${name} 文件中导出的对象,然后合并到正确的 proto 上。
// egg-core/lib/loader/mixin/extend.js
module.exports = {
    loadAgentExtend(){
        this.loadExtend('agent', this.app)
    },
    loadContextExtend(){
        this.loadExtend('context', this.app.context)
    },
    loadRequestExtend(){
        this.loadExtend('request', this.app.request)
    }
}
loadExtend
loadExtend(name, proto){
    const filepaths = this.getExtendFilePaths(name)
    for(let i = 0, l = filepaths.length; i < l; i++){
        // 可以看出 loadUnit/extend 下的文件也支持根据环境加载,不过官网没有提到,实际应该也没什么使用场景
        filepaths.push(filepaths.push(filepath + `${this.serverEnv}`))
    }
    for(let filepath of filepaths){
        const ext = this.requireFile(pathfile)
        const properties = Object.getOwnPropertyNames(ext).concat(Object.getOwnPropertySymbols(ext))
        for (const property of properties) {
            let descriptor = Object.getOwnPropertyDescriptor(ext, property)
            let originalDescriptor = Object.getOwnPropertyDescriptor(proto, property)

            if (originalDescriptor) {
              // don't override descriptor
              descriptor = Object.assign({}, descriptor);
              if (!descriptor.set && originalDescriptor.set) {
                descriptor.set = originalDescriptor.set
              }
              if (!descriptor.get && originalDescriptor.get) {
                descriptor.get = originalDescriptor.get
              }
            }
            Object.defineProperty(proto, property, descriptor)
          }
    }
}
loadExtend 将 proto 和 ext 上每个属性的 descriptor 进行合并,不过这里并不是直接覆盖的,而是对属性的 get 和 set 进行merge。另外因为定义属性时既有字符串也有 Symbol,所以 descriptor 是 Object.getOwnPropertyNames 和 Object.getOwnPropertySymbols 的并集。
loadExtend 执行完后,app 上就有了对应属性的原型。在 egg 重写的 createContext 方法中,使用的就是 app 上的对象作为原型。
// egg/lib/egg.js
class EggApplication extends EggCore {
    createContext(req, res){
        const app = this;
        const context = Object.create(app.context);
        const request = context.request = Object.create(app.request);
        const response = context.response = Object.create(app.response);
        context.app = request.app = response.app = app;
        context.req = request.req = response.req = req;
        context.res = request.res = response.res = res;
        request.ctx = response.ctx = context;
        request.response = response;
        response.request = request;
        context.onerror = context.onerror.bind(context);
        context.originalUrl = request.originalUrl = req.url;

        context.starttime = Date.now();
        return context;
    }
}
extend是如何生效的
loadConfig
加载配置的方法在 egg-core/lib/loader/mixin/config.js 下。loadConfig 会先将应用的 config 获取到,在加载非 app 配置时,appConfig 会被注入到配置函数的参数中。
loadConfig() {
    this.configMeta = {};
    const target = {};

    // Load Application config first
    const appConfig = this._preloadAppConfig();

    // this.getTypeFiles('config') => ['config.default.js', 'config.${serverEnv}.js']
    for (const filename of this.getTypeFiles('config')) {
      for (const unit of this.getLoadUnits()) {
        const isApp = unit.type === 'app';
        const config = this._loadConfig(unit.path, filename, isApp ? undefined : appConfig, unit.type);
        extend(true, target, config);
      }
    }

    // You can manipulate the order of app.config.coreMiddleware and app.config.appMiddleware in app.js
    target.coreMiddleware = target.coreMiddlewares = target.coreMiddleware || [];
    target.appMiddleware = target.appMiddlewares = target.middleware || [];

    this.config = target;
  }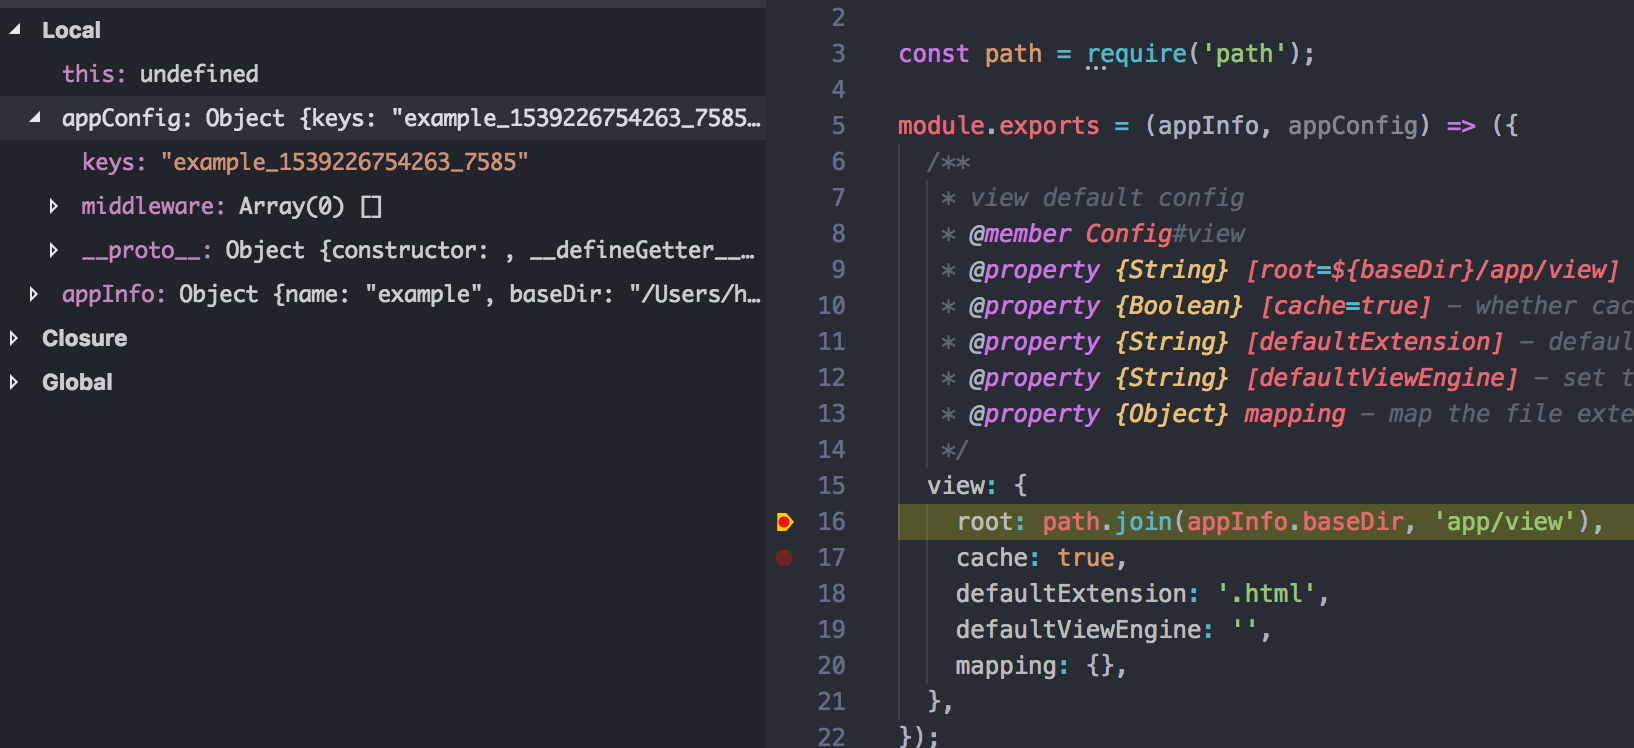
因此在写写插件配置时,除了官方文档上说的 appInfo,还存在另一个参数 appConfig。
图为一个初始化egg工程中,egg-view插件的config.default.js
loadConfig
loadPlugin && Loadmiddleware
loadPlugin 最后会生成一个 this.plugins 列表,每一项包括插件的名字,文件夹。
loadMiddleware 先是把 loadUnit 上所有的 middleware 通过 loadToApp 挂载到 app.middlewares 上。当 middleware 都注册完后,loader 会遍历 config.coreMiddleware 和 appMiddleware,依次调用 app.use。
loadMiddleware(opt) {
    const app = this.app;
    const middlewarePaths = opt.directory;
    this.loadToApp(middlewarePaths, 'middlewares', opt);

    for (const name in app.middlewares) {
      Object.defineProperty(app.middleware, name, {
        get() {return app.middlewares[name];}
      });
    }

    for (const name of middlewareNames) {
      const options = this.config[name] || {};
      let mw = app.middlewares[name];
      mw = mw(options, app);
      mw._name = name;
      mw = wrapMiddleware(mw, options);
      if (mw) {
        app.use(mw);
      }
    }
}
loadToApp和loadToCtext的不同
在 loadMiddleware 的过程中我们已经看到了 loadToApp 这个方法,在 egg-core/lib/loader/mixin 目录下还有 controller.js, service,js, router.js,主要实现了 loadController, loadService, loadRouter 方法。loadController 和 loadService 实现上最大的不同就是内部调用的分别是loadToApp和loadToContext。
loadToApp 和 loadRouter
loadToApp(directory, property, opt) {
    const target = this.app[property] = {};
    opt = Object.assign({}, {
      directory,
      target,
      inject: this.app,
    }, opt);
    new FileLoader(opt).load();
}
loadToApp实际没太多内容,只是处理了一下opt参数,然后执行 new FileLoader(opt).load()
loadRouter更简单,直接调用了loadFile
loadFile(filepath, ...inject) {
    filepath = filepath && this.resolveModule(filepath);
    // function(arg1, args, ...) {}
    if (inject.length === 0) inject = [ this.app ];

    let ret = this.requireFile(filepath);
    if (is.function(ret) && !is.class(ret)) {
      ret = ret(...inject);
    }
    return ret;
}
FileLoader
load() {
    const items = this.parse();
    const target = this.options.target;
    for (const item of items) {
      // item { properties: [ 'a', 'b', 'c'], exports }
      // => target.a.b.c = exports
      item.properties.reduce((target, property, index) => {
        let obj;
        const properties = item.properties.slice(0, index + 1).join('.');
        if (index === item.properties.length - 1) {
          if (property in target) {
          obj = item.exports;
          if (obj && !is.primitive(obj)) {
            obj[FULLPATH] = item.fullpath;
            // 当导出对象构建好后,会通过obj[EXPORTS]进行标记,后面会用到
            obj[EXPORTS] = true;
          }
        } else {
          obj = target[property] || {};
        }
        target[property] = obj;
        return obj;
      }, target);
    }
    return target;
}
FileLoader 在 parse 的过程中,会把目录下的文件转成一个对象,比如 controller 下的 home.js,会被描述为 {properties: ['home'], exports: module.exports},然后将每个对象添加到 target 上。比如当loadController 方法执行完后,所有的 controller 就都加载到 this.app.controller 上了。
loadToContext与loadToApp的区别
与 loadToApp 不同,loadToContext 内部执使用的是 ContextLoader 而非 FileLoader,ContextLoader 继承自 FileLoader,没有重写 FileLoader 的任何方法,但是在构造函数中重写了 app.context[property] 的 getter,因此 Service 其实是延迟实例化的。
class ContextLoader extends FileLoader(){
    constructor(options){
        super(options)
        const app = this.options.inject
        const property = this.options.property
        Object.defineProperty(app.context, property){
            get(){
                if(!this[CLASSLOADER]){
                    this[CLASSLOADER] = new Map()
                }
                const classloader = this[CLASSLOADER]
                let instance = classloader.get(property)
                if(!instance){
                    // getInstance 很关键
                    instance = getInstance(target, this)
                    classloader.set(property, instance)
                }
                return instance
            }
        }
    }
}
getInstance
function getInstance(values, ctx) {
  // it's a directory when it has no exports
  // then use ClassLoader
  const Class = values[EXPORTS] ? values : null;
  let instance;
  if (Class) {
    if (is.class(Class)) {
      instance = new Class(ctx);
    } else {
      // it's just an object,从这里可以看出,Service实际上也可以是纯对象,不过好像没什么使用场景
      instance = Class;
    }
  // Can't set property to primitive, so check again
  // e.x. module.exports = 1;
  } else if (is.primitive(values)) {
    instance = values;
  } else {
    instance = new ClassLoader({ ctx, properties: values });
  }
  return instance;
}
getInstance 在 ContextLoader 和 ClassLoader 中都有用到,如果 values[EXPORTS] 标记为 true,说明 values 是个 Service 类,会执行 new Class(ctx),否则当做目录处理,返回一个 ClassLoader 实例。
LoadCustom
loadCustom 主要包括 loadCustomApp 和 loadCustomAgent,这两个函数内部都调用了this[LOAD_BOOT_HOOK],从命名可以看出和启动有关,先将 loadUnit 中的生命周期函数(app.js 和 agent.js 中)注册在 this.lifecycle 上,然后执行 lifecycle 上的 triggerConfigWillLoad 方法。
  loadCustomApp() {
    this[LOAD_BOOT_HOOK]('app');
    this.lifecycle.triggerConfigWillLoad();
  },

  loadCustomAgent() {
    this[LOAD_BOOT_HOOK]('agent');
    this.lifecycle.triggerConfigWillLoad();
  },
  [LOAD_BOOT_HOOK](fileName) {
    for (const unit of this.getLoadUnits()) {
      const bootFilePath = this.resolveModule(path.join(unit.path, fileName));

      const bootHook = this.requireFile(bootFilePath);
      if (is.class(bootHook)) {
        // if is boot class, add to lifecycle
        this.lifecycle.addBootHook(bootHook);
      } else if (is.function(bootHook)) {
        // if is boot function, wrap to class for compatibility
        this.lifecycle.addFunctionAsBootHook(bootHook);
      }
    }
    // 先进行lifecycle.init();
    this.lifecycle.init();
  }
生命周期
在官方文档的启动自定义部分,可以知道 egg 是通过 app.js 自定义启动过程的,文件返回的内容被称为Boot类,可以通过类中的生命周期函数自定义初始化工作。
egg中提供了以下几个生命周期:
- 配置文件即将加载,这是最后动态修改配置的时机(configWillLoad)
- 配置文件加载完成(configDidLoad)
- 文件加载完成(didLoad)
- 插件启动完成(willReady)
- worker 准备就绪(didReady)
- 应用启动完成(serverDidReady)
- 应用即将关闭(beforeClose)
常用的生命周期
在 egg 没有生命周期的时候,egg 的插件都是以 app 为参数的函数。egg 在兼容老插件时,把函数都包装成了 Boot 类,导出的函数作为 configDidLoad 函数。因此 configDidLoad 是实际上使用最多的生命周期函数。
如果有异步启动逻辑,老api是调用 app.beforeStart,在新的生命周期中,应该使用 didLoad 。比如@kapp/disconf 中启动 disconf client 并初始化配置就是在这一生命周期完成。
当所有的 didLoad 执行完毕,证明插件都已经启动成功,需要在所有插件启动成功后再进行的操作应该在 didLoad 的下一个生命周期 willReady 中进行。
loadReady和bootReady
egg 的生命周期构造函数中初始化完一些变量和一些回调后,执行了 INIT_READY 方法,INIT_READY 创建了两个对象,分别是 loadReady 和 bootReady。根据名字可以判断出,分别是文件加载完成和应用启动完成的过程。loadReady 注册的回调中调用了 triggerWillReady ,进入下一个生命周期,bootReady 则是直接执行 ready(true),执行进程启动成功的回调,这些回调有的在 egg 中注册,有的在 egg-core 中注册,也有的在 egg-cluster 中就已经注册了。
  [INIT_READY]() {
    this.loadReady = new Ready({ timeout: this.readyTimeout });
    this[DELEGATE_READY_EVENT](this.loadReady);
    this.loadReady.ready(err => {
      debug('didLoad done');
      if (err) {
        this.ready(err);
      } else {
        this.triggerWillReady();
      }
    });

    this.bootReady = new Ready({ timeout: this.readyTimeout, lazyStart: true });
    this[DELEGATE_READY_EVENT](this.bootReady);
    this.bootReady.ready(err => {
      this.ready(err || true);
    });
  }
在 loadCustom 的部分已经讲到了 loadCustomApp/loadCustomAgent 会通过[LOAD_BOOT_HOOK]把 app.js/agent.js 中的方法添加到 BOOT_HOOKS,然后执行 lifecycle.init(),然后执行 lifecycle.triggerConfigWillLoad 启动生命周期。
lifecycle.init 方法将添加到 BOOT_HOOKS 中的类全部以 this.app 作为参数实例化。实例都在 this[BOOTS] 中。
触发生命周期的流程很简单,triggerConfigWillLoad 会遍历 BOOTS,取出所有的 configWillLoad 函数,然后执行,遍历完成后,执行 this.triggerConfigDidLoad,即进入下一个生命周期。
triggerConfigDidLoad 同理,遍历执行完钩子之后,执行 triggerDidLoad。
生命周期执行流程
同步生命周期 && 异步生命周期
对于 configWillLoad, configDidLoad 这种仅允许同步操作的生命周期,执行非常简单,直接遍历执行即可,但是对于 didLoad,willReady 这种允许进行异步操作的生命周期显然是不行的。egg 中对这些生命周期使用 REGISTER_READY_CALLBACK 注册,这个方法内部通过 get-ready 和 ready-callback 两个包完成。
// triggerDidLoad 和 triggerWillReady 类似,triggerDidLoad 是注册在 bootReady 上
triggerDidLoad() {
    debug('register didLoad');
    for (const boot of this[BOOTS]) {
      const didLoad = boot.didLoad && boot.didLoad.bind(boot);
      if (didLoad) {
        this[REGISTER_READY_CALLBACK](didLoad, this.loadReady, 'Did Load');
      }
    }
}

triggerWillReady() {
    debug('register willReady');
    this.bootReady.start();
    for (const boot of this[BOOTS]) {
      const willReady = boot.willReady && boot.willReady.bind(boot);
      if (willReady) {
        this[REGISTER_READY_CALLBACK](willReady, this.bootReady, 'Will Ready');
      }
    }
}
[REGISTER_READY_CALLBACK](scope, ready, timingKeyPrefix) {
if (!is.function(scope)) {
throw new Error('boot only support function');
}
// get filename from stack
const name = utils.getCalleeFromStack(true, 4);
const timingkey = `${timingKeyPrefix} in ` + utils.getResolvedFilename(name, this.app.baseDir);
this.timing.start(timingkey);
const done = ready.readyCallback(name);
// ensure scope executes after load completed
process.nextTick(() => {
utils.callFn(scope).then(() => {
done();
this.timing.end(timingkey);
}, err => {
done(err);
this.timing.end(timingkey);
});
});
}REGISTER_READY_CALLBACK
REGISTER_READY_CALLBACK 在执行生命周期前,会通过 readyCallback 注册一个回调,返回的 done 是一个函数,执行 done 表示注册的异步流程已经完成,当所有的 done 函数都执行完成后,表明所有该阶段的钩子都已经执行完成,注册在 ready(loadReady 或者 bootReady)上的回调就会被触发。
egg的启动阶段
从 loadReady 和 bootReady 这两个属性来看,egg 内部还把生命周期划分成了 load 和 boot 两大阶段,didLoad 执行完成后,load阶段结束,boot 阶段开始。
从文档似乎可以看出,官方更希望把动态修改配置的操作放在 configWillLoad 中,事实上现在的 configWillLoad 和 configDidLoad 并无区别。
loadReady 注册的回调执行了 this.triggerWillReady()。willReady 的函数是注册在 bootReady 上的。bootReady 全部执行完后,执行回调中的回调 this.ready,触发 didReady,同时,在 egg-cluster 中注册的 ready 回调也被触发。
serverDidReady 是在进程监听到 'egg-ready' 后再触发的,实现在 egg/lib/egg.js 的构造函数中。
至此,egg 的 app 或 agent 进程启动完成。
总结
1. egg-core 是基于 koa 封装的框架,在 koa 的基础上增加了 loader 和 lifecycle,同时基于约束,让框架更容易扩展,但是直接用 egg-core 去编写上层框架,工作量会很大。
2. egg 中大部分内容都继承自 egg-core,是将 egg 提供的核心API组合起来,封装成的一个框架。
3. 大多数基于 egg 的框架,也不会过多的去使用 egg-core 提供的核心API,并且启动流程这些一般也不会有改动,而是将一些插件和中间件整合沉淀。