Docker Deep Dive

Syed Saad Qamar
Software Engineer
at IOmechs
/SyedSaadQamar96
/in/syed-saad-qamar
/saadqamar01
/saadqamar96


Before starting docker we need to have a look on those days where docker didn't exist.
Docker Deep Dive
The bad old days:
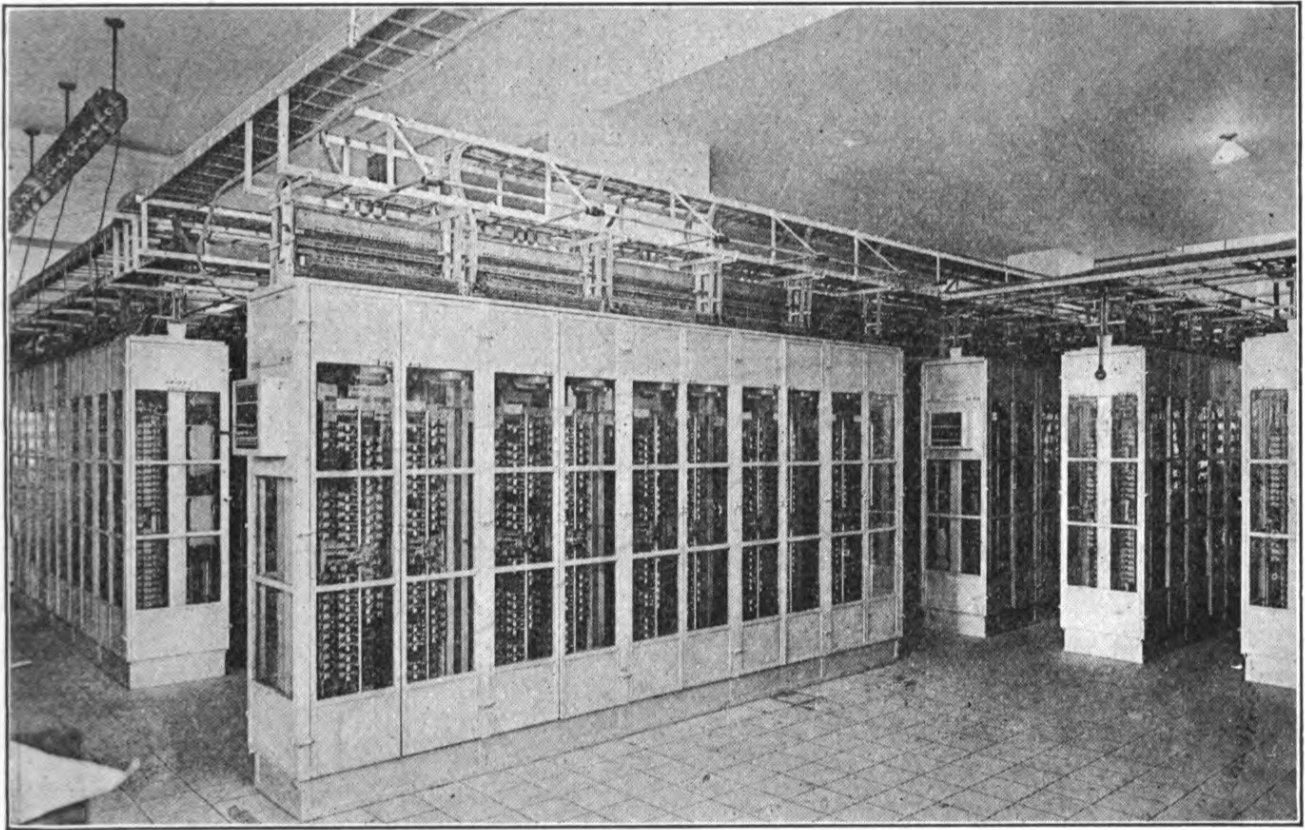
* Most applications run on servers. And in the past, we could only run one
application per server. The open-systems world of Windows and Linux just
didn’t have the technologies to safely and securely run multiple applications on
the same server.
* Every time the business needed a new application, IT would go out and buy a new server.
* IT usually bought bigger servers than were actually needed. This resulted in huge numbers of servers operating as low as 5-10% of their potential capacity. A tragic waste of company capital and resources!
Docker Deep Dive
Hello VMware!
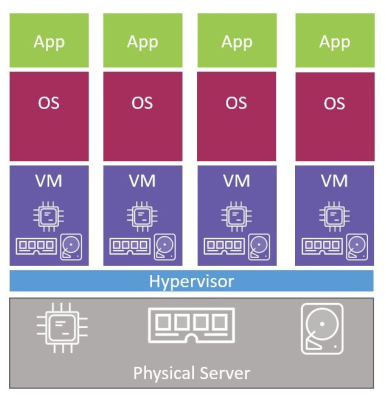
VMware, Inc. gave the world a gift - the virtual machine (VM). And almost overnight the world changed into a much better place! We finally had a technology that would let us safely and securely run multiple businesses applications on a single server.
This was a game changer! IT no longer needed to procure a brand new oversized server every time the business asked for a new application. More often than not they could run new apps on existing servers that were sitting around with spare capacity.
Docker Deep Dive
VMwarts
But... and there’s always a but! As great as VMs are, they’re not perfect!
The fact that every VM requires its own dedicated OS is a major flaw. Every OS consumes CPU, RAM, and storage that could otherwise be used to power more applications. Every OS needs patching and monitoring. And in some cases, every OS requires a license. All of this is a waste of op-ex (operational expenditure is an ongoing cost for running a product) and cap-ex ( a capital expenditure, is the cost of developing or providing non-consumable parts for the product or system).
The VM model has other challenges too. VMs are slow to boot and portability isn’t great - migrating and moving VM workloads between hypervisors and cloud platforms is harder than it needs to be.
Docker Deep Dive
Hello Containers!
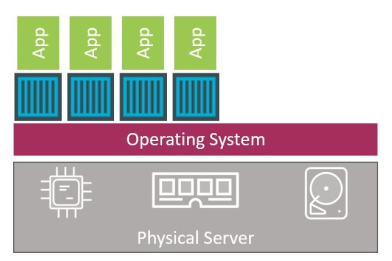
- For a long time, the big web-scale players like Google have been using container technologies to address these shortcomings of the VM model.
- In the container model, the container is roughly analogous to the VM. The major difference though is that every container does not require a full-blown OS. In fact, all containers on a single host share a single OS. This frees up huge amounts of system resources such as CPU, RAM, and storage. It also reduces potential licensing costs and reduces the overhead of OS patching and other maintenance. This results in savings on the cap-ex and op-ex fronts. Containers are also fast to start.
Docker Deep Dive
VMware vs Container
Docker Deep Dive
Hello Docker!
Docker is software that runs on Linux and Windows. It creates, manages and orchestrates containers. The software is developed in the open as part of the Moby open-source project on GitHub. Docker, Inc. is a company based out of San Francisco and is the overall maintainer of the open-source project. Docker, Inc. also has offers commercial versions of Docker with support contracts etc.
Note: The word “Docker” comes from a British colloquialism meaning dock worker - somebody who loads and unloads ships.
Docker Deep Dive
Docker Installation
For installation, I am not covering this part, below are the links of docker official website there cover installation of Windows, Linux, and Mac.
Linux (Ubuntu):
https://docs.docker.com/install/linux/docker-ce/ubuntu/
Windows:
https://docs.docker.com/docker-for-windows/install/
Mac:
https://docs.docker.com/docker-for-mac/install/
Docker Deep Dive
After installation you can check docker's version using that command.
saad@saad-HP-EliteBook-Folio-9470m:~$ docker version

Client:
 Version:	17.12.1-ce
 API version:	1.35
 Go version:	go1.10.1
 Git commit:	7390fc6
 Built:	Wed Apr 18 01:23:11 2018
 OS/Arch:	linux/amd64

Server:
 Engine:
  Version:	17.12.1-ce
  API version:	1.35 (minimum version 1.12)
  Go version:	go1.10.1
  Git commit:	7390fc6
  Built:	Wed Feb 28 17:46:05 2018
  OS/Arch:	linux/amd64
  Experimental:	false
Docker Deep Dive
Images
A good way to think of a Docker image is as an object that contains an OS filesystem and an application. If you work in operations, it’s like a virtual machine template. A virtual machine template is essentially a stopped virtual machine. In the Docker world, an image is effectively a stopped container. If you’re a developer, you can think of an image as a class.
Docker Deep Dive
Run the docker image ls command on your Docker host
$ docker image ls

REPOSITORY TAG IMAGE ID CREATED SIZE
If you are working from a freshly installed Docker host it will have no images and will look like the output above.
Getting images onto your Docker host is called “pulling”. If you are following along with Linux, pull the ubuntu
Docker Deep Dive
$ docker image pull ubuntu:latest

latest: Pulling from library/ubuntu
b6f892c0043b: Pull complete
55010f332b04: Pull complete
2955fb827c94: Pull complete
3deef3fcbd30: Pull complete
cf9722e506aa: Pull complete
Digest: sha256:382452f82a8b....463c62a9848133ecb1aa8
Status: Downloaded newer image for ubuntu:latest
$ docker image ls
REPOSITORY TAG IMAGE ID CREATED SIZE
ubuntu latest bd3d4369aebc 11 days ago 126.6 MBRun the docker image ls command on your Docker host
Docker Deep Dive
Containers Commands
Now that we have an image pulled locally on our Docker host, we can use the Docker container run command to launch a container from it.
$ docker container run -it ubuntu:latest /bin/bash
root@6dc20d508db0:/#
For Linux:
Run a ps command from inside of the container to list all running processes.
root@e43941d202f6:/# ps -elf
F S UID        PID  PPID  C PRI  NI ADDR SZ WCHAN  STIME TTY          TIME CMD
4 S root         1     0  0  80   0 -  4627 wait   11:29 pts/0    00:00:00 /bin/
4 R root        12     1  0  80   0 -  8600 -      11:29 pts/0    00:00:00 ps -e
Docker Deep Dive
saad@saad-HP-EliteBook-Folio-9470m:~$ sudo docker container ls
[sudo] password for saad:
CONTAINER ID        IMAGE               COMMAND             CREATED             STATUS              PORTS               NAMES
28b74ecc0579        ubuntu:latest       "/bin/bash"         8 seconds ago       Up 7 seconds                            condescending_montalcini
You can see all running containers on your system using the docker container ls command.
Attaching to running containers:
This example references a container called “vigilant_borg”. The name of your container will be different, so remember to substitute “vigilant_borg” with the name or ID of the container running on your Docker host.
$ docker container exec -it vigilant_borg bash
root@e2b69eeb55cb:/#
Docker Deep Dive
Stop the container and kill it using the docker container stop and
$ docker container stop vigilant_borg
vigilant_borg
$
$ docker container rm vigilant_borg
vigilant_borg
Verify that the container was successfully deleted by running another docker container ls command.
$ docker container ls
CONTAINER ID IMAGE COMMAND CREATED STATUS PORTS NAMES
Docker Deep Dive
Now take an Example we clone an app from a Git repo, inspect its Dockerfile,
build the image and push that image to docker hub and then pull the same image from docker hub and run it as a container.
$ git clone https://github.com/nigelpoulton/psweb.git
Cloning into 'psweb'...
remote: Counting objects: 15, done.
remote: Compressing objects: 100% (11/11), done.
remote: Total 15 (delta 2), reused 15 (delta 2), pack-reused 0
Unpacking objects: 100% (15/15), done.
Checking connectivity... done.
$ cd psweb
$ ls -lChange directory into the cloned repo’s directory and list the contents of the directory.
Docker Deep Dive
List the contents of the Dockerfile.
cat Dockerfile

FROM alpine
LABEL maintainer="nigelpoulton@hotmail.com"
RUN apk add --update nodejs nodejs-npm
COPY . /src
WORKDIR /src
RUN npm install
EXPOSE 8080
ENTRYPOINT ["node", "./app.js"]
At this point we have pulled some application code from a remote Git repo. We also have a Dockerfile containing instructions that describe how to create a new Docker image with the application inside.
Use the docker image build command to create a new image using the instructions contained in the Dockerfile. This example creates a new Docker image called test:latest .
Docker Deep Dive
Build the image:
$ docker image build -t test:latest .

Sending build context to Docker daemon 74.75kB
Step 1/8 : FROM alpine
latest: Pulling from library/alpine
88286f41530e: Pull complete
Digest: sha256:f006ecbb824...0c103f4820a417d
Status: Downloaded newer image for alpine:latest
---> 76da55c8019d
<Snip>Successfully built f154cb3ddbd4
Successfully tagged test:latest
Check to make sure that the new test
$ docker image ls

REPO     TAG     IMAGE ID     CREATED         SIZE
test   latest  f154cb3ddbd4  1 minute ago    55.6MB
Docker Deep Dive
Push the image on the docker hub
1) Create an account on the docker hub
https://hub.docker.com/next=https%3A%2F%2Fhub.docker.com%2F
2) login on your system by using below command
saad@saad-HP-EliteBook-Folio-9470m:~$ docker login
Username: saadqamar01
Password:
Login Succeeded
Docker Deep Dive
Now take a image that you build, tag the image using below command
docker tag <image-name>:<image-tag> <docker-uname>/<image-name>:<image-tag>
saad@saad-HP-EliteBook-Folio-9470m:~$ sudo docker push saadqamar01/test:latest
The push refers to repository [docker.io/saadqamar01/test]
52bfb8171a15: Pushed
de3b2ce7f19c: Pushed
50413c63bb9e: Pushed
df64d3292fd6: Mounted from saadqamar01/cv-creater
latest: digest: sha256:f759c29aab1c7e2c7f18bb51002b83195ed9c95dc99da1dc9ebfd184603b5299 size: 1160
saad@saad-HP-EliteBook-Folio-9470m:~$ docker tag test:latest saadqamar01/test:latestdocker push <docker-uname>/<image-name>:<image-tag>
Now push your image on docker hub
Docker Deep Dive
Pull the image from the docker hub
Pull the image using below command
saad@saad-HP-EliteBook-Folio-9470m:~$ docker pull saadqamar01/test

Using default tag: latest
latest: Pulling from saadqamar01/test
Digest: sha256:a2d437b129b4614e8743b48fccf47a918d1c0bb737c9101b17cdd8e5fa287ede
Status: Image is up to date for saadqamar01/test:latest
docker pull <docker-uname>/<image-name>:<image-tag>
You can see the image after pulling by using below command
$ docker image ls

REPO     TAG     IMAGE ID     CREATED         SIZE
test   latest  f154cb3ddbd4  1 minute ago    55.6MB
Docker Deep Dive
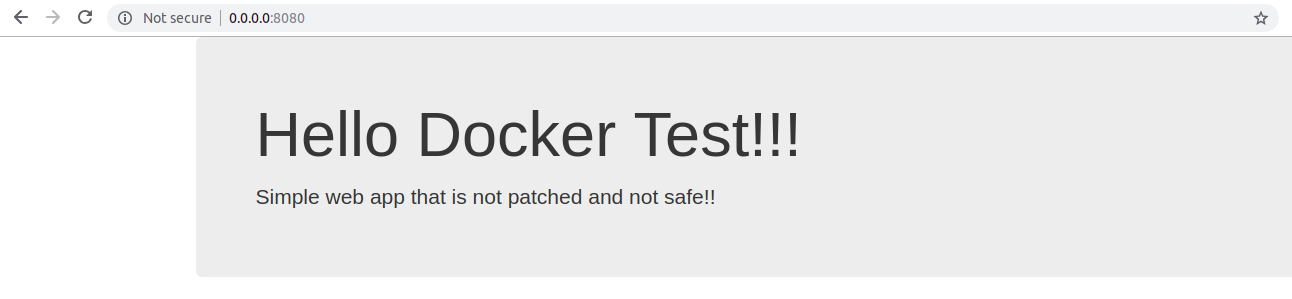
Now finally you can run the docker container command and run the application
docker container run -d \
--name web1 \
-p 8080:8080 \
test:latest
Open a web browser and navigate to http://0.0.0.0:8080/ .
You will see the following web page.