User & Post Models
& Hooks
& Data Validation

@tkssharma
github.com
/tkssharma
Node JS with Mysql
ORM Yes/No


Javascript
Javascript hat heute viele Anwendungsgebiete, wie z.B.
-
Browser Anwendungen
- Frameworks: JQuery, AngularJS, React, EmberJS, KnockoutJS, BackboneJS etc.
-
Desktop Anwendungen
- z.B. Chrome Browser, Atom IDE
- Frameworks: Electron
-
Mobile Apps
- Frameworks: Apache Cordova / Ionic
-
Server Anwendungen (Basis NodeJS)
- z.B. Paypal
- Konsolen Anwendungen als Entwicklungstools wie z.B. Node Package Manager, Buildengine Gulp
Was brauchen wir zum Frontend-Code entwickeln?
(Absteigend von der Priorität)
Wir werden heute keine Tools einrichten.
Wir coden heute in Plunker.
1. Ein guter Browser

2. Editor
wie z.B.
Visual Studio Code / Visual Studio* (Microsoft)
Atom (Github)
Webstorm / IntelliJ* (Jetbrains)
* kostenpflichtig


3. git
Atlassion SourceTree für GUI-Fans
4. NodeJS
Für unterstützende Entwicklungstools (inkl. Node Package Manager)
5. Gulp
npm install gulp -gFür die Automatisierung von bestimmten Aufgaben wie z.B. Minifizieren und Verunstaltung (uglify) von Javascript-Dateien, ausführen von Tests, Starten eines lokalen Webservers, etc.
6. Yeoman
npm install yo -g
npm install bower -g
npm install generator-gulp-angular -g
Generator für Webanwendungen, sogn. 'Scaffolding'
Generatoren: http://yeoman.io/generators/
Demo.

Sequelize is available via npm (or yarn).
npm install --save sequelize
You also have to install manually the driver for the database of your choice:
# One of the following:

$ npm install --save pg pg-hstore # Postgres
$ npm install --save mysql2
$ npm install --save mariadb
$ npm install --save sqlite3
$ npm install --save tedious
# Microsoft SQL Server
AngularJS wird als Open-Source Framework von Google entwickelt.
Github: https://github.com/angular/angular.js
Heute
Morgen?
Benefits of Sequelize
const Sequelize = require('sequelize');

// Option 1: Passing parameters separately
const sequelize = new Sequelize('database', 'username', 'password', {
  host: 'localhost',
  dialect: /* one of 'mysql' | 'mariadb' | 'postgres' | 'mssql' */
});

// Option 2: Using a connection URI
const sequelize =
     new Sequelize('postgres://user:pass@example.com:5432/dbname');


const sequelize = new Sequelize(/* ... */, {
  // ...
  pool: {
    max: 5,
    min: 0,
    acquire: 30000,
    idle: 10000
  }
});
sequelize
.authenticate()
.then(() => {
console.log('Connection has been
established successfully.');
})
.catch(err => {
console.error('Unable to
connect to the database:', err);
});connection
.sync({
logging: console.log,
force: true
})
.then(() => {
console.log('Connection to database established successfully.');
app.listen(port, () => {
console.log('Running server on port ' + port);
});
})
.catch(err => {
console.error('Unable to connect to the database:', err);
});Sequelize is a promise- based Object Relational Mapper.
1. Reduce
Boilerplate Code
"The programmer must write a lot of code to do minimal jobs."
Beispiel
<!doctype html>
<html>
  <head>
    <script src="https://code.jquery.com/jquery-2.1.0.js"></script>
    <script type="text/javascript">
    $(function(){
        $(document).keyup(function(){
            var yourName= $("#yourName").val();
           $("#output").html(yourName+"!");
        });
    });
    </script>
  </head>
  <body>
    <div>
      <label>Name:</label>
      <input type="text" id="yourName" placeholder="Enter a name here">
      <hr>
          <h1>Hello <b id="output">!</b></h1>
    </div>
  </body>
</html>
JQuery
AngularJS
<!doctype html>
<html ng-app>
  <head>
    <script src="https://ajax.googleapis.com/ajax/libs/angularjs/1.3.0-beta.5/angular.min.js"></script>
  </head>
  <body>
    <div>
      <label>Name:</label>
      <input type="text" ng-model="yourName" placeholder="Enter a name here">
      <hr>
      <h1>Hello {{yourName}}!</h1>
    </div>
  </body>
</html>https://plnkr.co/edit/jUR0veBLcupm5jTCXKgB
2. Getting
Structures
AngularJS the superheroic
Javascript MVW* Framework
* Model View Whatever
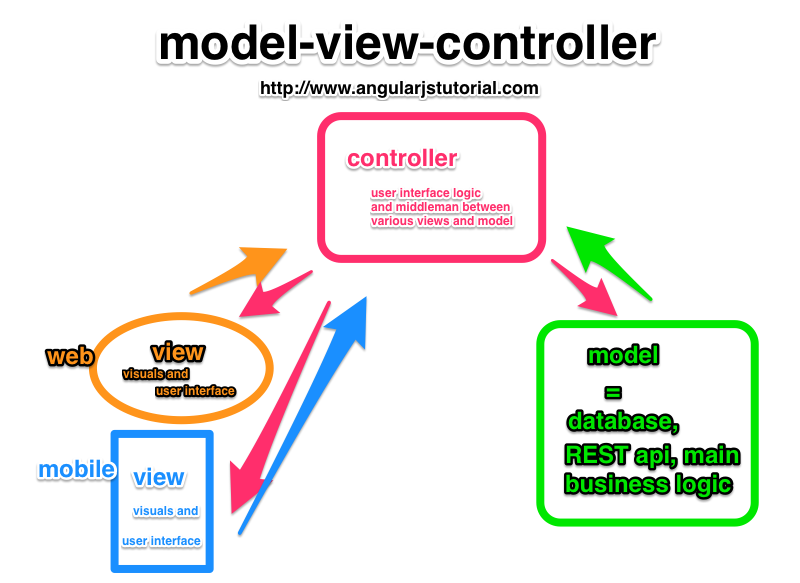
Model-View-Controller (MVC)
3. Testability
angular.module('app', [])
.controller('PasswordController', function PasswordController($scope) {
  $scope.password = '';
  $scope.grade = function() {
    var size = $scope.password.length;
    if (size > 8) {
      $scope.strength = 'strong';
    } else if (size > 3) {
      $scope.strength = 'medium';
    } else {
      $scope.strength = 'weak';
    }
  };
});
describe('PasswordController', function() {
beforeEach(module('app'));
var $controller;
beforeEach(inject(function(_$controller_){
// The injector unwraps the underscores (_) from around the parameter names when matching
$controller = _$controller_;
}));
describe('$scope.grade', function() {
it('sets the strength to "strong" if the password length is >8 chars', function() {
var $scope = {};
var controller = $controller('PasswordController', { $scope: $scope });
$scope.password = 'longerthaneightchars';
$scope.grade();
expect($scope.strength).toEqual('strong');
});
it('sets the strength to "weak" if the password length <3 chars', function() {
var $scope = {};
var controller = $controller('PasswordController', { $scope: $scope });
$scope.password = 'a';
$scope.grade();
expect($scope.strength).toEqual('weak');
});
});
});[ {
“id”: 1,
“title”: ‘First post’,
“userId”: 1,
“User”: {
“name”: ‘Buckminster’
“email”: ‘123@email.com’
}
]Unser Kanal
Die Links zu den Übungen werden dort verschickt.
Ihr könnt Eure Beispiele teilen.
Unsere Entwicklungsumgebung
Plunker
www.plnkr.co
Beispiel 'forken'

Promise
Represents the eventual completion (or failure) of an asynchronous operation, and its resulting value.
Dateien
<html ng-app="berufzug.angularjs.workshop">

<head>
  <title>AngularJS Workshop</title>
  <link rel="stylesheet" href="style.css" />
  <script src="https://code.angularjs.org/1.4.9/angular.js"></script>
  <script src="app.js"></script>
</head>

<body ng-controller="MainController">
  <p>Hello {{name}}!</p>
</body>

</html>index.html
var app = angular.module('berufzug.angularjs.workshop', []);

app.controller('MainController', function($scope) {
  $scope.name = 'World';
});
app.js
AngularJS spezifische Elemente:
- ng-app Direktive
- ng-controller Direktive
AngularJS spezifische Elemente:
index.html
ng-app Direktive
"Use this directive to auto-bootstrap an AngularJS application. The ngApp directive designates the root element of the application and is typically placed near the root element of the page - e.g. on the <body> or<html> tags."
<html ng-app="berufzug.angularjs.workshop">Eindeutiger Modulname
Script Dateien laden
<!-- AngularJS Bibliothek laden -->
<script src="https://code.angularjs.org/1.4.9/angular.js"></script>

<!-- Javascript Datei laden -->
<script src="app.js"></script>
Hinweis:
Für eine produktive Anwendung immer die minifizierte (.min) verwenden!
ng-controller Direktive
"The ngController directive attaches a controller class to the view. This is a key aspect of how angular supports the principles behind the Model-View-Controller design pattern."
<body ng-controller="MainController">Eindeutiger Controller-Name
{{name}} Expression
"Angular expressions are JavaScript-like code snippets that are mainly placed in interpolation bindings [...]."
<p>Hello {{name}}!</p>Name der Scope-Eigenschaft
app.js
"The angular.module is a global place for creating, registering and retrieving Angular modules. All modules (angular core or 3rd party) that should be available to an application must be registered using this mechanism."
var app = angular.module('berufzug.angularjs.workshop', []);Eindeutiger Modulname
Angabe von Fremdabhängigkeiten
controller
app.controller('MainController', function($scope) {

 // Logik/Daten für die View

});
Controllername
Angabe von Abhängigkeiten
"Scope is the glue between [...] controller and the view."
$scope.name = 'World';Eigenschaft auf dem Scope
User.findById(1)
   .then((user) => {
      res.json(user);
    })
    .catch((err) => {
      console.log(err);
})
Übung 1 (10' + 5')
Aufgabe Two-Way Binding
Tipps:
- Verwende ein HTML-Input Feld.
- Lese dich in die ng-model Direktive ein.
- Was brauchst Du nun nicht mehr?
Übung 2 (30' + 10')
Aufgabe Meldung
Tipps:
- Verwende ein HTML-Input und ein HTML-Button.
- Lese dich in die ng-click, ng-change, ng-show, ng-if und in die Möglichkeiten des Inputs im AngularJS Kontext ein.
- Wie kannst Du Javascript-Funktionen (function) an den $scope hängen.
- Könntest Du deinen Code noch optimieren?
Übung 3 (20' + 10')
Aufgabe Zahlenraten
Tipps:
- Verwende ein HTML-Input und ein HTML-Button.
- In die Javascript-Zufallszahlen ein.
- Könntest Du deinen Code noch optimieren?
Debugging
Tipps & Tricks
-
debugger;
-
Konsole
-
Netzwerk
-
$log
AngularJS (1.x)
Routing
Was versteht man unter Routing in einer SPA?
Starterbeispiel
Plunker: https://plnkr.co/edit/U7L6xJWqpRDCrB0XqQdD?p=info
Dateien
-
index.html
-
app.js
-
view1.html
-
view1Controller.js
-
view2.html
-
view2Controller.js
index.html
<html ng-app="berufzug.angularjs.workshop">

<head>
  <title>AngularJS Workshop</title>
  <link rel="stylesheet" href="style.css" />
  <script src="https://code.angularjs.org/1.4.9/angular.js"></script>
  <script src="https://code.angularjs.org/1.4.9/angular-route.js"></script>
  <script src="app.js"></script>
  <script src="view1Controller.js"></script>
  <script src="view2Controller.js"></script>
</head>

<body>
  <a href="#/view1">View 1</a>
  <a href="#/view2">View 2</a><br/>

  <div ng-view>
     <div>Default View</div>
  </div>
</body>
</html>
Script Dateien laden
<script src="https://code.angularjs.org/1.4.9/angular.js"></script>
<script src="https://code.angularjs.org/1.4.9/angular-route.js"></script>
<script src="app.js"></script>
<script src="view1Controller.js"></script>
<script src="view2Controller.js"></script>
angular.js - Angular Core Module
angular-route.js - Angular Routing Modul - Angular Module
app.js - Initialisieren der Anwendung (Achtung: Routing-Logik)
view1Controller.js - Controller für View 1
view2Controller.js - Controller für View 2
Navigation
  <a href="#/view1">View 1</a>
  <a href="#/view2">View 2</a>
Definition der Links - einfach via <a href...> Tag.
Platzhalter für die View
  <div ng-view>
     <div>Default View</div>
</div>app.js
Deklaration einer Abhängigkeit
var app = angular.module('berufzug.angularjs.workshop', ['ngRoute']);Um das Routing verwenden zu können, brauchen wir ngRoute. Dies kann als Fremdabhängigkeit angegeben werden.
Routing Konfiguration
app.config(['$routeProvider',
        function($routeProvider) {
            $routeProvider.
                when('/view1', {
                    templateUrl: 'view1.html',
                    controller: 'View1Controller'
                }).
                when('/view2', {
                    templateUrl: 'view2.html',
                    controller: 'View2Controller'
                }).
                otherwise({
                    redirectTo: '/'
                });
}]);
- $routeProvider
- when(...)
- Template URL
- Controller
Aufgabe
Tipps:
1. Erstelle eine neue View und einen Controller.
2. Passe die Routing-Konfiguration an.
3. Erstelle einen Button und mache einen alert().
AngularJS (1.x)
Filters
"Filters are used for formatting data displayed to the user."
AngularJS Filter
AngularJS Built-In Filter
<body ng-controller="MainController">
  <span>{{currentDate | date:'yyyy-MM-dd HH:mm:ss'}}</span>
</body>
Plunker: https://plnkr.co/edit/GoKsRiBVG9pf2af7UMYK?p=preview
var app = angular.module('berufzug.angularjs.workshop', []);

app.controller('MainController', function($scope, $interval) {

  $interval(function() {
      $scope.currentDate = new Date();
  }, 1000);

});
AngularJS Custom Filter
<head>
  <title>AngularJS Workshop</title>
  <link rel="stylesheet" href="style.css" />
  <script src="https://code.angularjs.org/1.4.9/angular.js"></script>
  <script src="app.js"></script>
  <script src="sayHelloFilter.js"></script>
</head>

<body ng-controller="MainController">
  <input type="text" ng-model="name" /><br />
  <div>{{name | sayHello}}</div>
</body>
Plunker: https://plnkr.co/edit/yeAQ3POe2LgoSlLbEPab?p=preview
angular.module('berufzug.angularjs.workshop')
       .filter('sayHello', function() {

  return function(input) {
    if(input && input !== "") {
       return "Hello " + input;
    }

    return "";
  };

})
AngularJS (1.x)
Services
"[...] You can use services to organize and share code across your app.
Angular services are:
- Lazily instantiated – Angular only instantiates a service when an application component depends on it.
- Singletons – Each component dependent on a service gets a reference to the single instance generated by the service factory."
Beispiel
Beispiel
app.controller('MainController', function($scope, $interval, calculator) {

  $scope.runCalculator = function(number1, number2) {
      $scope.result = calculator.plus(number1, number2);
  };

});

app.factory('calculator', function($log) {
  var calculator = {};

  calculator.plus = function(number1, number2) {
    $log.log('Number 1: ' + number1 + ' Number 2 ' + number2);
    var result = number1 + number2;
    $log.log('Result: ' + result);
    return result;
  };

  return calculator;
});
AngularJS (1.x)
HTTP Kommunikation
"The $http service is a core Angular service that facilitates communication with the remote HTTP servers [...]"
SBB-Beispiel
Plunker: https://plnkr.co/edit/mWUWhoKJ9UyNk3Ir5Hef
Javascript
app.factory('sbbService', function($http) {
  var communication = {};

  communication.getConnections = function(
    from, to, successCallback, errorCallback) {
    $http.get('https://transport.opendata.ch/v1/connections?from=' + from + '&to=' + to)
         .then(successCallback, errorCallback);
  };

  return communication;

});
app.controller('mainController', function($scope, $interval, sbbService, $log) {

  $scope.from = "Luzern";
  $scope.to = "Zürich";

  $scope.getConnections = function(from, to) {
      sbbService.getConnections(from, to, function(result) {
        $scope.result = result.data.connections;
      }, function(error) {
        $log.error('Error');
        $log.error(error);
      })
  };

});
index.html
<body ng-controller="MainController">
  <input type="text" ng-model="from" /><br />
  <input type="text" ng-model="to" /><br />
  <button ng-click="getConnections(from, to)">Get Connections</button>
  <br />
  <div ng-repeat="connection in result">
    <span>{{connection.from.station.name}} {{connection.from.departure | date:'dd.MM.yyyy HH:mm'}}</span><br />
    <span>{{connection.to.station.name}} {{connection.to.arrival | date:'dd.MM.yyyy HH:mm'}}</span><br />
    <br/>
    <br/>
  </div>

  <!--<div>JSON: {{result | json}}</div>-->
</body>
Aufgabe
Auf welchem Gleis?
Tipps:
1. Analysiere, das Format von der Ressource Connection.
2. Erweitere die Ausgabe um die Angabe der Plattform, bei der Abfahrt sowie bei der Ankunft.
Let's hack 'n' slack
Aufgabe
Tipps:
1. Erstelle deinen eigenen Slack-Bot, um die URL zu erhalten.
2. Lese dich in $http, insb. http.post ein. Das Nachrichten-Format von Slack sieht wie folgt aus:
3. Lösche deinen HTTP-Header, um OPTIONS Aufrufe zu verhindern (siehe Code).
app.config(['$httpProvider', function ($httpProvider) {
  $httpProvider.defaults.headers.post = {};
}]);
var data = {"text": "<<Dein Text>>"};