EB RACE
Script Tutorial
-
Getting started
- Hello World (1 Minute Tutorial)
- Detmerine CPU Peaks (5 Minute Tutorial)
-
EB RACE Script API
- Events & Channels
- Timemarkers
- Charts & Tables
- Decoder
- Tagging Events
- HTML 5 & JavaScript Callbacks
-
Behind the scenes
- Xtend - The script language
- Execution context
- Lifecycle of a script
- Download, unzip and launch EB RACE
- Apply for a license key
- Re-start EB RACE and enter your license key
- Click on "Start with Demo Files"
- You are now ready to implement your first script
Hello World
Prerequisites

Hello World
Create a New Script
Go to the Resource Explorer and select New -> New Script
Hello World
Give your script a name
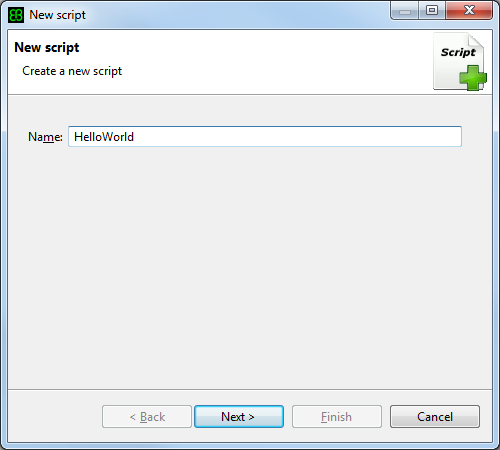
Give the script a meaningful name. You don't need to add a file extension, since it will be auto-completed with .xtend.
Xtend is the language that is internally used as scripting language. Learn more about Xtend.
Hello World
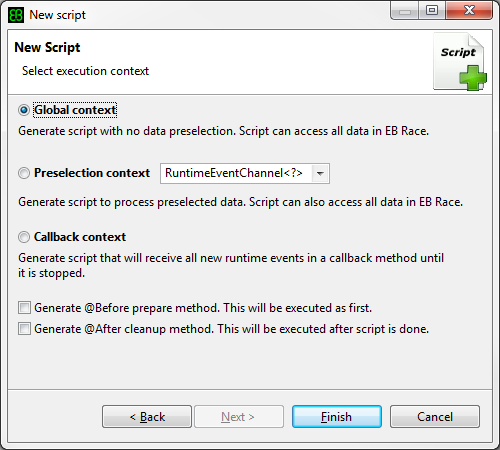
Select a execution context
Scripts can be executed in various contexts. Select Global context and proceed with Finish.
Learn more about execution contexts later.
Hello World
The generated script skeleton
class HelloWorld
{

    extension RaceScriptContext _raceScriptContext
    extension RaceScriptBase _raceScriptBase

    new (RaceScriptContext raceScriptContext) {
    	_raceScriptContext = raceScriptContext
        _raceScriptBase = new RaceScriptBase(_raceScriptContext)
    }

    /**
	 * Add a meaningful content to the description tag to describe the feature, which is executed by this script
	 * The content of the description tag will be used in all UI widgets where the script can be invoked
	 * If the content is empty, then the classname.methodname will be used instead
	 */
    @Execute(context=ExecutionContext.GLOBAL, description="")
	def executeScript() {
	}
}
The new script HelloWorld.xtend will be created an opened in the editor. The basic code of your script will be created automatically for you. It contains a constructor, that will give you access to the EB RACE API. Therefore the constructor MUST NOT be touched. Additionally the skeleton of your script method will be generated. Methods with the annotation @Execute will automatically recognized from EB RACE. Learn more here.
Hello World
Add a console prompt to your script
class HelloWorld
{

    extension RaceScriptContext _raceScriptContext
    extension RaceScriptBase _raceScriptBase

    new (RaceScriptContext raceScriptContext) {
    	_raceScriptContext = raceScriptContext
        _raceScriptBase = new RaceScriptBase(_raceScriptContext)
    }

    /**
	 * Add a meaningful content to the description tag to describe the feature, which is executed by this script
	 * The content of the description tag will be used in all UI widgets where the script can be invoked
	 * If the content is empty, then the classname.methodname will be used instead
	 */
    @Execute(context=ExecutionContext.GLOBAL, description="")
	def executeScript() {
            /* YOUR CONSOLE PROMPT */
    	    consolePrintln("Hello EB RACE Script")
	}
}
Hello World
Execute your script
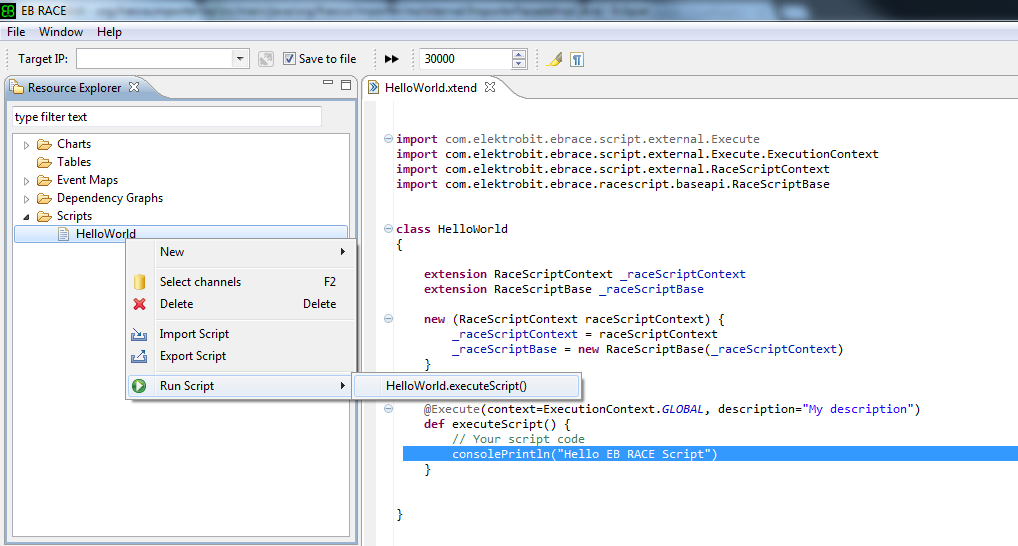
The new script HelloWorld.xtend will be created an opened in the editor.Scripts which are annotated with ExecutionContext.GLOBAL can be executed within the Resource Explorer.
Go to the folder Scripts, navigate to your script and execute it.
Hello World
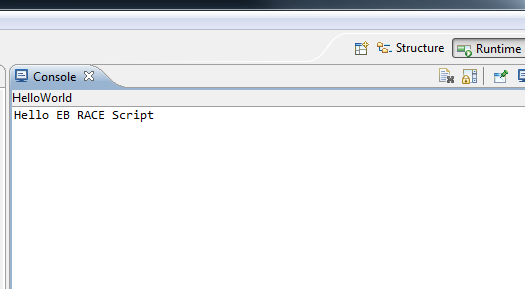
See the result
As usual for a "Hello World" example we have picked the most simple use-case. Printing a string into the console.
The console will be opened automatically in EB RACE.
Continue with this tutorial for more elaborated scripts.
Determine CPU Peaks
Use Case Description
We want to determine the highest value of a channel (i.e. the global peak) and visualize it as a time-marker. We want to apply this function for arbitrary channels and display the result in a line chart together with the markers.
Determine CPU Peaks
Setting the execution context
@Execute(context=ExecutionContext.PRESELECTION, description="Create a time-marker for the highest value")
def tutorial01(RuntimeEventChannel<?> channel) {
}
We want to call the script, in the context of the channel explorer.
So we need to set the ExecutionContext to PRESELECTION and add a RuntimeEventChannel as parameter.

The script is now registered and can be called.
And we can now add our code into the generated skeleton.
Determine CPU Peaks
Retrieve the events from a channel
@Execute(context=ExecutionContext.PRESELECTION, description="Create a time-marker for the highest value")
def tutorial01(RuntimeEventChannel<?> channel) {
    // get all events from a channel
    channel.events
}
First we need to get access to all events within the given channel.
This is a simple EB RACE API call:
Detmerine CPU Peaks
Determine the peak value
@Execute(context=ExecutionContext.PRESELECTION, description="Create a time-marker for the highest value")
def tutorial01(RuntimeEventChannel<?> channel) {
    // sort the events from a channel by its values and pick the highest (i.e. the ast element of the list)
    channel.events.sortBy[value as Double].last
}
To determine the event with the highest value, we need to sort the list of events and take the last entry from the list.
This is pure Xtend functionality
Determine CPU Peaks
Create a timemarker
@Execute(context=ExecutionContext.PRESELECTION, description="Create a time-marker for the highest value")
def tutorial01(RuntimeEventChannel<?> channel) {
    channel.events.sortBy[value as Double].last.createTimemarker("CPU Peak "+channel.name)
}
Since we have picked the event with the peak value, we can now create a marker at the given time-stamp and give the marker a meaningful name.
Detmermine CPU Peaks
Create a chart and jump to the marker
@Execute(context=ExecutionContext.PRESELECTION, description="Create a time-marker for the highest value")
def tutorial01(RuntimeEventChannel<?> channel) {
    channel.events.sortBy[value as Double].last.createTimemarker("CPU Peak "+channel.name).jumpTo
    createOrGetChart("CPU Load Overview", CHART_TYPE.LINE_CHART).add(channel)
}
Then visualize the cpu values in a chart and jump to the marker, that has just been created.
Determine CPUPeaks
See the result
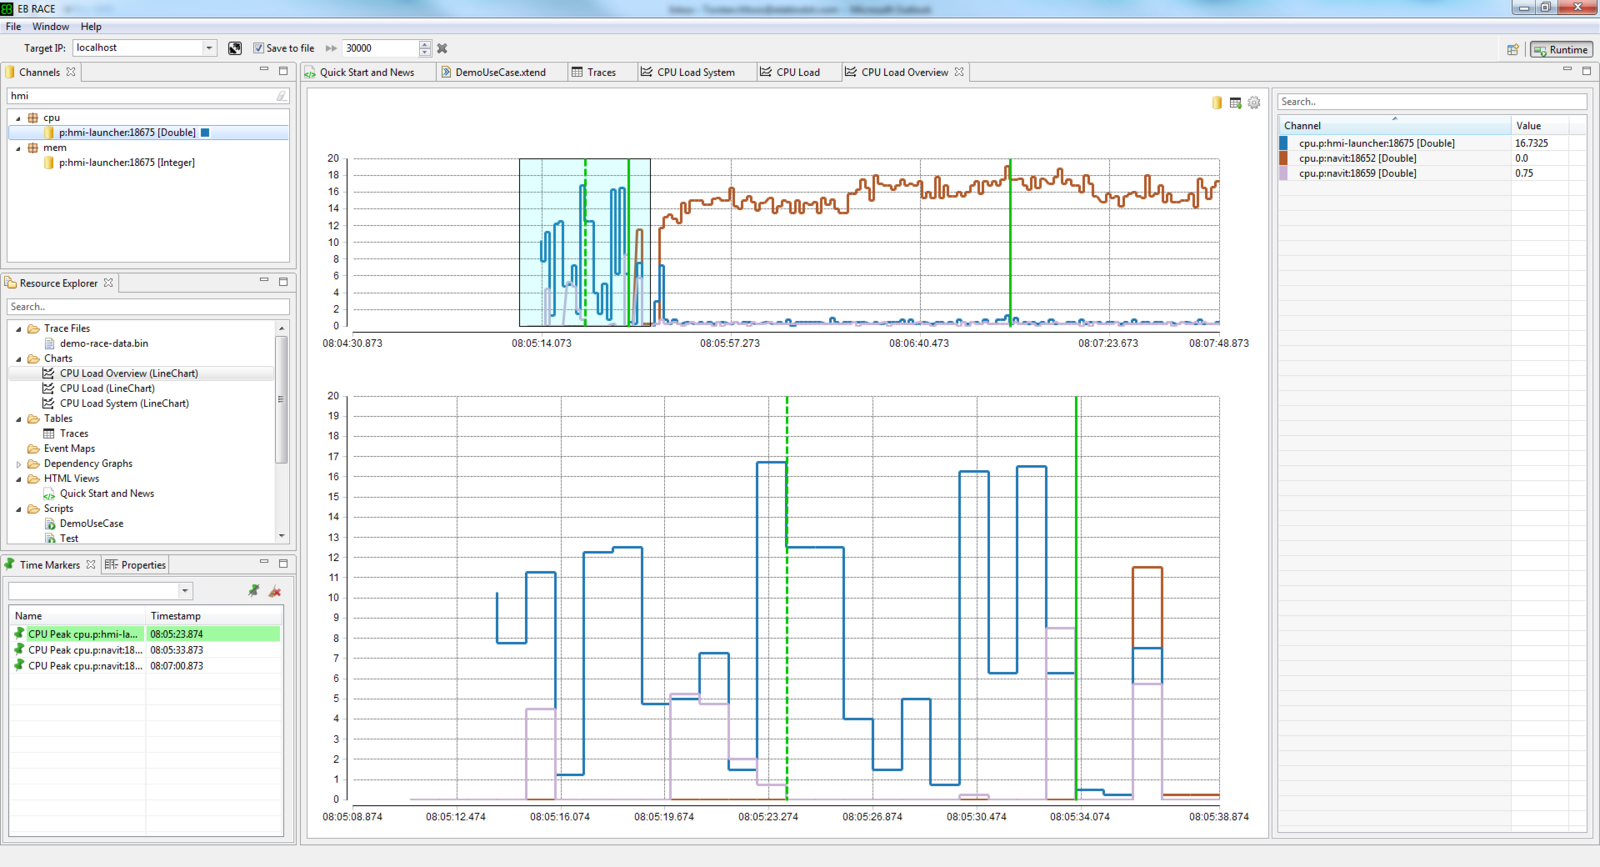
See what happens, when the script is applied on several channels
Events & Channels
Events
- Events carry the basic run-time data of your system, such as cpu load, memory consumption, ipc messages, trace and logging data, etc.
- Events can either be acquired from a target agent plug-in and sent to EB RACE or created by an importer directly in EB RACE.
- An event always comes with a time-stamp along with any kind of value, whereas the value can be of primitive type or of any arbitrary complex type.
- Complex types can be transformed into structured trees by a corresponding decoder.
- Events can be accessed and created by use of the internal Script API
Events & Channels
Channels
- Channels are container for events of the same kind of data
- They do have a unique names, such as "cpu.p:targetagent:3460", whereas the "." in the name serves as a separator in the hierarchical channel view
- Channels with events of
- numeric types (e.g. integer, double, etc.) can be visualized in Line Charts and Tables
- boolean type can be visualized in Gantt Charts and Tables
- complex types can be visualized in the decoder view as part of an EB RACE Table
- Channels can be accessed and created by use of the internal Script API
Xtend
EB RACE built-in script language
- Xtend is using the Java type-system and hence allows a seamless integration into an Eclipse RCP application, what EB RACE is.
- Xtend code will be generated into Java source code on-the-fly in the background, so that no additional interpreter is needed at runtime.
- Xtend is a hybrid language that combines object-oriented and functional programming at the same time, which allows the implementation of very expressive and concise scripts.
- You have the full power of Java with some syntactical sugar on top.
- Eclipse editor functionality like content-assist, code completion, referencing is the same as for Java.
Execution Context
Overview
- In order to allow the best possible ease of use the scripts are designed to be executed directly within the EB RACE GUI.
- Depending on your use case scenario (e.g. postmortem vs. live analysis) you can tell EB RACE how to execute your scripts.
- This will be achieved by annotating your script methods with the tag @Execute and a corresponding context.
- There are three different context available:
- Global
- Preselection
- Callback
Execution Context
Example Use Case
In order to explain the different execution contexts, take following use case, where you want to create a time-marker, whenever your cpu load is higher than 50%:
Scenario 1: You want to do the analysis post-mortem and you know your corresponding channel is named "cpu.system"
Scenario 2: You want to do the analysis for any kind of channel
Scenario 3: You want to do the anaylsis in case of live connection
Execution Context
Scenario 1 (Global)
@Execute(context=ExecutionContext.GLOBAL, description="")
def createMarkerForHighCpuLoad() {
    // you as a developer need to indicate the channel,
    // in this case "cpu.system".channel
    getChannel("cpu.system").events.filter[value as Double > 50].
        forEach[createTimemarker("High CPU Load")]
}
Scenario 1: You want to do the analysis post-mortem and you know your corresponding channel is named "cpu.system"
Execution Context
Preselection
@Execute(context=ExecutionContext.PRESELECTION, description="")
def createMarkerForHighCpuLoad(RuntimeEventChannel<?> channel) {
    // The channel was already selected by the user within the GUI
    // and can be accessed as parameter
    channel.allEventsFromChannel.filter[value as Double > 50].
        forEach[createTimemarker("High CPU Load")]
}
Scenario 2: You want to do the analysis for any kind of channel
Execution Context
Callback
@Execute(context=ExecutionContext.CALLBACK, description="")
def createMarkerForHighCpuLoad(List<RuntimeEvent<?>> events) {
    // You need to check if the list of events contain information
    // from the channel you are interested in.
    events.filter[channelName.equals("cpu.system")].
        filter[value as Double > 50].
        forEach[createTimemarker("High CPU Load")]
}
Scenario 3: You want to do the anaylsis in case of live connection
Execution Context
Summary
| Context | Description |
|---|---|
| GLOBAL | The script developer can assume to have access to all events from all channels collected by EB RACE so far. This context is usually chosen in post-mortem analysis. The script is started by the user in the resource explorer and stops when the end of the executable method is reached. It can be stopped explicitly in case it is a long running script. |
| PRESELECTION | The pre-selection mode differs from the global mode insofar as the context of the data where the script is to be executed is already select by the user. E.g. in context of a channel, a timemarker or a runtime event |
| CALLBACK | The callback mode is usually chosen during live connection or for big data files. The script is notified continuously after a certain time-interval with new events. The script is started and also stopped by the user explicitly. In case the Callback mode is used in conjunction with EB RACE Auto the script is stopped when the end of file is reached. |
Lifecycle of a Script
Overview
Similar to a JUnit-Test an EB RACE Script follows the paradigm, that a script can undergo certain life cycle stages, where you can implement startup and cleanup code, if needed.
When creating a new script, the wizard asks you to generate corresponding skeletons for your method.

Lifecycle of a Script
Generated Code
@BeforeRaceScript
def setupScript() {
    // Your setup code
}

@Execute(context=ExecutionContext.GLOBAL, description="My description")
def executeScript() {
    // Your script code
}

@AfterRaceScript
def cleanup() {
     // Your cleanup code
}
setup
cleanup
execution
optional
optional
Lifecycle of a Script
The rules and workflow
- You are free to rename method names, the annotations are decisive.
- Every script is invoked with the order: @BeforeRaceScript -> @Execute -> @AfterRaceScript.
- The startup and cleanup methods are optional, they are only invoked when they are available.
- The lifecycle order applies for all execution contexts (Global, Preselection and Callback) in the same way.
- Whenever a script is stopped explicitly by the user (e.g. when ending a callback script during live-connection) the @AfterRaceScript method is called (if available).