Intro to:
HTML & CSS
HTML and Tags
- HyperText Markup Language - interpreted by browsers
-
Tags in angle brackets surround content and give it meaning:
-
Tags can be nested inside each other:
- Tags can have attributes to add further meaning:
<tag>Content</tag>
<pizza>
   <topping>pineapple</topping>
   <topping>ham</topping>
   <topping>cheese</topping>
</pizza>
<tag attribute="value">Content goes here</tag>Anatomy of an html tag
<img src="path/to/image/file.jpg" alt="description" />attribute
value
attribute
value
<h1>This is a Heading</h1>opening tag
closing tag
self closing
HTML page structure
- Saved as text files (.html) readable by browser
- DOCTYPE - tells the browser which version of HTML to use
- html - root element that starts & ends a page
- head - instructions for browser (not visible except <title>)
- body - all visible content goes here
<!DOCTYPE html>
<html>
  <head>
    <title>Page title goes here</title>
  </head>
  <body>
    Content goes here!
  </body>
</html>
Creating a home for our code
* No spaces and all lowercase.
Dashes or underscores are OK.
tts/html/my_first_site
FIrst html page
Lorem ipsum dolor sit amet, consectetur adipiscing elit. Morbi nec metus justo. Aliquam erat volutpat.
<!DOCTYPE html>
<html>
  <head>
    <title>My first awesome web page</title>
  </head>
  <body>
    <h1>Jaime's Page</h1>
    <p>A simple page put together using HTML!</p>
  </body>
</html>
Save as: my_first_page.html
* No spaces and all lowercase. Dashes or underscores are OK.
site Organization
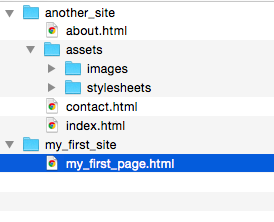
- Web sites are organized just like folders on your computer.
- Each parent folder on the root (html) holds a site.
- Each site contains its own html, images and stylesheets.

HTML Tag
reference

HTML Examples
- Headings
- Paragraphs
- Lists
- Links
- Images
- Divs
- Spans
Open up Sublime and let's play around with some HTML.
Copy your my_first_page.html and save it as travel.html
Headings
Let's format some text on our page with heading tags.
<h1> through <h6> (1 being the highest level, 6 being the lowest). Headings should be used in order and h1 only once.
<h1>Welcome to Travel Bug</h1>


<h2>Places I'd Like to Visit</h2>
Paragraphs
Paragraphs or <p> simply separate lines of text into paragraphs. They typically sit below headings.
Adding <b> or <strong> will embolden the text.
Adding <i> or <em> will italicize the text.
<h1>Welcome to Travel Bug</h1>
<p>This is a site dedicated to all the cool places I'd like to visit.</p>
<p>If anyone wants to invite me on a trip <em>please</em> email me!</p>

<h2>Places I'd Like to Visit</h2>
<p>Here are some destinations I've been <b>dreaming</b> about.</p>
Lists
HTML gives us 2 types of lists. Ordered (numbered) and unordered (bulleted) lists.
Nested list items, or <li> sit inside <ol> or <ul> tags.
<h2>Places I'd Like to Visit</h2>
<p>Here are some destinations I've been dreaming about.</p>

<ul>
  <li>New Zealand</li>
  <li>Peru</li>
  <li>South Africa</li>
  <li>Belize</li>
</ul>
html activity
-
Open a new file in Sublime and save it as eats.html
-
Create a basic html page with a heading, paragraph and list 5 of your favorite restaurants.
-
Open your page in Chrome and holler!


list of Good eats
<!DOCTYPE html>
<html>
 <head>
   <title>Jaime's Favorite Restaurants</title>
 </head>
 <body>
   <h1>Good Eats</h1>
   <p>Here are a few of my favorite places to eat in Atlanta.</p>
   <ol>
     <li>2 Urban Licks</li>
     <li>Victory Sandwich</li>
     <li>JCT Kitchen</li>
     <li>Bar Taco</li>
     <li>Antico Pizza</li>
   </ol>
  </body>
</html>
Links
Linking (or hyperlinking) lets us navigate through the pages in our site and elsewhere. No Javascript necessary!
An anchor tag <a> is used to define a link. You also need to add a parameter (href) to set the destination of the link.
Lets add an external link to one of our list items.
<ul>
  <li><a href="http://www.newzealand.com/">New Zealand</a></li>
  <li>Peru</li>
  <li>South Africa</li>
  <li>Belize</li>
</ul>
External Links
Clicking this link directs us to another site which is great. But anyone notice the problem? We're losing our audience because the new site opens in the same window.
Let's tack on another parameter so a new tab opens instead and our site stays put!
<a href="http://www.newzealand.com/" target="_blank">New Zealand</a>
Internal Links
How would we link to another page in our own site? Well, we have to add pages first!
Let's add a new page and name it after one of our list items. I called mine belize.html.
<!DOCTYPE html>
<html>
  <head>
    <title>Belize</title>
  </head>
  <body>
    <h1>Page about Belize</h1>
    <p>Simple paragraph about Belize.</p>
  </body>
</html>
Internal Links
Meanwhile, back on travel.html we'll add our internal link. Since it's in the same folder we can simply set "belize.html" as our destination.
And just like that our pages are linked together.
<ul>
  <li><a href="http://www.newzealand.com/">New Zealand</a></li>
  <li>Peru</li>
  <li>South Africa</li>
  <li><a href="belize.html">Belize</a></li>
</ul>
Internal Links
How would we link back to travel.html from our Belize page?
<h1>Page about Belize</h1>
<p>Simple paragraph about Belize.</p>
<a href="travel.html">Back to travel</a>
HTML ACTIVITY
Add 2 more links to your site:
- 1 external link to another website
- make sure it opens in a new tab
- 1 internal link within our travel site
- Don't forget, you'll have to create another page!
Images
Let's spice up this boring, text-heavy page with images!
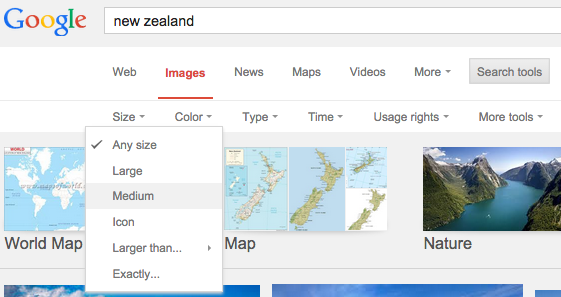
- Do a Google search for one of your destinations.
- Click the Images tab, then Search Tools.
- Another menu appears. Select Size, and then Medium.
Images
Select an image you dig, then click View Image from the right side menu.

Images
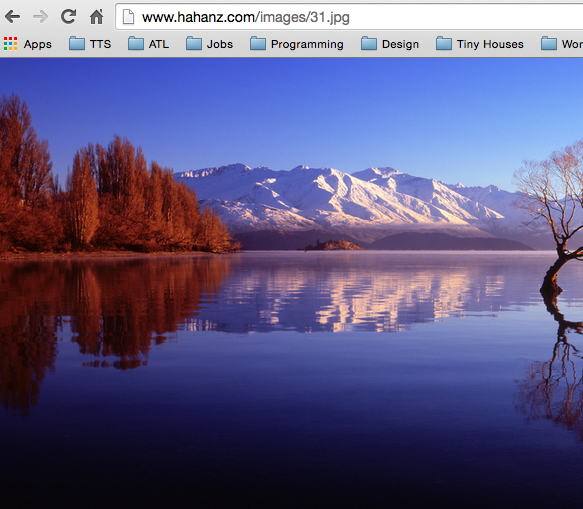
Then select and copy the link from the address bar.
ImageS
We use the <img> tag with a "src" (short for source) parameter to put an image on our page. Paste your image URL into the value.
<img src="http://www.hahanz.com/images/31.jpg" width="700" alt="New Zealand">
We should also add a width parameter to control sizing, and an alt tag to provide a text description of our image.
NOTE: Adding a width will automagically calculate the height for us. Try experimenting with percentages too.
ImageS
What are some possible problems with linking to images externally?
Someone may take down the website or move the image. A better approach is to save the image to a folder inside our site. This way we have control over it!
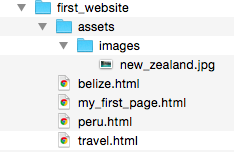
Go ahead and create a folder called "assets" and inside there a folder called "images."
ImageS
Select another medium sized image but instead of copying the URL let's save it to our images folder.
You should name the image something meaningful and short. Don't include spaces and keep it lowercase.
ImageS
To add an image saved locally we'll use the same syntax as before. This time, though, we point to the image's location in the assets/images folder.
<img src="assets/images/new_zealand.jpg" width="700" alt="New Zealand">
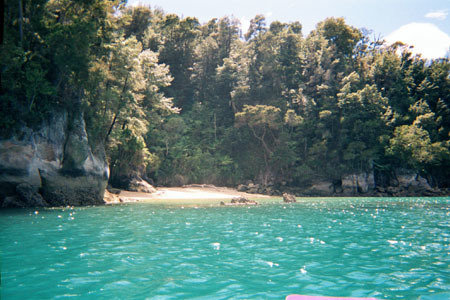
If the image doesn't show up reexamine your folder structure. Make sure your image folder is nested inside your assets folder. Inside that, the image should be a .gif, .jpg or .png file and consist of all lowercase letters.
Image Activity
Try adding another local image to travel.html

CSS
- Cascading Style Sheet
- Describes the look and formatting of HTML pages
- 3 ways to apply: inline, internal and external

Inline stylesheets
- dropped right into HTML code using "style" attribute
- only styles current element on current page
- good for trial and error / testing
- avoid whenever possible
<p style="color:red;">This is my snazzy red paragraph!</p>
<p>This paragraph will not be red.</p>
Anatomy of a css rule*
h1 { color: gray; }selector
{ declaration block }
property
value
* Internal and external stylesheets
Internal stylesheets
- added to <head> between <style> tags
- only styles markup on current page
- avoid whenever possible
<!DOCTYPE html>
<html>
  <head>
    <style>
      h1 {
          font-size:50px;
          text-align: center;
        }
    </style>
  </head>
  <body>
    <h1>Welcome to Travel Bug</h1>
    <p>Supporting paragraph. Very informative.</p>
  </body>
</html>
External stylesheets
- completely separate file, linked to in <head>
- reusable styles contained in 1 document
- best practice - use this one!
<!DOCTYPE html>
<html>
  <head>
     <link rel="stylesheet" href="assets/stylesheets/styles.css">
  </head>
  <body>
    <p>This is my snazzy red paragraph!</p>
  </body>
</html>
body {
width: 900px;
margin: auto;
}
p {
  color: violet;
  text-align: center;
}HTML
CSS
Our travel site so far

-
HTML tags such as p, h1, h2, body, etc.
-
No extra markup necessary
Types of CSS Rules
p {
color: violet;
text-align: center;
}element selector
<p>
  Something Awesome!
</p>
Types of CSS Rules
#top {
  background:gray;
  text-align:center;
}
id selector
-
can only use once per page
- use id attribute in HTML tag
<div id="top">
  Something Awesome!
</div>-
can be used many times per page
- use class attribute in HTML tag
Types of CSS Rules
.blue-text {
  color: blue;
  font-size: 15px;
}
class selector
<p class="blue-text">
  Something Awesome!
</p>

<p class="blue-text">
  Something else awesome!
</p>
CSS properties reference

CSS activity
-
Save a new stylesheet as eats-styles.css
-
Change the color of your unordered list of 5 restaurants with an element selector.
-
Change your favorite to a different color with a class selector.
-
Share with the class!
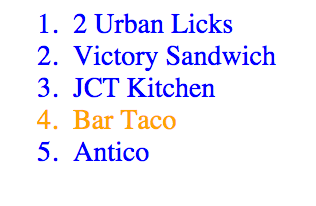
My Awesome list
<!DOCTYPE html>
<html>
  <head>
     <title>My favorite restaurants</title>
     <link rel="stylesheet" href="assets/stylesheets/eats-styles.css">
  </head>
  <body>
    <ul>
      <li>2 Urban Licks</li>
      <li>Victory Sandwich</li>
      <li>JCT Kitchen</li>
      <li>Bar Taco</li>
      <li class="fave">Antico</li>
    </ul>
  </body>
</html>
li {
color: blue;
}
.fave{
color: red;
}HTML
list.html
CSS
list-styles.css
The Browser

Chrome is the best!
Most developers use Chrome because it comes pre-installed with a set of developer tools that make debugging and troubleshooting easier.
Project + homework
Create a 2 page personal website
index.html
- link to about.html
- write a "blog post" about anything you like
- include some images, headings and paragraphs
- style it up! (styles.css)
about_me.html
- link to index.html
- write your bio
- include at least 1 photo of yourself
- style it up (styles.css)
Additional TOPICS
- Tables
- Divs/Spans
- Box Model (padding vs margin)
-
Eye Dropper Extension
(https://chrome.google.com/webstore/category/apps)
- Pixlr for photo editing
(http://pixlr.com/editor/)
-
Forms
(http://htmldog.com/guides/html/beginner/forms/)