Introduction to Animations in React Native
Vladimir Novick
Frontend Developer & Architect
mail: vnovick@gmail.com
twitter: @VladimirNovick
github: vnovick
facebook: vnovickdev
I assume
you are familiar with
-
React
-
ReactNative
-
Basics of animation easing
Brief mechanics of RN
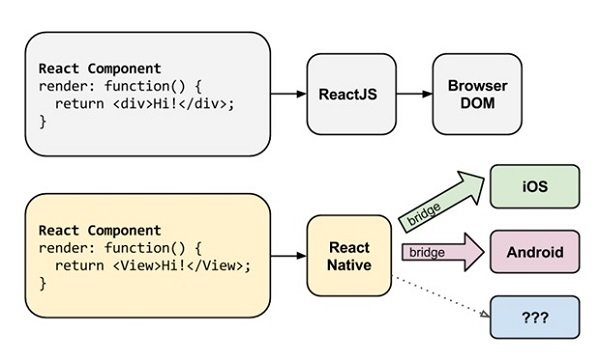
What RN Animations really are

LayoutAnimation = Native
Animated = requestAnimationFrame
LayoutAnimation
- Native Animations
- Applied to all style properties of component
- No need for specific values (heights/ widths)
- Less configurable
- Animates everything on next render
- If another setState triggers during animation this won't affect current animation
Pros:
Cons:
Animated
- Extremely configurable
- Can target very specific components
- Utilizes requestAnimationFrame to animate the values
- If setState takes time animations can stutter
Pros:
Cons:
LayoutAnimation
// enable layout animation for Android in component constructor
if (Platform.OS === 'android') {
    UIManager
        .setLayoutAnimationEnabledExperimental(true)
}
Just works
LayoutAnimation Basic usage
LayoutAnimation
  onPress(index) {
    const {
      easeInEaseOut,
      spring,
      linear
    } = LayoutAnimation.Presets;

    LayoutAnimation.configureNext(
        easeInEaseOut
//      spring
//      linear
    )
    this.setState({ index });
  }


  renderButton(index) {
    return (
      <TouchableOpacity
            key={'button' + index}
            style={styles.button}
            onPress={() => this.onPress(index)}>
        <Text>{index}</Text>
      </TouchableOpacity>
    );
  }

render() {
    const { redStyle, greenStyle, blueStyle } = this.getStyleByIndex(this.state.index)

    return (
      <View style={styles.container}>
        <View style={styles.topButtons}>
          {this.renderButton(0)}
          {this.renderButton(1)}
          {this.renderButton(2)}
        </View>
        <View style={styles.content}>
          <View style={{flexDirection: 'column', flex: 1}}>
            <View style={[redStyle, {backgroundColor: 'red'}]}/>
            <View style={[greenStyle, {backgroundColor: 'green'}]}/>
            <View style={[blueStyle, {backgroundColor: 'blue'}]}/>
          </View>
        </View>
      </View>
    );
 }
LayoutAnimation API
configureNext - configures LayoutAnimation for next render
create - helper for custom animation creation
LayoutAnimation API

LayoutAnimation beyond Presets
easeInEaseOut Preset
easeInEaseOut: create(
    300, Types.easeInEaseOut, Properties.opacity
)
Property to animate out of:
Type of animation out of:
TypesEnum = {
  spring: true,
  linear: true,
  easeInEaseOut: true,
  easeIn: true,
  easeOut: true,
  keyboard: true,
}
PropertiesEnum = {
opacity: true,
scaleXY: true,
};duration
LayoutAnimation beyond Presets
Linear Preset
linear: create(
    500, Types.linear, Properties.opacity
)
spring Preset
spring: {
    duration: 700,
    create: {
      type: Types.linear,
      property: Properties.opacity,
    },
    update: {
      type: Types.spring,
      springDamping: 0.4,
    },
    delete: {
      type: Types.linear,
      property: Properties.opacity,
    },
  }
LayoutAnimation
custom animations
const CustomLayoutAnimation = {
    duration: 1000,
    create: {
      delay: 1000,
      type: LayoutAnimation.Types.spring,
      property: LayoutAnimation.Properties.scaleXY,
      springDamping: 0.2,
      initialVelocity: 1
    },
    update: {
      type: LayoutAnimation.Types.easeInEaseOut,
      property: LayoutAnimation.Properties.scaleXY
    },
    delete: {
      type: LayoutAnimation.Types.easeOut,
      property: LayoutAnimation.Properties.opacity
    },
  };
Animation to execute on initial render
Animation to execute state update
Animation to execute when component is destroyed
LayoutAnimation
custom animations
  onPress(index) {
    LayoutAnimation.configureNext(CustomLayoutAnimation);
    this.setState({index: index});
  }

  renderButton(index) {
    return (
      <TouchableOpacity key={'button' + index} style={styles.button} onPress={() => this.onPress(index)}>
        <Text>{index + 1}</Text>
      </TouchableOpacity>
    );
  }

  renderCircle(key) {
    var size = 50;
    return (
      <View key={key} style={{width: size, height: size, borderRadius: size / 2.0, backgroundColor: 'yellow', margin: 20}}/>
    );
  }

  render() {

    var circles = [];
    for (var i = 0; i < (1 + this.state.index); i++) {
      circles.push(this.renderCircle(i));
    }

    return (
      <View style={styles.container}>
        <View style={styles.topButtons}>
          {this.renderButton(0)}
          {this.renderButton(1)}
          {this.renderButton(2)}
        </View>
        <View style={styles.content}>

          <View style={styles.circleContainer}>
            {circles}
          </View>
        </View>
      </View>
    );
  }
Animated
Utilizes requestAnimationFrame to animate the values and setNativeProps in order to send values to the native world
Animated value types:
Animated components
- Animated.View
- Animated.Text
- Animated.Image
- createAnimatedComponent(Custom Component)
Animated.Value
Animated.ValueXY
timing/spring/decay/sequence/parallel/stagger/delay/event
Animated functions:
Animated API
Animated.Value
In order to create a simple value that can be animated we need to create a new value with
new Animated.Value(0)Value cannot be object or array. It must be simple value.
Actual value is shielded inside Animated.Value and can be passed to style or other native prop on Animated components
Important!
Consider this
class Circle extends Component {
  constructor(props){
    super(props);
    this.state = {
      opacity: new Animated.Value(0)
    }
  }

  componentDidMount(){
    Animated.timing(
      this.state.opacity,
      {
        toValue: 50,
        duration: 10000
      }
    ).start();
  }

  render(){
    let size = 50;
    const circleStyle = {
        width: size,
        height: size,
        borderRadius: size / 2,
        backgroundColor: 'coral',
        margin: 20
    }
    return (
      <Animated.View
          key={this.props.id}
          style={{
           ...circleStyle,
            opacity: this.state.opacity
          }}
      />
    );
  }
}
Animated.Value API
- setValue - let's you control animation values without triggering animations
- addListener/removeListener - attach listener to animation value update
- stopAnimation - stops animation in the middle of execution
Animated.ValueXY
In order to create a {x: 0, y:0 } value that can be animated we need to create a new value with
new Animated.ValueXY({x: 0, y: 0})Usually used when dealing with component position/gestures
Actual value is shielded inside Animated.ValueXY and can be passed to style or other native prop on Animated components
Reasons to use
Animated.ValueXY API
getLayout() ->
getTranslateTransform() ->
{
    left: this._animatedValue.x,
    top: this._animatedValue.y
}
{transform: [
{
translateX:
this._animatedValue.x
},
{
translateY:
this._animatedValue.y
}
]}setOffset - sets base offset above value. This method is also present in Animated.Value
The power of Interpolation
Interpolate is a function that gives us ability to bind to Animated.Value and change our output.

constructor(props){
    super(props);
    this._animatedXY = new Animated.ValueXY({ x: 0, y: 0});
  }

componentDidMount(){
  Animated.timing(
    this._animatedXY,
  {
    toValue: 100,
    duration: 1000
  }).start();
}

render(){
    let size = 50;
   const circleStyle = {
       width: size,
       height: this._animatedXY.y.interpolate({
         inputRange: [0, 100],
         outputRange: [0, 50]
       }),
       borderRadius: size / 2,
       margin: 20,
       backgroundColor: this._animatedXY.x.interpolate({
         inputRange: [0, 100],
         outputRange: ['coral', 'blue']
       })
   }
   return (
     <Animated.View
         key={this.props.id}
         style={{
          ...circleStyle
         }}
     />
   );
 }
Extrapolation
When interpolating values you have to specify how to extrapolate them.

Extrapolation
Three types of extrapolation:
- extend - (default) - extend interpolation beyond inputRange
- clamp: - stop interpolation when reached inputRange
- identity: when you hit inputRange boundary bypass everything and assign a value
componentDidMount(){
    Animated.timing(
      this._animatedXY,
      {
        toValue: 1000,
        duration: 1000
      }
    ).start();
  }

  render(){
    let size = 50;
   const circleStyle = {
       width: size,
       height: this._animatedXY.y.interpolate({
         inputRange: [0, 100],
         outputRange: [0, 50],
         extrapolate: 'extend',
        //  extrapolate: 'clamp',
        //  extrapolate: 'identity',
       }),
       borderRadius: size / 2,
       margin: 20,
       backgroundColor: this._animatedXY.x.interpolate({
         inputRange: [0, 100],
         outputRange: ['coral', 'blue']
       })
   }
Animated Functions Overview
- timing - animates value over a set amount of time
- spring - animate from start to end without seting time, but setting other properties like velocity, speed, tension e.t.c
- decay - animate with specified velocity and apply deceleration to it
- sequence - sequence one animation after another
Animated Functions Overview
- parallel - runs several animations in parallel
- stagger - runs several animations with some delay between them
- delay - just like timing, but without animating anything just ways specified number of milliseconds
- event - helper function to map event data to Animated values
Resources to check