ESP32 OLED SSD1306
Wokwi SSD1306
- Monochrome 128x64 OLED display with I2C interface. Default I2C address: 0x3c (60).
- Pin Names:
- DATA: I2C data line (SDA)
- CLK: I2C clock line (SCL)
- 3V3: 3.3V regulated output
- GND: Ground
- VIN: Supply voltage 5V
- Attributes:
- i2cAddress: I2C address of the display, default value "0x3c".
- Note: The SSD1306 simulation only supports I2C mode, so pins DC, RST, and CS for SPI mode are not functional[1].

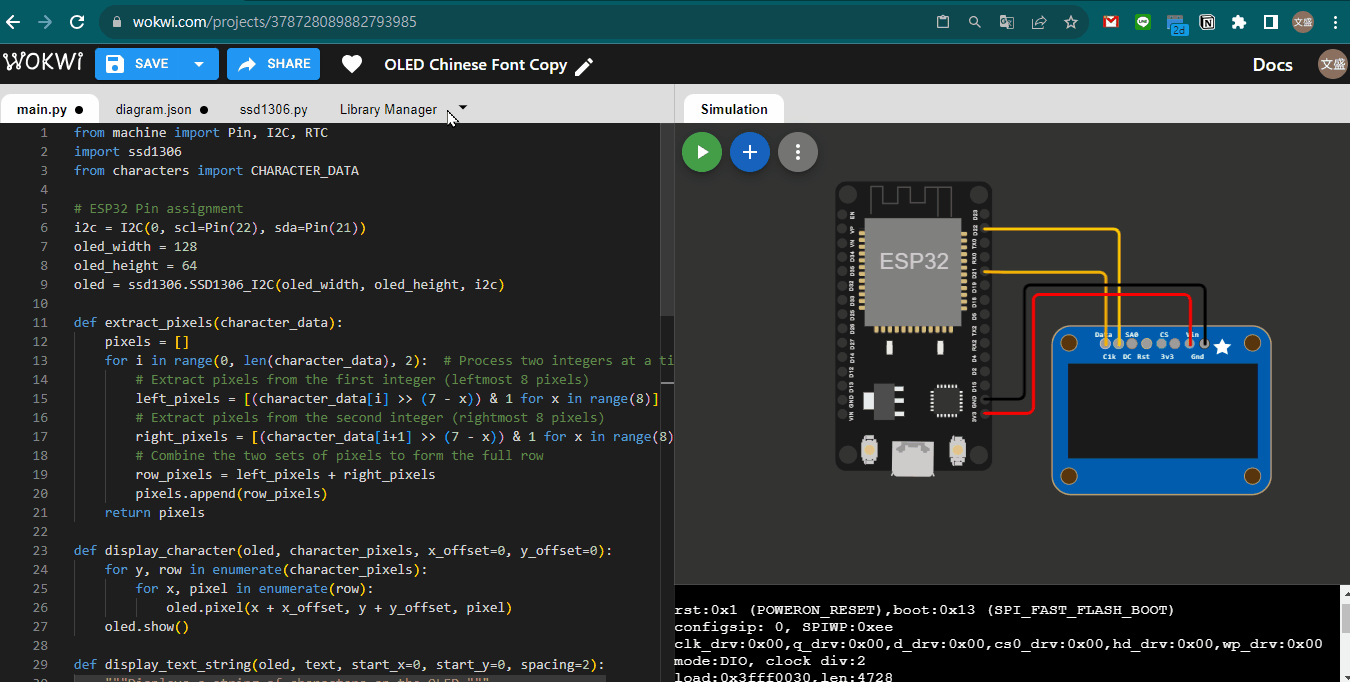
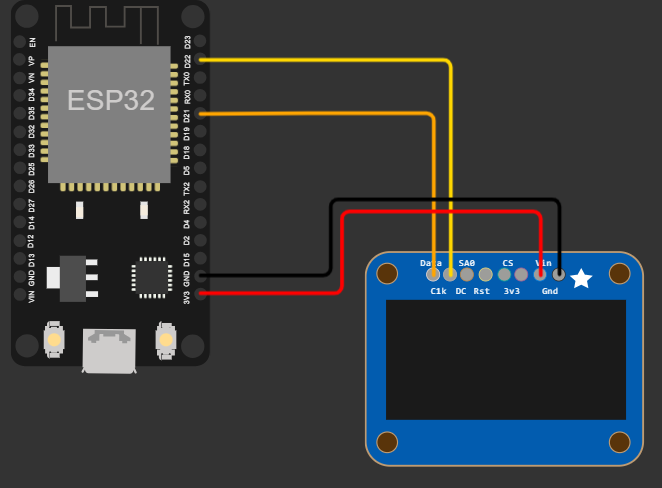
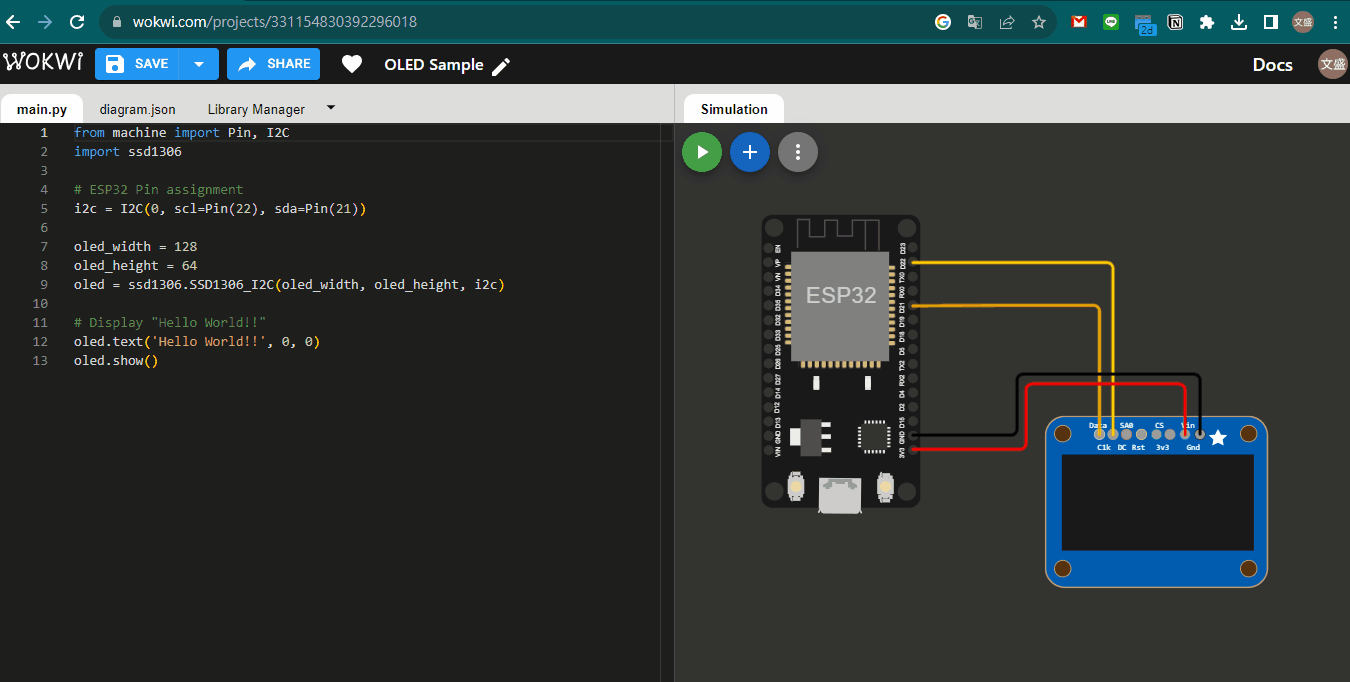
Connecting ESP32 to OLED ssd1306
- Wiring:
- ESP32 Pin 22 to OLED SCL
- ESP32 Pin 21 to OLED SDA
- ESP32 GND to OLED GND
- ESP32 3.3V to OLED VCC
SSD1306 Driver 🔗
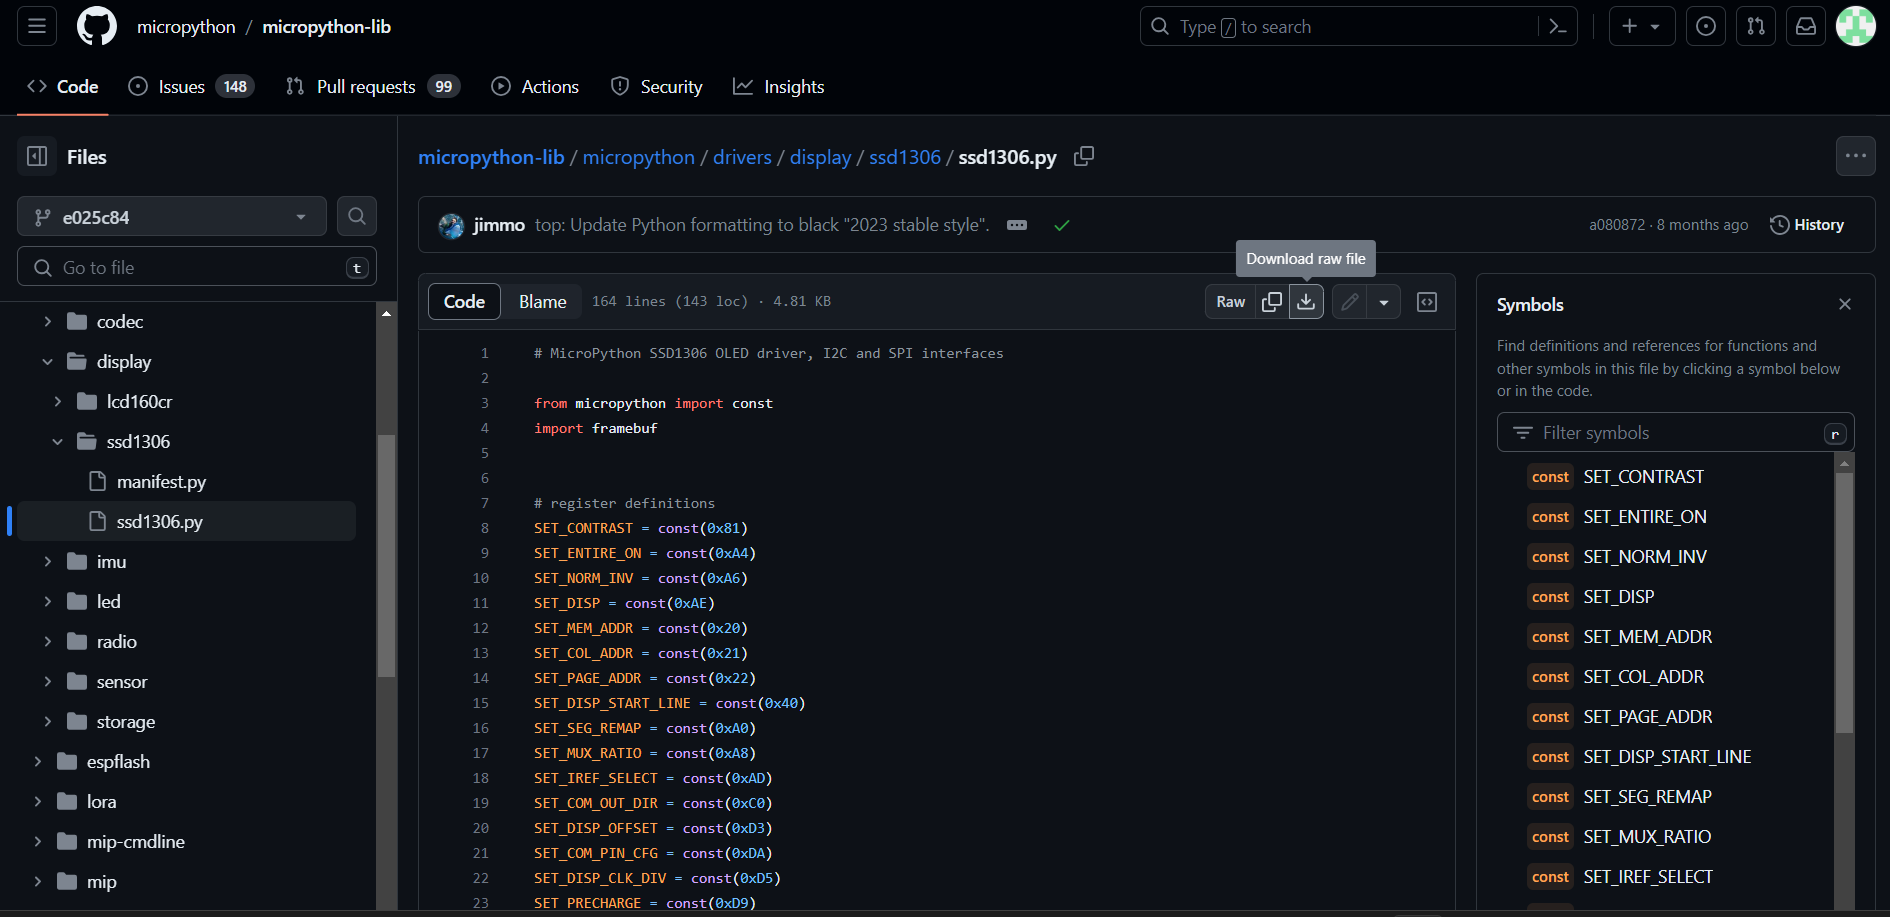
upload SSD1306 Driver
upload SSD1306 Driver
Simple "Hello World" Code
from machine import Pin, I2C
import ssd1306

# ESP32 Pin assignment
i2c = I2C(0, scl=Pin(22), sda=Pin(21))

oled_width = 128
oled_height = 64
oled = ssd1306.SSD1306_I2C(oled_width, oled_height, i2c)

# Display "Hello World!!"
oled.text('Hello World!!', 0, 0)
oled.show()
A Simple "Hello World" Example
Additional OLED Functions
# Basic Functions
oled.fill(0)           # Clear the display
oled.show()            # Update the display
display.poweroff()     # power off the display
display.poweron()      # power on the display
display.contrast(255)  # set brightness
display.invert(1)      # invert display colors

# Drawing Functions
display.pixel(10, 10, 1)     # set pixel at x=10, y=10
display.hline(0, 20, 50, 1)  # draw horizontal line
display.vline(0, 30, 50, 1)  # draw vertical line
display.rect(10, 10, 60, 30, 1)  # draw rectangle outline
display.fill_rect(10, 10, 60, 30, 1)  # draw filled rectangle
More Code
from machine import Pin, I2C
import ssd1306

# ESP32 Pin assignment
i2c = I2C(0, scl=Pin(22), sda=Pin(21))

oled_width = 128
oled_height = 64
oled = ssd1306.SSD1306_I2C(oled_width, oled_height, i2c)

oled.fill(0)  # Clear the display
oled.rect(10, 30, 108, 10, 1)  # Draw slider outline
oled.fill_rect(10, 30, 20, 10, 1)  # Fill slider with position
oled.show()  # Update the display
More Code
from machine import Pin, I2C
import ssd1306

# ESP32 Pin assignment
i2c = I2C(0, scl=Pin(22), sda=Pin(21))

oled_width = 128
oled_height = 64
display = ssd1306.SSD1306_I2C(oled_width, oled_height, i2c)

display.fill(0)                         # fill entire screen with colour=0
display.pixel(0, 10)                    # get pixel at x=0, y=10
display.pixel(0, 10, 1)                 # set pixel at x=0, y=10 to colour=1
display.hline(0, 8, 4, 1)               # draw horizontal line x=0, y=8, width=4, colour=1
display.vline(0, 8, 4, 1)               # draw vertical line x=0, y=8, height=4, colour=1
display.line(0, 0, 127, 63, 1)          # draw a line from 0,0 to 127,63
display.rect(10, 10, 107, 43, 1)        # draw a rectangle outline 10,10 to 117,53, colour=1
display.fill_rect(10, 10, 107, 43, 1)   # draw a solid rectangle 10,10 to 117,53, colour=1
display.text('Hello World', 0, 0, 1)    # draw some text at x=0, y=0, colour=1
#display.scroll(20, 0)                   # scroll 20 pixels to the right

display.show()
More Code
from machine import Pin, I2C
import ssd1306

# ESP32 Pin assignment
i2c = I2C(0, scl=Pin(22), sda=Pin(21))

oled_width = 128
oled_height = 64
display = ssd1306.SSD1306_I2C(oled_width, oled_height, i2c)

display.fill(0)                         # fill entire screen with colour=0
# draw another FrameBuffer on top of the current one at the given coordinates
import framebuf
fbuf = framebuf.FrameBuffer(bytearray(8 * 8 * 1), 8, 8, framebuf.MONO_VLSB)
fbuf.line(0, 0, 7, 7, 1)
display.blit(fbuf, 10, 10, 0)           # draw on top at x=10, y=10, key=0
display.show()
More Code
from machine import Pin, I2C
import ssd1306

# ESP32 Pin assignment
i2c = I2C(0, scl=Pin(22), sda=Pin(21))

oled_width = 128
oled_height = 64
display = ssd1306.SSD1306_I2C(oled_width, oled_height, i2c)

display.fill(0)
display.fill_rect(0, 0, 32, 32, 1)
display.fill_rect(2, 2, 28, 28, 0)
display.vline(9, 8, 22, 1)
display.vline(16, 2, 22, 1)
display.vline(23, 8, 22, 1)
display.fill_rect(26, 24, 2, 4, 1)
display.text('MicroPython', 40, 0, 1)
display.text('SSD1306', 40, 12, 1)
display.text('OLED 128x64', 40, 24, 1)
display.show()
Bitmap Font
| 1 | 1 | ||||||
| 1 | 1 | 1 | 1 | ||||
| 1 | 1 | ||||||
| 1 | 1 | 1 | 1 | 1 | 1 | ||
| 1 | 1 | 1 | 1 | 1 | 1 | ||
| 1 | 1 | ||||||
| 1 | 1 | 1 | 1 | ||||
| 1 | 1 | 1 | 1 |
Dot Matrix Tool
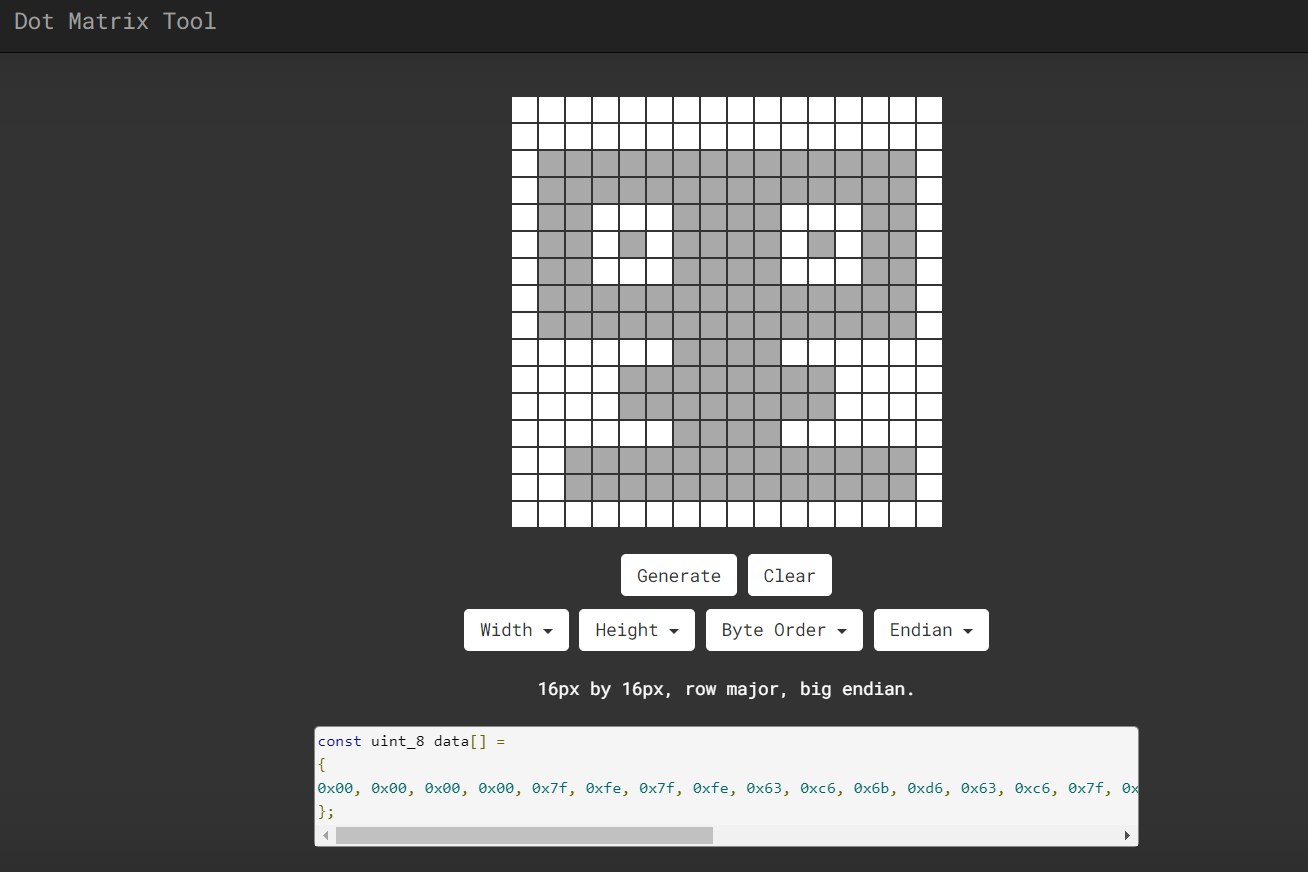
Example of Bitmap Font
Oled Chinese Font

0 0 0 0 0 0 0 0 0 0 0 0 0 0 0 0
0 0 0 1 0 0 0 1 1 1 1 1 1 1 0 0
0 0 0 1 0 0 0 0 0 0 0 0 1 1 0 0
0 0 1 0 0 0 0 0 0 0 0 0 1 0 0 0
0 1 1 1 1 1 1 0 0 0 0 1 0 0 0 0
0 0 1 1 0 0 1 0 0 0 1 0 0 0 0 0
0 0 1 1 0 0 1 0 0 0 1 0 0 0 0 0
0 0 1 0 0 1 0 1 1 1 1 1 1 1 1 0
0 1 1 0 0 1 0 0 0 0 1 0 0 0 0 0
0 1 1 1 0 1 0 0 0 0 1 0 0 0 0 0
0 1 0 1 1 1 0 0 0 0 1 0 0 0 0 0
0 0 0 0 1 1 0 0 0 0 1 0 0 0 0 0
0 0 0 1 0 1 1 0 0 0 1 0 0 0 0 0
0 0 1 1 0 0 1 0 0 0 1 0 0 0 0 0
0 1 0 0 0 0 0 1 1 1 1 0 0 0 0 0
0 0 0 0 0 0 0 0 0 0 0 0 0 0 0 0
Oled Chinese Font
      1       1 1 1 1 1 1 1
      1                 1 1
    1                   1
  1 1 1 1 1 1         1
    1 1     1       1
    1 1     1       1
    1     1   1 1 1 1 1 1 1 1
  1 1     1         1
  1 1 1   1         1
  1   1 1 1         1
        1 1         1
      1   1 1       1
    1 1     1       1
  1           1 1 1 1
0 0 0 0 0 0 0 0 0 0 0 0 0 0 0 0
0 0 0 1 0 0 0 1 1 1 1 1 1 1 0 0
0 0 0 1 0 0 0 0 0 0 0 0 1 1 0 0
0 0 1 0 0 0 0 0 0 0 0 0 1 0 0 0
0 1 1 1 1 1 1 0 0 0 0 1 0 0 0 0
0 0 1 1 0 0 1 0 0 0 1 0 0 0 0 0
0 0 1 1 0 0 1 0 0 0 1 0 0 0 0 0
0 0 1 0 0 1 0 1 1 1 1 1 1 1 1 0
0 1 1 0 0 1 0 0 0 0 1 0 0 0 0 0
0 1 1 1 0 1 0 0 0 0 1 0 0 0 0 0
0 1 0 1 1 1 0 0 0 0 1 0 0 0 0 0
0 0 0 0 1 1 0 0 0 0 1 0 0 0 0 0
0 0 0 1 0 1 1 0 0 0 1 0 0 0 0 0
0 0 1 1 0 0 1 0 0 0 1 0 0 0 0 0
0 1 0 0 0 0 0 1 1 1 1 0 0 0 0 0
0 0 0 0 0 0 0 0 0 0 0 0 0 0 0 0
Create Chinese Font File 📃
CHARACTER_DATA = {
    "空": [0, 0, 1, 0, 1, 0, 127, 254, 66, 66, 66, 66, 6, 64, 12, 66, 56, 126, 32, 0, 63, 252, 1, 0, 1, 0, 1, 0, 1, 0, 127, 252],
    "氣": [0, 0, 8, 0, 31, 254, 16, 0, 47, 248, 64, 0, 63, 240, 2, 144, 50, 208, 26, 144, 63, 240, 7, 16, 10, 138, 50, 106, 66, 6, 0, 0],
    "品": [0, 0, 0, 0, 15, 240, 8, 16, 8, 16, 8, 16, 8, 16, 15, 240, 0, 0, 126, 126, 66, 66, 66, 66, 66, 66, 66, 66, 126, 126, 66, 66],
    "質": [0, 0, 2, 4, 60, 122, 32, 64, 63, 126, 36, 136, 101, 136, 95, 248, 16, 8, 31, 248, 16, 8, 31, 248, 16, 8, 31, 248, 12, 56, 112, 7],
    "不": [0, 0, 0, 0, 0, 0, 127, 252, 1, 128, 1, 0, 3, 0, 7, 96, 13, 24, 25, 12, 113, 6, 193, 2, 1, 0, 1, 0, 1, 0, 1, 0],
    "好": [0, 0, 17, 252, 16, 12, 32, 8, 126, 16, 50, 32, 50, 32, 37, 254, 100, 32, 116, 32, 92, 32, 12, 32, 22, 32, 50, 32, 65, 224, 0, 0],
    "佳": [0, 0, 8, 64, 8, 64, 19, 252, 16, 64, 48, 64, 119, 252, 80, 0, 16, 64, 16, 64, 23, 252, 16, 64, 16, 64, 16, 64, 31, 254, 0, 0],
    "良": [0, 0, 1, 0, 1, 0, 31, 248, 16, 8, 16, 8, 31, 248, 16, 8, 16, 8, 31, 248, 17, 4, 17, 152, 16, 224, 16, 96, 31, 56, 120, 14],
    "差": [0, 0, 24, 16, 12, 48, 127, 254, 1, 0, 63, 248, 1, 0, 1, 0, 127, 252, 8, 0, 31, 252, 16, 192, 48, 192, 32, 64, 207, 254, 0, 0],
}
characters.py
Load Font and Required Libraries
# 下載台北思源黑體並命名taipei_sans_tc_beta.ttf
!wget -O TaipeiSansTCBeta-Regular.ttf https://drive.google.com/uc?id=1eGAsTN1HBpJAkeVM57_C7ccp7hbgSz3_&export=download
font_path = "/content/TaipeiSansTCBeta-Regular.ttf"

from PIL import Image, ImageDraw, ImageFont
from google.colab import files
Draw Character Grid
def draw_character_grid(char, font_path, image_size, grid_size):
    font = ImageFont.truetype(font_path, grid_size * 16)
    image = Image.new('L', image_size, 255)
    draw = ImageDraw.Draw(image)
    bbox = draw.textbbox((0, 0), char, font=font)
    char_width, char_height = bbox[2], bbox[3]
    x = (image_size[0] - char_width) // 2
    y = (image_size[1] - char_height) // 2 - 8
    draw.text((x, y), char, font=font, fill=0)
    for row in range(0, image_size[0], grid_size):
        draw.line([(row, 0), (row, image_size[1])], fill=128)
    for column in range(0, image_size[1], grid_size):
        draw.line([(0, column), (image_size[0], column)], fill=128)
    return image

# Usage:
char = '好'
image_size = (256, 256)
grid_size = 16
image = draw_character_grid(char, font_path, image_size, grid_size)
display(image)
Display Pattern
def display_pattern(bitmap):
    # Assuming 16x16 bitmap, 2 bytes per row
    for i in range(0, len(bitmap), 2):
        row = ''
        for j in range(2):  # Two bytes per row
            byte = bitmap[i+j]
            for k in range(8):  # Eight bits per byte
                bit = (byte >> (7 - k)) & 1
                row += str(bit)+" " if bit else '  '
        print(row)

char = [0, 0, 17, 252, 16, 12, 32, 8, 126, 16, 50, 32, 50, 32, 37, 254,
    100, 32, 116, 32, 92, 32, 12, 32, 22, 32, 50, 32, 65, 224, 0, 0]
display_pattern(char)
      1       1 1 1 1 1 1 1
      1                 1 1
    1                   1
  1 1 1 1 1 1         1
    1 1     1       1
    1 1     1       1
    1     1   1 1 1 1 1 1 1 1
  1 1     1         1
  1 1 1   1         1
  1   1 1 1         1
        1 1         1
      1   1 1       1
    1 1     1       1
  1           1 1 1 1
Generate Font Data
def generate_font_data(characters, font_path, size):
    font = ImageFont.truetype(font_path, size)
    font_data = {}
    for char in characters:
        image = Image.new('1', (16, 16), 0)
        draw = ImageDraw.Draw(image)
        draw.text((0, 0), char, font=font, fill=1)
        bitmap = list(image.getdata())
        byte_data = []
        for byte_pos in range(0, len(bitmap), 8):
            byte_value = 0
            for bit_no in range(8):
                bit = bitmap[byte_pos + bit_no]
                if bit:
                    byte_value |= 1 << (7 - bit_no)
            byte_data.append(byte_value)
        font_data[char] = byte_data
    return font_data

# Example usage:
characters = '空氣品質不好佳良差'
font_data = generate_font_data(characters, font_path, 16)
Write to Font File
characters = '空氣品質不好佳良差'
font_data = generate_font_data(characters, font_path, 16)

filename = "characters.py"
with open(filename, "w") as file:
    file.write("CHARACTER_DATA = {\n")
    for char, bitmap in font_data.items():
        file.write(f'    "{char}": {bitmap},\n')
    file.write("}\n")

with open(filename, "r", encoding='utf-8') as file:
    file_contents = file.read()
print(file_contents)
CHARACTER_DATA = {
    "空": [0, 0, 1, 0, 1, 0, 127, 254, 66, 66, 66, 66, 6, 64, 12, 66, 56, 126, 32, 0, 63, 252, 1, 0, 1, 0, 1, 0, 1, 0, 127, 252],
    "氣": [0, 0, 8, 0, 31, 254, 16, 0, 47, 248, 64, 0, 63, 240, 2, 144, 50, 208, 26, 144, 63, 240, 7, 16, 10, 138, 50, 106, 66, 6, 0, 0],
    "品": [0, 0, 0, 0, 15, 240, 8, 16, 8, 16, 8, 16, 8, 16, 15, 240, 0, 0, 126, 126, 66, 66, 66, 66, 66, 66, 66, 66, 126, 126, 66, 66],
    "質": [0, 0, 2, 4, 60, 122, 32, 64, 63, 126, 36, 136, 101, 136, 95, 248, 16, 8, 31, 248, 16, 8, 31, 248, 16, 8, 31, 248, 12, 56, 112, 7],
    "不": [0, 0, 0, 0, 0, 0, 127, 252, 1, 128, 1, 0, 3, 0, 7, 96, 13, 24, 25, 12, 113, 6, 193, 2, 1, 0, 1, 0, 1, 0, 1, 0],
    "好": [0, 0, 17, 252, 16, 12, 32, 8, 126, 16, 50, 32, 50, 32, 37, 254, 100, 32, 116, 32, 92, 32, 12, 32, 22, 32, 50, 32, 65, 224, 0, 0],
    "佳": [0, 0, 8, 64, 8, 64, 19, 252, 16, 64, 48, 64, 119, 252, 80, 0, 16, 64, 16, 64, 23, 252, 16, 64, 16, 64, 16, 64, 31, 254, 0, 0],
    "良": [0, 0, 1, 0, 1, 0, 31, 248, 16, 8, 16, 8, 31, 248, 16, 8, 16, 8, 31, 248, 17, 4, 17, 152, 16, 224, 16, 96, 31, 56, 120, 14],
    "差": [0, 0, 24, 16, 12, 48, 127, 254, 1, 0, 63, 248, 1, 0, 1, 0, 127, 252, 8, 0, 31, 252, 16, 192, 48, 192, 32, 64, 207, 254, 0, 0],
}
Upload the "characters.py"