AUTHOR : YELLOWJEFF
Syntactically Awesome StyleSheets
SASS is a
CSS preprocessor
a layer between the stylesheets you author and the .css files you serve to the browser.
Why SASS?
Ever needed to change, say, a color in your stylesheet, and found that you had to find and replace the value multiple times? Don’t you wish CSS allowed you to do this?
$brand-color: #fc3;

a { color: $brand-color; }
nav { background-color:$brand-color; }
Or how about repeated blocks of styles that are used in various locations throughout the stylesheet?
@mixin default-type {
margin-bottom: 20px;
font-size: 14px;
line-height: 1.5; }

header { @include default-type; }
footer { @include default-type; }
CSS IS SO WET
CSS is anything but DRY.
At times, it drips with repeated rules, declarations, and values.
DRY PRINCIPLE
“Every piece of knowledge must have a single, unambiguous, authoritative representation within a system.”
Andy Hunt and Dave Thomas in their book The Pragmatic Programmer.
But I don't want to change the way I write CSS!
you don’t have to change anything about the way you write CSS. Commenting, indenting, or not indenting, all your formatting preferences can remain the same when working in .scss files.
.SCSS
Let’s get Sassing people!
$Variables
Variables is a way to store information that you want to reuse throughout your stylesheet.
$font-stack:Helvetica, sans-serif;
$primary-color: #333;


body {
  font: 100% $font-stack;
  color: $primary-color;
}
body {
  font: 100% Helvetica, sans-serif;
  color: #333;
}
Don’t be too vague when naming your Variables.
Use semantic variable names
// Bad
$red: red;
$yellow: yellow;

// Better
$brand-color: red;
$accent-color: yellow;
Adopt useful conventions
// Base colors
$base-color: #333;
$brand-color: red;
$brand-80-color: rgba($color-brand, 0.8);
$accent-color: yellow;
Nesting
Sass will let you nest your CSS selectors in a way that follows the same visual hierarchy of your HTML.
Be aware that overly nested rules will result in over-qualified CSS that could prove hard to maintain and is generally considered bad practice.
nav {
  ul {
    margin: 0;
    padding: 0;
    list-style: none;
  }

  li { display: inline-block; }

  a {
    display: block;
    padding: 6px 12px;
    text-decoration: none;
  }
}
nav ul {
  margin: 0;
  padding: 0;
  list-style: none;
}

nav li {
  display: inline-block;
}

nav a {
  display: block;
  padding: 6px 12px;
  text-decoration: none;
}
Too much Nesting can leads to overly specific selectors.
Like a monster.
body {
  div.container {
    div.content {
      div.articles {
        & > div.post {
          div.title {
            h1 {
              a {
              }
            }
          }
          div.content {
            p { ... }
            ul {
              li { ... }
            }
          }
          div.author {
            a.display {
              img { ... }
            }
            h4 {
              a { ... }
            }
            p {
              a { ... }
            }
            ul {
              li { ... }
            }
          }
        }
      }
    }
  }
}
This looks "all good", right?
body { ... }
body div.content div.container { ... }
body div.content div.container div.articles { ... }
body div.content div.container div.articles > div.post { ... }
body div.content div.container div.articles > div.post div.title { ... }
body div.content div.container div.articles > div.post div.title h1 { ... }
body div.content div.container div.articles > div.post div.title h1 a { ... }
body div.content div.container div.articles > div.post div.content { ... }
body div.content div.container div.articles > div.post div.content p { ... }
body div.content div.container div.articles > div.post div.content ul { ... }
body div.content div.container div.articles > div.post div.content ul li { ... }
body div.content div.container div.articles > div.post div.author { ... }
body div.content div.container div.articles > div.post div.author a.display { ... }
body div.content div.container div.articles > div.post div.author a.display img { ... }
body div.content div.container div.articles > div.post div.author h4 { ... }
body div.content div.container div.articles > div.post div.author h4 a { ... }
body div.content div.container div.articles > div.post div.author p { ... }
body div.content div.container div.articles > div.post div.author p a { ... }
body div.content div.container div.articles > div.post div.author ul { ... }
body div.content div.container div.articles > div.post div.author ul li { ... }
After compiling the Sass, we take a look at the result on to find that we've created a CSS monster. Ugh!
_Partials
You can create partial Sass files that contain little snippets of CSS that you can include in other Sass files.
stylesheets/
|
|-- modules/              # Common modules
|   |-- _all.scss         # Include to get all modules
|   |-- _utility.scss     # Module name
|   |-- _colors.scss      # Etc...
|   ...
|
|-- partials/             # Partials
|   |-- _base.sass        # imports for all mixins + global project variables
|   |-- _buttons.scss     # buttons
|   |-- _figures.scss     # figures
|   |-- _grids.scss       # grids
|   |-- _typography.scss  # typography
|   |-- _reset.scss       # reset
|   ...
|
|-- vendor/               # CSS or Sass from other projects
|   |-- _colorpicker.scss
|   |-- _jquery.ui.core.scss
|   ...
|
`-- main.scss            # primary Sass file
"I like to layout my Sass projects like this"
John W. Long

Multiple stylesheets are handy once a project grows to a certain size.
@Import
Instead of requiring an HTTP request, Sass will take the file that you want to import and combine it with the file you're importing into so you can serve a single CSS file to the web browser.
// Modules and Variables
@import "partials/base";

// Partials
@import "partials/reset";
@import "partials/typography";
@import "partials/buttons";
@import "partials/figures";
@import "partials/grids";
// ...

// Third-party
@import "vendor/colorpicker";
@import "vendor/jquery.ui.core";
Sass builds on top of the current CSS @import but instead of requiring an HTTP request
Mixins
A mixin lets you make groups of CSS declarations that you want to reuse throughout your site. You can even pass in values to make your mixin more flexible.
@mixin border-radius($radius) {
  -webkit-border-radius: $radius;
     -moz-border-radius: $radius;
      -ms-border-radius: $radius;
          border-radius: $radius;
}

.box {
  @include border-radius(10px);
}
.box {
  -webkit-border-radius: 10px;
  -moz-border-radius: 10px;
  -ms-border-radius: 10px;
  border-radius: 10px;
}
"Rule is: mixins without arguments smell."
For some uses, the @extend directive may be a better choice
Extend
Using @extend lets you share a set of CSS properties from one selector to another. It helps keep your Sass very DRY.
.message {
  border: 1px solid #ccc;
  padding: 10px;
  color: #333;
}

.success {
  @extend .message;
  border-color: green;
}

.error {
  @extend .message;
  border-color: red;
}

.warning {
  @extend .message;
  border-color: yellow;
}
.message, .success, .error, .warning {
  border: 1px solid #cccccc;
  padding: 10px;
  color: #333;
}

.success {
  border-color: green;
}

.error {
  border-color: red;
}

.warning {
  border-color: yellow;
}
“Overuse of the Extend directive may creates a lot of ugly selectors”
If you find yourself extending your .clearfix class twenty times, you may consider adding it to your HTML.
%Placeholders
Unlike mixins, %placeholders can be used multiple times without adding any duplicate code. This makes them a much friendlier option for outputting DRY CSS
%bg-image {
    width: 100%;
    background-position: center center;
    background-size: cover;
    background-repeat: no-repeat;
}
.image-one {
    @extend %bg-image;
    background-image:url(/img/image-one.jpg");
}
.image-two {
    @extend %bg-image;
    background-image:url(/img/image-two.jpg");
}
.image-one, .image-two {
    width: 100%;
    background-position: center center;
    background-size: cover;
    background-repeat: no-repeat;
}

.image-one {
    background-image:url(/img/image-one.jpg") ;
}

.image-two {
    background-image:url(/img/image-two.jpg") ;
}
Error!
You may not @extend a ourter $placeholder or an outer selector from within @media!
@Functions
Functions are used to perform calculations. A Sass function does not output any CSS. Instead, it returns a value that can be used in the CSS.
@function calculate-width ($col-span) {
    @return 100% / $col-span
}

.span-two {
    width: calculate-width(2);
    // spans 2 columns, width = 50%
}

.span-three {
    width: calculate-width(3);
    // spans 3 columns, width = 33.3%
}
Tips!
Using source maps with Sass 3.3
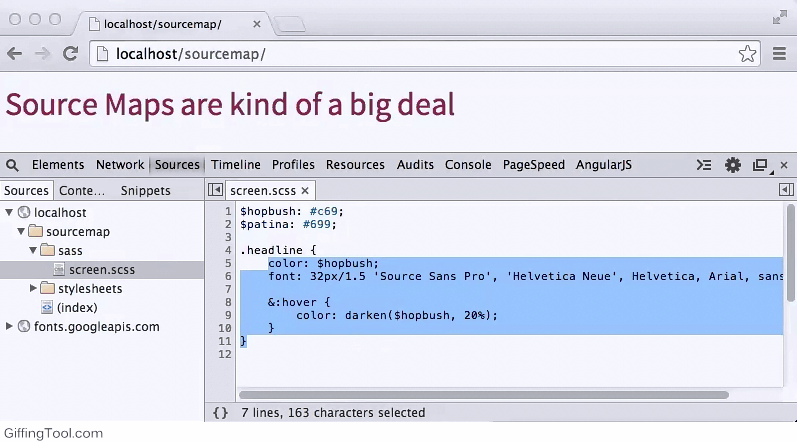
Open the processed CSS once in a while and see what it looks like
Never nest more then 3 levels deep
Overusing nested rules in Sass can cause a lot of issues, from complex code to over-specificity and too much reliance on the HTML structure of a page.
Use nesting when it makes sense to, not as a default option.
Keep Things
Simple
All Sass features are useful when used in the correct situations and in moderation.
Thank you!
RESOURCES
http://sass-lang.com/
http://thesassway.com
http://css-tricks.com/sass-style-guide/
http://alistapart.com/article/getting-started-with-sass
http://alistapart.com/article/a-vision-for-our-sass
http://thesassway.com/intermediate/using-source-maps-with-sass