Electron
일렉트론 이해하기
네이티브 UI 활용, 브라우저 내부 뷰 활용
일렉트론에서 데이터의 흐름
일렉트론을 상용앱으로 패키징하기
자동 업데이트 이해하기

Software Engineer | Studio XID, Inc.
Microsoft MVP
TypeScript Korea User Group Organizer
Electron Korea User Group Organizer
Marktube (Youtube)


Mark Lee

일렉트론 이해하기

Electron
The Electron framework lets you write cross-platform desktop applications
using JavaScript, HTML and CSS.
It is based on Node.js and Chromium
and is used by the Atom editor and many other apps.
- framework
-
cross-platform desktop applications
- 데스크탑 어플리케이션 (NOT 모바일 어플리케이션)
-
web technologies
- HTML
- CSS
- JavaScript
-
Native? Web?
- Native 라 불르는 이유는 ?

Desktop Application
- OS 에 맞는 설치 프로그램을 다운로드
- 설치 프로그램을 실행시켜, 실행 프로그램을 컴퓨터에 설치
- 사용자는 설치된 프로그램을 더블 클릭해서 실행
- UI 가 있는 프로그램도 있고, 없는 프로그램도 있고
-
보통 컴퓨터의 리소스에 접근을 할 수 있음
- 파일을 열거나 쓰고
- 트레이에 아이콘도 생기고
Electron Desktop Application
- 세 가지 OS 에서 실행되는 실행 프로그램을 제공
- 이 프로그램 안에 스크립트를 넣고 실행하여, 프로그램을 내 맘대로 만들 수 있다.
- UI 가 없는 경우, Node.js 런타임
-
UI 가 있는 경우
- 컴퓨터의 리소스는 Node.js 를 통해 컨트롤
-
커스텀 뷰를 만들 때는 HTML, CSS, JavaScript 를 이용해서 제작
- 여기서 JS 는 브라우저의 JS 이지만, Node.js 를 결합할 수 있음
-
리소스에 접근을 할 수 있음
-
파일을 열거나 쓰고
- Node.js 를 이용
-
트레이에 아이콘도 생기고
- Electron 의 API 를 이용
-
파일을 열거나 쓰고

Framework VS Library
-
프로그램의 라이프 사이클
-
컨트롤 할것이냐?
-
컨트롤 당할 것이냐?
-
Electron 의 app 모듈에서 어플리케이션 시작 및 종료에 관한 이벤트를 받아 프로그래머가 작성한 코드를 실행합니다.
-
-
-
라이브러리는 앱을 풍성하게 하기 위한 도움 요소입니다.
-
Electron + React
-
Electron + jQuery
-
-
제어하는 부분이 다르다면 프레임워크를 한가지만 써야 하는것은 아닙니다.
-
Electron + Angular
-
Electron 은
Web Technologies 을 통해
Native Desktop App
을 만드는 Framework 입니다.
Web Technologies 란 ?
-
HTML, CSS, JavaScript 로 하는 모든 것 입니다.
-
어떻게 하면 일렉트론을 잘 만들수 있어요?
-
일렉트론 프레임워크에 대한 이해 (구조 및 API)
-
HTML, CSS, JavaScript 를 잘하면 됩니다.
-
근데 이 세가지는 끝이 없다 할 정도 입니다.
-
HTML, CSS 는 크로미움에 맞는 스펙을 잘 알면 됩니다.
-
하지만 JavaScript 는?
-
JavaScript 문법
-
ES6, ES7 문법
-
DOM, Node.js
-
jQuery / React / Angular / Vue ...
-
TypeScript ...
-
-
계속해서 웹기술을 더 깊이 있게 배우는 것이 중요
-
-
node.js & chrome
- 일렉트론은 이 두가지를 이용합니다.
-
Node.js 와 OS 의 이벤트 루프를 합쳐 ' Native UI ' 를 제어합니다.
- Native UI ?
-
어떤 노드를 쓰나요?
- 노드 버전은 일렉트론 버전과 함께 올라갑니다.
- 사용할 수 있는 자바스크립트 문법이나 노드 api 가 달라집니다.
-
크롬 브라우저에 들어가는 크로미움을 개조한 라이브러리를 랜더링 할때 사용합니다.
-
그냥 크롬 브라우저가 뜨는구나 하시면 됩니다.
-
그래서 크롬의 버전 체크가 중요합니다.
- 제공하는 ES 스펙
- 크롬의 api
-
그래서 크롬의 버전 체크가 중요합니다.
- 이 크롬 브라우저에서 Node.js 도 사용할 수 있습니다. (우왓!!!)
-
그냥 크롬 브라우저가 뜨는구나 하시면 됩니다.


Main Process & 1 Renderer Process

Main Process & 0 Renderer Process

Main Process & 2 Renderer Process

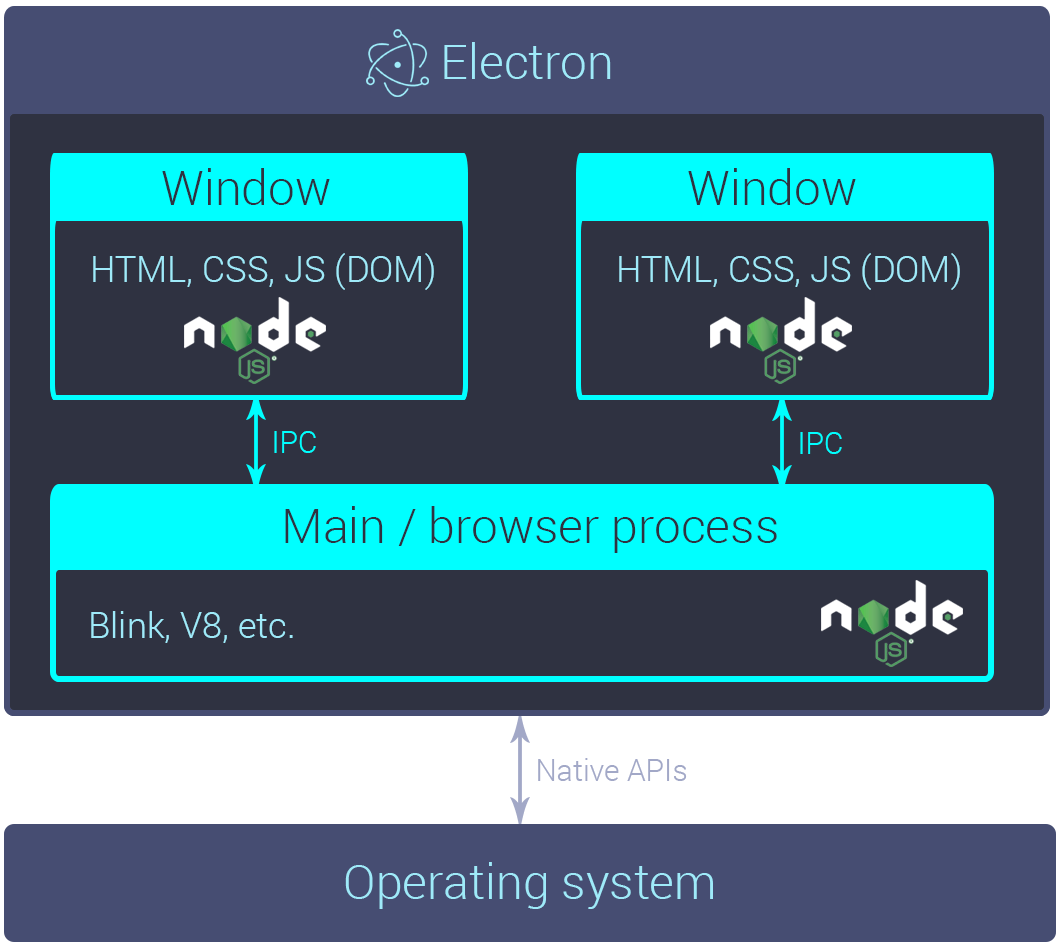
Main Process & Renderer Process
-
Main Process - Only One
-
그냥 노드 서버라고 생각하면 편하다
-
근데 서버가 사용자에 로컬에 있다면??
-
-
Renderer Process - 만들기 나름
-
크롬 브라우저라고 생각하면 편하다.
-
크롬에서 노드를 사용할 수 있다니 !
-
브라우저 샌드박스가 아니다.
-
하지만 샌드박스로 만들수 있다.
-
-
BrowserWindow 객체를 생성하면 프로세스가 생긴다.
-
ipc & remote
-
Main 과 Renderer 프로세스는 각각 별도의 프로세스이다.
-
데이타를 주고 받으려면 별도의 방식을 사용해야 한다.
-
-
방식 1. IPC - Inter Process Communication
-
메인의 ipcMain 모듈과 랜더러의 ipcRenderer 모듈을 이용
-
이벤트를 반인딩하고, 메세지와 데이터를 샌드하는 방식
-
-
방식 2. remote
-
랜더러 프로세스의 remote 모듈을 이용
-
메인의 몇가지 모듈을 제어 가능하다.
-
라이프사이클로 인해 사용에 주의한다.
-
주로 단발성 액션에 사용
-
-

electron-quick-start
Electron 을 개발하려면 ?
-
Node.js (include NPM)
- 노드만 설치되어 있으면, 개발이 가능합니다.
- https://nodejs.org
- Node Version Manager
-
에디터 - VSCode
- Visual Studio Code
- https://code.visualstudio.com/
electron 의 최신 버전 알아보기

Electron 버전의 의미
-
Electron - 6.0.10
-
Node - 12.4.0
-
Chromium - 76.0.3809.146
-
-
실행 환경과 개발 환경
-
개발 환경에서의 일렉트론 실행 절차 알아보기
-
개발 환경의 Node 버전과 실행 환경인 Electron 의 Node 버전
-
-
그래서 개발 환경의 Node 버전은 어떤 것으로 ?
Node Version Manager
-
Node Version Manager
-
nvm > n
-
-
(Windows) nvm-windows 추천
-
zsh 에서 더 멋짐 ? -
명령어
-
nvm install 12.4.0
-
nvm use 12.4.0
-
nvm alias default 12.4.0 (mac only)
-
Node 프로젝트 만들기
mkdir <PROJECT_NAME>
cd <PROJECT_NAME>
npm init -y
electron 설치 및 설정
- npm i electron -D
-
D 인 이유 : electron-builder
- npm i electron -D
- D 인 이유 : electron-builder
- electron 의 메인 진입점 경로를 package.json 의 main 프로퍼티와 맞춘다.
npm i electron -Dpackage.json
- electron 의 메인 진입점 경로를 package.json 의 main 프로퍼티와 맞춘다.
- "electron ." 명령을 scripts 에 추가한다.
{
  "name": "quick-start",
  "version": "1.0.0",
  "description": "",
  "main": "index.js",
  "scripts": {
    "start": "electron ."
  },
  "keywords": [],
  "author": "",
  "license": "ISC",
  "devDependencies": {
    "electron": "^6.0.10"
  }
}
// index.js
const {app, BrowserWindow} = require('electron')
const path = require('path')
let mainWindow
function createWindow () {
mainWindow = new BrowserWindow({
width: 800,
height: 600,
webPreferences: {
preload: path.join(__dirname, 'preload.js')
}
})
mainWindow.loadFile('index.html')
mainWindow.on('closed', function () {
mainWindow = null
})
}
app.on('ready', createWindow)
app.on('window-all-closed', function () {
if (process.platform !== 'darwin') app.quit()
})
app.on('activate', function () {
if (mainWindow === null) createWindow()
})<!-- index.html -->
<!DOCTYPE html>
<html>
<head>
<meta charset="UTF-8">
<title>Hello World!</title>
</head>
<body>
<h1>Hello World!</h1>
We are using Node.js <span id="node-version"></span>,
Chromium <span id="chrome-version"></span>,
and Electron <span id="electron-version"></span>.
<!-- You can also require other files to run in this process -->
<script src="./renderer.js"></script>
</body>
</html>// preload.js
// All of the Node.js APIs are available in the preload process.
// It has the same sandbox as a Chrome extension.
window.addEventListener('DOMContentLoaded', () => {
const replaceText = (selector, text) => {
const element = document.getElementById(selector)
if (element) element.innerText = text
}
for (const type of ['chrome', 'node', 'electron']) {
replaceText(`${type}-version`, process.versions[type])
}
})// preload.js
// All of the Node.js APIs are available in the preload process.
// It has the same sandbox as a Chrome extension.
window.addEventListener('DOMContentLoaded', () => {
const replaceText = (selector, text) => {
const element = document.getElementById(selector)
if (element) element.innerText = text
}
for (const type of ['chrome', 'node', 'electron']) {
replaceText(`${type}-version`, process.versions[type])
}
})// renderer.js
// This file is required by the index.html file and will
// be executed in the renderer process for that window.electron-quick-start 앱의 흐름 요약
// main process 생성
index.js

// main process 생성 완료 이벤트 바인딩
app.on('ready', createWindow);

// 바인딩 된 함수 실행
createWindow();

// renderer process 생성
mainWindow = new BrowserWindow({
  width: 800,
  height: 600,
  webPreferences: {
    preload: path.join(__dirname, "preload.js")
  }
});

// renderer process 에 로딩할 컨텐츠 삽입
mainWindow.loadFile("index.html");

// renderer process 의 script 실행
<script src="./renderer.js"></script>
네이티브 UI 활용, 브라우저 내부 뷰 활용
app
-
랜더러 프로세스가 없는 앱도 데스크탑 앱이다.
-
프로세스에서 하나밖에 없는 단일 객체입니다.
-
app 모듈은 개발하는 앱의 라이프사이클을 알고 있다.
-
그 라이프사이클의 이벤트에 사용자의 함수를 할당한다.
-
그 이벤트들을 학습하자.
-
app.on('ready', () => {}); 등등
-
app.on('will-finish-launching', () => {
    /*
     [Windows / Linux] => = ready
     [macOS] => = applicationWillFinishLaunching (NSApplication)
     'open-file', 'open-url' 이벤트에 대해 설정하거나 (둘다 macOS 용 이벤트)
     'crash reporter' and 'auto updater' 를 시작합니다.
    */
    console.log('will-finish-launching');
});

app.on('ready', (launchInfo) => {
    /*
     일렉트론 앱이 초기화되어 준비된 상태입니다.
     [macOS] launchInfo Object
     */
    console.log(`ready : ${JSON.stringify(launchInfo)}`);
});

app.on('window-all-closed', () => {
    /*
     모든 윈도우가 닫히자 마자 불립니다.
     */
    console.log('window-all-closed');
    app.quit();
});

app.on('before-quit', (event) => {
    /*
     앱 종료가 시작되어서 앱의 모든 윈도우들을 클로즈 하기 시작할때 불립니다.
     이미 닫혀있어도 불립니다.
     */
    // event.preventDefault();
    console.log('before-quit');
});

app.on('will-quit', (event) => {
    /*
     모든 윈도우가 닫히고 나서 메인 앱 프로세스를 종료하기 직전에 불립니다.
     */
    // event.preventDefault();
    console.log('will-quit');
});

/*
 window-all-closed 와 will-quit 차이
 만약에 window-all-closed 이벤트를 받는 함수를 설정하지 않으면, 모든 윈도우들이 닫혔을때 app.quit() (before-quit => will-quit => quit) 이 진행됩니다.
 만약에 window-all-closed 이벤트를 받는 함수를 설정 한다면, app.quit() 을 할지 안할지 결정할 수 있습니다.
 모든 윈도우를 닫아서가 아니라, <Cmd + Q> 를 호출하거나, 코드에서 직접 app.quit() 을 호출해서 앱을 종료하면,
 모든 윈도우를 닫은 후 will-quit 이벤트를 발생시킨다.
 이럴 경우에는 window-all-closed 이벤트는 발생하지 않는다.
 */

app.on('quit', (event, exitCode) => {
    /*
     최종적으로 종료되면서 불립니다.
     */
    console.log(`quit : ${exitCode}`);
});

/*
    [macOS]
    dock 에서 어플리케이션 아이콘을 클릭하면 발생하는 이벤트
 */
app.on('activate', (event, hasVisibleWindows) => {
    /*
     열려있는 윈도우가 있으면, hasVisibleWindows 가 true 입니다.
     없으면, hasVisibleWindows 가 false 입니다.
     */
    console.log(`activate : ${hasVisibleWindows}`);
});
BrowserWindow
-
랜더러 프로세스 생성
-
어려가지 옵션
-
-
생성된 윈도우에 이벤트 설정
-
ready-to-show 이벤트 알아두기
-
-
타이틀바 없는 창
-
frame
-
titleBarStyle
-
-
창의 부모 자식 관계
-
parent
-
modal
-
const mainWindow = new BrowserWindow({
  width: 600,
  height: 600
});

mainWindow.loadURL('https://github.com/2woongjae');

const secondWindow = new BrowserWindow({
  width: 300,
  height: 300,
  x: 0,
  y: 0,
  minWidth: 200,
  minHeight: 200,
  maxWidth: 500,
  maxHeight: 500,
  movable: false,
  title: 'second'
});

secondWindow.loadFile(`second.html`);
const {app, BrowserWindow} = require('electron');
let first = null;
let second = null;
let third = null;
app.on('ready', () => {
first = new BrowserWindow({
width: 600,
height: 600,
frame: false
});
first.loadFile(`index.html`);
second = new BrowserWindow({
width: 600,
height: 600,
titleBarStyle: 'hidden'
});
second.loadFile(`index.html`);
third = new BrowserWindow({
width: 600,
height: 600,
titleBarStyle: 'hidden-inset'
});
third.loadFile(`index.html`);
});const {app, BrowserWindow} = require('electron');
let win = null;
app.on('ready', () => {
win = new BrowserWindow({
width: 600,
height: 600,
// show: false
});
win.loadURL('https://github.com/2woongjae');
/*
win.once('ready-to-show', () => {
win.show();
});
*/
});const {app, BrowserWindow} = require('electron');
let win = null;
app.on('ready', () => {
win = new BrowserWindow({
show: false
});
win.loadFile(`index.html`);
win.once('ready-to-show', () => {
win.show();
console.log('win ready-to-show');
});
win.on('close', () => {
console.log('win close');
});
win.on('closed', () => {
console.log('win closed');
});
win.on('show', () => {
console.log('win show');
});
win.on('hide', () => {
console.log('win hide');
});
win.on('blur', () => {
console.log('win blur');
});
win.on('focus', () => {
console.log('win focus');
});
win.on('move', () => {
console.log('win move');
});
win.on('moved', () => {
console.log('win moved');
});
});
app.on('activate', (event, hasVisibleWindows) => {
if (!hasVisibleWindows) {
win.show();
}
});const {BrowserWindow} = require('electron').remote;
const btn_current = document.querySelector('#current');
const btn_all = document.querySelector('#all');
btn_current.addEventListener('click', () => {
const current = BrowserWindow.getFocusedWindow();
alert(current.id);
});
btn_all.addEventListener('click', () => {
const all = BrowserWindow.getAllWindows();
const ids = all.map(win => win.id);
alert(ids);
});Tray
-
트레이 생성
-
new Tray(이미지 경로);
-
-
트레이에 이벤트를 할당 가능
-
트레이에 메뉴를 적용
-
트레이.setContextMenu(메뉴);
-
메뉴 생성
-
= Menu.buildFromTemplate(템플릿);
-
= new Menu();
-
MenuItem 만들어서 추가
-
-
-
-
const {app, BrowserWindow, Tray, Menu} = require('electron');

let win = null;

app.on('ready', () => {
  win = new BrowserWindow();
  win.loadFile(`index.html`);

  const tray = new Tray(`${__dirname}/tray16_100.png`);

  tray.on("click", () => {
    console.log("tray click");
  });

  tray.on("right-click", () => {
    console.log("tray right-click");
  });

  const trayMenu = Menu.buildFromTemplate([
    {
      label: "Item1",
      type: "normal"
    },
    {
      label: "Item2",
      type: "checkbox",
      checked: true
    },
    {
      type: "separator"
    },
    {
      label: "Item3",
      type: "normal",
      click: () => {
        console.log("Item3 click");
      }
    }
  ]);
  tray.setContextMenu(trayMenu);
});
어플리케이션 메뉴를 만드는 법
-
Menu.setApplicationMenu(메뉴);
-
메뉴
-
= Menu.buildFromTemplate(템플릿);
-
= new Menu();
-
MenuItem 만들어서 추가
-
-
-
템플릿은 객체
macOS 와 Windows 의 어플리케이션 메뉴 차이
-
macOS
-
앱 하나에 어플리케이션 메뉴 하나
-
-
Windows
-
랜더러 프로세스 별로 메뉴 존재
-
win.setMenu(null | 메뉴) 로 개개 메뉴 변경
-
const { app, BrowserWindow, Menu } = require('electron');

let win = null;
const template = [
  {
    label: 'first',
    submenu: [
      {
        label: 'first1',
        click: () => {
          console.log('first1 click');
        },
      },
    ],
  },
  {
    label: 'second',
    submenu: [
      {
        label: 'second1',
        click() {
          console.log('second1 click');
        },
      },
    ],
  },
];

app.on('ready', () => {
  const menu = Menu.buildFromTemplate(template);
  Menu.setApplicationMenu(menu);
  console.log(Menu.getApplicationMenu());

  win = new BrowserWindow();
  win.loadURL(`file://${__dirname}/index.html`);
});
native dialog 는 총 5개
-
open dialog
-
콜백 인자는 string[]
-
-
save dialog
-
콜백 인자는 string
-
-
message dialog
-
콜백 인자는 버튼 id: number
-
-
error dialog
-
노 콜백
-
-
certificate dialog
일렉트론에서 데이터의 흐름
inter process communication
-
랜더러 프로세스와 메인 프로세스의 데이터 전달
-
메인 프로세스는 ipcMain 모듈 사용
-
랜더러 프로세스는 ipcRenderer 모듈 사용
-
동기로 전달하는 방식과 비동기로 전달하는 방식이 있다.
-
비동기 : 랜더러에서 전달받은 후 메인에서 비동기로 데이터를 처리해서 다시 랜더러로 넘기는 경우
-
동기 : 랜더러에서 가져갈 데이터가 메인에 바로 있는 경우
-
const {app, BrowserWindow, ipcMain} = require('electron');

let win = null;

app.on('ready', () => {
  win = new BrowserWindow({
    webPreferences: {
      nodeIntegration: true,
    }
  });
  win.loadFile(`index.html`);

  ipcMain.on('test-async', (event, arg) => {
    console.log(arg);
    event.sender.send('test-async-reply', 'reply-async');
  });

  ipcMain.on('test-sync', (event, arg) => {
    console.log(arg);
    event.returnValue = 'reply-sync';
  });
});
const {ipcRenderer} = require('electron');
ipcRenderer.on('test-async-reply', (event, arg) => {
console.log(arg);
});
const btn_async = document.querySelector('#test-async');
const btn_sync = document.querySelector('#test-sync');
btn_async.addEventListener('click', () => {
ipcRenderer.send('test-async', 'this is async test');
});
btn_sync.addEventListener('click', () => {
const reply = ipcRenderer.sendSync('test-sync', 'this is sync test');
console.log(reply);
});Discuss. 왜 메인으로 보내야 할까요 ?
일렉트론을 상용앱으로 패키징하기
'npm i electron -D' 를 하면 ?

node_modules/electron/install.js
#!/usr/bin/env node

var version = require('./package').version

var fs = require('fs')
var os = require('os')
var path = require('path')
var extract = require('extract-zip')
var download = require('electron-download')

var installedVersion = null
try {
  installedVersion = fs.readFileSync(path.join(__dirname, 'dist', 'version'), 'utf-8').replace(/^v/, '')
} catch (ignored) {
  // do nothing
}

var platformPath = getPlatformPath()

var electronPath = process.env.ELECTRON_OVERRIDE_DIST_PATH || path.join(__dirname, 'dist', platformPath)

if (installedVersion === version && fs.existsSync(electronPath)) {
  process.exit(0)
}

// downloads if not cached
download({
  cache: process.env.electron_config_cache,
  version: version,
  platform: process.env.npm_config_platform,
  arch: process.env.npm_config_arch,
  strictSSL: process.env.npm_config_strict_ssl === 'true',
  force: process.env.force_no_cache === 'true',
  quiet: process.env.npm_config_loglevel === 'silent' || process.env.CI
}, extractFile)

// unzips and makes path.txt point at the correct executable
function extractFile (err, zipPath) {
  if (err) return onerror(err)
  extract(zipPath, { dir: path.join(__dirname, 'dist') }, function (err) {
    if (err) return onerror(err)
    fs.writeFile(path.join(__dirname, 'path.txt'), platformPath, function (err) {
      if (err) return onerror(err)
    })
  })
}

function onerror (err) {
  throw err
}

function getPlatformPath () {
  var platform = process.env.npm_config_platform || os.platform()

  switch (platform) {
    case 'darwin':
      return 'Electron.app/Contents/MacOS/Electron'
    case 'freebsd':
    case 'linux':
      return 'electron'
    case 'win32':
      return 'electron.exe'
    default:
      throw new Error('Electron builds are not available on platform: ' + platform)
  }
}

prebuilt 된 실행 파일의 실행 방법
-
CLI 실행
-
Electron.app/Contents/MacOS/Electron 명령어 실행
-
-
GUI 에서 실행
-
Electron.app 더블클릭
-
실행 방식
-
인자로 '실행할 Electron 프로젝트 폴더'를 지정하고 실행
-
'실행할 Electron 프로젝트' 란 package.json 의 main 에 main process 파일이 지정되어 있는 폴더
-
그 프로젝트를 실행한다.
-
CLI 에서는 뒤에 경로를 붙여서 명령어를 실행한다.
-
GUI 에서는 폴더를 Electron.app 에 끌어다 놓으면 된다.
-
-
인자를 지정하지 않고 실행
-
기본 실행 지정된 Electron Prebuilt 안에 폴더를 실행한다.
-
app.asar 혹은 app 폴더
-
default_app.asar (미리 들어 있음)
-
-
실행 환경(OS)에 따라 미리 정해진 폴더
// On macOS
electron/Electron.app/Contents/Resources/app/
├── package.json
├── main.js
└── index.html

// On Windows and Linux
electron/resources/app
├── package.json
├── main.js
└── index.html
MacOS 의 기본 위치

app 폴더 대신 app.asar 파일 가능
// On macOS
electron/Electron.app/Contents/Resources/app.asar
├── package.json
├── main.js
└── index.html

// On Windows and Linux
electron/resources/app.asar
├── package.json
├── main.js
└── index.html
asar 는 왜 권장하는가 ?
-
electron/asar
-
what is asar ?
-
Simple extensive tar-like archive format with indexing
-
Windows node_modules 긴 경로
-
require 속도 향상
-
코드 보호
-

step1. 각각의 환경에 맞는 prebuilt 된 실행파일 준비
-
Electron Releases
-
Github Release 의 버전별 페이지
-
여러가지 환경에서 사용 가능한 실행 파일이 준비되어 있습니다.
-
npm package
-
https://github.com/electron/get
-
electron 에서 사용하는 모듈
-
구 electron-download
-
-
step2. 이 prebuilt 된 실행파일의 실행 방법
-
단독 실행 => 실행 환경(OS)에 따라 미리 정해진 폴더를 실행
-
더블 클릭 하거나
-
커맨드라인에서 인자 없이 실행
-
-
인자로 특정 폴더를 지정하여 실행 (개발 모드에서 실행하는 방식)
-
커맨드라인에서 실행파일 뒤에 폴더를 인자로 하여 실행
-
step3. 실행파일이 실행하는 폴더
-
${Project-Folder}/ <= 실행할때 지정된 폴더
-
package.json
- main 이 지정하는 js 파일을 엔트리 포인트로 사용
-
package.json
-
그래서 이 실행파일(일렉트론)에서 사용하는 node.js 의 버전과 크로미움의 버전이 중요
- 개발 환경의 node.js 버전과 관계 없이
- electron 6.0.10 의 node.js 가 12.4.0 이기 때문에
- async - await 가 사용 가능합니다.
- 이 프로젝트 폴더가 ' 개발해야할 영역 '
step4. 실행파일의 이름과 아이콘 변경
-
리브랜딩 이라고 합니다.
-
일렉트론 프레임워크의 소스코드를 받아서 빌드할때 처리할 수 있지만, 권장하지 않습니다.
-
미리 빌드된 실행파일로도 이름과 아이콘을 변경할 수 있습니다.
-
그래서 대부분 미리 빌드된 실행파일을 다운받고,
-
자신의 프로젝트 소스 폴더만 정해진 자리에 넣은 뒤,
-
아이콘과 이름만 변경하는 방식을 사용합니다.
-
step5. 코드 서명
- 누가 만든 어플리케이션
- macOS 는 macOS 에서만 => 애플 개발자 등록
- Windows 는 인증서 사서 => 비싸요

electron-packager --overwrite --icon=icon.icns .

패키징 전후 파일들
// 프로젝트 폴더 (before packaging)
electron-packager-example/
├── node_modules/
├── icon.icns
├── package.json
├── package-lock.json
└── index.js

// 프로젝트 폴더 (after packaging)
electron-packager-example/
├── electron-packager-example-darwin-x64/
├── node_modules/
├── icon.icns
├── package.json
├── package-lock.json
└── index.js

// 패키징 된 app 폴더 (혹은 app.asar 파일)
electron-packager-example-darwin-x64/Contents/Resources/app/
├── icon.icns
├── package.json
├── package-lock.json
└── index.js
electron-builder


electron-installer-debian
electron-installer-redhat
electron-installer-flatpak
electron-installer-windows
electron-osx-sign
msi-packager

electron-forge ?
-
electron 앱 개발을 위한 cli 툴
-
angular 에겐 angular-cli
-
react 에겐 create-react-app
-
electron 에겐 electron-forge
-
-
프로젝트 만들기
-
npx create-electron-app electron-forge-example
-
-
스크립트
-
개발모드 실행 : npm start
-
패키징 : npm run package
-
최종 배포 파일 : npm run make
-
퍼블리싱 : npm run publish
-
npx create-electron-app electron-forge-example


자동 업데이트 이해하기
[macOS] 자동 업데이트 (feat. Squirrel)
autoUpdater 모듈 - Squirrel interface

autoUpdater 기본
// 업데이트 서버 주소 설정 및 초기화
autoUpdater.setFeedURL(`http://127.0.0.1:${port}/update/latest`);

// 업데이트 있는지 체크
autoUpdater.checkForUpdates();

// 업데이트 파일이 다운로드 다 되었는지 확인하는 이벤트 바인딩
autoUpdater.on('update-downloaded', async() => {

    // 앱 종료 후 업데이트 후 재시작
    autoUpdater.quitAndInstall();

});
macOS 에서의 Squirrel
-
사용이 생각보다 어렵지 않습니다.
-
업데이트용 파일인 .zip 파일을 electron-builder 에서 지원
-
-
설치 및 실행 파일에 별도의 추가 변경이 필요하지 않습니다.
-
Windows 는 실행 파일 구조 자체가 변합니다.
-
macOS 는 Squirrel.mac 이 built-in 되어 있습니다.
-
codesign 이 꼭 되어있어야 합니다.
-
-
단점
-
다운로드 진행 상태를 알수 없습니다.
-
파일이 60MB 이상인걸?
-
역대급 꼼수
-
-
무조건 업데이트 파일 다운로드는 처음부터
-
릴리즈노트는 다운로드 끝나고?
-

최초 자동 업데이트 서버
-
electron-release-server 라는 프로젝트를 사용
-
https://github.com/ArekSredzki/electron-release-server
-
squirrel 지원
-
다양한 다운로드 링크 제공
-
소스만 받아서 서버에 설치 후 쉽게 사용 가능
-
sails.js 사용 - 전 잘 몰라요
-
DB 는 postgresql (RDS)

macOS 최종 절차
-
step1. 앱 최초 실행시 url 룰에 맞게 릴리즈 서버를 호출
-
204 면 업데이트 없음.
-
아니면 (200), 있으니깐 이때 response 에 넣어둔 릴리즈 노트를 받아 사용
-
-
step2. 릴리즈 노트를 보여주며, 업데이트 다운로드 버튼을 누르도록
-
캔슬할수도...
-
다운로드 버튼을 누르면
-
-
step3. 로컬에 squirrel 용 .zip 파일을 다운로드
-
프로그레스 가능
-
이미 받아둔거 있으면 (체크섬), 다시 사용안하도록 처리 가능
-
-
step4. 로컬에 짱 박아둔 웹서버를 이용하여, autoUpdater 모듈 사용
-
autoUpdater.setFeedURL(`http://127.0.0.1:${port}/update/latest`);
-
여기부터 윈도우 입니다.
Squirrel.Windows
-
macOS 와는 다릅니다.
-
클라이언트에서도 다릅니다.
-
통으로 새로운 파일을 받아서 갈아끼는 스타일이 아닙니다.
-
확장자도 .zip 아니고, .nupkg 입니다.
-
이전 버전과의 diff 를 만들어서 업데이트 처리합니다.
-
업데이트 설치시 gif 파일이 나타납니다.
-
설치를 아무데나 할수가 없습니다.
-
빌드시 이전 버전을 기준삼아 빌드해서 diff 파일을 만듭니다.
-
-
서버에서도 다릅니다.
-
응답이 파일로 옵니다. (헐)
-
http://download.myapp.com/update/win32/:version/RELEASES
http://download.myapp.com/update/win64/:version/RELEASES
http://download.myapp.com/update/win32/:version/:channel/RELEASES
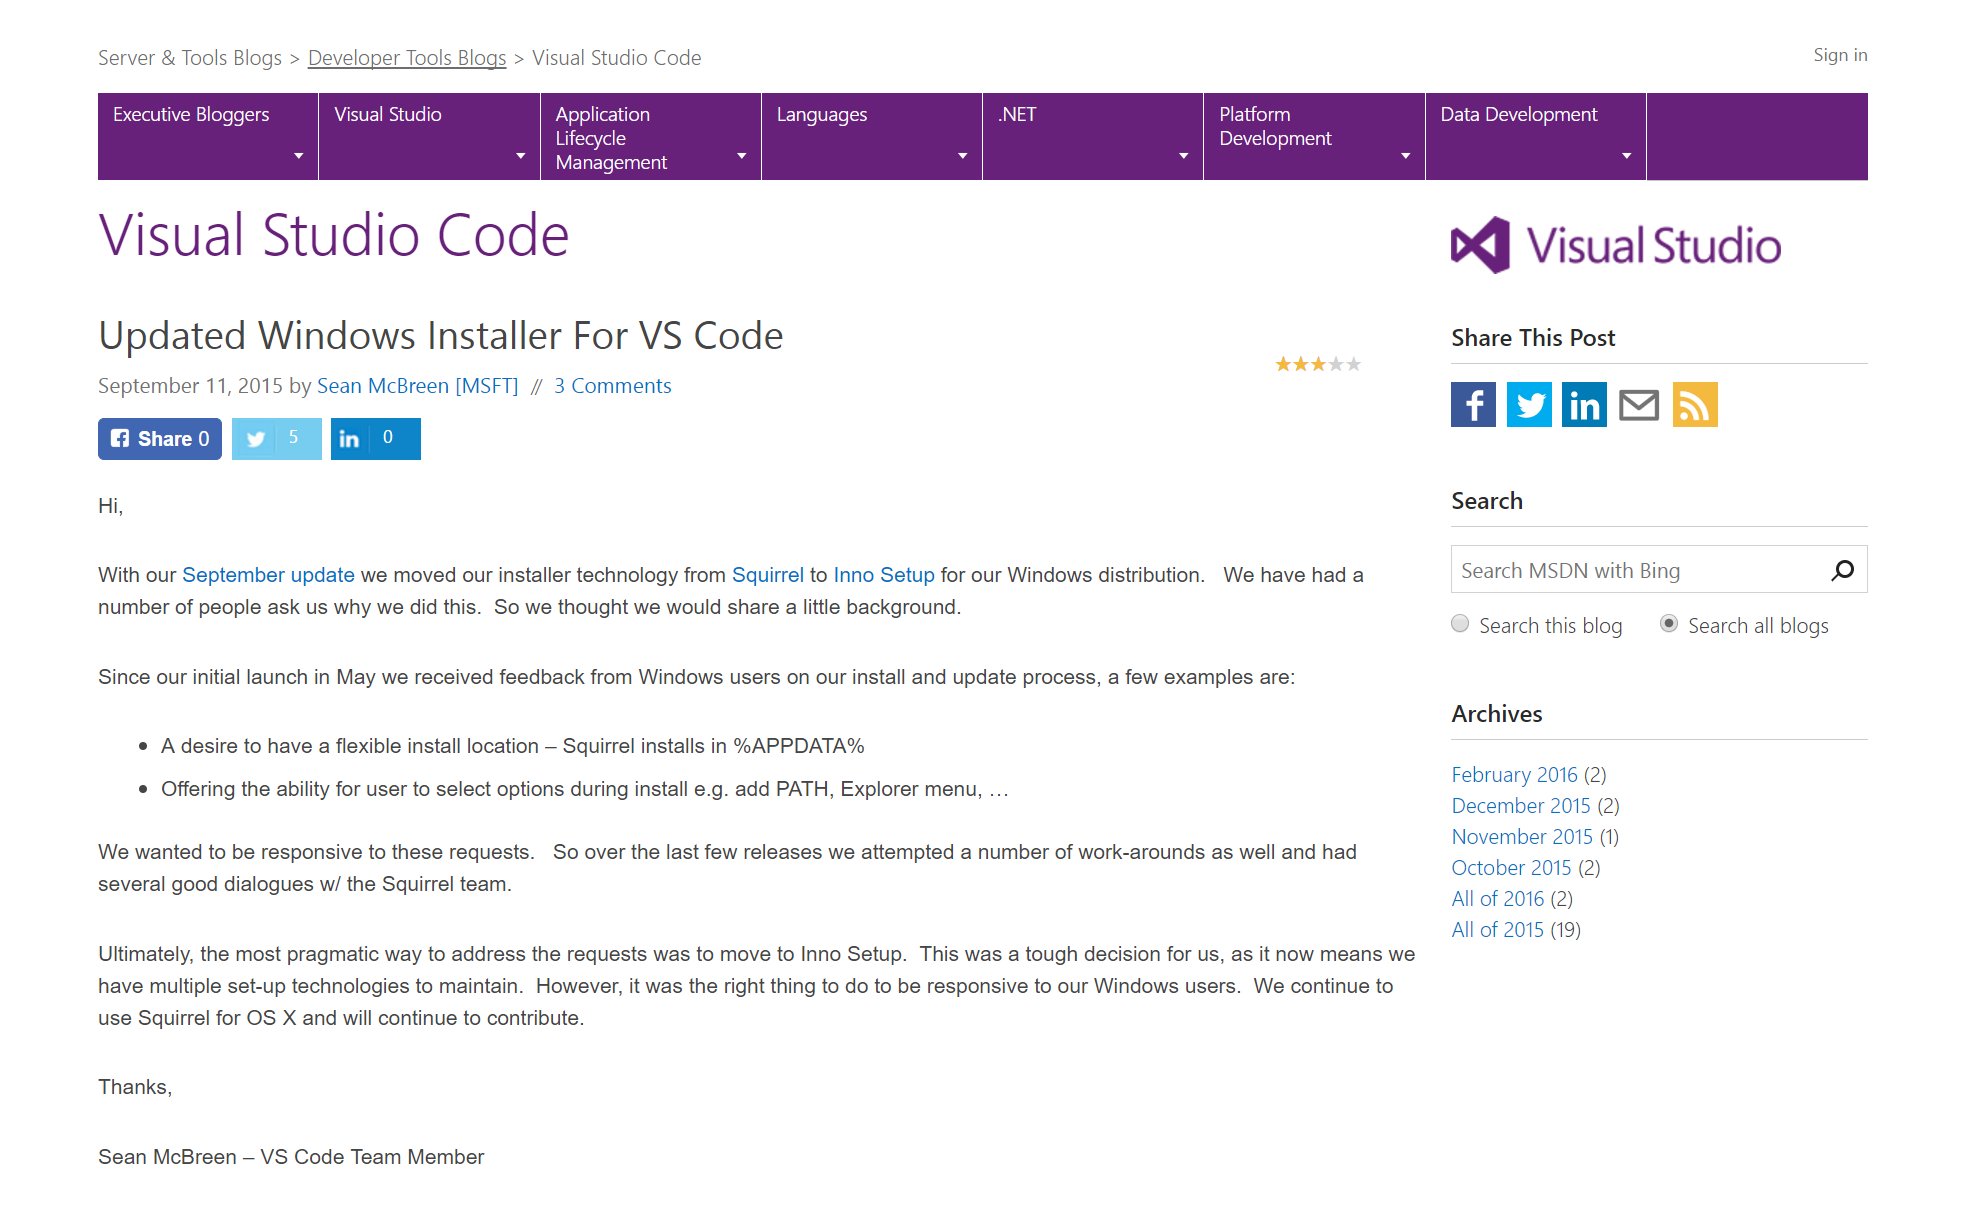
http://download.myapp.com/update/win64/:version/:channel/RELEASESSquirrel.Windows 포기
-
VSCode 의 영향이 컸습니다.
-
업데이트를 누르면 재설치 파일이 실행됩니다.
-
inno-setup 을 사용합니다.
-
사실 nsis, squirrel 의 문제점을 알고, 대안을 모색하다 발견
-
https://blogs.msdn.microsoft.com/vscode/2015/09/11/updated-windows-installer-for-vs-code/
-
-
inno-setup 으로 전환
-
VSCode 는 electron 계의 표준전과
-
Updated Windows Installer For VS Code
Windows 자동 업데이트
- step1. 앱 최초 실행시 url 룰에 맞게 릴리즈 서버를 호출
- 204 면 업데이트 없음.
- 아니면 (200), 있으니깐 이때 response 에 넣어둔 릴리즈 노트를 받아 사용
- step2. 릴리즈 노트를 보여주며, 업데이트 다운로드 버튼을 누르도록
- 캔슬할수도...
- 다운로드 버튼을 누르면
- step3. 로컬에 inno-setup 으로 빌드된 .exe 파일을 다운로드
- 프로그레스 가능
- 이미 받아둔거 있으면(체크섬), 다시 사용안하도록 처리 가능
- step4. 프로그램을 종료시키면서 Setup.exe 파일을 실행
- shell.openItem(path);
inno setup
-
http://www.jrsoftware.org
-
free installer
-
설치 파일 생성 마법사도 있음
-
npm 모듈도 있음
-
innosetup-compiler
-
https://www.npmjs.com/package/innosetup-compiler
-
-
스크립트로 정의할수 있는데 스크립트는 Delphi
-
델파이 모르면 베끼기
-
https://github.com/Microsoft/vscode/blob/master/build/win32/code.iss
-
-
레지스트리 제어 (.pie 확장자 아이콘 처리)
-
설치시 추가 기능 제공
-
삭제시 할일 처리
code.iss (delphi script)
; 프로그램 전체에 대한 설정을 정의한다.
[Setup]
AppId={#AppId}
AppName={#NameLong}
AppVerName={#NameVersion}
AppPublisher=Studio XID, Inc.
AppPublisherURL={#Homepage}
AppSupportURL={#Homepage}docs/
;AppUpdatesURL={#Homepage}
DefaultDirName={userpf}\{#DirName}
DisableDirPage=yes
DefaultGroupName={#NameLong}
AllowNoIcons=yes
OutputDir={#RepoDir}\dist
OutputBaseFilename={#OutputBaseFilename}
Compression=lzma
SolidCompression=yes
AppMutex={code:GetAppMutex}
SetupMutex={#AppMutex}setup
WizardImageFile={#RepoDir}\build\win32\inno_big_410.bmp
WizardSmallImageFile={#RepoDir}\build\win32\inno_small_138.bmp
SetupIconFile={#RepoDir}\build\win32\icon_setup.ico
UninstallDisplayIcon={app}\{#ExeBasename}.exe
ChangesEnvironment=true
ChangesAssociations=true
MinVersion=6.1.7600
SourceDir={#SourceDir}
AppVersion={#Version}
VersionInfoVersion={#RawVersion}
ShowLanguageDialog=auto
; CloseApplications=force
ArchitecturesAllowed={#ArchFlag}
ArchitecturesInstallIn64BitMode={#ArchFlag}
PrivilegesRequired=lowest

; 프로그램이 사용하는 언어를 정의한다.
[Languages]
Name: "english"; MessagesFile: "compiler:Default.isl,{#RepoDir}\build\win32\i18n\messages.en.isl"
Name: "simplifiedChinese"; MessagesFile: "{#RepoDir}\build\win32\i18n\Default.zh-cn.isl,{#RepoDir}\build\win32\i18n\messages.zh-cn.isl"

; 설치시에 제거 할 파일이 있으면 정의한다.
[InstallDelete]
;Type: filesandordirs; Name: {app}\resources

[UninstallDelete]
Type: filesandordirs; Name: "{app}\_"

; 설치 프로세스를 사용자 측에서 상세하게 설정하는 경우에 각각의 처리(작업)에 대해 정의한다.
[Tasks]
Name: "desktopicon"; Description: "{cm:CreateDesktopIcon}"; GroupDescription: "{cm:AdditionalIcons}"
Name: "quicklaunchicon"; Description: "{cm:CreateQuickLaunchIcon}"; GroupDescription: "{cm:AdditionalIcons}"; Flags: unchecked; OnlyBelowVersion: 0.6.1
Name: "associatewithfiles"; Description: "{cm:AssociateWithFiles,{#NameShort}}"; GroupDescription: "{cm:Other}"
Name: "runcode"; Description: "{cm:RunAfter,{#NameShort}}"; GroupDescription: "{cm:Other}"; Check: WizardSilent

; 설치 파일을 정의한다.
[Files]
Source: "{#SourceDir}\*"; Excludes: "\tools,\tools\*"; DestDir: "{code:GetDestDir}"; Flags: ignoreversion recursesubdirs createallsubdirs
Source: "tools\*"; DestDir: "{app}\tools"; Flags: ignoreversion

; 설치시 생성하는 프로그램 등의 바로 가기 파일에 대해 정의한다.
[Icons]
Name: "{group}\{#NameLong}"; Filename: "{app}\{#ExeBasename}.exe"; AppUserModelID: "{#AppUserId}"
Name: "{commondesktop}\{#NameLong}"; Filename: "{app}\{#ExeBasename}.exe"; Tasks: desktopicon; AppUserModelID: "{#AppUserId}"
Name: "{userappdata}\Microsoft\Internet Explorer\Quick Launch\{#NameLong}"; Filename: "{app}\{#ExeBasename}.exe"; Tasks: quicklaunchicon; AppUserModelID: "{#AppUserId}"

; 설치 프로그램 실행 후 실행되는 프로그램이 있으면 정의한다.
[Run]
Filename: "{app}\{#ExeBasename}.exe"; Description: "{cm:LaunchProgram,{#NameLong}}"; Tasks: runcode; Flags: nowait postinstall; Check: ShouldRunAfterUpdate
Filename: "{app}\{#ExeBasename}.exe"; Description: "{cm:LaunchProgram,{#NameLong}}"; Flags: nowait postinstall; Check: WizardNotSilent

; 설치 프로그램 레지스트리 키를 편집하는 경우, 그 내용을 정의한다.
[Registry]
; associatewithfiles
 Root: HKCU; Subkey: "Software\Classes\.pie\OpenWithProgids"; ValueType: none; ValueName: "{#RegValueName}"; Flags: deletevalue uninsdeletevalue; Tasks: associatewithfiles
 Root: HKCU; Subkey: "Software\Classes\.pie\OpenWithProgids"; ValueType: string; ValueName: "{#RegValueName}.pie"; ValueData: ""; Flags: uninsdeletevalue; Tasks: associatewithfiles
 Root: HKCU; Subkey: "Software\Classes\{#RegValueName}.pie"; ValueType: string; ValueName: ""; ValueData: "{cm:SourceFile,PIE}"; Flags: uninsdeletekey; Tasks: associatewithfiles
 Root: HKCU; Subkey: "Software\Classes\{#RegValueName}.pie\DefaultIcon"; ValueType: string; ValueName: ""; ValueData: "{app}\resources\resources\win32\icon_file.ico"; Tasks: associatewithfiles
 Root: HKCU; Subkey: "Software\Classes\{#RegValueName}.pie\shell\open\command"; ValueType: string; ValueName: ""; ValueData: """{app}\{#ExeBasename}.exe"" ""%1"""; Tasks: associatewithfiles

; 설치 프로그램 자체 처리를 하는 경우에 그 내용을 파스칼 스크립트로 정의한다.
[Code]
function WizardNotSilent(): Boolean;
begin
  Result := not WizardSilent();
end;

// Updates
function IsBackgroundUpdate(): Boolean;
begin
  Result := ExpandConstant('{param:update|false}') <> 'false';
end;

function LockFileExists(): Boolean;
begin
  Result := FileExists(ExpandConstant('{param:update}'))
end;

function ShouldRunAfterUpdate(): Boolean;
begin
  Result := ExpandConstant('{param:runafterupdate}') = 'true'
end;

function GetAppMutex(Value: string): string;
begin
  if IsBackgroundUpdate() then
    Result := ''
  else
    Result := '{#AppMutex}';
end;

function GetUninstallString(): String;
var
  sUnInstPath: String;
  sUnInstallString: String;
begin
  sUnInstPath := ExpandConstant('Software\Microsoft\Windows\CurrentVersion\Uninstall\{#emit SetupSetting("AppId")}_is1');
  sUnInstallString := '';
  if not RegQueryStringValue(HKLM, sUnInstPath, 'UninstallString', sUnInstallString) then
    RegQueryStringValue(HKCU, sUnInstPath, 'UninstallString', sUnInstallString);
  Result := sUnInstallString;
end;

function UnInstallOldVersion(): Integer;
var
  sUnInstallString: String;
  iResultCode: Integer;
  //intRe: Integer;
begin
// Return Values:
// 1 - uninstall string is empty
// 2 - error executing the UnInstallString
// 3 - successfully executed the UnInstallString
// 4 - no need to uninstall

  // default return value
  Result := 0;

  // get the uninstall string of the old app
  sUnInstallString := GetUninstallString();

  if ExpandConstant('{param:silent|false}') <> 'false' then
    Result := 4
  else if sUnInstallString <> '' then begin
    sUnInstallString := RemoveQuotes(sUnInstallString);
    if (Exec(sUnInstallString, '/NORESTART /SUPPRESSMSGBOXES', '', SW_HIDE, ewWaitUntilTerminated, iResultCode)) then
      Result := 3
    else
      Result := 2;
  end else
    Result := 1;
end;

function InitializeSetup(): Boolean;
begin
  UnInstallOldVersion();
  Result := True;
end;

function GetDestDir(Value: string): string;
begin
  if IsBackgroundUpdate() then
    Result := ExpandConstant('{app}\_')
  else
    Result := ExpandConstant('{app}');
end;

function BoolToStr(Value: Boolean): String;
begin
  if Value then
    Result := 'true'
  else
    Result := 'false';
end;

procedure CurStepChanged(CurStep: TSetupStep);
var
  UpdateResultCode: Integer;
begin
  if IsBackgroundUpdate() and (CurStep = ssPostInstall) then
  begin
    CreateMutex('{#AppMutex}-ready');

    while (CheckForMutexes('{#AppMutex}')) do
    begin
      Log('Application is still running, waiting');
      Sleep(1000);
    end;

    Exec(
      ExpandConstant('{app}\tools\protopie_updater.exe'),
      ExpandConstant('"{app}\{#ExeBasename}.exe" ' + BoolToStr(LockFileExists())),
      '', SW_SHOW, ewWaitUntilTerminated, UpdateResultCode
    );
  end;
end;
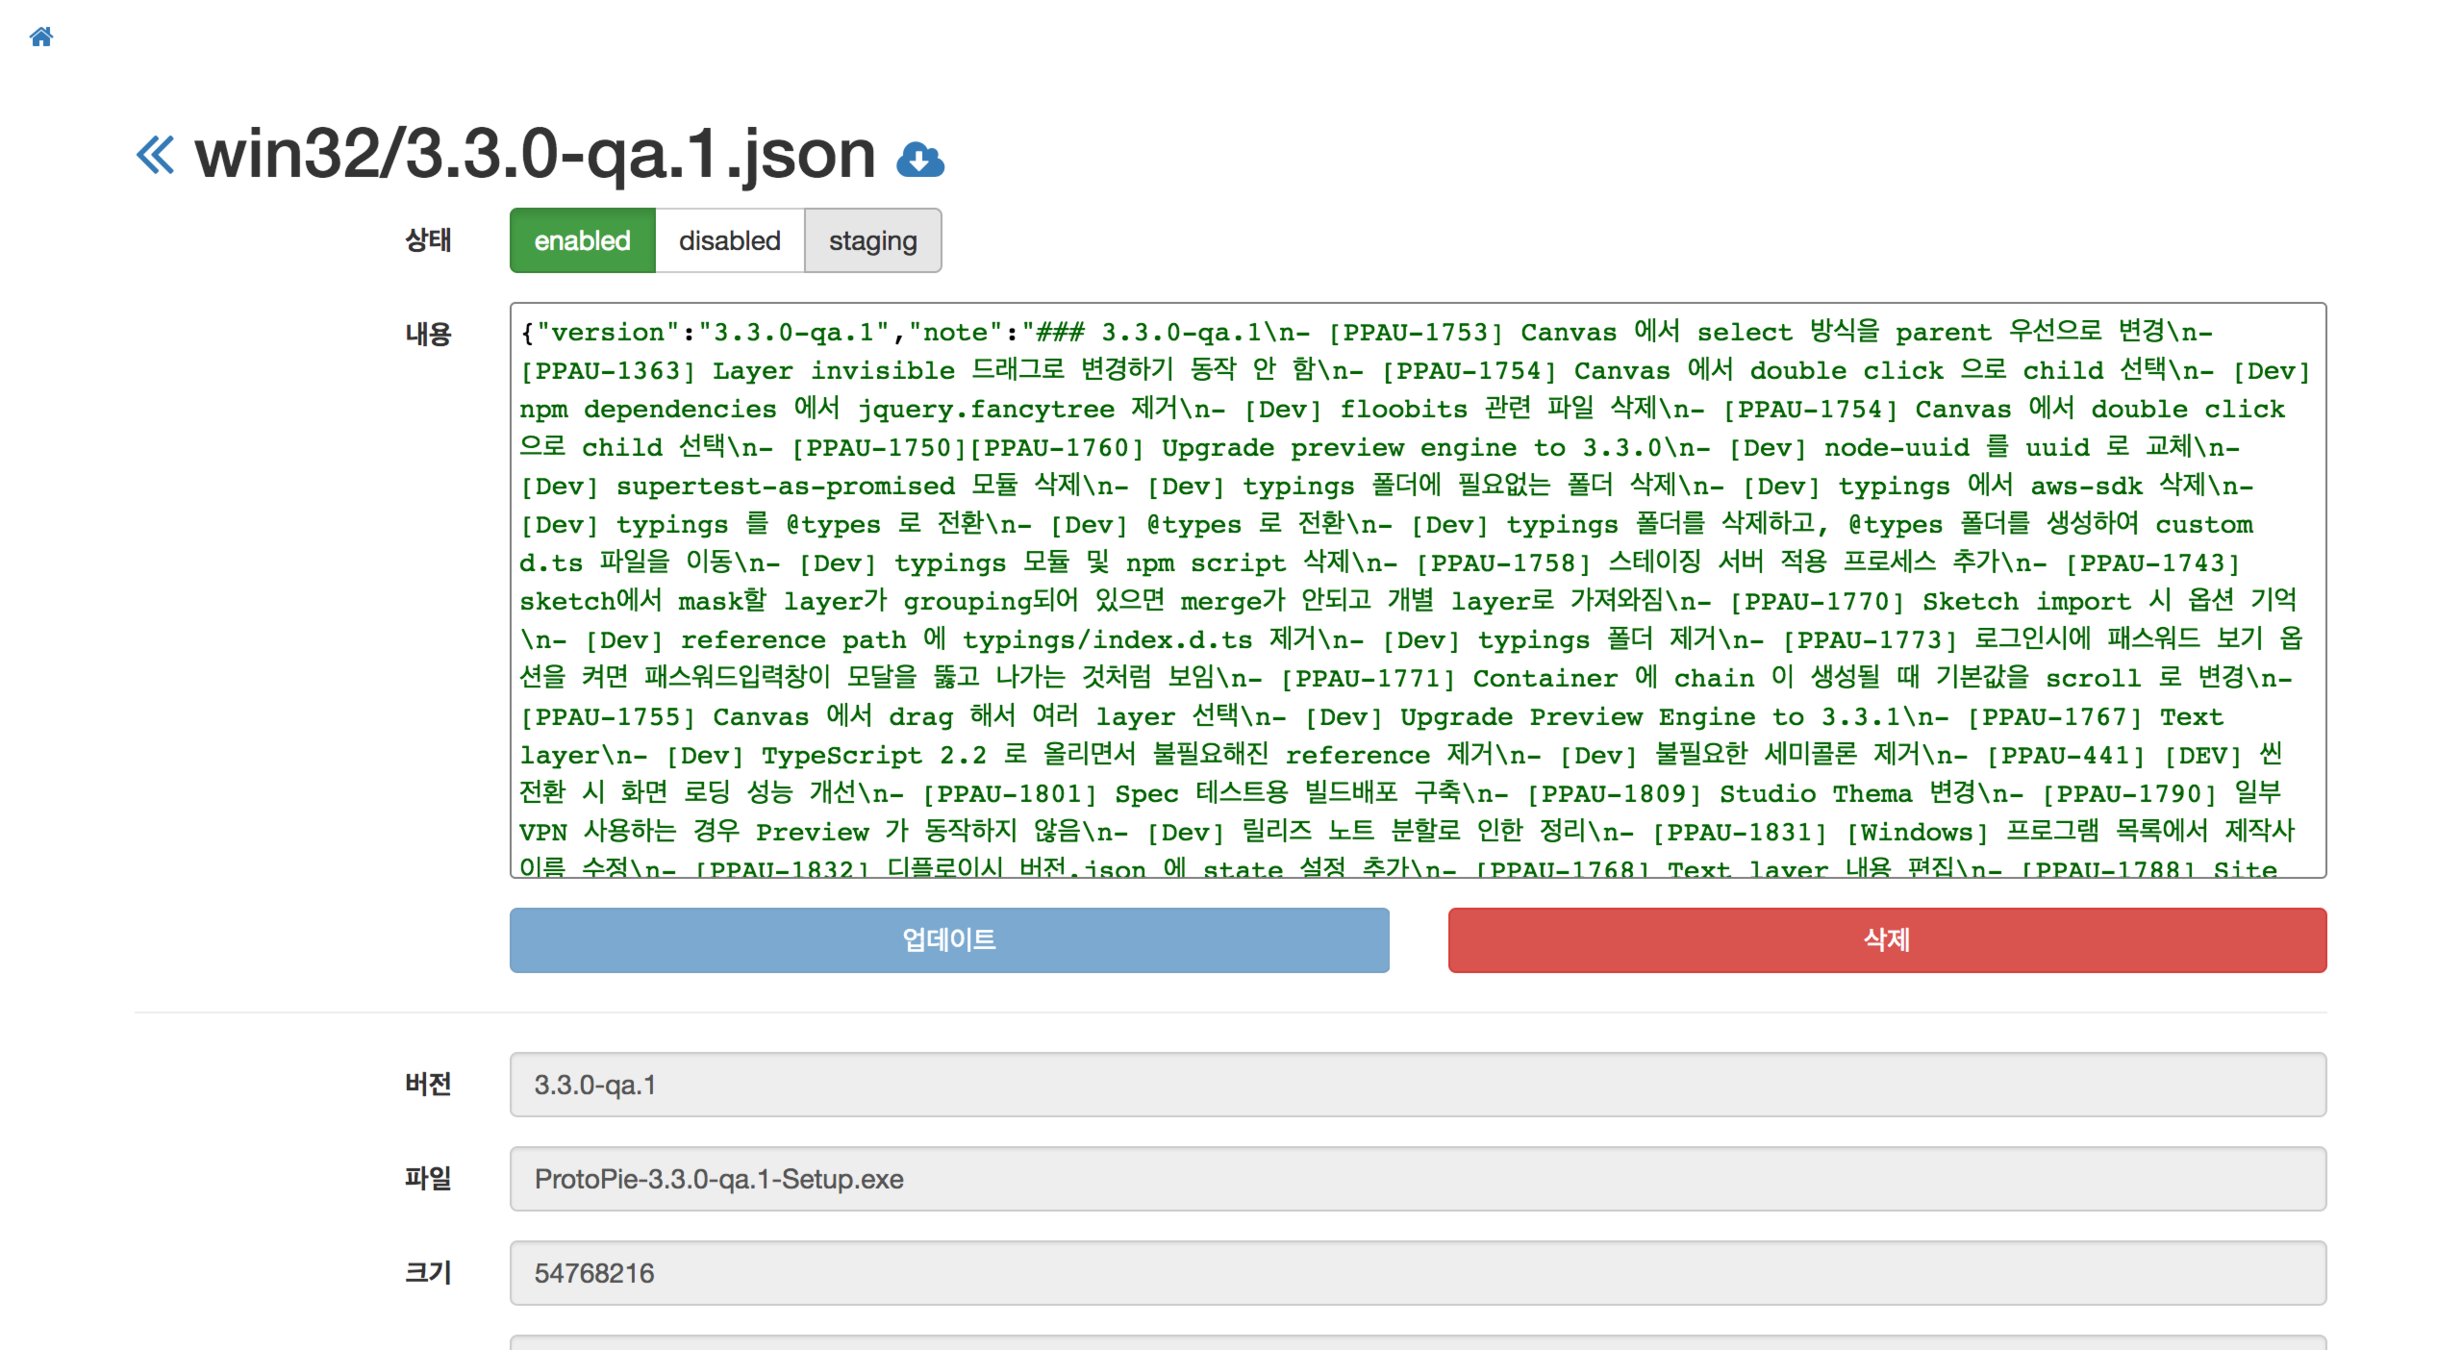
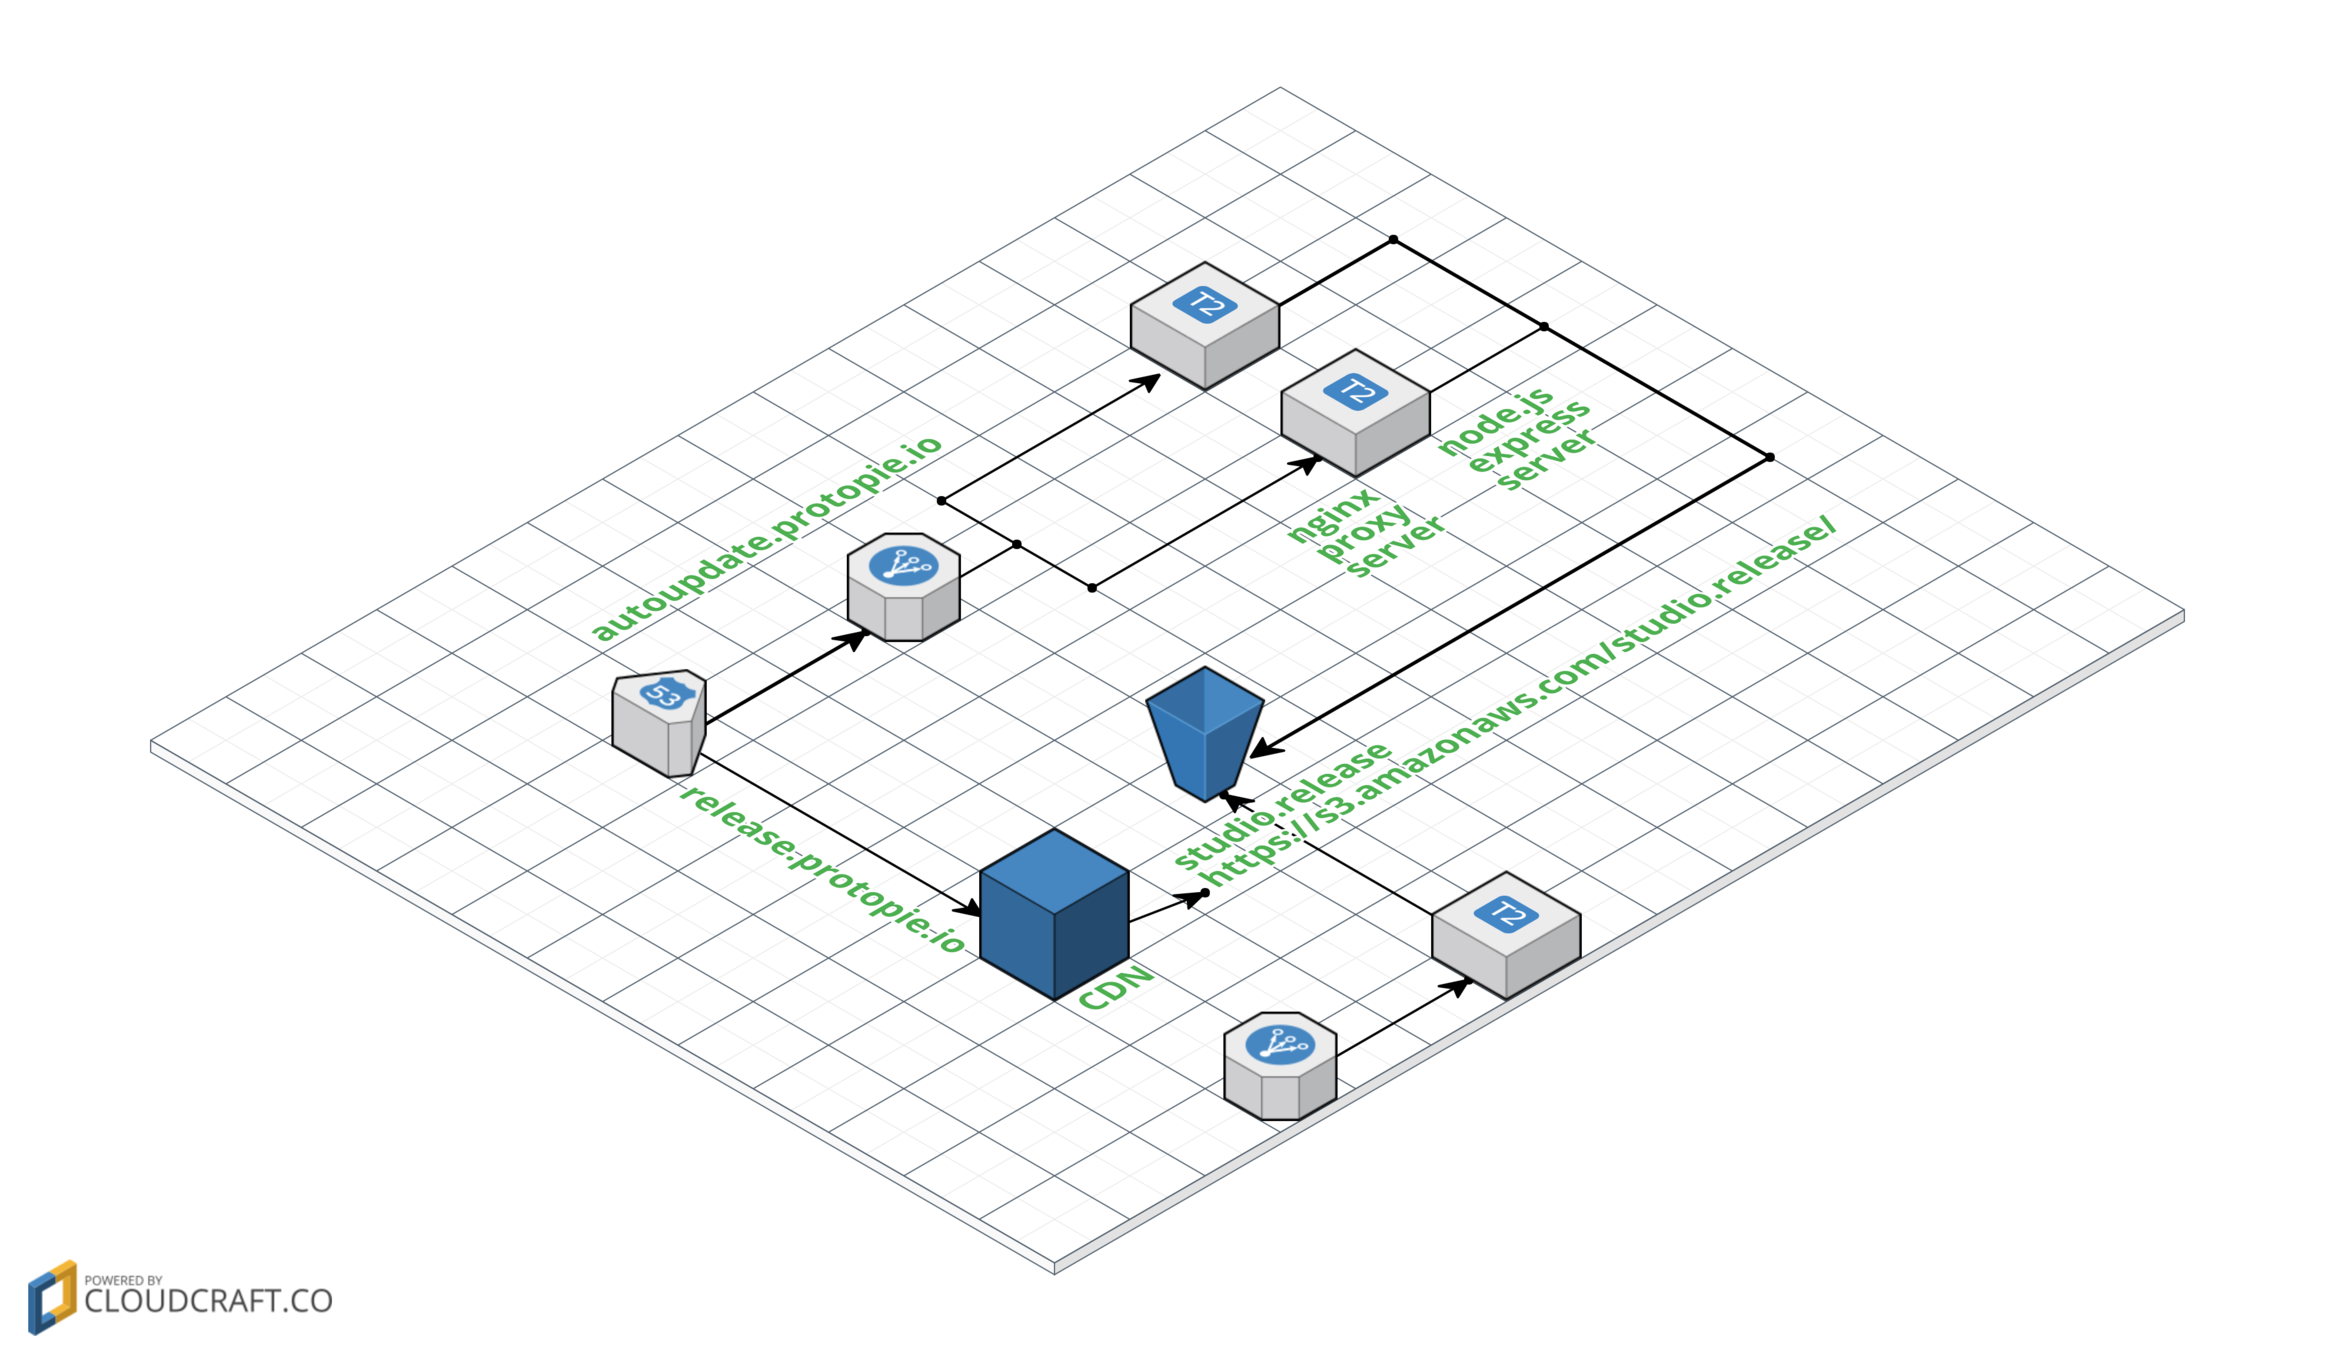
업데이트 서버
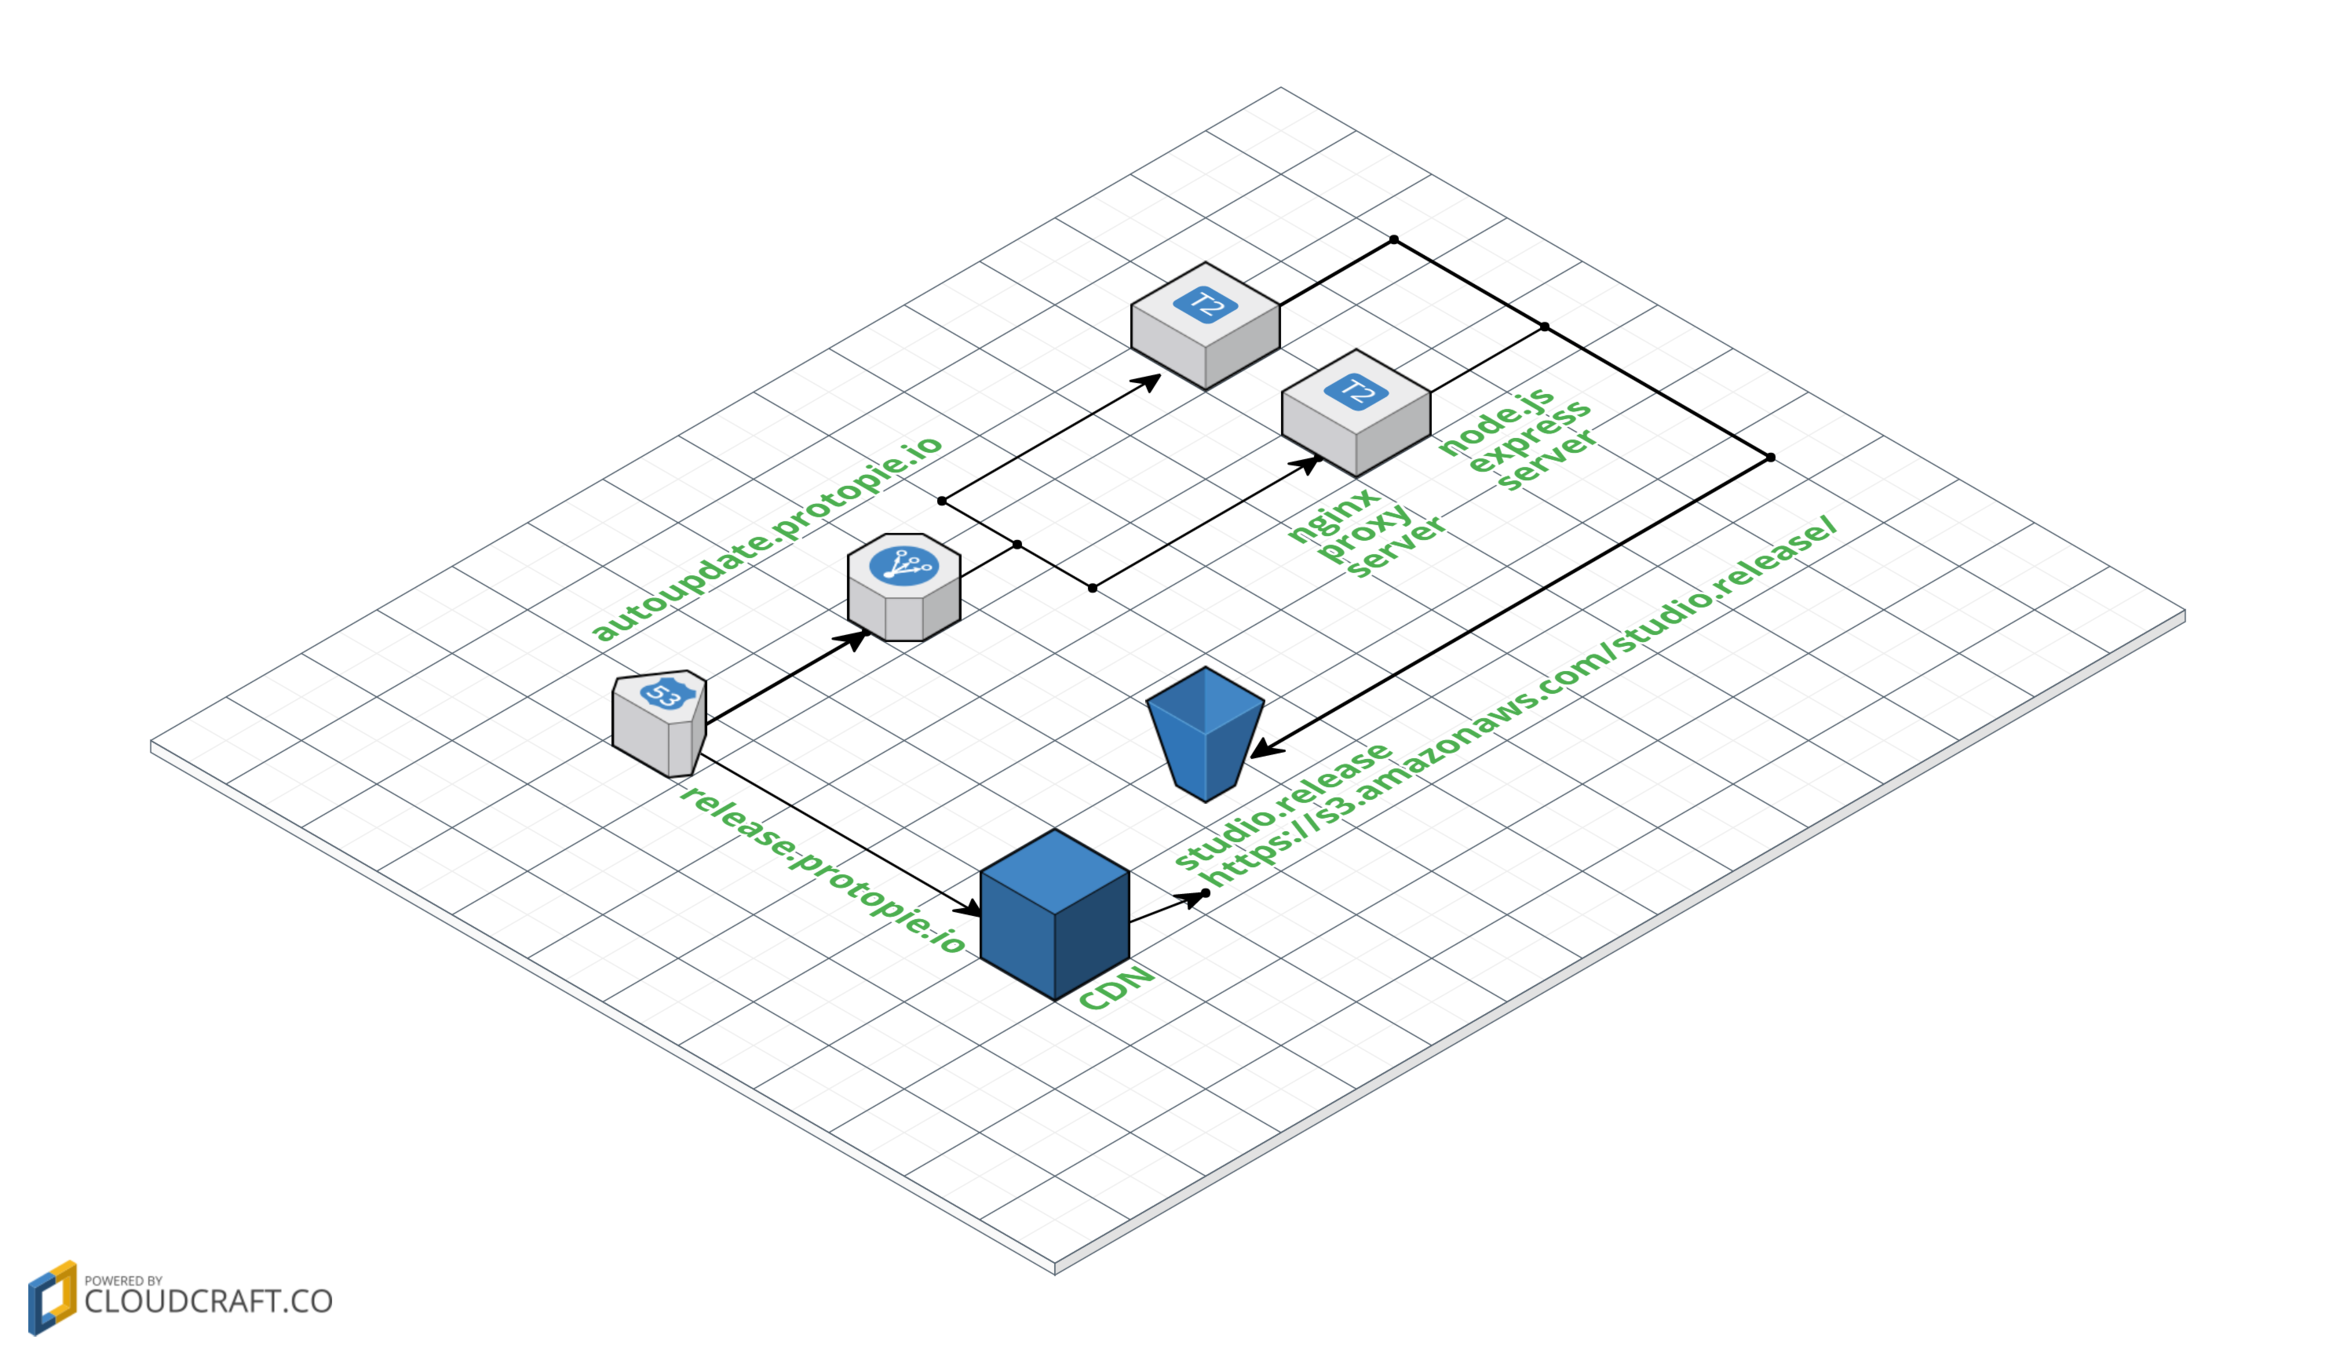
1. make `ProtoPie-${Version}-Setup.exe` file
2. make `${Version}.json` file
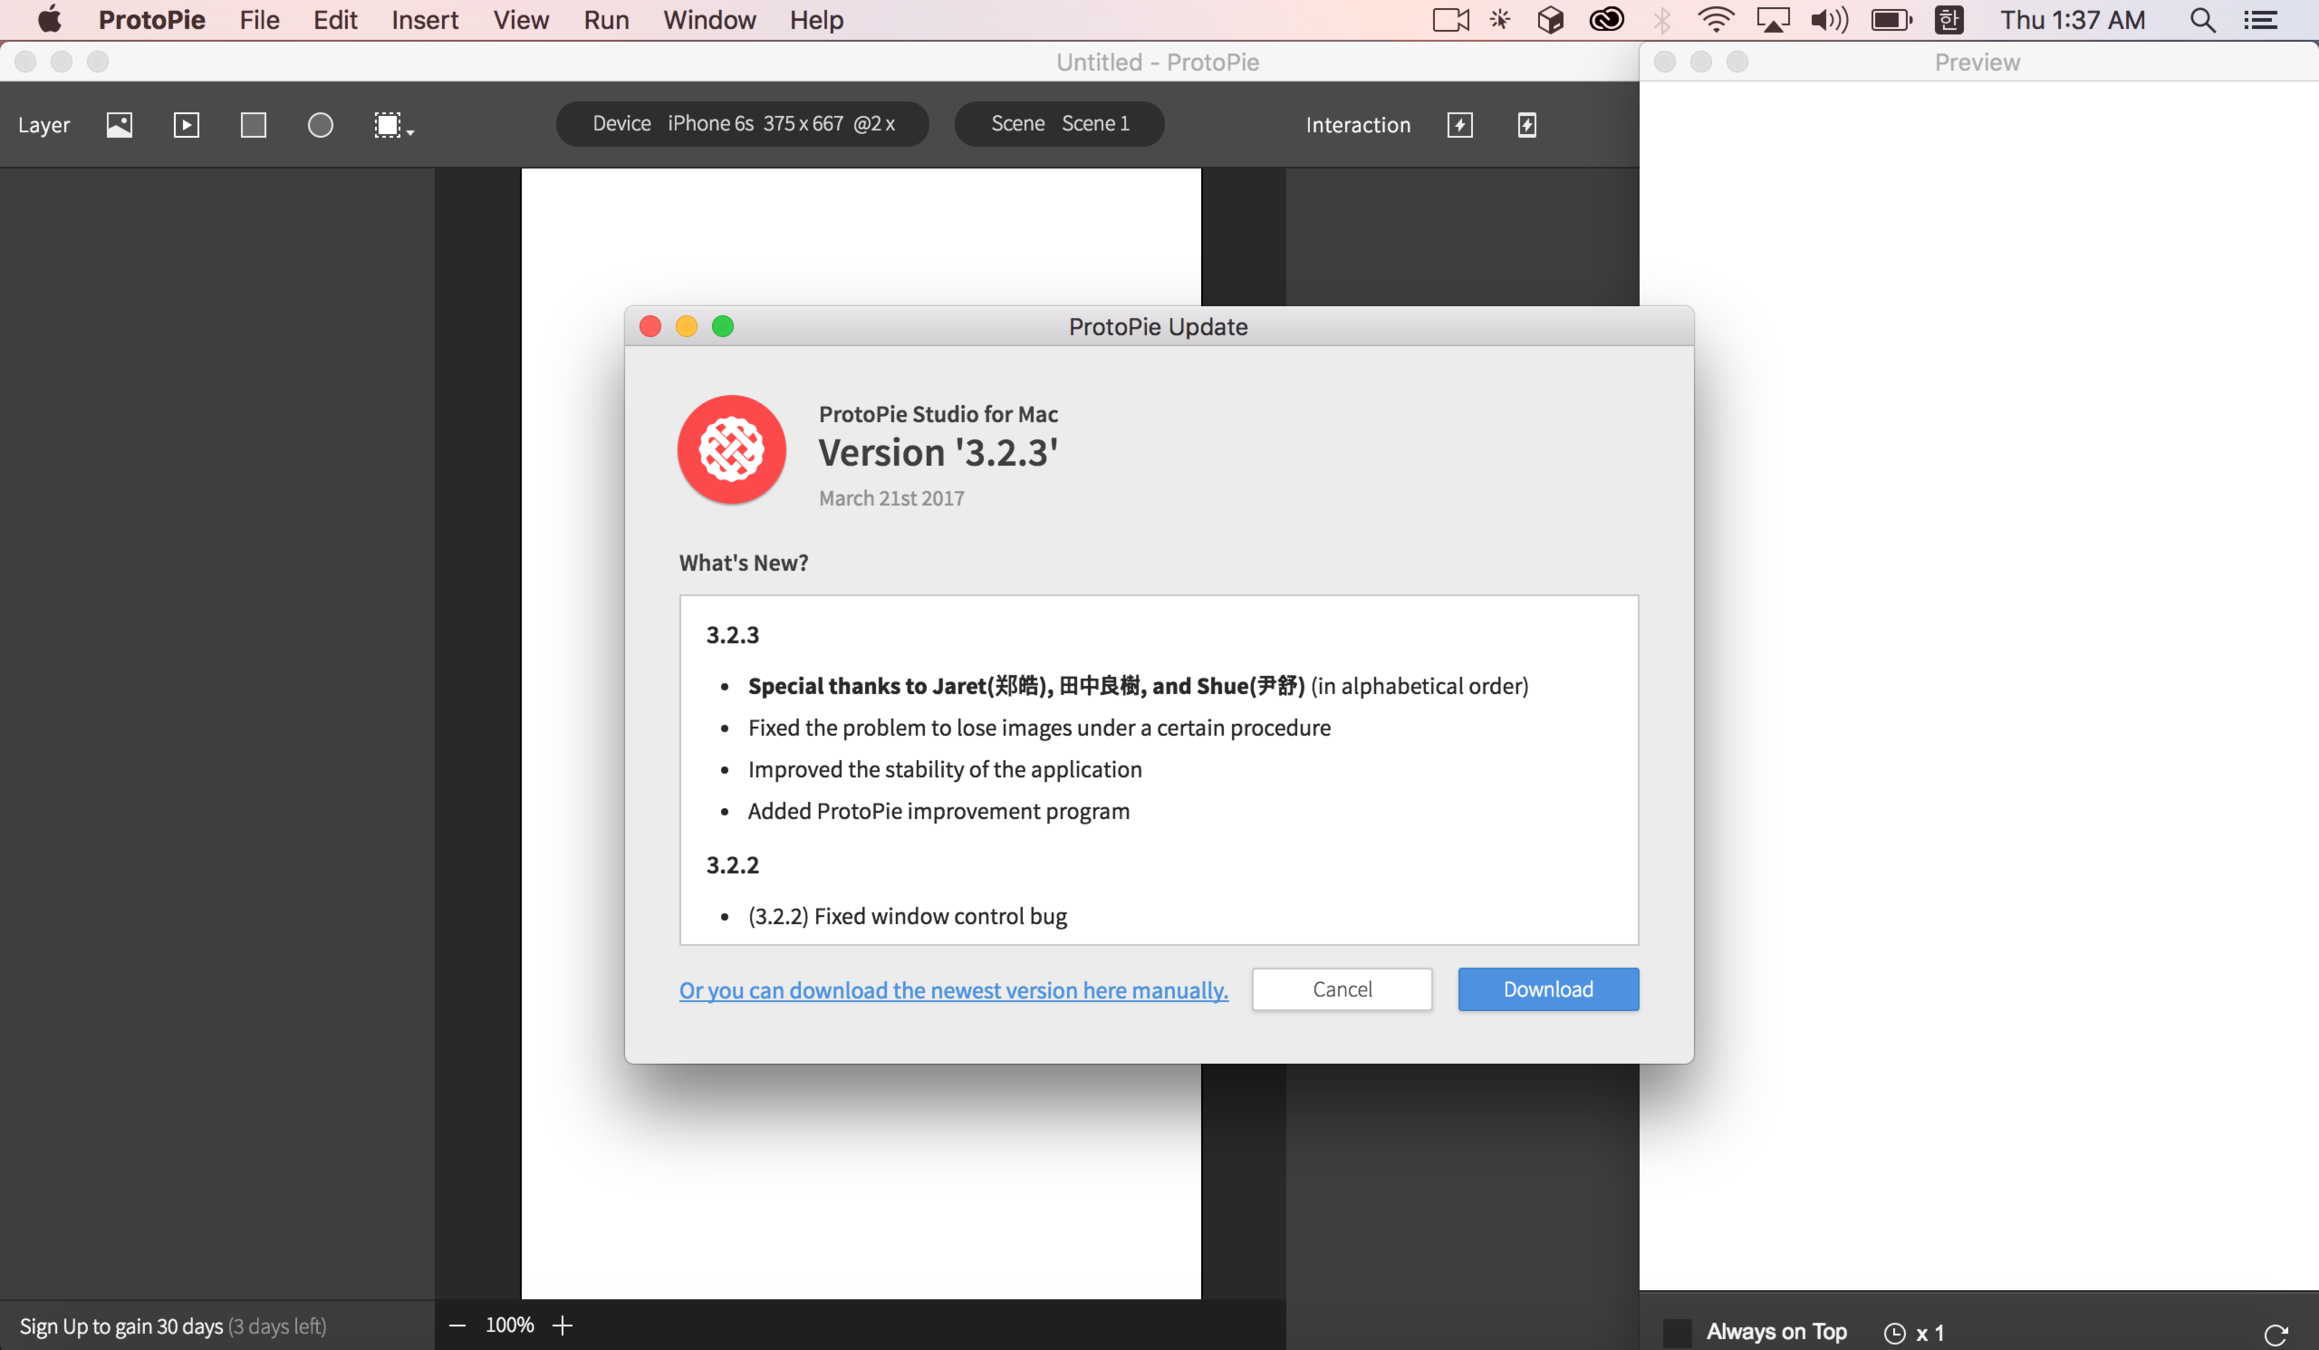
3. upload to S3 - `${Version.json}` file, `ProtoPie-${Version}-Setup.exe` file[macOS] {Version}.json
{
    "version": "3.2.3",
    "note": "### 3.2.3\n- <strong>Special thanks to Jaret(郑皓), 田中良樹, and Shue(尹舒)</strong> (in alphabetical order)\n- Fixed the problem to lose images under a certain procedure\n- Improved the stability of the application\n- Added ProtoPie improvement program",
    "file": "ProtoPie-3.2.3-mac.zip",
    "metadata": {
        "osx": {
            "size": 75391013,
            "checksum": "39432d1cb5b4214515a443d4bec719e9d2b787ab"
        }
    },
    "pub_date": "2017-03-21T09:54:30.939Z",
    "state": "enabled"
}
[Windows] {Version}.json
{
    "version": "3.2.3",
    "note": "### 3.2.3\n- <strong>Official version for Windows</strong>\n- Thank you for your effort to improve ProtoPie for Windows.\n- Beta test program is over on March 31, 2017 in KST.\n- Please jump in and ride on the official version. ;)",
    "file": "ProtoPie-3.2.3-Setup.exe",
    "metadata": {
        "win32": {
            "size": 55642520,
            "checksum": "5df925f649af2924e48bbd935eb9a3f4807bad65"
        }
    },
    "pub_date": "2017-03-31T05:55:56.133Z",
    "state": "enabled"
}
S3
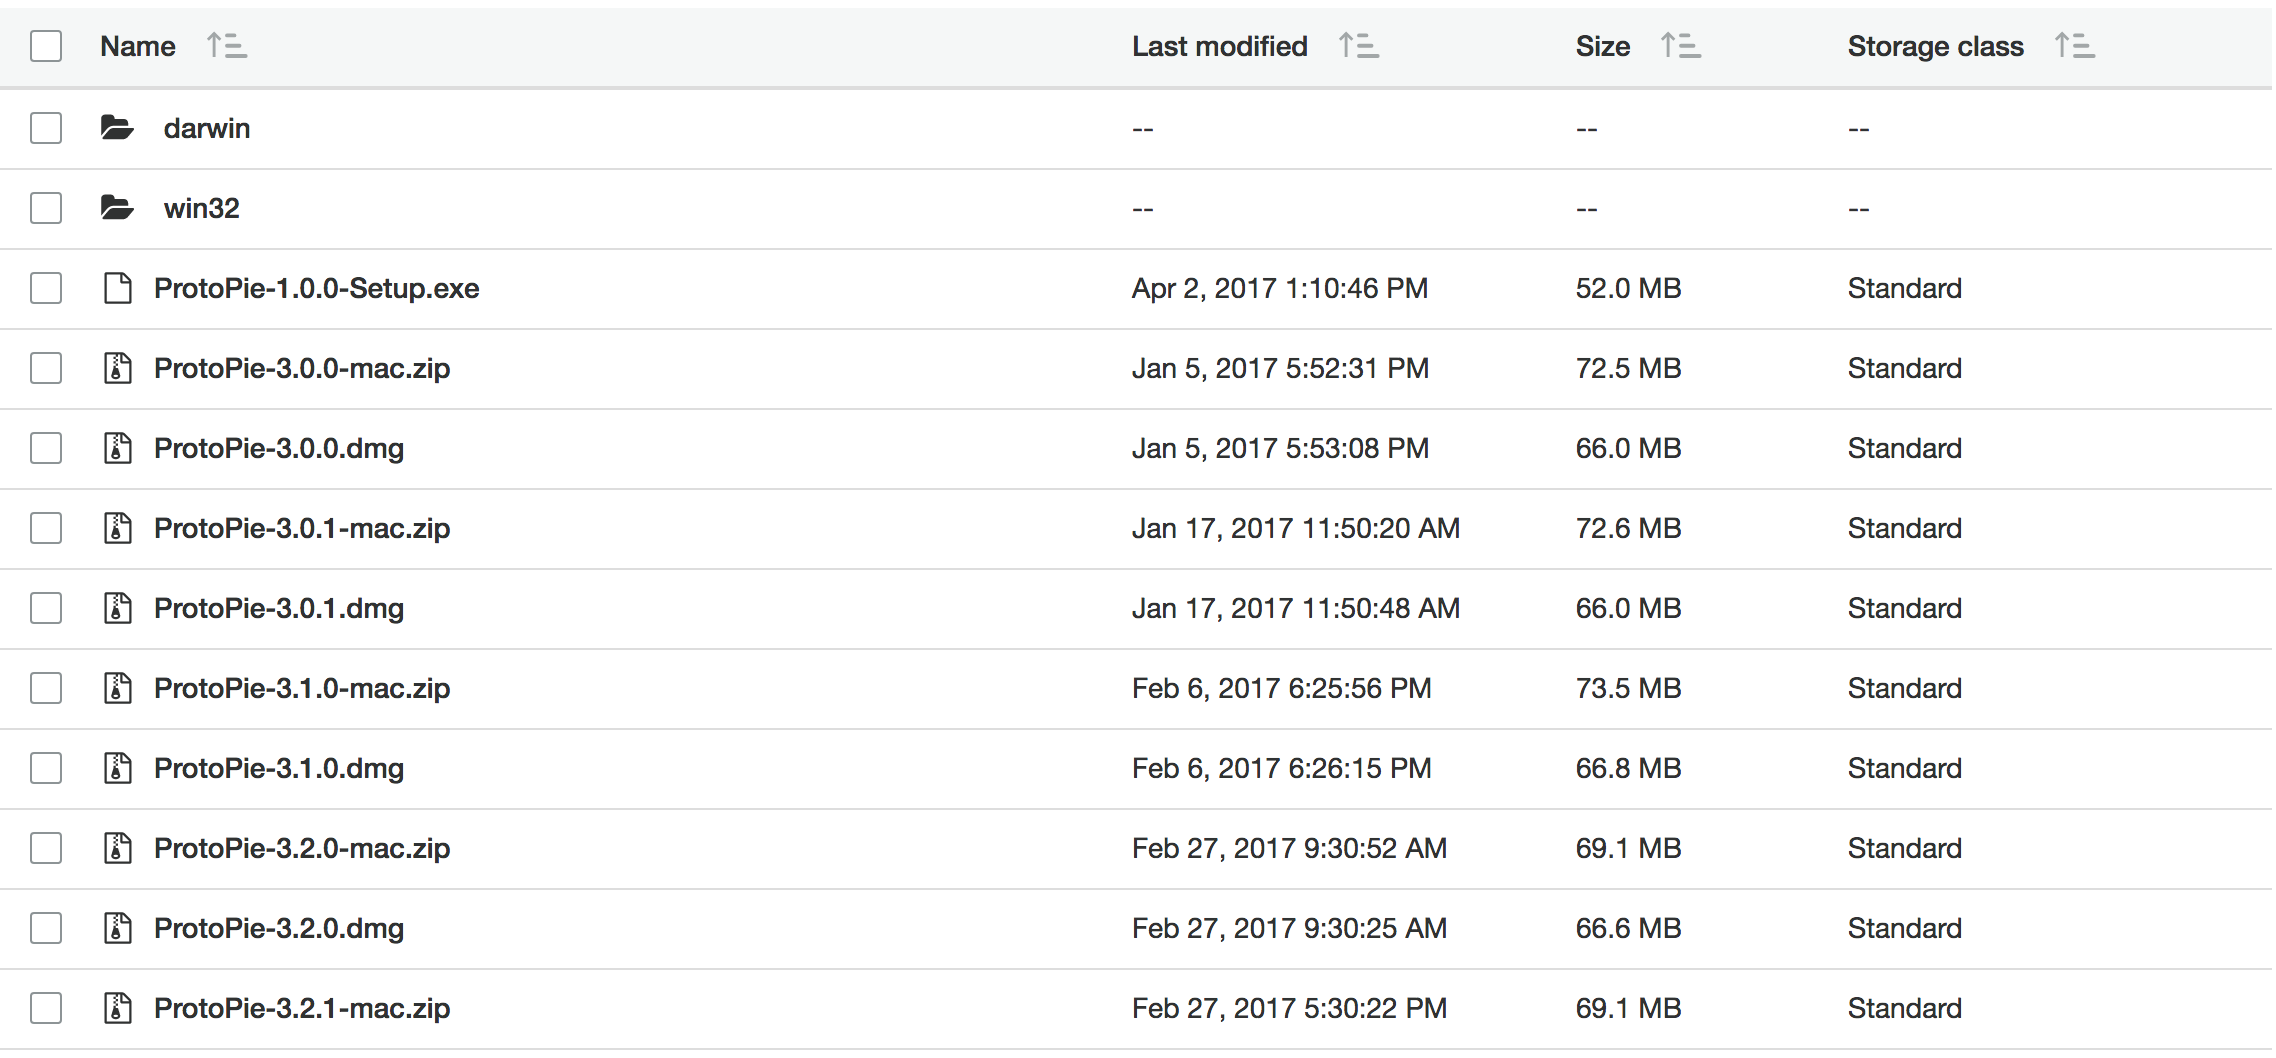
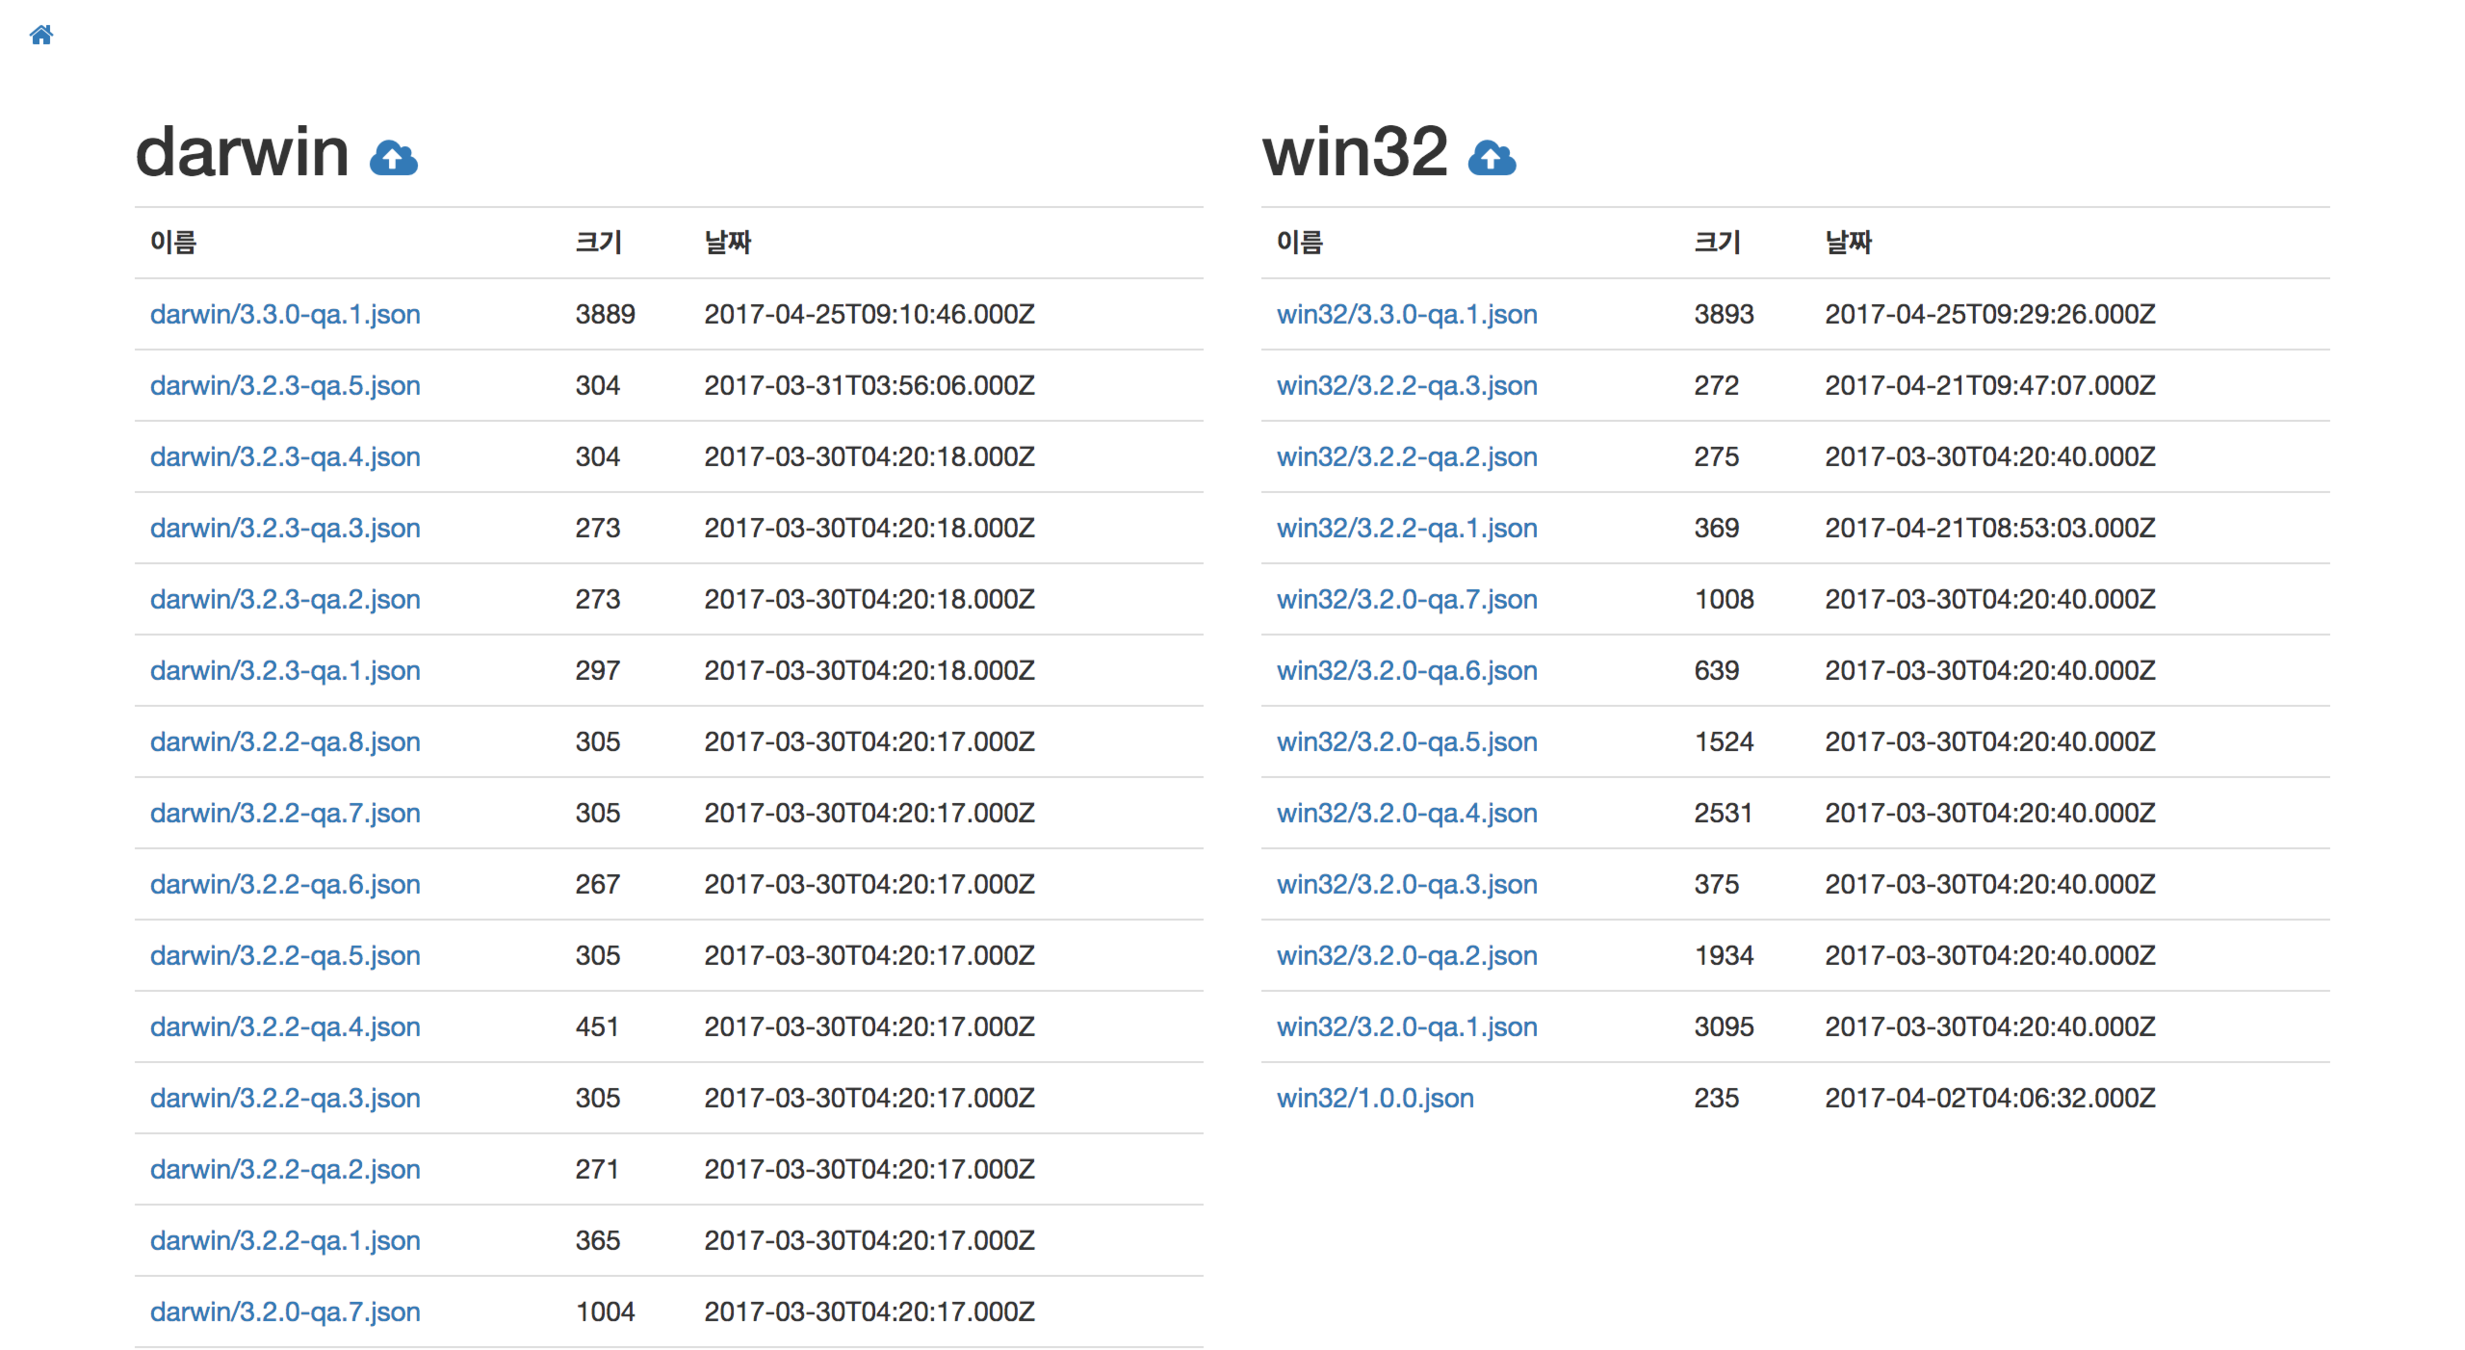
버전 처리
-
다양한 버전의 우선순위
-
v3.3.0
-
v3.3.0-qa.1
-
v3.3.0-winrc.1
-
v3.3.0-rc.1
-
-
http://semver.org/ => Semantic Versioning
-
https://www.npmjs.com/package/semver
import * as semver from 'semver';

semver.gt(version, '3.3.0');

semver.lte(version, '3.1.0')
ec2 - express
// 라우팅 핸들러 설정
router.get('/:platform/:version/', ctrl.index);

// 라우팅 함수
async function index(req, res) {
    // 플랫폼과 버전을 받음
    const platform: string = req.params.platform;
    const version: string = req.params.version;

    if (platform !== 'darwin_x64' && platform !== 'win32') {
        return res.status(400).end();
    }

    if (semver.valid(version) === null) {
        return res.status(400).end();
    }

    // 버전 관리자를 통해 S3 로 부터 최신 버전 리스트를 업데이트
    const versionManager: IVersionManager = VersionManager.getInstance();
    await versionManager.update();
    // 최신 버전 리스트에서 요청받은 플랫폼과 버전레 맞춰 response 에 담을 내용을 만들어 냄.
    const result = versionManager.getResult(platform, version);

    if (result) {
        res.json(result);
    } else {
        res.sendStatus(204);
    }
}
VersionManager.ts
export class VersionManager implements IVersionManager {
    // 매니저는 단일 객체

    public getResult(platfrom: string, version: string) {
        const platfromId: string = (platfrom === 'darwin_x64') ? 'darwin' : platfrom;
        const versionInPlatform: IVersion[] = this._versionList.filter(v => {
            if ((v.getPlatform() === platfromId) && semver.gt(v.getVersion(), version)) {
                if (MODE === 'production' || MODE === 'qa') {
                    return v.getState() === 'enabled';
                } else {
                    return v.getState() !== 'disabled';
                }
            } else {
                return false;
            }
        });
        versionInPlatform.sort((l, r) => semver.gt(l.getVersion(), r.getVersion()) ? -1 : 1);

        if (versionInPlatform.length > 0) {
            const url = versionInPlatform[0].getFile();
            const name = versionInPlatform[0].getVersion();
            const notes = this._getNotes(versionInPlatform);
            const metadata = versionInPlatform[0].getMetadata();
            const pub_date = versionInPlatform[0].getDate();

            return {
                url,
                name,
                notes,
                metadata,
                pub_date
            };
        } else {
            return null;
        }
    }

    public async update(): Promise<void> {
        let s3List = null;
        try {
            s3List = await getS3List();
        } catch (e) {
            await sendSNS('Autoupdate Server : getS3List 실패', '자동업데이트 서버에서 S3 로 부터 JSON 리스트를 읽어오다가 실패함.');
            return;
        }

        let s3Objects = null;
        try {
            s3Objects = await getS3Objects(s3List);
        } catch (e) {
            await sendSNS('Autoupdate Server : getS3Objects 실패', '자동업데이트 서버에서 S3 로 부터 JSON 파일을 읽어오다가 실패함.');
            return;
        }

        this._setVersions(s3List, s3Objects);
    }

    private _setVersions(s3List: any[], s3Objects: any[]): void {
        this._versionList = [];
        s3List.forEach((item, index) => {
           this._versionList.push(new Version(s3List[index], s3Objects[index]));
        });
    }

    private _getNotes(versionInPlatform): string {
        const notes = [];
        versionInPlatform.forEach((item, index) => {
            if (index < 3) {
                notes.push(`## ${item.getVersion()}\n${item.getNote()}\nmetadata:${JSON.stringify(item.getMetadata())}`);
            }
        });
        return notes.join('\n');
    }
}
Staging Server
Admin Page (1)
Admin Page (2)