


Woongjae Lee
Daangn - Frontend Core Team ex) NHN Dooray - Frontend Team Leader ex) ProtoPie - Studio Team
일렉트론 이해하기
네이티브 UI 활용, 브라우저 내부 뷰 활용
일렉트론에서 데이터의 흐름
일렉트론을 상용앱으로 패키징하기
자동 업데이트 이해하기
Software Engineer | Studio XID, Inc.
Microsoft MVP
TypeScript Korea User Group Organizer
Electron Korea User Group Organizer
Marktube (Youtube)
The Electron framework lets you write cross-platform desktop applications
using JavaScript, HTML and CSS.
It is based on Node.js and Chromium
and is used by the Atom editor and many other apps.
프로그램의 라이프 사이클
컨트롤 할것이냐?
컨트롤 당할 것이냐?
Electron 의 app 모듈에서 어플리케이션 시작 및 종료에 관한 이벤트를 받아 프로그래머가 작성한 코드를 실행합니다.
라이브러리는 앱을 풍성하게 하기 위한 도움 요소입니다.
Electron + React
Electron + jQuery
제어하는 부분이 다르다면 프레임워크를 한가지만 써야 하는것은 아닙니다.
Electron + Angular
HTML, CSS, JavaScript 로 하는 모든 것 입니다.
어떻게 하면 일렉트론을 잘 만들수 있어요?
일렉트론 프레임워크에 대한 이해 (구조 및 API)
HTML, CSS, JavaScript 를 잘하면 됩니다.
근데 이 세가지는 끝이 없다 할 정도 입니다.
HTML, CSS 는 크로미움에 맞는 스펙을 잘 알면 됩니다.
하지만 JavaScript 는?
JavaScript 문법
ES6, ES7 문법
DOM, Node.js
jQuery / React / Angular / Vue ...
TypeScript ...
계속해서 웹기술을 더 깊이 있게 배우는 것이 중요
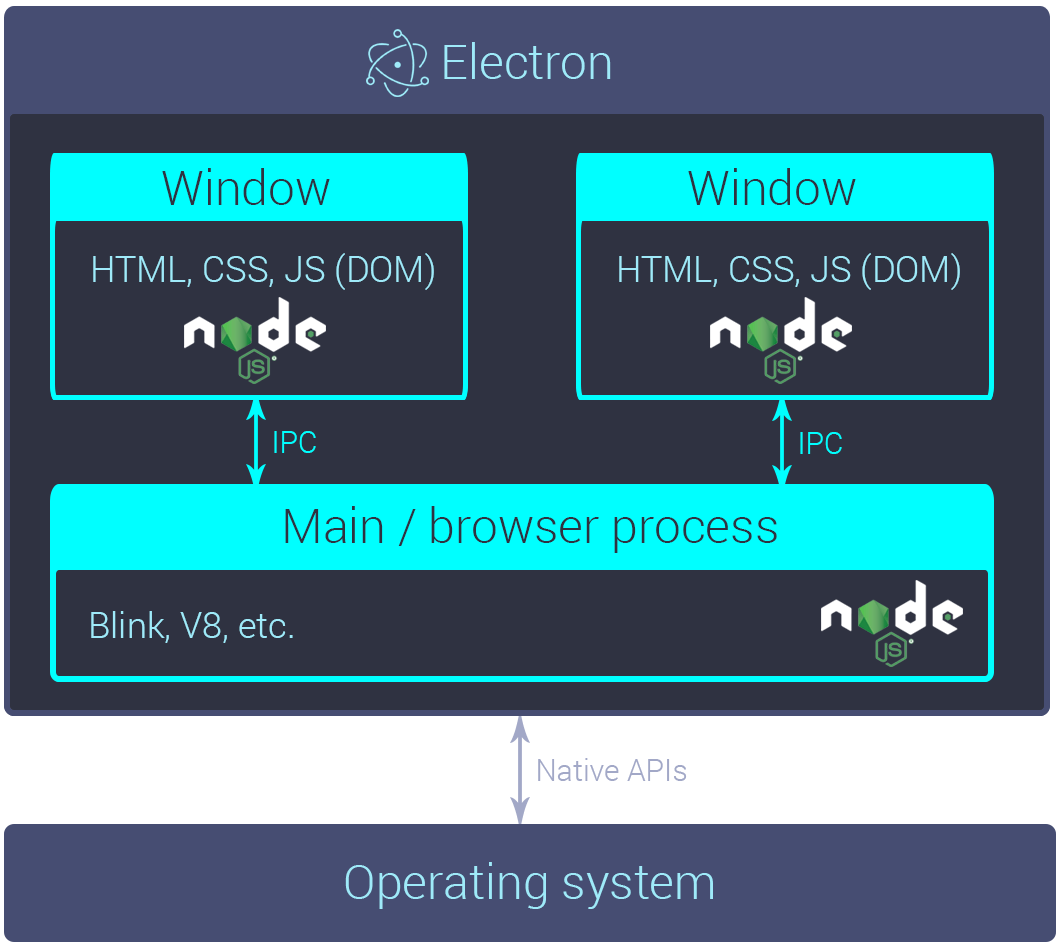
Main Process - Only One
그냥 노드 서버라고 생각하면 편하다
근데 서버가 사용자에 로컬에 있다면??
Renderer Process - 만들기 나름
크롬 브라우저라고 생각하면 편하다.
크롬에서 노드를 사용할 수 있다니 !
브라우저 샌드박스가 아니다.
하지만 샌드박스로 만들수 있다.
BrowserWindow 객체를 생성하면 프로세스가 생긴다.
Main 과 Renderer 프로세스는 각각 별도의 프로세스이다.
데이타를 주고 받으려면 별도의 방식을 사용해야 한다.
방식 1. IPC - Inter Process Communication
메인의 ipcMain 모듈과 랜더러의 ipcRenderer 모듈을 이용
이벤트를 반인딩하고, 메세지와 데이터를 샌드하는 방식
방식 2. remote
랜더러 프로세스의 remote 모듈을 이용
메인의 몇가지 모듈을 제어 가능하다.
라이프사이클로 인해 사용에 주의한다.
주로 단발성 액션에 사용
Electron - 6.0.10
Node - 12.4.0
Chromium - 76.0.3809.146
실행 환경과 개발 환경
개발 환경에서의 일렉트론 실행 절차 알아보기
개발 환경의 Node 버전과 실행 환경인 Electron 의 Node 버전
그래서 개발 환경의 Node 버전은 어떤 것으로 ?
Node Version Manager
nvm > n
(Windows) nvm-windows 추천
zsh 에서 더 멋짐 ?
명령어
nvm install 12.4.0
nvm use 12.4.0
nvm alias default 12.4.0 (mac only)
mkdir <PROJECT_NAME>
cd <PROJECT_NAME>
npm init -yD 인 이유 : electron-builder
npm i electron -D{
"name": "quick-start",
"version": "1.0.0",
"description": "",
"main": "index.js",
"scripts": {
"start": "electron ."
},
"keywords": [],
"author": "",
"license": "ISC",
"devDependencies": {
"electron": "^6.0.10"
}
}// index.js
const {app, BrowserWindow} = require('electron')
const path = require('path')
let mainWindow
function createWindow () {
mainWindow = new BrowserWindow({
width: 800,
height: 600,
webPreferences: {
preload: path.join(__dirname, 'preload.js')
}
})
mainWindow.loadFile('index.html')
mainWindow.on('closed', function () {
mainWindow = null
})
}
app.on('ready', createWindow)
app.on('window-all-closed', function () {
if (process.platform !== 'darwin') app.quit()
})
app.on('activate', function () {
if (mainWindow === null) createWindow()
})<!-- index.html -->
<!DOCTYPE html>
<html>
<head>
<meta charset="UTF-8">
<title>Hello World!</title>
</head>
<body>
<h1>Hello World!</h1>
We are using Node.js <span id="node-version"></span>,
Chromium <span id="chrome-version"></span>,
and Electron <span id="electron-version"></span>.
<!-- You can also require other files to run in this process -->
<script src="./renderer.js"></script>
</body>
</html>// preload.js
// All of the Node.js APIs are available in the preload process.
// It has the same sandbox as a Chrome extension.
window.addEventListener('DOMContentLoaded', () => {
const replaceText = (selector, text) => {
const element = document.getElementById(selector)
if (element) element.innerText = text
}
for (const type of ['chrome', 'node', 'electron']) {
replaceText(`${type}-version`, process.versions[type])
}
})// preload.js
// All of the Node.js APIs are available in the preload process.
// It has the same sandbox as a Chrome extension.
window.addEventListener('DOMContentLoaded', () => {
const replaceText = (selector, text) => {
const element = document.getElementById(selector)
if (element) element.innerText = text
}
for (const type of ['chrome', 'node', 'electron']) {
replaceText(`${type}-version`, process.versions[type])
}
})// renderer.js
// This file is required by the index.html file and will
// be executed in the renderer process for that window.// main process 생성
index.js
// main process 생성 완료 이벤트 바인딩
app.on('ready', createWindow);
// 바인딩 된 함수 실행
createWindow();
// renderer process 생성
mainWindow = new BrowserWindow({
width: 800,
height: 600,
webPreferences: {
preload: path.join(__dirname, "preload.js")
}
});
// renderer process 에 로딩할 컨텐츠 삽입
mainWindow.loadFile("index.html");
// renderer process 의 script 실행
<script src="./renderer.js"></script>랜더러 프로세스가 없는 앱도 데스크탑 앱이다.
프로세스에서 하나밖에 없는 단일 객체입니다.
app 모듈은 개발하는 앱의 라이프사이클을 알고 있다.
그 라이프사이클의 이벤트에 사용자의 함수를 할당한다.
그 이벤트들을 학습하자.
app.on('ready', () => {}); 등등
app.on('will-finish-launching', () => {
    /*
     [Windows / Linux] => = ready
     [macOS] => = applicationWillFinishLaunching (NSApplication)
     'open-file', 'open-url' 이벤트에 대해 설정하거나 (둘다 macOS 용 이벤트)
     'crash reporter' and 'auto updater' 를 시작합니다.
    */
    console.log('will-finish-launching');
});

app.on('ready', (launchInfo) => {
    /*
     일렉트론 앱이 초기화되어 준비된 상태입니다.
     [macOS] launchInfo Object
     */
    console.log(`ready : ${JSON.stringify(launchInfo)}`);
});

app.on('window-all-closed', () => {
    /*
     모든 윈도우가 닫히자 마자 불립니다.
     */
    console.log('window-all-closed');
    app.quit();
});

app.on('before-quit', (event) => {
    /*
     앱 종료가 시작되어서 앱의 모든 윈도우들을 클로즈 하기 시작할때 불립니다.
     이미 닫혀있어도 불립니다.
     */
    // event.preventDefault();
    console.log('before-quit');
});

app.on('will-quit', (event) => {
    /*
     모든 윈도우가 닫히고 나서 메인 앱 프로세스를 종료하기 직전에 불립니다.
     */
    // event.preventDefault();
    console.log('will-quit');
});

/*
 window-all-closed 와 will-quit 차이
 만약에 window-all-closed 이벤트를 받는 함수를 설정하지 않으면, 모든 윈도우들이 닫혔을때 app.quit() (before-quit => will-quit => quit) 이 진행됩니다.
 만약에 window-all-closed 이벤트를 받는 함수를 설정 한다면, app.quit() 을 할지 안할지 결정할 수 있습니다.
 모든 윈도우를 닫아서가 아니라, <Cmd + Q> 를 호출하거나, 코드에서 직접 app.quit() 을 호출해서 앱을 종료하면,
 모든 윈도우를 닫은 후 will-quit 이벤트를 발생시킨다.
 이럴 경우에는 window-all-closed 이벤트는 발생하지 않는다.
 */

app.on('quit', (event, exitCode) => {
    /*
     최종적으로 종료되면서 불립니다.
     */
    console.log(`quit : ${exitCode}`);
});

/*
    [macOS]
    dock 에서 어플리케이션 아이콘을 클릭하면 발생하는 이벤트
 */
app.on('activate', (event, hasVisibleWindows) => {
    /*
     열려있는 윈도우가 있으면, hasVisibleWindows 가 true 입니다.
     없으면, hasVisibleWindows 가 false 입니다.
     */
    console.log(`activate : ${hasVisibleWindows}`);
});랜더러 프로세스 생성
어려가지 옵션
생성된 윈도우에 이벤트 설정
ready-to-show 이벤트 알아두기
타이틀바 없는 창
frame
titleBarStyle
창의 부모 자식 관계
parent
modal
const mainWindow = new BrowserWindow({
  width: 600,
  height: 600
});

mainWindow.loadURL('https://github.com/2woongjae');

const secondWindow = new BrowserWindow({
  width: 300,
  height: 300,
  x: 0,
  y: 0,
  minWidth: 200,
  minHeight: 200,
  maxWidth: 500,
  maxHeight: 500,
  movable: false,
  title: 'second'
});

secondWindow.loadFile(`second.html`);
const {app, BrowserWindow} = require('electron');
let first = null;
let second = null;
let third = null;
app.on('ready', () => {
first = new BrowserWindow({
width: 600,
height: 600,
frame: false
});
first.loadFile(`index.html`);
second = new BrowserWindow({
width: 600,
height: 600,
titleBarStyle: 'hidden'
});
second.loadFile(`index.html`);
third = new BrowserWindow({
width: 600,
height: 600,
titleBarStyle: 'hidden-inset'
});
third.loadFile(`index.html`);
});const {app, BrowserWindow} = require('electron');
let win = null;
app.on('ready', () => {
win = new BrowserWindow({
width: 600,
height: 600,
// show: false
});
win.loadURL('https://github.com/2woongjae');
/*
win.once('ready-to-show', () => {
win.show();
});
*/
});const {app, BrowserWindow} = require('electron');
let win = null;
app.on('ready', () => {
win = new BrowserWindow({
show: false
});
win.loadFile(`index.html`);
win.once('ready-to-show', () => {
win.show();
console.log('win ready-to-show');
});
win.on('close', () => {
console.log('win close');
});
win.on('closed', () => {
console.log('win closed');
});
win.on('show', () => {
console.log('win show');
});
win.on('hide', () => {
console.log('win hide');
});
win.on('blur', () => {
console.log('win blur');
});
win.on('focus', () => {
console.log('win focus');
});
win.on('move', () => {
console.log('win move');
});
win.on('moved', () => {
console.log('win moved');
});
});
app.on('activate', (event, hasVisibleWindows) => {
if (!hasVisibleWindows) {
win.show();
}
});const {BrowserWindow} = require('electron').remote;
const btn_current = document.querySelector('#current');
const btn_all = document.querySelector('#all');
btn_current.addEventListener('click', () => {
const current = BrowserWindow.getFocusedWindow();
alert(current.id);
});
btn_all.addEventListener('click', () => {
const all = BrowserWindow.getAllWindows();
const ids = all.map(win => win.id);
alert(ids);
});트레이 생성
new Tray(이미지 경로);
트레이에 이벤트를 할당 가능
트레이에 메뉴를 적용
트레이.setContextMenu(메뉴);
메뉴 생성
= Menu.buildFromTemplate(템플릿);
= new Menu();
MenuItem 만들어서 추가
const {app, BrowserWindow, Tray, Menu} = require('electron');

let win = null;

app.on('ready', () => {
  win = new BrowserWindow();
  win.loadFile(`index.html`);

  const tray = new Tray(`${__dirname}/tray16_100.png`);

  tray.on("click", () => {
    console.log("tray click");
  });

  tray.on("right-click", () => {
    console.log("tray right-click");
  });

  const trayMenu = Menu.buildFromTemplate([
    {
      label: "Item1",
      type: "normal"
    },
    {
      label: "Item2",
      type: "checkbox",
      checked: true
    },
    {
      type: "separator"
    },
    {
      label: "Item3",
      type: "normal",
      click: () => {
        console.log("Item3 click");
      }
    }
  ]);
  tray.setContextMenu(trayMenu);
});Menu.setApplicationMenu(메뉴);
메뉴
= Menu.buildFromTemplate(템플릿);
= new Menu();
MenuItem 만들어서 추가
템플릿은 객체
macOS
앱 하나에 어플리케이션 메뉴 하나
Windows
랜더러 프로세스 별로 메뉴 존재
win.setMenu(null | 메뉴) 로 개개 메뉴 변경
const { app, BrowserWindow, Menu } = require('electron');

let win = null;
const template = [
  {
    label: 'first',
    submenu: [
      {
        label: 'first1',
        click: () => {
          console.log('first1 click');
        },
      },
    ],
  },
  {
    label: 'second',
    submenu: [
      {
        label: 'second1',
        click() {
          console.log('second1 click');
        },
      },
    ],
  },
];

app.on('ready', () => {
  const menu = Menu.buildFromTemplate(template);
  Menu.setApplicationMenu(menu);
  console.log(Menu.getApplicationMenu());

  win = new BrowserWindow();
  win.loadURL(`file://${__dirname}/index.html`);
});
open dialog
콜백 인자는 string[]
save dialog
콜백 인자는 string
message dialog
콜백 인자는 버튼 id: number
error dialog
노 콜백
certificate dialog
랜더러 프로세스와 메인 프로세스의 데이터 전달
메인 프로세스는 ipcMain 모듈 사용
랜더러 프로세스는 ipcRenderer 모듈 사용
동기로 전달하는 방식과 비동기로 전달하는 방식이 있다.
비동기 : 랜더러에서 전달받은 후 메인에서 비동기로 데이터를 처리해서 다시 랜더러로 넘기는 경우
동기 : 랜더러에서 가져갈 데이터가 메인에 바로 있는 경우
const {app, BrowserWindow, ipcMain} = require('electron');

let win = null;

app.on('ready', () => {
  win = new BrowserWindow({
    webPreferences: {
      nodeIntegration: true,
    }
  });
  win.loadFile(`index.html`);

  ipcMain.on('test-async', (event, arg) => {
    console.log(arg);
    event.sender.send('test-async-reply', 'reply-async');
  });

  ipcMain.on('test-sync', (event, arg) => {
    console.log(arg);
    event.returnValue = 'reply-sync';
  });
});
const {ipcRenderer} = require('electron');
ipcRenderer.on('test-async-reply', (event, arg) => {
console.log(arg);
});
const btn_async = document.querySelector('#test-async');
const btn_sync = document.querySelector('#test-sync');
btn_async.addEventListener('click', () => {
ipcRenderer.send('test-async', 'this is async test');
});
btn_sync.addEventListener('click', () => {
const reply = ipcRenderer.sendSync('test-sync', 'this is sync test');
console.log(reply);
});#!/usr/bin/env node
var version = require('./package').version
var fs = require('fs')
var os = require('os')
var path = require('path')
var extract = require('extract-zip')
var download = require('electron-download')
var installedVersion = null
try {
installedVersion = fs.readFileSync(path.join(__dirname, 'dist', 'version'), 'utf-8').replace(/^v/, '')
} catch (ignored) {
// do nothing
}
var platformPath = getPlatformPath()
var electronPath = process.env.ELECTRON_OVERRIDE_DIST_PATH || path.join(__dirname, 'dist', platformPath)
if (installedVersion === version && fs.existsSync(electronPath)) {
process.exit(0)
}
// downloads if not cached
download({
cache: process.env.electron_config_cache,
version: version,
platform: process.env.npm_config_platform,
arch: process.env.npm_config_arch,
strictSSL: process.env.npm_config_strict_ssl === 'true',
force: process.env.force_no_cache === 'true',
quiet: process.env.npm_config_loglevel === 'silent' || process.env.CI
}, extractFile)
// unzips and makes path.txt point at the correct executable
function extractFile (err, zipPath) {
if (err) return onerror(err)
extract(zipPath, { dir: path.join(__dirname, 'dist') }, function (err) {
if (err) return onerror(err)
fs.writeFile(path.join(__dirname, 'path.txt'), platformPath, function (err) {
if (err) return onerror(err)
})
})
}
function onerror (err) {
throw err
}
function getPlatformPath () {
var platform = process.env.npm_config_platform || os.platform()
switch (platform) {
case 'darwin':
return 'Electron.app/Contents/MacOS/Electron'
case 'freebsd':
case 'linux':
return 'electron'
case 'win32':
return 'electron.exe'
default:
throw new Error('Electron builds are not available on platform: ' + platform)
}
}
CLI 실행
Electron.app/Contents/MacOS/Electron 명령어 실행
GUI 에서 실행
Electron.app 더블클릭
인자로 '실행할 Electron 프로젝트 폴더'를 지정하고 실행
'실행할 Electron 프로젝트' 란 package.json 의 main 에 main process 파일이 지정되어 있는 폴더
그 프로젝트를 실행한다.
CLI 에서는 뒤에 경로를 붙여서 명령어를 실행한다.
GUI 에서는 폴더를 Electron.app 에 끌어다 놓으면 된다.
인자를 지정하지 않고 실행
기본 실행 지정된 Electron Prebuilt 안에 폴더를 실행한다.
app.asar 혹은 app 폴더
default_app.asar (미리 들어 있음)
// On macOS
electron/Electron.app/Contents/Resources/app/
├── package.json
├── main.js
└── index.html

// On Windows and Linux
electron/resources/app
├── package.json
├── main.js
└── index.html// On macOS
electron/Electron.app/Contents/Resources/app.asar
├── package.json
├── main.js
└── index.html
// On Windows and Linux
electron/resources/app.asar
├── package.json
├── main.js
└── index.htmlelectron/asar
what is asar ?
Simple extensive tar-like archive format with indexing
Windows node_modules 긴 경로
require 속도 향상
코드 보호
Electron Releases
Github Release 의 버전별 페이지
여러가지 환경에서 사용 가능한 실행 파일이 준비되어 있습니다.
npm package
https://github.com/electron/get
electron 에서 사용하는 모듈
구 electron-download
단독 실행 => 실행 환경(OS)에 따라 미리 정해진 폴더를 실행
더블 클릭 하거나
커맨드라인에서 인자 없이 실행
인자로 특정 폴더를 지정하여 실행 (개발 모드에서 실행하는 방식)
커맨드라인에서 실행파일 뒤에 폴더를 인자로 하여 실행
리브랜딩 이라고 합니다.
일렉트론 프레임워크의 소스코드를 받아서 빌드할때 처리할 수 있지만, 권장하지 않습니다.
미리 빌드된 실행파일로도 이름과 아이콘을 변경할 수 있습니다.
그래서 대부분 미리 빌드된 실행파일을 다운받고,
자신의 프로젝트 소스 폴더만 정해진 자리에 넣은 뒤,
아이콘과 이름만 변경하는 방식을 사용합니다.
// 프로젝트 폴더 (before packaging)
electron-packager-example/
├── node_modules/
├── icon.icns
├── package.json
├── package-lock.json
└── index.js

// 프로젝트 폴더 (after packaging)
electron-packager-example/
├── electron-packager-example-darwin-x64/
├── node_modules/
├── icon.icns
├── package.json
├── package-lock.json
└── index.js

// 패키징 된 app 폴더 (혹은 app.asar 파일)
electron-packager-example-darwin-x64/Contents/Resources/app/
├── icon.icns
├── package.json
├── package-lock.json
└── index.jselectron 앱 개발을 위한 cli 툴
angular 에겐 angular-cli
react 에겐 create-react-app
electron 에겐 electron-forge
프로젝트 만들기
npx create-electron-app electron-forge-example
스크립트
개발모드 실행 : npm start
패키징 : npm run package
최종 배포 파일 : npm run make
퍼블리싱 : npm run publish
// 업데이트 서버 주소 설정 및 초기화
autoUpdater.setFeedURL(`http://127.0.0.1:${port}/update/latest`);

// 업데이트 있는지 체크
autoUpdater.checkForUpdates();

// 업데이트 파일이 다운로드 다 되었는지 확인하는 이벤트 바인딩
autoUpdater.on('update-downloaded', async() => {

    // 앱 종료 후 업데이트 후 재시작
    autoUpdater.quitAndInstall();

});사용이 생각보다 어렵지 않습니다.
업데이트용 파일인 .zip 파일을 electron-builder 에서 지원
설치 및 실행 파일에 별도의 추가 변경이 필요하지 않습니다.
Windows 는 실행 파일 구조 자체가 변합니다.
macOS 는 Squirrel.mac 이 built-in 되어 있습니다.
codesign 이 꼭 되어있어야 합니다.
단점
다운로드 진행 상태를 알수 없습니다.
파일이 60MB 이상인걸?
역대급 꼼수
무조건 업데이트 파일 다운로드는 처음부터
릴리즈노트는 다운로드 끝나고?
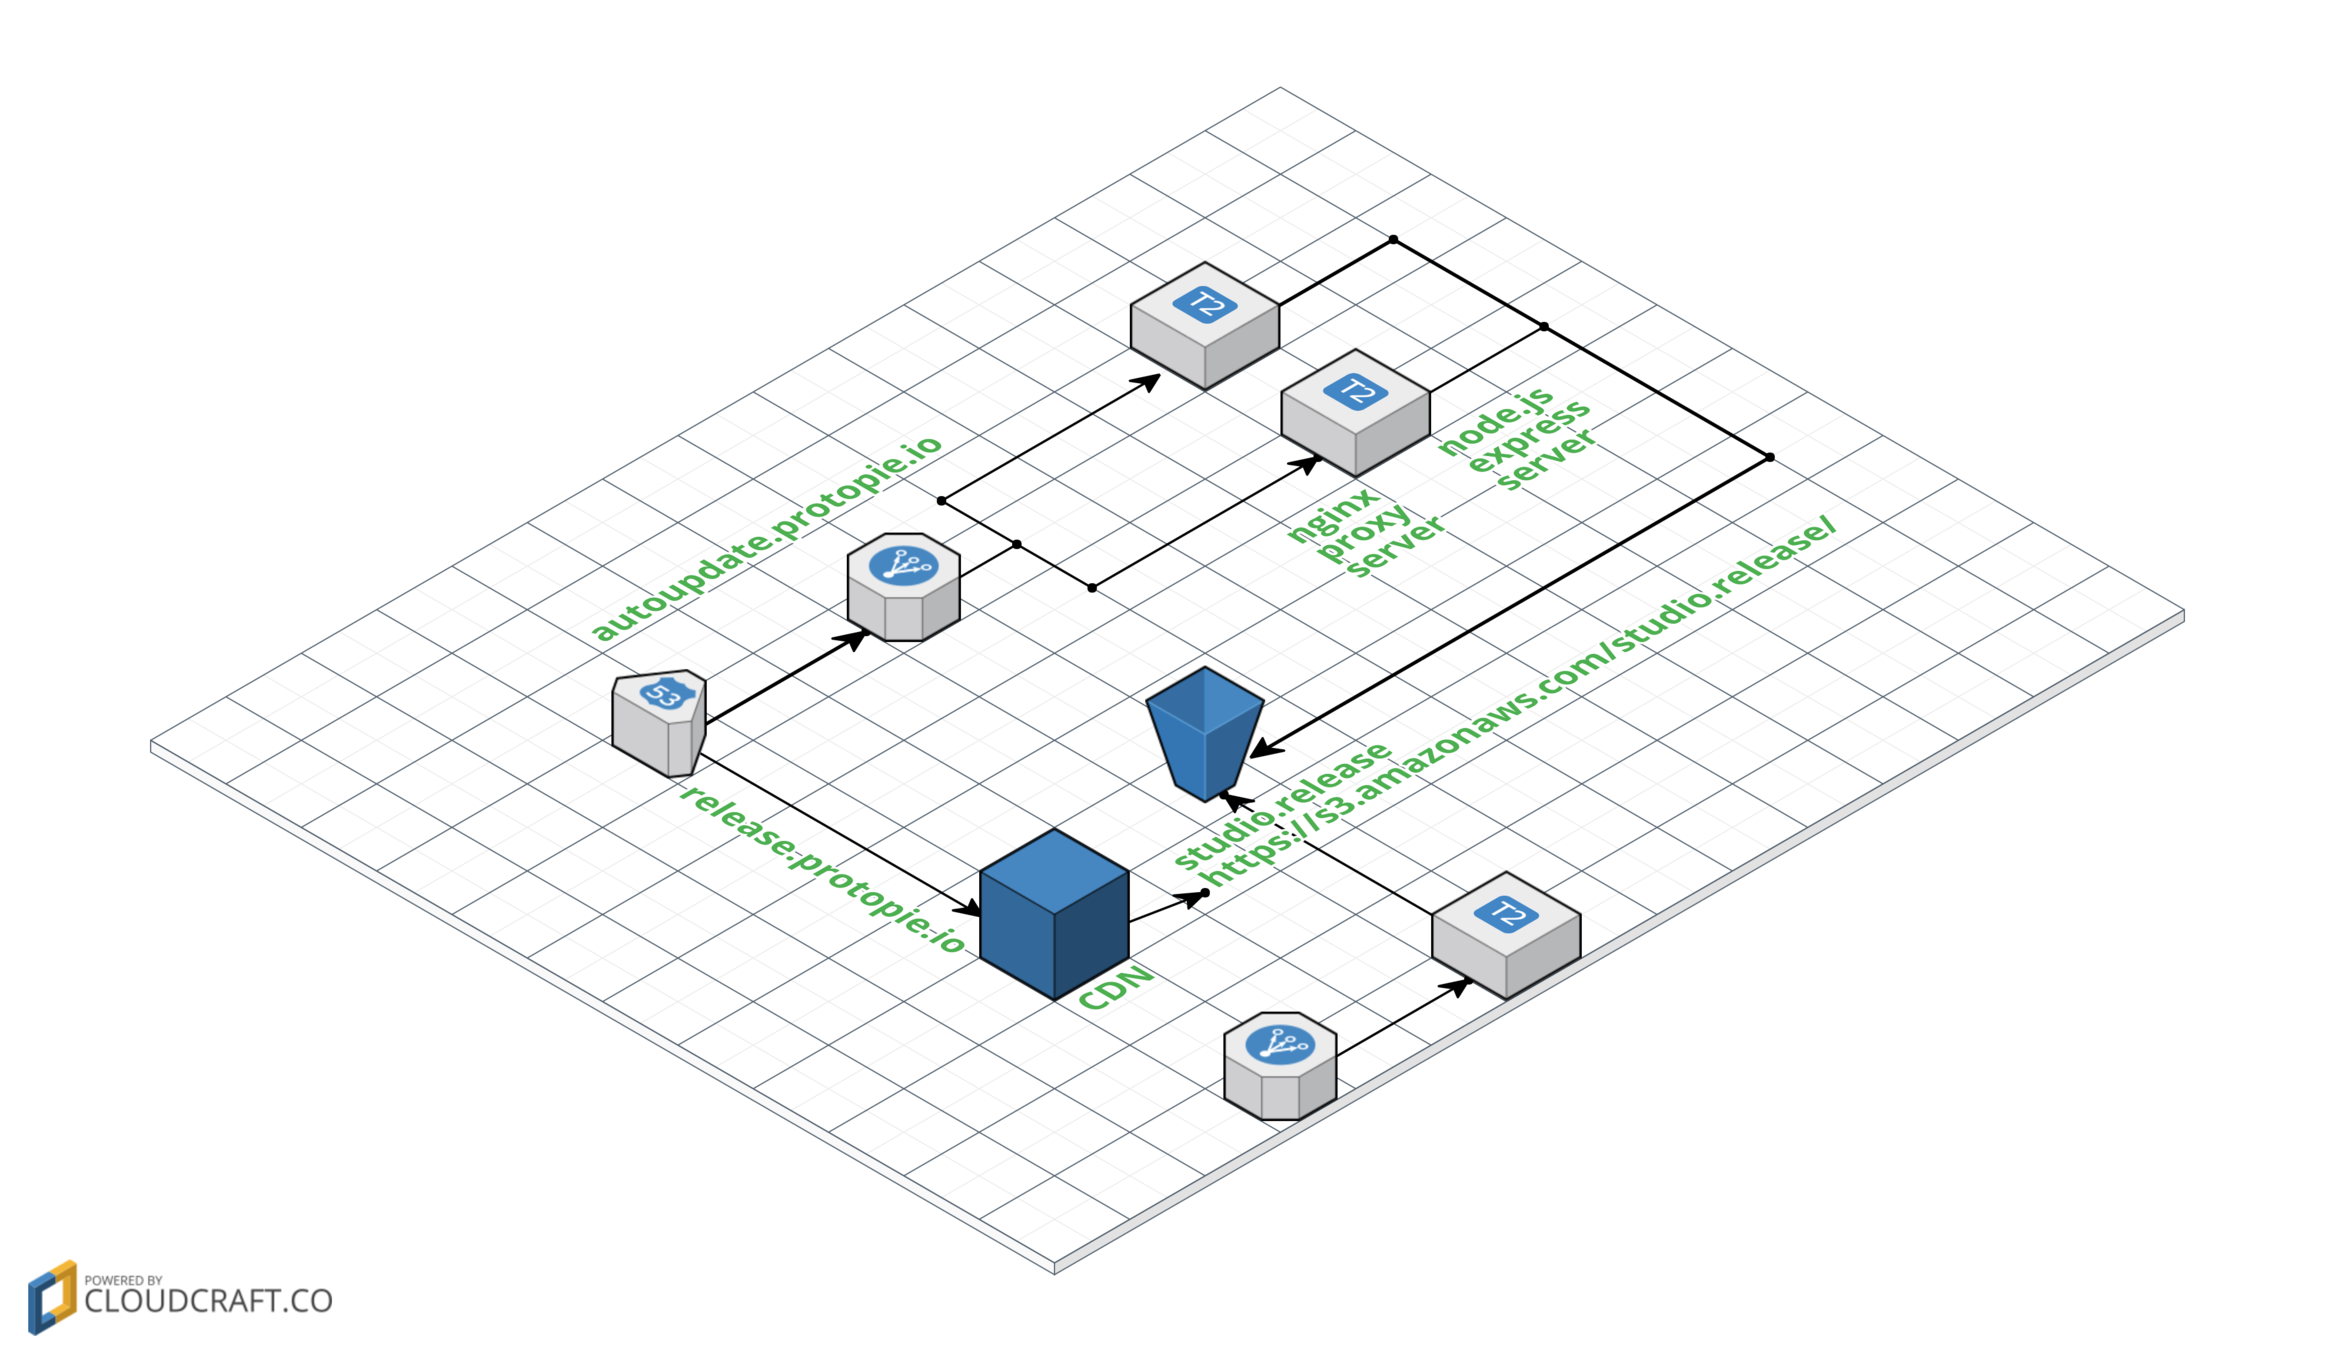
electron-release-server 라는 프로젝트를 사용
https://github.com/ArekSredzki/electron-release-server
squirrel 지원
다양한 다운로드 링크 제공
소스만 받아서 서버에 설치 후 쉽게 사용 가능
sails.js 사용 - 전 잘 몰라요
DB 는 postgresql (RDS)
step1. 앱 최초 실행시 url 룰에 맞게 릴리즈 서버를 호출
204 면 업데이트 없음.
아니면 (200), 있으니깐 이때 response 에 넣어둔 릴리즈 노트를 받아 사용
step2. 릴리즈 노트를 보여주며, 업데이트 다운로드 버튼을 누르도록
캔슬할수도...
다운로드 버튼을 누르면
step3. 로컬에 squirrel 용 .zip 파일을 다운로드
프로그레스 가능
이미 받아둔거 있으면 (체크섬), 다시 사용안하도록 처리 가능
step4. 로컬에 짱 박아둔 웹서버를 이용하여, autoUpdater 모듈 사용
autoUpdater.setFeedURL(`http://127.0.0.1:${port}/update/latest`);
macOS 와는 다릅니다.
클라이언트에서도 다릅니다.
통으로 새로운 파일을 받아서 갈아끼는 스타일이 아닙니다.
확장자도 .zip 아니고, .nupkg 입니다.
이전 버전과의 diff 를 만들어서 업데이트 처리합니다.
업데이트 설치시 gif 파일이 나타납니다.
설치를 아무데나 할수가 없습니다.
빌드시 이전 버전을 기준삼아 빌드해서 diff 파일을 만듭니다.
서버에서도 다릅니다.
응답이 파일로 옵니다. (헐)
http://download.myapp.com/update/win32/:version/RELEASES
http://download.myapp.com/update/win64/:version/RELEASES
http://download.myapp.com/update/win32/:version/:channel/RELEASES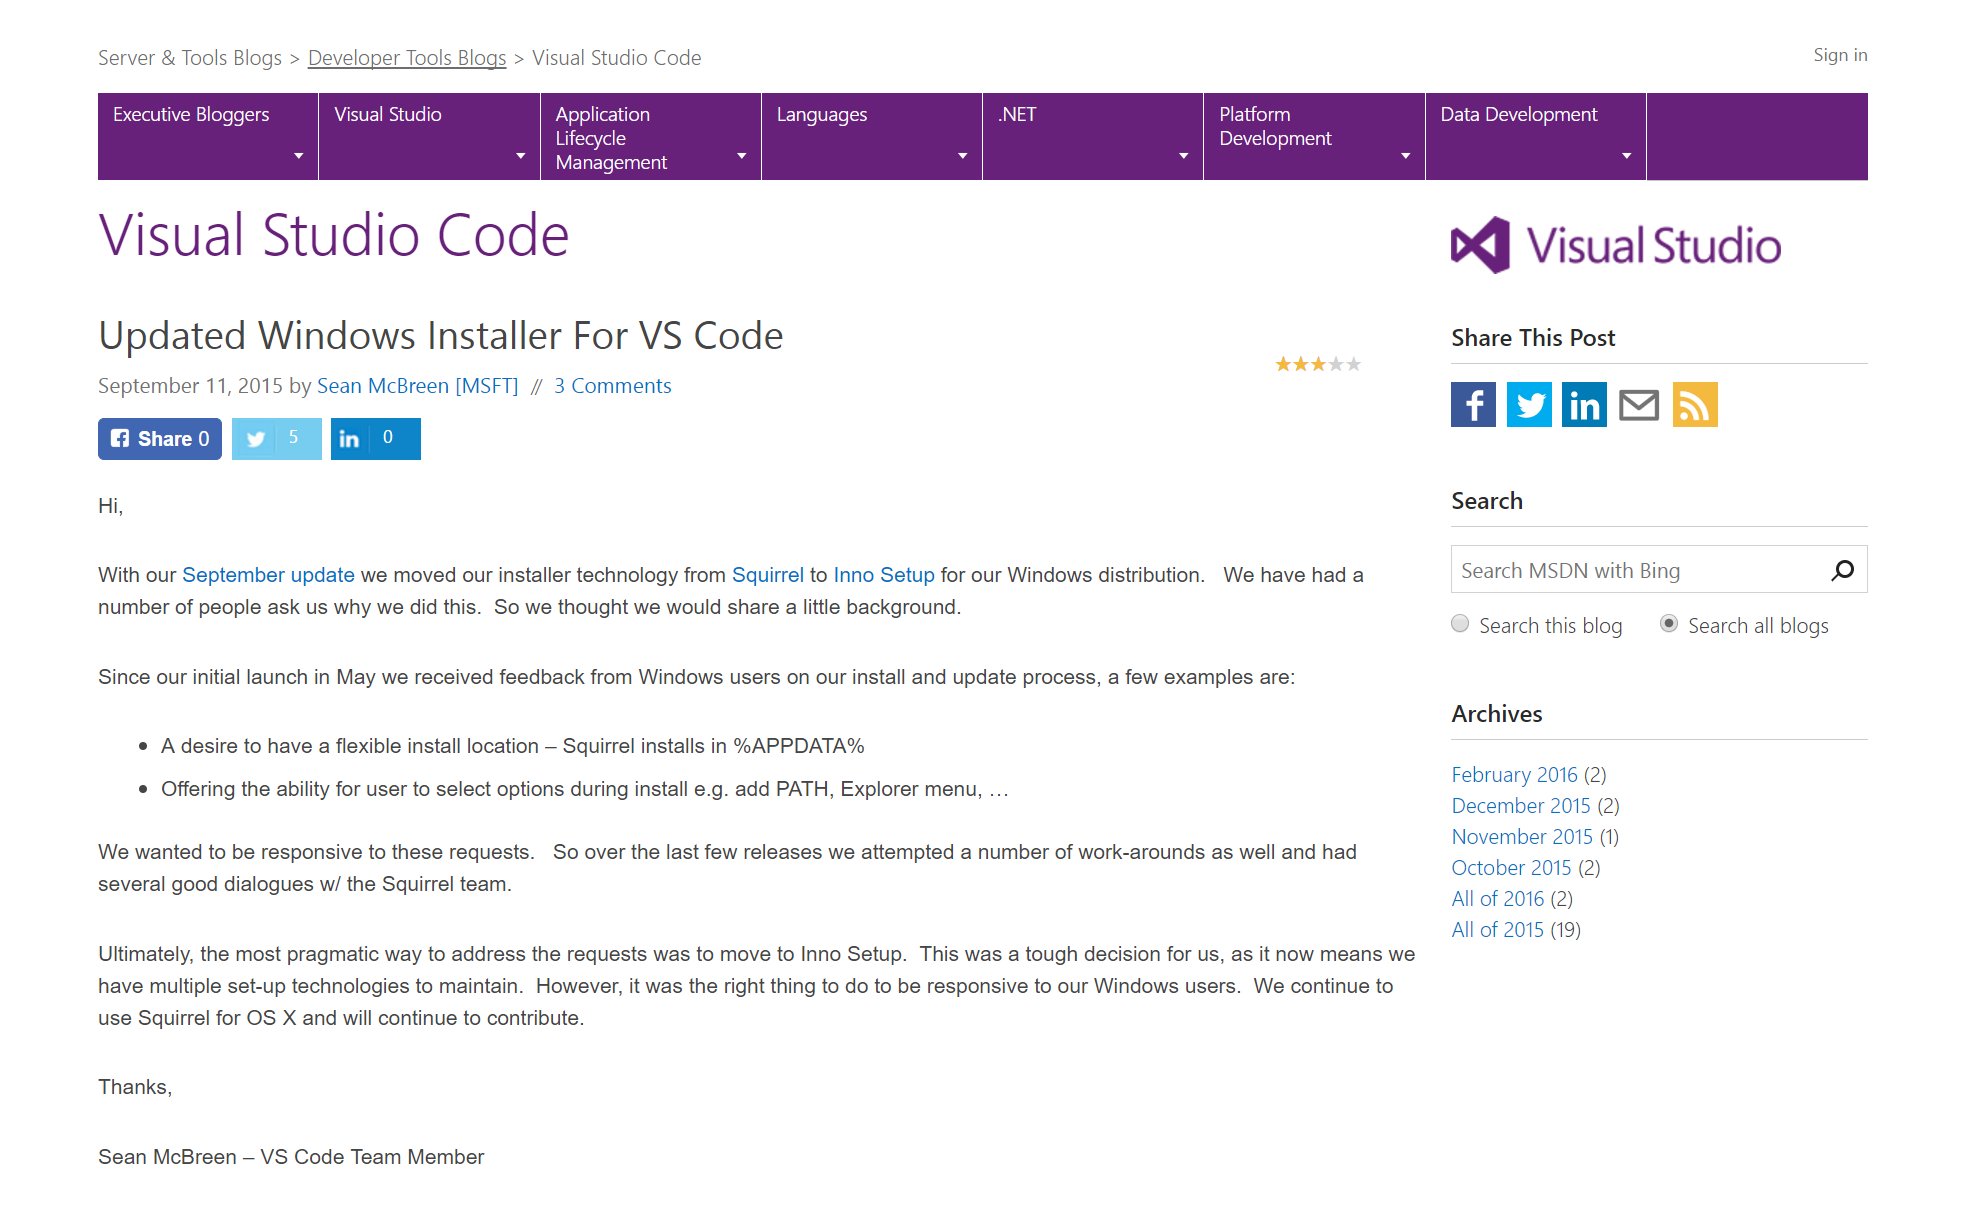
http://download.myapp.com/update/win64/:version/:channel/RELEASESVSCode 의 영향이 컸습니다.
업데이트를 누르면 재설치 파일이 실행됩니다.
inno-setup 을 사용합니다.
사실 nsis, squirrel 의 문제점을 알고, 대안을 모색하다 발견
https://blogs.msdn.microsoft.com/vscode/2015/09/11/updated-windows-installer-for-vs-code/
inno-setup 으로 전환
VSCode 는 electron 계의 표준전과
http://www.jrsoftware.org
free installer
설치 파일 생성 마법사도 있음
npm 모듈도 있음
innosetup-compiler
https://www.npmjs.com/package/innosetup-compiler
스크립트로 정의할수 있는데 스크립트는 Delphi
델파이 모르면 베끼기
https://github.com/Microsoft/vscode/blob/master/build/win32/code.iss
레지스트리 제어 (.pie 확장자 아이콘 처리)
설치시 추가 기능 제공
삭제시 할일 처리
; 프로그램 전체에 대한 설정을 정의한다.
[Setup]
AppId={#AppId}
AppName={#NameLong}
AppVerName={#NameVersion}
AppPublisher=Studio XID, Inc.
AppPublisherURL={#Homepage}
AppSupportURL={#Homepage}docs/
;AppUpdatesURL={#Homepage}
DefaultDirName={userpf}\{#DirName}
DisableDirPage=yes
DefaultGroupName={#NameLong}
AllowNoIcons=yes
OutputDir={#RepoDir}\dist
OutputBaseFilename={#OutputBaseFilename}
Compression=lzma
SolidCompression=yes
AppMutex={code:GetAppMutex}
SetupMutex={#AppMutex}setup
WizardImageFile={#RepoDir}\build\win32\inno_big_410.bmp
WizardSmallImageFile={#RepoDir}\build\win32\inno_small_138.bmp
SetupIconFile={#RepoDir}\build\win32\icon_setup.ico
UninstallDisplayIcon={app}\{#ExeBasename}.exe
ChangesEnvironment=true
ChangesAssociations=true
MinVersion=6.1.7600
SourceDir={#SourceDir}
AppVersion={#Version}
VersionInfoVersion={#RawVersion}
ShowLanguageDialog=auto
; CloseApplications=force
ArchitecturesAllowed={#ArchFlag}
ArchitecturesInstallIn64BitMode={#ArchFlag}
PrivilegesRequired=lowest

; 프로그램이 사용하는 언어를 정의한다.
[Languages]
Name: "english"; MessagesFile: "compiler:Default.isl,{#RepoDir}\build\win32\i18n\messages.en.isl"
Name: "simplifiedChinese"; MessagesFile: "{#RepoDir}\build\win32\i18n\Default.zh-cn.isl,{#RepoDir}\build\win32\i18n\messages.zh-cn.isl"

; 설치시에 제거 할 파일이 있으면 정의한다.
[InstallDelete]
;Type: filesandordirs; Name: {app}\resources

[UninstallDelete]
Type: filesandordirs; Name: "{app}\_"

; 설치 프로세스를 사용자 측에서 상세하게 설정하는 경우에 각각의 처리(작업)에 대해 정의한다.
[Tasks]
Name: "desktopicon"; Description: "{cm:CreateDesktopIcon}"; GroupDescription: "{cm:AdditionalIcons}"
Name: "quicklaunchicon"; Description: "{cm:CreateQuickLaunchIcon}"; GroupDescription: "{cm:AdditionalIcons}"; Flags: unchecked; OnlyBelowVersion: 0.6.1
Name: "associatewithfiles"; Description: "{cm:AssociateWithFiles,{#NameShort}}"; GroupDescription: "{cm:Other}"
Name: "runcode"; Description: "{cm:RunAfter,{#NameShort}}"; GroupDescription: "{cm:Other}"; Check: WizardSilent

; 설치 파일을 정의한다.
[Files]
Source: "{#SourceDir}\*"; Excludes: "\tools,\tools\*"; DestDir: "{code:GetDestDir}"; Flags: ignoreversion recursesubdirs createallsubdirs
Source: "tools\*"; DestDir: "{app}\tools"; Flags: ignoreversion

; 설치시 생성하는 프로그램 등의 바로 가기 파일에 대해 정의한다.
[Icons]
Name: "{group}\{#NameLong}"; Filename: "{app}\{#ExeBasename}.exe"; AppUserModelID: "{#AppUserId}"
Name: "{commondesktop}\{#NameLong}"; Filename: "{app}\{#ExeBasename}.exe"; Tasks: desktopicon; AppUserModelID: "{#AppUserId}"
Name: "{userappdata}\Microsoft\Internet Explorer\Quick Launch\{#NameLong}"; Filename: "{app}\{#ExeBasename}.exe"; Tasks: quicklaunchicon; AppUserModelID: "{#AppUserId}"

; 설치 프로그램 실행 후 실행되는 프로그램이 있으면 정의한다.
[Run]
Filename: "{app}\{#ExeBasename}.exe"; Description: "{cm:LaunchProgram,{#NameLong}}"; Tasks: runcode; Flags: nowait postinstall; Check: ShouldRunAfterUpdate
Filename: "{app}\{#ExeBasename}.exe"; Description: "{cm:LaunchProgram,{#NameLong}}"; Flags: nowait postinstall; Check: WizardNotSilent

; 설치 프로그램 레지스트리 키를 편집하는 경우, 그 내용을 정의한다.
[Registry]
; associatewithfiles
 Root: HKCU; Subkey: "Software\Classes\.pie\OpenWithProgids"; ValueType: none; ValueName: "{#RegValueName}"; Flags: deletevalue uninsdeletevalue; Tasks: associatewithfiles
 Root: HKCU; Subkey: "Software\Classes\.pie\OpenWithProgids"; ValueType: string; ValueName: "{#RegValueName}.pie"; ValueData: ""; Flags: uninsdeletevalue; Tasks: associatewithfiles
 Root: HKCU; Subkey: "Software\Classes\{#RegValueName}.pie"; ValueType: string; ValueName: ""; ValueData: "{cm:SourceFile,PIE}"; Flags: uninsdeletekey; Tasks: associatewithfiles
 Root: HKCU; Subkey: "Software\Classes\{#RegValueName}.pie\DefaultIcon"; ValueType: string; ValueName: ""; ValueData: "{app}\resources\resources\win32\icon_file.ico"; Tasks: associatewithfiles
 Root: HKCU; Subkey: "Software\Classes\{#RegValueName}.pie\shell\open\command"; ValueType: string; ValueName: ""; ValueData: """{app}\{#ExeBasename}.exe"" ""%1"""; Tasks: associatewithfiles

; 설치 프로그램 자체 처리를 하는 경우에 그 내용을 파스칼 스크립트로 정의한다.
[Code]
function WizardNotSilent(): Boolean;
begin
  Result := not WizardSilent();
end;

// Updates
function IsBackgroundUpdate(): Boolean;
begin
  Result := ExpandConstant('{param:update|false}') <> 'false';
end;

function LockFileExists(): Boolean;
begin
  Result := FileExists(ExpandConstant('{param:update}'))
end;

function ShouldRunAfterUpdate(): Boolean;
begin
  Result := ExpandConstant('{param:runafterupdate}') = 'true'
end;

function GetAppMutex(Value: string): string;
begin
  if IsBackgroundUpdate() then
    Result := ''
  else
    Result := '{#AppMutex}';
end;

function GetUninstallString(): String;
var
  sUnInstPath: String;
  sUnInstallString: String;
begin
  sUnInstPath := ExpandConstant('Software\Microsoft\Windows\CurrentVersion\Uninstall\{#emit SetupSetting("AppId")}_is1');
  sUnInstallString := '';
  if not RegQueryStringValue(HKLM, sUnInstPath, 'UninstallString', sUnInstallString) then
    RegQueryStringValue(HKCU, sUnInstPath, 'UninstallString', sUnInstallString);
  Result := sUnInstallString;
end;

function UnInstallOldVersion(): Integer;
var
  sUnInstallString: String;
  iResultCode: Integer;
  //intRe: Integer;
begin
// Return Values:
// 1 - uninstall string is empty
// 2 - error executing the UnInstallString
// 3 - successfully executed the UnInstallString
// 4 - no need to uninstall

  // default return value
  Result := 0;

  // get the uninstall string of the old app
  sUnInstallString := GetUninstallString();

  if ExpandConstant('{param:silent|false}') <> 'false' then
    Result := 4
  else if sUnInstallString <> '' then begin
    sUnInstallString := RemoveQuotes(sUnInstallString);
    if (Exec(sUnInstallString, '/NORESTART /SUPPRESSMSGBOXES', '', SW_HIDE, ewWaitUntilTerminated, iResultCode)) then
      Result := 3
    else
      Result := 2;
  end else
    Result := 1;
end;

function InitializeSetup(): Boolean;
begin
  UnInstallOldVersion();
  Result := True;
end;

function GetDestDir(Value: string): string;
begin
  if IsBackgroundUpdate() then
    Result := ExpandConstant('{app}\_')
  else
    Result := ExpandConstant('{app}');
end;

function BoolToStr(Value: Boolean): String;
begin
  if Value then
    Result := 'true'
  else
    Result := 'false';
end;

procedure CurStepChanged(CurStep: TSetupStep);
var
  UpdateResultCode: Integer;
begin
  if IsBackgroundUpdate() and (CurStep = ssPostInstall) then
  begin
    CreateMutex('{#AppMutex}-ready');

    while (CheckForMutexes('{#AppMutex}')) do
    begin
      Log('Application is still running, waiting');
      Sleep(1000);
    end;

    Exec(
      ExpandConstant('{app}\tools\protopie_updater.exe'),
      ExpandConstant('"{app}\{#ExeBasename}.exe" ' + BoolToStr(LockFileExists())),
      '', SW_SHOW, ewWaitUntilTerminated, UpdateResultCode
    );
  end;
end;
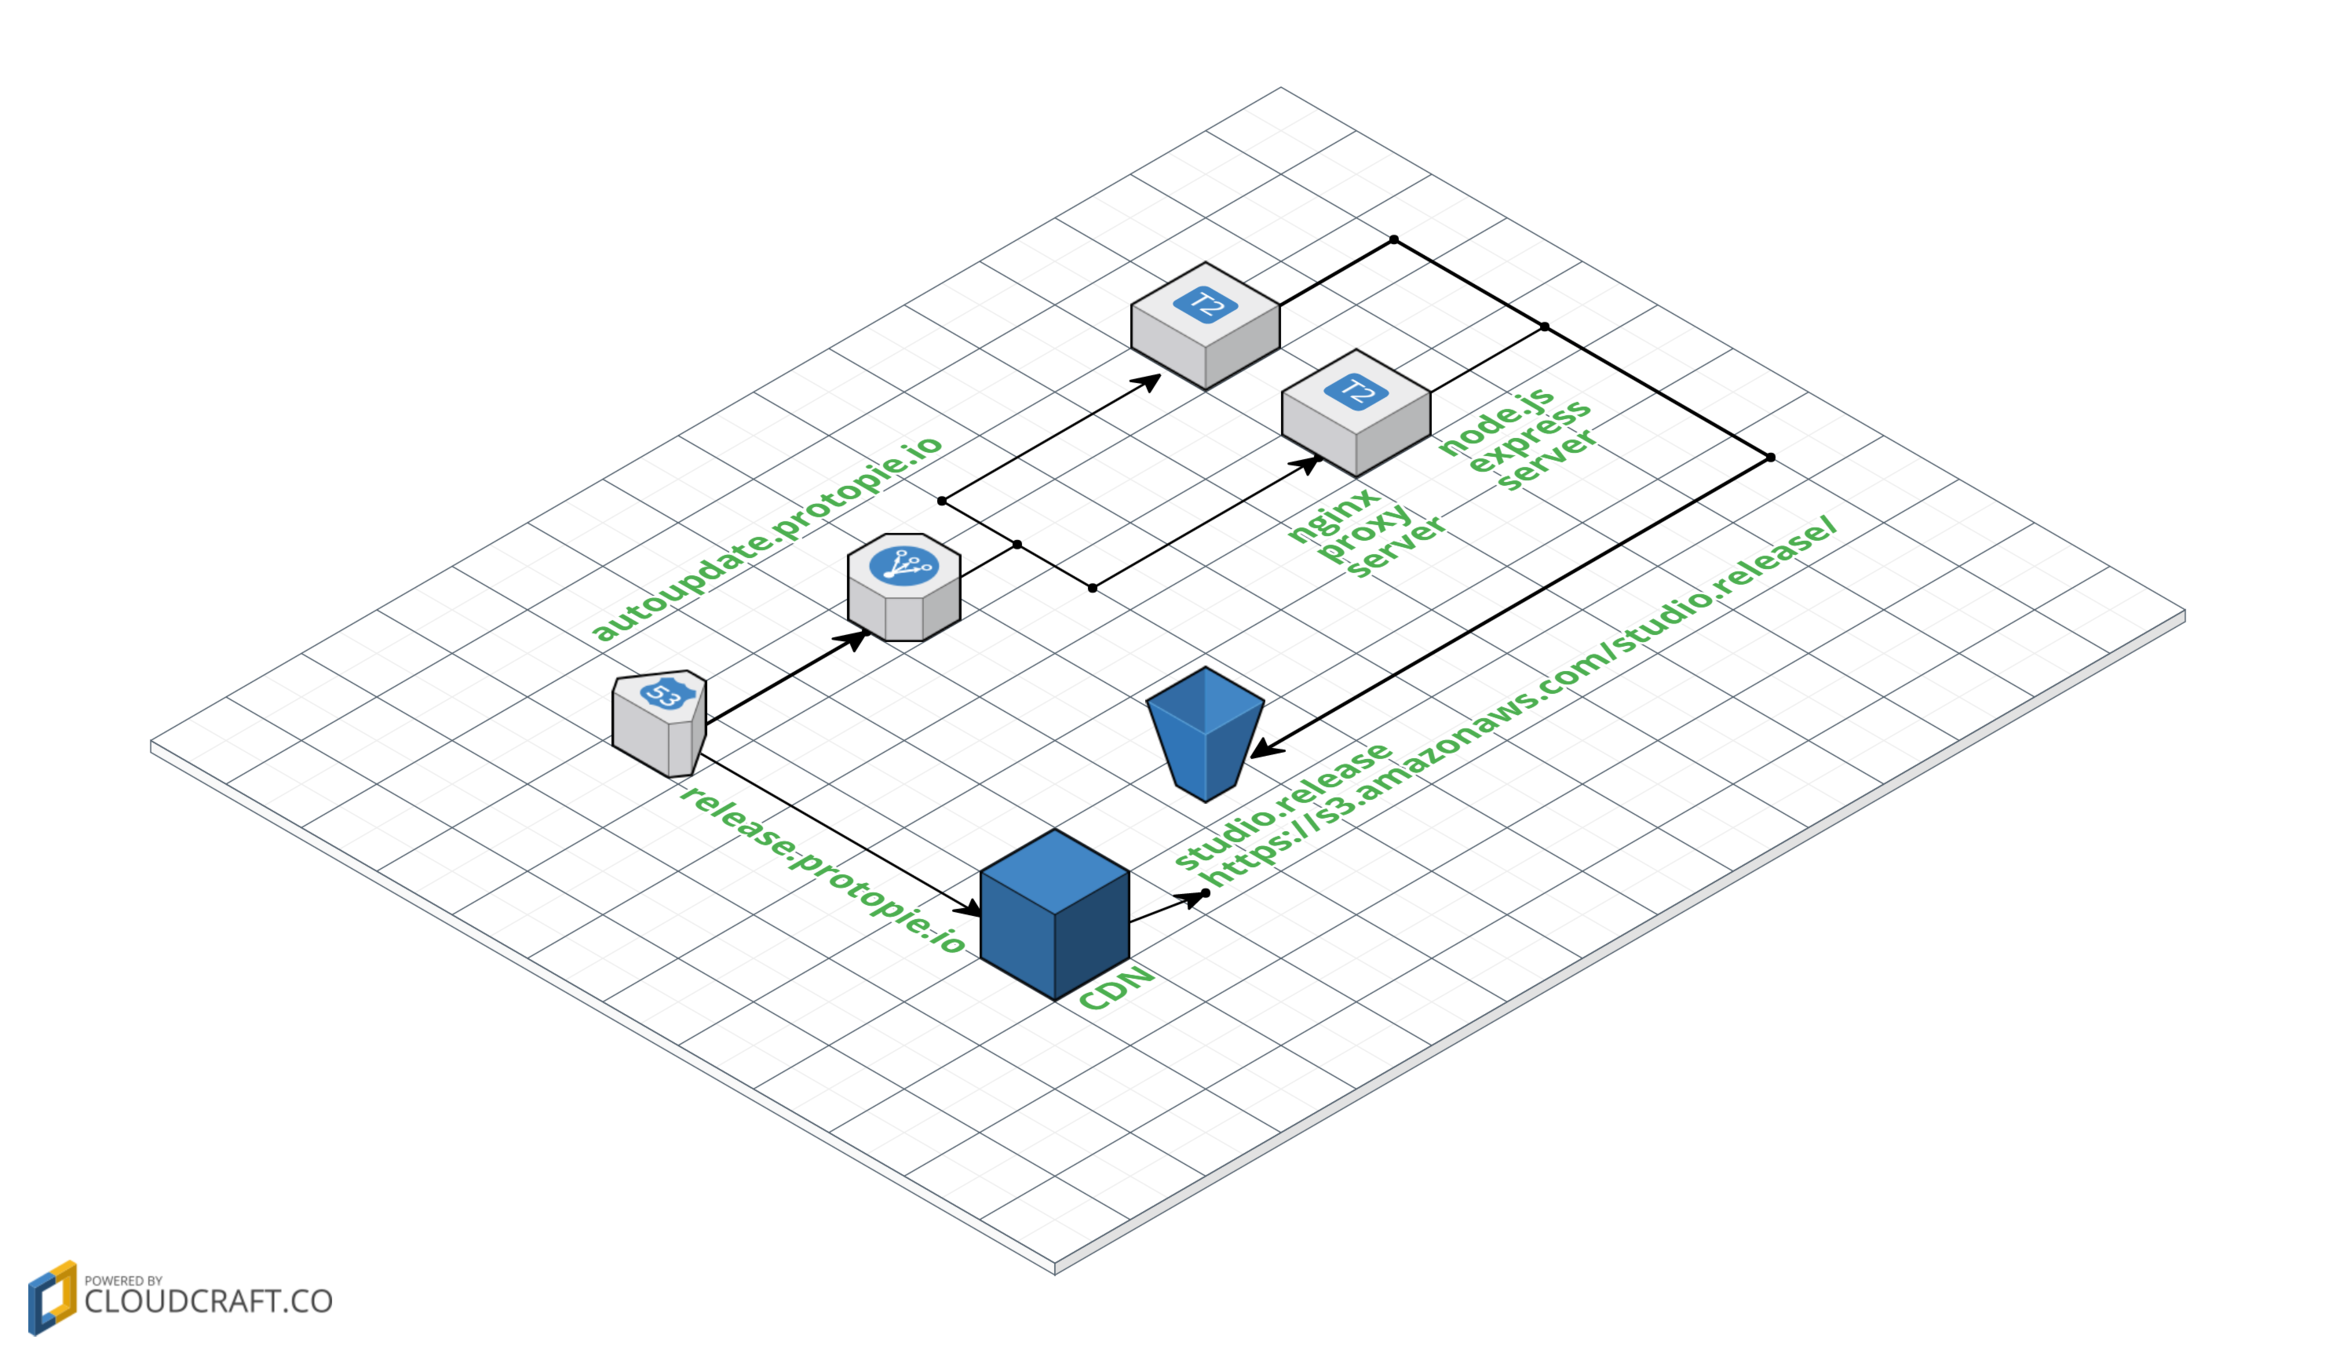
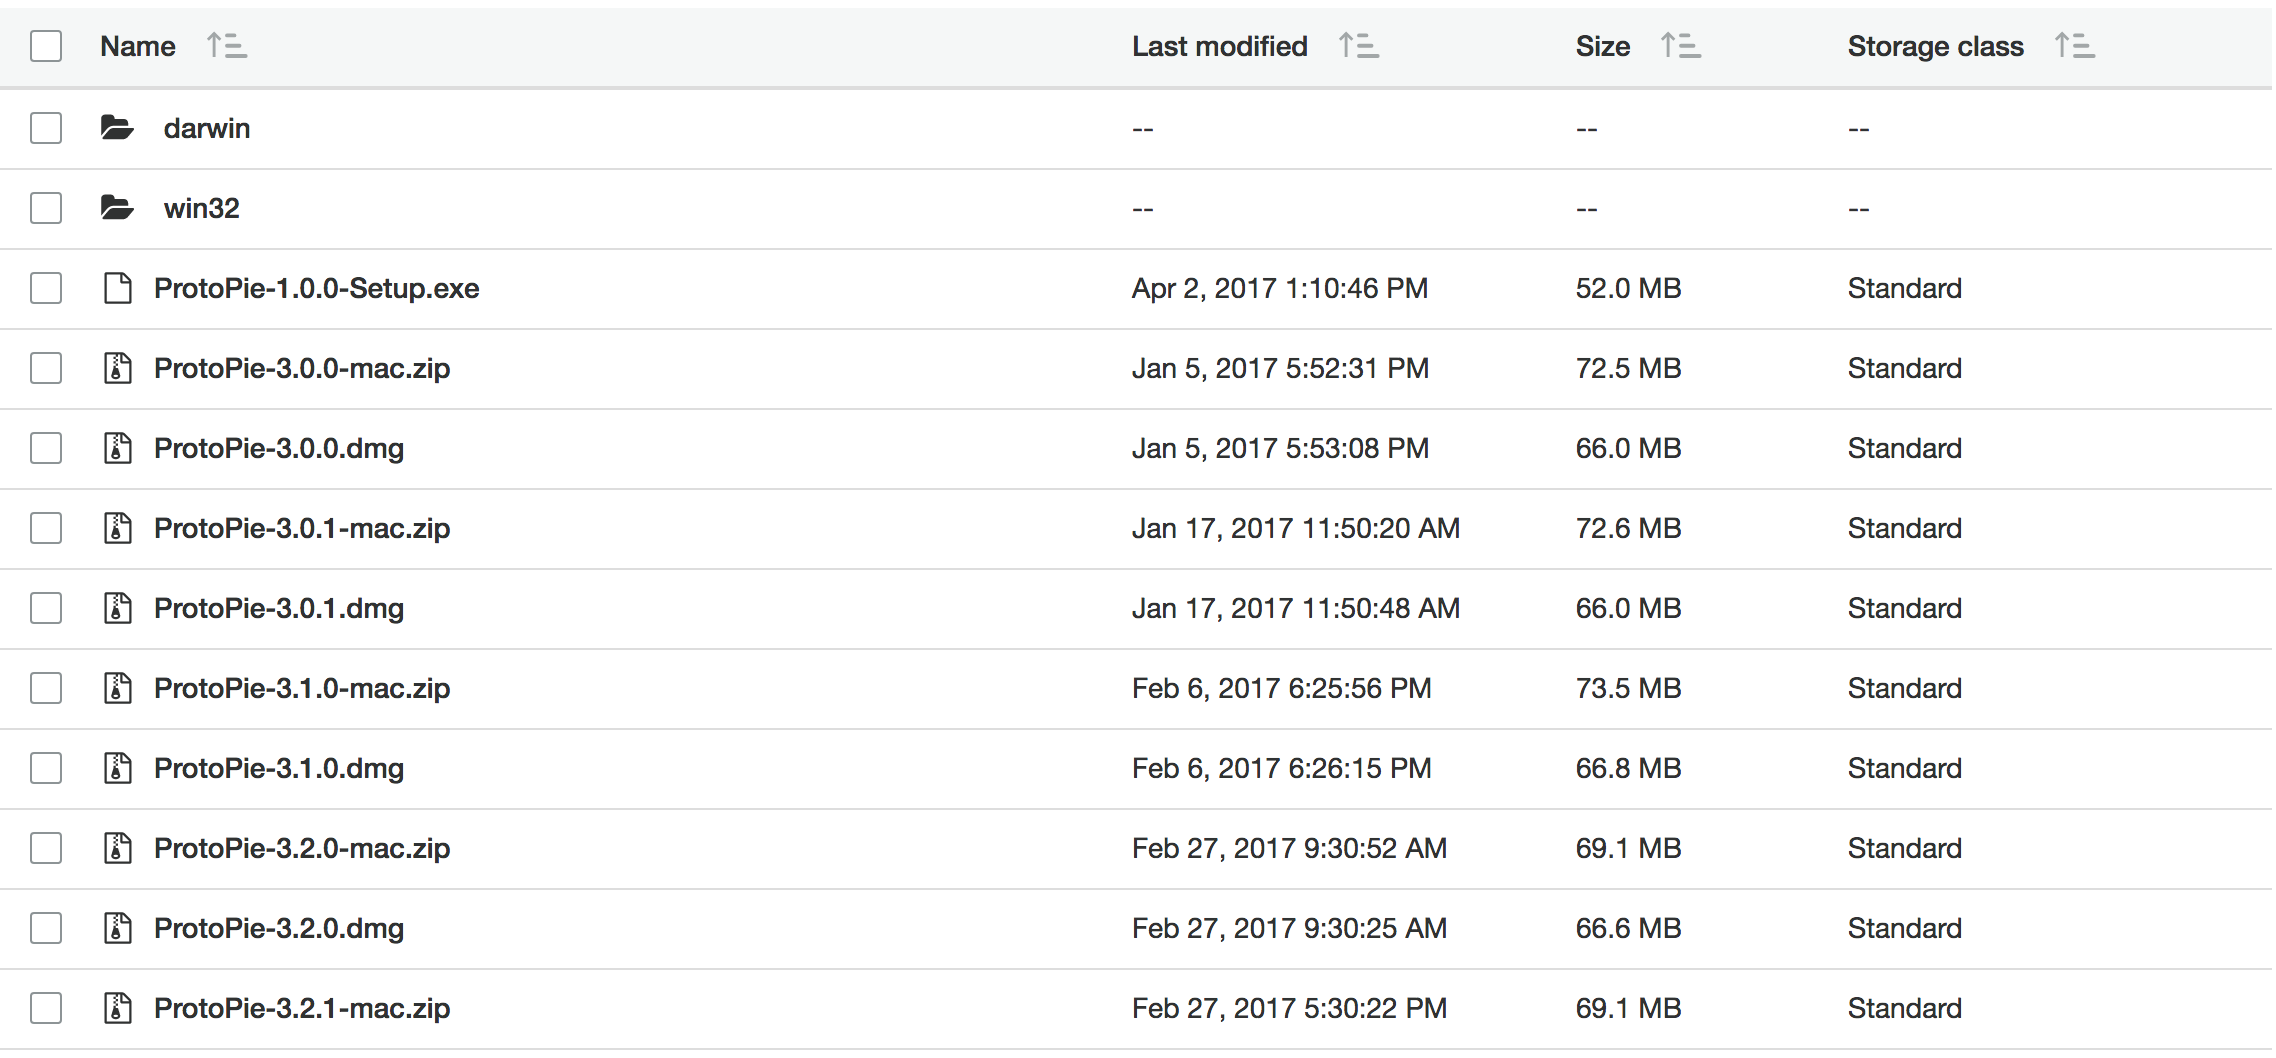
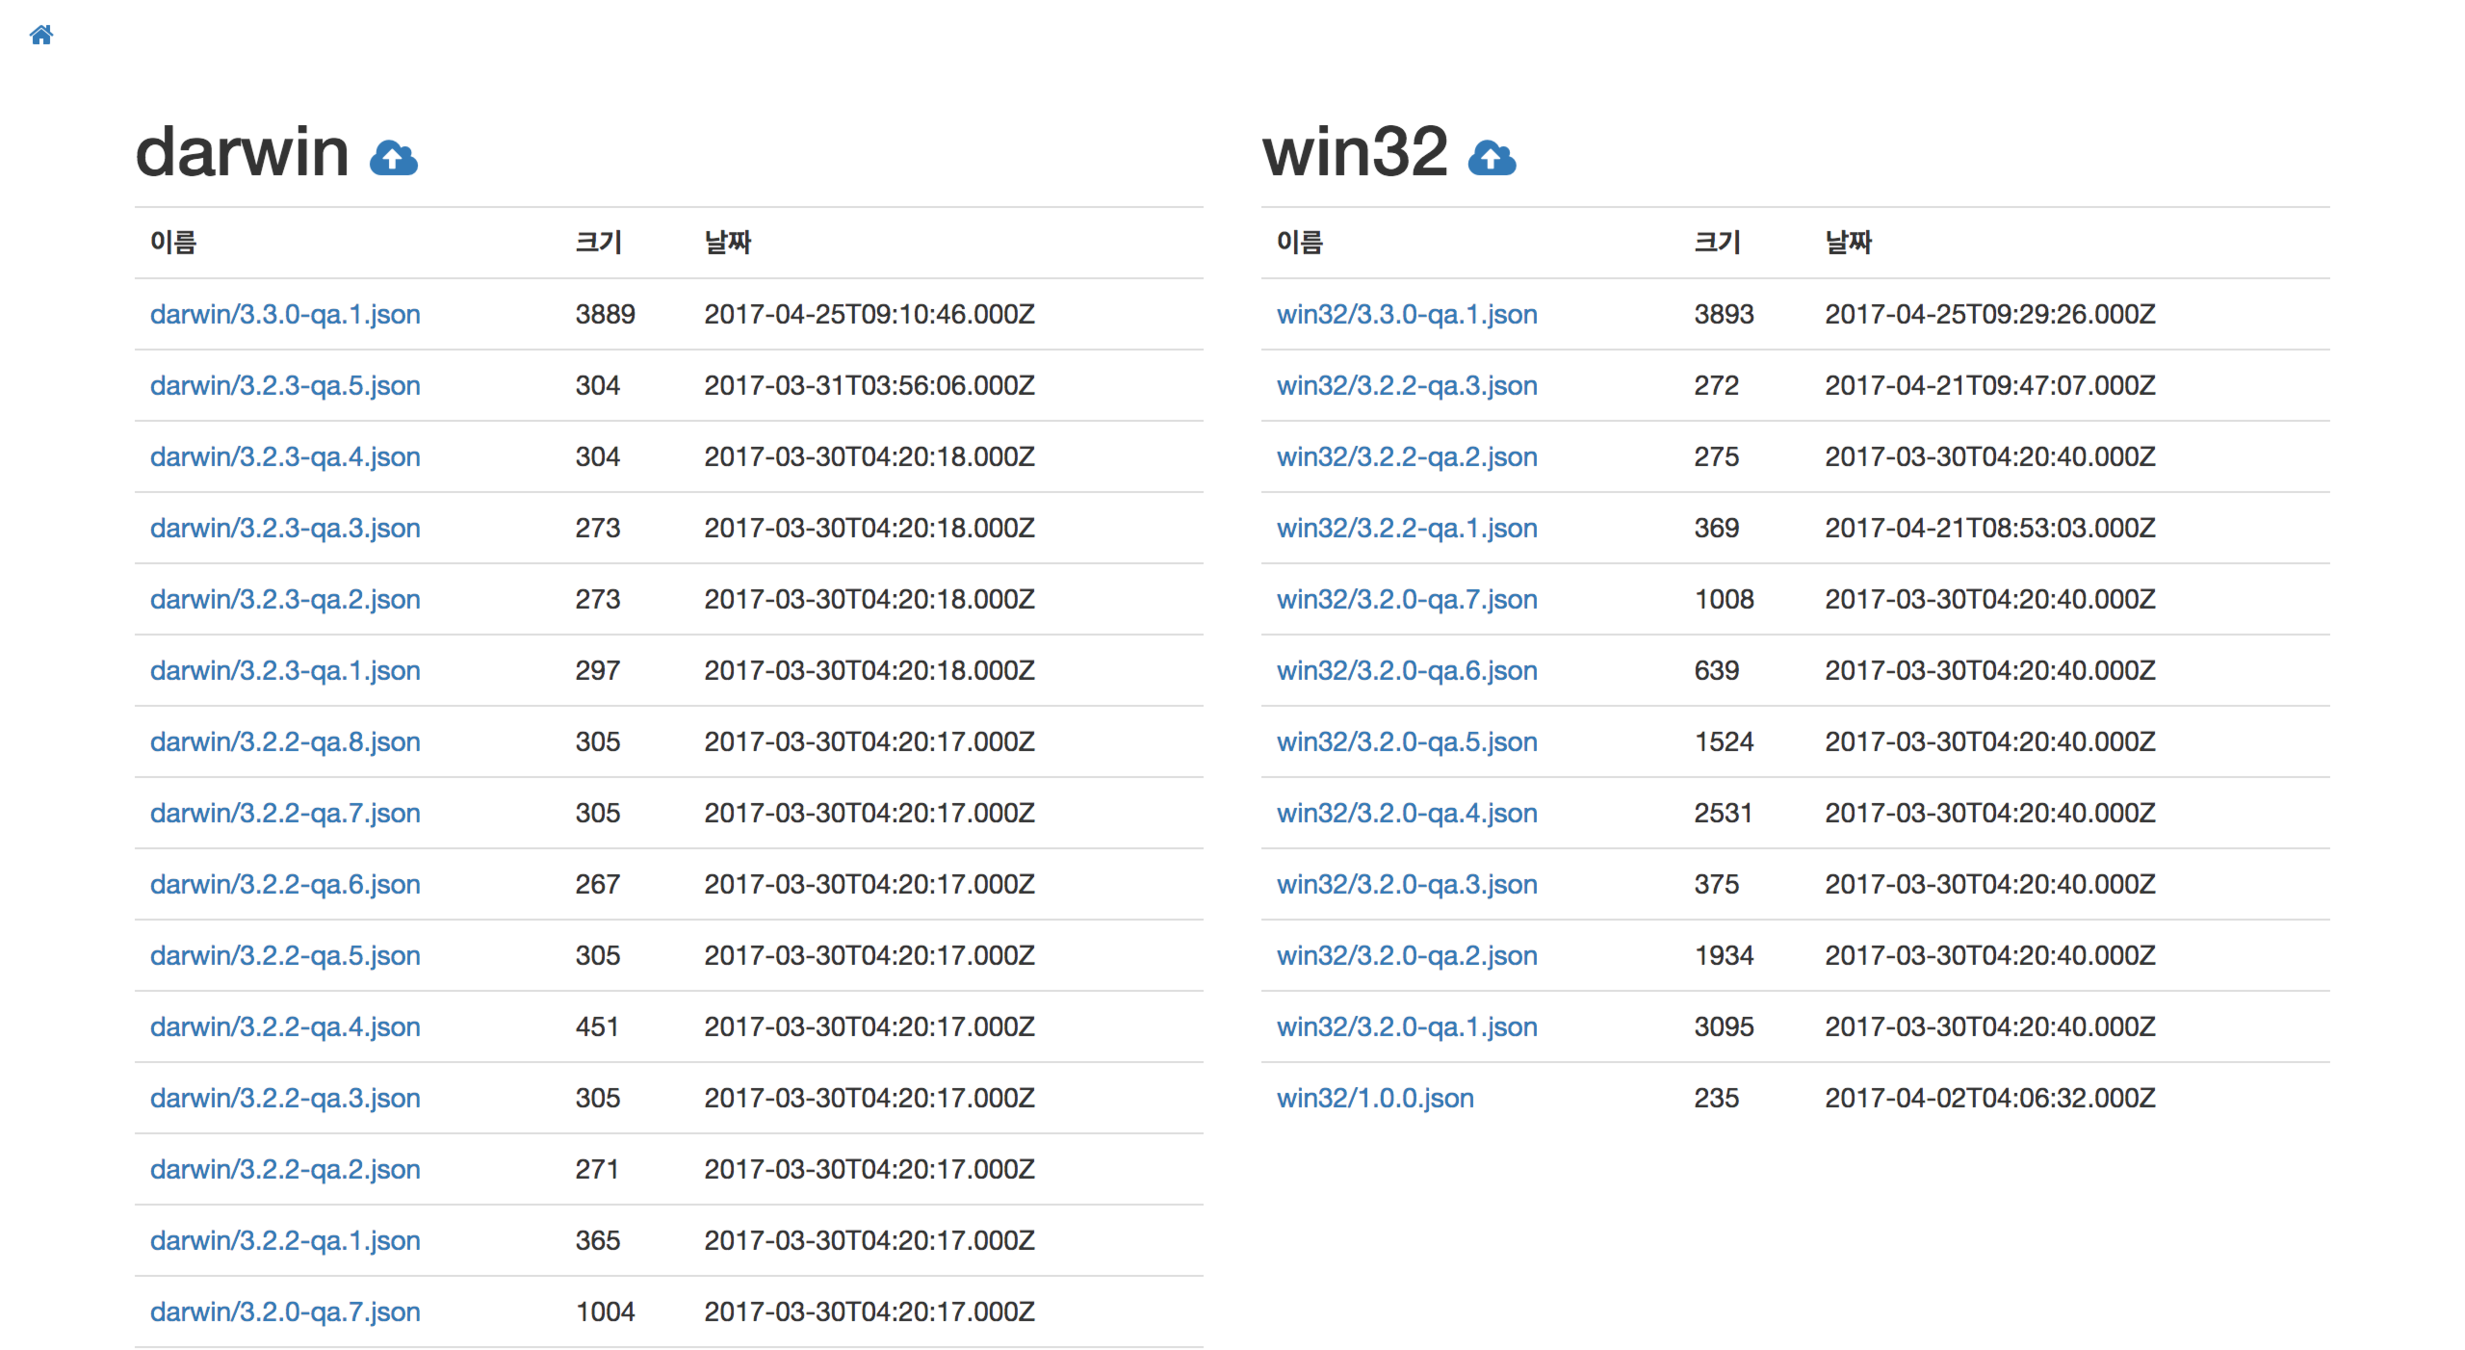
1. make `ProtoPie-${Version}-Setup.exe` file
2. make `${Version}.json` file
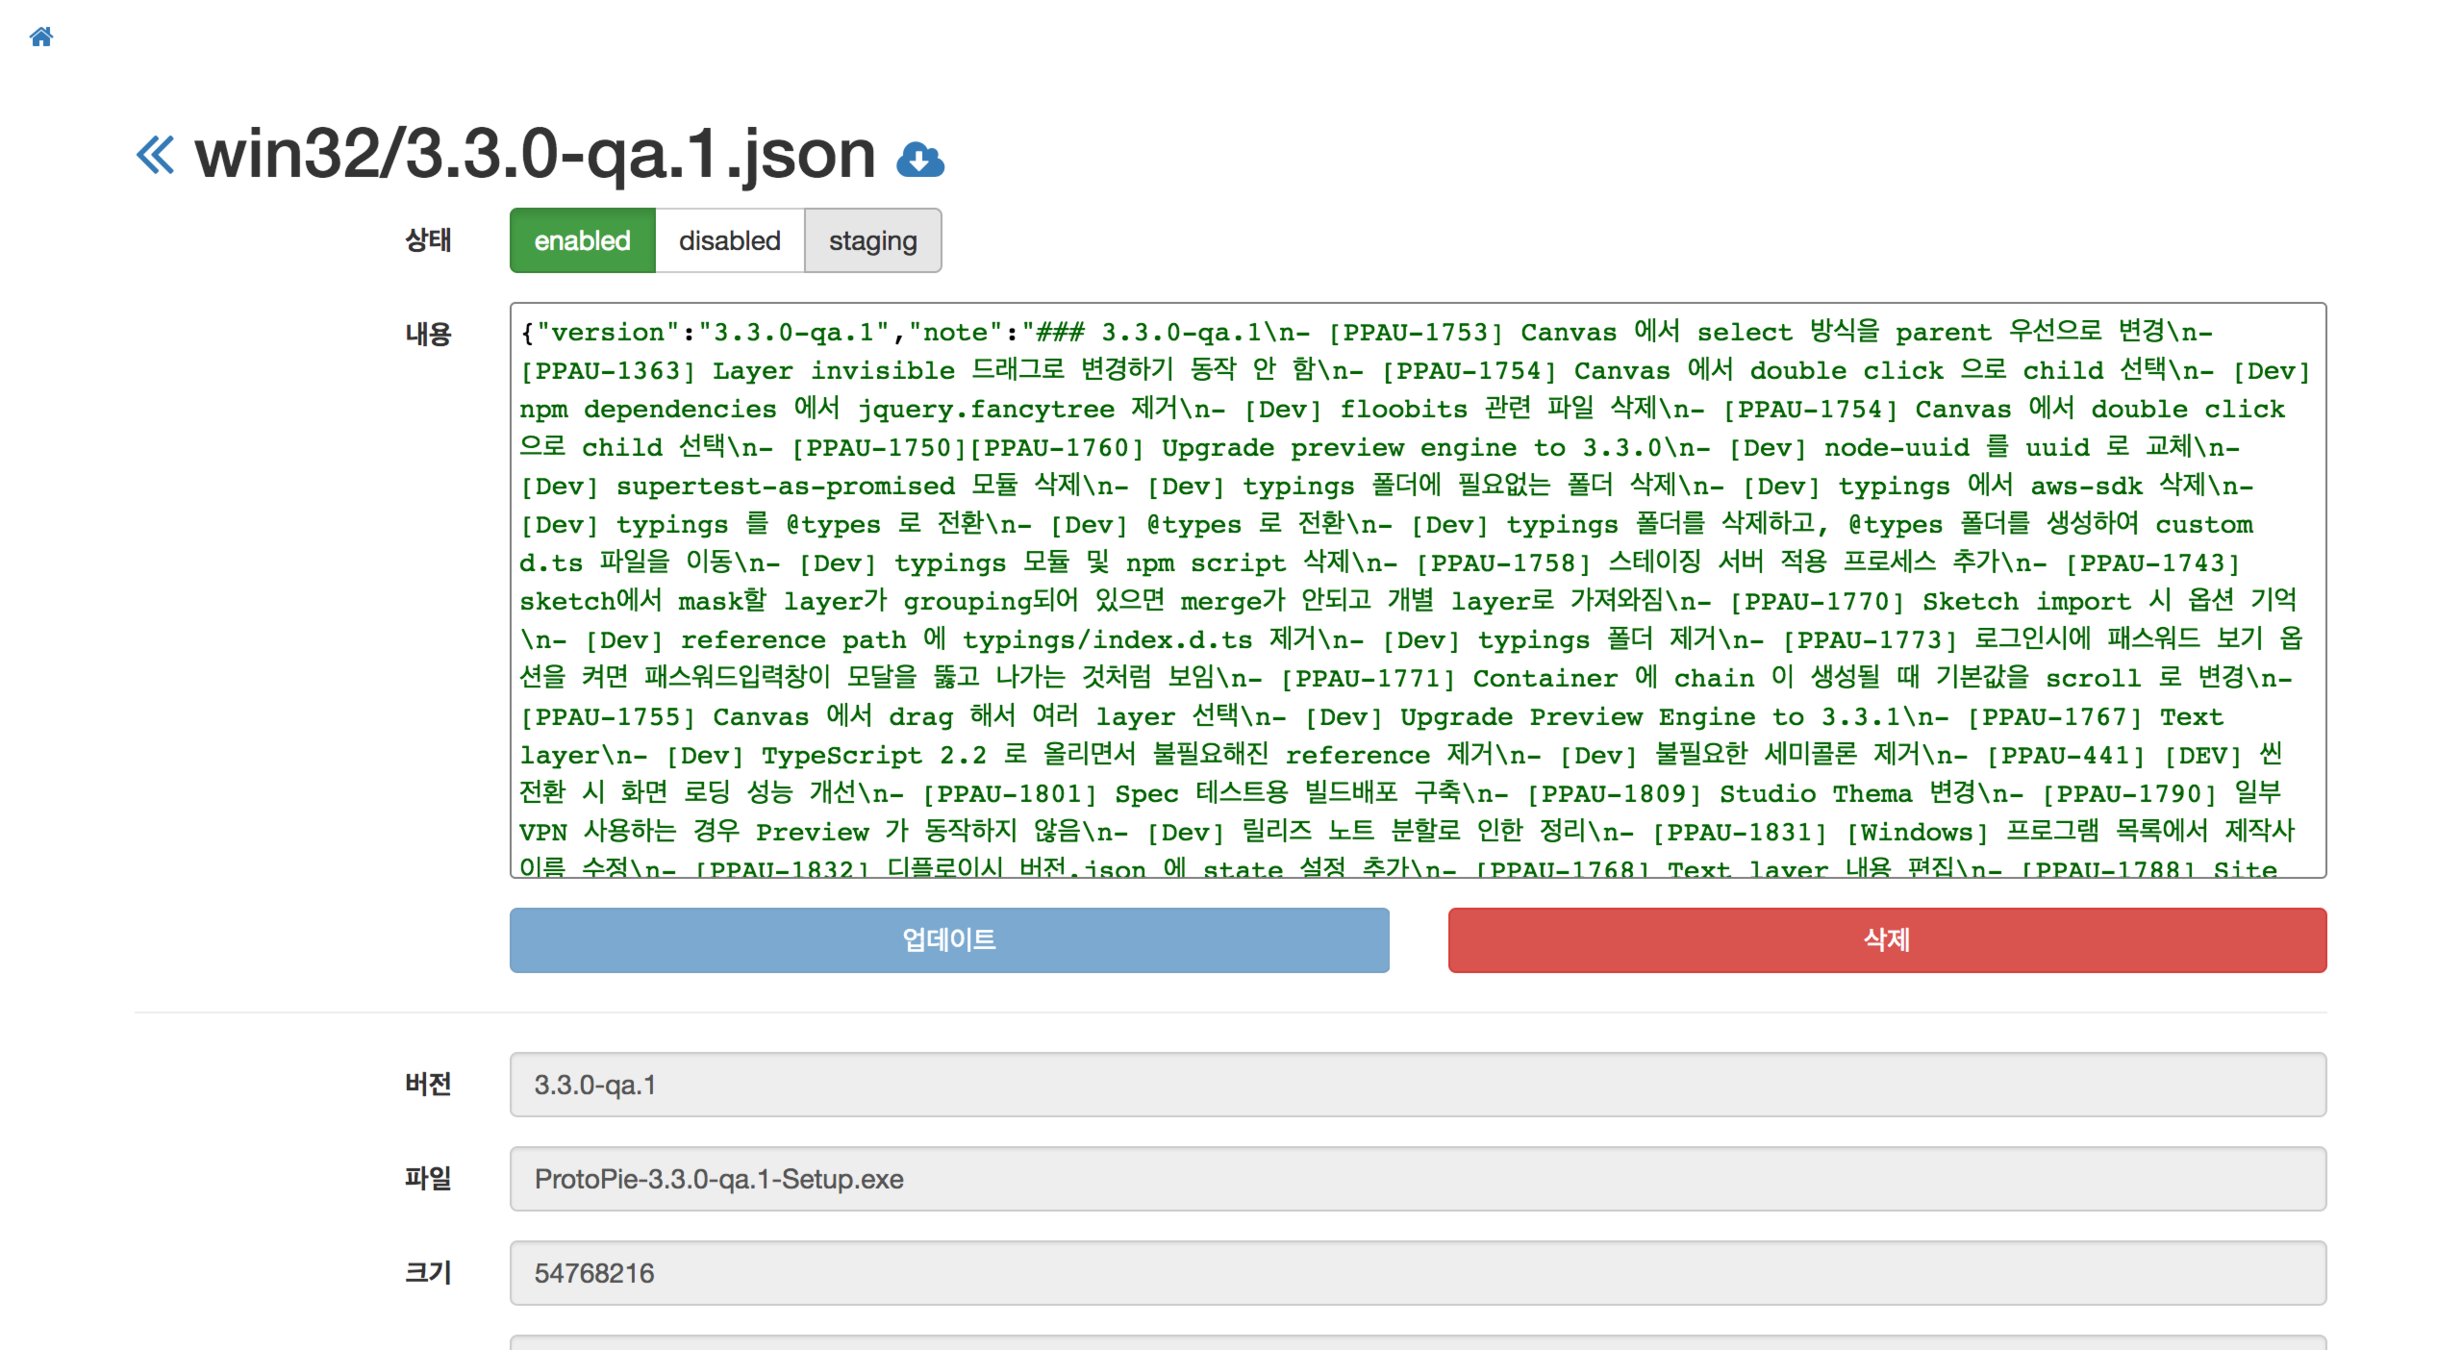
3. upload to S3 - `${Version.json}` file, `ProtoPie-${Version}-Setup.exe` file{
"version": "3.2.3",
"note": "### 3.2.3\n- <strong>Special thanks to Jaret(郑皓), 田中良樹, and Shue(尹舒)</strong> (in alphabetical order)\n- Fixed the problem to lose images under a certain procedure\n- Improved the stability of the application\n- Added ProtoPie improvement program",
"file": "ProtoPie-3.2.3-mac.zip",
"metadata": {
"osx": {
"size": 75391013,
"checksum": "39432d1cb5b4214515a443d4bec719e9d2b787ab"
}
},
"pub_date": "2017-03-21T09:54:30.939Z",
"state": "enabled"
}{
"version": "3.2.3",
"note": "### 3.2.3\n- <strong>Official version for Windows</strong>\n- Thank you for your effort to improve ProtoPie for Windows.\n- Beta test program is over on March 31, 2017 in KST.\n- Please jump in and ride on the official version. ;)",
"file": "ProtoPie-3.2.3-Setup.exe",
"metadata": {
"win32": {
"size": 55642520,
"checksum": "5df925f649af2924e48bbd935eb9a3f4807bad65"
}
},
"pub_date": "2017-03-31T05:55:56.133Z",
"state": "enabled"
}다양한 버전의 우선순위
v3.3.0
v3.3.0-qa.1
v3.3.0-winrc.1
v3.3.0-rc.1
http://semver.org/ => Semantic Versioning
https://www.npmjs.com/package/semver
import * as semver from 'semver';

semver.gt(version, '3.3.0');

semver.lte(version, '3.1.0')// 라우팅 핸들러 설정
router.get('/:platform/:version/', ctrl.index);
// 라우팅 함수
async function index(req, res) {
// 플랫폼과 버전을 받음
const platform: string = req.params.platform;
const version: string = req.params.version;
if (platform !== 'darwin_x64' && platform !== 'win32') {
return res.status(400).end();
}
if (semver.valid(version) === null) {
return res.status(400).end();
}
// 버전 관리자를 통해 S3 로 부터 최신 버전 리스트를 업데이트
const versionManager: IVersionManager = VersionManager.getInstance();
await versionManager.update();
// 최신 버전 리스트에서 요청받은 플랫폼과 버전레 맞춰 response 에 담을 내용을 만들어 냄.
const result = versionManager.getResult(platform, version);
if (result) {
res.json(result);
} else {
res.sendStatus(204);
}
}
export class VersionManager implements IVersionManager {
    // 매니저는 단일 객체

    public getResult(platfrom: string, version: string) {
        const platfromId: string = (platfrom === 'darwin_x64') ? 'darwin' : platfrom;
        const versionInPlatform: IVersion[] = this._versionList.filter(v => {
            if ((v.getPlatform() === platfromId) && semver.gt(v.getVersion(), version)) {
                if (MODE === 'production' || MODE === 'qa') {
                    return v.getState() === 'enabled';
                } else {
                    return v.getState() !== 'disabled';
                }
            } else {
                return false;
            }
        });
        versionInPlatform.sort((l, r) => semver.gt(l.getVersion(), r.getVersion()) ? -1 : 1);

        if (versionInPlatform.length > 0) {
            const url = versionInPlatform[0].getFile();
            const name = versionInPlatform[0].getVersion();
            const notes = this._getNotes(versionInPlatform);
            const metadata = versionInPlatform[0].getMetadata();
            const pub_date = versionInPlatform[0].getDate();

            return {
                url,
                name,
                notes,
                metadata,
                pub_date
            };
        } else {
            return null;
        }
    }

    public async update(): Promise<void> {
        let s3List = null;
        try {
            s3List = await getS3List();
        } catch (e) {
            await sendSNS('Autoupdate Server : getS3List 실패', '자동업데이트 서버에서 S3 로 부터 JSON 리스트를 읽어오다가 실패함.');
            return;
        }

        let s3Objects = null;
        try {
            s3Objects = await getS3Objects(s3List);
        } catch (e) {
            await sendSNS('Autoupdate Server : getS3Objects 실패', '자동업데이트 서버에서 S3 로 부터 JSON 파일을 읽어오다가 실패함.');
            return;
        }

        this._setVersions(s3List, s3Objects);
    }

    private _setVersions(s3List: any[], s3Objects: any[]): void {
        this._versionList = [];
        s3List.forEach((item, index) => {
           this._versionList.push(new Version(s3List[index], s3Objects[index]));
        });
    }

    private _getNotes(versionInPlatform): string {
        const notes = [];
        versionInPlatform.forEach((item, index) => {
            if (index < 3) {
                notes.push(`## ${item.getVersion()}\n${item.getNote()}\nmetadata:${JSON.stringify(item.getMetadata())}`);
            }
        });
        return notes.join('\n');
    }
}
By Woongjae Lee
Kakao Seminar 20190930


