Version Control with Git
-
Go to: http://bit.ly/ucdavis-git
- Follow installation instructions for git
-
Go to: https://github.com
- If you already have an account, login
- If you don't have an account, create one
- Put up your green stickie
Getting Started:
What is version control?
- A tool to track the history of a project
- who changed what when
- Individual or collaborative
Why do I can about the history of a project?
- Individual:
- fix (or undo) mistakes
- what was done and why
- definitive (final?) version
- hard to accidentally delete
- Collaborative:
- who to ask if you have questions
- work simultaneously
- hard to overwrite

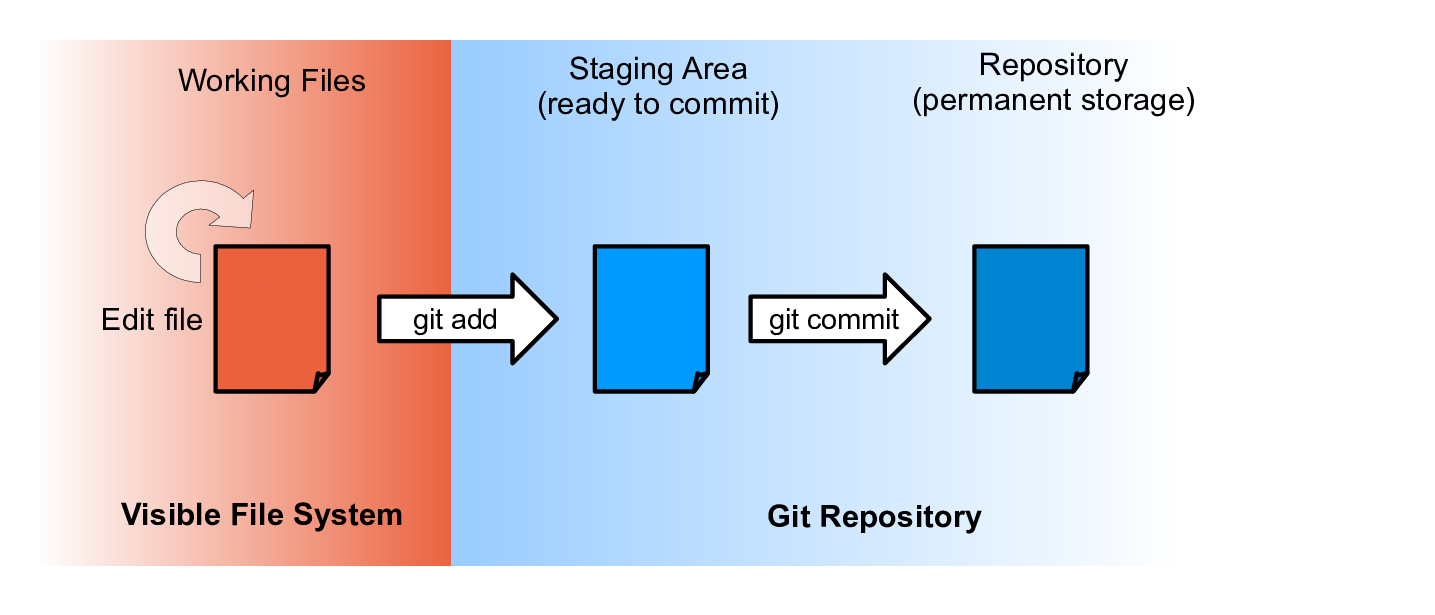
Local Repo
- Where you keep things on a single machine
- Works w/o internet
Remote Repo
- A place for other machines to access
- cloud (GitHub, BitBucket)
- Private server (GitLab)
- Thumb drive
- Need a way for different machines to connect to the same location (usually there internet)
You can create either one first. In this lesson we are going to create the remote repo and then make a local copy
The Situation
- Dracula and Wolfman
- research moving to another planet
- want to share their research

Create a Remote Repository
-
Find a partner
-
Decide who is Wolfman and who is Dracula
-
Login or create an account on github.com
-
Select "New Repository" from the "+" menu in the upper right corner
-
Fill in info (as below)
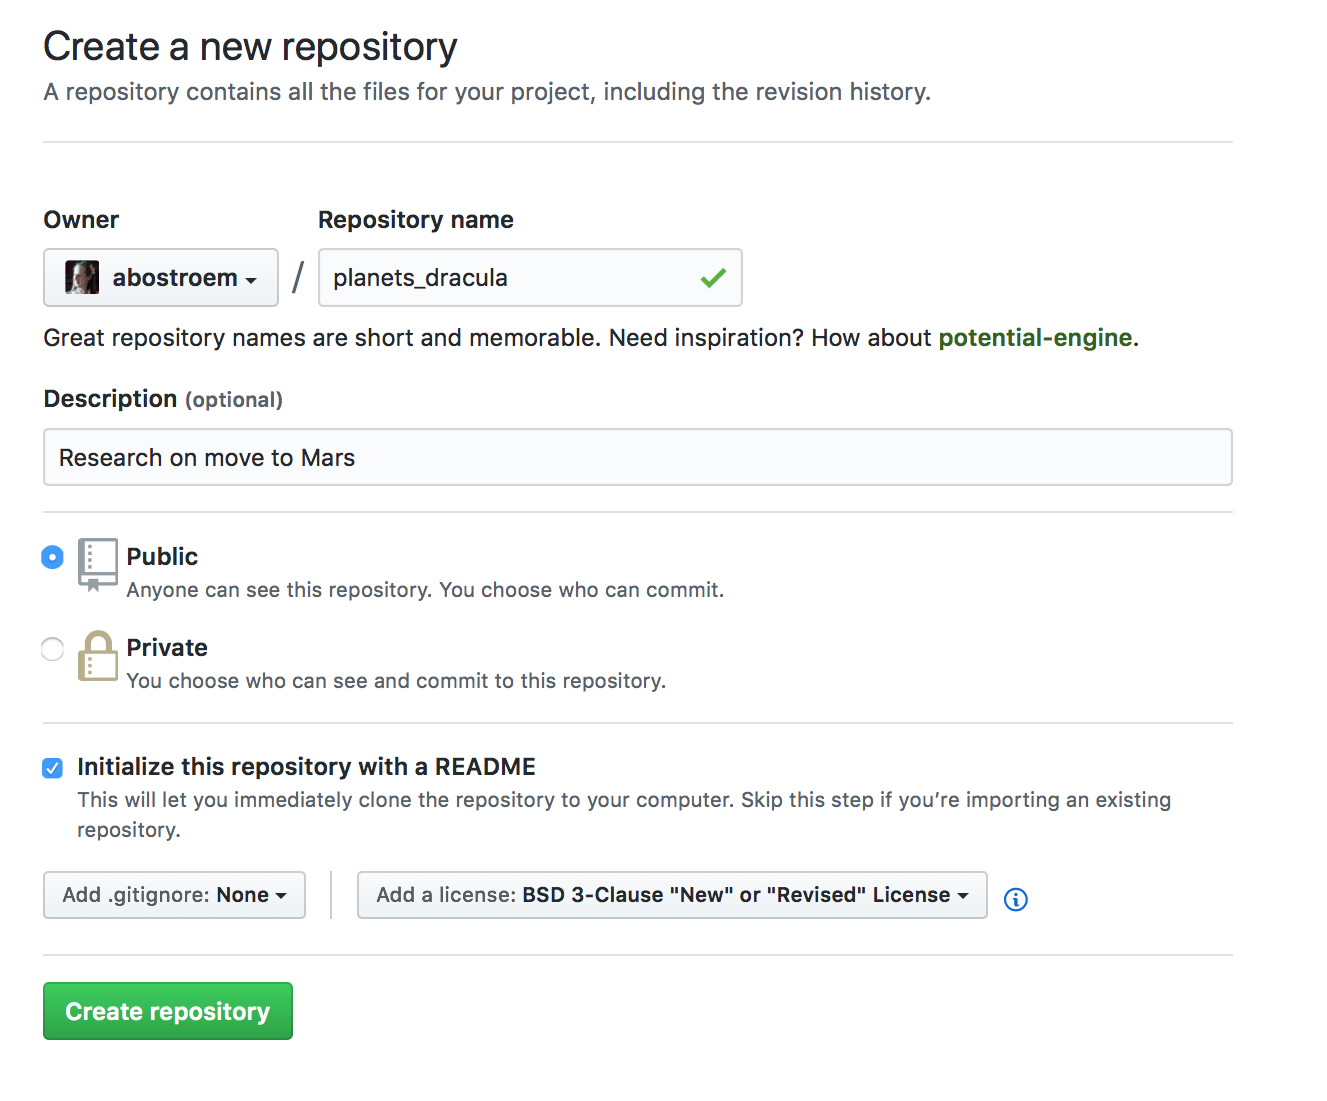
Repo name: if you're Wolfman this should be planets_wolfman
Short description
Public: note edu and paid accts can have private repos
Start with a README
and a license (note: you have options)
Make a local copy (or clone)
- Copy the text that appears when you click the green "clone or download" button
- Open a terminal
- Navigate to where you want this repository to live (you can move it later)
-
type: git clone <paste text>
- git clone https://github.com/abostroem/planets_dracula.git
-
Navigate into your repository:
- cd planets_dracula
- Note:
- git command format: git verb argument
- verb: clone
- argument: url to repo
Configuration
- --global
- apply everywhere
- color: color code output
- editor: set default editor
- you can change these setting at any time
git config --global user.name "Your Name"
git config --global user.email "YourEmail@email.edu"
git config --global color.ui "auto"
git config --global core.editor "nano"
Investigate your repository
ls -a- .git directory is where git stores the history of the project
git statusTracking Changes to Files
- Create a file to track called mars.txt
- Open your text editor
- Type: cold and dry but everything is my favorite color
- save file as mars.txt
- What is the status of your repository?
- start tracking file
- Record current state
-
- -m : commit message inline
git statusgit add mars.txtgit commit -m "starting to think about mars"What are we doing?
Exercise 1:
- Create a file called jupiter.txt with a sentence about jupiter in your planets directory
- start tracking and record the current state of jupiter.txt
- Put your green stickie up when you are done
git status
git add filename
git commit -m "commit message"
Normal workflow:
- Open your mars.txt file and add:
- The two moons may be a problem for Wolfman
- Check the status of your files
- (View the changes you made)
- Tell git which files you want to record changes in
- Save changes to revision history
- (View your history):
-
git statusgit diff mars.txtgit add mars.txtgit commit -m "concerns about Mar's moons"git logExercise 2
- Open file jupiter.txt in your text editor
- Add a line
- View the change you made using git
- Record your changes in the project's history
- View your project's history
- Put up your green stickie
- Bonus:
- make another change
- try any one of these variations:
- commit without adding
- view changes between adding and committing
- commit without the -m
Copy your incremental changes to your remote repository
- Vocabulary:
- origin: nickname/alias for the url you cloned
-
- master: default branch name
- origin: nickname/alias for the url you cloned
- Check for changes on your remote repo
- Put your changes on your remote repo
git remote -vgit pull origin mastergit push origin masterCollaborate!
- Navigate out of your repository
- In your web browser go to your remote repository
- Add your partner as a collaborator:
- Settings --> collaborators --> enter their GitHub username
- Accept your partner's invitation
- Find your partner's repository on GitHub
- clone your partner's repository
Exercise 3:
- Make a change to the last line of mars.txt in your repository
- add, commit, and push to your remote repository
git status
git add filename
git commit -m "commit message"
git push origin master
git pull origin master
Exercise 4:
- Make a change to the mars.txt in your partner's repository
- add and commit mars.txt
- Try to push
- When that doesn't work, try to pull
- Put up your green stickie when you have a message about a CONFLICT (similar to below)
git status
git add filename
git commit -m "message"
git push origin master
git pull origin master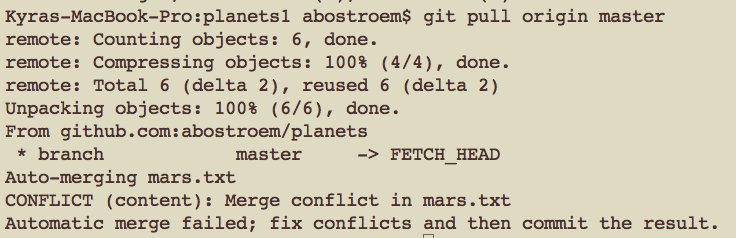
Resolving Conflicts
- What happened: you both modified the same line and GitHub doesn't know who to believe
- You have the final word
- Open and edit mars.txt, in your partner's repo, to look how you think it should look
- Add, commit, and push
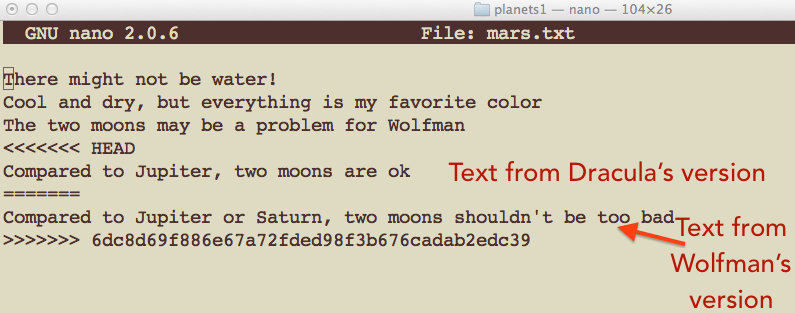
Dracula's File
git status
git add filename
git commit -m "message"
git push origin master
git pull origin master
Resource
- http://swcarpentry.github.io/git-novice/
- https://www.git-scm.com/doc
- https://learngitbranching.js.org
- Google/StackOverflow
- https://help.github.com/articles/generating-a-new-ssh-key-and-adding-it-to-the-ssh-agent/
version_control_60min
By abostroem


