Alexe Bogdan
Web Developer, JavaScript Lover, User Experience Professional, working in the web and mobile application development industry.
<!-- Built in directive -->
<div ng-repeat="item in items"> </div>

<!-- Custom directive -->
<my-directive> </my-directive>

<!-- OR -->
<div my-directive> </div><!-- Imperative Way -->
<button id="1" class="B C"></button>
<!-- V.s. Declarative way-->
<button my-action-handler></button><my-directive> </my-directive>.directive('myDirective', function(){
});Directive Names Angular uses a convention borrowed from other JS projects: names in HTML are hyphenated
while identifiers in the JS are camel-cased
angular
    .module('myApp', [])
    .directive('myDirective', function(){
        return{
            link: function(scope, lement, attrs, ctrl){

                element.bind("mouseenter", function(){
                    element.css({color: 'red'});
                });
            },
            require: '',
            controller: ['$scope', '$element', function($scope, $element){}],
            scope: false,
            transclude: false,
            restrict: 'E',
            template: "<div>Hello, World!</div>"
        };
    });
Everything but link is optional.
The params are supplied as args not injected:
We have the option, in directives, of using either:
.directive('myDirective', function(){
    return {
        //scope: false // default, use local scope
        //scope: true // create a child of local scope
        //Create a new isolate scope
        scope: {


        }
    }
});Angular provides ways to bind the value of properties in isolate scope to attributes on the element, using special operators:
scope: {
    local1: '@attr1',
    local2: '=attr1',
    local3: '&attr3'
}<div sidebox title="Links">
<ul>
<li>First link</li>
<li>Second link</li>
</ul>
</div>
<script type="text/ng-template" id="directive.template.html">
<h2 class="header">{{ title }}</h2>
<div class="content" ng-transclude></div>
</script>angular.module('myApp', [])
.directive('sidebox', function() {
return {
restrict: 'EA',
scope: {
title: '@'
},
transclude: true,
templateUrl: 'directive.template.html'
});The link function provides isolation between directives, while the controller defines shareable behavior.
The string(s) provided to the require option may optionally be prefixed with the following options:
<level-one>
    <level-two>
        <level-three>
            Hello {{name}}
        </level-three>
    </level-two>
</level-one>
function createDirective(name){
return function(){
return {
restrict: 'E',
compile: function(tElem, tAttrs){
console.log(name + ': compile => ' + tElem.html());
return {
pre: function(scope, iElem, iAttrs){
console.log(name + ': pre link => ' + iElem.html());
},
post: function(scope, iElem, iAttrs){
console.log(name + ': post link => ' + iElem.html());
}
}
}
}
}
}
angular.module('myModule', [])
.directive('levelOne', createDirective('levelOne'))
.directive('levelTwo', createDirective('levelTwo'))
.directive('levelThree', createDirective('levelThree')); The goal is simple: let AngularJS process three nested directives where each directive has its own compile, pre-link and post-link function that logs a line to the console so we can identify them.
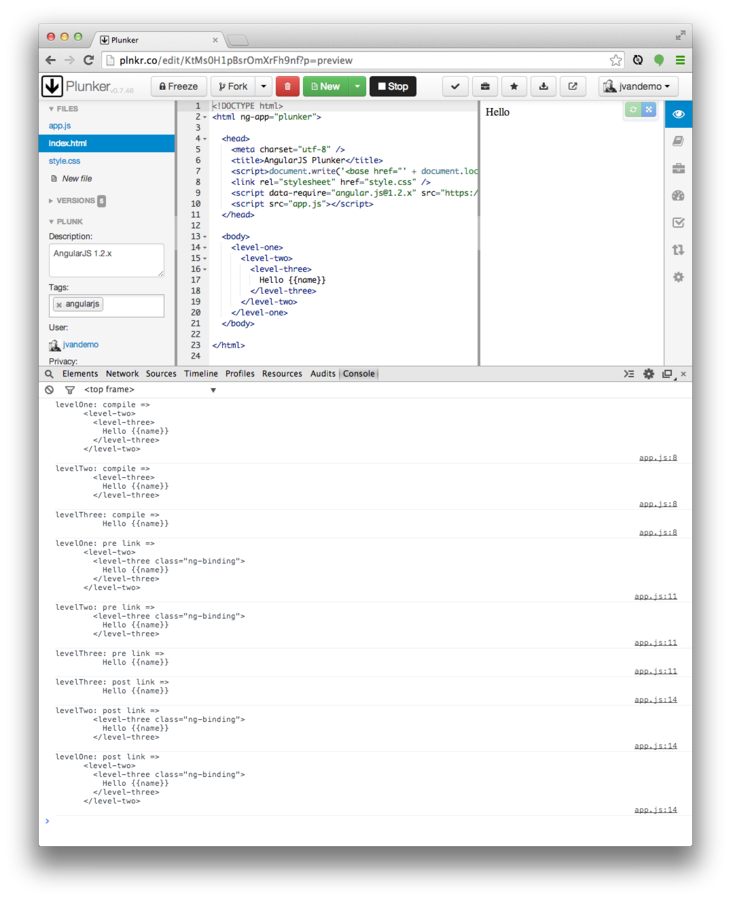
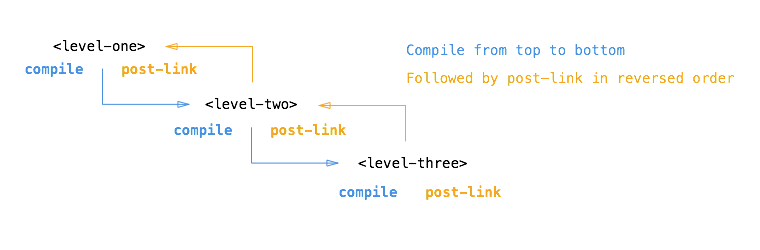
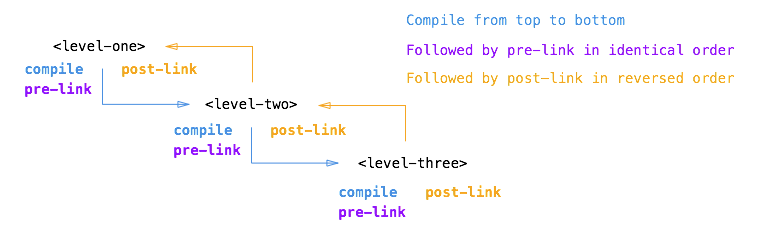
Compile:
Use only to change the original DOM (template element) before Angular creates an instance of it and before a scope is created.
Pre-link:
Use to implement logic that runs when Angular has already compiled the child elements, but before any of the child element's post-link and pre-link functions have been called.
Post-link:
Use to execute logic, knowing that all child elements have been compiled and all pre-link and post-link functions of child elements have been executed.
By Alexe Bogdan
Angular custom directives


