CODING TEMPLE
HTML/CSS Basics
AGENDA
- Learn basic foundation of HTML/CSS
- Be able to create a simple webpages.
Choose your text editor
Get it here:
http://brackets.io/
HTML
Stands for:
- "HyperText Markup Language"
- HyperText is a nerdy word for a link.
- Markup Language is a language that lets you insert instructions within the text that you write.
HTML Origins
- Proposed in 1989 by Tim Berners-Lee.
- Released in 1993.
- Used as a way to share documents with other researchers.
- Lee described:
- "Hyper-text" as text displayed on computer screen or sent electronically with links to other text.
- "Mark-up" as a set of instructions on how to present the text-based documentation.
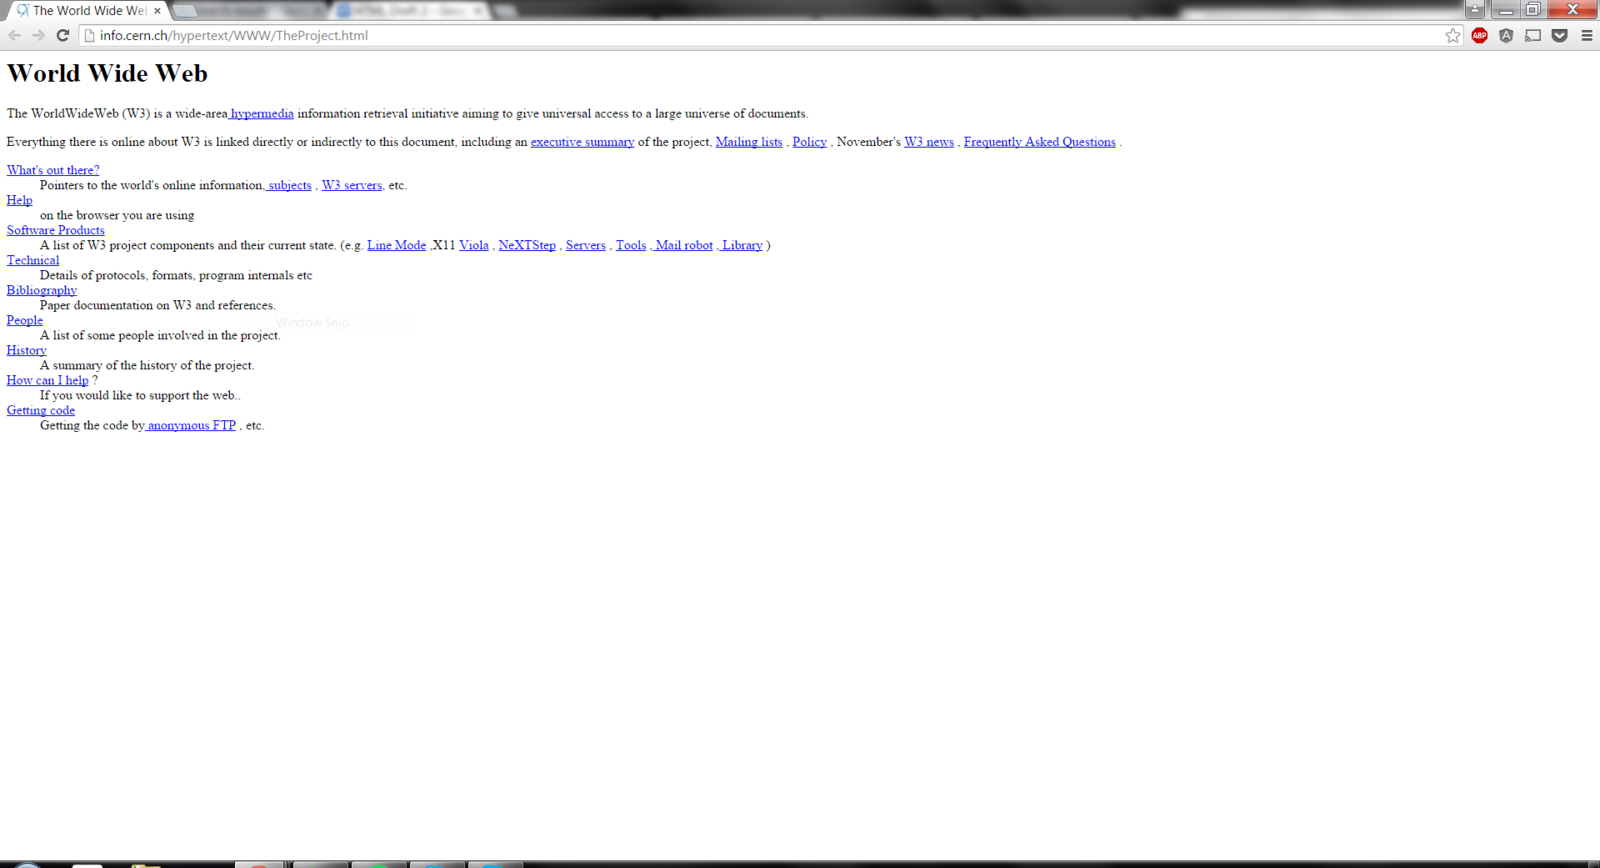
Very first web page
HTML Elements
- HTML documents consists of HTML elements.
- HTML ignores blank lines and spaces, together which are called white spaces.
- HTML elements consist of a start tag followed by content, followed by an end tag.
- <tagname>content</tagname>
- Elements can go inside other elements. This is called nesting.
Example:
<p>Hello World!</p>
Tags
- Think of tags as a set of instructions wrapped around content.
- <p>
- <h1>
- <br>
- <b>
*Notice that the tag name is abbreviated*
More tags here: http://www.w3schools.com/tags/
Examples
Tags syntax
- Opening angle bracket (<)
- Tag Name
- Attributes (optional)
- *I will get into this later*
- Closing angle bracket (>)
Example:
Opening bracket
Tag name
Closing bracket
<
p
>
Tags continued
- Tags usually come in pairs but not always.
- A closing tag must have the same name as its matching opening tag.
- A closing tag must include a forward slash (/) between the opening bracket and the tag name.
Opening tag: <p>
Closing tag: </p>
Types of Elements
-
Block-level elements
- starts on a new line
- takes up the full width of the window.
- Examples: h1-h6, p, and div
- Inline elements
- does not start on a new line
- only take up the width of the enclosing content.
- Examples: b, ul, and span
Two types of elements
Tags Practice
For Reference: http://www.w3schools.com/tags/
Trying playing around with the following tags:
<li>
<header>
<body>
<strong>
<em>
Lists
- You can create ordered lists or unordered lists.
- Lists are denoted by:
- <ul> for unordered
- <ol> for ordered
- Any content inside the list is padded/margin on the left.
- list items are denoted by <li>
List Practice
- Create a list of your top 3 favorite movies.
- Create a list of household chores and bold every other list item in that list.
Reference: http://goo.gl/cCzp9v
Anatomy of the HTML element
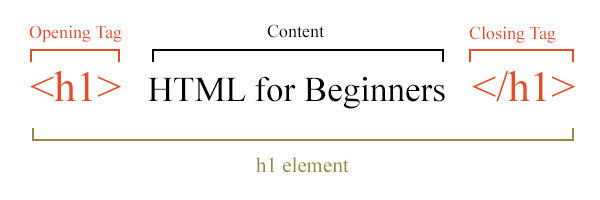
source: http://schoolsofweb.com/
Without attribute
With attribute

source: University of Alaska Fairbanks
HTML Attributes
- Attributes provide additional information about HTML elements.
- Attributes are always specified in the start tag.
- Attributes always have a space between it and the element name and other attributes.
- The attribute name is followed by an equals sign, which is followed by a value wrapped in quotes.
- Some HTML tags require elements.

source: developer.mozilla.org
Embedding Images
<img> Tag
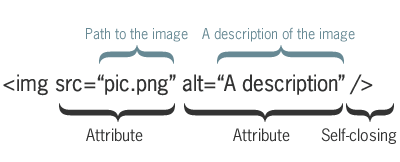
- <img> tag is used to embed images into the page.
- A src attribute is required to provide a path to the image. The path can be a link to an image on the web or to an image relative to your HTML file.
- A alt attribute is required to provide text to display if the image cannot be displayed.
source: University of Alaska Fairbanks
Links
a Tag
- The a (a being short for "anchor") tag provides a link to another webpage.
- An href attribute specifies a location to go to on the same page or any other page on the web.
<a href="www.safetyschool.org"> A school for Harvard rejects</a>
Going through it Step-by-step
- Wrap content in an <a> tag
<a>A school for Harvard rejects</a>
2. Give the <a> element an href attribute, like so
<a href=""> A school for Harvard rejects</a>
3. Fill in the value of this attribute with the web address that you want the link to link to.
<a href="www.safetyschool.org"> A school for Harvard rejects</a>
Complete Document
- A !DOCTYPE tells the browser what version of HTML we are using. The default is HTML 5.
- <head> element is a container of information for the web browser. Nothing you put in there, with the exception of the title element, is directly visible to your site's visitors.
- <body> element is where all the content of the document goes. You'll spend most of your time here.
Metadata tags
- <head> element is a container for metadata (data about data).
-
<title>
- defines a title in the browser tab.
-
<meta>
- Provides additional information such as search terms for web browsers.
-
<link>
- creates a link between this html document and an external resource.
Here are some tags that go inside the <head> element that provide information about the webpage:
Cascading style sheets
CSS
- HTML is for adding content and structuring it whereas CSS exists to style it.
- Called "cascading" because often a single element on a webpage will have multiple sources that style it.
- Examples of CSS styling:
- http://www.csszengarden.com/218/
- https://goo.gl/HlVn0c
setting up
- Create a text file called styles.css and save it to the same directory/folder where you saved your index.html
- You will need to link this css to your index.html. You do this by using the <link> tag inside the head element.
The link tag will have the following attributes:
- rel - means relationship to the current document
- href - path to the external document.
CSS Syntax
- Use the selector to select the element(s) you want to style.
- CSS rules for that selected element(s) go inside a pair of curly braces {}.
- The rules format is the following: property name : value;
- Every rule is terminted by a semi-colon.
- You can have multiple rules in one selection.
Styling text
h1 {
  color: #66CCFF;   /*named colors aren't typically used. So use the color's hex number*/
  text-align: center;
}

h2 {
  font-size: 20px;   /*px stands for pixels*/
  font-style: italic;
  text-align: center;
}

p {
  font-family: Monospace;
}
Hex digits for colors: https://goo.gl/tNyyIs
Styling Text Practice
- Create a <p> element filled with text.
- Give it some rules with the following properties:
color
text-align
font-style
font-weight
font-size
Reference: https://goo.gl/9GzVZF
(Use the sidebar on left to navigate)
Selecting a group of different elements
- We can assign all elements that need the same set of css rules by giving them a class attribute.
- We then select all those elements using their class name as the css selector.
<p class="apple">Steve Jobs co-founded Apple</p>
<b class="apple">But Wozniak was the genius behind it</b>
.apple{
color:red;
}HTML
CSS
Use a period followed by class name to select a class.
More On Classes
- You can assign multiple class names to an element. Simple set the class attribute to the names (separated by spaces).
- You can select a element with multiple class names by using one or more of its names.
<p class="apple">Steve Jobs co-founded Apple</p>
<b class="apple nerd">But Wozniak was the genius behind it</b>/*What will happen here?*/
.nerd.apple{
color: blue;
}
.nerd{
color:red;
}HTML
CSS
<p class="apple">Steve Jobs co-founded Apple</p>
<b class="apple nerd">But Wozniak was the genius behind it</b>/*This rule and the one following it are equal in specificity*/
.nerd{
color: blue;
}
/*This rule will be applied since it is the last one in this file.*/
.apple{
  color:red;
}
HTML
CSS
- The selectors that are the most specific have the highest precedence.
- If two or more selectors are equal in specificity, the last selector in the file out of the two is applied.
Styling with classes practice
- Create 3 elements. Give them a class called "important"
- Make the text in the important class red and bold.
- Create two <h1> elements and one <p> element. Give all three the same class called "header"
- Use h1.header selector to make the h1 elements bold.
- e.g. h1.header {rule goes in here }
- notice that you can select specific type of tags in a class.
- e.g. h1.header {rule goes in here }
Reference: https://goo.gl/JMNlPu
id vs classes
- If you want an element to have a unique class name, then you must use an id attribute.
- Ids are not classes.
- The value for id must be unique within the HTML document. In other words, no other element can have that id value.
<h1 id="myHeader">One Ring to rule them all...</h1> HTML
CSS
#myHeader{
    text-align: center;
}- Use # followed by id name to select id.
Span
<p>If you want to be my lover, <span class="c2">you gotta get with my friends!</span></p>HTML
CSS
.c2{
    color: blue;
}- Use the <span> tag to add a hook to text within an element to style it.
Div
- You can group elements together using <div>
-
<div> are block-level elements.
- Which means they start on an new line.
- This is more efficient than assigning a class to each individual element.
<h2 class="important">Thriller</h2>
<p class="important">
   'Cause this is thriller, thriller night
    And no one's gonna save you from the beast about to
    Strike
    You know it's thriller, thriller night
    You're fighting for your life inside a killer
    Thriller tonight
</p>
<img class="important" src="scary.png" alt="Zombie Michael Jackson">
<div class= "important">
<h2>Thriller</h2>
<p>
'Cause this is thriller, thriller night
And no one's gonna save you from the beast about to
Strike
You know it's thriller, thriller night
You're fighting for your life inside a killer
Thriller tonight
</p>
<img src="scary.png" alt="Zombie Michael Jackson">
</div>Box Model
- All HTML elements are represented as a rectangular box.
- Each box has four edges: margin, border, padding, and content
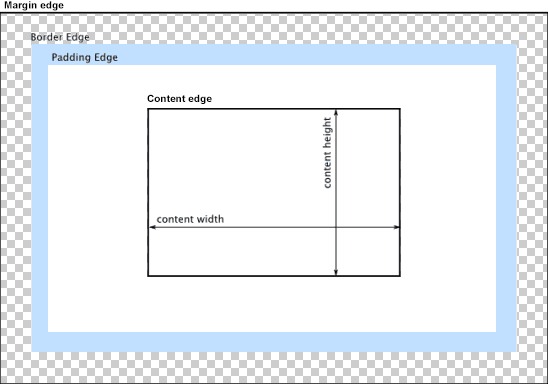
source: developer.mozilla.org
Another Example
source: w3schools.com
Floats
The float property specifies where the element is placed within a container.
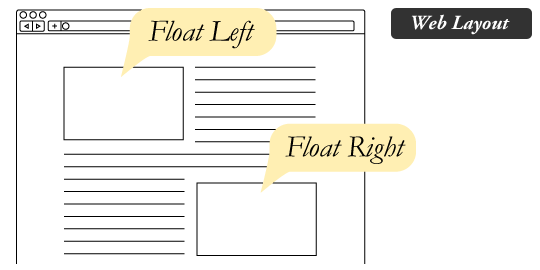
source: css-tricks.com
Floats Continued
<p> <img alt="nyan cat" src ="https://upload.wikimedia.org/wikipedia/en/e/ed/Nyan_cat_250px_frame.PNG">
nyan nyan nyan nyan nyan nyan nyan Nyan nyan nyan nyan nyan nyan nyan nyan nyan nyan nyan nyan nyan
nyan nyan nyan nyan nyan nyan nyan nyan Nyan nyan nyan nyan nyan nyan nyan nyan nyan nyan nyan nyan
nyan nyan nyan nyan nyan nyan nyan nyan nyan Nyan nyan nyan nyan nyan nyan nyan nyan nyan nyan nyan nyan
nyan nyan nyan nyan nyan nyan nyan nyan nyan Nyannyan nyan nyan nyan nyan nyan nyan nyan nyan nyan nyan
nyan nyan nyan nyan nyan nyan nyan nyan nyan Nyan nyan nyan nyan nyan nyan nyan nyan nyan nyan nyan nyan
nyan nyan nyan nyan nyan nyan nyan nyan nyan Nyan</p>
The image will float to the right of the paragraph.
img {
    float: right;
}
CSS
Floats practice
- Have an <img> inside a <p> element and float it to the left.
- Create two columns of paragraphs.
- Create a side bar

Copy of HTML/CSS Basics
By avipatel91