JS 543
Chiahao Lin
2015.08.28
Outline
- 浮點數計算
- 型別系統
- 物件
- 範圍鏈
- 提昇
- 原型
- this
- ES2015 (ES6) 使用
- Promise
- Generator
- Testing
浮點數計算
Floating Compute
Number 在 JS 中一律是以 64bits 的浮點數儲存
所以進行小數點計算,可能會有誤差產生
var float1 = 0.1 + 0.2; // 0.30000000000000004
var float2 = 0.1 * 0.1; // 0.010000000000000002
所以務必四捨五入,不然會卡到陰
var float1 = 0.1 + 0.2; // 0.30000000000000004
var float2 = 0.1 * 0.1; // 0.010000000000000002

// 等價於 +float1.toFixed(3), '+' 會強迫自動轉型
Number(float1.toFixed(3)); // 0.3

// 或者利用轉整數方法,自定義轉換 function
function roundOff(number, fractionDigits) {
    return Math.round(number * Math.pow(10,fractionDigits))
           / Math.pow(10,fractionDigits);
}

roundOff(float2, 3); // 0.01
型別系統
Type System
之前有提過,
JS 型別主要有分原始型別跟物件型別兩種
原始型別與物件型別最大的差異就是在於是否能自由擴增屬性
// 自由擴增屬性

var obj = {a:10, b:20};

// 新增屬性
obj.c = 30;

// 刪除屬性
delete obj.c;

// 判斷屬性是否存在
// 正確的作法
if('c' in obj) {}

// 錯誤用法,因為屬性可以被 assgin 成 undefined
typeof(obj.c) === 'undefined'
原始型別
- number
- string
- boolean
- null
- undefined
而為了讓原始型別有特別屬性與方法
除了 null 與 undefined 外,
其餘都有對應的包裹物件
包裹物件
- number => Number
- string => String
- boolean => Boolean
共通方法
- valueOf () => 物件型別轉原始型別
- toString () => 物件轉字串
有包裹物件後,就可以做一些型態轉換
型態轉換
- var num = Number('543'); // 100
- var num = Number ('543abc'); // 失敗 => NaN
- var str = String(543); // '543';
- var bool = Boolean ('false'); //true, 只有空字串為 false
Not a number is a number(NaN)
,NaN 與 任何值比較永遠回傳 false
強制轉型小技巧
- +'543' // 543 => number
- 543 + 'abc' // 543abc => + 號優先轉字串
- !!'whaterver' //true => 強轉 boolean
- 除了 NaN, undefined, null, 0 與空字串才是 false
比較
- 一律使用 === 或!== 避免觸發自動轉型
預設值設定技巧
- var arr = arr || [];
- var num = num || 99;
- var str = str || "";
- var bool = bool || true;
- var obj = obj || {};
物件資料結構
Object Data Structure
在 JS 裡,所有的資料都是儲存在一顆巨大的 Tree 當中
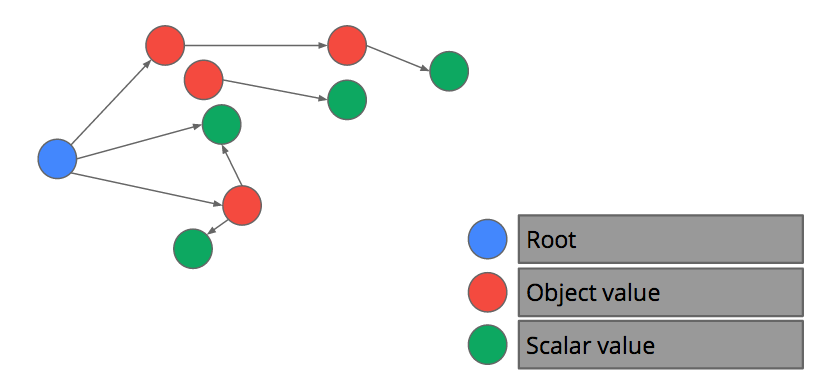
將被 GC
所有物件資料都是從根物件 (root object) 開始連結 (chain)
任何 JS 的運行環境都有根物件,
在根物件底下的屬性 / 變數就是所謂的全域變數
Root Object
- Browser -> window
- node -> global
當在全域環境下,宣告變數或函數時,
其會直接長在根物件底下
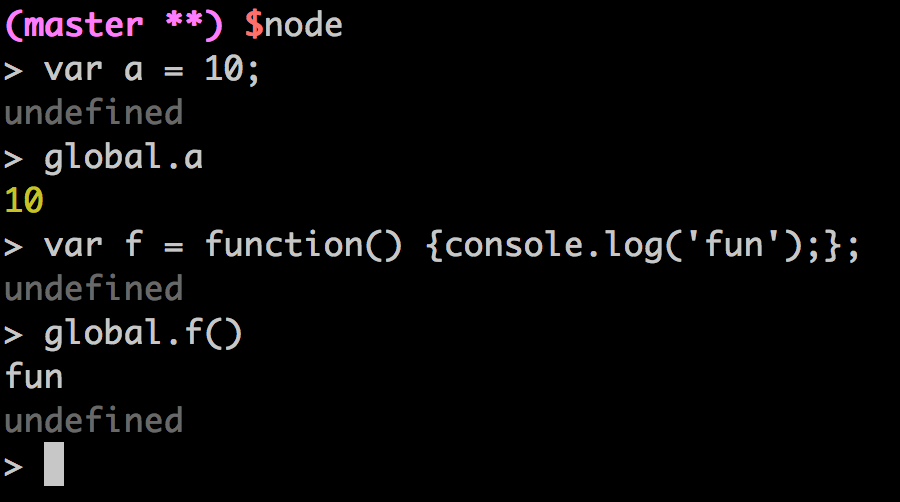
但比較弔詭得是,node 若用檔案執行的話,你本身一開始就不在全域環境底下 (local module context),所以並不會自動長在根物件底下,避免宣告不必要的全域變數。
若未使用 var 宣告的變數 (不管是否在全域),實際上根本不是變數,其會自動在根物件底下長一個屬性,且可以使用 delete 刪除。
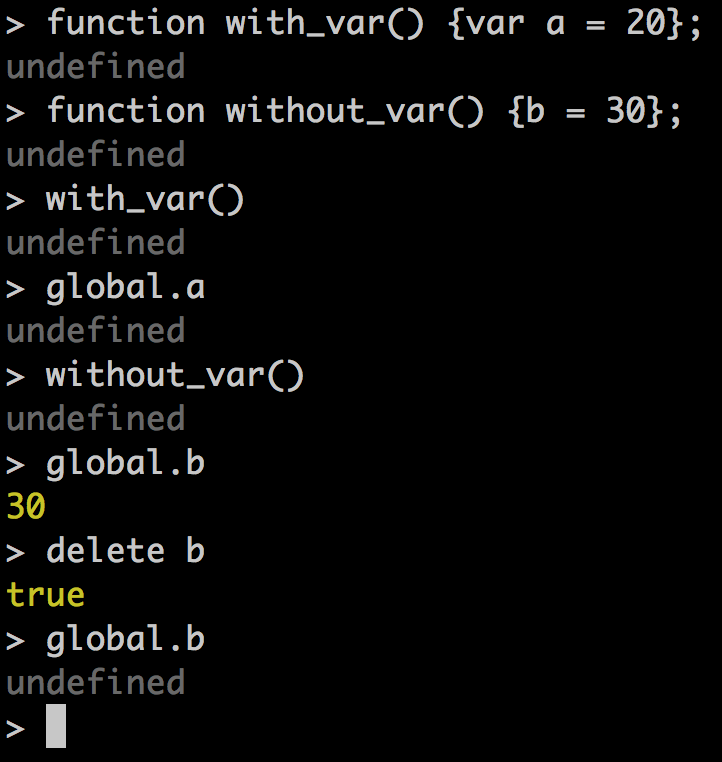
所以永遠使用 var 宣告!!!
Resource
提昇
Hoisting
當使用 var 宣告或者 函數宣告 (函數實字無用)
其會自動提升到順序到函數最前面
什麼意思?
// hoisting
function hoisting() {
  hoist();
  console.log('not-defined a', a);
  var a = 10;
  console.log('already-defined a', a);

  function hoist() {
    console.log('hoist');
  }
}
hoisting();

// output: [No Error]
// hoist
// not-defined a undefined
// already-defined a 10
// without var
function without_var() {
  console.log(b);
  b = 20;
  console.log(b);
}

without_var();

// output: [Error]
// [ReferenceError: b is not defined]
// without function hoisting
function without_hoisting() {
  without_hoist();

  // 函數實字不會提昇
  // 雖然變數提昇了,但是值還是 undefined
  var without_hoist = function() {
    console.log('without_hoist');
  };
}

without_hoisting();

// output: [Error]
// [TypeError: without_hoist is not a function]
最安全的方法就是永遠只在函數最頂端宣告!
範圍鏈
Scope Chain
範圍鏈在講的就是 JS 找查一個變數存不存在的方式
JS 的變數範圍不像一般 C 或 Java ,是根據大括號 ({}) 範圍來決定的,而是根據函數 (function)
每個函數內部其實都有一個無法從外部存取的屬性 - scope,裡面存放這個函數的所有變數
而函數變數的找查就是根據這個屬性一層一層由內往外找出去,直到根物件的變數
找查順序
- 函數內部變數
- 上一層函數變數
- 重複第二步驟直到根物件
- 根物件變數
- ReferenceError: variable is not defined
// scope chain
var global_value = 'global'

function outer(a) {
  var b = 10;
  var c = 40;
  return function inter(c) {
    var d = 20;
    var b = 30;

    console.log('a', a);
    console.log('b', b);
    console.log('c', c);
    console.log('d', d);
    console.log('global', global_value);
    console.log('not-defined', miss);
  }
}

outer(100)(200);

// output:
// a 100
// b 30
// c 200
// d 20
// global global
// [ReferenceError: miss is not defined]
原型
Prototype
原型是 JS 實作物件導向的方式
JS 並沒有 class
要建立一個物件要透過建構式,
而 JS 的建構式就是使用 new 關鍵字的函式
// create a object from constructor
function Cat() {
  this.name = 'cat';
  this.say = function() {
    return this.name + 'say' + ' meow~';
  }
}

var cat = new Cat();
console.log(cat.name);
console.log(cat.say());
而 JS 在繼承的時候,會不斷根據它的原型 (prototype 屬性) 去繼承,直到頂層 (Object)
這個不斷繼承的流程就稱為原型鏈 (prototype chain)
prototype chain != scope chain
繼承流程
- 宣告上層建構式
- 宣告下層建構式
- 透過 prototype 建立物件繼承關係
- 建立物件
// Object inheritance
// 上層建構式
function Animal() {
  this.name = 'Animal';
  this.canMove = true;
}

// 下層建構式
function Cat() {
  this.name = 'cat';
  this.say = function() {
    return this.name + 'say' + ' meow~';
  }
}

// 建立物件繼承關係
Cat.prototype = new Animal();
Cat.prototype.constructor = Cat;

// 建立物件
var cat = new Cat();
console.log(cat.name);
console.log(cat.say());
console.log(cat.canMove);

delete cat.name;
console.log(cat.name);

// output:
// cat
// catsay meow~
// true
// Animal
node 有提供比較簡便繼承的方法
util.inherits
// node-way inheritance
var inherits = require('util').inherits;

// 上層建構式
function Animal() {
  this.name = 'Animal';
  this.canMove = true;
}

// 下層建構式
function Cat() {
  this.name = 'cat';
  this.say = function() {
    return this.name + 'say' + ' meow~';
  }
}

// 建立物件繼承關係
inherits(Cat, Animal);

// 建立物件
var cat = new Cat();
console.log(cat.name);
console.log(cat.say());
console.log(cat.canMove);

delete cat.name;
console.log(cat.name);
this
this 在 JS 中是種很神奇的東西,很容易混亂
(現在還是有點搞不太懂,講錯請糾正 Orz...)
因為函數在 JS 中也是物件
(Instance of Function),所以一定有 this
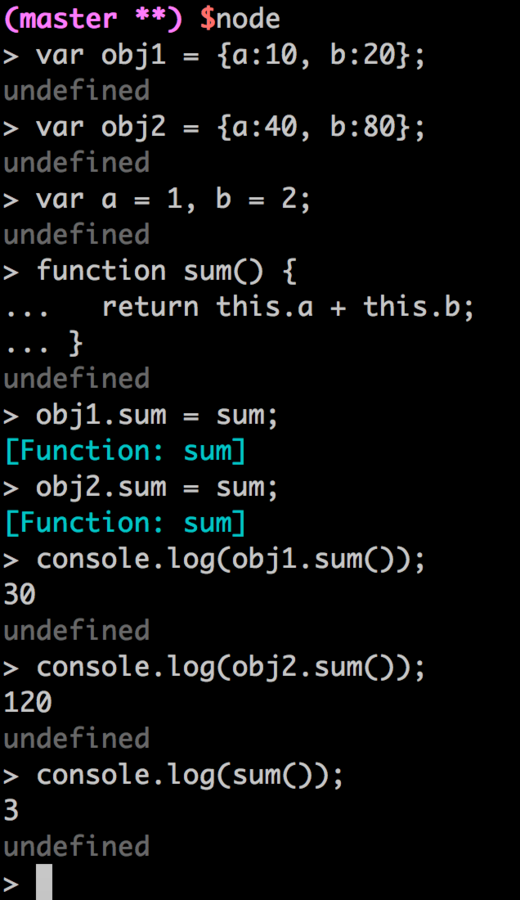
判斷原則
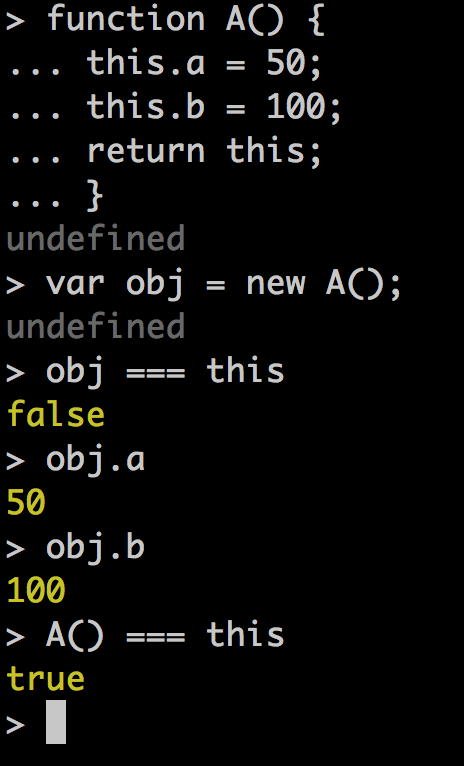
- 函式若當成建構式使用,this 就是建立物件的實例 (instance)
- 若是當成一般函式使用,this 就是呼叫它的物件
- 是從呼叫決定,而非定義!
apply/call
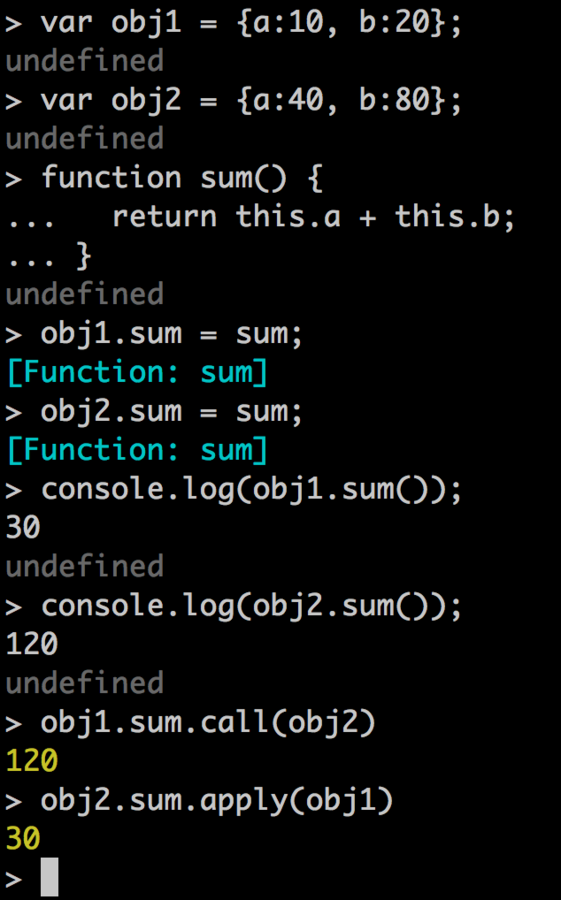
- apply 或 call 可以用於強制綁定特定的 this
- 兩者功能一樣,差別只是函數參數給值得方式不同
- apply(this, [arg1, arg2, ...])
- call(this, arg1, arg2, ...)
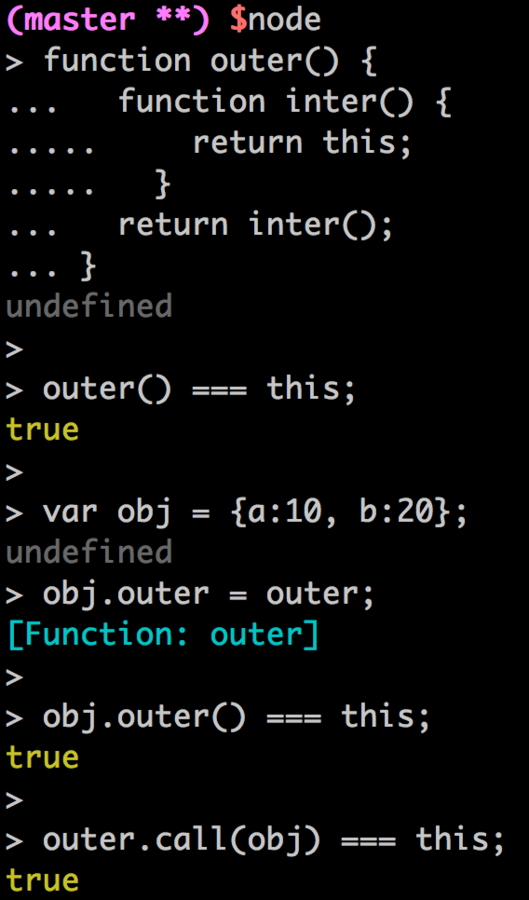
要注意若是有 closure,要確保每層都綁定 this,不然一樣會指到根物件
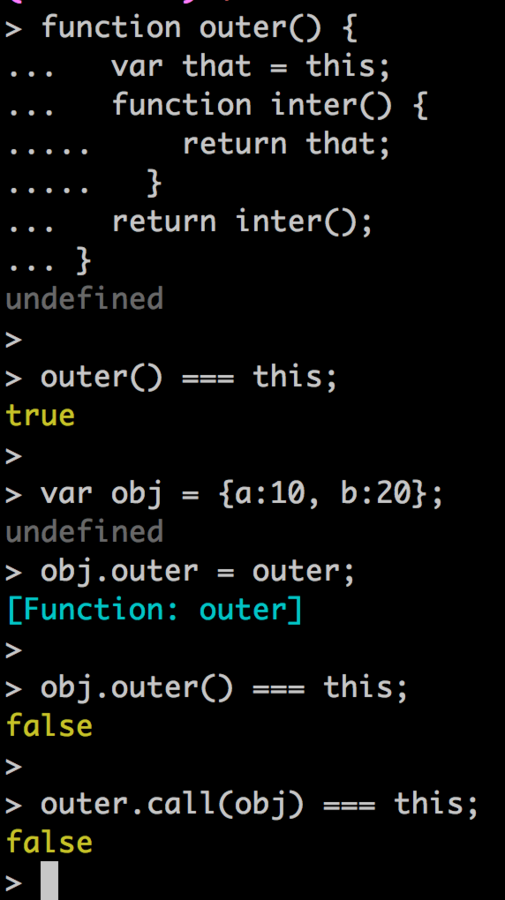
所以有時會看到 vat that = this ,這種奇怪的寫法
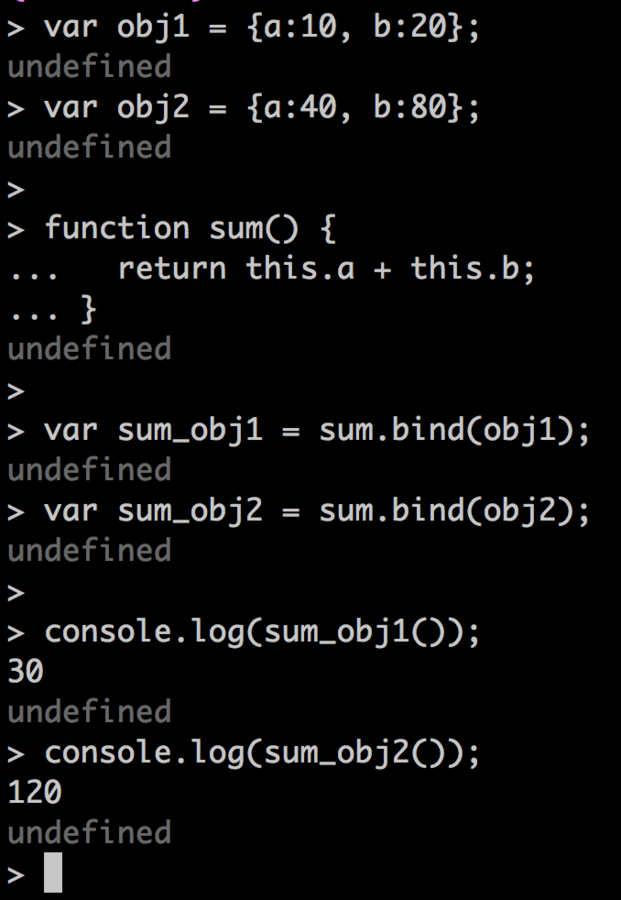
最後再提一下 bind
bind
- bind 的作用也是用來綁定 this
- bind(this, [arg1, arg2, ...])
- 與 apply 不同的地方
- return 新的 function,而不是執行
Resource

聽說演講超過十五分鐘,要放隻貓!
ES2015 (ES6) 使用
How to use ES2015 (ES6) ?
ES2015 在今年才剛正式發佈,不管是 Browser 或 node 可能都還沒完全支援
但是因為其提供了一些很不錯的語法,
所以就有人開發出支持 ES2015 的工具
本章主要就是提供幾個常用的 ES2015 的使用方法
ES2015 執行方法
Babel 是一個將 ES2015 轉換成 ES5 語法的工具
(所以可以向下相容)
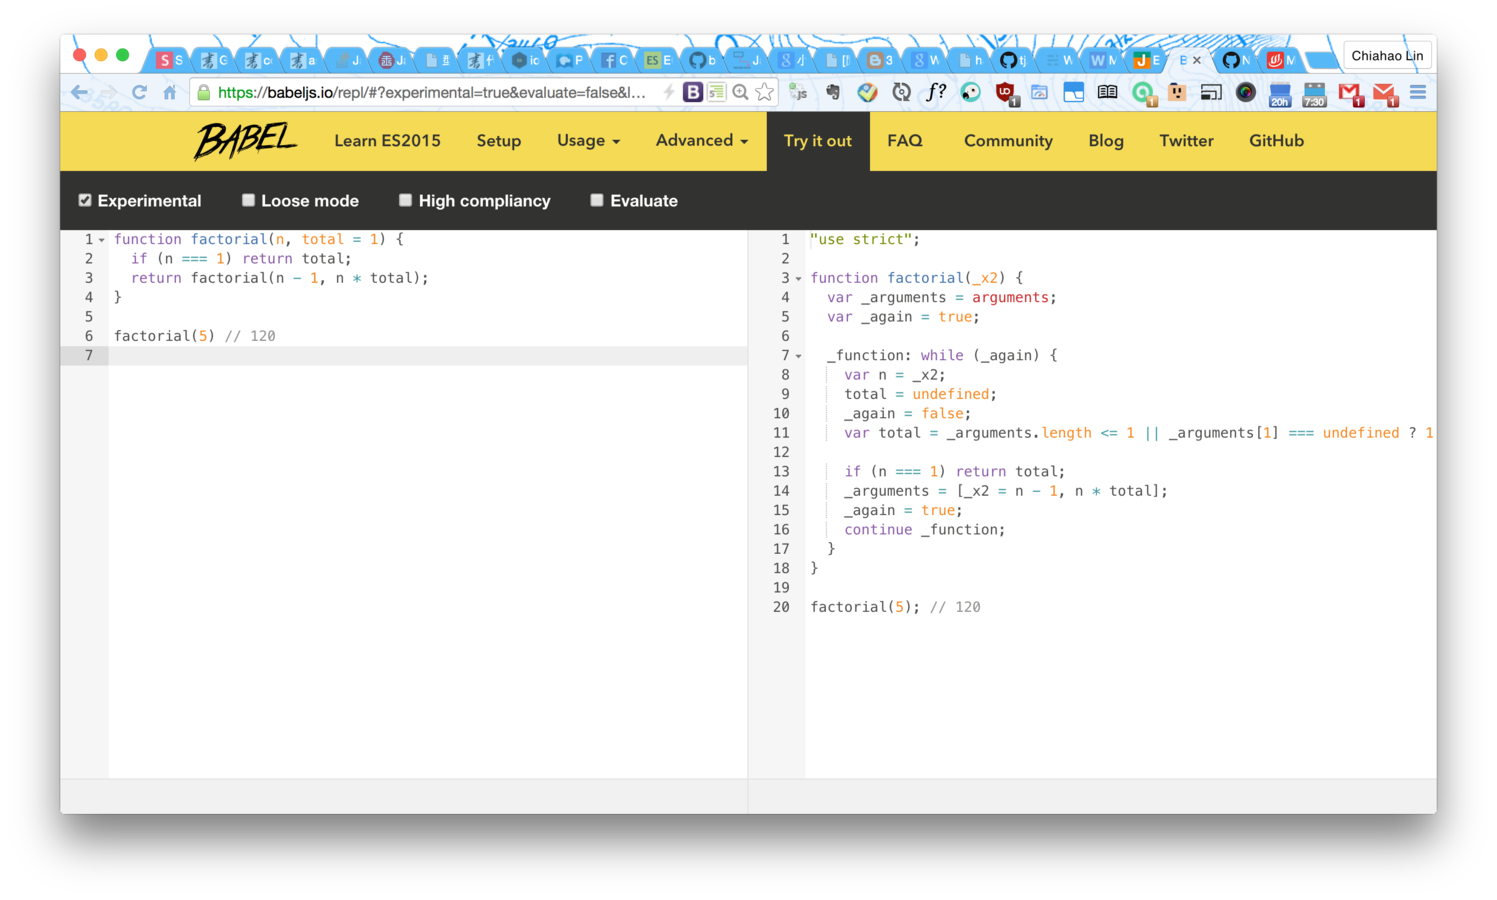
Babel 轉譯
- npm install --save babel
- 設定 entry point (建立 entry.js)
- 在 entry.js 裡 require ('babel/register') 與 require 主程式
- node entry.js
- 可以額外設定 .babelrc 的檔案,做更細緻的轉換設定
因為是轉譯,所以相容性最好
基本上 Browser 上就是選擇 Babel 了!
// entry.js
require('babel/register');

require('./app.js');
// app.js
let a = [10, 20, 30];
const pi = 3.14;

a.forEach( (elem) => {
  console.log(elem);
});
node entry.js
{
  "stage": 0,
  "loose": "all",
  "blacklist": [
		"regenerator"
	]
}
.babelrc
babel-node
- npm install -g babel
- babel-node app.js
最方便,但是速度上會慢一點
- nvm install iojs
- iojs app.js//node app.js 也行
原生支持,所以效率最高
基本上都支援,只有少許尚未支持 (詳細看官網)
更新速度超級快!(一個版號追不完啊 Orz...)
iojs 是 node 的一個分支,而且在今年 (2015) 十月左右會合併回 node,所以這個執行方法到未來仍然可以使用!
=> node 4.0 !!!
node --harmony
- node --harmony app.js
這個實際上就是 iojs 與 Babel 出現前的過度品
所以最好是根本別用 XD
Promise
Promise 是 ES2015 (ES6) 的語法
Promise 是為了改善 Callback 過深的問題而存在的!
asyncFun1(function(err, result) {
  asyncFun2(function(err, result) {
    asyncFun3(function(err, result) {
      asyncFun4(function(err, result) {
        asyncFun5(function(err, result) {
          asyncFun6(function(err, result) {
            asyncFun7(function(err, result) {
              asyncFun8(function(err, result) {
                asyncFun9(function(err, result) {
                  // do something
                });
              });
            });
          });
        });
      });
    });
  });
});
舉例來說,我們要依序讀取兩個檔案 ...
fs.readFile('file1', function(err, data1) {
  fs.readFile('file2', function(err, data2) {
    // do something
  })
});
Callback
readFileAsync('file1')
.then( function(data1) {
  // file1 result
  return readFileAsync('file2');
})
.then( function(data2) {
  // file2 result
})
.catch(function(err) {
  // error handling
});
Promise
可以發現使用 Promise ,程式碼不再會橫向發展,而只有單純的縱向發展
那麼 Promise 該怎麼使用呢?
Promise 有 reslove (fulfill) 與 reject (error) 兩種狀態
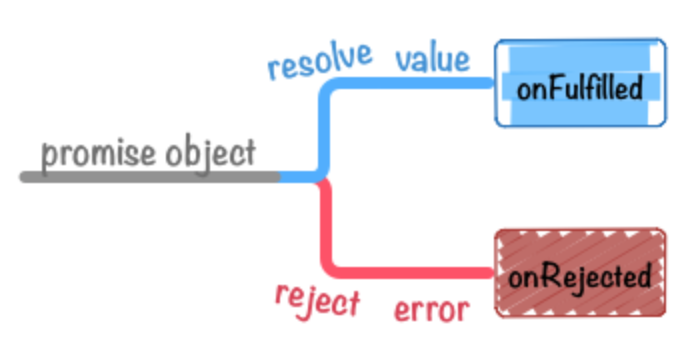
http://liubin.github.io/promises-book
先將原本的非同步的 callback function 改寫成 Promise (Promisfy),並 return Promise 物件
// Promise-way readFile
var readFileAsync = function(file) {
  return new Promise( function(resolve, reject) {
    fs.readFile(file, function(err, data) {
      if(err) return reject(err); // error
      return resolve(data); // fulfill
    });
  });
}
接著就可以使用 then 與 catch 方法使用它
只要有錯誤發生,會中斷當前全部的 Promise ,直接將 error 當成參數丟給 catch 方法
readFileAsync('file')
.then( function(data) {
  console.log('data', data.toString());
})
.catch( function(err) {
  console.error(err);
);
語法糖
- Promise.resolve
- Promise.reject
// Resolve
Promise.resolve(543);
// 等價於
new Promise(function(resolve) {
  resolve(543);
});

// Reject
Promise.reject(new Error('A Error'));
// 等價於
new Promise(function(resolve, reject){
  reject(new Error('A Error'));
});
另外要強調的是,在 then 的 callback 裡面 return 的內容,會自動包覆成 Promise ,傳遞給下一個 then 的 參數
因此就有所謂的 Promise Chain (什麼都要 Chain 一下)
// Promise Chain
function taskA() {
    console.log("Task A");
    return "From A";
}
function taskB(a) {
    console.log("Task B");
    console.log("Value From A", a);
    return "From B";
}
function onRejected(error) {
    console.log("Catch Error: A or B", error);
}
function finalTask() {
    console.log("Final Task");
}

Promise.resolve()
  .then(taskA)
  .then(taskB)
  .catch(onRejected)
  .then(finalTask);

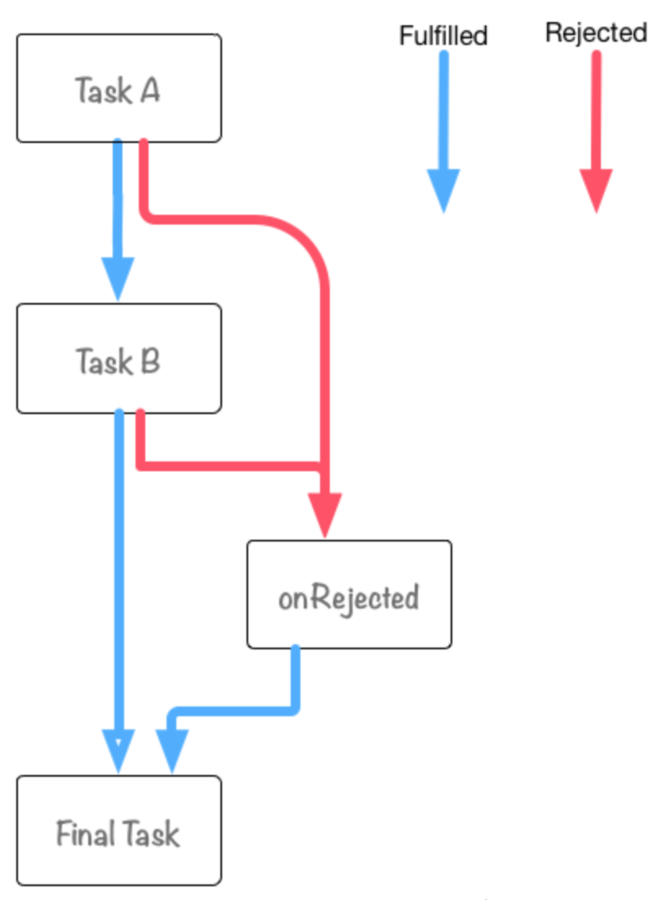
http://liubin.github.io/promises-book
併行 / 競爭
- Promise.all
- Promise.race
有時我們想要同時併行處理多個非同步請求,並等待所有結果完成後才往下執行,此時就可以用 Promise.all
// Promise.all
function main() {
  return Promise.all([
                      readFileAsync('file1'),
                      readFileAsync('file2')
                    ]);
}

main()
.then( function(result) {
  console.log(result); // [ 'file1\n', 'file2\n' ]
})
.catch( function(err) {
  console.error(err);
});
Promise.race 則是只要有一個 Promise 進入 resolve 或 reject 狀態,就往下執行
// `delay`毫秒後執行 resolve
function timerPromisefy(delay) {
    return new Promise(function (resolve) {
        setTimeout(function () {
            resolve(delay);
        }, delay);
    });
}
// 任何一個 promise 變成 resolve 或 reject 的話
// ,程式就會往下執行
Promise.race([
    timerPromisefy(1),
    timerPromisefy(32),
    timerPromisefy(64),
    timerPromisefy(128)
]).then(function (value) {
    console.log(value);    // => 1
});
最後 Promise 只剩下一個問題,就是每次要使用 Promise 之前必須先將 function Promisfy
有個套件叫 bluebird
https://github.com/petkaantonov/bluebird
它是一個 Promise 的實作,提供給尚未支援 Promise 的環境使用,然後速度超快
但重點是它有提供一個 method - promisifyAll
可以將符合 node 規範的 Callback Functions 全部自動 Promisfy (也可以各別轉)
所謂的符合規範就是 callback 為 function 的最後一個參數,並且 callback 第一個參數為 error,第二個參數為 success value
轉換出來的 function 名稱為原本名稱加上 "Async"
// bluebird promisifyAll
var Promise = require('bluebird');
var fs = Promise.promisifyAll(require('fs'));

fs.readFileAsync('file1')
.then(function(data) {
  console.log(data.toString());
})
.catch(function(err) {
  console.error(err);
});
Resource
Generator
Generator 也是 ES2015 (ES6) 的語法
Generator 是非同步流程控管更佳的解決方案
其程式碼表現上更接近同步思維
其能達到非同步控管,
是由於 Generator 能交出函數的執行權
先來看看 Generator 的樣子
function* gen(x) {
  var y = yield x + 10;
  return y;
}

var g = gen(20);

var result = g.next();
console.log(result);  // { value: 30, done: false }
var end = g.next(50);
console.log(end);  // { value: 50, done: true }
define a generator
交出執行權 keyword
執行第一段 generator
yield
funcAsync()
result
=
next 呼叫後的回傳值 (value)
暫停分界點
next 傳入參數值
看完,我還是不知道 generator 可以幹嘛阿!
假如 yield 後面接的是 return promise 的 function 呢?
一樣拿 readFile 當例子
// generator readFile
var Promise = require('bluebird');
var fs = Promise.promisifyAll(require('fs'));

function* gen() {
  try {
    var data = yield fs.readFileAsync('file1');
    console.log('result', data.toString());
  } catch(err) {
    console.error('居然抓的到!!', err);
  }
  return;
}

// 執行
var g = gen();
// result.value 為 readFileAsync 回傳的 Promise
var result = g.next();
result.value.then( function(data) {
  g.next(data); // 將 result 扔回 generator
})
.catch( function(err) {
  g.throw(err);
});
國防布

等等,不對阿,要是我有很多非同步操作勒?
// multi_async
var Promise = require('bluebird');
var fs = Promise.promisifyAll(require('fs'));

function* gen() {
  try {
    var data1 = yield fs.readFileAsync('file1');
    console.log('result1', data1.toString());
    var data2 = yield fs.readFileAsync('file2');
    console.log('result2', data2.toString());
    var data3 = yield fs.readFileAsync('file3');
    console.log('result2', data3.toString());
  } catch(err) {
    console.error('居然抓的到!!', err);
  }
  return;
}

// 執行
var g = gen();
g.next().value.then( function(data1) {
  return g.next(data1).value;
})
.then( function(data2) {
  return g.next(data2).value;
})
.then( function(data3) {
  return g.next(data3).value;
})
.catch( function(err) {
  g.throw(err);
});

WTF
但實際上執行的過程是可以疊代 (iteration) 的
所以可以寫成一個自動化的函式 (executor)
// multi_async_run
var Promise = require('bluebird');
var fs = Promise.promisifyAll(require('fs'));
function* gen() {
  try {
    var data1 = yield fs.readFileAsync('file1');
    console.log('result1', data1.toString());
    var data2 = yield fs.readFileAsync('file2');
    console.log('result2', data2.toString());
    var data3 = yield fs.readFileAsync('file3');
    console.log('result2', data3.toString());
  } catch(err) {
    console.error('居然抓的到!!', err);
  }
  return;
}
// executor
function run(gen){
  var g = gen();
  function next(data){
    var result = g.next(data);
    if (result.done) return result.value;
    result.value.then(function(data){
      next(data);
    })
    .catch( function(err) {
      g.throw(err);
    });
  }
  next();
}
// 執行
run(gen);
好棒棒這樣!!
當然,身為一個工程師就是要夠懶!
所以一定有模組,讓你連寫 executor 都省了!
co
https://github.com/tj/co.git
co 是一個 geneator 的 executor 模組
在 yield 後面可以接受 Promise 或 Thunk (這邊不解釋)
co 執行結束後,會 return Promise 物件,
generator 的 return 值會在 then 的參數中!
// co
var Promise = require('bluebird');
var fs = Promise.promisifyAll(require('fs'));
var co = require('co');

function* gen() {
  try {
    var data1 = yield fs.readFileAsync('file1');
    console.log('result1', data1.toString());
    var data2 = yield fs.readFileAsync('file2');
    console.log('result2', data2.toString());
    var data3 = yield fs.readFileAsync('file3');
    console.log('result2', data3.toString());
  } catch(err) {
    console.error('居然抓的到!!', err);
  }
  return 'finish';
}

// run
co(gen)
.then( function(result) {
  console.log(result);
})
.catch( function(err) {
  console.error(err);
});
co 也 support 併行處理
Array or Object
// co_parallel_array
var Promise = require('bluebird');
var fs = Promise.promisifyAll(require('fs'));
var co = require('co');

function* gen() {
  try {
    var p1 = fs.readFileAsync('file1');
    var p2 = fs.readFileAsync('file2');
    var p3 = fs.readFileAsync('file3');
    var result = yield [p1, p2, p3];
    console.log('resul1', result[0].toString());
    console.log('resul2', result[1].toString());
    console.log('resul3', result[2].toString());
  } catch(err) {
    console.error('居然抓的到!!', err);
  }
  return 'finish';
}

// run
co(gen)
.then( function(result) {
  console.log(result);
})
.catch( function(err) {
  console.error(err);
});
Array
// co_parallel_object
var Promise = require('bluebird');
var fs = Promise.promisifyAll(require('fs'));
var co = require('co');

function* gen() {
  try {
    var result = yield {
      a: fs.readFileAsync('file1'),
      b: fs.readFileAsync('file2'),
      c: fs.readFileAsync('file3')
    };
    console.log('resul1', result.a.toString());
    console.log('resul2', result.b.toString());
    console.log('resul3', result.c.toString());
  } catch(err) {
    console.error('居然抓的到!!', err);
  }
  return 'finish';
}

// run
co(gen)
.then( function(result) {
  console.log(result);
})
.catch( function(err) {
  console.error(err);
});
Object
Resource
Testing
你們有寫測試嗎?

測試是什麼,能吃嗎?
測試不能吃,但是至少讓你可以一夜好眠
(然後推卸責任也方便)
Testing 就是可以執行的文件
(所以程式不懂,直接看測試了解最快)
分類
- Test-Driven Development (TDD)
- Behavior-Driven Development (BDD)
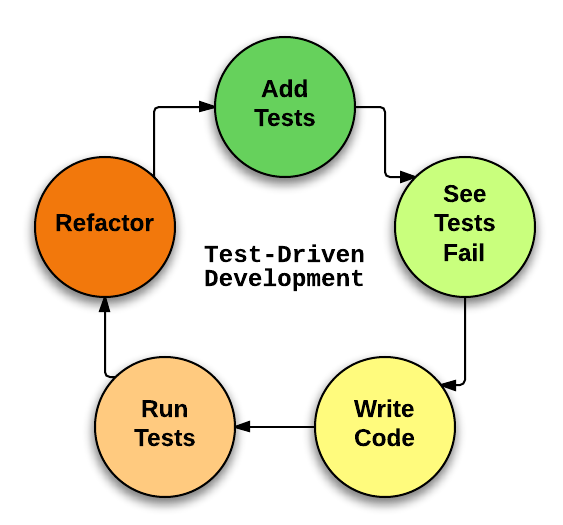
TDD 與 BDD 差異不大,都是先寫測試再寫程式
最大的差異是描述上語法的差異
TDD 通常用於單元測試 (Unit Testing),專注於 function 實作的細節與預期的結果
// BDD
suite('Array', function() {
  setup(function() {
    // ...
  });

  suite('#indexOf()', function() {
    test('should return -1 when not present', function() {
      assert.equal(-1, [1,2,3].indexOf(4));
    });
  });
});
走所謂的 Red/ Green/ Refactor 模型
https://joshldavis.com/2013/05/27/difference-between-tdd-and-bdd/
以寫最少程式碼,卻能通過測試為目標,
避免撰寫冗於的的程式
而 BDD 則是要先撰寫 User Story 或 Spec,然後針對此內容寫 Testing
所以其測試文件看起來會更接近自然語言、
更易讀,而測試結果也會更接近需求
// BDD
describe('Array', function() {
  before(function() {
    // ...
  });

  describe('#indexOf()', function() {
    context('when not present', function() {
      it('should not throw an error', function() {
        (function() {
          [1,2,3].indexOf(4);
        }).should.not.throw();
      });
      it('should return -1', function() {
        [1,2,3].indexOf(4).should.equal(-1);
      });
    });
    context('when present', function() {
      it('should return the index where the element first appears in the array', function() {
        [1,2,3].indexOf(3).should.equal(2);
      });
    });
  });
});
基本上想寫哪種都無所謂,喜歡就好!
現實上也不可太可能完全按照這流程走。
但秉持著有寫總比沒寫好,對吧!
簡單講一下測試怎寫
node 本身就有提供最基本的 testing api
- assert (斷言)
所以一般寫測試至少會有
test framework + assertion library
執行
- npm install -g mocha
- 裝區域也行,但要設定執行路徑
- 在專案資料夾下創建 "test" 資料夾
- 撰寫測試程式放至於 "test" 資料夾
- mocha // 執行
- mocha --compilers js:babel/register//babel 轉譯
Mocha 基本使用 for BDD
- describe/context
- 開始描述一個測試場景
- describe.skip () 可以忽略測試
- it
- 它,敘述期望的行為
- done()
- 用於非同步執行,告知 mocha 非同步執行完成
- Mocha 的 task 與 task 間是依序執行 (sequential)
before/after (BDD)
- before(callback)
- 每個 describe 開始前的設定
- after(callback)
- 每個 describe 結束前的設定
- beforeEach(callback)
- 每個 it 開始前的設定
- afterEach(callback)
- 每個 it 結束前的設定
// mocha_bdd_template
describe('Task A', function() {
  this.timeout(5000); // 設定每個 task 的執行上限時間, default: 2000 ms
  before(function(done) {
    // do something before testing
    done();
  });

  after(function(done) {
    // do something after testing
    done();
  });

  beforeEach(function(done) {
    // do something before each testing
    done();
  });

  afterEach(function(done) {
    // do something after each testing
    done();
  });

  it('should describe something about your testing', function(done) {
    // your assertion
    done();
  });
});
assertion library - Chai
- expect
- should
- assert
Chai 同時支援以上三種斷言方法

Chai 可以讓你以類似自然語言的方式描述斷言
Chai 也提供 plugins 擴展功能,
如 chai-as-promised 允許你直接針對 Promise 測試
Example
最後簡單提一下測試覆蓋率
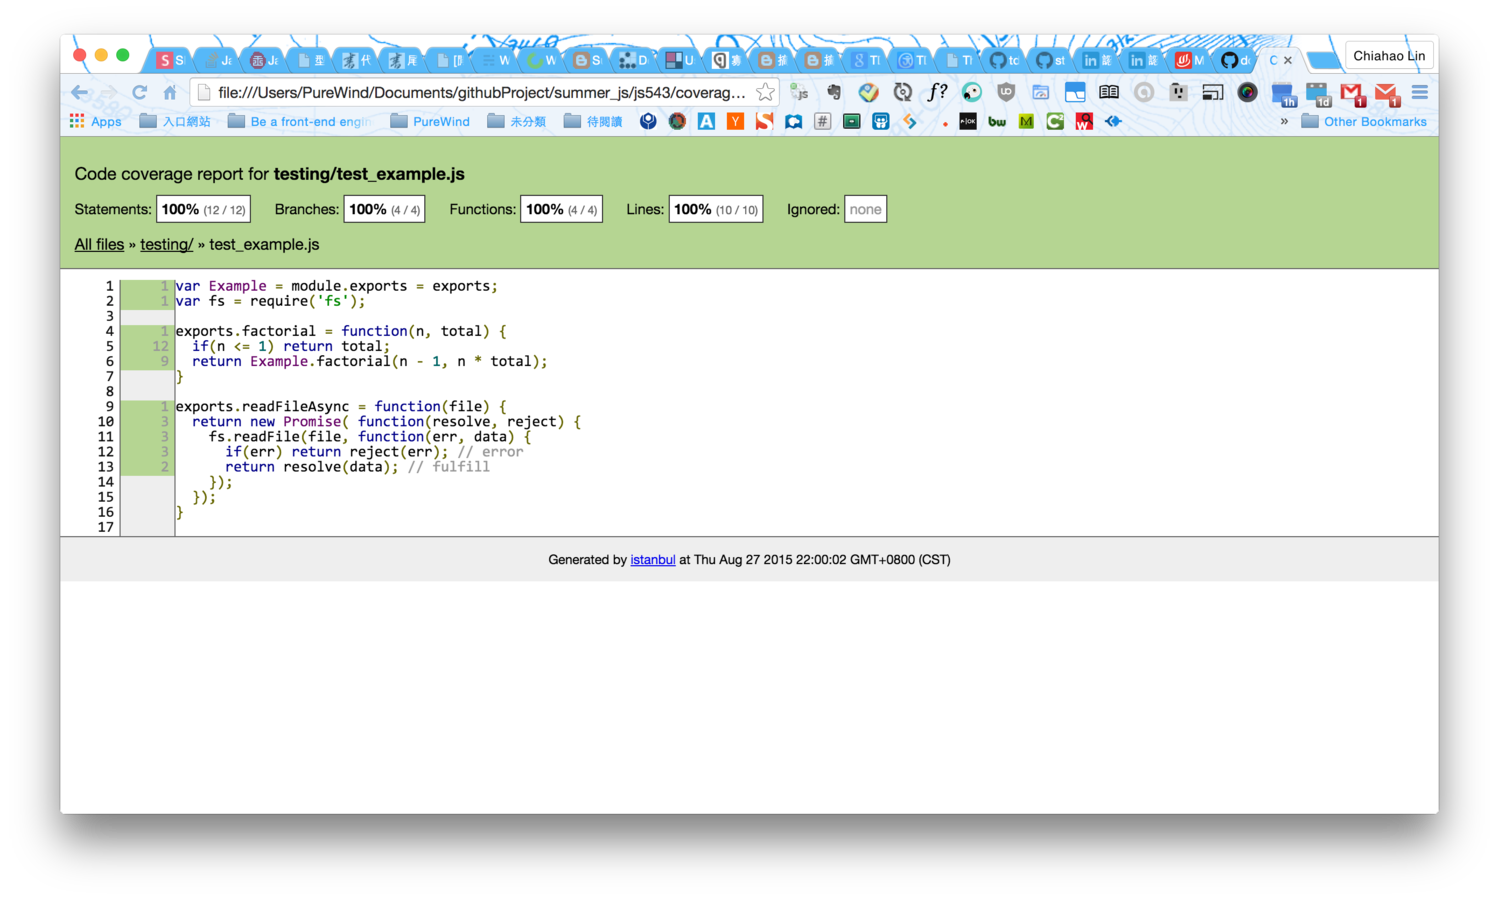
我們可以使用工具查看測試程式碼覆蓋程式碼的比率
Istanbul/Isparta
- Isparta 基於 Istanbul,但 for ES6
- npm install Istanbul // or Isparta
-
Istanbul
- ./node_modules/.bin/istanbul cover ./node_modules/.bin/_mocha -- --compilers js:babel/register
-
Isparta
- ./node_modules/.bin/babel-node ./node_modules/.bin/isparta cover ./node_modules/.bin/_mocha
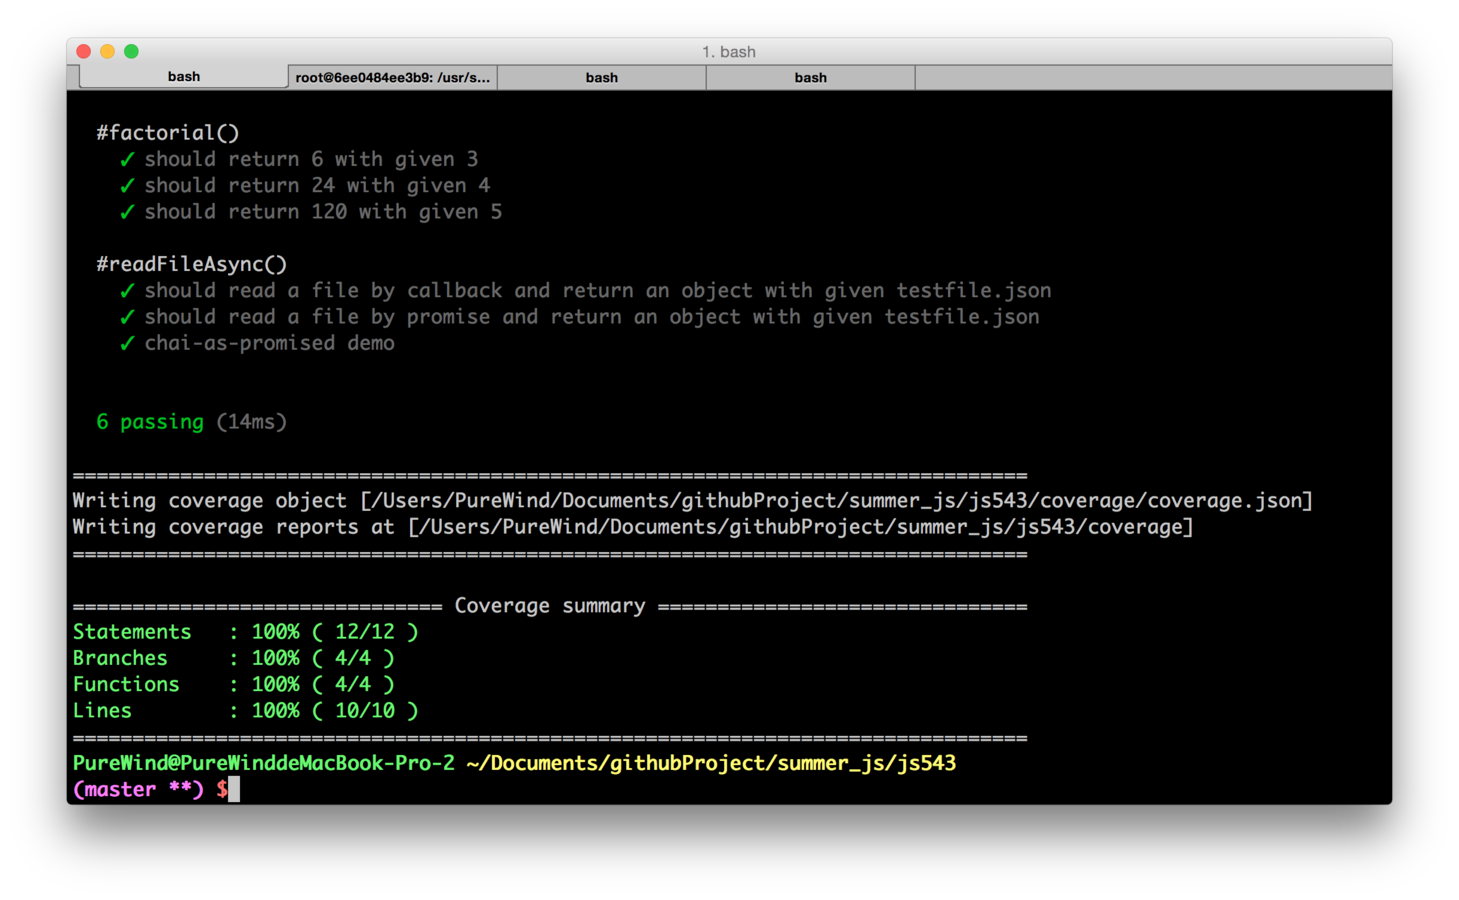
Istanbul 也提供各種格式的報表,如 HTML, JSON 等
Resource
Thank you!
Q&A
JS 543
By Chiahao Lin
JS 543
一些 JS 該知道或有幫助的事情
- 1,582