Introduction to Kivy
PyCon Korea 2015
이창욱 / @cleett
Write Once,
Run Anywhere

Compatibility
Natural User Interface
GPU acceleration
FOSS MIT License
Written in Python

Installation OSX
- http://kivy.org/#download
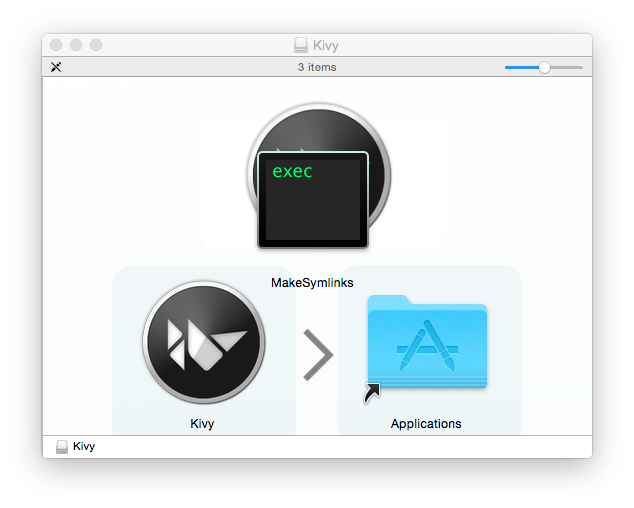
- Double-click to open it
- Drag the Kivy.app into your Applications folder
- Double click the makesymlinks script.
Windows
Linux
$ sudo add-apt-repository ppa:kivy-team/kivy
$ sudo apt-get install python-kivy
$ sudo apt-get install python3-kivy
http://www.lfd.uci.edu/~gohlke/pythonlibs/
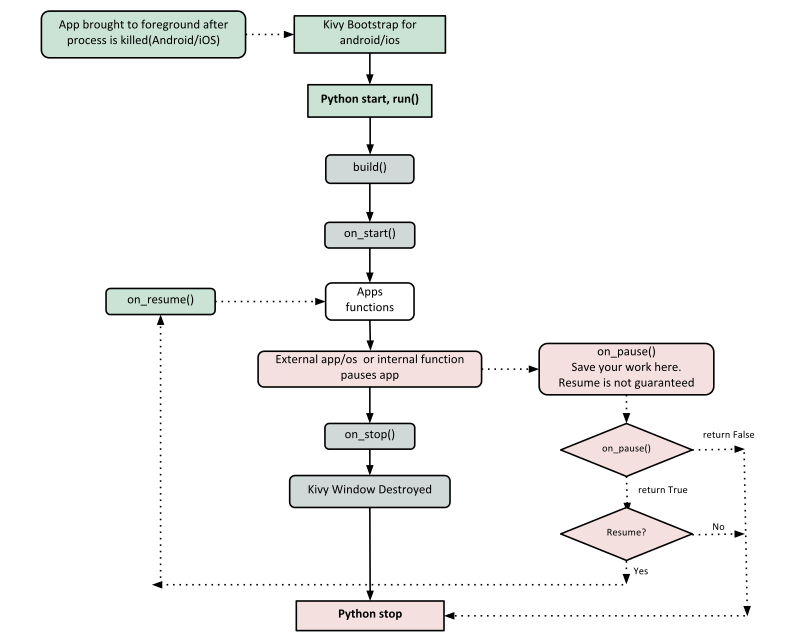
Kivy App Life Cycle
Hello World
from kivy.app import App
from kivy.uix.label import Label

class TestApp(App):
    def build(self):
        return Label(text='Hello World')

TestApp().run()
kv language
from kivy.app import App
from kivy.uix.label import Label

class HelloApp(App):
    def build(self):
        return Label()

HelloApp().run()
# File name: hello.kv
#:kivy 1.9.0
<Label>:
text: 'Hello World'Builder.load_file(‘path/to/file.kv’)kv cont'd
# File name: widgets.kv

<MyWidget>:
    Button:
        text: 'Hello'
        font_size: 32
        color: 0, 1, 0, 1
        pos: 0, 100
        size: 100, 50
    Button:
        text: 'World!'
        font_size:32
        color: 0, 1, 0, 1
        pos: 100, 0
        size: 100, 50
# File name: widgets.kv
<Button>:
font_size: 32
color: 0, 1, 0, 1
size: 100, 50
<MyWidget>:
Button:
text: 'Hello'
pos: 0, 100
Button:
text: 'World!'
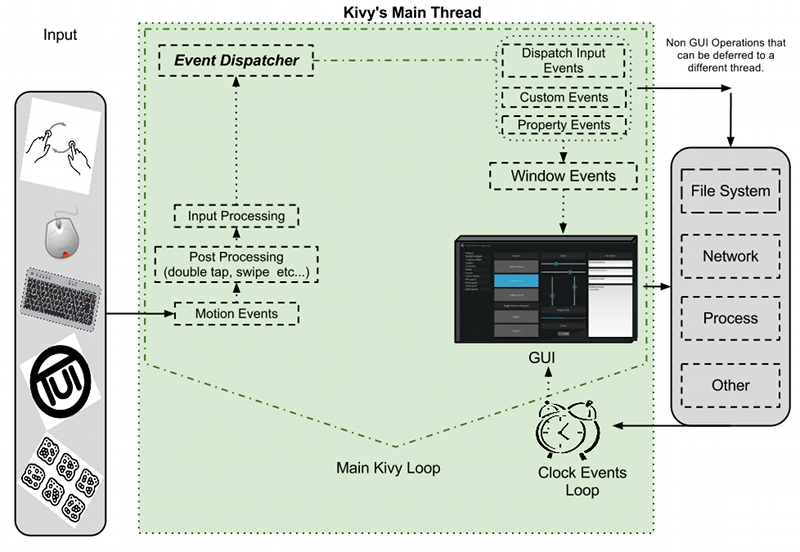
pos: 100, 0Events
Events cont'd
# Scheduled Event
# dt means delta-time
def my_callback(dt):
    print("Callback is called!")

# call my_callback every 0.5 seconds
Clock.schedule_interval(my_callback, 0.5)

# call my_callback in 5 seconds
Clock.schedule_once(my_callback, 5)

# call my_callback as soon as possible (usually next frame.)
Clock.schedule_once(my_callback)

# Trigger
trigger = Clock.create_trigger(my_callback)
# later
trigger()

# Widget Events
# Property event: if your widget changes its position or size, an event is fired.
# Widget-defined event: e.g. when a button is pressed or released, an event is fired.
Properties
- Value Checking / Validation
- Observer Pattern
- Better Memory Management
Widgets
# Add a button widget
layout = BoxLayout(padding=10)
button = Button(text='Press Me!')
layout.add_widget(button)

# Remove the widget
layout.remove_widget(button)

# Clear all widgets
layout.clear_widget()-
add_widget(): add a widget as a child
-
remove_widget(): remove a widget from the children list
-
clear_widgets(): remove all children from a widget
Canvas
class MyWidget(Widget):
    def __init__(self, **kwargs):
        super(MyWidget, self).__init__(**kwargs)
        with self.canvas:
            # add your instruction for main canvas here

            # Vertex Manipulation
            self.triangle = Triangle(points=[0,0, 100,100, 200,0])

        with self.canvas.before:
            # you can use this to add instructions rendered before

            # Context Manipulation
            Color(1, 0, .4, mode='rgb')

        with self.canvas.after:
            # you can use this to add instructions rendered after
Mobile Development
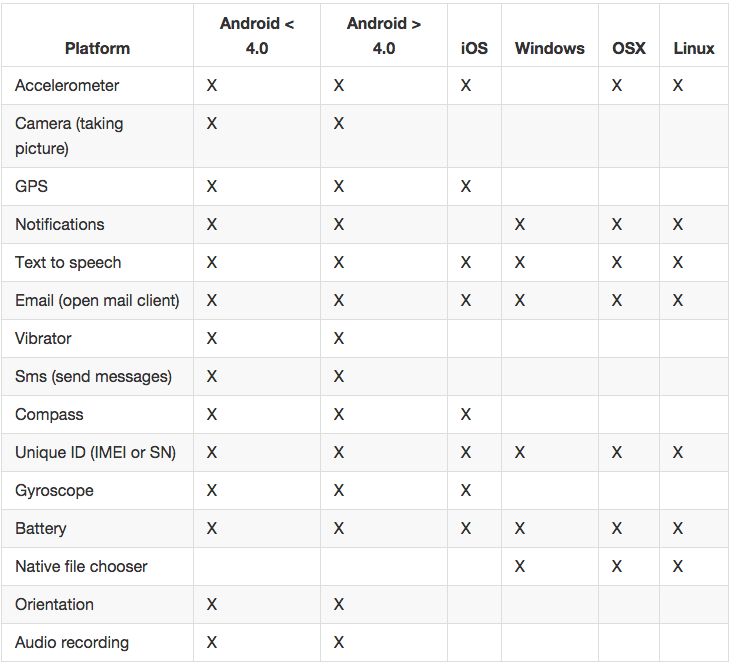
Plyer
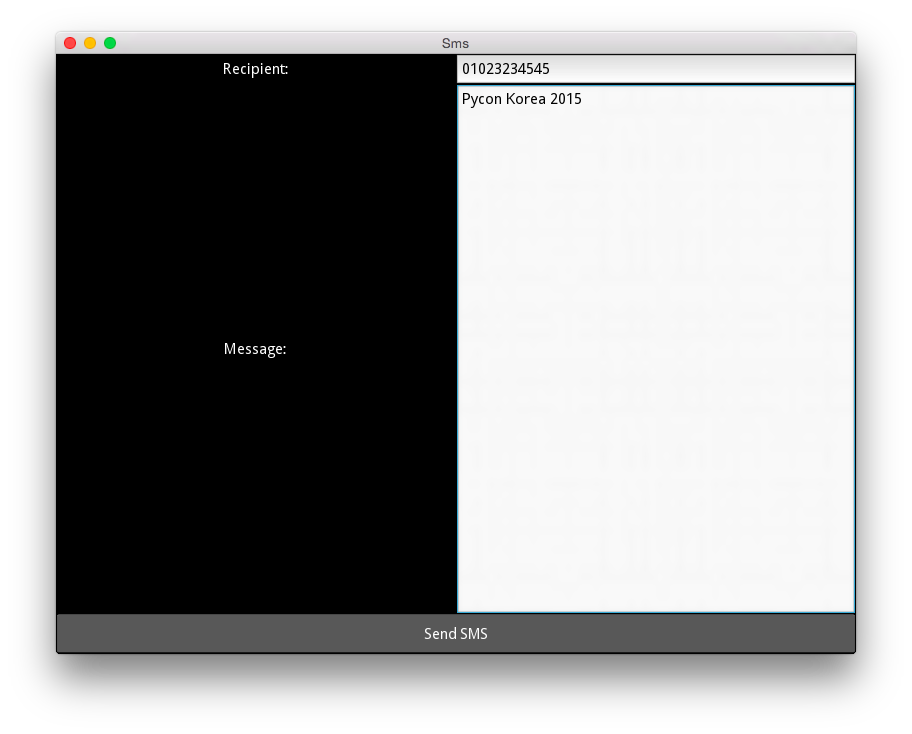
Example: SMS
from kivy.app import App
from kivy.uix.boxlayout import BoxLayout
from kivy.uix.button import Button
from kivy.lang import Builder
from kivy.properties import StringProperty

from plyer import sms

Builder.load_string('''
<SmsInterface>:
    orientation: 'vertical'
    BoxLayout:
        size_hint_y: None
        height: sp(30)
        Label:
            text: 'Recipient:'
        TextInput:
            id: recipient
            multiline: False
            on_text_validate: message.focus = True
    BoxLayout:
        Label:
            text: 'Message:'
        TextInput:
            id: message
    IntentButton:
        sms_recipient: recipient.text
        sms_message: message.text
        text: 'Send SMS'
        size_hint_y: None
        height: sp(40)
        on_release: self.send_sms()
''')
Example: SMS cont'd
class SmsInterface(BoxLayout):
    pass


class IntentButton(Button):
    sms_recipient = StringProperty()
    sms_message = StringProperty()

    def send_sms(self, *args):
        sms.send(recipient=self.sms_recipient, message=self.sms_message)


class SmsApp(App):
    def build(self):
        return SmsInterface()

if __name__ == "__main__":
    SmsApp().run()
Example: SMS cont'd
Example: SMS cont'd
#/plyer/platforms/android/sms.py

from jnius import autoclass
from plyer.facades import Sms

SmsManager = autoclass('android.telephony.SmsManager')


class AndroidSms(Sms):

    def _send(self, **kwargs):
        sms = SmsManager.getDefault()

        recipient = kwargs.get('recipient')
        message = kwargs.get('message')

        if sms:
            sms.sendTextMessage(recipient, None, message, None, None)


def instance():
    return AndroidSms()
Buildozer
Packaging for Android and iOS
# create buildozer.spec
buildozer init

# edit the buildozer.spec, then
buildozer android debug deploy run
iOS https://github.com/kivy/kivy-ios
Resources
- API http://kivy.org/docs/api-kivy.html
- Wiki https://github.com/kivy/kivy/wiki
- Google Groups #kivy-users
- IRC #Kivy on irc.freenode.net
Questions?
Introduction to Kivy
By Chang Wook Lee
Introduction to Kivy
- 4,536