Zero to API
Creating an API with Authentication for Beginners
Slides: https://slides.com/danielmouris/zero-to-api/
Follow Live: https://slides.com/danielmouris/zero-to-api/live
Github Repository: https://github.com/dgmouris/zero_to_api
Motivation For This Talk
Please save questions for the end/ask your neighbour!
Don't be afraid to learn!
APIs are super useful.
Where Are We?
-
Outline
-
Who am I?
-
Who is this talk for?
-
What is a RESTful API?
-
What Python packages are we going to use?
-
Installing the packages needed
-
Building our RESTful API from scratch
a. Create a Django project and run it
b. Configure authentication for our project
c. Our first RESTful API call!
d. Create a small feature and create an API for it
e. Make the feature only accessible by logging in
About Me: Dan Mouris
- Senior Software Developer at The Organic Box, and DistroPath
- Went to school for Electrical Engineering, but pursued a career in software development
- I like kitties and we'll be using my kitties in our example today.

Marshmallow
Ghost
Gambit
Where Are We?
-
Outline
-
Who am I?
-
Who is this talk for?
-
What is a RESTful API?
-
What Python packages are we going to use?
-
Installing the packages needed
-
Building our RESTful API from scratch
a. Create a Django project and run it
b. Configure authentication for our project
c. Our first RESTful API call!
d. Create a small feature and create an API for it
e. Make the feature only accessible by logging in
Who is This Talk for?
If you want learn more about but aren't fully familiar with:
- RESTful APIs
- Django
- Django Rest Framework
- Django Rest Auth
then this talk is for you.
If you are already familiar with all of this, please try to help (and /or sit beside) your friends who may not be as familiar with the above.
Assumptions
I'm assuming you have the following installed:
-
Python 3.6+
- Pipenv (or Pip and Virtualenv )
-
A RESTful API testing program (you can get one from Chrome/Firefox store)
- Advanced Rest Client (I'm using this it's deprecated sorry)
- Postman (also can get here https://www.getpostman.com/) - A good attitude installed in your brain!
Some Terminology
API
Acronym for Application Programmer Interface.
RESTful API
Stands for REpresentational State Transfer.
Endpoints
A URL of an/our API. ie. http://localhost:8000/rest-auth/login/
Object Relational Mapper (ORM)
The code interface that Django uses to interact with the database.
Migrations
A way that Django uses code to create database tables for our project.
More Terminology
Client
The computer that is making the calls to the API.
Model
A model does two things, first it is a class that maps fields to columns in a table. Secondly, it provides a Python interface to the database to get, create, update, and delete data.
Viewset
Type of class based view; automatically generates the URL endpoints to get, create, update & delete data if used within a router.
Serializer
This allows us to convert Python datatypes to json, and json back to a Python datatype while validating the data.
Note
I built this for Ubuntu, everything should work on other systems (except the bash specific commands).
Where Are We?
-
Outline
-
Who am I?
-
Who is this talk for?
-
What is a RESTful API?
-
What Python packages are we going to use?
-
Installing the packages needed
-
Building our RESTful API from scratch
a. Create a Django project and run it
b. Configure authentication for our project
c. Our first RESTful API call!
d. Create a small feature and create an API for it
e. Make the feature only accessible by logging in
What is a RESTful API?
It's a way to ask for, modify, create , and delete data on another computer or server over the web.
It's also a way that you can trigger an action on a server (such as what anyone here uses Python for) and getting a result.
RESTful API Analogy
Me
You
Do you have cats?
1. Ask if I have cats.
Air between us
RESTful API Analogy
Me
You
2. I'll respond to tell you that I do have cats
I have three cute cats
Note:
I'll only tell people I have three cats if I trust them. Otherwise I won't tell them.
Air between us
RESTful API Diagram
Server
Serving API
- Mobile App
- Other Server
- Front End
GET /cats/
This will be sent with a token to show that we can trust the client (I'll cover that later).
The Internet
RESTful API Diagram
Server
Serving API
- Mobile App
- Other Server
- Front End
Status 200
Body: Cat Names
If the token is correct, we'll give them the information.
The Internet
Where Are We?
-
Outline
-
Who am I?
-
Who is this talk for?
-
What is a RESTful API?
-
What Python packages are we going to use?
-
Installing the packages needed
-
Building our RESTful API from scratch
a. Create a Django project and run it
b. Configure authentication for our project
c. Our first RESTful API call!
d. Create a small feature and create an API for it
e. Make the feature only accessible by logging in
What Packages Are We Using?
1. Django
- Web Framework, Server, Object Relational Mapper (ORM)
https://www.djangoproject.com/
2. Django Rest Framework (DRF)
- Package for Django to create RESTful APIs
https://www.django-rest-framework.org/
3. Django Rest Auth
- Package for DRF for authentication
https://django-rest-auth.readthedocs.io/en/latest/
Where Are We?
-
Outline
-
Who am I?
-
Who is this talk for?
-
What is a RESTful API?
-
What Python packages are we going to use?
-
Installing the packages needed
-
Building our RESTful API from scratch
a. Create a Django project and run it
b. Configure authentication for our project
c. Our first RESTful API call!
d. Create a small feature and create an API for it
e. Make the feature only accessible by logging in
Create Your Project Environment
Create a directory that you're going to use for the project:
mkdir <your-project-name>
cd <your-project-name>
Create an isolated Python environment:
pipenv shell --python 3.6
Install the Packages
With Pipenv, install all of the packages we just talked about:
pipenv install django
pipenv install djangorestframework
pipenv install django-rest-auth
Now we can use these packages in our Django project that we're going to create!
Where Are We?
-
Outline
-
Who am I?
-
Who is this talk for?
-
What is a RESTful API?
-
What Python packages are we going to use?
-
Installing the packages needed
-
Building our RESTful API from scratch
a. Create a Django project and run it
b. Configure authentication for our project
c. Our first RESTful API call!
d. Create a small feature and create an API for it
e. Make the feature only accessible by logging in
Create Your Django Project
Go into your project and start your virtual environment (using Pipenv shell):
cd <your-project-name>
pipenv shell
Let's create a Django project from Django's command line tool:
django-admin.py startproject <your_project_name>Go into your project (below) and we'll talk about what's there:
cd <your_project_name>What's There?
Let's see what's in the Django project:

Let's see what's in the folder of the same name as our project:

Let's Start Our Server
Let's run our server (you are in the same folder as manage.py):
python manage.py runserver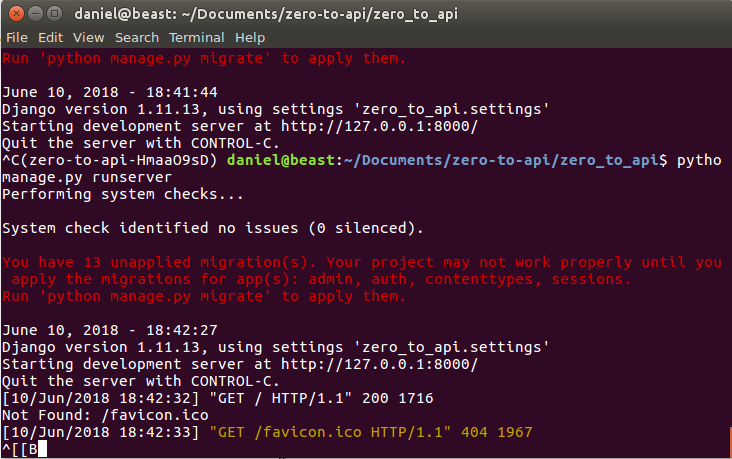
Your terminal should show something like this:
Before We Talk About Migrations...
Go to your browser!
You should see something like:
"The install worked successfully! Congratulations!"
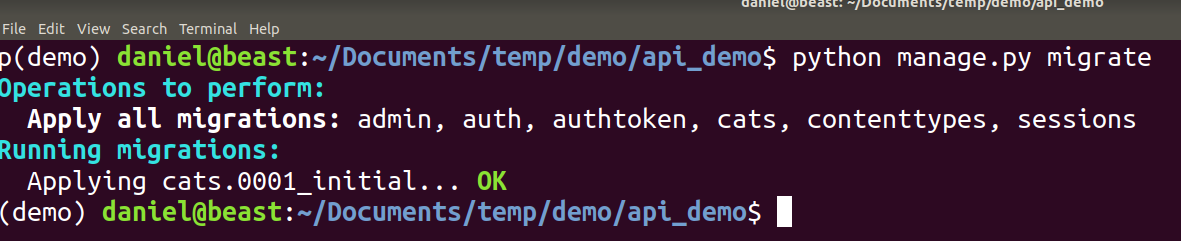
Migrations (Briefly)
Since the project is telling us we have unapplied migrations, let's apply them:
python manage.py migrate
Django has an ORM which allows us to access and modify the database.
Applying migrations is a mechanism that Django gives us to create, modify and add tables to the database.
python manage.py runserverLet's run our server again: (no migration warnings!)
Where Are We?
-
Outline
-
Who am I?
-
Who is this talk for?
-
What is a RESTful API?
-
What Python packages are we going to use?
-
Installing the packages needed
-
Building our RESTful API from scratch
a. Create a Django project and run it
b. Configure authentication for our project
c. Our first RESTful API call!
d. Create a small feature and create an API for it
e. Make the feature only accessible by logging in
Add the Installed Packages to Project
Within your Django project open <your-projectname>/settings.py
and add the following lines to the INSTALLED_APPS list:
    # my installed apps
    'rest_framework',
    'rest_framework.authtoken',
    'rest_auth',
Now if you run your server again, you'll see that there are unapplied migrations (new tables from our packages) that need to be applied.
Follow the steps previously defined to apply these migrations:
python manage.py migrate
Add the Django Rest
Auth Endpoints
Should look like this:
Open your <project-name>/urls.py file and add the following import:
from django.contrib import admin
from django.conf.urls import url, include
from django.urls import path

urlpatterns = [
    path('admin/', admin.site.urls),
    url(r'^rest-auth/', include('rest_auth.urls')),
]
url(r'^rest-auth/', include('rest_auth.urls')),
Add the line to url_patterns:
from django.conf.urls import url, include
Let's Start Our Server
Let's run our server (you are in the same folder as manage.py):
python manage.py runserverGo to your browser and you'll see a 404 error. Some URL patterns are defined:
- admin (we'll talk about this)
- rest-auth (what we've just added!)
Where Are We?
-
Outline
-
Who am I?
-
Who is this talk for?
-
What is a RESTful API?
-
What Python packages are we going to use?
-
Installing the packages needed
-
Building our RESTful API from scratch
a. Create a Django project and run it
b. Configure authentication for our project
c. Our first RESTful API call!
d. Create a small feature and create an API for it
e. Make the feature only accessible by logging in
Let's Create an Admin User
Go into the root directory of your project. Write the following in order to create a super user:
python manage.py createsuperuserAnswer the questions that follow (basically username, email, and password).
Doing Our First Request

Response of the Request
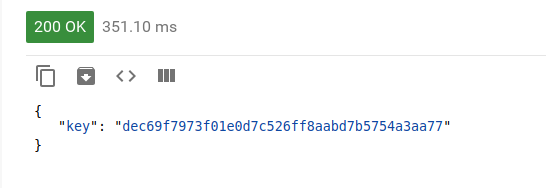
The response should be successful, with a key as the response:
Congrats!
You just completed your first API request!
Where Are We?
-
Outline
-
Who am I?
-
Who is this talk for?
-
What is a RESTful API?
-
What Python packages are we going to use?
-
Installing the packages needed
-
Building our RESTful API from scratch
a. Create a Django project and run it
b. Configure authentication for our project
c. Our first RESTful API call!
d. Create a small feature and create an API for it
e. Make the feature only accessible by logging in
Lets Add a Django "App"
An app is a logical unit for your site.
We're going to create a Django "app" within the project and add it to our project:
python manage.py startapp catsAdd this "app" to our INSTALLED_APPS in our
<project-name>/settings.py file (in the INSTALLED_APPS list):
'cats',What's in Our Cats App

- models.py
- Models contains everything that interfaces with our ORM.
- admin.py
- Uses the Models to register them to our admin interface.
- views.py
- This contains specific views that serve specific functions based on a specific request (such as asking for cats).
Add Models to "Cats"
Open the cats/models.py file and add the following lines:
from django.db import models


class CatType(models.Model):
    type_name = models.CharField(max_length=255)
    description = models.CharField(max_length=255)

    def __str__(self):
        return "{}, {}".format(self.type_name, self.description)

class Cat(models.Model):
    name = models.CharField(max_length=255)
    cat_type = models.ForeignKey(CatType,
                                 on_delete=models.SET_NULL,
                                 null=True)


    def __str__(self):
        return "{}, {}".format(self.name, self.cat_type)
Models are the way you define tables in your database in Django. It's also the way that you interact with your database to get, create, update and delete data.
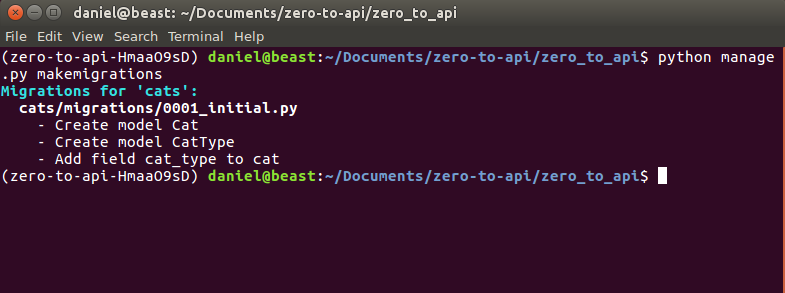
Let's Talk More About Migrations
Open your terminal and make the migrations:
python manage.py makemigrationsLet's apply the migrations to our database so that we can use those models:
python manage.py migrateThis will create some changes because we modified our cats/models.py file.
What Making Migrations Looks Like
What Our Migration
Looks Like
Let's Make Our Tables Browsable
In the cats/admin.py file, add the following lines:
from django.contrib import admin
from cats.models import Cat, CatType


class CatAdmin(admin.ModelAdmin):
    pass

admin.site.register(Cat, CatAdmin)


class CatTypeAdmin(admin.ModelAdmin):
    pass

admin.site.register(CatType, CatTypeAdmin)
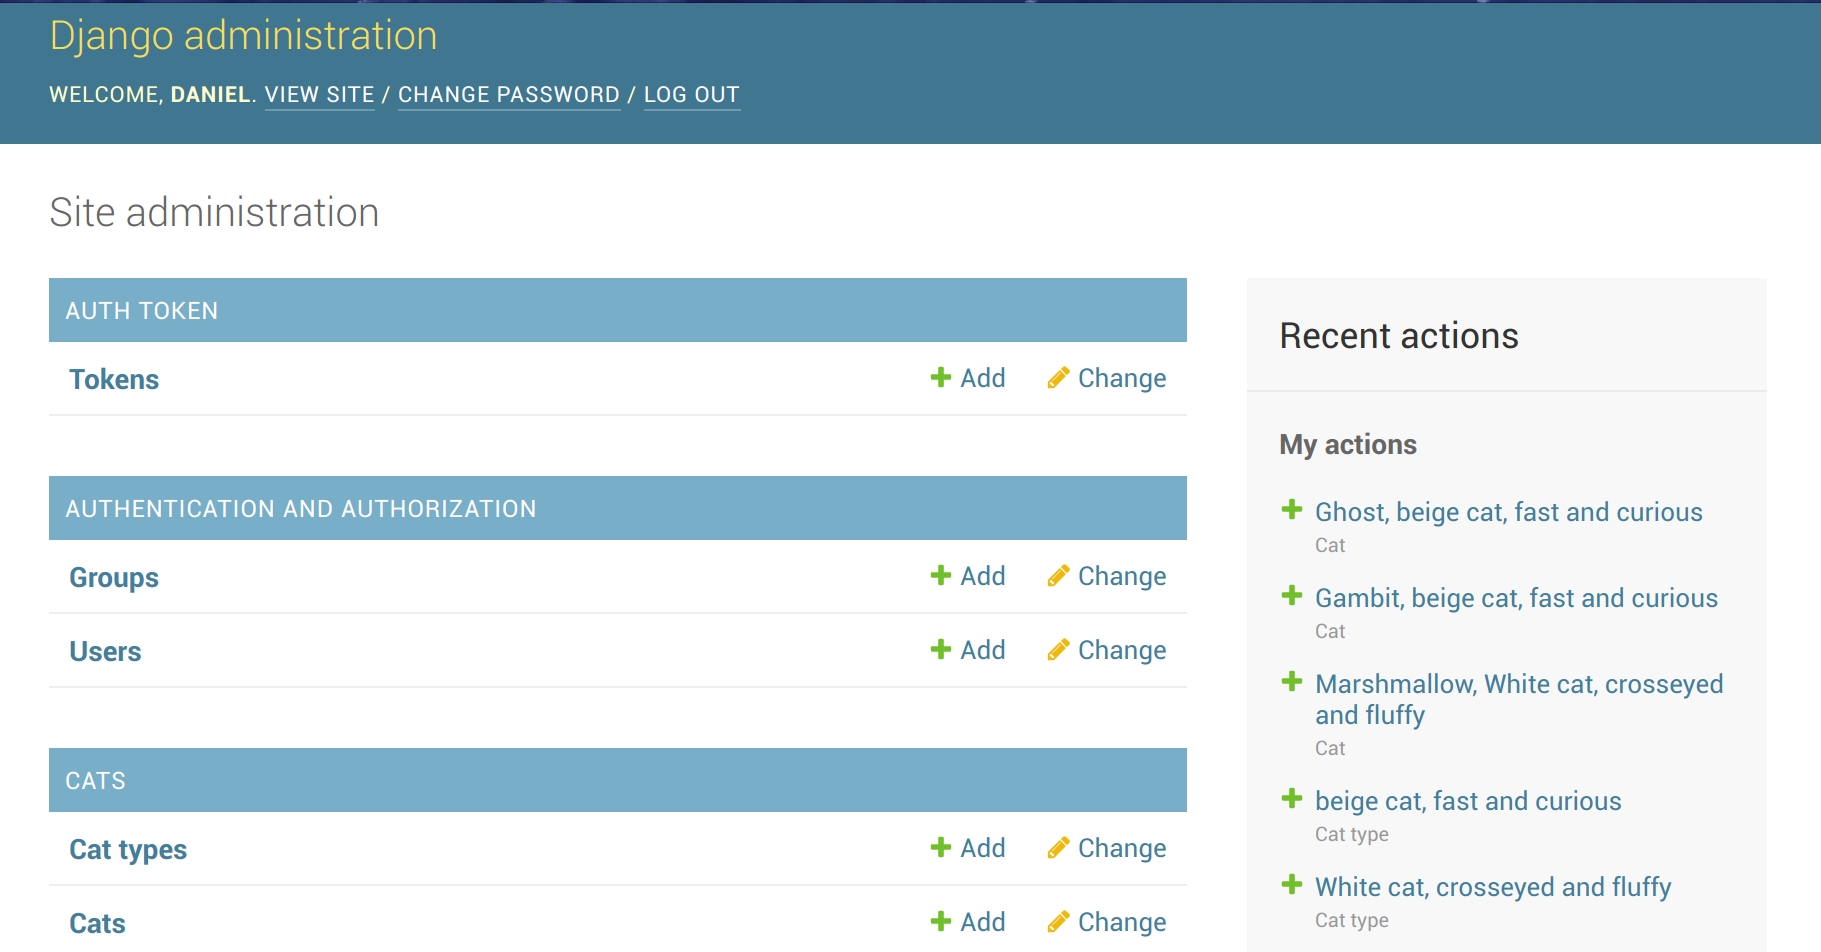
Django gives us an admin dashboard where we can add data to our tables and see our data. To do this, we need to "register" our models with Django's admin.
Open your browser and go to the admin!
Look at the Admin!
Once you open the admin, login with the credentials created earlier.
Let's Make an API for this
from rest_framework import serializers

from cats.models import Cat, CatType


class CatTypeSerializer(serializers.ModelSerializer):
    class Meta:
        model = CatType
        fields = '__all__'


class CatSerializer(serializers.ModelSerializer):
    class Meta:
        model = Cat
        fields = '__all__'
        depth = 1
Serializers translate Python datatypes and models into json.
Serializers also allow us to translate json data back into Python and also give the ability for validation.
We use a model serializer to simplify the code.
Let's create a cats/serializers.py file by adding the following:
1. Making Serializers
Let's Make an API for this
from django.shortcuts import render

from rest_framework import viewsets

from cats.models import Cat, CatType
from cats.serializers import CatTypeSerializer, CatSerializer


class CatTypeViewSet(viewsets.ModelViewSet):
    queryset = CatType.objects.all()
    serializer_class = CatTypeSerializer


class CatViewSet(viewsets.ModelViewSet):
    queryset = Cat.objects.all()
    serializer_class = CatSerializer
Viewsets are very similar to views in Django. This is the the code that gets executed when you do a GET or POST request.
We're using a ModelViewset to simplify what we're doing.
Let's add the following to the cats/views.py file:
2. Making a Viewset
Let's Make an API for this
from django.conf.urls import url
from rest_framework import routers
from cats.views import CatTypeViewSet, CatViewSet

router = routers.DefaultRouter()
router.register(r'cat-types', CatTypeViewSet)
router.register(r'cats', CatViewSet)


urlpatterns = router.urls
Let's create a cats/urls.py file and add the following code to the file:
3. Add the URL endpoints to the app
We are going to add a "router" which adds the logic to handle the requests and point them to the right class.
Let's Make an API for this
from django.contrib import admin
from django.conf.urls import url, include
from django.urls import path

urlpatterns = [
    path('admin/', admin.site.urls),
    url(r'^rest-auth/', include('rest_auth.urls')),
    url(r'^cats/', include('cats.urls')),
]
Open <project-name>/urls.py and add the following line in the url_patterns list:
4. Add the defined URLs to our overall project
Find the URLs from our defined app and add them to your project.
url(r'^cats/', include('cats.urls')),The overall file should look like this:
Run Your Server!
Go to http://localhost:8000/cats/
You can browse your own API.
Congratulations, you've made an API!
Now go to your Rest client and try to post to it
You'll get a CSRF token failure.....
Let's continue and get this done!
Where Are We?
-
Outline
-
Who am I?
-
Who is this talk for?
-
What is a RESTful API?
-
What Python packages are we going to use?
-
Installing the packages needed
-
Building our RESTful API from scratch
a. Create a Django project and run it
b. Configure authentication for our project
c. Our first RESTful API call!
d. Create a small feature and create an API for it
e. Make the feature only accessible by logging in
No More CSRF Failure
Since you won't be having any javascript on your page, we're going to use token authentication to login.
Let's make our settings reflect this!
REST_FRAMEWORK = {
   'DEFAULT_AUTHENTICATION_CLASSES': (
        'rest_framework.authentication.TokenAuthentication',
    ),
    'PAGE_SIZE': 100,
}
Open <project-name>/settings.py and add the following lines:
This tells the API to use tokens instead of a session which is what we need if we want to make an authenticated app.
But now EVERYONE can view or add anything they want to our project...
Forcing Users to Login to View or Modify
from django.shortcuts import render

from rest_framework import viewsets, permissions

from cats.models import Cat, CatType
from cats.serializers import CatTypeSerializer, CatSerializer

class CatTypeViewSet(viewsets.ModelViewSet):
    permission_classes = [permissions.IsAuthenticated]
    queryset = CatType.objects.all()
    serializer_class = CatTypeSerializer


class CatViewSet(viewsets.ModelViewSet):
    permission_classes = [permissions.IsAuthenticated]
    queryset = Cat.objects.all()
    serializer_class = CatSerializer
Open your cats/views.py file.
Add permissions as an import and add the permissions classes to each serializer:
Try to See the Cats
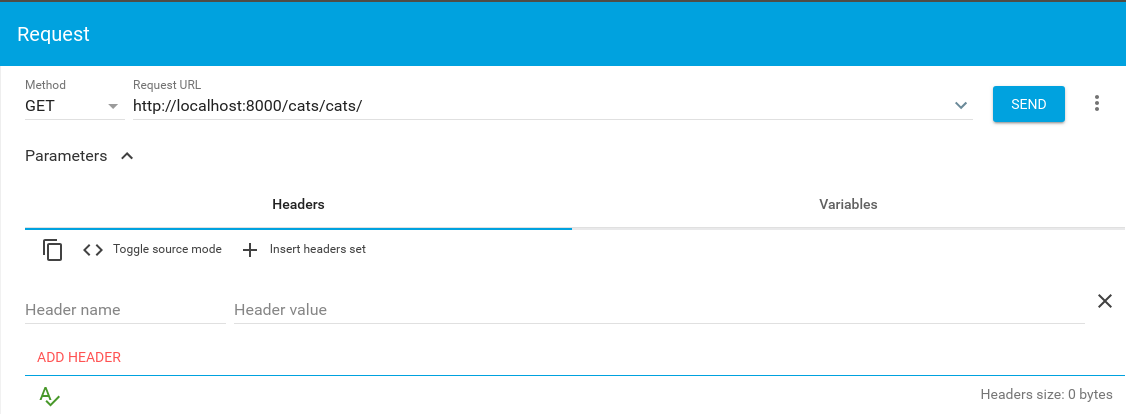
Fill in your RESTful API client with the following information:
Request isn't Trusted
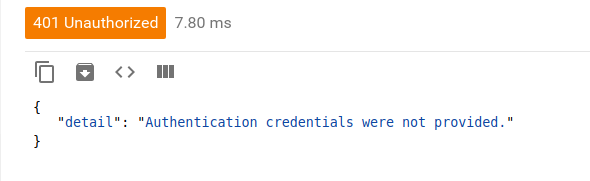
We just confirmed that we need to be authenticated to view our cats!
But now how can I view or add something to our project?
Get Your Auth Token

Save Your Auth Token

The response of the above request should give you a successful request:
Save this token to a text file.
Request to View Cats
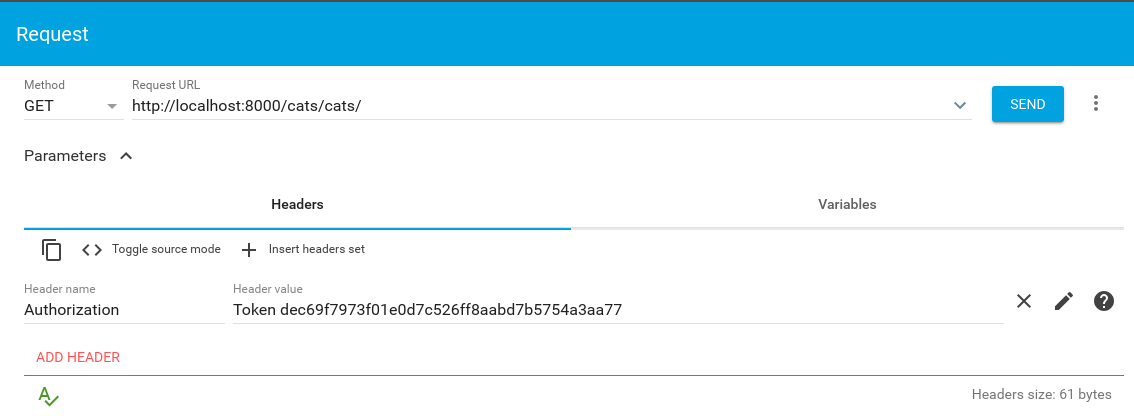
In the Headers section, add an "Authorization" header with the value of "Token <your saved token here>".
Response to View Cats
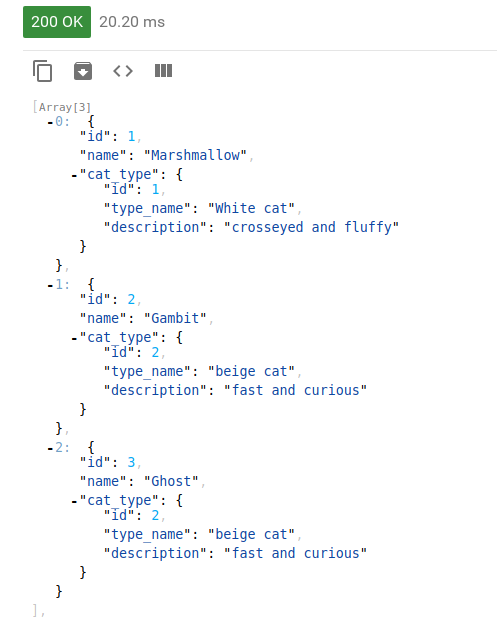
A successful response is given using the authentication token! Great!
Congratulations!
You've created an authenticated
RESTful API!
What We've Covered
- Learned about RESTful APIs
- Created a Django project and ran it
- Configured authentication for our project
- Created a small feature and an API for it
- Made the feature only accessible by logging in
Conclusion
APIs aren't scary! Now you can create your profitable idea, app or website.
Unfortunately, by listening to this talk I get 10% of everything you make... (just kidding)
I Hoped You Enjoyed This Talk.
Here's My Kitties!
Marshmallow
Ghost
Gambit
Questions?
Feel Free to Reach Out!
- You can reach me on LinkedIn:
https://www.linkedin.com/in/daniel-mouris-baa4b972/ - You can reach me on Twitter:
https://twitter.com/dgmouris
(although I mainly tweet about edmontonpy meetups) - You can email me at dgmouris@gmail.com
- You can also find me on Slack (dgmouris)
We covered a lot today and I'd love to talk with you more about it :)
Zero to Api, creating an api with authentication for beginners
By Daniel Mouris
Zero to Api, creating an api with authentication for beginners
Creating an authenticated API from scratch for beginners.


