Web Components

@dvdchavarri
Web Components
@dvdchavarri
Custom Elements Shadow DOM Templates Imports
Are custom HTML elements that allow encapsulation of markup, scripts and styles inside a template block.
Are based on a standart set of W3C Especification:
Web Components
@dvdchavarri
Several Implementations:
Standart Polymer X-Tag


Web Components - Custom Elements
@dvdchavarri
Especification to use new types of DOM elements in a document and extend
There are already custom elements shipped with HTML5
- <video>
- <figure>
- <article>
- <header>
- <aside>
- <nav>
- .....
Web Components - Custom Elements
@dvdchavarri
Custom elements allow
- Define new HTML elements.
- Bundle together custom functionality into a single tag.
- Extend other elements.
- Extend the API of other DOM elements.
Properties
Web Components - Custom Elements
@dvdchavarri
Two ways to create a custom element:
1. HTML (declarative)
2. JavaScript (imperative)
Declaring
Web Components - Custom Elements
@dvdchavarri
A custom element declared this way inherits HTMLElement's prototype.
Unlike the HTML5 new tags, a custom element's tag name must contain at least one dash, otherwise it will inherit HTMLUnknownElement's prototype.
Declaring with HTML (declarative)
<body>
    <my-element>
        my custom element
    </my-element>
</body>
Web Components - Custom Elements
@dvdchavarri
Until you register the custom element with the registerElement()method, it will be called an Unresolved Element.
Declaring with JS (imperative)
// with createElement
var myCustomElement = document.createElement('my-custom-element');

// with registerElement
// and the new operator
var MyCustomElement = document.registerElement('my-custom-element');
var myCustomElement = new MyCustomElement();
Web Components - Custom Elements
@dvdchavarri
Custom elements allow you to extend other HTML elements.
This type of element is called a Type Extension Custom Element. It lets you extend native elements APIs with your own properties.
Extending elements
Web Components - Custom Elements
@dvdchavarri
To define a type extension element you need to pass registerElement() the name and prototype of the element you want to inherit from.
Extending example
var MegaButton = document.registerElement('mega-button', {
    extends: "button",
    prototype: Object.create(HTMLButtonElement.prototype, {
        name: {
            value: "Custom Button"
        },
        createdCallback: {
            value: function() {
                this.addEventListener('click', function() {
                    alert("This is a " + this.name);
                });
            }
        }
    })
});
var megaButton = new MegaButton();
megaButton.click() // "This is a Custom Button"
Web Components - Custom Elements
@dvdchavarri
Supported callback functions for custom elements are called lifecycle callbacks:
- createdCallback() - Called every time a custom element is created.
- attachedCallback() - Called when the element is attached to the DOM.
- detachedCallback() - Called when the element is removed from the DOM.
- attributeChangedCallback() - Called whenever one of the elements' attributes changes.
Callbacks
Web Components - Custom Elements
@dvdchavarri
Callback Sample
var myCarousel = document.registerElement('my-carousel', {
    prototype: Object.create(HTMLElement.prototype, {
        createdCallback: {
	    value: function() {
	        this.ul = document.createElement('ul');
		this.setAttribute("items", this.getSlides);
		this.slides = this.getSlides;
    	    }
        },
        attachedCallback: {
	    value: function() {
                for (var i = 1; i <= this.getSlides; ++i) {
		    var li = document.createElement('li');
		    li.id = i;
		    li.textContent = "Slide number " + i;
		    this.ul.appendChild(li);
		}
		this.appendChild(this.ul);
	    }
        }
    })
});
Web Components - Custom Elements
@dvdchavarri
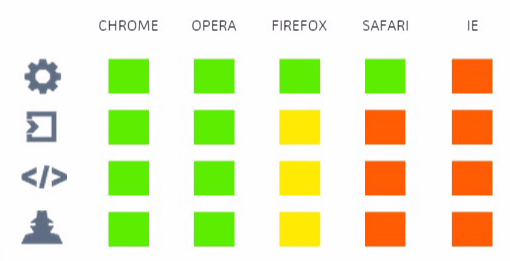
Browser support
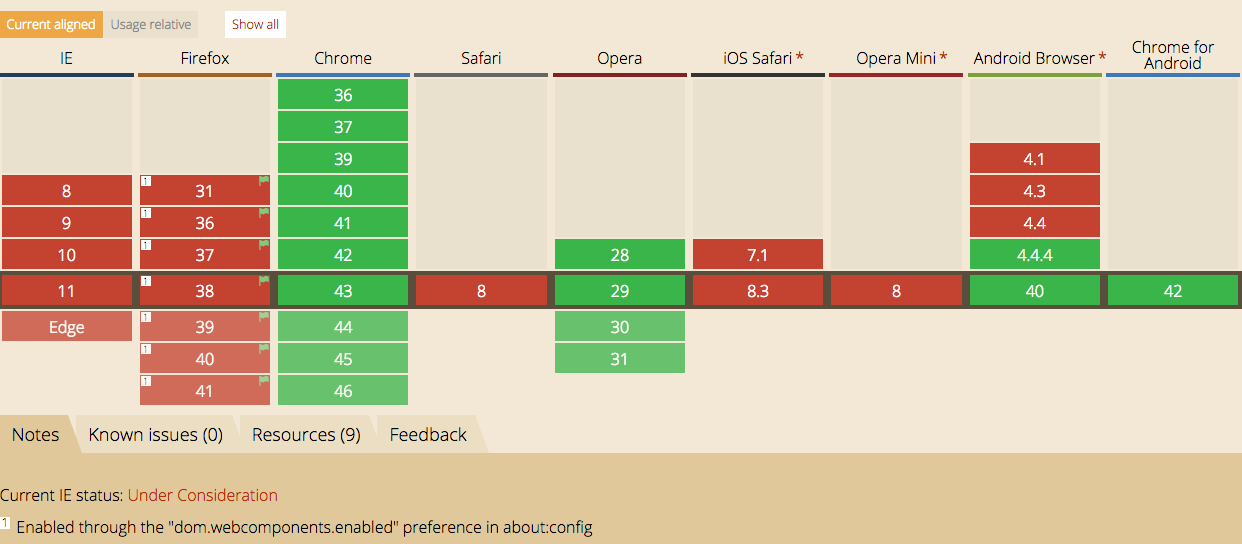
Browser support could be improved with the use of polyfills
Web Components - Shadow DOM
@dvdchavarri
Shadow DOM refers to the browser's ability to include a subtree of DOM elements into the rendering of a document.
This allows developers to encapsulate their HTML, styles and script into a single component.
Web Components - Shadow DOM
@dvdchavarri
- Hide presentation details
- Separate content from presentation
- Keep component subtree safe from external css / js
- Markup, style and javascript encapsulation
- One time boilerplate
Why
Web Components - Shadow DOM Example
@dvdchavarri
For example, let's consider the range input
<input type="range" min="100" max="500" step="10" />When rendered in Chrome, the range inputs has two distinct elements, a draggable button and a slider track.

Inspecting the element with Shadow Dom activated from dev tools, we can see the HTML markup for all rendered elements, inside the input's shadow root.
Web Components - Shadow DOM How
@dvdchavarri
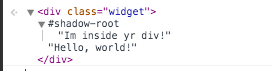
To create a shadow tree, we first specify that a node should act as a shadow host. In this case, we use widget as our shadow host.
Then we add a new node to our shadow host, known as a shadow root. The shadow root acts as the first node in your shadow host and all other nodes descend from it.
<div class="widget">Hello, world!</div>
<script>
  var host = document.querySelector('.widget');
  var root = host.createShadowRoot();
  root.textContent = 'I\'m inside yr div!';
</script>
The takeaway is that the content inside of the shadow host is no longer rendered. Instead, the content inside of the shadow root is what gets rendered.
@dvdchavarri
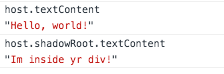
<content> and presentation
<div class="widget">Hello, world! <p>This also gets rendered</p></div>
<script>
  var host = document.querySelector('.widget');
  var root = host.createShadowRoot();
  root.textContent += 'Im inside yr div!';
  root.textContent += '<content></content>';
</script>
To show the shadow hosts' content in the presentation layer you have to add the <content> tag somewhere inside the shadow root tree.
<content> will cherry pick all content from the shadow host and append it inside the shadow root.
Web Components - Shadow DOM
@dvdchavarri
Applying styles
<button class="red">Click me</button>
<script>
    var button = document.querySelector('button');
    var root = button.createShadowRoot();
    root.innerHTML += '<style>' +
    		      ':host { border-radius:5px; border:1px solid #000;}' +
                      '</style>';
    root.innerHTML += "<content></content>"
</script>
1. Style encapsulation, with JS
Web Components - Shadow DOM
@dvdchavarri
Applying styles
<template id="nameTagTemplate">
    <style>
        :host {
            background-color:#FFF;
            border:1px solid #000;
            border-radius:5px;
        }
        .boilerplate {
            font-size:24px;
        }
    </style>
    <div class="outer">
        <p class="boilerplate">Hello world</p>
    </div>
</template>
2. Style encapsulation, with HTML Templates
Web Components - Shadow DOM
Because styles are encapsulated, they apply to this element only.
@dvdchavarri
Applying styles
<style>
    .widget {
	color:#FFF;
    }
    .widget::shadow button {
	border:2px solid #000;
	display: block;
    }
</style>
<div class="widget">Hello, world! <p>This also gets rendered</p></div>
<script>
    var host = document.querySelector('.widget');
    var root = host.createShadowRoot();
    root.innerHTML += '<content></content>';
    root.innerHTML += '<button>Click me</button>';
</script>
3. From outside CSS, using the ::shadow pseudo-element
Web Components - Shadow DOM
/deep/ ignores all shadow boundaries and crosses into all shadow trees.
::content pseudo-selector for styling distributed nodes
@dvdchavarri
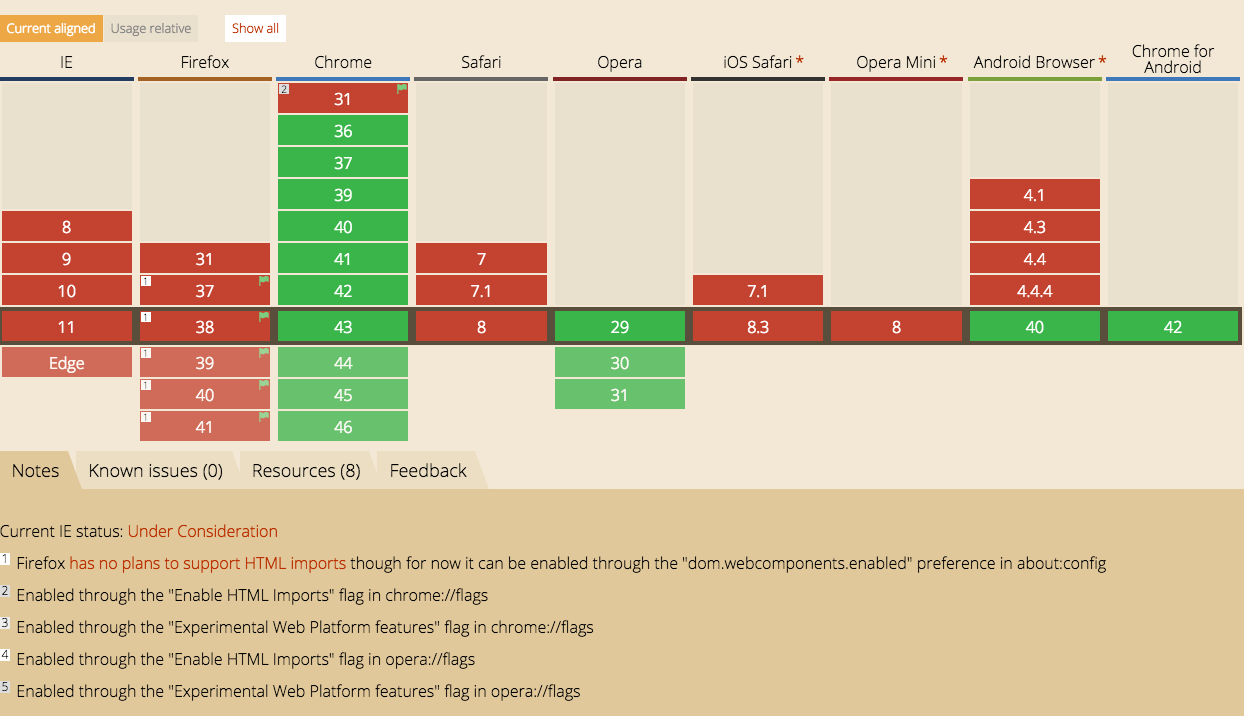
Browser support
Web Components - Shadow DOM
Browser support could be improved with the use of polyfills
Web Components - HTML Templates
@dvdchavarri
The <template> element is used to declare fragments of HTML that can be cloned and inserted in the DOM by script.
They're an ideal placeholder for declaring the structure of a custom element.
Web Components - HTML Templates
@dvdchavarri
Defining a new template for a custom element
Declaration
<template id="template">
    <style>
        h1 { color: orange; }
    </style>
    <div>
        <h1>Web Components</h1>
        <img src="http://webcomponents.org/img/logo.png">
    </div>
    <script>
        var template = document.getElementById('template');
        var img = template.querySelector('img');
        var i = 1;
        setInterval(function() {
            i++;
            img.css.transform = rotate(i+'deg');
        }, 25);
    </script>
</template>
Web Components - HTML Templates
@dvdchavarri
Appending the template to the shadow root of a custom element.
Using
var MyCustomElement = document.registerElement('my-custom-element', {
    prototype: Object.create(HTMLElement.prototype, {
        createdCallback: {
            value: function() {
               var template = document.getElementById("template");
               var templateClone = template.content.cloneNode(true);
               var root = this.createShadowRoot()
               root.appendChild(templateClone);
            }
        }
    });
});
var customDOMElement = new myCustomElement();
document.body.appendChild(customDOMElement);
This is the when the cloned template will get initialized.
Web Components - HTML Templates
@dvdchavarri
Deep Copy
createdCallback: {
    value: function() {
        var template = document.getElementById("template");
        var templateClone = template.content.cloneNode(true);
        var root = this.createShadowRoot()
        root.appendChild(templateClone);
    }
}
The template is cloned using the cloneNode() method. By calling the method with the bool argument as true, we are creating a deep copy of the element, meaning that all descendants of the node will be cloned.
@dvdchavarri
Browser support
Web Components - HTML Templates

Browser support could be improved with the use of polyfills
Web Components - HTML Imports
@dvdchavarri
HTML Imports allow you to load resources inside HTML documents as an aggregated HTML file.
In order to load a HTML file, add a link tag with an import in the rel attribute and the path to the file to href.
// index.html
<link rel="import" href="component.html">
...
Web Components - HTML Imports
@dvdchavarri
HTML Imports will immediately load the imported document, resolve subresources and execute JavaScript, if any.
// index.html
<link rel="import" href="component.html">     // 1.
<script src="script.js"></script>             // 5.

// component.html
<link rel="stylesheet" href="component.css">  // 2.
<script src="component.js"></script>          // 3.
<script src="animate.js"></script>            // 4.
You can use async attribute on the link[rel="import"] tag just as you would on a script tag, in order to avoid blocking of HTML rendering.
Web Components - HTML Imports
@dvdchavarri
In order to obtain component.html's document object from within index.html, refer to the link element's import property.
// index.html
var componentDoc = document.querySelector('link[rel="import"]').import;
To obtain the document object from within component.html itself, refer to document.currentScript.ownerDocument.
// component.html
var componentDoc = document.currentScript.ownerDocument;
Web Components - HTML Imports
@dvdchavarri
HTML Imports can be used to import resources from other origins by using CORS
// index.html
<link rel="import" href="http://webcomponents.org/components/component.html">
...
@dvdchavarri
Browser support
Web Components - HTML Import
Browser support could be improved with the use of polyfills
@dvdchavarri
// component.html
<template id="template">
    <style>
        h1 { color: orange; }
    </style>
    <div>
        <h1>Web Components</h1>
        <img src="http://webcomponents.org/img/logo.png">
    </div>
</template>
<script>
    var template = document.getElementById("template");
</script>
<script src="js/component.js"></script>
Web Components - Wrapping up
An example with all the pieces together:
Web Components - Wrapping up
@dvdchavarri
// index.html
...
    <link rel="import" href="component.html">
</head>
<body>
    <my-component>
        <h1>This is a Custom Element</h1>
    </my-component>
...
// component.js
var myComponent = document.registerElement('my-component', {
prototype: Object.create(HTMLElement.prototype, {
createdCallback: {
value: function() {
var templateClone = template.content.cloneNode(true);
var root = this.createShadowRoot()
root.appendChild(templateClone);
}
}
});
});Web Components - Wrapping up
@dvdchavarri
Browser support
PROS
- Component encapsulation
- Reusable
- Content inside of your component is safe from external scripts / styles
- Elements will always render exactly how you intended
- Polyfills to all browsers
- HTML imports aggregator tool
- Access to data-binding on elements with Polymer
CONS
- Limited browser support by default
- No data-binding by default
- Harder to inspect in browser
- Harder to access element's shadow root tree (js, css)
- Working draft spec @ W3C
- Not production ready
- Can get out of hand if you abuse html imports (seeVulcanize)
Web Components - Wrapping up
@dvdchavarri
@dvdchavarri
Sources
- https://css-tricks.com/modular-future-web-components
- http://webcomponents.org/articles/why-web-components
- http://glazkov.com/2011/01/14/what-the-heck-is-shadow-dom
- https://developer.mozilla.org/en-US/docs/Web/Web_Components
- http://webcomponents.org/articles/introduction-to-custom-elements
- http://www.html5rocks.com/en/tutorials/webcomponents/customelements
- http://webcomponents.org/articles/interview-with-joshua-peek
- http://robdodson.me/shadow-dom-the-basics/
- http://html5-demos.appspot.com
Web Components
By David Chavarri