Justin James
@digitaldrummerj
Use Your Existing Web Skills to Create Native Mobile Applications
Workshop
"So you want to build a native app?"
More Platforms. More Problems.
Why are we still coding for multiple platforms?


"Is there an alternative?"
"Hello."
"I have heard hybrid apps are slow!"
Mobile devices have rapidly improved!
| Year | Device | Processor | RAM |
|---|---|---|---|
| 2007 | iPhone | 620 MHz | 128 MB |
| 2010 | iPhone 4 | 1 GHz | 512 MB |
| 2014 | iPhone 6 | 1.4 GHz dual-core | 1 GB |
| 2015 | iPhone 6s | 1.8 GHz dual-core | 2 GB |
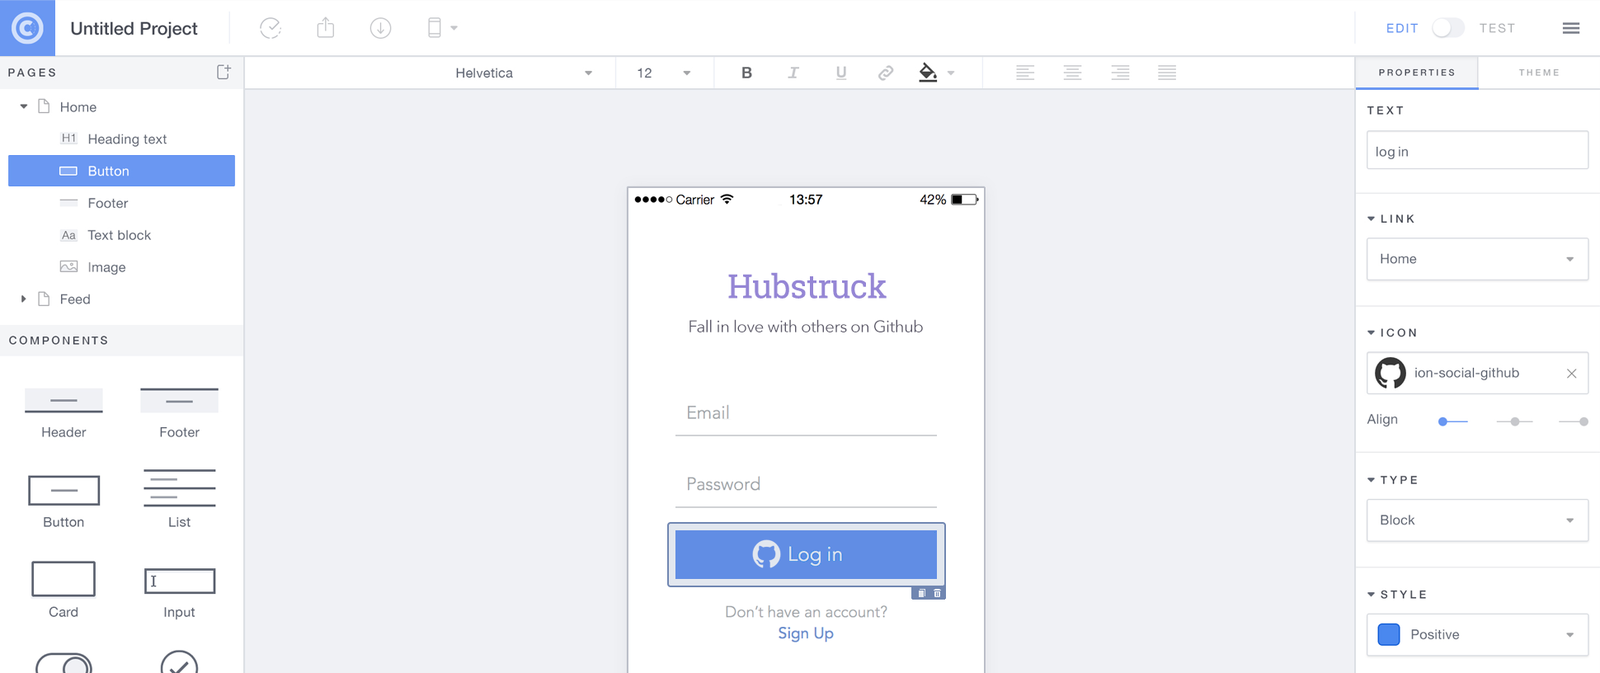
Web Technologies You
Already Know and Love


Native Focused
Performance Obsessed
Supported Devices
iOS 6+
Android 4+
Win Phone 10

Apache Cordova

Your App
Ionic
Angular
Webview (Cordova)
Native SDK
What are we
building
today?
Lets Get Started
$ npm install -g gulp bower cordova ionic Installing Ionic
-
Install NodeJs - http://nodejs.org
-
Visual Studio Code - https://code.visualstudio.com/
-
Install Git - https://msysgit.github.io/
-
Mac already has it installed
-
-
Globally install npm packages
Create ionic project
ionic start todo blankionic serveProject Created
-
Directory create for project
-
Project created using Ionic blank template
-
Angular wired up
-
Basic Gulp File Created
-
Node web server wired up
Time to Code
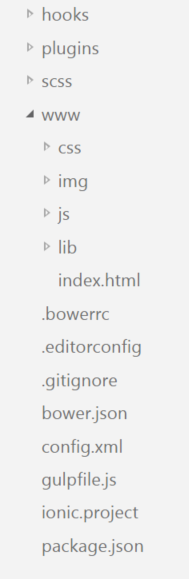
Angular Module
Angular Module
angular.module('starter', ['ionic'])collection of services, directives, controllers, filters, and configuration information
file: www\js\app.js
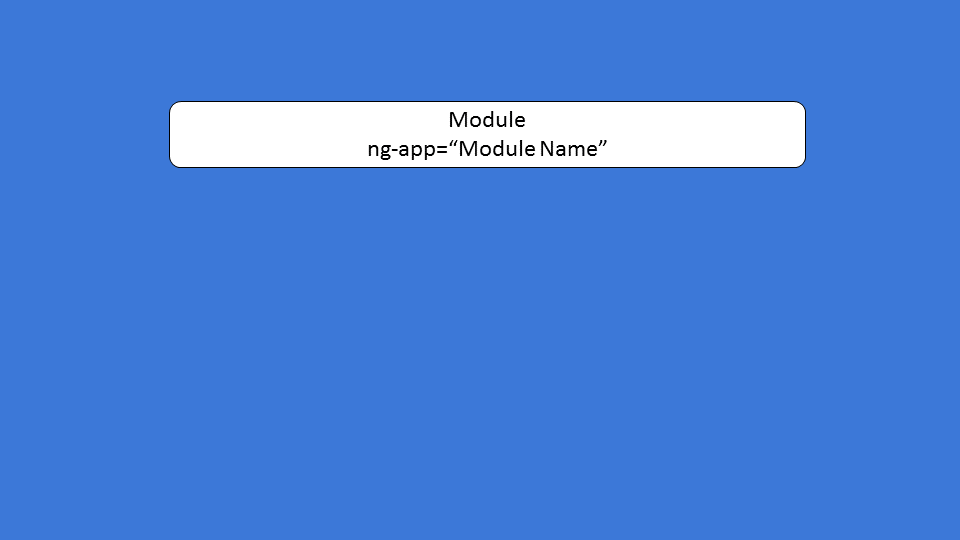
Angular Config
Angular Config
angular.module('starter', ['ionic'])
    .config(function () {
    })
Allows configurations to be applied before app runs.
file: www\js\app.js
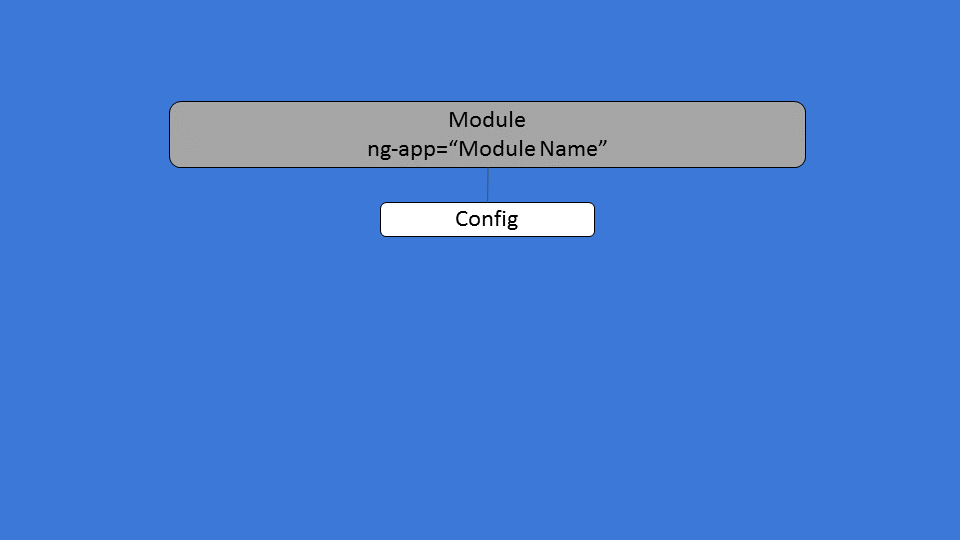
Angular Routes
Angular Routes
-
Define navigation to specific states
-
Define configuration for each route
-
Ionic use Angular UI Router
Add a Route
$stateProvider$stateProvider
.state('about', {
url: "/about",
templateUrl: "templates/about.html"
});Add parameter to .config function
Add our first state
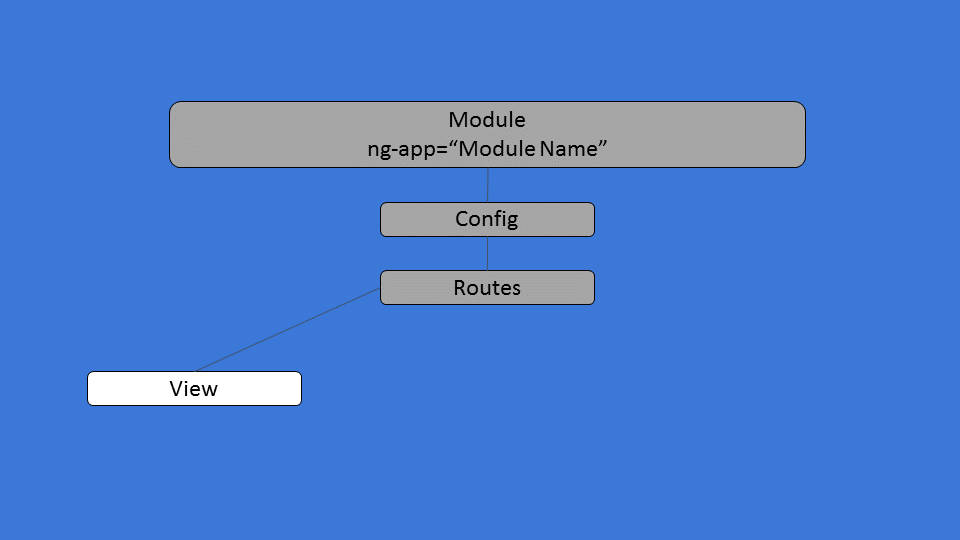
Angular View
Angular View
-
Interface that user sees
-
Contains the Html markup
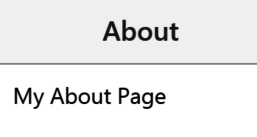
Add a View
<ion-view view-title="About">
    <ion-content class="padding">
        My About Page
    </ion-content>
</ion-view>-
Create Directory www\templates
-
Create file about.html
View About Page
-
Run ionic serve
-
Navigate to http://localhost:8100/#/about
-
Was It What You Expected?
Fixing View Display
ion-nav-view
-
Renders templates
-
Keeps track of history
-
Can manage multiple histories
-
Caches Views
Fixing View Display
<ion-nav-view></ion-nav-view>
-
Open www\index.html
-
Clear out contents in <body> tag
-
Add ion-nav-view in <body> tag
View About Page
-
Navigate to http://localhost:8100/#/about
-
This time you should see
Angular Default Route
State to show when user hits home page
Uses the $urlRouterProvider otherwise method
Adding Default Route
$urlRouterProvider.otherwise('/about');
$urlRouterProviderAdd additional parameter to .config
Add otherwise statement to .config
View Home Page
-
Run ionic serve
-
Navigate to http://localhost:8100/
-
Did it redirect you to /#/about?
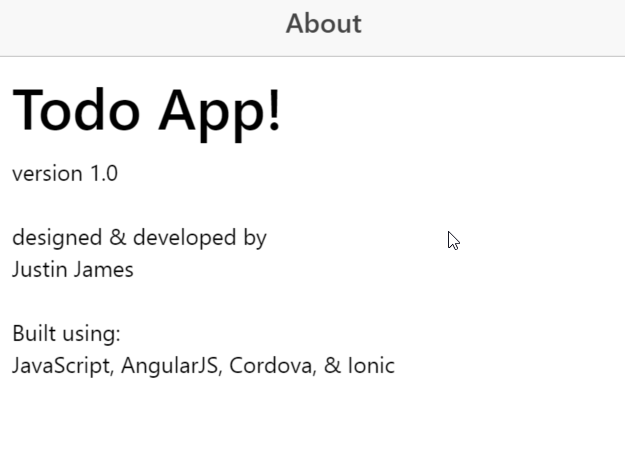
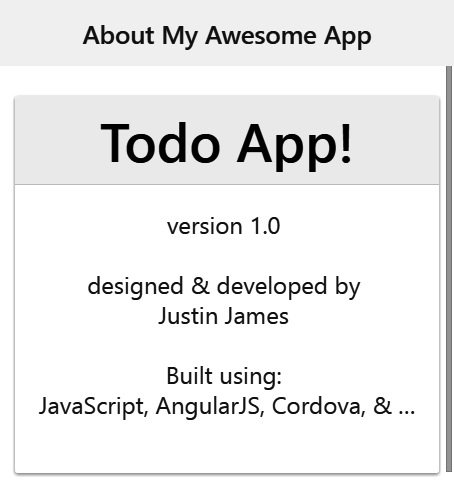
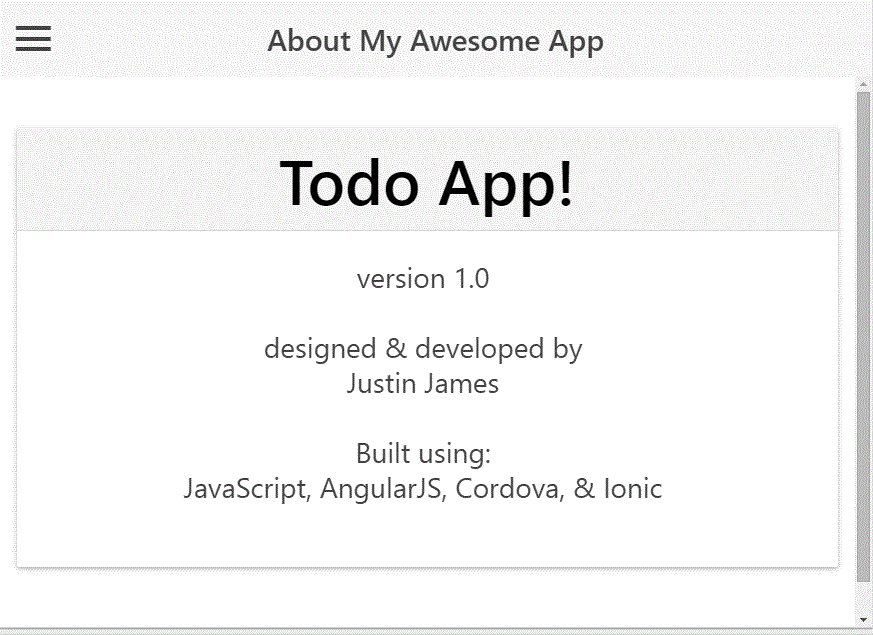
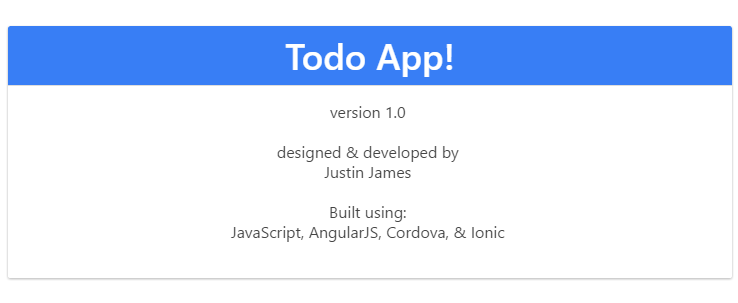
Filling Out About Page
<div>
    <div>
        <h1>Todo App!</h1>
    </div>
    <div>
        version 1.0
        <br/>
        <br/> designed & developed by
        <br/> [Your Name]
        <br/>
        <br/> Built using:
        <br/> JavaScript, AngularJS, Cordova, & Ionic
        <br/>
        <br/>
    </div>
</div>
Viewing About Page
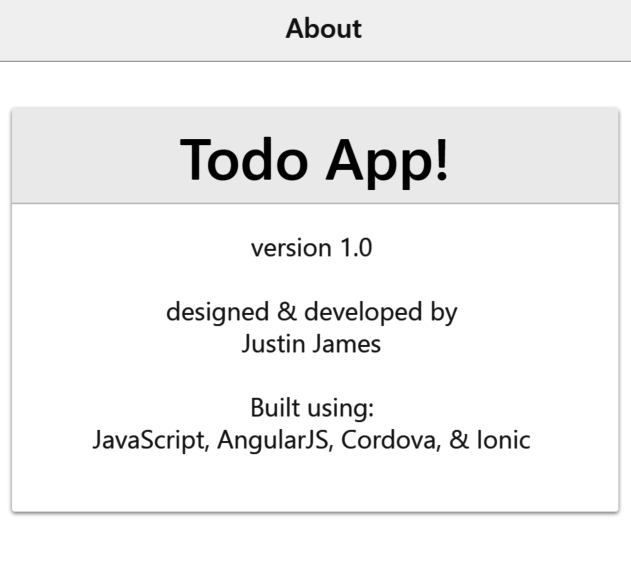
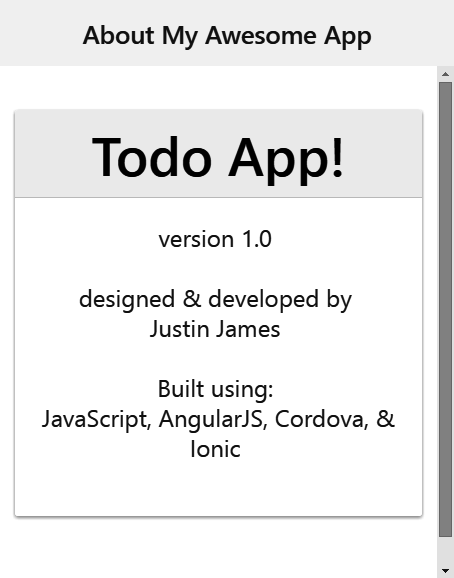
Adding Class To About
<div class="card">
    <div class="item item-divider text-center">
        <h1>Todo App!</h1>
    </div>
    <div class="item text-center">
        version 1.0
        <br/>
        <br/> designed & developed by
        <br/> [Your Name]
        <br/>
        <br/> Built using:
        <br/> JavaScript, AngularJS, Cordova, & Ionic
        <br/>
        <br/>
    </div>
</div>Viewing About Page
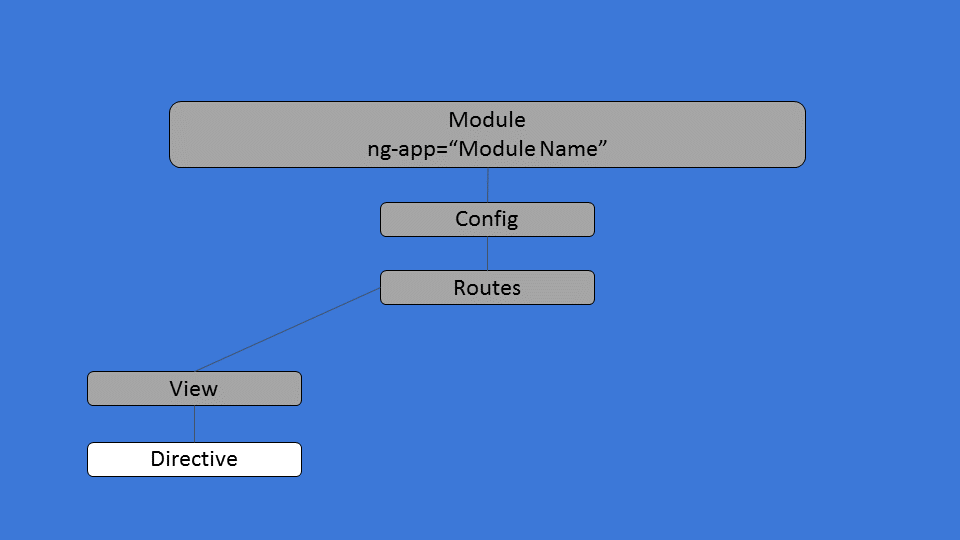
Angular Directive
Angular Directives
Reusable elements that encapsulate behavior
-
Grids
-
Menus
-
Tabs
-
ng-click
-
ng-options
-
ng-repeat
Examples
Add a Side Menu
<ion-side-menus enable-menu-with-back-views="false">
  <ion-side-menu-content>
    <ion-nav-bar class="bar-stable">
      <ion-nav-back-button></ion-nav-back-button>

      <ion-nav-buttons side="left">
        <button  menu-toggle="left"
            class="button button-icon button-clear ion-navicon">
        </button>
      </ion-nav-buttons>
    </ion-nav-bar>
    <ion-nav-view name="menuContent"></ion-nav-view>
  </ion-side-menu-content>

  <ion-side-menu side="left">
  </ion-side-menu>
</ion-side-menus>-
Create file templates\menu.html

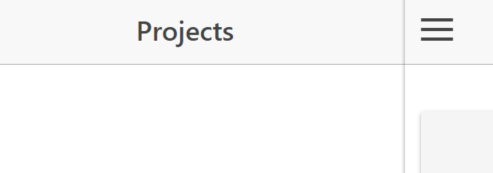
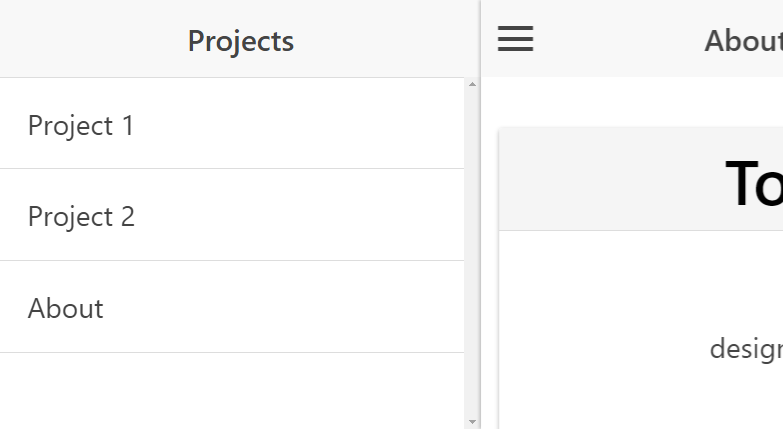
Add Sidemenu Title
<ion-header-bar class="bar-stable">
    <h1 class="title">Projects</h1>
</ion-header-bar>
Add Title to Menu
Add Side Menu Content
 <ion-content>
    <ion-list>
        <ion-item menu-close ng-href="#/app/about">
            About
        </ion-item>
    </ion-list>
</ion-content>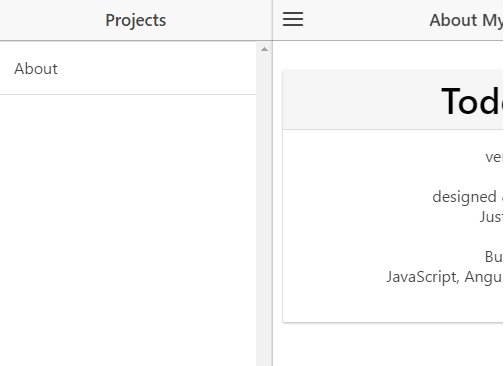
Add Route for Side Menu
.state('app', {
    abstract: true,
    'url': '/app',
    'templateUrl': 'templates/menu.html',
})-
Open app.js and add new route
Making about route work
.state('app.about', {
    url: '/about',
    views: {
      'menuContent': {
          'templateUrl': 'templates/about.html',
      }
    }
})
Fixing Otherwise Route
$urlRouterProvider.otherwise('/app/about');
Angular Controller
Angular Controller
-
Define methods/properties for view to interact with
-
Should be lightweight
-
Focused on view they are controlling
Add a Controller
angular
    .module('starter')
    .controller('AboutController',
        AboutController);

AboutController.$inject = ['$scope'];

function AboutController($scope) {
  $scope.title = "About My Awesome App";
}-
Create Directory www\js\controllers
-
Create file about.controller.js
Using Controller
'menuContent':
    {
        templateUrl: 'templates/about.html',
        controller: 'AboutController'
}-
Open app.js
-
Need to tell route about controller
Updating Title in View
<ion-nav-title>{{title}}</ion-nav-title>-
Open about.html
-
Add ion-nav-title as 1st element in view
-
Remove view-title="About" from ion-view
Add Script Tag
<script
    src="js/controllers/about.controller.js">
</script>
Add about.controller.js to index.html
Updated Title
Making Text Wrap
item-text-wrap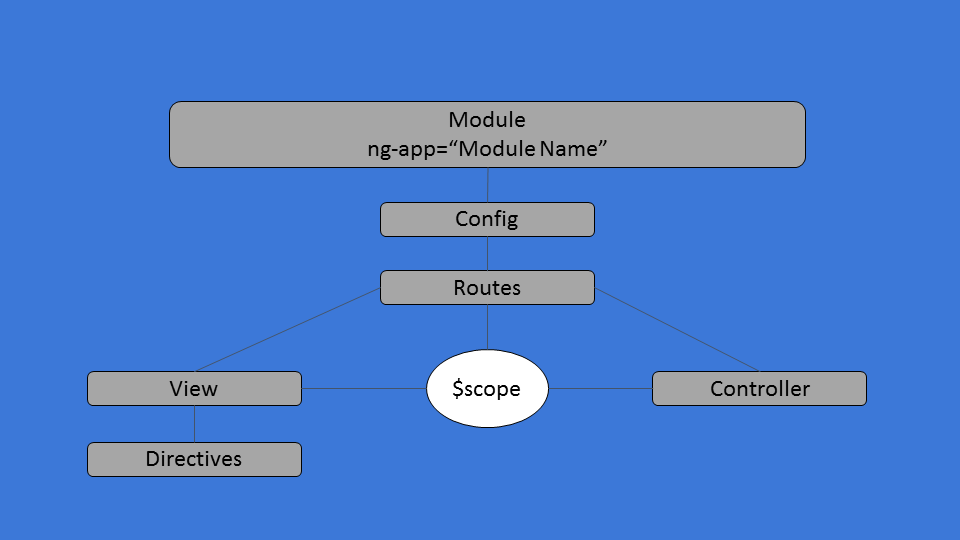
Angular $scope
Angular $scope
Glue between the controller and view
Showing
Projects List
in Menu
Add Project Controller
angular
    .module('starter')
    .controller('ProjectController', ProjectController);

ProjectController.$inject = ['$scope'];

function ProjectController($scope){
}
Create js\controllers\project.controller.js
Add to Route
.state('app', {
        abstract: true,
        url: '/app',
        templateUrl: 'templates/menu.html',
        controller: 'ProjectController'
})
Open app.js and add another route
Add Projects Data
 $scope.projects = [
    {
      "title": "Project 1"

    },
    {
      "title": "Project 2"
    }
];
Add data to ProjectController
Add to Menu
<ion-item ng-repeat="project in projects">
    {{project.title}}
</ion-item>
Add Project title to Side Menu
Add Script Tag
<script
    src="js/controllers/project.controller.js">
</script>
Add project.controller.js to index.html
View in Browser
Get Tasks
for Project
Steps
What do you think?
Add New Tasks View
<ion-view>
    <ion-nav-title>{{activeProject.title}}</ion-nav-title>

    <ion-content class="padding">
        <ion-list>
            <ion-item
                ng-repeat="task in activeProject.tasks">
                {{task.title}}
            </ion-item>
        </ion-list>
    </ion-content>
</ion-view>
Create file templates\tasks.html
Add New Controller
angular
    .module('starter')
    .controller('TasksController', TasksController);

TasksController.$inject = ['$scope'];

function TasksController($scope) {
}
Create js\controllers\tasks.controller.js
Add New Route
.state('app.tasks', {
        url: '/tasks',
        views: {
          'menuContent': {
            templateUrl: 'templates/tasks.html',
            controller: 'TasksController'
        }
    }
})
Open app.js and add new route
Select Project
<ion-item
    ng-repeat="project in projects"
    ng-click="selectProject(project)"
    menu-close
    ng-href="#/app/tasks"
>
    {{project.title}}
</ion-item>
Add ng-click, menu-close, and ng-href
Add selectProject function
$scope.selectProject = function (project) {
    $scope.activeProject = project;
}
Add function to ProjectController
Add Tasks
{
  "title": "Project 1",
  "tasks": [
    {
      "title": "Task 1",
      "completed": false
    },
    {
      "title": "Task 2",
      "completed": true
    }
  ]
}
Add some tasks to the Project 1
Add Script Tag
<script
    src="js/controllers/tasks.controller.js">
</script>
Add tasks.controller.js to index.html
Check Out Your Work

Angular Service
Angular Service
-
Provide common functionality
-
Shared across application
-
Only gets instantiated once
Types of Services
| value | store simple values that may change |
| constant | store values that will never change |
| service | Service created using constructor function.
Good for devs that prefer OOP-style programming and like using the this keyword |
| factory | Service created using constructor function
Good for devs using Revealing Module pattern |
| provider | Most control over defining service but more complex and verbose. |
Factory
angular
    .module('starter')
    .factory('ProjectService', ProjectService);

ProjectService.$inject = [];

function ProjectService() {
}-
Create Directory www\js\services
-
Create file project.service.js
Create Service Method
function getProjects() {
    return [
      {
        "title": "Project 1",
        "tasks": [
          { "title": "Task 1", "completed": false },
          { "title": "Task 2", "completed": true  }
        ]
      },
      {
        "title": "Project 2",
        "tasks": []
      }
    ];
}
Create Method to Get Project List
Update Service Return
angular
    .module('starter')
    .factory('ProjectService', ProjectService);

ProjectService.$inject = [];

function ProjectService() {
  return {
    "getProjects": getProjects
  };
}
Expose getProjects as a callable method
Use Project Service
$scope.projects = ProjectService.getProjects();-
Open project.controller.js
-
Inject ProjectService
-
Update $scope.projects to call getProjects
ProjectController.$inject = [
    '$scope', '$state', 'ProjectService'];

function ProjectController($scope, $state, ProjectService) {
}
Everything should still work
Angular Big Picture
Add New Project
Add Project - Plus Icon
<i class="button button-icon ion-plus"
     ng-click="showProjectModal()">
</i>
-
Open menu.html
-
Add + icon in header
Add Project - ionicModal
ProjectController.$inject = [
    '$scope',
    '$state',
    'ProjectService',
    '$ionicModal'
];

function ProjectController(
    $scope, $state, ProjectService, $ionicModal) {
}
-
Open project.controller.js
-
Inject $ionicModal
Add Project - set modal
$ionicModal.fromTemplateUrl(
    'templates/new-project.html',
    function (modal) {
        $scope.projectModal = modal;
    },
    {
      scope: $scope
    }
);-
Open project.controller.js
-
Add following
Add Project - create html
<ion-modal-view>

  <!-- Modal header bar -->
  <ion-header-bar class="bar-secondary">
  </ion-header-bar>

  <!-- Modal content area -->
  <ion-content>
  </ion-content>

</ion-modal-view>-
Add templates\new-project.html
-
Add Basic Modal template
Add Project - modal header
 <!-- Modal header bar -->
<ion-header-bar class="bar-secondary">
    <h1 class="title">New Project</h1>
    <button
        class="button button-clear button-positive"
        ng-click="closeProjectModal()"
    >
        Cancel
    </button>
</ion-header-bar>
Add Project - modal body
<ion-content>
    <form ng-submit="saveNewProject(project)">
        <div class="list">
            <label class="item item-input">
                <input type="text"
                    placeholder="Project Name"
                    ng-model="project.title">
            </label>
        </div>
        <div class="padding">
            <button type="submit"
                class="button button-block button-positive"
            >
            Create Project
            </button>
        </div>
    </form>
</ion-content>
Add Project - open modal
$scope.showProjectModal= function () {
    $scope.projectModal.show();
}-
In project.controller.js
-
Add $scope.showProjectModal function
Add Project - close modal
$scope.closeProjectModal = function () {
    $scope.projectModal.hide();
}-
In project.controller.js
-
Add $scope.closeProjectModal function
Add Project - save
$scope.saveNewProject = function (project) {
    var projectTitle = project.title;
    if (projectTitle) {
      var newProject = ProjectService.addProject(project);
      $scope.projects.push(newProject);
      $scope.selectProject(newProject);
      $scope.closeProjectModal();
      $ionicHistory.nextViewOptions({
        disableBack: true
      });

      $state.go('app.tasks');

    }

    project.title = "";
}
In project.controller.js
Add Project - service save
function ProjectService() {
    return {
        "getProjects": getProjects,
        "addProject": addProject
    };

    function addProject(project) {
        return {
          "title": project.title,
          "tasks": [
            { "title": "first tasks" }
          ]
        };
    }
    ....
}
In project.service.js
Check Your Work
But
menu doesn't hide!
Making Menu Hide
$ionicSideMenuDelegate.toggleLeft();-
Open project.controller.js
-
Inject $ionicSideMenuDelegate
-
In saveNewProject function add:
ProjectController.$inject = [
    '$scope', '$state',
    'ProjectService', '$ionicSideMenuDelegate'];

function ProjectController($scope, $state,
    ProjectService, $ionicSideMenuDelegate) {
}
Side Menu Now Hides!
Add New Task
Add Task - Plus Icon
<ion-nav-title>{{activeProject.title}}</ion-nav-title>

<ion-nav-buttons side="right">
      <button class="button button-icon"
            ng-click="newTask()"
            ng-if="activeProject"
        >
        <i class="icon ion-compose"></i>
    </button>
</ion-nav-buttons>-
Open tasks.html
-
Add ion-compose icon in header
Add Task - ionicModal
angular
    .module('starter')
    .controller('TasksController', TasksController);

TasksController.$inject = ['$scope', '$ionicModal'];

function TasksController($scope, $ionicModal) {
}-
Open tasks.controller.js
-
Inject $ionicModal
Add Task - set modal
$ionicModal.fromTemplateUrl(
    'templates/new-task.html',
    function (modal) {
        $scope.taskModal = modal;
    },
    {
      scope: $scope
    }
);-
Open tasks.controller.js
-
Add following
Add Task - create html
<ion-modal-view>

  <!-- Modal header bar -->
  <ion-header-bar class="bar-secondary">
  </ion-header-bar>

  <!-- Modal content area -->
  <ion-content>
  </ion-content>

</ion-modal-view>-
Add templates\new-task.html
-
Add Basic Modal template
Add Task - modal header
 <!-- Modal header bar -->
<ion-header-bar class="bar-secondary">
    <h1 class="title">New Task for {{activeProject.title}}</h1>
    <button
        class="button button-clear button-positive"
        ng-click="closeTaskModal()"
    >
        Cancel
    </button>
</ion-header-bar>
Add Task - modal body
<ion-content>
    <form ng-submit="saveNewTask(task)">
        <div class="list">
            <label class="item item-input">
                <input type="text"
                    placeholder="What do you need to do?"
                    ng-model="task.title">
            </label>
        </div>
        <div class="padding">
            <button type="submit"
                class="button button-block button-positive"
            >
            Create Task
            </button>
        </div>
    </form>
</ion-content>
Add Task - open modal
$scope.showTaskModal= function () {
    $scope.taskModal.show();
}-
In tasks.controller.js
-
Add $scope.showTaskModal function
Add Task - close modal
$scope.closeTaskModal = function () {
    $scope.taskModal.hide();
}-
In tasks.controller.js
-
Add $scope.closeTaskModal function
Add Task - task save
function ProjectService() {
    return {
        "getProjects": getProjects,
        "addProject": addProject,
        "addTask": addTask
    };

    function addTask(task) {
        return {
          "title": task.title,
          "completed": false
        };
    }
    ....
}
In project.service.js
Task Add - Use ProjectService
-
Open tasks.controller.js
-
Inject ProjectService
angular
    .module('starter')
    .controller('TasksController', TasksController;

TasksController.$inject = [
    '$scope',
    '$ionicModal',
    'ProjectService'
];

function TasksController($scope, $ionicModal, ProjectService) {
}
Add Task - save
$scope.saveNewTask = function (task) {

    if (!$scope.activeProject || !task || !task.title) {
      return;
    }

    var newTask = ProjectService.addTask(task);
    $scope.activeProject.tasks.push(newTask);
    $scope.closeTaskModal();

    task.title = "";
}
In tasks.controller.js
Add Task Should Work
Delete Project
Delete Project - Delete Icon
<i class="icon icon-accessory ion-close-circled"></i>-
Open menu.html
-
Add ion-close-circled icon to project list
Delete Project - Wire Up Icon
class="item item-icon-right"-
Add classes to ion-item for project
-
Add ng-click to icon
ng-click="deleteProject(project, $index)"class="item item-icon-right"Delete Project - function
$scope.deleteProject = function (project, $index) {
    if (project === $scope.activeProject) {
      $scope.activeProject = {};
    }

    $scope.projects.splice($index, 1);
}-
In project.controller.js
-
Add deleteProject function on $scope
Project Delete Works
Delete Task
Delete Task - Add Delete Icon
  <ion-list>
    <ion-item
        ng-repeat="task in activeProject.tasks"
        class="item item-icon-right"
    >
        {{task.title}}
        <i
            class="icon ion-close icon-accessory"
            ng-click="deleteTask(task, $index)">
        </i>
    </ion-item>
</ion-list>-
Open tasks.html
-
Add ion-close icon to task list
Delete Task - function
$scope.deleteTask = function (task, $index) {
    $scope.projects.tasks.splice($index, 1);
}-
In tasks.controller.js
-
Add deleteTask function on $scope
Task Delete Works
Complete Task
Complete Task - Add Icon
<i class="icon"
    ng-class="task.completed ?
        'ion-checkmark-circled' :
        'ion-ios-circle-outline'"
    ng-click="completeTask(task, $index)">
</i>-
Open tasks.html
-
Add ion-close icon to task list before delete
Complete Task - function
$scope.completeTask = function (task, $index) {
    if ($scope.activeProject.tasks[$index].completed) {
      $scope.activeProject.tasks[$index].completed = false;
    } else {
      $scope.activeProject.tasks[$index].completed = true;
    }

    ProjectService.save($scope.projects);
}-
In tasks.controller.js
-
Add completeTask function on $scope
Complete Task - icon position
<ion-item
    ng-repeat="task in activeProject.tasks"
    class="item item-icon-left item-icon-right"
>-
In tasks.html
-
Add item-icon-left to ion-item

Task Complete Works
Persist Data
Local Storage
-
Stored only in the user's browser
-
Storage is per domain and protocol
-
At least 5 MB in space
-
Never transferred to the server
Persist Data - Local Storage
angular.module('ionic.utils', [])
.factory('$localstorage', ['$window', function($window) {
  return {
    set: function(key, value) {
      $window.localStorage[key] = value;
    },
    get: function(key, defaultValue) {
      return $window.localStorage[key] || defaultValue;
    },
    setObject: function(key, value) {
      $window.localStorage[key] = JSON.stringify(value);
    },
    getObject: function(key) {
      return JSON.parse($window.localStorage[key] || '{}');
    }
  }
}]);-
Create File js\services\local.storage.service.js
Persist Data - Module Inject
angular.module('starter', ['ionic', 'ionic.utils'])-
Open app.js
-
Inject ionic.utils into angular module
Persist Data - Service Inject
ProjectService.$inject = ['$localstorage'];

function ProjectService($localstorage) {
}-
Open project.service.js
-
Inject $localstorage into ProjectService
Persist Data - Save Data
return {
    "getProjects": getProjects,
    "addProject": addProject,
    "addTask": addTask,
    "save": save
};

function save(projects) {
    $localstorage.set('projects', angular.toJson(projects));
}-
Open project.service.js
-
Inject $localstorage into ProjectService
Persist Data - Get Data
function getProjects() {
    var projects = $localstorage.get('projects');
    if (projects) {
      return angular.fromJson(projects);
    }

    return [];
}-
Open project.service.js
-
Modify getProjects function
Persist Data - Save Projects
ProjectService.save($scope.projects);
-
Open project.controller.js
-
Call ProjectService.save in
-
saveNewProject
-
deleteProject
-
Persist Data - Call Tasks
ProjectService.save($scope.projects);
-
Open tasks.controller.js
-
Call ProjectService.save in
-
saveNewTask
-
deleteTask
-
completeTask
-
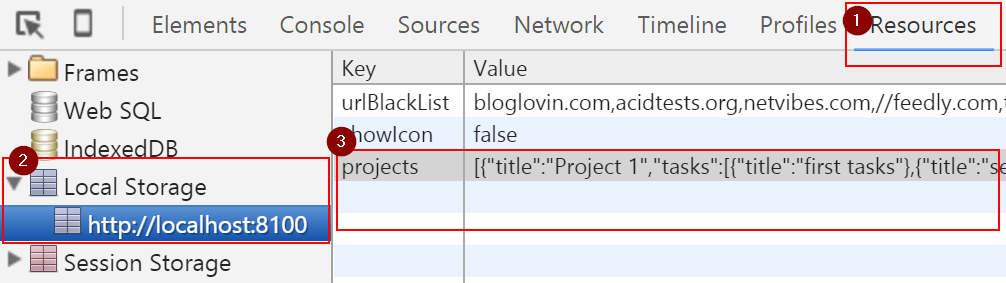
Viewing Data
-
In Chrome, Open the Developer Tools
-
Click on Resources
-
Expand Local Storage
-
Select http://localhost:8100
Theming
Plain ol' CSS
Or
Setting up Sass
-
Stop ionic serve
-
Run ionic setup sass
Changing Theme
-
Open about.html
-
Add class
-
item-positive to header div
-
light to h1
-
<div class="item-positive item item-divider text-center">
    <h1 class="light">Todo App!</h1>
</div>
Theme - About Styled
Create Our Own Styles
-
Open scss\ionic.app.scss
-
At bottom of file add
.activeProject {
	background-color: $dark;
	  color: $light;
}

.completedTask {
	text-decoration: line-through;
	color: #A9A9A9;
}
Using Our Styles
-
Open task.html
-
To ion-item add
ng-class="{completedTask: task.completed}"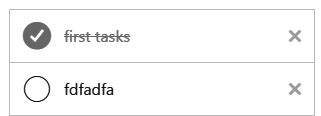
Testing on Device
with Ionic View
Ionic View
Share without
the
App Store
$ ionic start myApp tabs
$ cd myApp
$ ionic upload
$ ionic share [email address]
Ionic Built-In UI Elements
i.e. Web SDK
Ionicons
Over 600 MIT licensed font-icons included


Menu

Slide Box
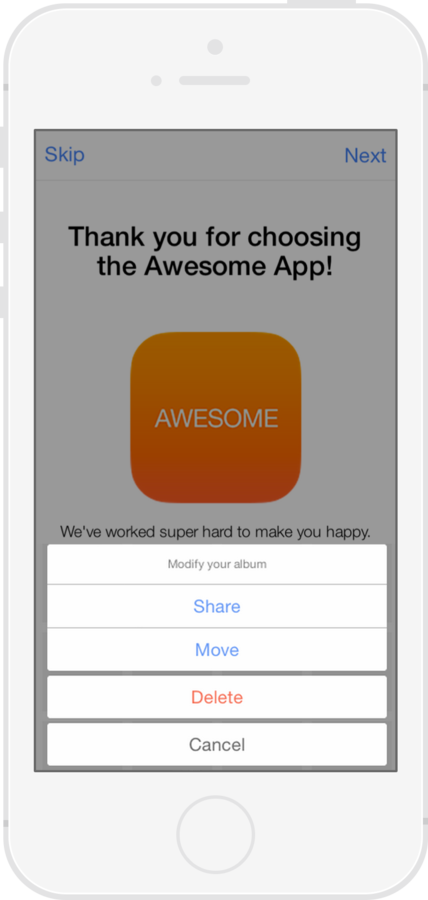
Action Sheet
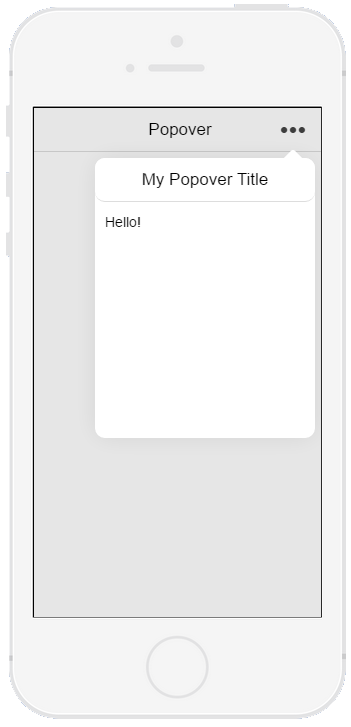
Popover
Pull to Refresh
Ionic Tooling
Automatically generate icons and splash screens
Creates size needed for each platform
Icons and Splash Screens
$ ionic resources
$ ionic resources --icon
$ ionic resources --splash
Ionic Market

Ionic Creator
Ionic IO
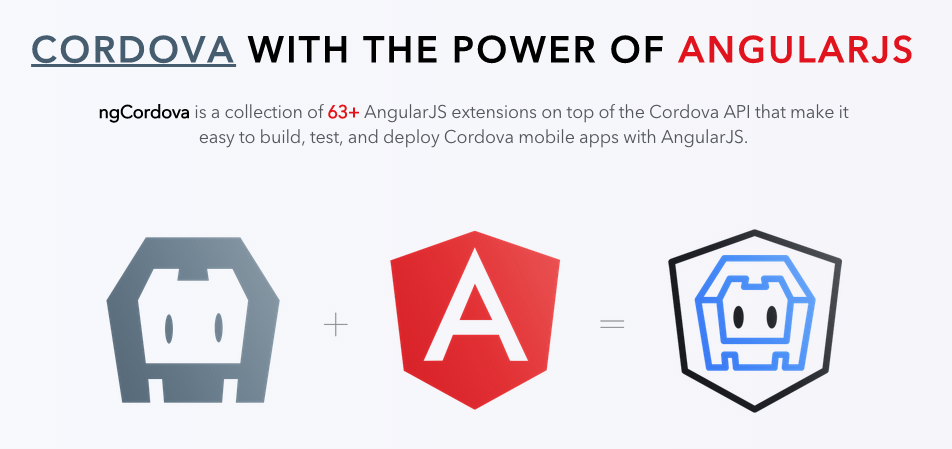
Interacting with the Device
ngCordova
Compiling for Devices
iOS Prerequisites
-
Mac only
-
XCode
-
iOS Simulator
-
Safari
-
Apple Developers Account ($99 per year)
Android Prerequisites
-
Windows / Linux / OSx
-
Java SDK 7
-
Android Studio
-
Android SDK
-
Google Chrome
-
Google Developers Account ($25 lifetime)
-
Optional:
-
Genymotion
-
Visual Studio 2015 Cordova Tools
-
Ionic Setup Details
Compiling for Devices
ionic platform add [android/ios]ionic [run/emulate] [android/ios]Run test on device/emulator
Add mobile platform (Android or iOS)
thank you
i'm Justin.
@digitaldrummerj - digitaldrummerj@gmail.com
http://digitaldrummerj.me
Backup
List Views
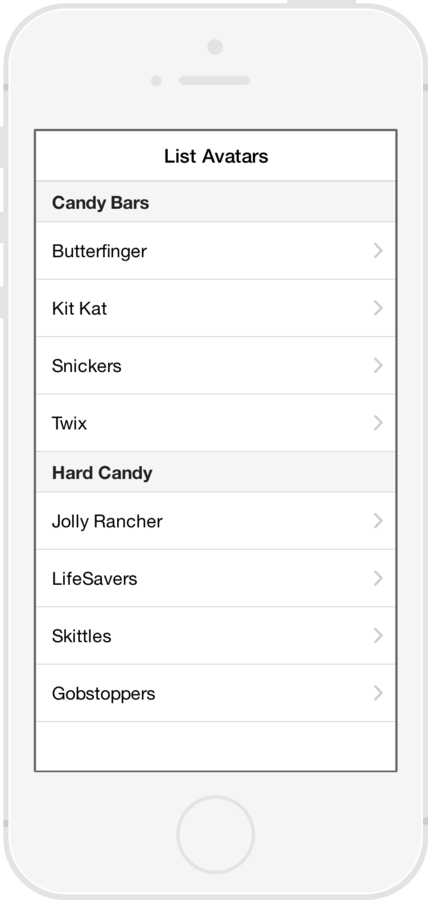
-
Simple List
-
Data Only
-
-
Complex List
-
Edit / Delete / Reorder
-
-
Long List
-
> 1000 items.
-
Modal


Sorting Our Data
Gulp
Introduction
Notes
- gulp inject
- gulp minify
- minification talk
- ng-annotate
1 480 ??? ????

Ionic Workshop
By Justin James
Ionic Workshop
Workshop for Ionic


