양재동 코드랩
NodeJS를 통한 Rest API 개발
[제 1회]
슬라이드 :https://slides.com/jeonghwan/nodejs/live
예제코드 : https://github.com/jeonghwan-kim/express-ocl
NodeJS
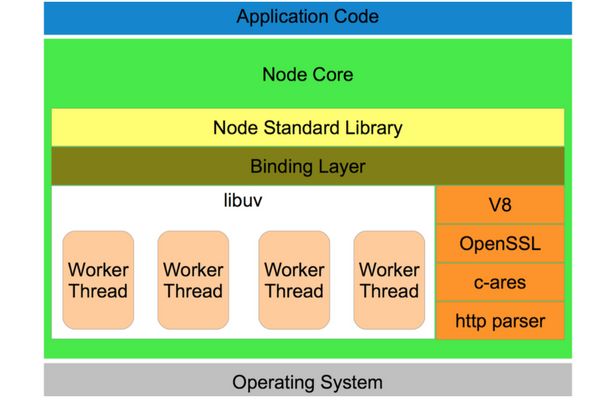
노드JS 구조
- 어플리케이션/모듈: 확인할 수 있는 모든 자바스크립트 코드
- 바인딩 레이어: JS와 C/C++ 코드를 묶는 역할
- libuv: 비동기 기능을 제공하는 C 라이브러리
- V8: 자바스크립트 엔진
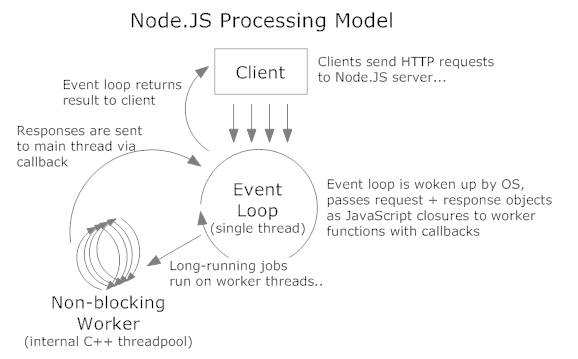
이벤트 기반 비동기 I/O
- 이벤트 큐에 이벤트 저장
- 메인 쓰레드: 큐에서 이벤트를 꺼내 실행
- 비동기 잡이면 일꾼 쓰레드 위임
- 동기 잡이면 실행
- 일꾼 쓰레드: 잡을 완료하고 큐로 저장
- 메인 쓰레드:
큐에서 완료된 잡을 꺼내 실행
모듈시스템
- 격리된 모듈을 만들기 위한 클로져 생성 (IIFE)
- 비동기 모듈 시스템 AMD (RequireJS)
- 파일 형태의 모듈 시스템 CommonJS (NodeJS)
// IIFE
(function ($) {
    // $ 는 이 함수 스콥에서만 사용
})($)

// RequireJS(AMD)
<script type="text/javascript">.
require(["jquery.min.js"], function($) {
    // $ 는 이 함수 스콥에서만 사용
});
</script>

// CommonJS
// sum.js 파일이 모듈로 감춰짐
const sum = require('./sum.js');
console.log(circle(1, 2));
ECMAScript 6
자바스크립트의 새로운 스펙인 ES6에 대해서
let, const
블록스코프를 따르는 변수 키워드 (let: 변수, const: 상수)
function f() {
  {
    let x;
    {
      const x = "sneaky";
      // 에러. 상수는 한 번만 할당
      x = "foo";
    }
    // 에러. 블록에서 이미 선언됨
    let x = "inner";
  }
}
템플릿 문자열
템플릿 문자열을 이용하면 손쉽게 문자열을 만들수 있음
// 기본적인 문자열 생성
`In JavaScript is \n a line-feed.`

// 여러줄 문자열
`In JavaScript this is
 not legal.`

// 문자열 인터폴레이션
var name = "Bob", time = "today";
`Hello ${name}, how are you ${time}?`
화살표 함수
'=>' 문법을 이용해 함수를 짧게 표현한다
arr.map(v => v + 1);
arr.map((v, i) => v + i);
arr.map(v => ({even: v, odd: v + 1}));
어휘적 this를 사용하기 때문에 동적 this의 모호함을 개선한다.
// 함수 표현식은 동적 this

var numbers = {
   numberA: 5,
   numberB: 10,
   sum: function() {
     console.log(this === numbers); // true
     function calculate() {
       // this는 window, 엄격 모드였으면 undefined
       console.log(this === numbers); // false
       return this.numberA + this.numberB;
     }
     return calculate();
   }
};
numbers.sum(); // NaN, 엄격 모드였으면 TypeError
// 화살표 함수는 어휘적 this
var numbers = {
numberA: 5,
numberB: 10,
sum: function() {
console.log(this === numbers); // true
const calculate = () => {
console.log(this === numbers); // true
return this.numberA + this.numberB;
}
return calculate();
}
};
numbers.sum(); // 10프라미스
콜백 스타일의 비동기 코드는 콜백에 로직의 순서가 매여있음
프라미스는 비동기 코드를 값으로 만들어줌
비동기 코드 콜백의 주도권을 제어함
프라미스 체인을 이용해 코드를 평탄화 함
// 프라미스

const foo = new Promise(resolve => {
  console.log(0);
  setTimeout(_=> resolve(2), 10);
});

setTimeout(_=> {
  console.log(1);
  foo.then(n => console.log(n))
}, 100);

// 0, 1, 2
// 프라미스
const foo = new Promise(...);
const bar = new Promise(...);
Promise.resolve()
.then(foo)
.then(bar)
.then(val => ...);
Hello world
NodeJS로 헬로 월드 코드를 만들어 보자
Hello world
const http = require('http');

const hostname = '127.0.0.1';
const port = 3000;

const server = http.createServer((req, res) => {
  res.statusCode = 200;
  res.setHeader('Content-Type', 'text/plain');
  res.end('Hello World\n');
});

server.listen(port, hostname, () => {
  console.log(`Server running at http://${hostname}:${port}/`);
});- node --version
- npm --version
- node app.js
- npm init
- npm start
- curl -X GET localhost:3000
자주 사용하는 명령어
// packageg.json

{
  "scripts": {
    "start": "node app.js"
  }
}
익스프레스JS
노드 웹 프레임워크 ExpressJS
Hello world
const express = require('express');
const app = express();

app.get('/', (req, res) => {
    res.send('Hello World!\n')
});

app.listen(3000, () => {
    console.log(`Run at http://localhost:3000`)
});
Express와 Http
- 요청 처리
- 쿼리문자열 파싱
- 리퀘스트 바디 파싱 (body-parser)
- 응답 처리
- 응답 헤더 자동 설정
- 응답 형식에 따른 메소드 지원
- 라우팅 처리
- 구조적인 코드를 유지할 수 있음
- 미들웨어
- 미들웨어 형태로 기능을 추가함: 로깅(morgan), 인증(passport) ...
어플리케이션
- 어플리케이션: 익스프레스 인스턴스
- 서버에 필요한 기능을 미들웨어 형태로 추가할 수 있음
- 라우팅 설정
- 요청 대기 상태 (listen)
const express = require('express');
const app = express();

app.use(require('morgan')('dev'));

app.get('/', (req, res) => res.send('Hello World!\n'));

app.listen(3000, () => console.log('Run at http://localhost:3000'));
요청 객체
- 클라이언트 요청 정보를 담은 객체
- http 모듈의 request 객체를 사용함
- express에서 아래 객체를 추가함
- req.params: 경로 파라매터
- req.query: 쿼리 문자열
- req.body: 요청 바디
app.get('/:id', (req, res) => {
    const id = req.params.id; // /1
    const limit = req.query.limit; // ?limit=10
    const body = req.body; // {name: 'chris'}
});
응답 객체
- 클라이언트 응답 정보를 담은 객체
- http 모듈의 response 객체를 사용함
- express에서 아래 객체를 추가함
- res.send(): 문자열로 응답
- res.status(): HTTP 상태 코드를 헤더에 설정
- res.json(): 제이슨 데이터를 응답
app.get('/:id', (req, res) => {
    res.status(204).end();
    res.send('hello world');
    res.json([{msg: 'hello world'}]);
});
라우터
- 라우팅 설정을 위한 클래스
- API 서버 핵심인 라우팅 로직을 구조적으로 구현할 수 있음
/* index.js */
const user = require('./user');
app.use('/users', user)
/* user.js */
const router = require('express').Router()
router.get('/', (req, res) => res.send('user list'));
router.post('/', (req, res) => res.send('created user'));
module.exports = router;
미들웨어
미들웨어 호출 순서
req → middlewares... → route → middlewares... → res
const app = require('express')();

app.use((req, res, next) => {
  console.log('middleware 1');
  next();
});

app.use((req, res, next) => {
  console.log('middleware 2');
  next();
});

app.get('/', (req, res, next) => {
  console.log('middleware 3');
  next();
}, (req, res) => {
  console.log('router GET /');
  res.send('hello world\n')
});

app.listen(3000, _=> console.log('Run server'));
'Run server'
'middleware 1'
'middleware 2'
'middleware 3'
'router Get /'
미들웨어
에러 미들웨어: 에러를 처리한 경우
const app = require('express')();

app.use((req, res, next) => {
  console.log('middleware 1');
  next('error 1');
});

app.use((error, req, res, next) => {
  console.log('middleware 2', error);
  next();
});

app.get('/', (req, res, next) => {
  console.log('middleware 3');
  next();
}, (req, res) => {
  console.log('router GET /');
  res.send('hello world\n')
});

app.listen(3000, _=> console.log('Run server'));
'Run server'
'middleware 1'
'middleware 2 error 1'
'middleware 3'
'router Get /'
미들웨어
에러 미들웨어: next(error)로 에러를 위임한 경우
const app = require('express')();

app.use((req, res, next) => {
  console.log('middleware 1');
  next('error 1');
});

app.use((error, req, res, next) => {
  console.log('middleware 2', error);
  next(error);
});

app.get('/', (req, res, next) => {
  console.log('middleware 3');
  next();
}, (req, res) => {
  console.log('router GET /');
  res.send('hello world\n')
});

app.listen(3000, _=> console.log('Run server'));
'Run server'
'middleware 1'
'middleware 2 error 1'
'error1'
미들웨어
- 익스프레스 미들웨어(링크)
- body-parser: 요청 바디 데이터 파싱
- morgan: 서버 콘솔 로그 출력
- passport: 인증 처리
- 사용자 정의 미들웨어
- 기본적인 미들웨어
-
app.use((req,res,next)=> next())
-
- 에러 미들웨어
-
app.use((err, req,res,next)=> next())
-
- 기본적인 미들웨어
배열 메소드
반복문과 배열 메소드
let arr = [1,2,3];
for (const i=0; i<arr.length; i++) {
  arr[i] = arr[i] * 2;
}
console.log(arr) // [2,4,6]
let arr = [1,2,3];
arr = arr.map(num => num * 2);
console.log(arr) // [2,4,6]반복문: for
배열 메소드: map()
반복문과 배열 메소드
map 함수의 내부를 들여다 보면
Array.prototype.map = function(iteratee) {
    var results = [];
    for (var index = 0; index < this.length; index++) {
      results[index] = iteratee(this[index]);
    }
    return results;
};
var list = [1,2,3];
list.map(function (n) {
return n * 2;
});반복문과 배열 메소드
reduce()
var sum = [0, 1, 2, 3].reduce(function(a, b) {
  return a + b;
}, 0);
// sum is 6
["a", "b", "c"].forEach(function(element) {
console.log(element); // a b c
});function isBigEnough(value) {
return value >= 10;
}
var filtered = [12, 5, 8, 130, 44].filter(isBigEnough);
// filtered is [12, 130, 44]forEach()
filter()
REST API
요청
모든 자원은 명사 단어로 식별함
- /users/{id} vs /getUserById
자원에 대한 행동은 메소드로 표현
- GET /users/{id}
- CRUD: GET, POST, PUT, DELETE
응답
헤더는 상태코드로 성공/실패를 표현
- 200: 성공(success)
- 201: 작성됨(created)
- 204: 내용 없음 (No Conent)
- 400: 잘못된 요청 (Bad Request)
- 401: 권한 없음 (Unauthorized)
- 404: 찾을 수 없음 (Not found)
- 409: 충돌 (Conflict)
- 500: 서버 에러 (Interel server error)
본문(Body)은 JSON 형식으로 표현
[{
  id: 1,
  name: 'Alice'
}, {
  id: 2,
  name: 'Bek'
}, {
  id: 3,
  name: 'Chris'
}]
GET /users
사용자 목록 조회
// 임시데이터
let users = [{
  id: 1,
  name: 'Alice'
}, {
  id: 2,
  name: 'Bek'
}, {
  id: 3,
  name: 'Chris'
}];

// 라우팅 설정
app.get('/users', (req, res) => {
  // 여기에 라우팅 로직을 작성하면 됩니다.
  res.json(users);
});
BDD
Mocha, should, superTest
Mocha
테스트 러너
npm i mocha --save-dev
Test suite: describe()
Test: it()
user.spec.js
node_modules/.bin/mocha user.spec.js
비동기 테스트는 done 콜백을 수행함
const assert = require('assert');

describe('test suite', () => {
  it('true is true', done => {
    assert.equal(true, true);
    done();
  });
});
Should
검증자
npm i should --save-dev
가독성 높은 코드를 유지할 수 있음
const should = require('should');

describe('test suite', () => {
  it('true is true', (done) => {
    (true).should.be.equal(true);
  });
});
SuperTest
HTTP 테스트를 위한 용도
npm i supertest --save-dev
module.exports = app;
const request = require('supertest');
const app = require('../../app');

describe('GET /users', () => {
  it('should return 200 status code',done=> {
    request(app)
        .get('/users')
        .expect(200)
        .end((err, res) => {
          if (err) throw err;

          console.log(res.body);
          // [{id: 1, name: 'Alice'} ... ]

          res.body.should.be.instanceof(Array)
          res.body.should.have.properties('id', 'name');

          done();
        })
  });
});
GET /users를 TDD로
- success
- 유저 객체를 담은 배열을 응답한다
- 최대 limit 갯수만큼 응답한다
- error
- limit이 숫자형이 아니면 400을 응답한다
- offset이 숫자형이 아니면 400을 응답한다
API 개발
GET /users
success
✓ 유저 객체를 담은 배열을 응답한다
✓ 최대 limit 갯수만큼 응답한다
error
✓ limit이 숫자형이 아니면 400을 응답한다
✓ offset이 숫자형이 아니면 400을 응답한다
GET /users/:id
success
✓ id가 1인 유저 객체를 반환한다
error
✓ id가 숫자가 아닐경우 400으로 응답한다
✓ id로 유저를 찾을수 없을 경우 404로 응답한다
DELETE /users/:id
success
✓ 204를 응답한다
error
✓ id가 숫자가 아닐경우 400으로 응답한다
POST /users
success
✓ 생성된 유저 객체를 반환한다
✓ 입력한 name을 반환한다
error
✓ name 파라매터 누락시 400을 반환한다
✓ name이 중복일 경우 409를 반환한다
PUT /users/:id
success
✓ 변경된 정보를 응답한다
error
✓ 정수가 아닌 id일 경우 400 응답
✓ name이 없을 경우 400 응답
✓ 없는 유저일 경우 404 응답
✓ 이름이 중복일 경우 409 응답
코드 정리
api/user/index.js
api/user/user.ctrl.js
api/user/user.spec.js
데이터베이스
데이터베이스 종류
SQL
- 데몬: MySQL, PostgreSQL, Aurora (AWS)
- 파일: Sqlite
NoSQL
- MongoDB
- DynamoDB (aws)
In Momory DB
- Redis
- Memcashed
SQL 쿼리
create database codelab
use codelab;
create table user;
select * from user where id = 1;
insert into user (name, age) values ('chris', 30);
...
ORM
Object Relational Mapping
- SQL: 시퀄라이즈 (Sequelize)를 사용함
- No SQL: Mongoose
| ORM (Model) | SQL (Table) |
|---|---|
| find() | select * from |
| create() | insert into |
| update() | update from |
| destroy() | delete from |
모델
시퀄라이즈 define() 메소드로 테이블과 연결된 모델을 정의함
// models.js
const Sequelize = require('sequelize');
const sequelize = new Sequelize('node_api_codelab', 'root', 'root')

const User = sequelize.define('user', {
  name: Sequelize.STRING
});

module.exports = {sequelize, User};
정의한 모델을 데이터베이스와 동기화 (쿼리 생성)
// app.js
app.listen(3000, () => {
  require('./models').sequelize.sync({force: true})
      .then(() => console.log('Databases sync'));
});
컨트롤러에 디비 연동
모델을 정의한 models.js를 컨트롤러에 임포트
모델 메소드: create(), findAll(), findOne(), update(), destroy()
const models = require('../../models');

exports.create = (req, res) => {
  const name = req.body.name || '';
  if (!name.length) {
    return res.status(400).json({error: 'Incorrenct name'});
  }

  models.User.create({
    name: name
  }).then((user) => res.status(201).json(user))
};
테스트에 디비 연동
서버 구동과 디비 싱크 로직을 모듈로 분리
- bin/sync-databbase.js
- bin/www.js
모카 후커로 디비 연동
- before()
- after()
- beforeEach()
- afterEach()
// bind/sync-database.js
const models = require('../models');
module.exports = () => {
  return models.sequelize.sync({force: true})
}
// /bin/www.js
const app = require('../app');
const syncDatabase = require('./sync-database');
app.listen(3000, () => {
  syncDatabase().then(() => {
    console.log('Database sync');
  });
});
before('sync database', (done) => {
syncDatabase().then(() => done());
});
before('insert seed user data', (done) => {
models.User.bulkCreate(users).then(() => done());
})
after('delete seed user data', (done) => {
models.User.destroy({
where: {
name: {
in: users.map(user => user.name)
}
}
});
});환경의 분리
test
- sqlite 데이터베이스 연동
- 로그 숨김
development
- sqlite 데이터베이스 연동
- 모든 로그 출력
production
- mysql 데이터베이스 연동
- 최소 로그만 출력
NODE_ENV 환경변수로 식별
문서화
깃헙 위키 -> APIDOC -> 스웨거
깃헙위키
- 문서 일관성 유지 어려움
- FE개발자도 포스트맨으로 테스트하며 개발
- POST /users
-
input
- name
- gender
- mobile
- nationality
- dob
- ...
-
response
- userId
- name
- gender
- age
- address
- token
- channel
- ...
APIDOC
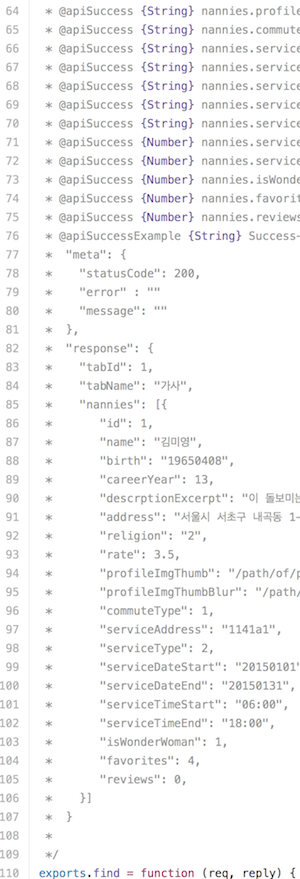
- 코드에 주석으로 API 문서를 작성하는 형식
- 코드보다 주석이 많은 경우가 빈번함
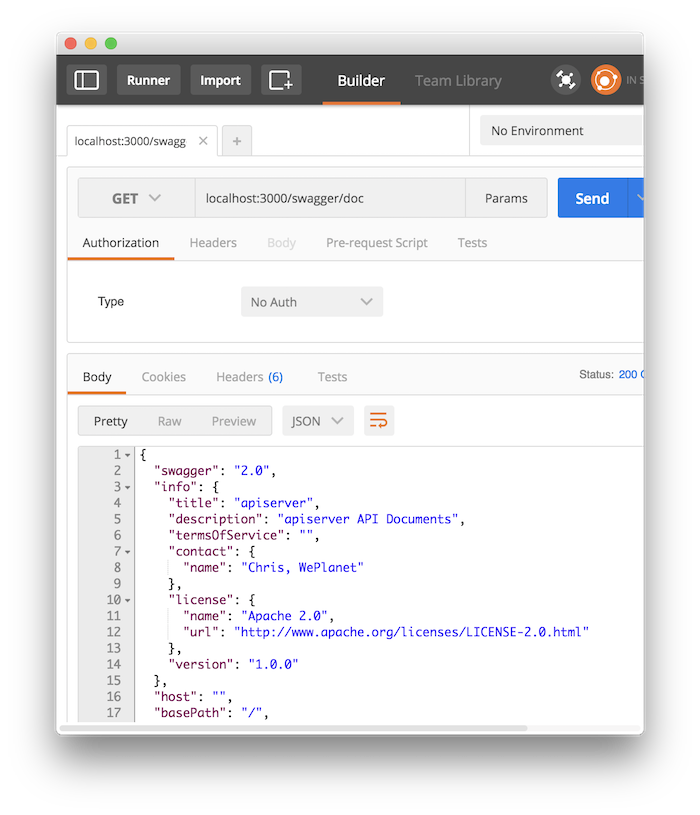
스웨거
- 스웨거 문법에 맞춰 문서를 작성함 (json, yaml 형식)
- swagger-ui를 api 서버에 연동하여 개발
- 문서와 api 테스트 툴을 함께 사용할 수 있는 장점
Swagger spec
스웨거 문법에 맞게 문서 작성(swagger spec)
const paths =  {
  '/users': {
    get: {
      tags: ['User'],
      summary: '유저 조회',
      operationId: 'findUsers',
      consumes: ["application/json"],
      produces: ["application/json"],
      parameters: [
        {
          in: "query",
          name: "limit",
          required: true,
          type: 'number',
          default: 10
        },
        {
          in: "query",
          name: "offset",
          required: true,
          type: 'number',
          default: 0
        },
      ],
      responses: {
        200: {description: 'OK'},
        400: {description: 'BadRequest'}
      }
    },
    post: {
      tags: ['User'],
      summary: '유저 추가',
      operationId: 'addUsers',
      consumes: ["application/json"],
      produces: ["application/json"],
      parameters: [
        {
          in: "body",
          name: "body",
          required: true,
          schema: {
            type: 'object',
            properties: {
              name: {
                type: 'string'
              }
            }
          }
        },
      ],
      responses: {
        201: {description: 'Created'},
        400: {description: 'BadRequest'},
        409: {description: 'Conflict'}
      }
    }
  },
  '/users/{id}': {
    get: {
      tags: ['User'],
      summary: '유저 조회',
      operationId: 'getUsers',
      consumes: ["application/json"],
      produces: ["application/json"],
      parameters: [
        {
          in: "path",
          name: "id",
          required: true,
          type: 'number'
        },
      ],
      responses: {
        200: {description: 'NoContent'},
        404: {description: 'BadRequest'}
      }
    },
    delete: {
      tags: ['User'],
      summary: '유저 삭제',
      operationId: 'delUsers',
      consumes: ["application/json"],
      produces: ["application/json"],
      parameters: [
        {
          in: "path",
          name: "id",
          required: true,
          type: 'number'
        },
      ],
      responses: {
        204: {description: 'NoContent'},
        400: {description: 'BadRequest'},
        404: {description: 'BadRequest'}
      }
    },
    put: {
      tags: ['User'],
      summary: '유저 수정',
      operationId: 'putUsers',
      consumes: ["application/json"],
      produces: ["application/json"],
      parameters: [
        {
          in: "path",
          name: "id",
          required: true,
          type: 'number'
        },
        {
          in: "body",
          name: "body",
          required: true,
          schema: {
            type: 'object',
            properties: {
              name: {
                type: 'string'
              }
            }
          }
        },
      ],
      responses: {
        200: {description: 'Created'},
        400: {description: 'BadRequest'},
        409: {description: 'Conflict'}
      }
    }
  }
};

module.exports = {
  "swagger": "2.0",
  "info": {
    "description": "codelab api 문서입니다",
    "version": "1.0.0",
    "title": "Swagger codelab api document",
    "termsOfService": "http://swagger.io/terms/",
    "contact": {
      "email": "apiteam@swagger.io"
    },
    "license": {
      "name": "Apache 2.0",
      "url": "http://www.apache.org/licenses/LICENSE-2.0.html"
    }
  },
  "host": "localhost:3000",
  "basePath": "/",
  "schemes": [
    "http"
  ],
  "paths": paths,
  "securityDefinitions": {
    "petstore_auth": {
      "type": "oauth2",
      "authorizationUrl": "http://petstore.swagger.io/oauth/dialog",
      "flow": "implicit",
      "scopes": {
        "write:pets": "modify pets in your account",
        "read:pets": "read your pets"
      }
    },
    "api_key": {
      "type": "apiKey",
      "name": "api_key",
      "in": "header"
    }
  },
  "externalDocs": {
    "description": "Find out more about Swagger",
    "url": "http://swagger.io"
  }
}
Swagger spec
작성한 문서를 호스팅
const swaggerDoc =
    require('./config/document.swagger');

app.get('/doc', (req, res) => {
  res.json(swaggerDoc);
});
Swagger-ui
스웨거 문서를 렌더링할 swagger-ui 툴을 프로젝트에 추가
app.use('/', (req, res, next) => {
if (req.url === '/') res.redirect('?url=/doc');
else next();
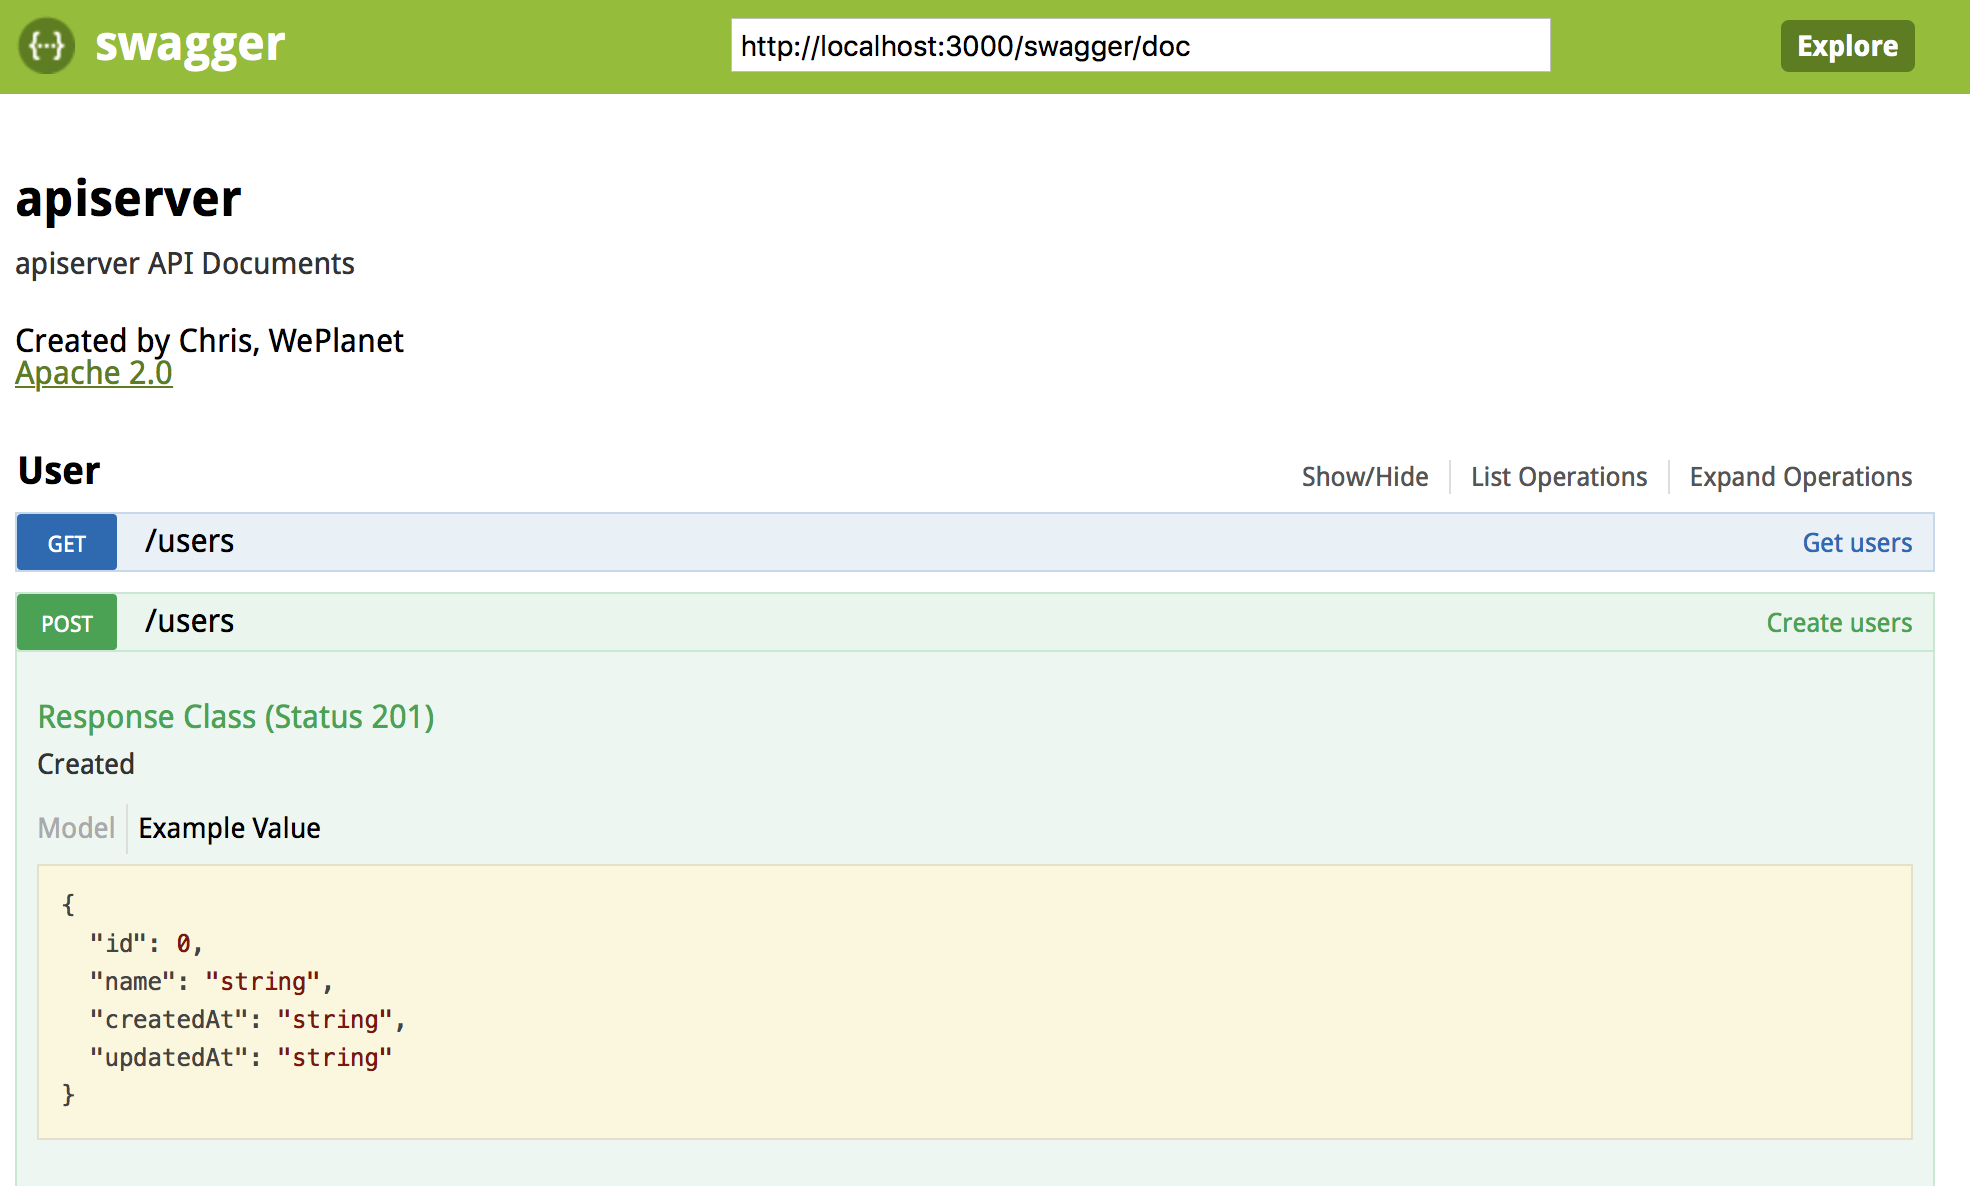
}, express.static('node_modules/swagger-ui/dist'));Swagger-ui
루트 경로로 접근하여 스웨거 문서를 열람
배포
AWS EC2, Elastic Beanstalk
리눅스 배포
Git hooks을 이용한 배포 자동화
- 배포서버에 git 저장소 설치
- git init --bare --shared
- post-receive 후커 작성
- 배포서버 리모트 추가
- git remote add deploy [배포서버주소:저장소경로]
- 배포서버로 소스코드 배포
- git push deploy master
# hooks/post-receive
#!/bin/bash
APP_NAME=codelab_nodeapi
APP_DIR=$HOME/$APP_NAME
REVISION=$(expr substr $(git rev-parse --verify HEAD) 1 7)

GIT_WORK_TREE=$APP_DIR git checkout -f

cd $APP_DIR
npm install --production
forever stop codelab_nodeapi
forever start --uid codelab_nodeapi --append bin/www.js
ElasticBeanstalk
주요 AWS 서비스를 묶은 서비스
깃과 자동으로 연동되어 있음.
eb-cli를 통해 더욱 단순하게 배포 가능
IAM 유저 생성
eb init
eb create
eb deploy
[양재동 코드랩] NodeJS를 통한 REST API 개발
By 김정환


