<info 340/>
Intro to React
Joel Ross
Winter 2020
Plan for Today
-
Check-in: Stage 2 and JavaScript
-
Introduction to React
- Problem Set 08 A
-
Work time
Questions or comments on Stage 2?
Stage 3 involves a significant code re-write, so you can now pivot to a different project idea or even to change groups.
You may reform as a team of up to 4 people for Stages 3-4. This team may either continue developing a project that had reached Stage 2, or develop something new from scratch.
Teams of 3 or 4 will be expected to produce final projects with larger scope (think: ~50% more features).
Changing Groups
Let us know if you're changing teams!
-
Dynamically generate and interact with the DOM (similar to jQuery)
-
Organize the DOM into User Interface "Components" for easy page design
-
Efficiently make changes to the rendered DOM (see here)
Ethical Consumption of Libraries?


Creating DOM Elements
//DOM
let message = document.createElement('hi');
message.id = 'hello';
message.classList.add('myClass');
message.textContent = 'Hello World!';

document.getElementById('root').appendChild(message);
Hello React
//message to show
let message = React.createElement(
   'h1', //html tag
   { id: 'hello', className: 'myClass' }, //object of attributes
   'Hello World!' //content
);

//show the content in the web page (inside #root)
ReactDOM.render(message, document.getElementById('root'));
can't use "class" since a keyword
React can be used to create and render DOM elements.
JSX
An XML syntax extension for the JavaScript language. You define React elements in a way that looks like HTML!
//message to show
let message = <h1 id="hello" className="myclass">Hello World</h1>;


//show the content in the web page (inside #root)
ReactDOM.render(message, document.getElementById('root'));
shortcut syntax for React.createElement()

Transpiling

Create React App
create-react-app is a command line application that generates scaffolding ("starter code") for a React website.
# from inside the "project" folder
cd path/to/project

# install dependencies (only once)
npm install

# run the server
npm start
Runs a script that starts a development server which will:
- Automatically transpile React code into pure JavaScript
- Combine (bundle) the code into a single file
- Show build and syntax errors in the console, including style warnings
- Automatically reload the page!
JSX & Inline Expressions
Use {} to include JavaScript expressions in the JSX. These expressions will be evaluated and inserted into the element's "HTML".
//Can include JavaScript expressions in React elements
let message = "Hello world!";
let element = <h1>{message}</h1>;


//Can include arbitrary expressions
let element = (
  <p>
    A leap year has {(365 + 1) * 24 * 60} minutes!
  </p>
);

//Can use inline expressions in attributes
let imgUrl = 'path/to/my_picture.png';
let pic = <img src={imgUrl} alt="A picture" />;
replace with expression (value)
use parentheses to write JSX on multiple lines
React elements
must be closed
React Components
React lets us describe the page in terms of UI components, instead of HTML elements.
In effect, we will create our own XML Elements!
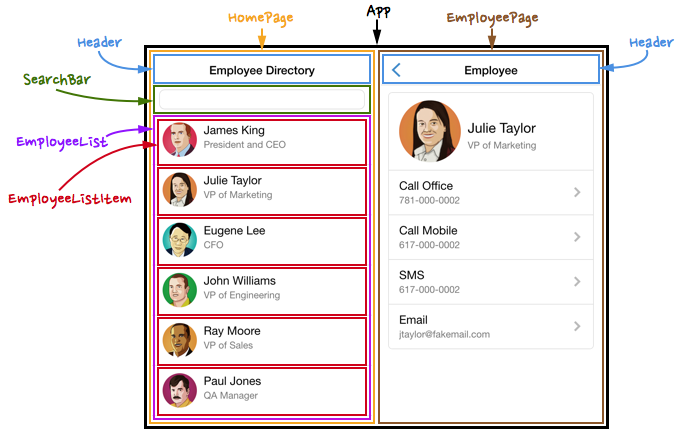
<App>
  <HomePage>
    <Header />
    <SearchBar />
    <EmployeeList>
      <EmployeeListItem person="James King" />
      <EmployeeListItem person="Julie Taylor" />
      <EmployeeListItem person="Eugene Lee" />
    </EmployList>
  </HomePage>
  <EmployeePage>
    <Header />
    ...
  </EmployeePage>
</App>
React Components
We define components as classes (like in Java!), creating a "template" (or "recipe" or "blueprint") for Components.
//declare a new class that IS A Component
class HelloMessage extends React.Component {


  //Components MUST override the render() method
  render() {
     //this method returns the elements (JSX)
     //that make up the component
     return <h1>Hello World!</h1>;
  }
}

//instantiate the class as a new object/variable!
let message = <HelloMessage />;

//show the content in the web page (inside #root)
ReactDOM.render(message, document.getElementById('root'));
class inheritance a la 143; can do Component stuff
called when component needs to be shown
our own HTML tags!
Capitalize!
Composing Components
class HelloMessage extends Component {
  render() {
     return <h1>Hello World!</h1>;
  }
}

class GoodbyeMessage extends Component {
  render() {
     return <h1>See ya later!</h1>;
  }
}

class MessageList extends React.Component {
  render() {
     return (
       <div>
         <HelloMessage /> {/* A HelloMessage component */}
         <GoodbyeMessage /> {/* A GoodbyeMessage component */}
       </div>
     );
  }
}

ReactDOM.render(<MessageList />, document.getElementById('root'));
Define and combine multiple classes!
comments in JSX
Component Modules
Components are usually defined in separate modules (files), and then imported into other modules that need to use them.
/*** e.g., App.js, HelloMessage.js, Messages.js ***/

//declare a new class that IS A Component
export class HelloMessage extends Component {
  //...
}
/*** index.js ***/
import { HelloMessage } from './App.js'
ReactDOM.render(<HelloMessage />, document.getElementById('root'));HTML Attributes
Elements can include attributes in the start tag, which specify options or add further meaning.
<tag attributeA="value" attributeB="value">
    content
</tag>
Attributes are a space-separated list of names (think: variables) and values.
Values are (almost) always Strings.
Properties (props)
//Passing a prop called `message` with value "Hello property"
let messageA = <MessageItem message="Hello property!" />;

//Passing a prop using an inline expression
let secret = "Shave and a haircut";
let messageB = <MessageItem message={secret} />;

//A component can accept multiple props
//This component takes in a `name` property as well as
//a `descriptor` property
let userInfo = <UserInfo name="Ethel" descriptor="Aardvark" />;
We specify attributes for a component (called " props") when we instantiate a component by specifying the XML attributes (key-value).
Props are the "input parameters" into a component!
Properties (props)
class MessageItem extends Component {
  render() {
    let message = this.props.message; //access the prop


    //can use prop for logic or processing
    let messageUpper = message.toUpperCase();


    return <li>{messageUpper}</li>; //render based on prop
  }
}

ReactDOM.render(<MessageItem message="Be quiet" />,
                document.getElementById('root'));
Inside the Component class definition, all the passed in props are stored in the
this.props field (an object), with the prop's "name" as the key.
all props stored in this object
props are read-only (can't change them!)
Properties (props)
//Pass an array as a prop!
let array = [1,2,3,4,5];
let suitcase = <Suitcase luggageCombo={array} />;


//Pass a function as a prop (like a callback)!
function sayHello() {
  console.log('Hello world!');
}
let greeting = <Greeting callback={sayHello} />;


//Pass another Component as a prop (not common)!
let card = <HolidayCard message="Greetings world!" />
let gift = <Gift toMsg="Ethel", fromMsg={card} />
Importantly, props can be any kind of variable! This includes, arrays, functions, and other components!
Props and Composition
class MessageList extends Component {
  render() {
    //msgItems will be an array of components!
    let msgComponents = this.props.messages.map((msgStr) => {
      let component = <MessageItem message={msgStr} />; //pass prop down!
      return component
    }

    return (
      <ul>
        {/* An array of components renders as siblings */}
        {msgComponents}
      </ul>
    );
  }
}

let messagesArray = ["Hello world", "No borders", "Go huskies!"];

ReactDOM.render(<MessageList messages={messagesArray} />,
                document.getElementById('root'));
Props will often need to be "passed down" to child components. A common pattern is to map an array of prop values to an array of children components to render!
Action Items!
-
Problem Sets 07-08
-
Finish through 08-A
-
If time: start 08-B (max: through step 7)
-
-
Project: let us know if you want to change groups
-
Reading: Chapter 16-17
Next Time: Interactive React
info340wi20-react-intro
By Joel Ross


