Who Am I?
- First name is just the letter J
- When asked what it stands for, I reply Truth, Justice and the American Way
- Married 20 years
- Have a 10 year old daughter
- Own the most ridiculous breed of dog ever created
- Play too many video games
- Live in Charleston SC - Hate Boating


Ridiculous Lay-abouts
Mastering
the
ADVANCED DONATION FORM
The Advanced Donation Form
Nothing to be afraid of...
Advanced
In that it requires advanced knowledge.
Donation
In that it does handle donations.
Form
In that you're the one creating the form.
Self Serve Donation Form
Might be a better description.
- You handle the HTML
- You handle the JS
- You handle the Validation
- You handle the confirmation
- You handle any designation search
- You get any code tables (Country, State, Title)
- Once you've done your part, you hand it off to the API and the Magic happens.

Advanced
Designation Search?
--Sure, if you build it.
Donor Challenge?
eCards?
eReceipts?
Notifications?
Impact Statements?
Matching Gifts?
Spouse info?
Standard
Designation Search?
--You betcha!
Donor Challenge? YEP!
eCards? 'Course!
eReceipts? Uh Huh!
Notifications? Indubitably!
Impact Statements? Ya
Matching Gifts? Yesum!
Spouse info? No Duh.

So, Why?
What you lose in out of the box functionality, you gain in flexibility.
BUT THERE IS A TIME AND A PLACE.
You've decided the ADF is right for your project... Now what?

Step 1
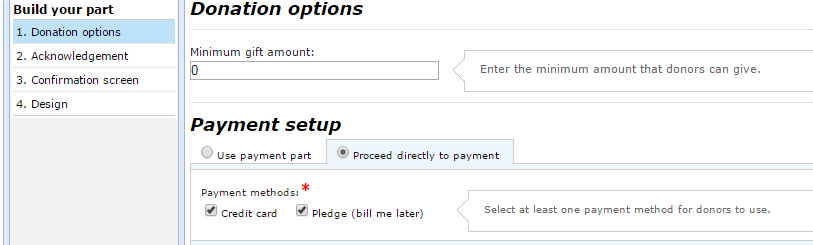
Text
Text
Pretty self explanatory... Except...
This option will require CHANGES in your CODE.
Yes, it is a bit of a GOTCHA to have a wizard button require code changes.
Step 2
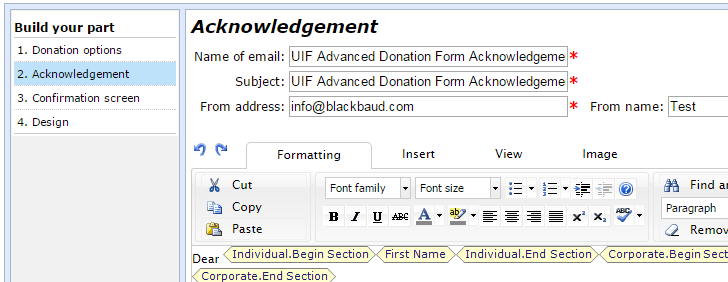
Again, self explanatory, just remember to fill out the required fields.
I usually come back to this later.
Step 3
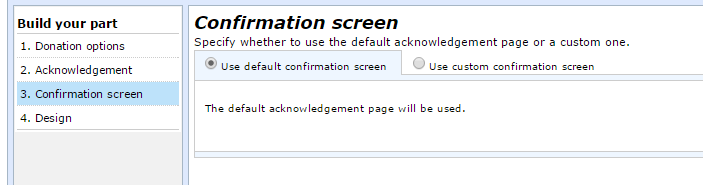
Here you can create the HTML that appears on confirmation.
Keep in mind that if you use the Payment Part, this Acknowledgements and Confirmations are combined into the Payment Part's Acknowledgement and Confirmation
Step 4
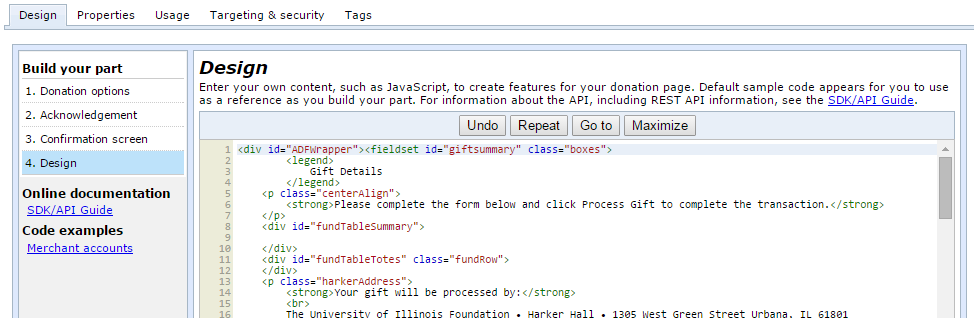
This is where the code lives. Or, if you refuse to understand how it works, this is where the Magic happens!

Best Practices
No surprises here, but it's counter to what the part may imply.
- Put your HTML mark up in step 4, but put your code in the JS namespace or library.
- Note the Merchant Account GUID at the left. You'll need their test account and later need their live account
- You have full control of the markup, so be sure to use valid markup, semantic naming conventions, and proper tag usage (labels, inputs types, class and ID)
Best Practices
No surprises here, but it's counter to what the part may imply.
- Put variables that will change and your content editors will need access to in Step 4 with the HTML. Everyone will thank you later.
Before we move on, Links!
- Feature Comparison: https://www.blackbaud.com/files/support/guides/bbis/bbisadvdon.html
- BBIS Dev Guide: http://developer.blackbaud.com/bbis/
- Techical Reference: http://developer.blackbaud.com/bbis/reference/rest/#donationapi
Payment Part Page
Even if you aren't going to use the Payment Part, configure a payment part. Your BBPS page will inherit the styles and it's a good way to test that your merchant account and BBPS pages are working.
The ADF MUST use Blackbaud Secure Payments.
Your Form HTML
Create anything you want. 1 steps, 3 steps, 14 steps.
Crazy validation, a slideshow of donors. Doesn't matter.
What does matter?
1. That you submit your data with the API correctly
2. That the data you submit is valid and includes all required fields.
THAT'S IT.
Douglas Adams
“Programming today is a race between software engineers striving to build bigger and better idiot-proof programs, and the Universe trying to produce bigger and better idiots. So far, the Universe is winning.”

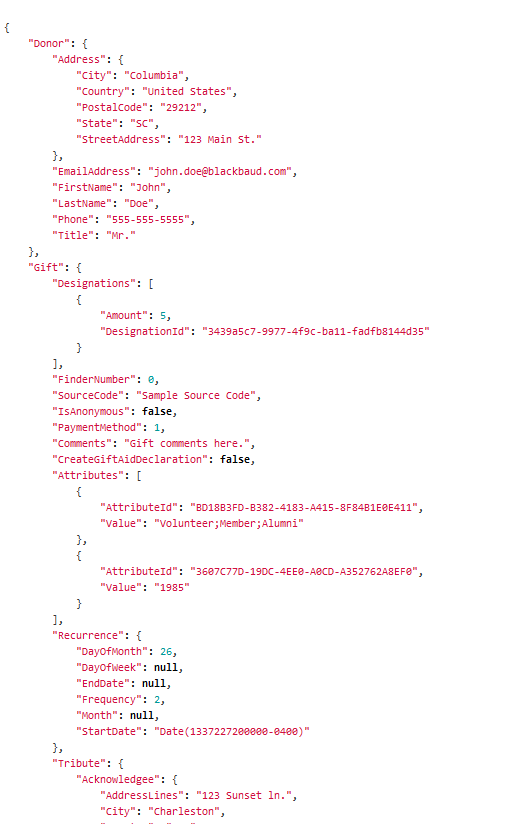
The Data
Remember this? This is how your data should be formed and submitted to the API.
If it's not in this list, it needs to be submitted as a
CUSTOM GIFT ATTRIBUTE.
So what fields are in that data?
Donor Data
Street Address, City, State, Country, Postal Code, Email Address, Phone, First and Last Name and Title.
Designations
Multiple designations, but you must submit the amount and the Designation ID (GUID) which is in CRM. ***
Recurrence
Optional, but supports Weekly, Monthly, Quarterly and Annually. Supports start date and end date.
Tribute Data
Acknowledgee contact information and tribute name and type.
Other fields
FinderNumer, SourceCode, Anonymous, Comments.
So what fields are in that data?
Pledge Installments
Brand New in SP6
Installment Amount
Number of Installments
Along with helper functions to compute amount per payment.
Donor fields are required ONLY if you are not using the Payment Part
Including LastName, EmailAddess, and all address fields
Fields that are always required
At least 1 designation with an amount and GUID
A payment method
Merchant account ID
Check the documentation.
Some fields are only required under certain circumstances:
For instance, OrganizationName is only required if IsCorporate was set to true.
Day of the Month for recurring gifts is required, unless the frequency was set to Weekly.
Example Code
At the right is an example where I'm simply getting the values from the form and loading them up into the object.
This will be the object I pass to the API.
var donationObject = {};
donationObject.Donor = {
    "Address": {
        "City": $('#ADDRESS').val(),
        "Country": $('#countryDD').find('option:selected').text(), //must use description for BBSP
        "PostalCode": $('#ZIP').val(),
        "State": $('#stateDD').val(),
        "StreetAddress": $('#ADDRESS').val()
    },
    "EmailAddress": $('#EMAIL').val(),
    "FirstName": $('#FIRST_NAME').val(),
    "LastName": $('#LAST_NAME').val(),
    "Phone": $('#PHONE').val()
};
Provided I've validated my data, and created the object correctly, all I need to do is submit it to the API.
Example Code
Loading up the gift information using .push()
//assumes we have some display of the designations selected for donation
var designationFormData = $('.designationDisplayRow');
var designationArray = [];

//looping through each row in the display
$.each(designationFormData, function(key,fundData) {
    designationArray .push({
        "Amount" : Number($(this).find('.amount').text()); //converting to an integer
        "DesignationId" : $(this).attr('data-guid')
    });
});
//load it up into the object we've created
donationObject.Gift.Designations = designationArray;
Submitting the Data
Now that we have our object, we need to create an instance of the Donation API service, then submit our donation. This requires the Part ID of the ADF.
//get the part ID
var partId = $('.BBDonationApiContainer').attr('data-partid');
//create an instance of the service
var donationService = new BLACKBAUD.api.DonationService(partId);
//create some function for when things fail
var donationFail = function (data) {
    $('#ADFWrapper')
        .prepend('<div class="BBFormValidatorSummary">')
        .html(BBI.Methods.convertErrorsToHtml(data));
    console.log('failed!');
};
//create some function for when things succeed
var donationSuccess = function (data) {
    console.log('processed!');
    console.log(data);
};
//call the service
donationService.createDonation(donationObject, donationSuccess, donationFail);
The DonationService attempts to redirect to the BBSPCheckoutUri or PaymentPageUri if either of them exist (and depending on what you selected in Step 1) after a successful callback from the createDonation method.
If your ADF is not forwarding to either page on success, something wasn't set correctly
Supporting Methods
Making things easier

State, Country and Title
No need to hard-code this information, you can use the Code Table API to retrieve those values.
populateCounrtryDropdowns: function(selectBox) {
    var countryService = new BLACKBAUD.api.CountryService({
        url: BBI.Defaults.rootpath, crossDomain: false});

    countryService.getCountries(function (country) {
        $.each(country, function () {
            var countryOption = $("<option></option>")
                .val(this["Abbreviation"])
                .text(this["Description"])
                .attr("id", this["Id"]);
            selectBox.append(countryOption);
        });

        selectBox.on('change', function() {
            var countryID = $(this).find(':selected').attr('id');
            BBI.Methods.populateStateDropdowns(countryID, $('#stateDD'));
        });

    });
},
populateStateDropdowns: function(countryID, selectBox) {
    var countryService = new BLACKBAUD.api.CountryService({
        url: BBI.Defaults.rootpath,
        crossDomain: false});

    countryService.getStates(countryID, function (state) {
        selectBox.find('option').remove();
        $.each(state, function () {
            var stateOption = $('<option></option>')
                .val(this["Abbreviation"])
                .text(this["Description"]);
            selectBox.append(stateOption);
        });
        selectBox.val($('#STATE').val());
    });
},
Designation GUID
Because you need the Designation GUID from CRM to submit a donation, it makes sense to use a Designation Search Query even if you are not offering a traditional search to the user.
EXAMPLE: https://www.myiu.org/recurring-gift
Using the Query API to get Designations
        //get designations for dropdown
            if ($('#designationAreaDropdown').length !== 0) {
                var queryService = new BLACKBAUD.api.QueryService();
                queryService.getResults(BBI.Defaults.designationQueryId, function (data) {
                    var fields = data.Fields,
                        rows = data.Rows,
                        fieldArray = [];
                    $.each(fields, function(key, value) {
                        fieldArray[value.Name]= key;
                    });
                    $.each(rows, function () {
                        var values = this['Values'],
                            designationID = values[fieldArray['System record ID']],
                            designationName = values[fieldArray['Public name']];
                        $('#designationAreaDropdown').append('<option value="'+ designationID +'">'+designationName+'</option>');
                    });
                });
            }
Putting It All Together
- Create Your HTML Form
- Grab Code Table data for dropdowns
- Grab Designations and GUIDs from Query API
- Create your Validation on Submit
- If Valid, build your Donation data object
- Create your donation service and
submit the object - Handle success and failures
(successes should automatically
redirect)

More ADF Examples
Advanced Donation Form
By J Owen Schultz
Advanced Donation Form
With great power comes great responsibility. How to create, implement and maintain.


