Jenkins for Java Developers
Jenkins
- Jenkins is an open source automation server.
- With Jenkins, organizations can accelerate the software development process by automating it.
- Jenkins manages and controls software delivery processes throughout the entire lifecycle, including build, document, test, package, stage, deployment, static code analysis and much more.
Creating your first job
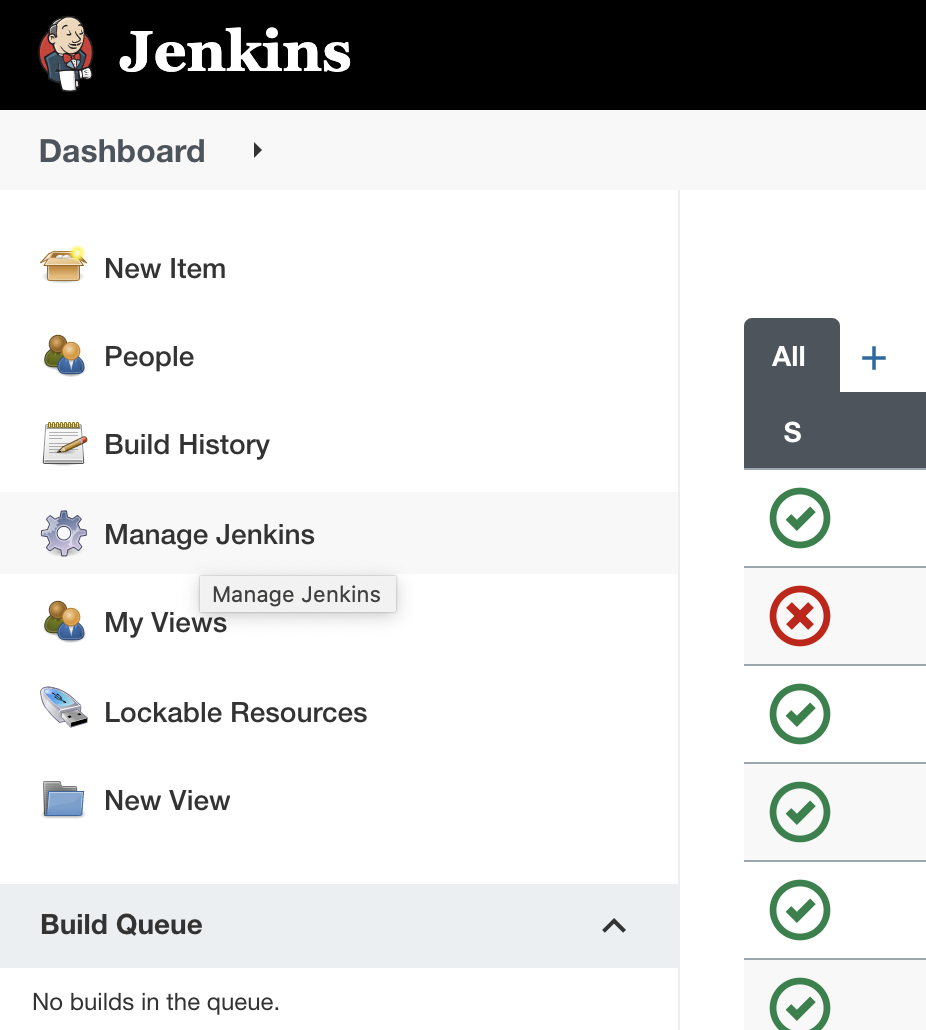
- Go to dashboard
- Click on New Item
- Provide name to the item and select freestyle job
- Click on ok
- In the build section add build step "execute shell"
- In the text box enter the text
- echo "Hello jenkins job"
- Click on save
Executing your first job
- Go to your dashboard.
- Select you job.
- Click on build now.
- In the console output you can check the result of your build.

Execute shell with variable
- Go to your job
- Click on configure in the execute shell section of build shell
- Enter the following text in the text box
- Name=pulkit
echo "Hello $Name. Current date is $(date)"
- Name=pulkit
- Click on Save
- Now trigger you job by clicking on "build now"
- check the the console output
Executing bash script from jenkins
- Create a bash file with following code myscript.sh
#!/bin/bash

FIRSTNAME=$1
LASTNAME=$2

echo "welcome $FIRSTNAME $LASTNAME"- execute and test the file
./myscript.sh pulkit pushkarna- Open jenkins job and click on configure
- In the execute shell enter the following command
FIRSTNAME=Pulkit
LASTNAME=Pushkarna
/Users/pulkitpushkarna/test-dir/myscript.sh $FIRSTNAME $LASTNAME- trigger the job and see the output
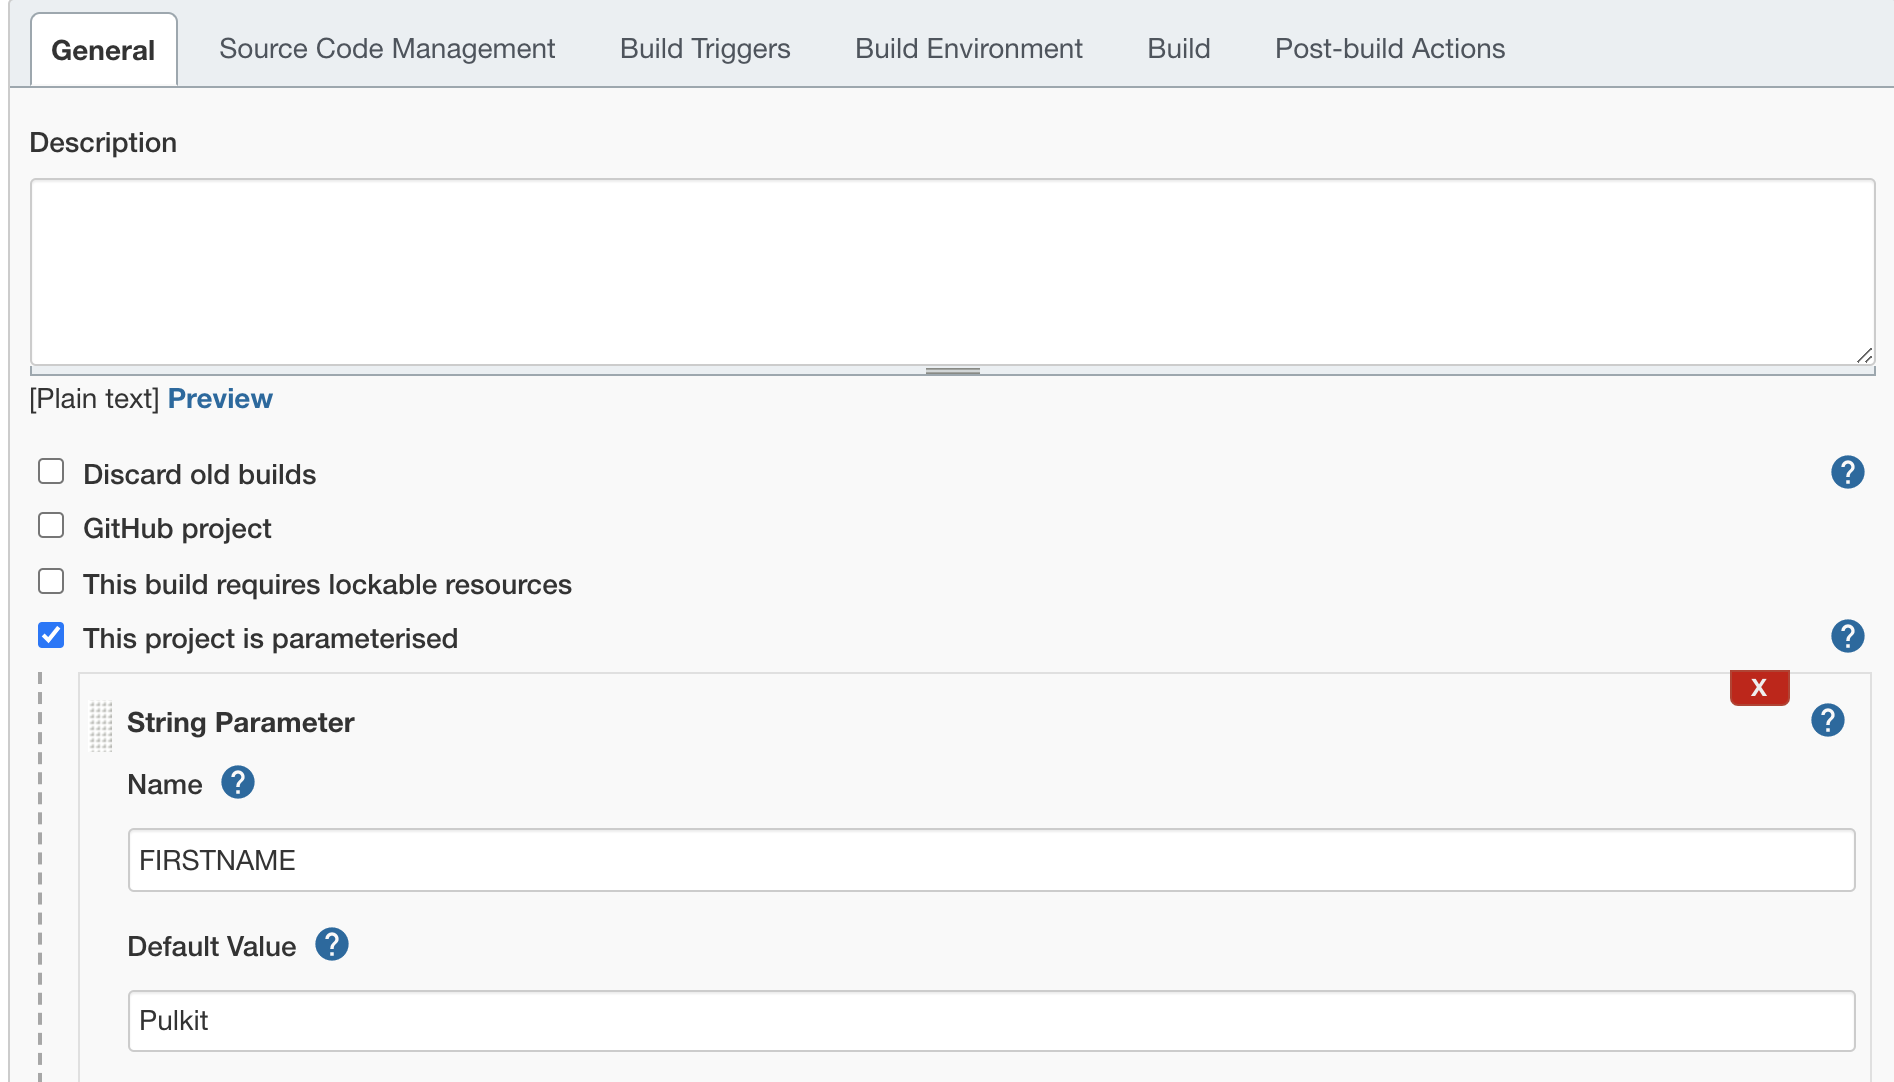
Build with parameters
- Go to the configure section of the job
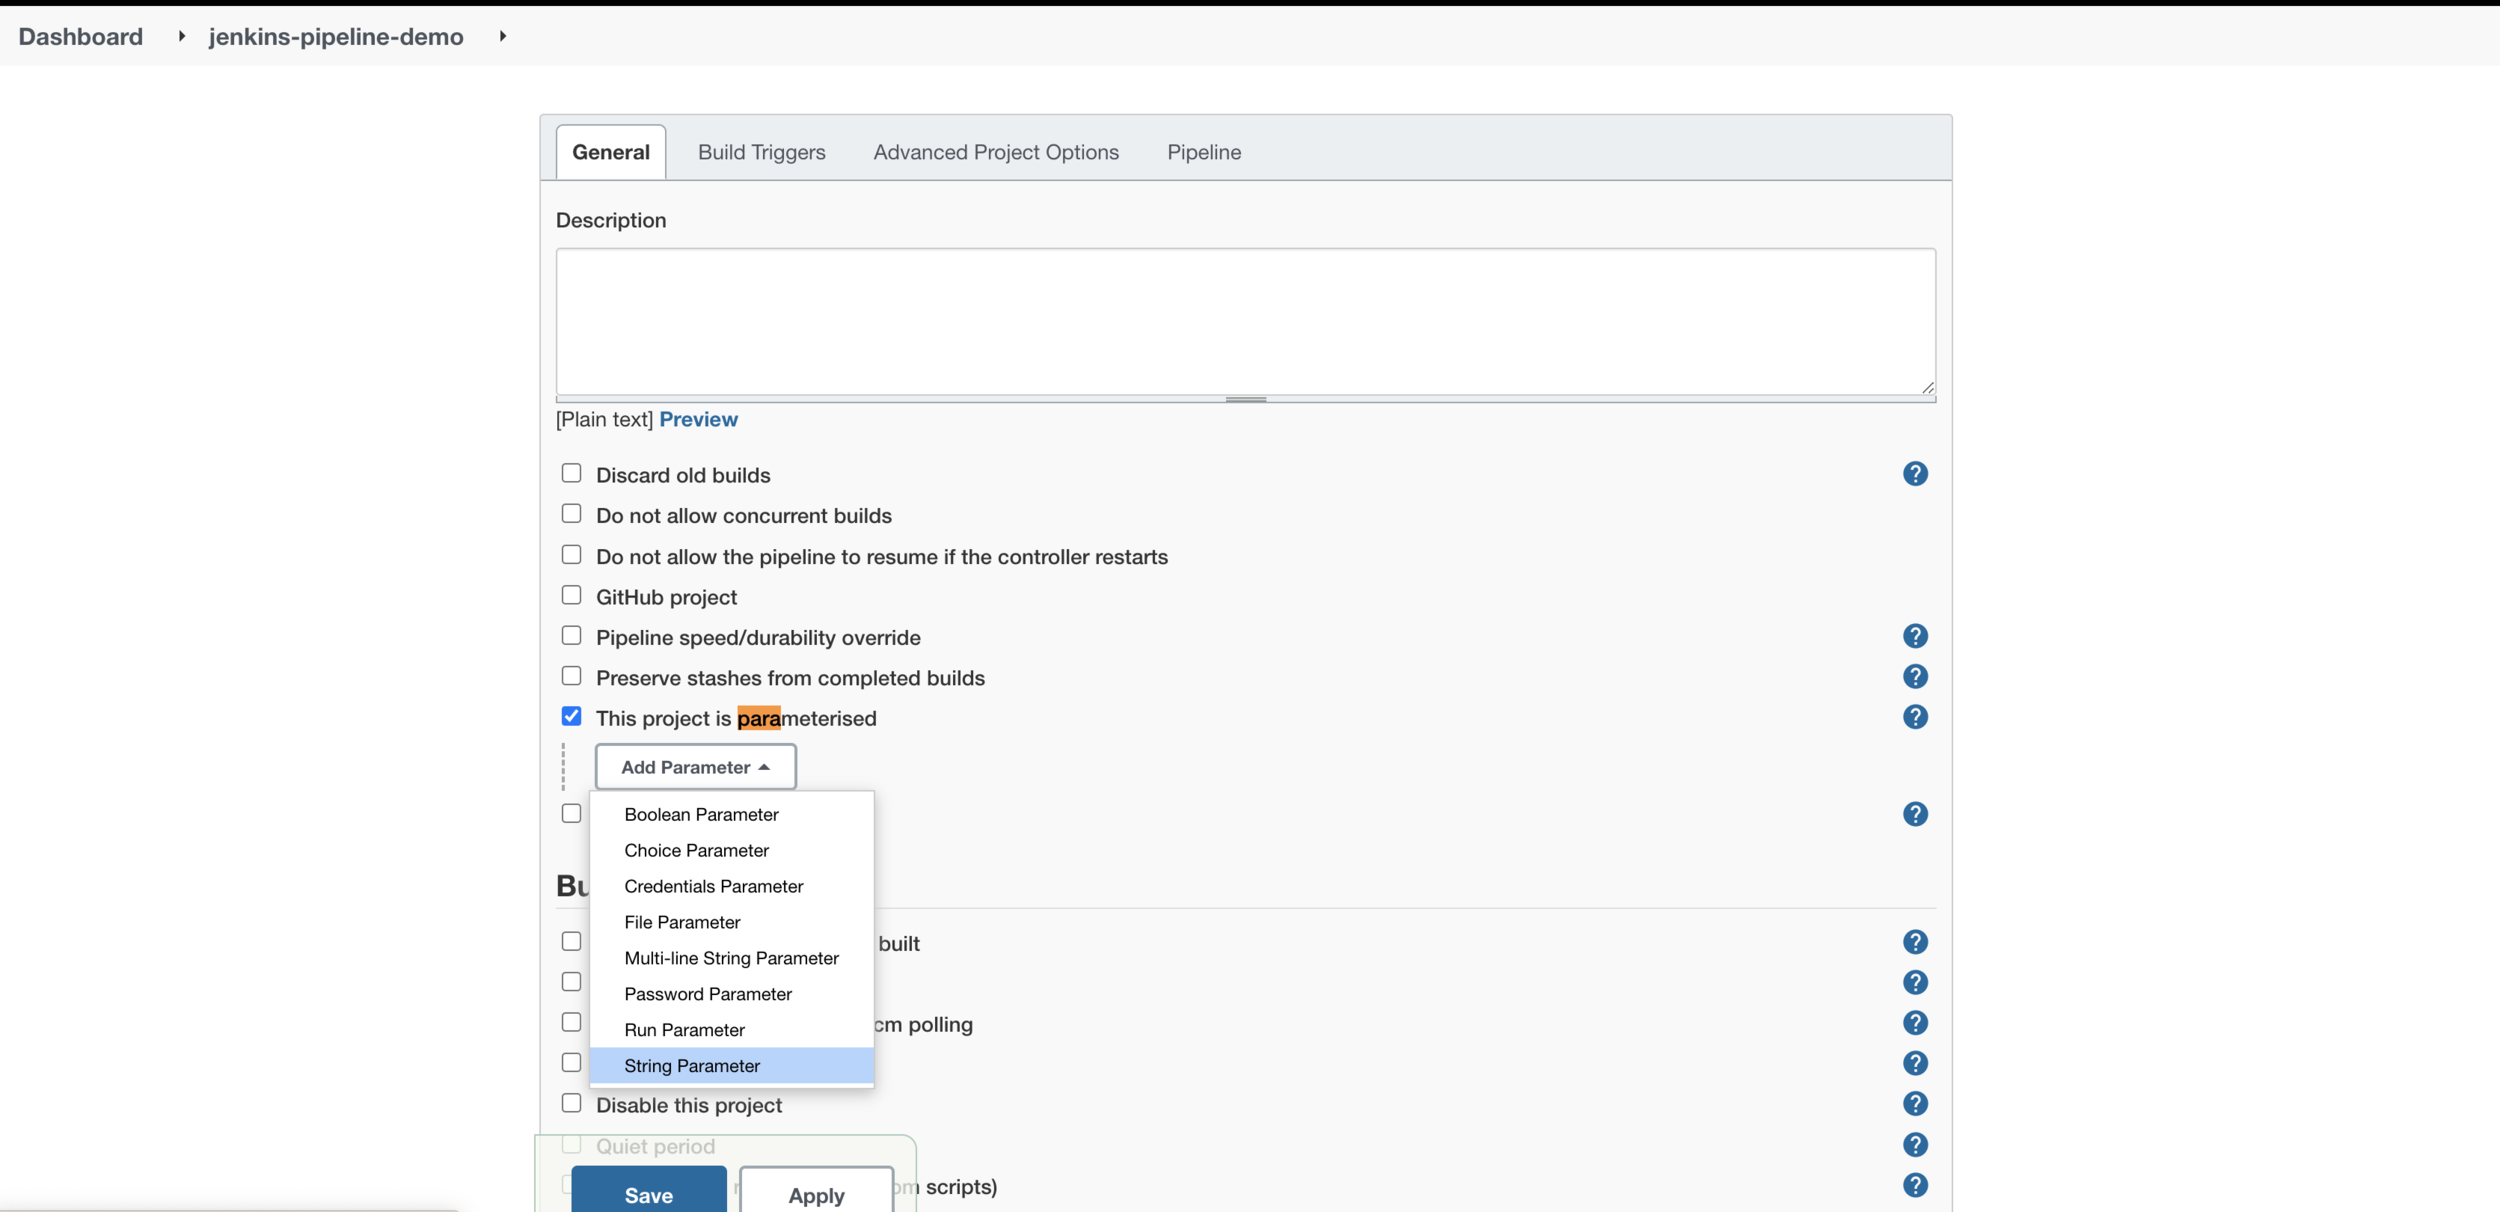
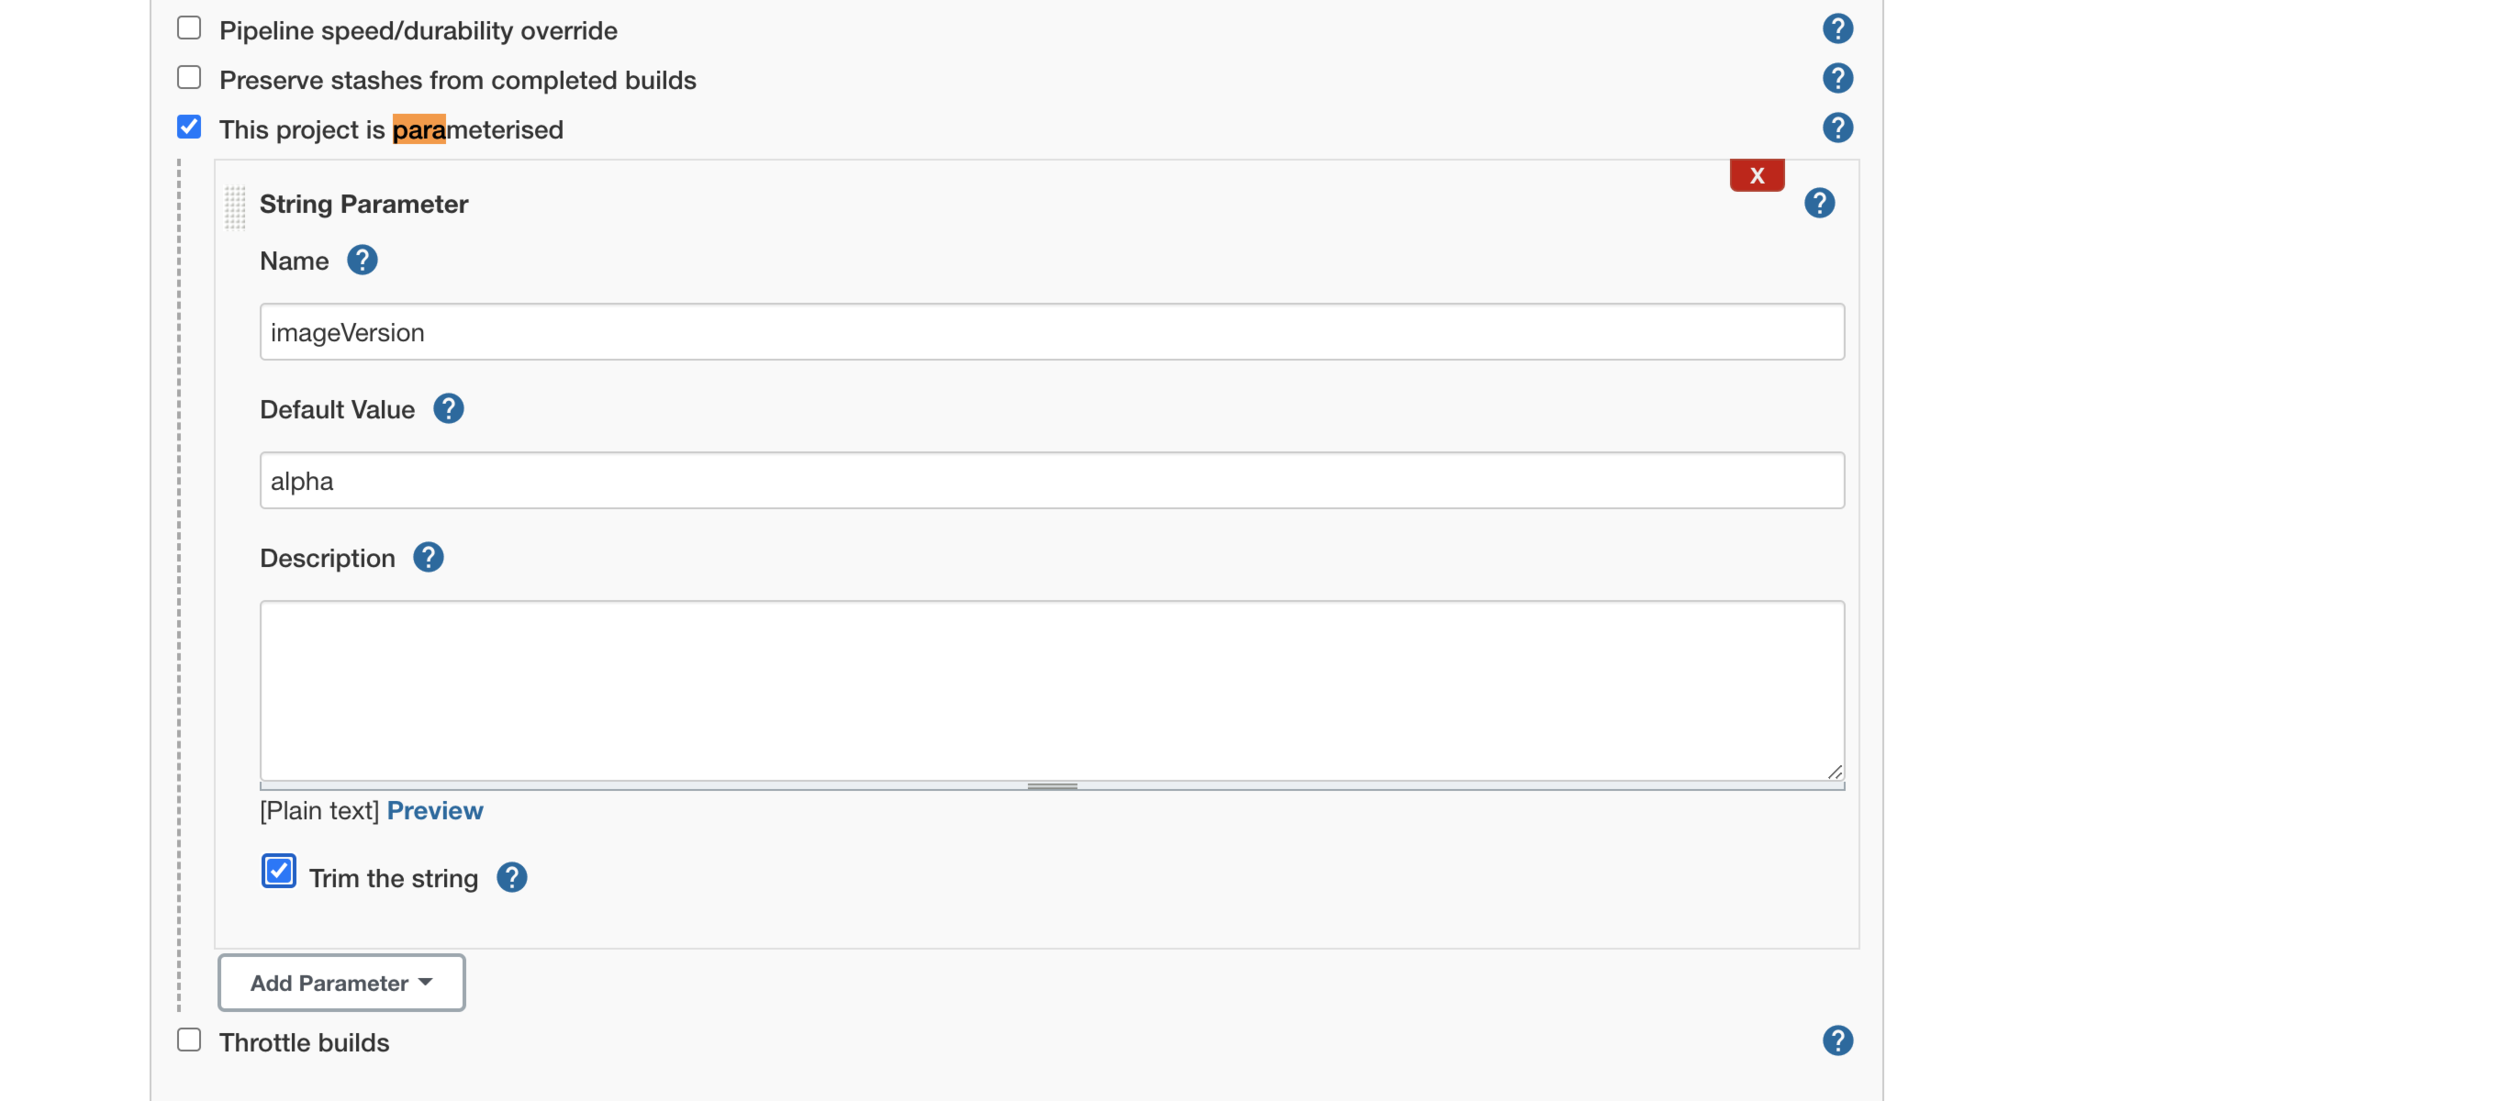
- In the general section select This project is parameterised
- Create 2 string parameter FIRSTNAME and LASTNAME and remove these variable from execute shell.
- click on save.
- Build the job with parameters.
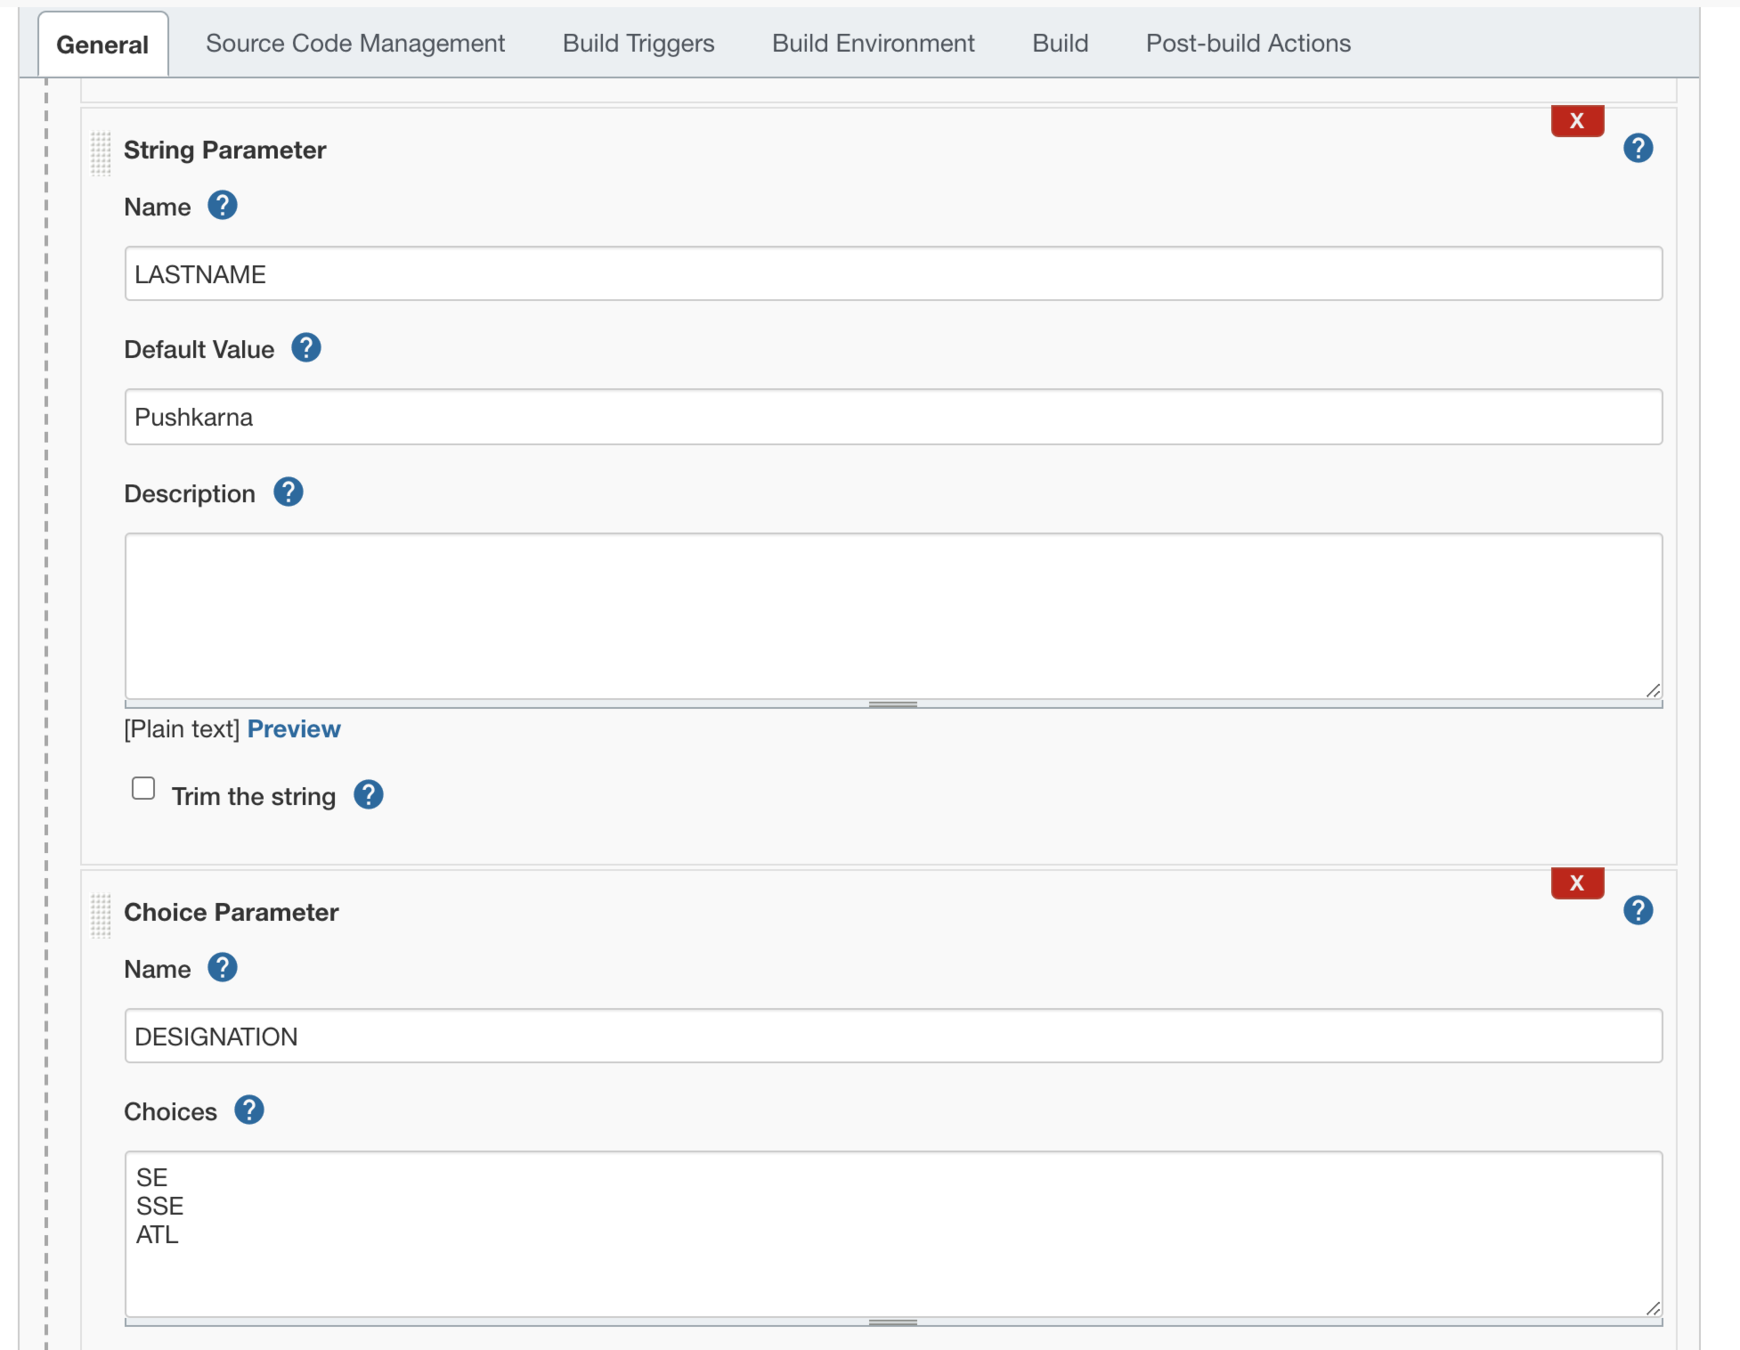
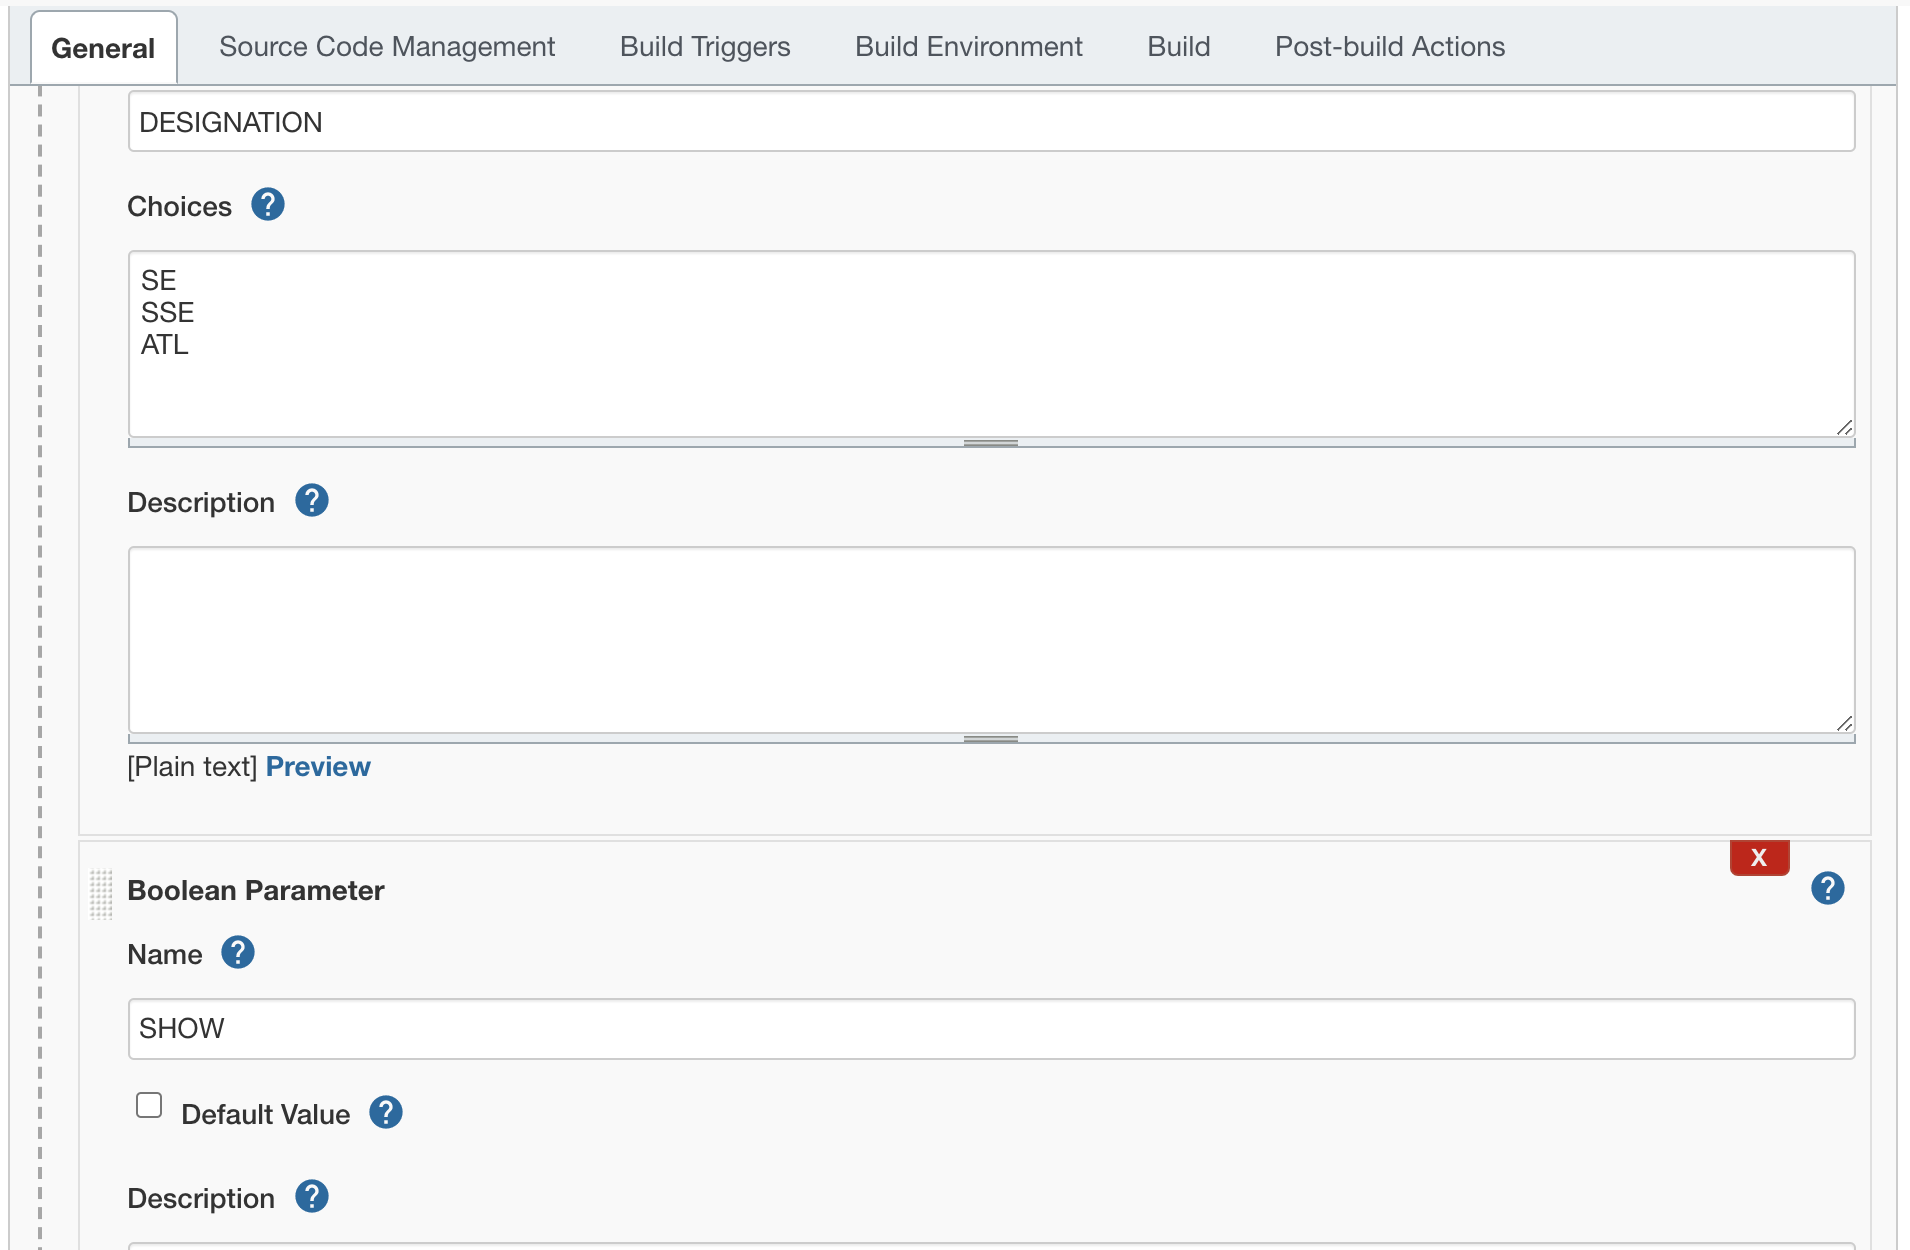
Adding choice and boolean parameters
- change the bash script with following code
#!/bin/bash

FIRSTNAME=$1
LASTNAME=$2
DESIGNATION=$3
SHOW=$4

if $SHOW
then
  echo "Welcome $FIRSTNAME $LASTNAME $DESIGNATION"
else
  echo "Show parameter set to false"
fi- Go to the job and in the configure section declare 2 parameters one boolean "SHOW" and another "DESIGNATION" Option type parameter containing values SE, SSE and ATL.
- In the execute shell mention the command below
/Users/pulkitpushkarna/test-dir/myscript.sh $FIRSTNAME $LASTNAME $DESIGNATION $SHOW- Build the job with parameters and see the result
Exercise 1
- Create a parameterized job which prints your name designation int the output shell if the boolean parameter is set to true.
Integration with Gradle
- Go to manage jenkins -> Plugin Manager
- Download Gradle plugin from plugin Manager
- Download the project https://drive.google.com/file/d/1UJV-zVk02i84DJ6CdgCuHq86X8lU_ef0/view?usp=sharing
- create a new repo on github and add the downloaded project to github using the command below
git remote add origin <git-hub-url>deploy.sh
#!/bin/bash
export BUILD_ID=dontKillMe
app_id=$(ps -ef | grep 'jenkins-maven-0.0.1-SNAPSHOT.jar' | grep -v 'grep' | awk '{ printf $2 }')
kill -9 $app_id
nohup java -jar ./build/libs/basic-app-0.0.1-SNAPSHOT.jar &
Deploy Spring Boot App using Jenkins
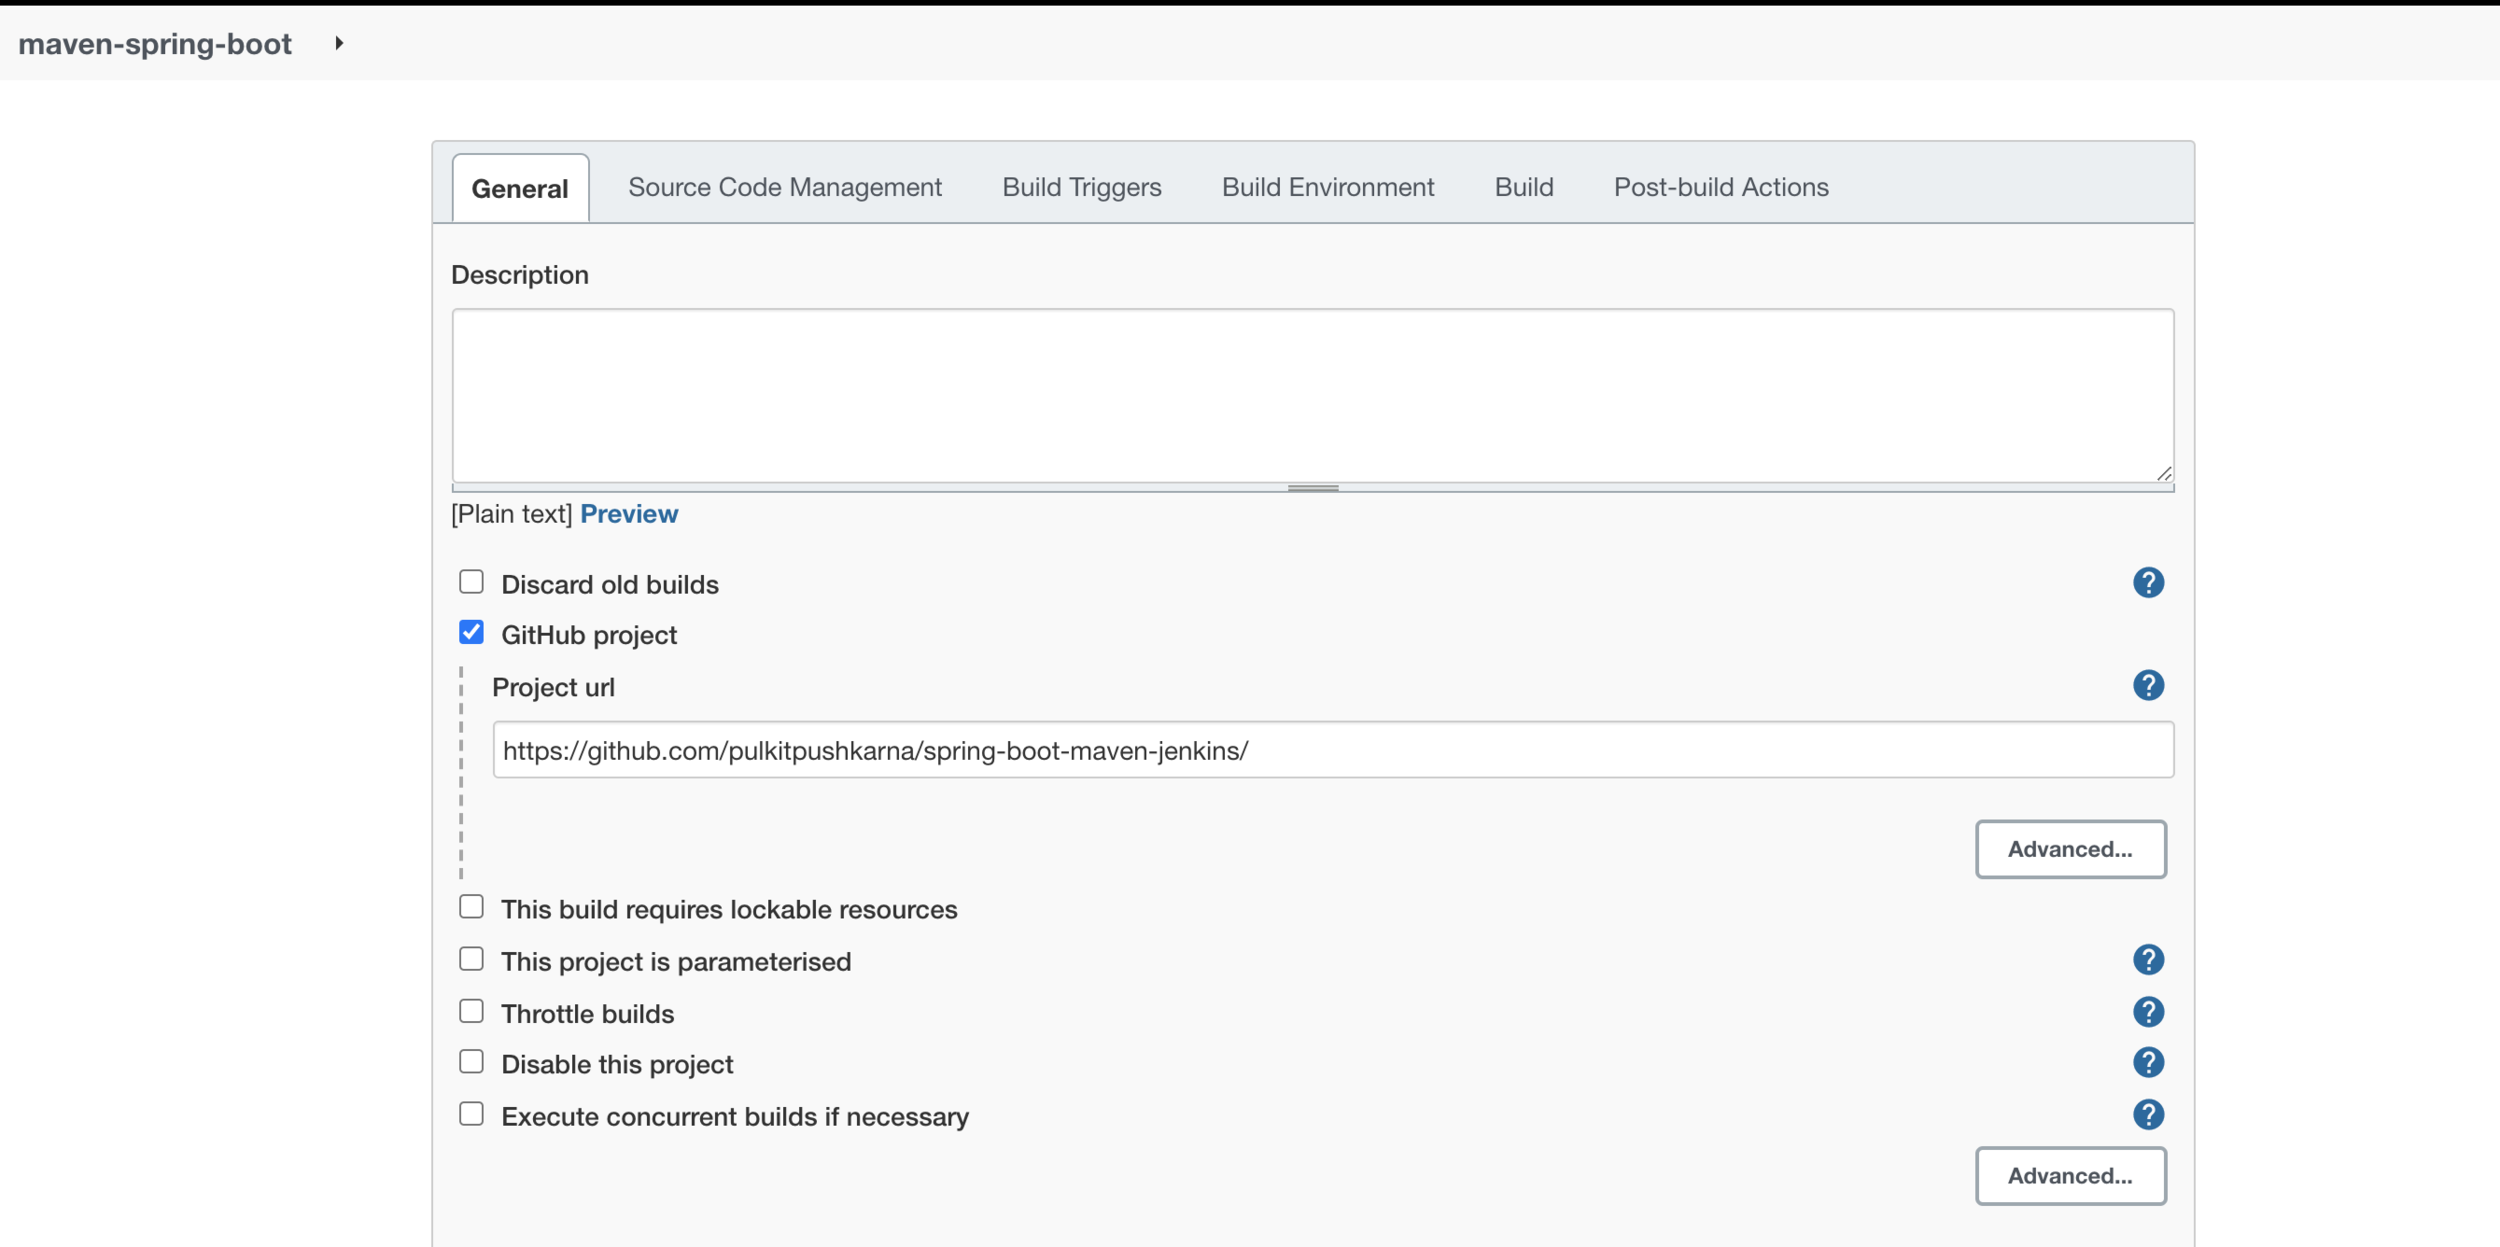
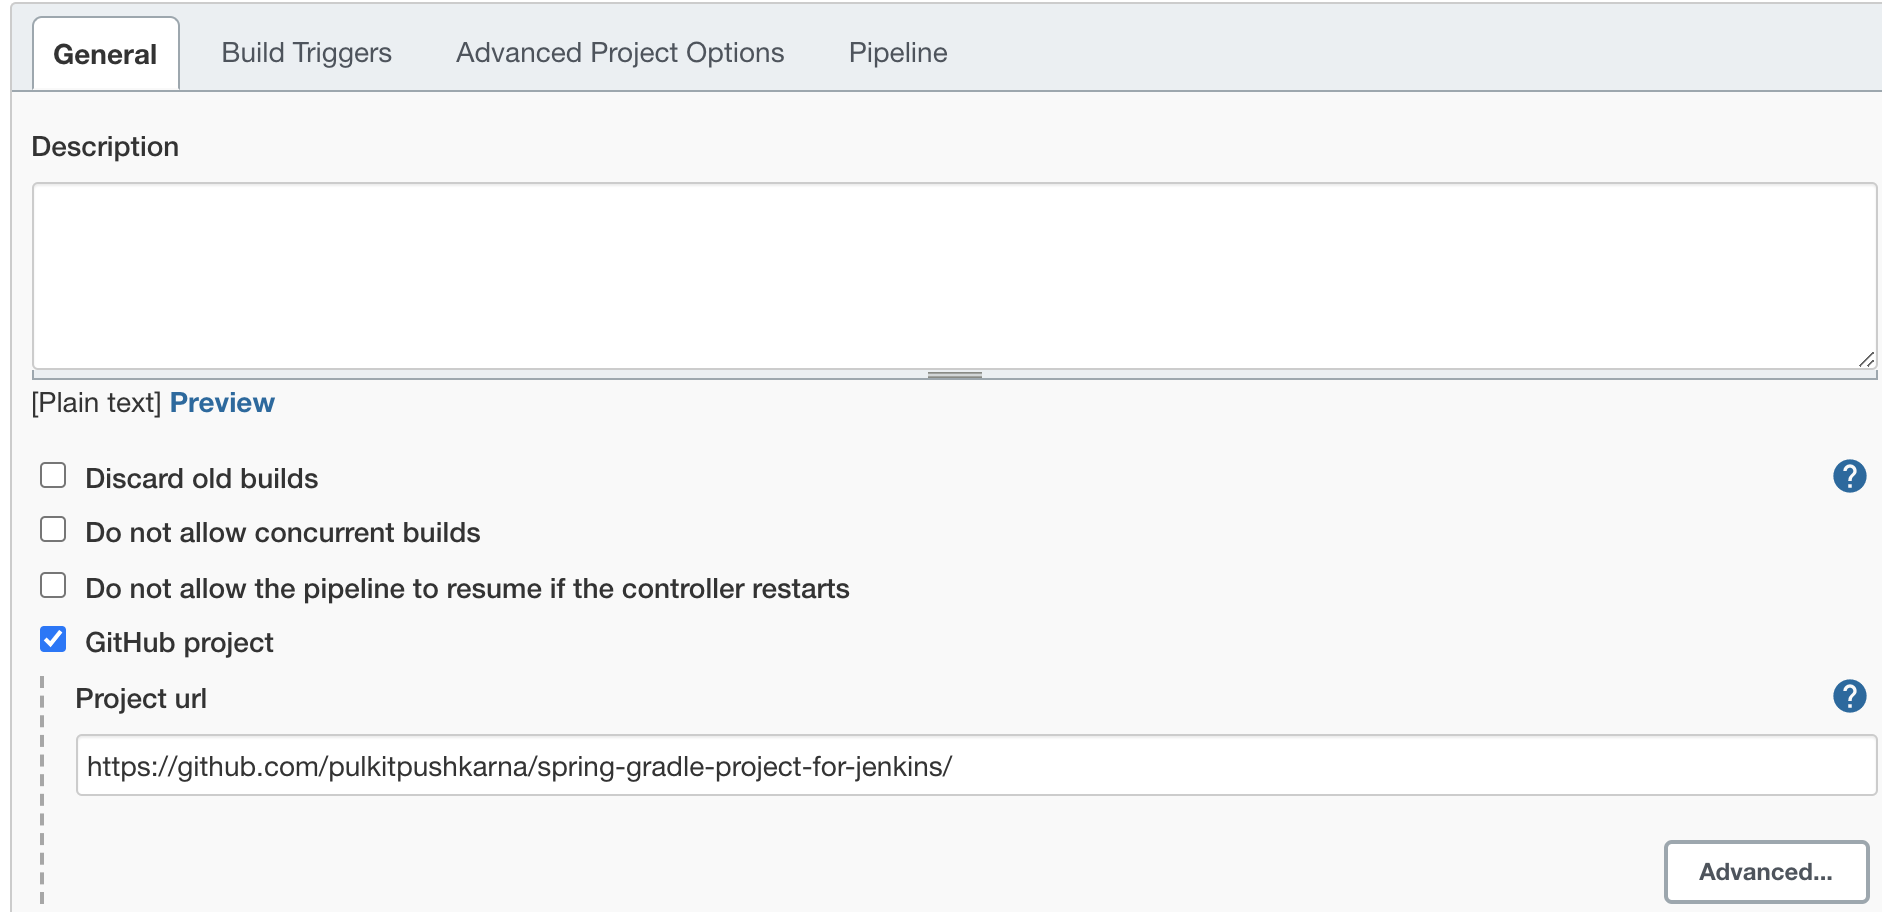
- Create a new job with the name Spring Boot App deployment.
- Enter GitHub project in description section without .git extension e.g https://github.com/pulkitpushkarna/spring-gradle-project-for-jenkins/
- In the Source Code management select git radio button and enter the git url e.g https://github.com/pulkitpushkarna/spring-gradle-project-for-jenkins.git
- Specify the branch as master
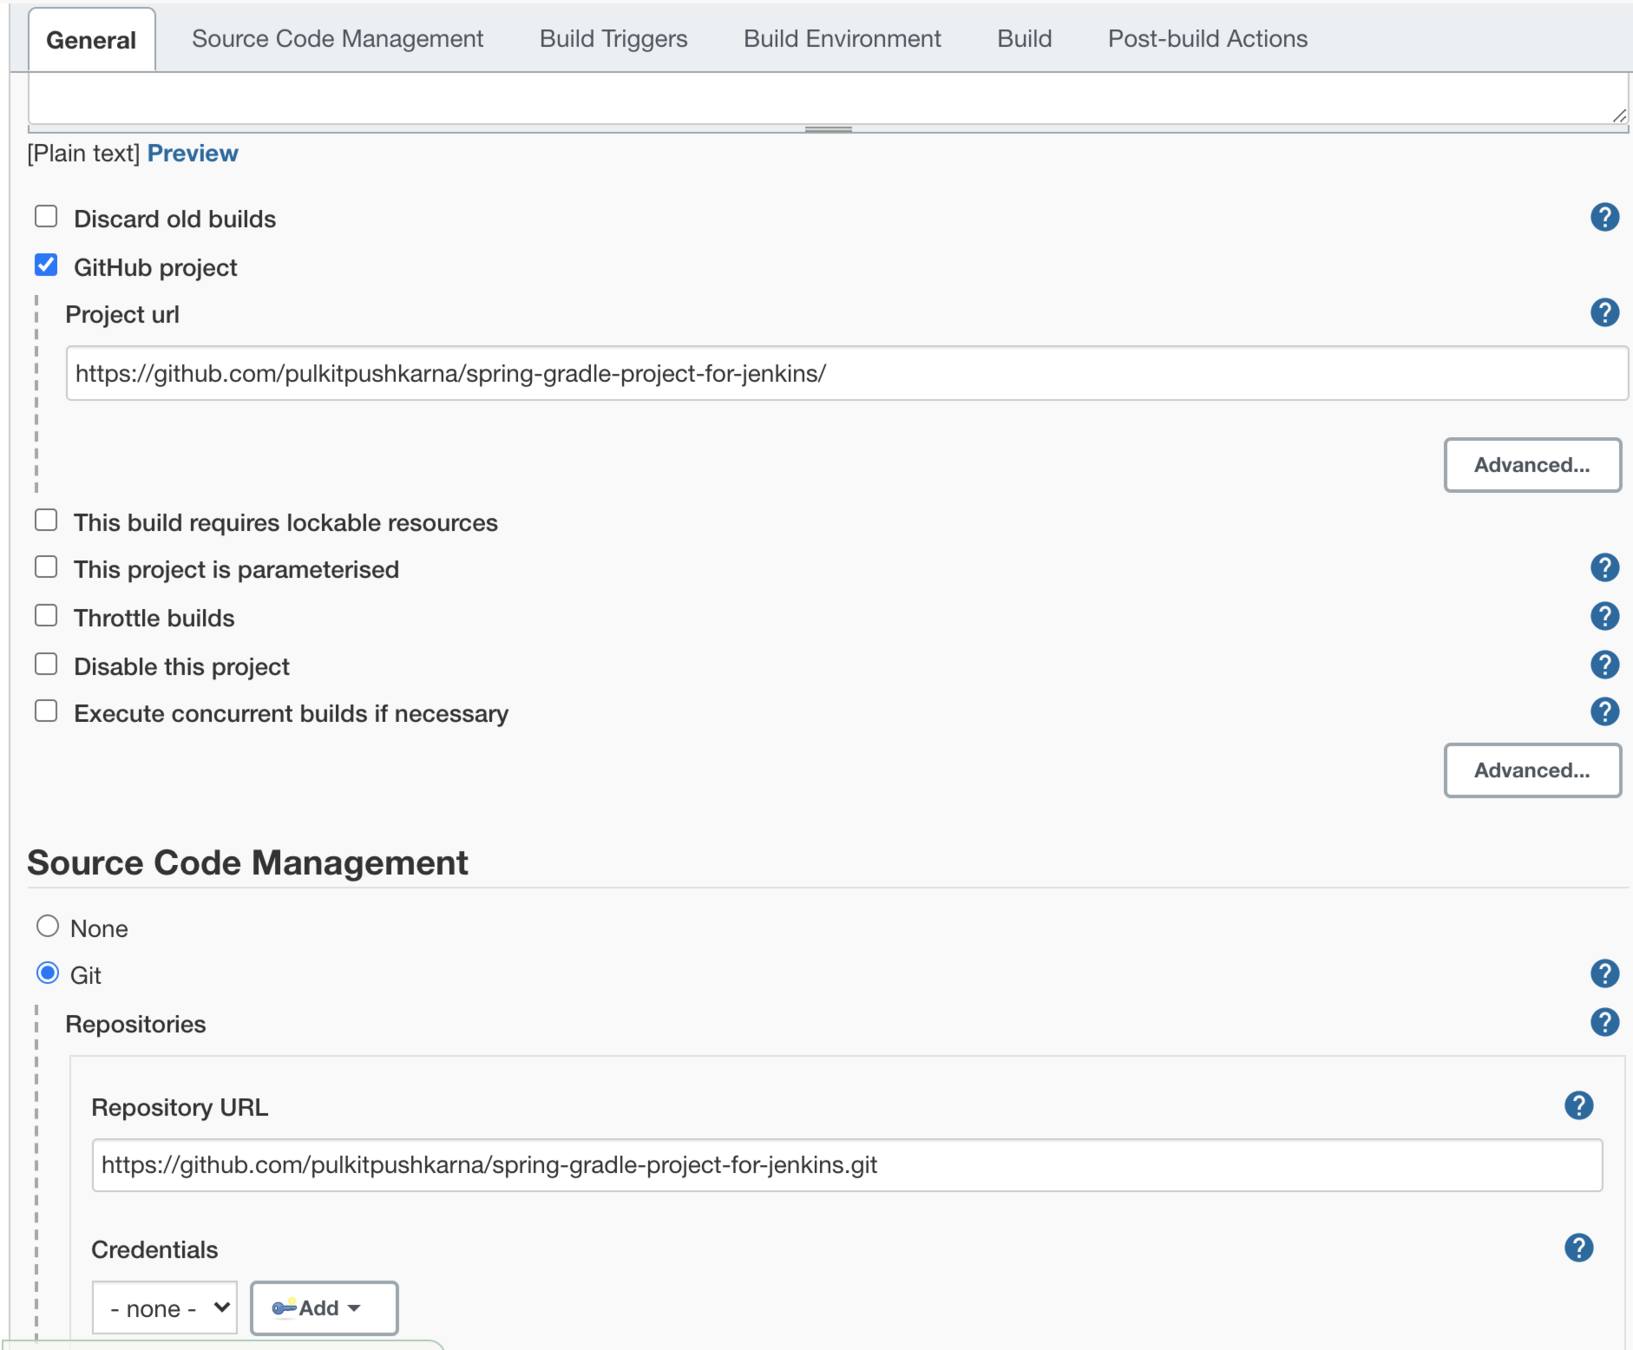
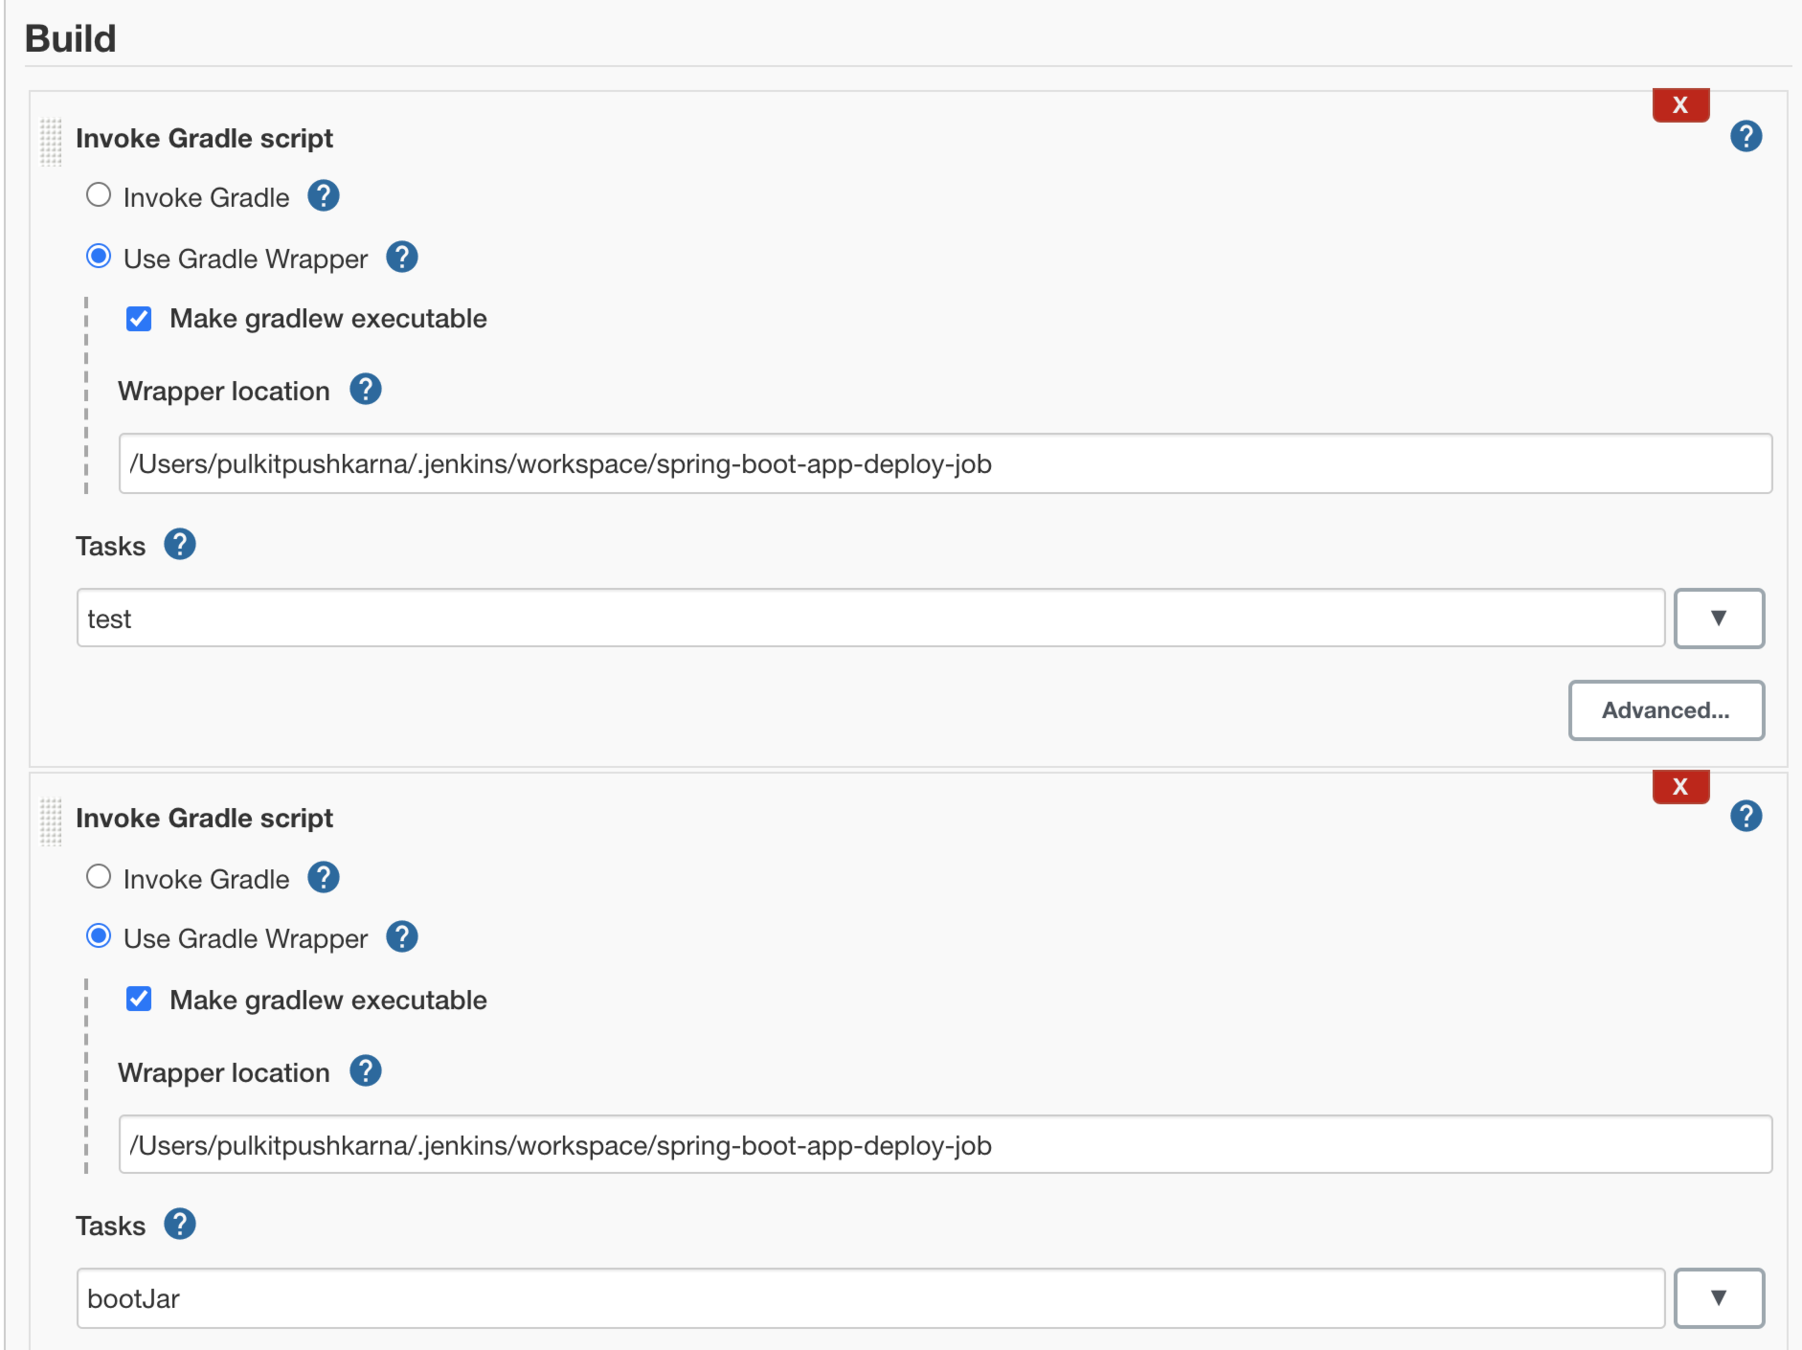
- In the build section add build step -> Invoke Gradle script
- In the invoke gradle script check the radio button Use Gradle Wrapper
- Select Make gradlew executable checkbox
- In Wrapper Location specify the location of wrapper i.e location where job exists in workspace e.g /Users/pulkitpushkarna/.jenkins/workspace/spring-boot-app-deploy-job
- In the task section specify task test
- Similarly create another gradle script invoke for task bootJar
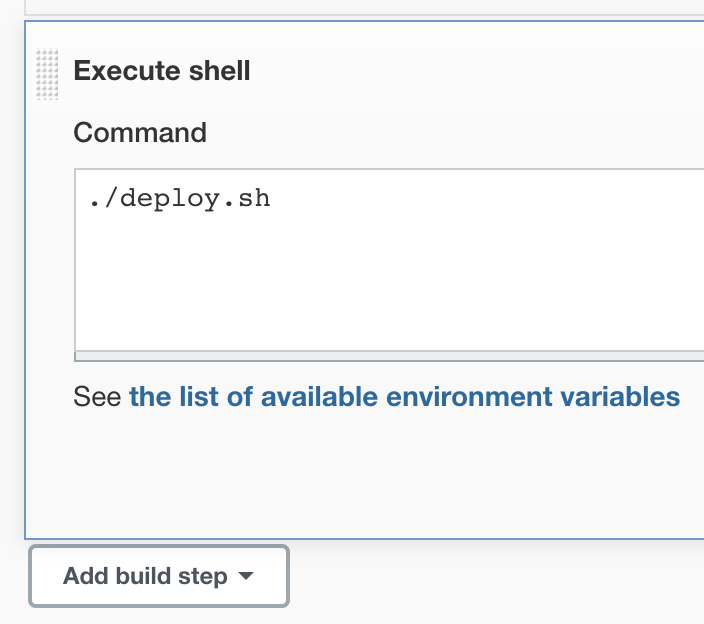
- Introduce on more build step for deployment Execute shell and execute ./deploy.sh script in that step.
- Now trigger the job for deployment. You will see that the jar is deployed on your on your system.
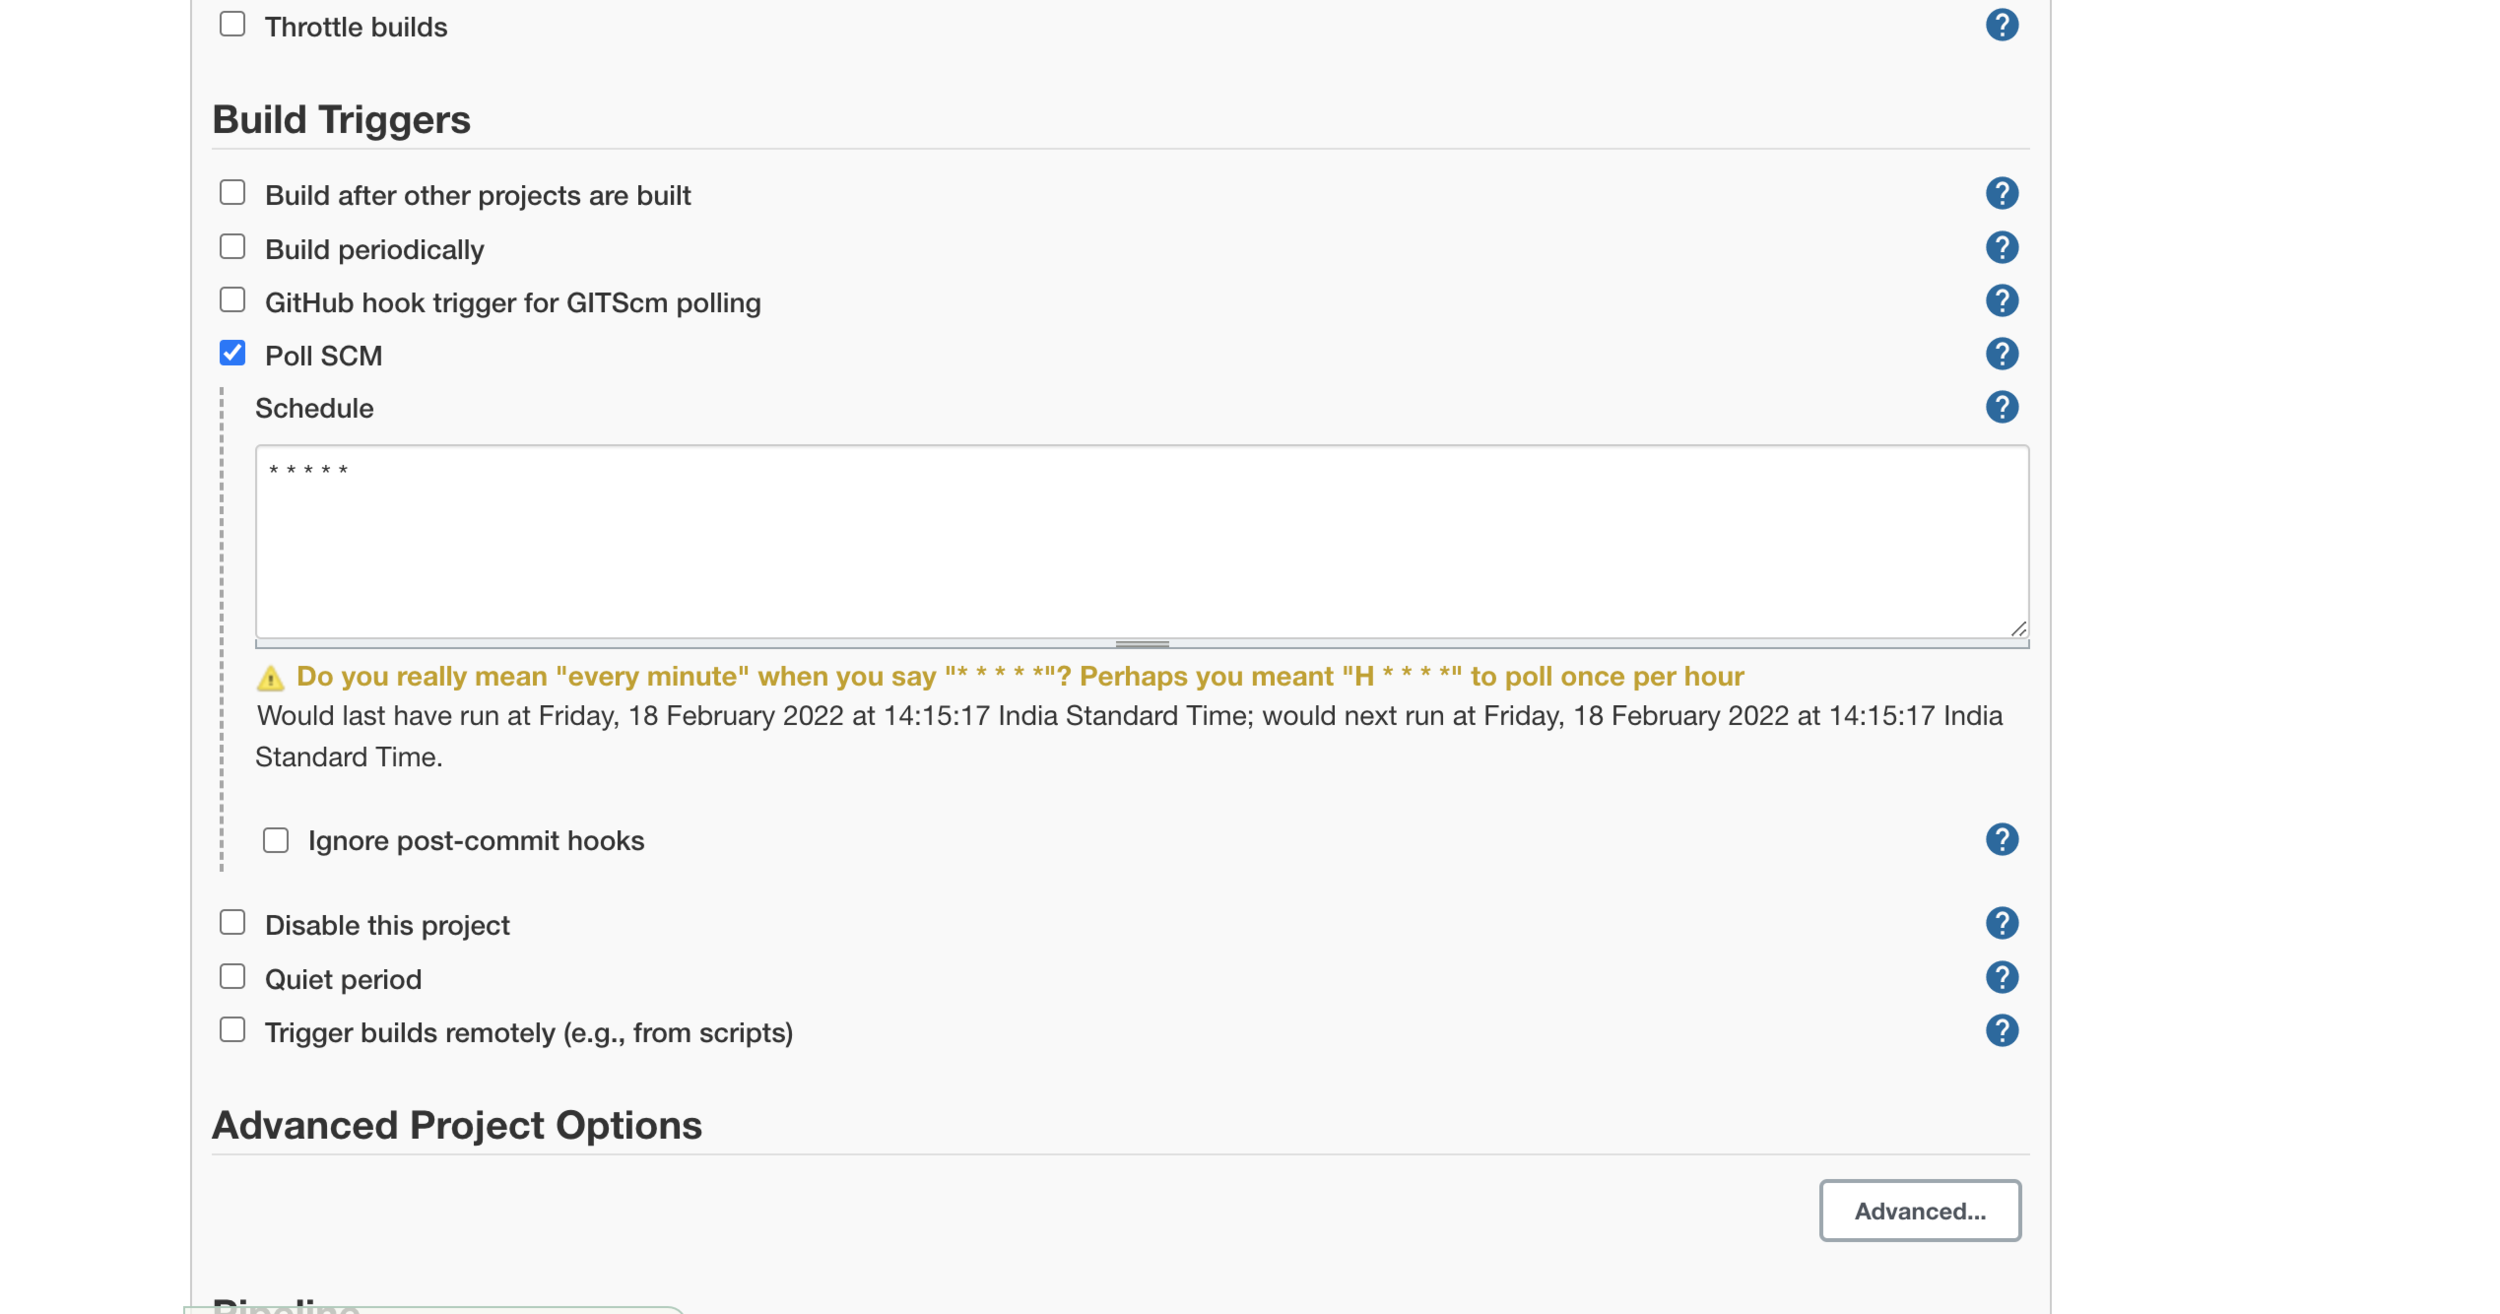
Trigger build and deploy job on push to master
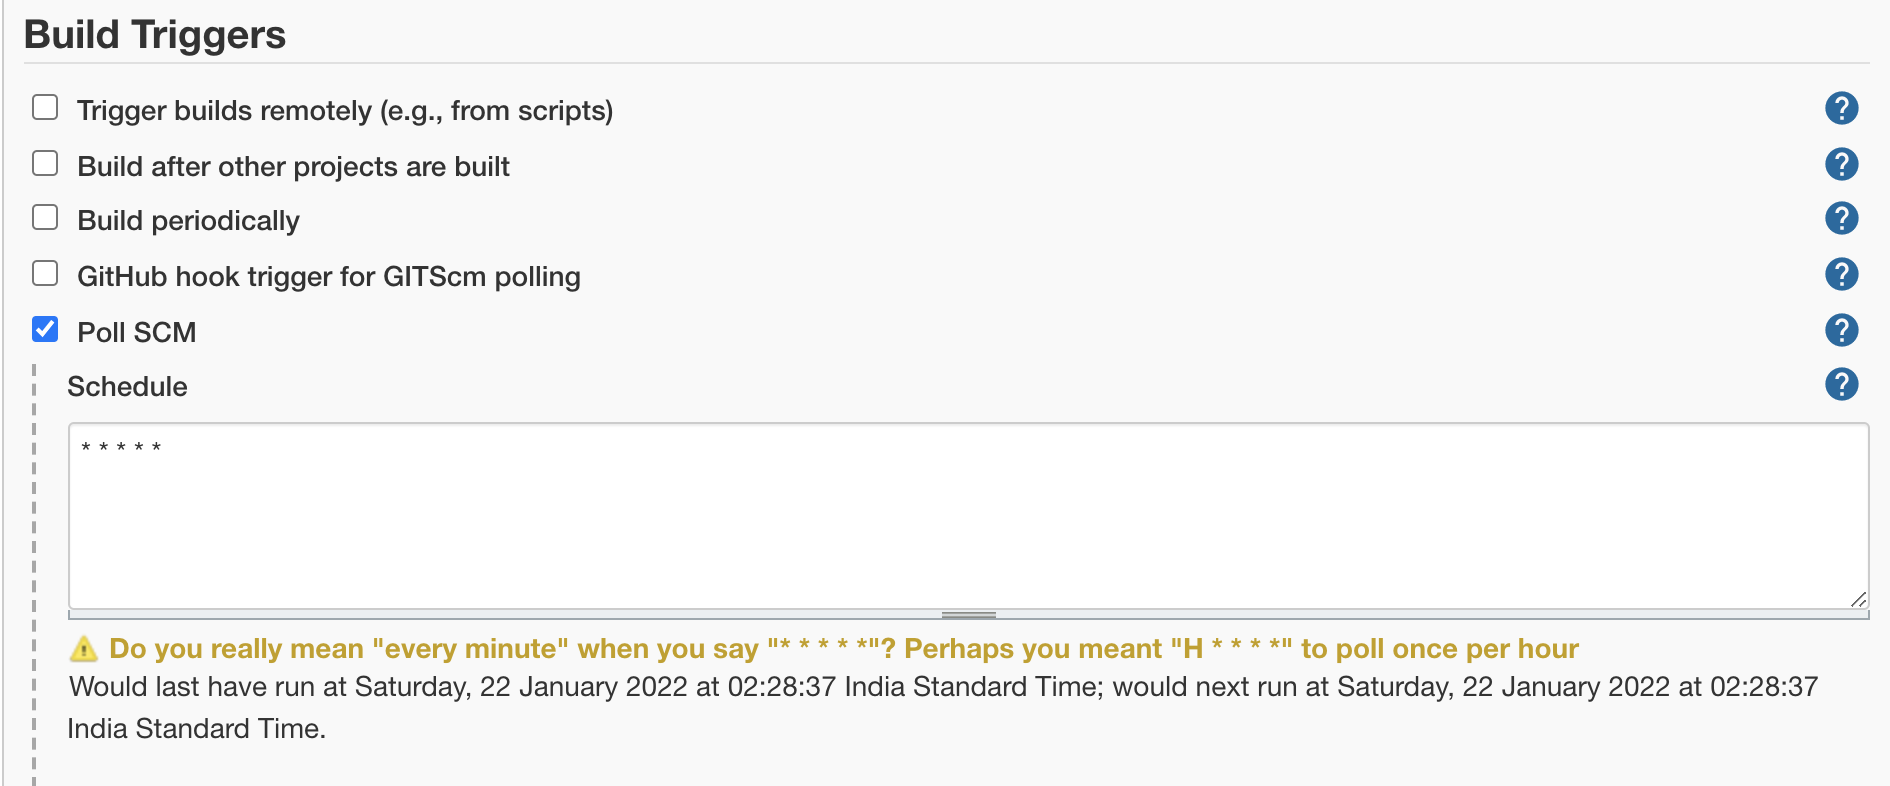
- Go to the job and click on configure
- in the Build trigger section check POLL SCM checkbox
- In the Textbox below specify the cron expression
- * * * * *
- This will poll the github repo and whenever a commit is made to the master branch this job will be triggered.
Webhook Trigger
- Uncheck SCM poll
- Check GitHub hook trigger for GITScm polling
- Install Webhook Relay following command here in the link
- After downloading webhookrelay CLI go to https://my.webhookrelay.com/ and login
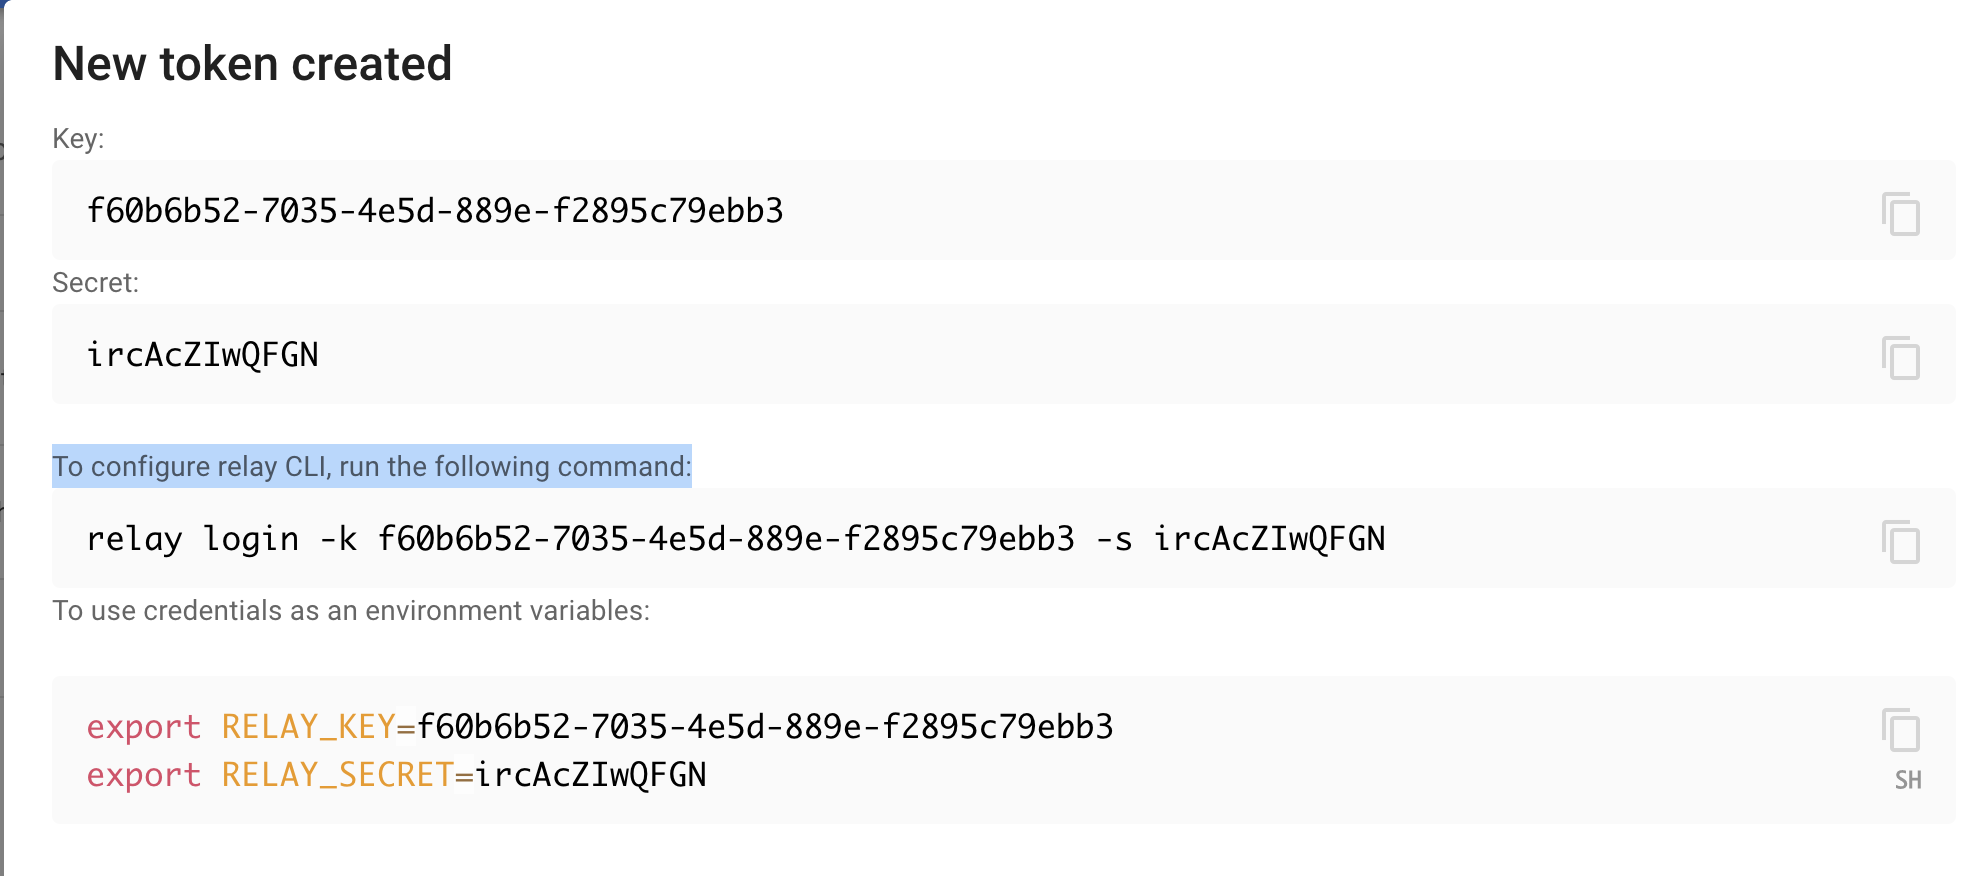
- Now go to https://my.webhookrelay.com/tokens and create token
- A pop up will appear in the copy the login command from the pop up
Create proxy for jenkins github webhook by using the command below
relay forward --bucket github-jenkins http://localhost:8080/github-webhook/
Forwarding:
https://0mu5u7hnaddxwio6oebtae.hooks.webhookrelay.com -> http://localhost:8080/github-webhook/
Starting webhook relay agent...
2022-01-20 19:33:59.164	INFO	using standard transport...
Now go to you git repo in the setting tabs select the webhook and in the webhook payload URL enter the url generated by relay and in the Content Type select application/json.
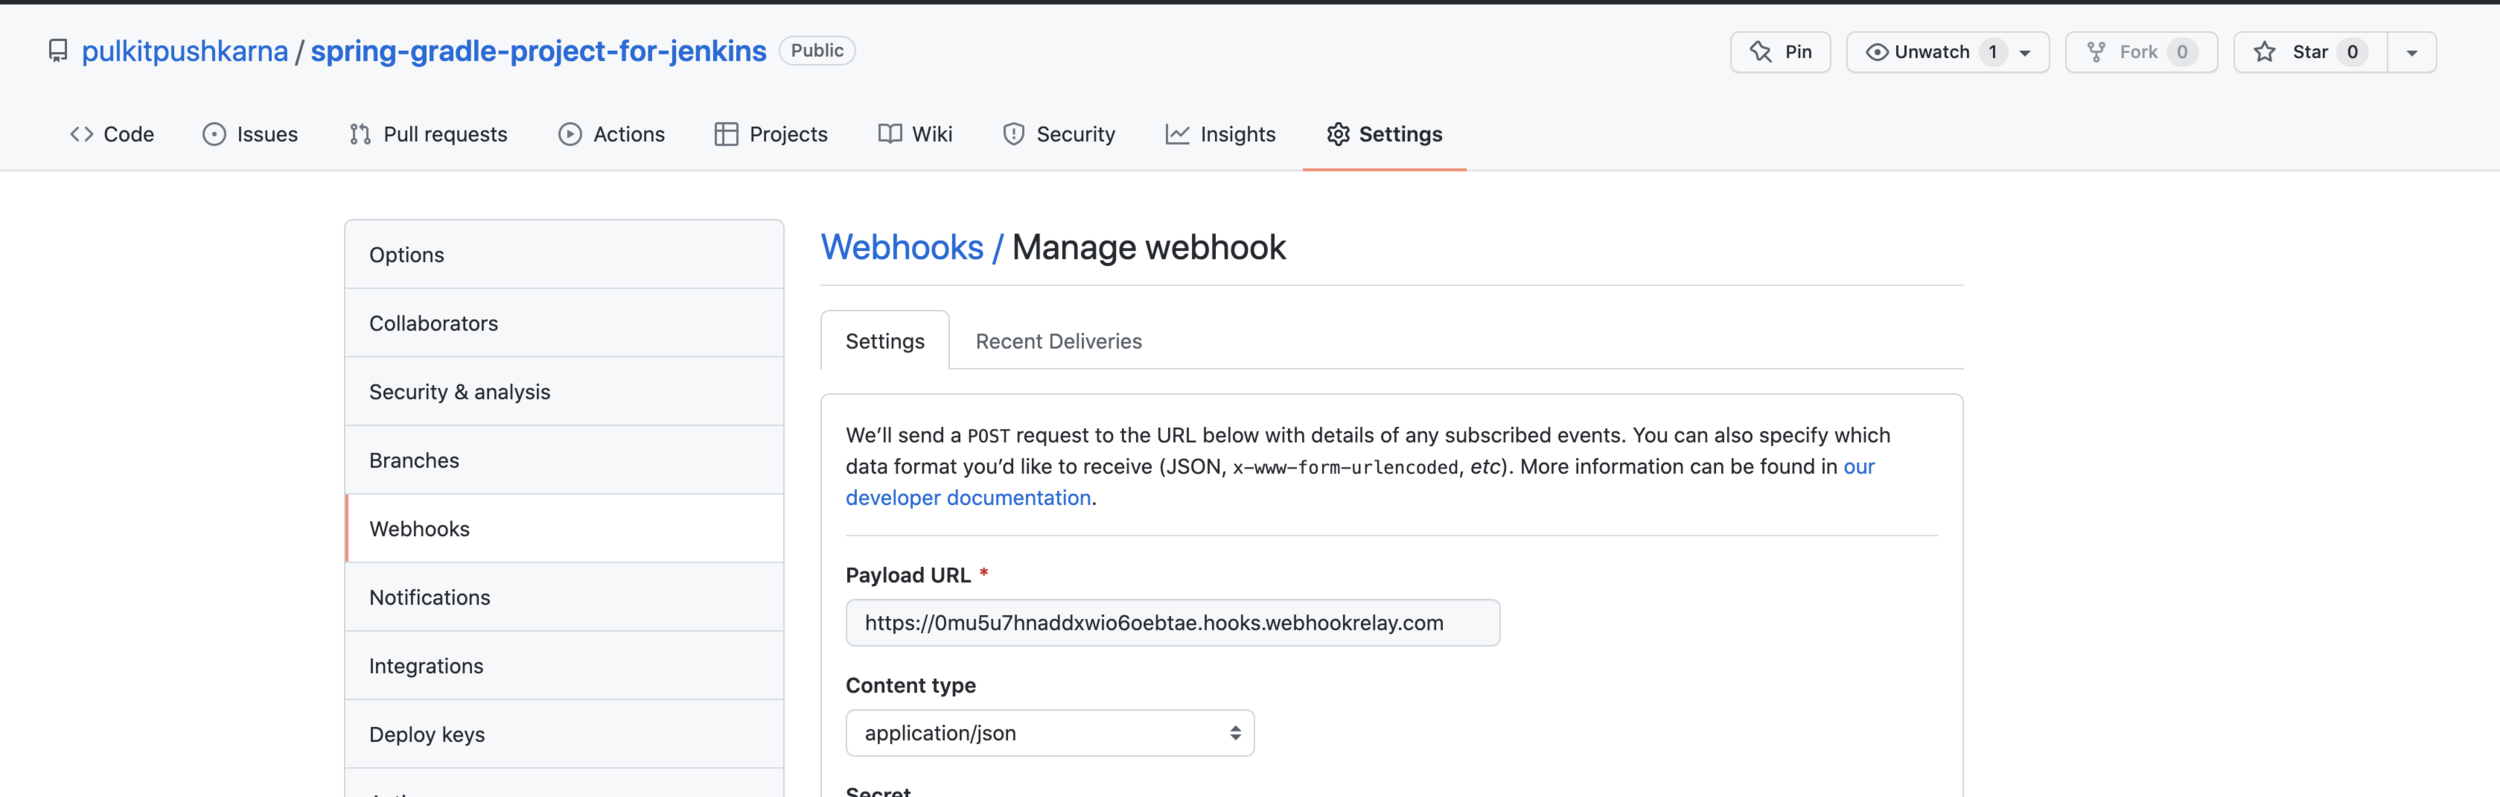
Now if you push any changes in master branch the build will trigger automatically and latest code will be deployed.
Deploy maven app using jenkins
- Download the project from here https://drive.google.com/file/d/1UJV-zVk02i84DJ6CdgCuHq86X8lU_ef0/view?usp=sharing
- Ensure that the app-deploy.sh has the 777 permission by running chmod 777 app-deploy.sh
- Create a repo in github and add this app to that repo.
- Go to
- Go to manage jenkins
Setting up maven
- Go to global tool configuration
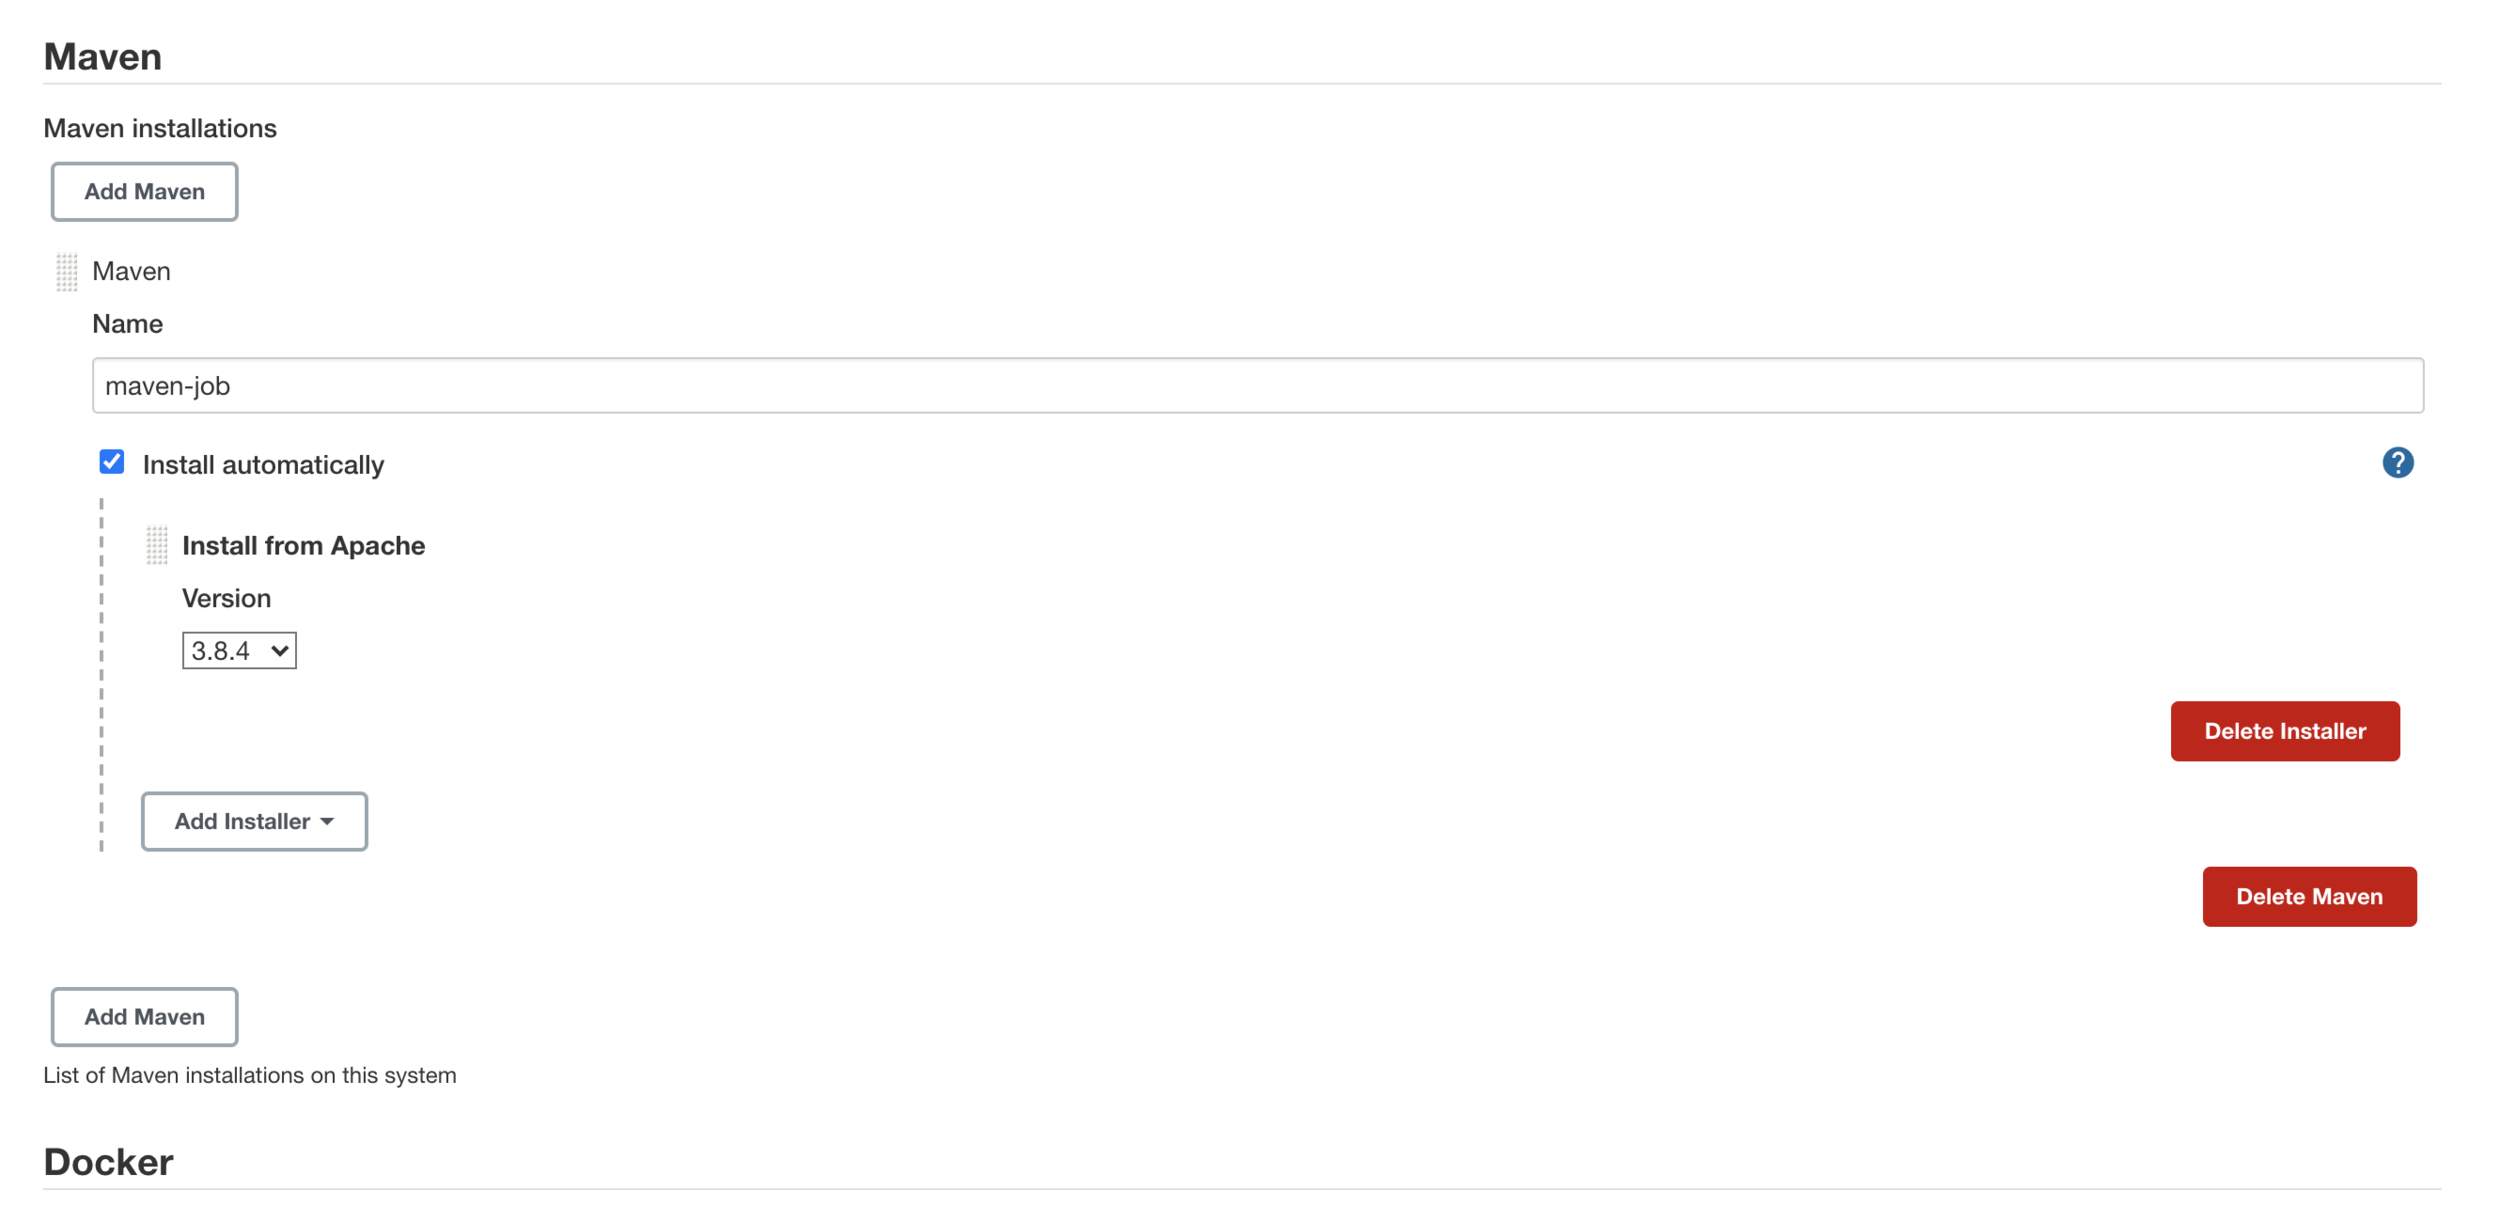
Give the maven installation and name it maven job
Create a job to build and deploy maven project

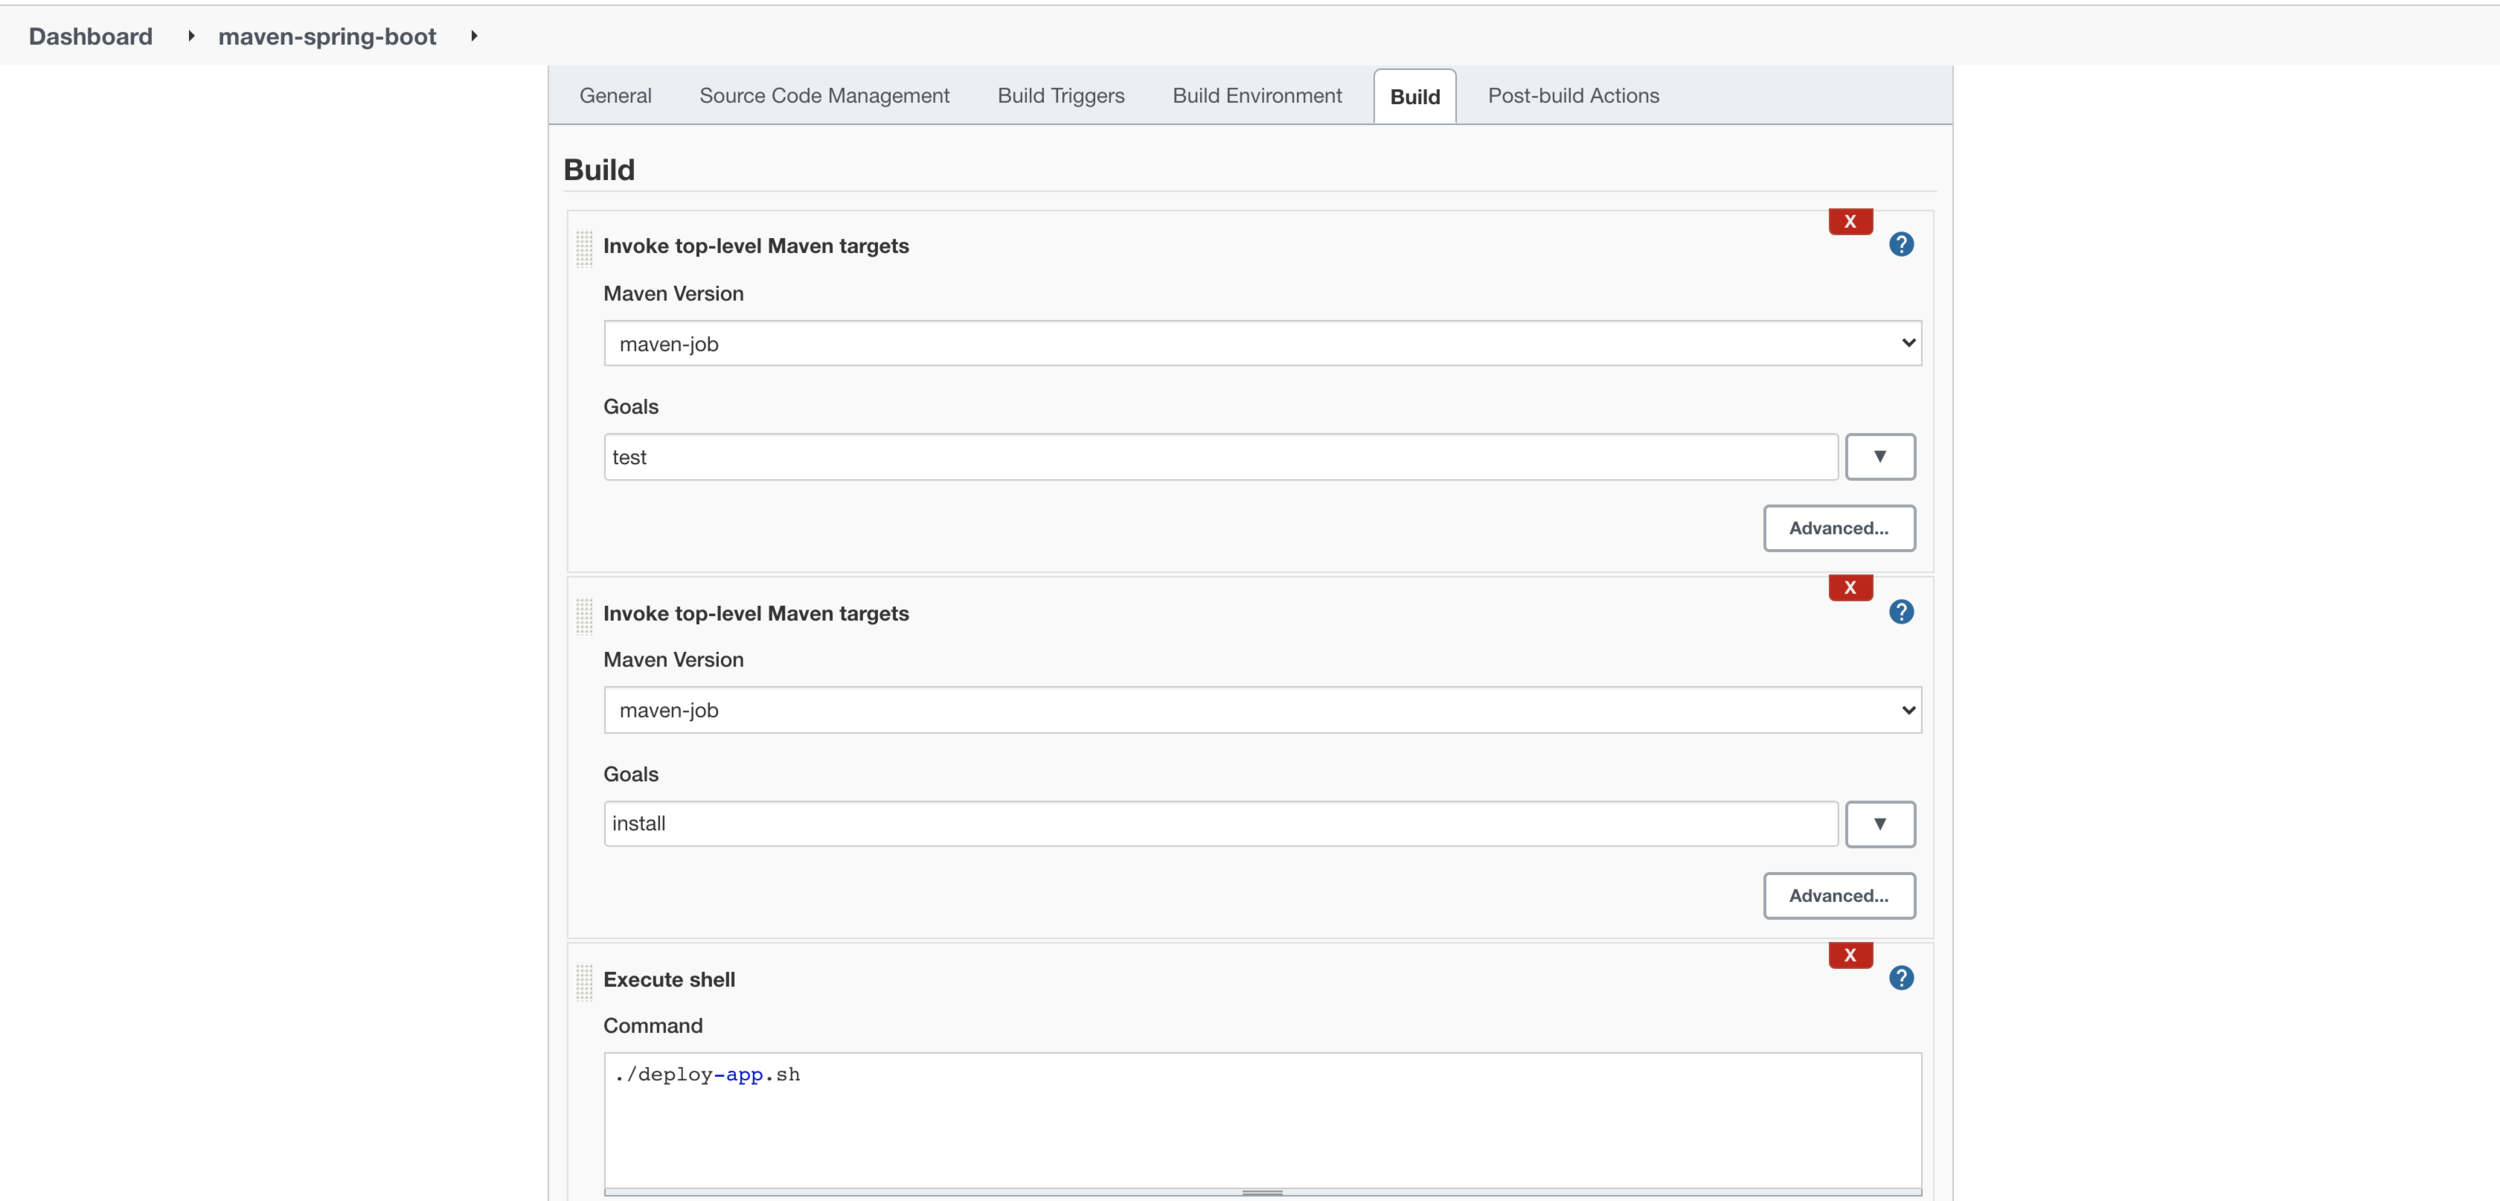
Set up the build steps
Now run the job and you will see that you are able to deploy the app.
Exercise 2
- Deploy spring boot project on the commit on the master branch of the git hub repo. Do it by polling and then by web hook method
Jenkins DSL
- Creating Jenkins Job with Code
- Install the DSL plugin for jenkins
- Now we will create a job which will act like a seed job i.e it will create another job
In the Build Triggers section go to build and select the build step Process Job DSLs
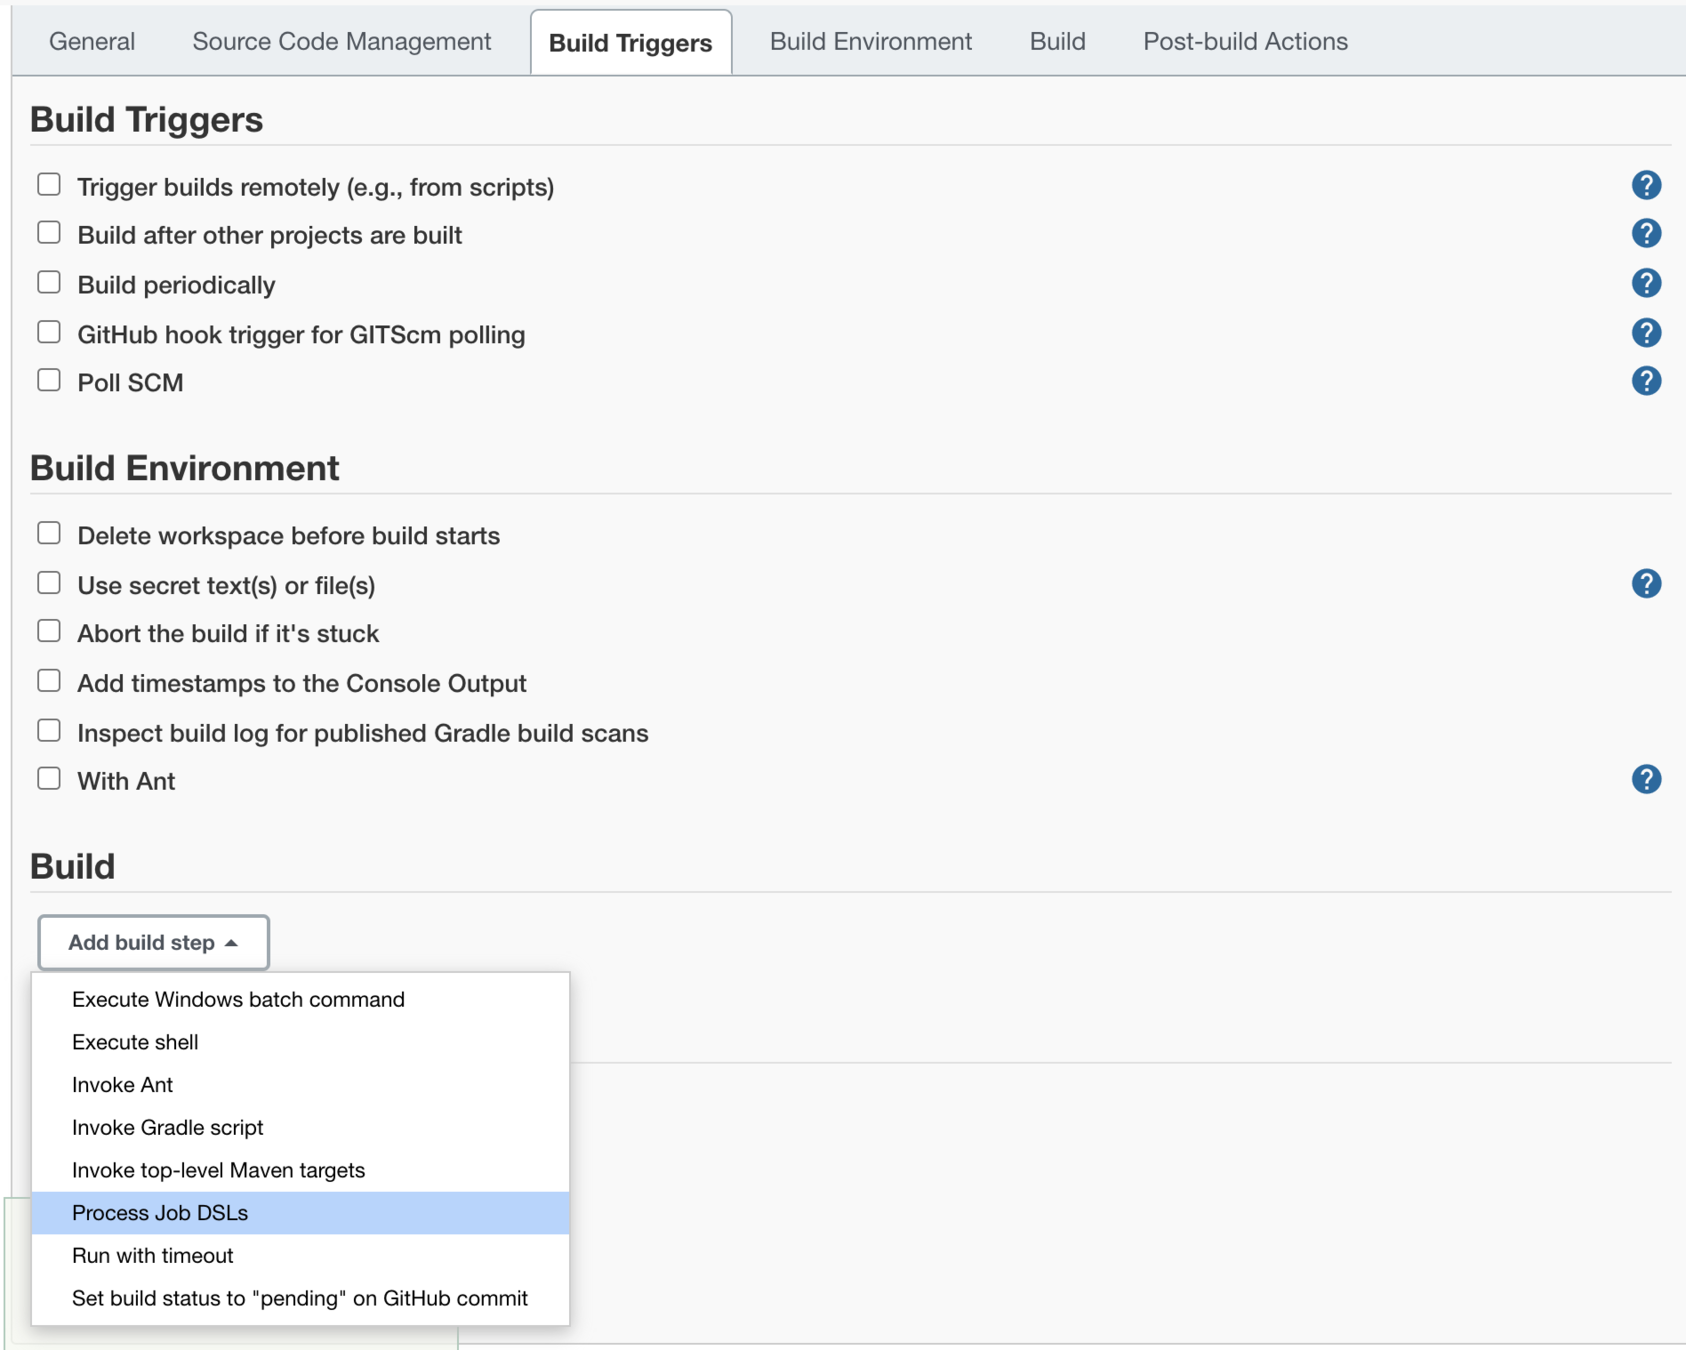
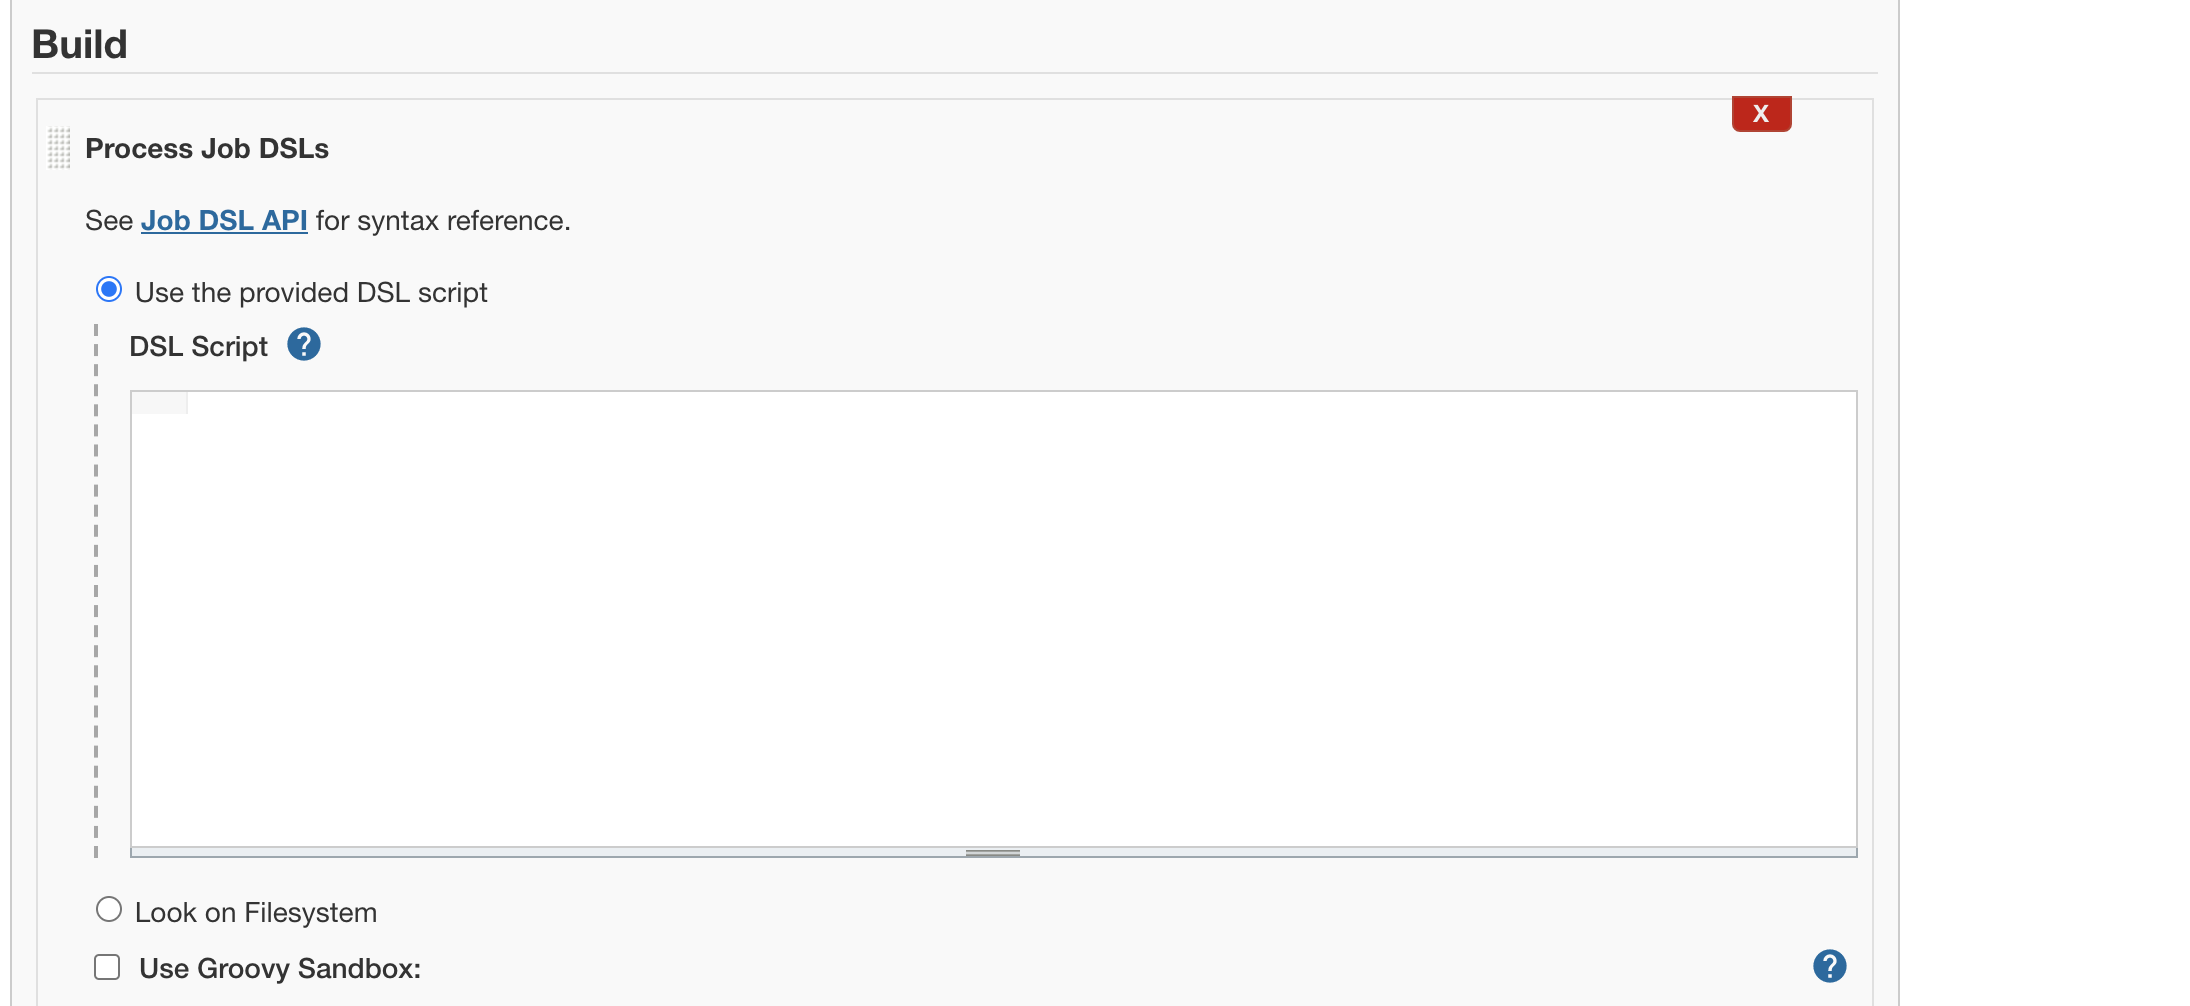
Now you can start writing DSL to generate new job
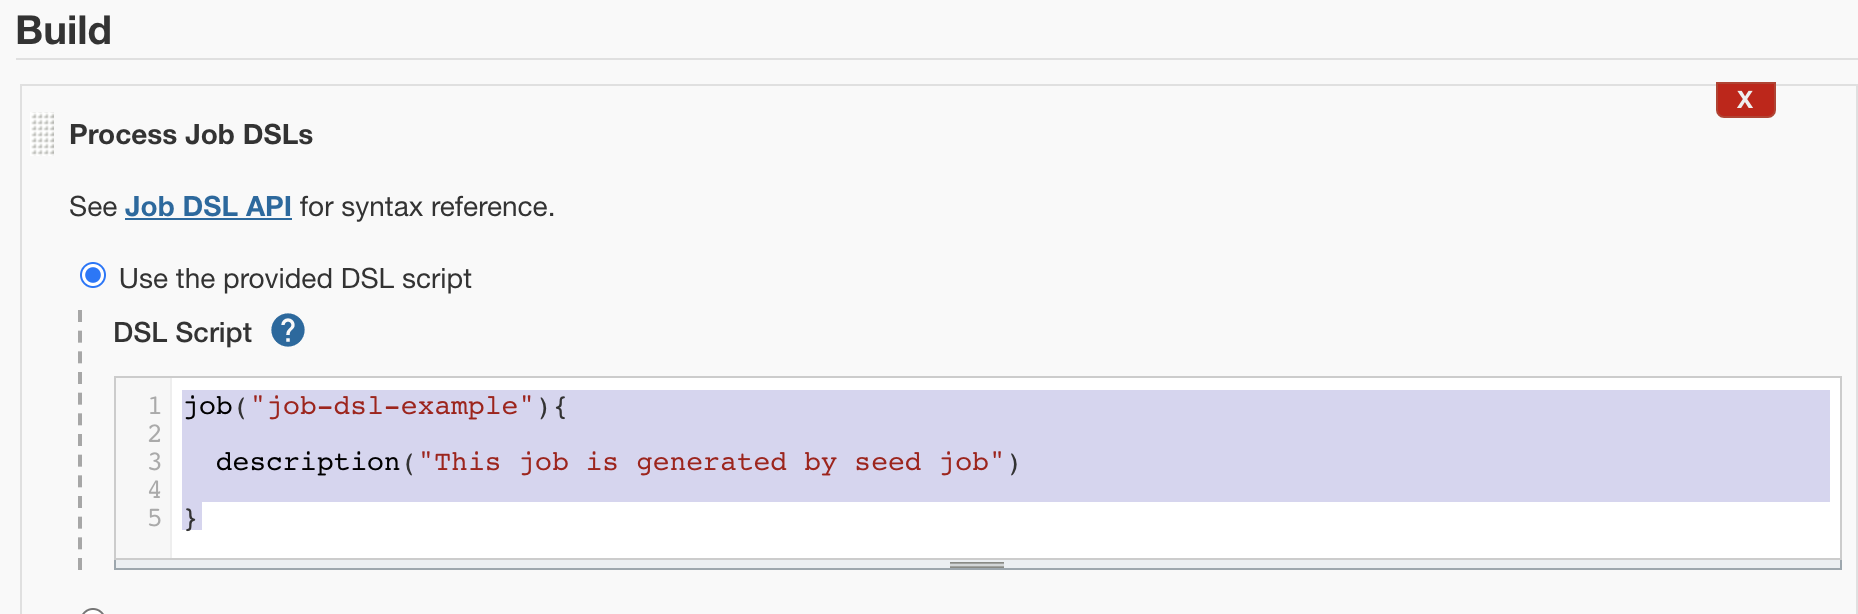
Create job with description
Now build this job and you will be able to see tha a new job with the name job-dsl-example is created.
job("job-dsl-example"){

  description("This job is generated by seed job")

  parameters{
  	stringParam("Name",defaultValue="Pulkit",description="This is the world")
    booleanParam("Post Graduate",false)
    choiceParam("Designation",["SE","SSE","ATL"])
  }

  scm{
  	git("https://github.com/pulkitpushkarna/spring-gradle-project-for-jenkins","master")
  }

  steps{
    gradle{
    	tasks("test")
    }
    gradle{
        tasks("bootJar")
    }
    shell("deploy.sh")
  }

}
Seed job for a gradle project
jenkinsfile
- jenkinsfile is used to create jenkins pipeline
- A Pipeline is another way of defining some Jenkins steps using code, and automate the process of deploying software.
- It is created using a Domain Specific Language(DSL) .
- Pipelines are written into a text file and treated as code; this means they can be added to version control and modified later on.
- To start using pipelines we have to install the Pipeline plugin that allows composing simple and complex automation.
Create a new job for pipeline
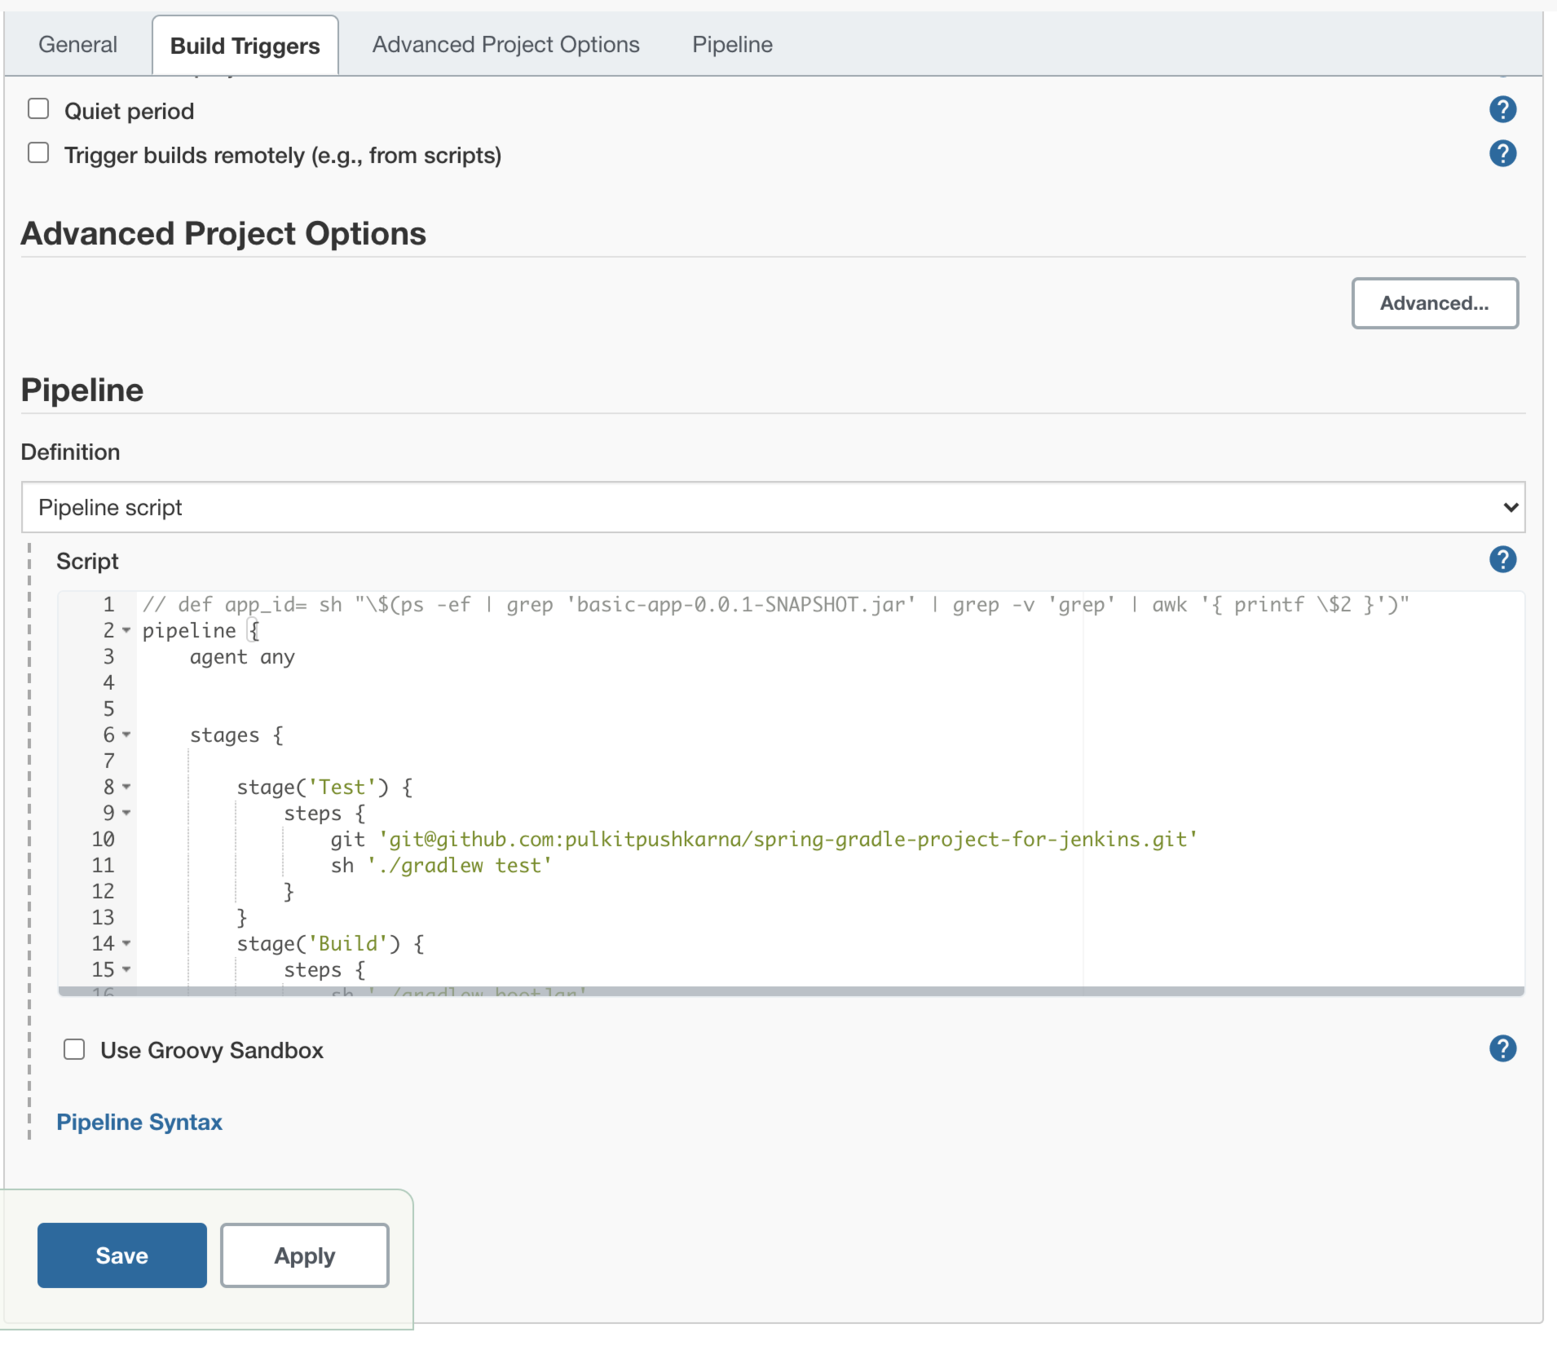
Configure pipeline job by introducing declarative script in pipeline
pipeline {
    agent any


    stages {

        stage('Test') {
            steps {
                git 'git@github.com:pulkitpushkarna/spring-gradle-project-for-jenkins.git'
                sh './gradlew test'
            }
        }
        stage('Build') {
            steps {
                sh './gradlew bootJar'
            }
        }
        stage('Deploy') {
            steps {

                 sh "kill -9 \$(ps -ef | grep 'basic-app-0.0.1-SNAPSHOT.jar' | grep -v 'grep' | awk '{ printf \$2 }')"

                withEnv(['JENKINS_NODE_COOKIE=dontkill']) {
                    sh 'nohup java -jar ./build/libs/basic-app-0.0.1-SNAPSHOT.jar &'
                }
            }
        }
    }
}
Exercise 3
- Prepare a seed job which set up a job for the deployment of a Spring Boot project
- Perform spring boot app deployment with the help of Jenkinsfile.
Jenkins for Java Developers part 2
Integration email
- Go to manage jenkins -> Configure system
- Now scroll down to Extended E-mail Notification
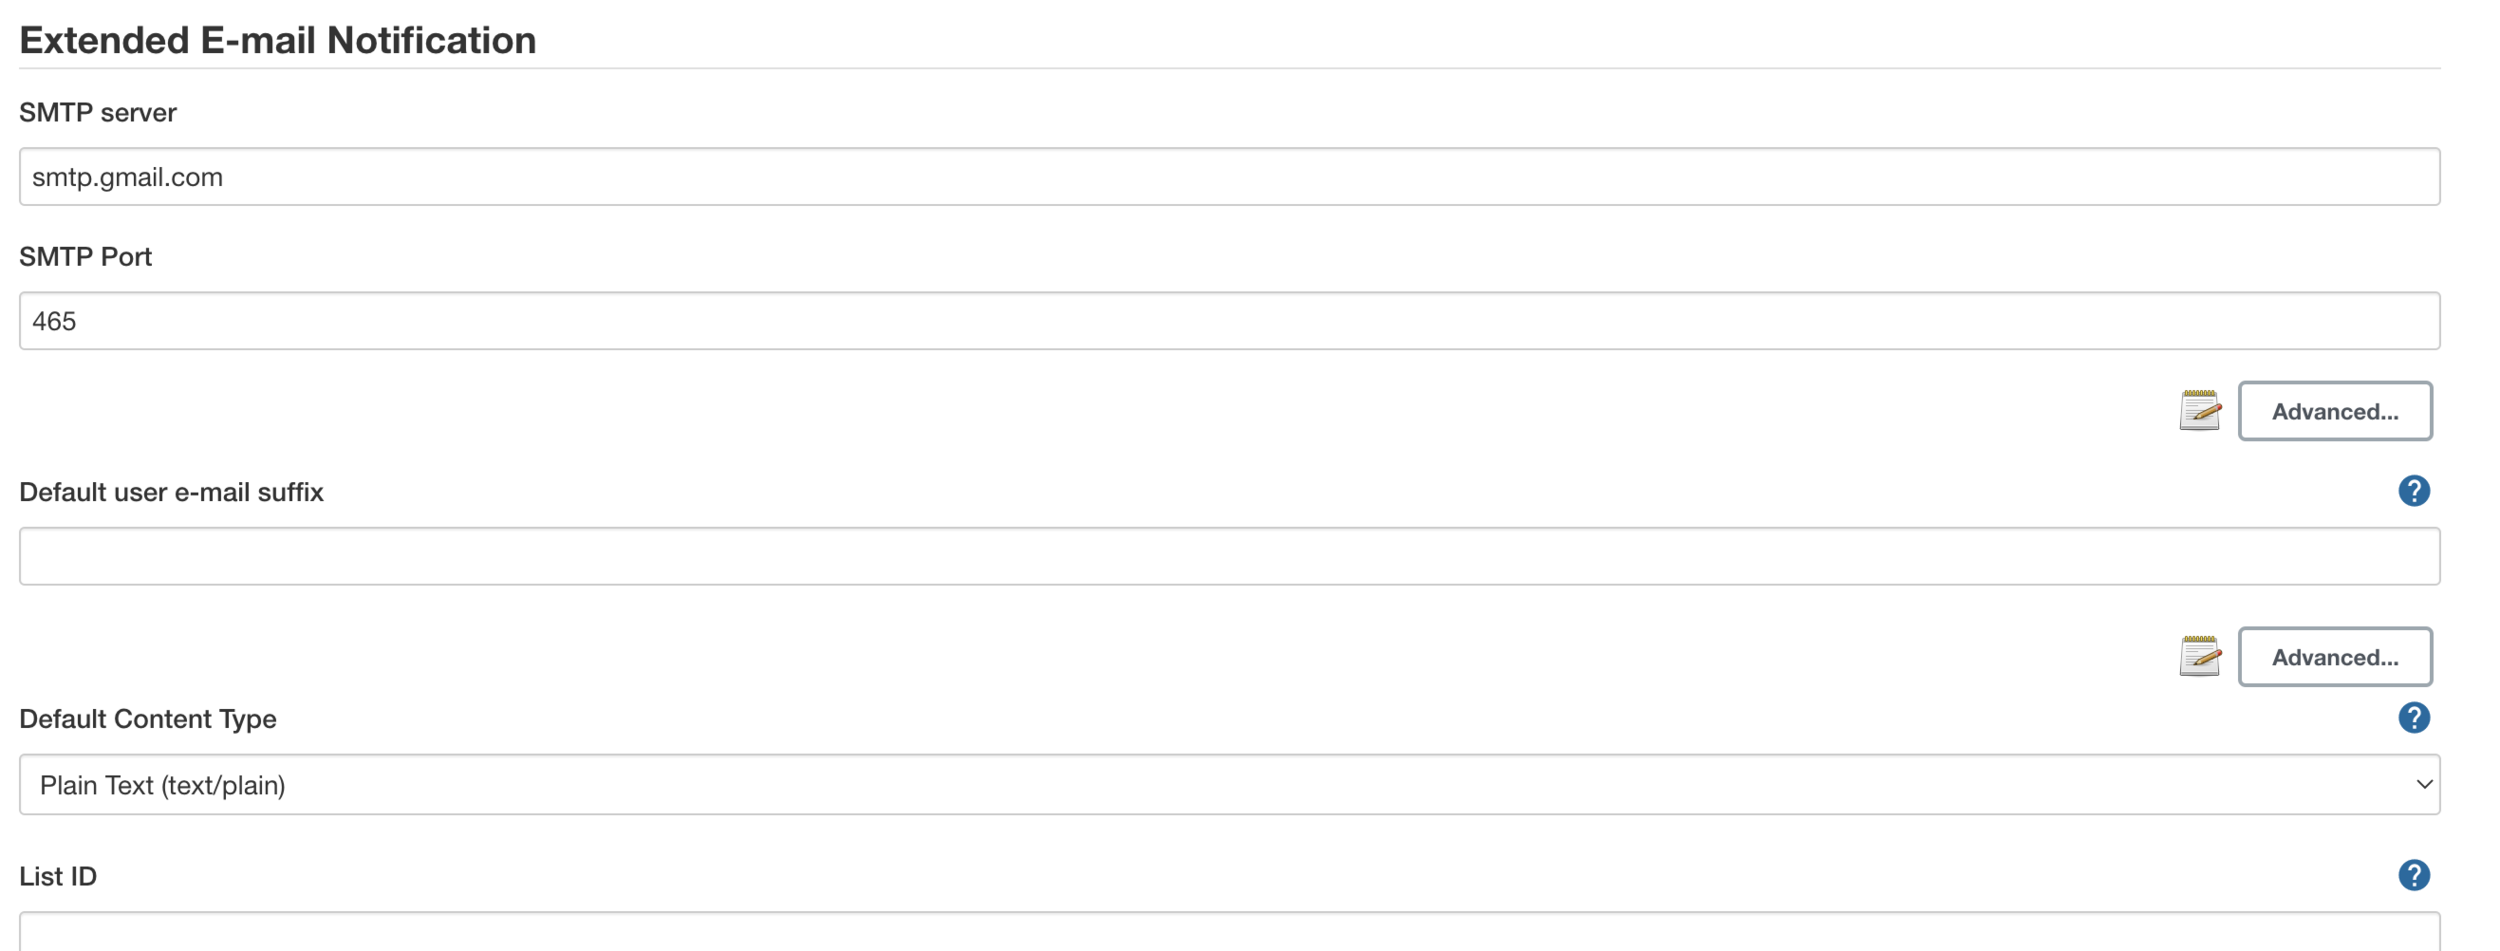
- Set SMTP server name as smtp.gmail.com
- SMTP Port to 465
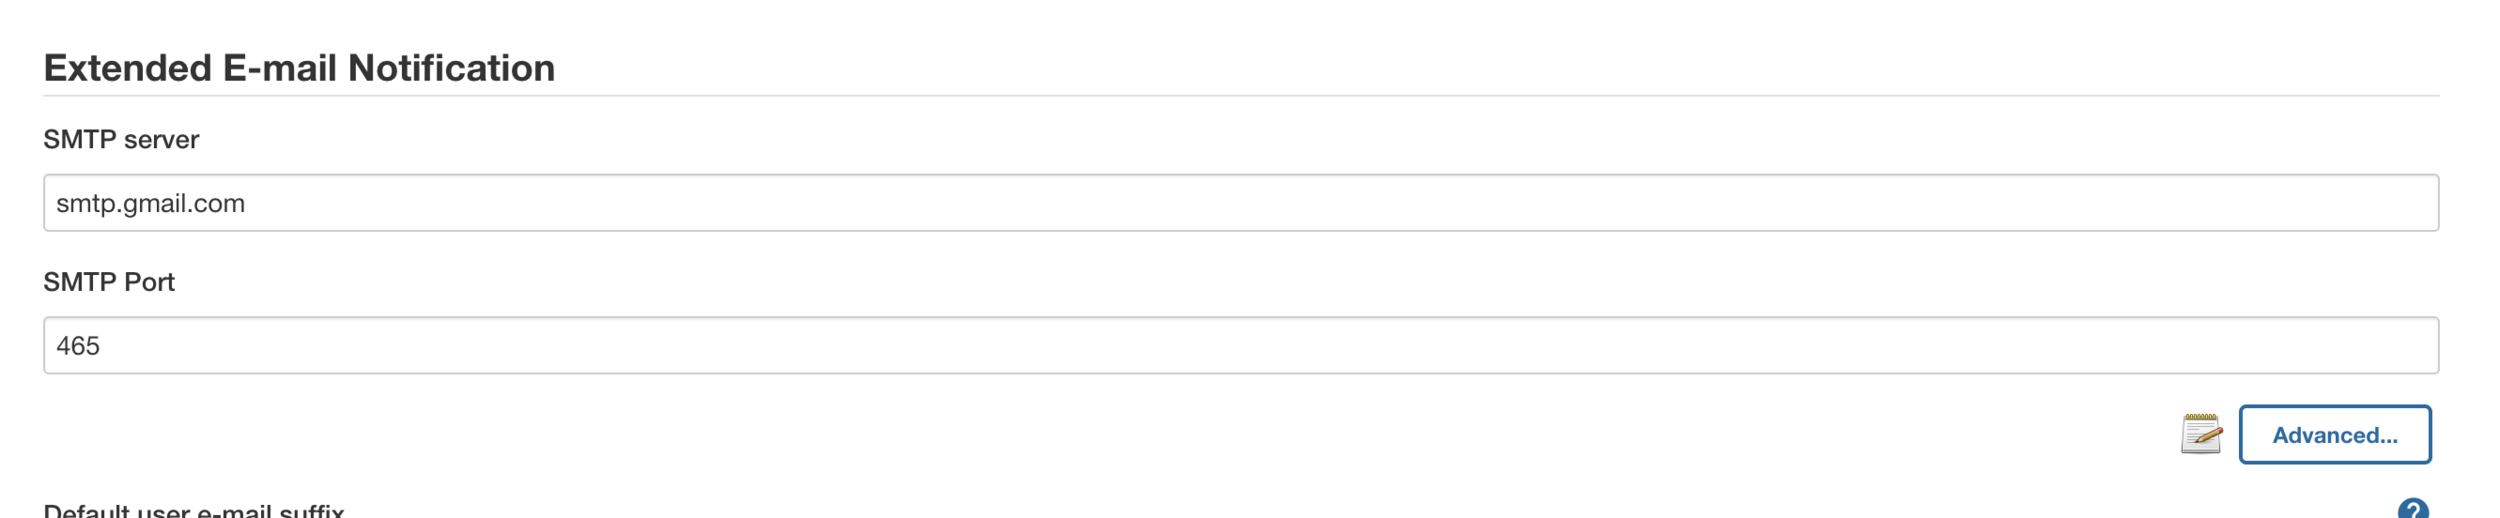
- Click on the advance button just below SMTP port textbox
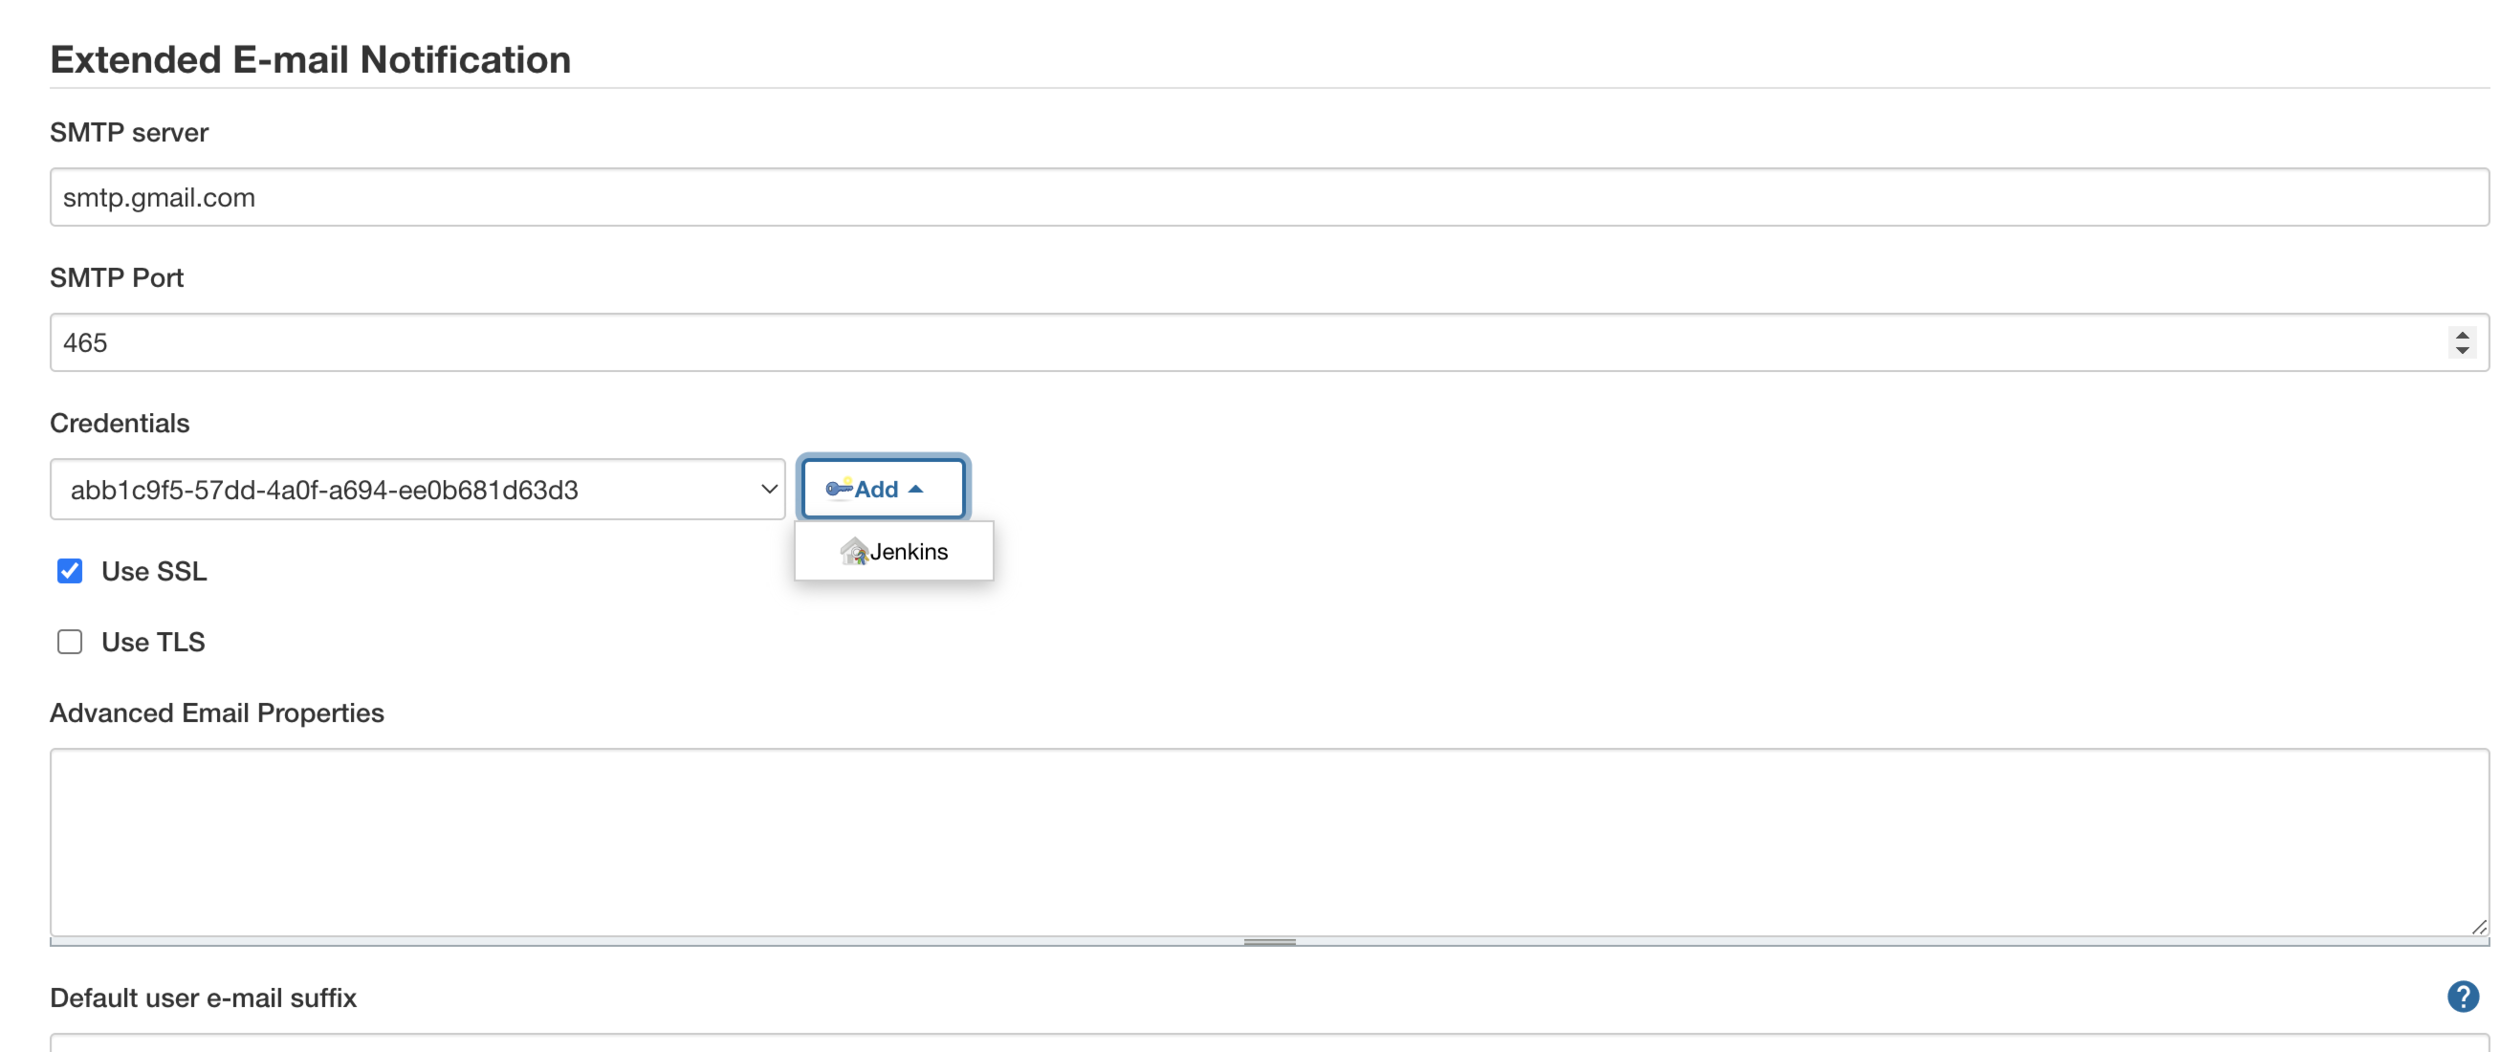
- Check use SSL
- Add jenkins credentials
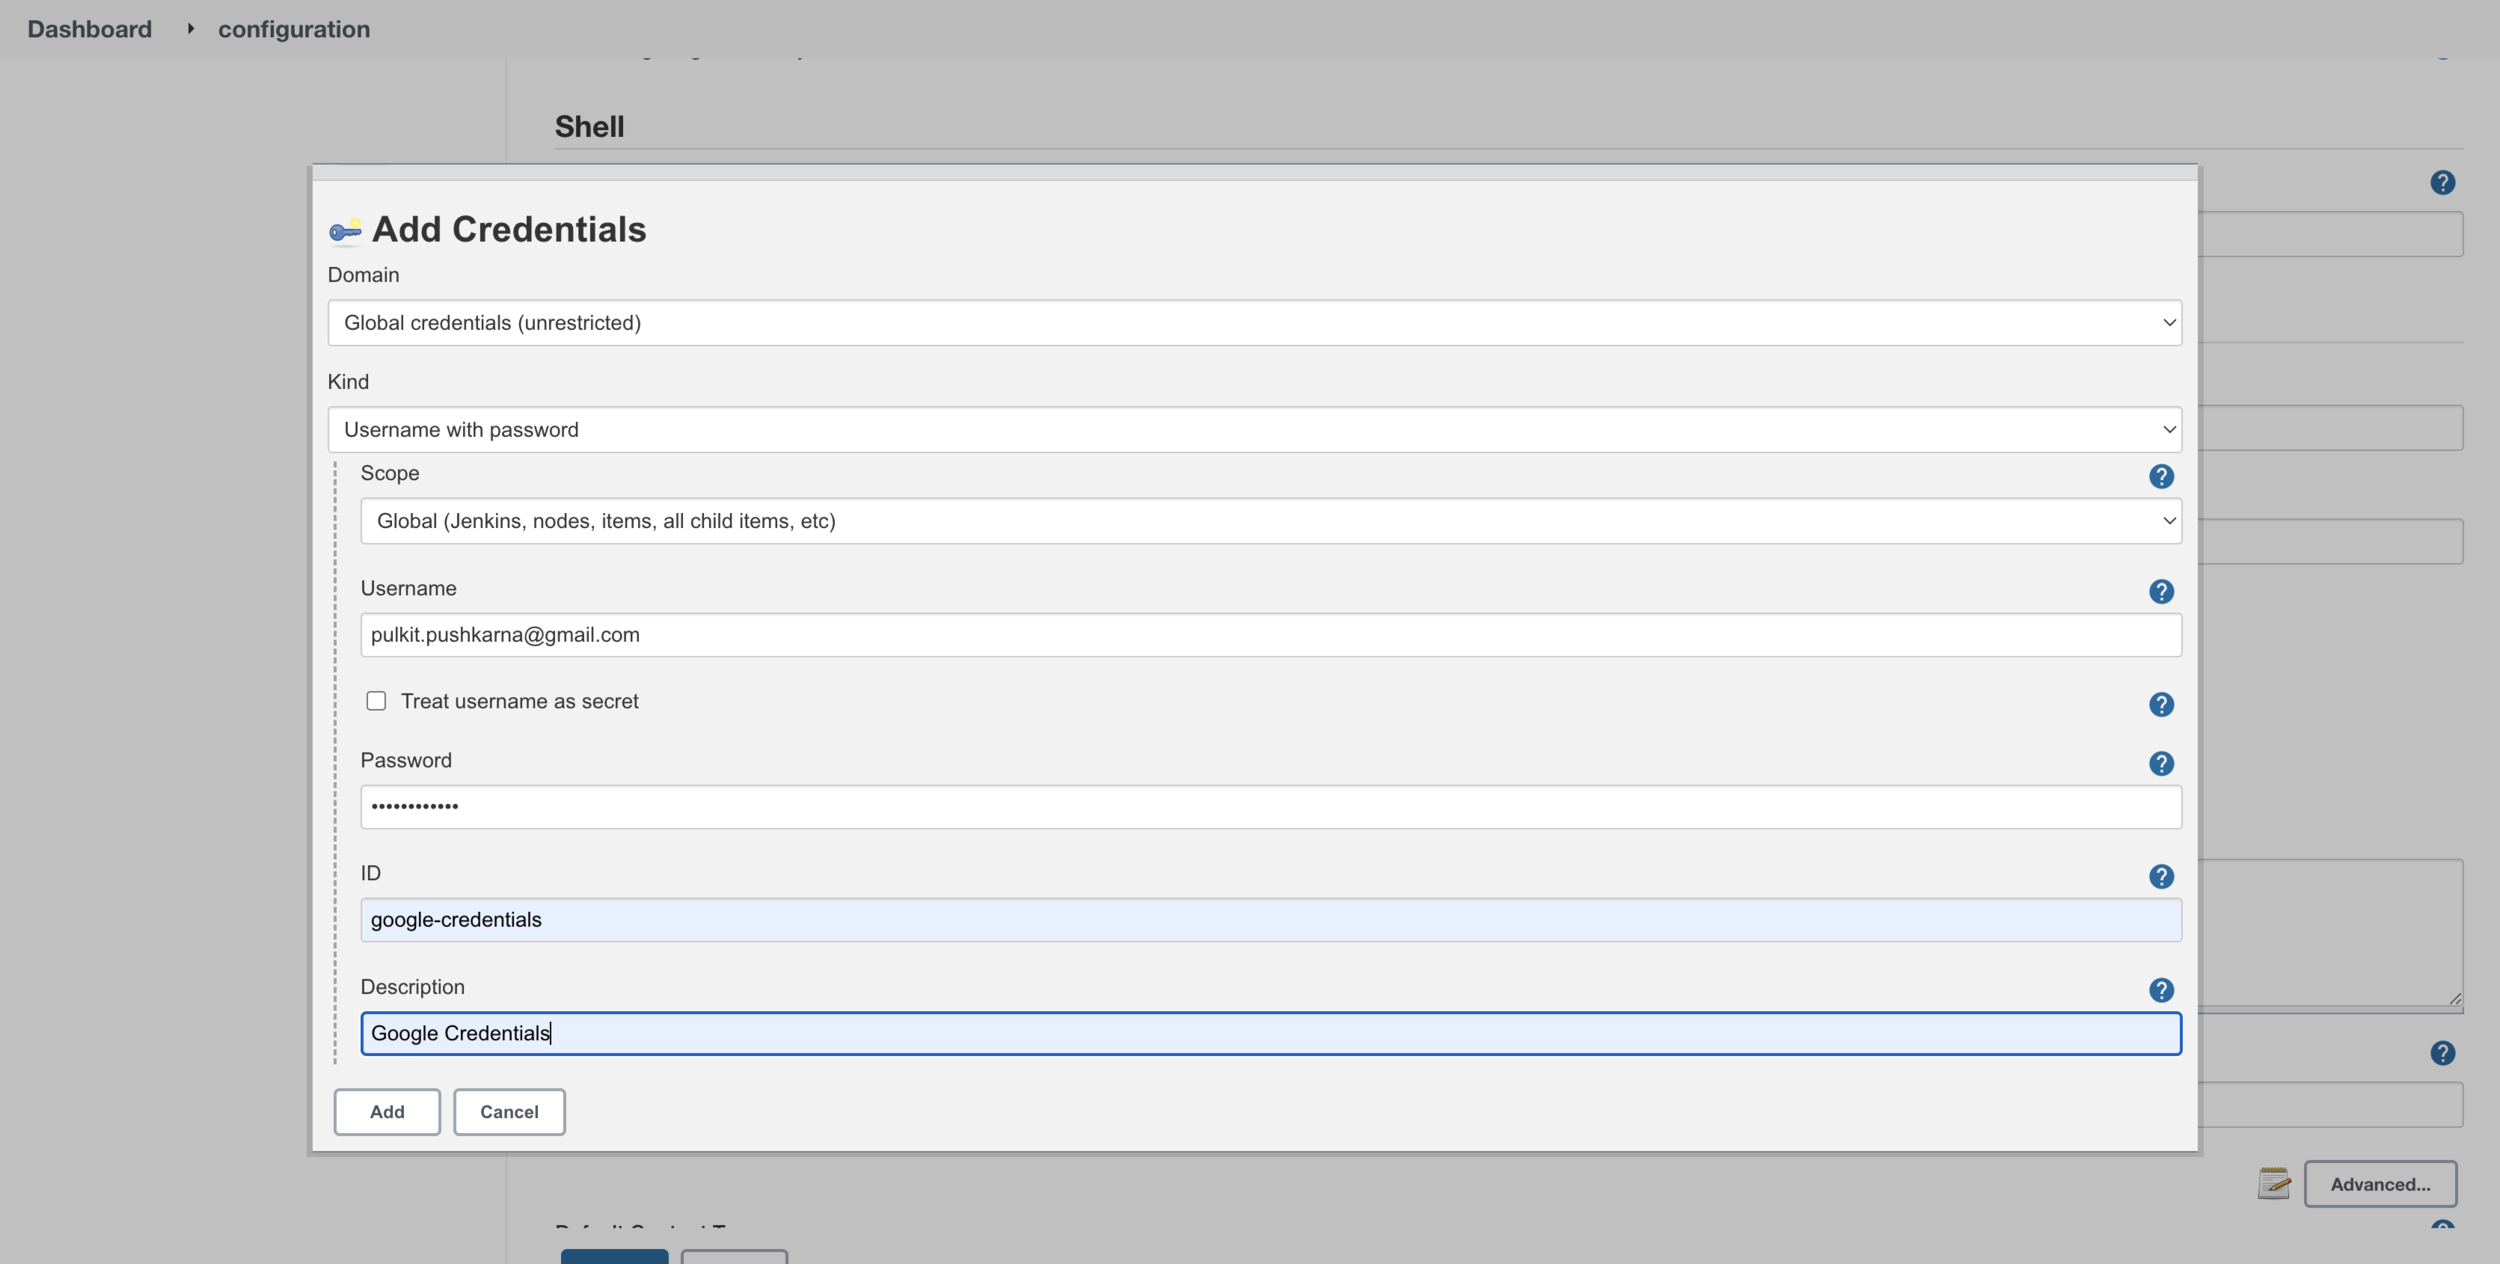
- Enter the credentials of you gmail id
- hit add button
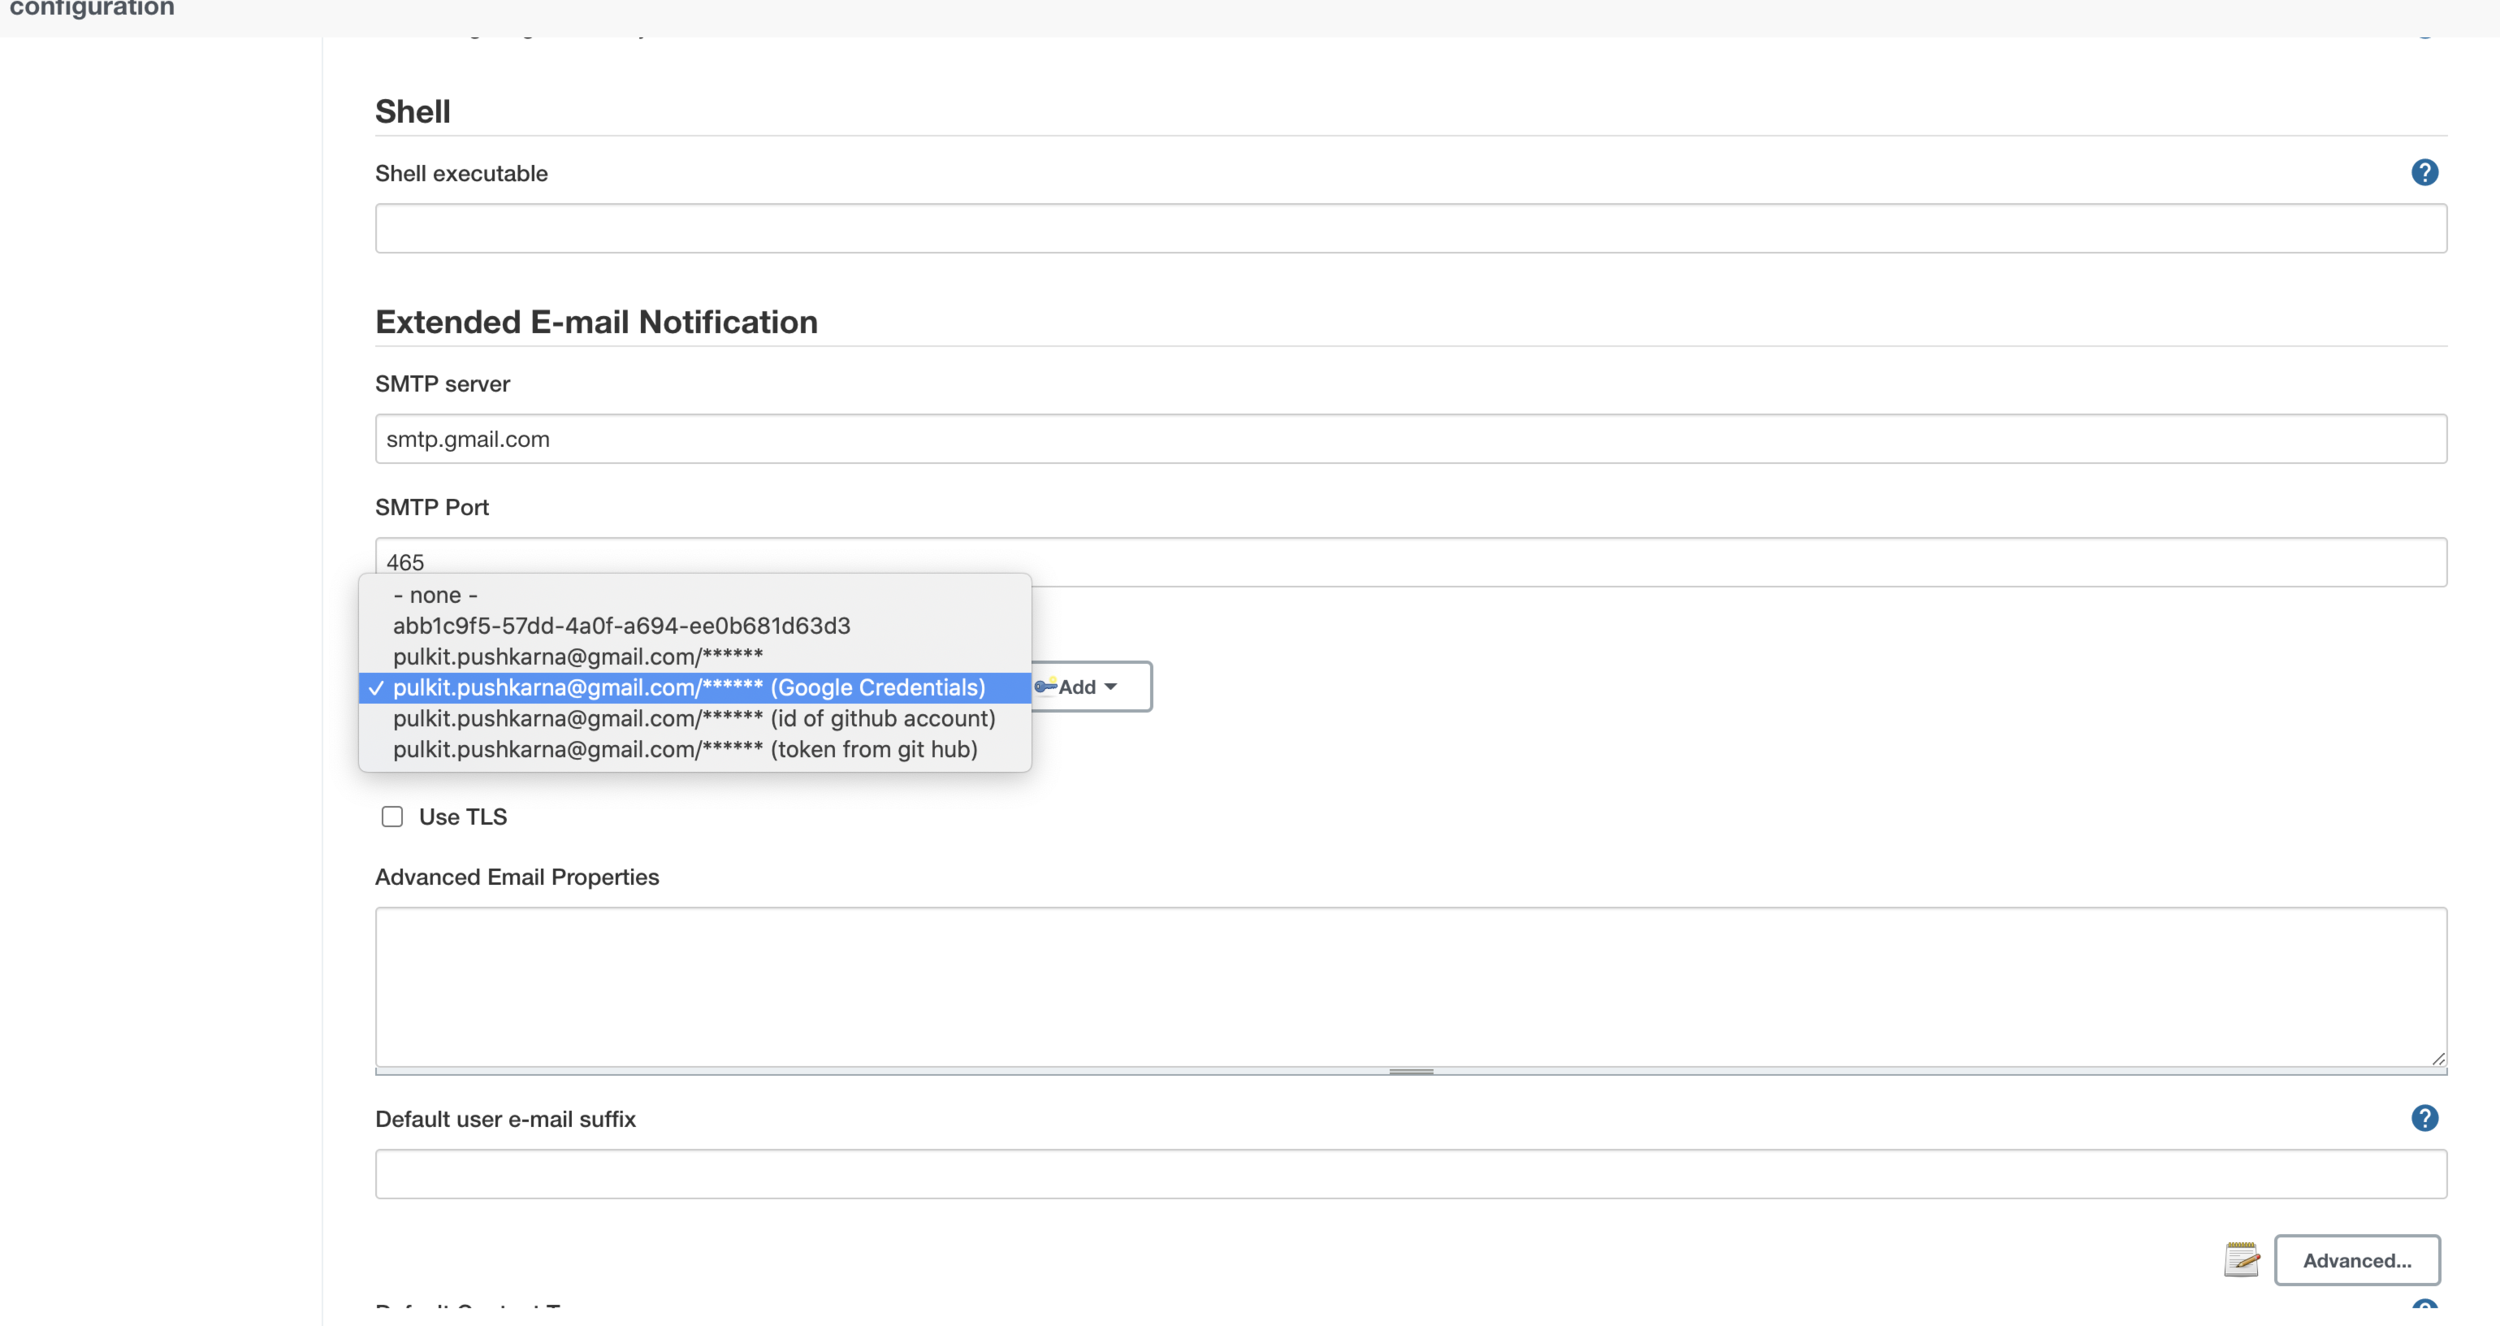
- Select you credentials
- Click save
- Create a new item freestyle project
- enter invalid shell command
- add email notification post build and check the checkbox send email for every unstable build
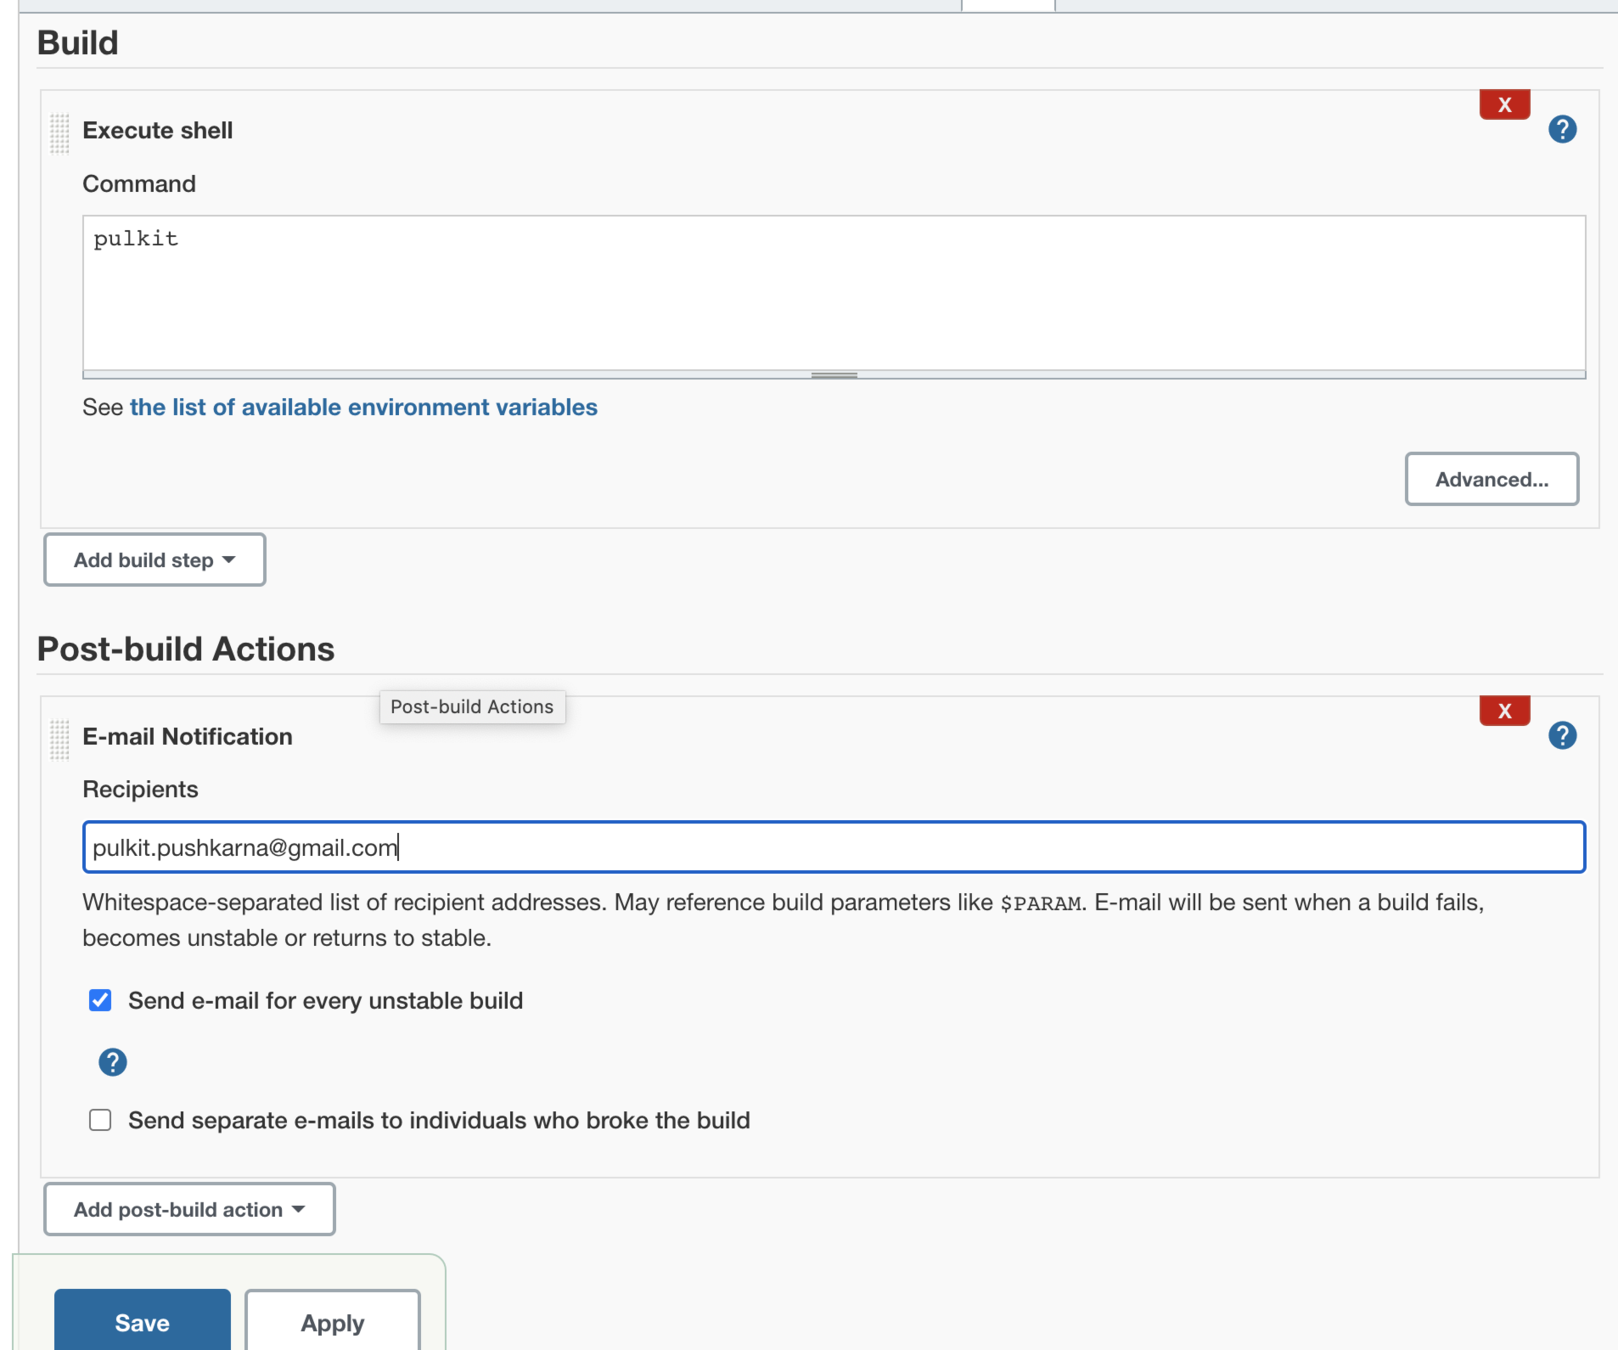
- run the test email job you will observer that the mail has been send on the build fail.
- Now edit the job and enter a valid command in bash shell and again run the job
- You will observer that the recovery mail is send on the email id.
Create a String app with following files
package com.jenkins.pipeline.demo.jenkinspipelinedemo;

import org.springframework.beans.factory.annotation.Value;
import org.springframework.boot.SpringApplication;
import org.springframework.boot.autoconfigure.SpringBootApplication;
import org.springframework.web.bind.annotation.GetMapping;
import org.springframework.web.bind.annotation.RestController;
import java.util.HashMap;
import java.util.Map;

@SpringBootApplication
@RestController
public class JenkinsPipelineDemoApplication {

	@Value("${app.version}")
	String appVersion;

	@Value("${app.env}")
	String appEnv;

	@GetMapping("/")
	public Map<String,String> index(){
		Map<String,String> map= new HashMap<>();
		map.put("appVersion",appVersion);
		map.put("appEnv",appEnv);
		return map;
	}

	public static void main(String[] args) {
		SpringApplication.run(JenkinsPipelineDemoApplication.class, args);
	}
}
application.properties
server.port=8611
app.version=v1
app.env=stage
Dockerfile
FROM tomcat:8.5.50-jdk8-openjdk

RUN apt-get update

WORKDIR /usr/local/bin

COPY ./build/libs/jenkins-pipeline-demo-0.0.1-SNAPSHOT.jar .

EXPOSE 8080

CMD ["java","-jar","jenkins-pipeline-demo-0.0.1-SNAPSHOT.jar"]
Test cases
package com.jenkins.pipeline.demo.jenkinspipelinedemo;

import org.junit.jupiter.api.Test;
import org.springframework.boot.test.context.SpringBootTest;
import org.springframework.util.Assert;

@SpringBootTest
class JenkinsPipelineDemoApplicationTests {

	@Test
	void test1() {
		Assert.isTrue(true,"Canary Test Failed");
	}

	@Test
	void test2() {
		Assert.isInstanceOf(String.class,"String");
	}

	@Test
	void test3() {
		Assert.isNull(null,"Object is not Null");
	}

}
Create a private github repo and push the code to the remote repo
Generate Github API token
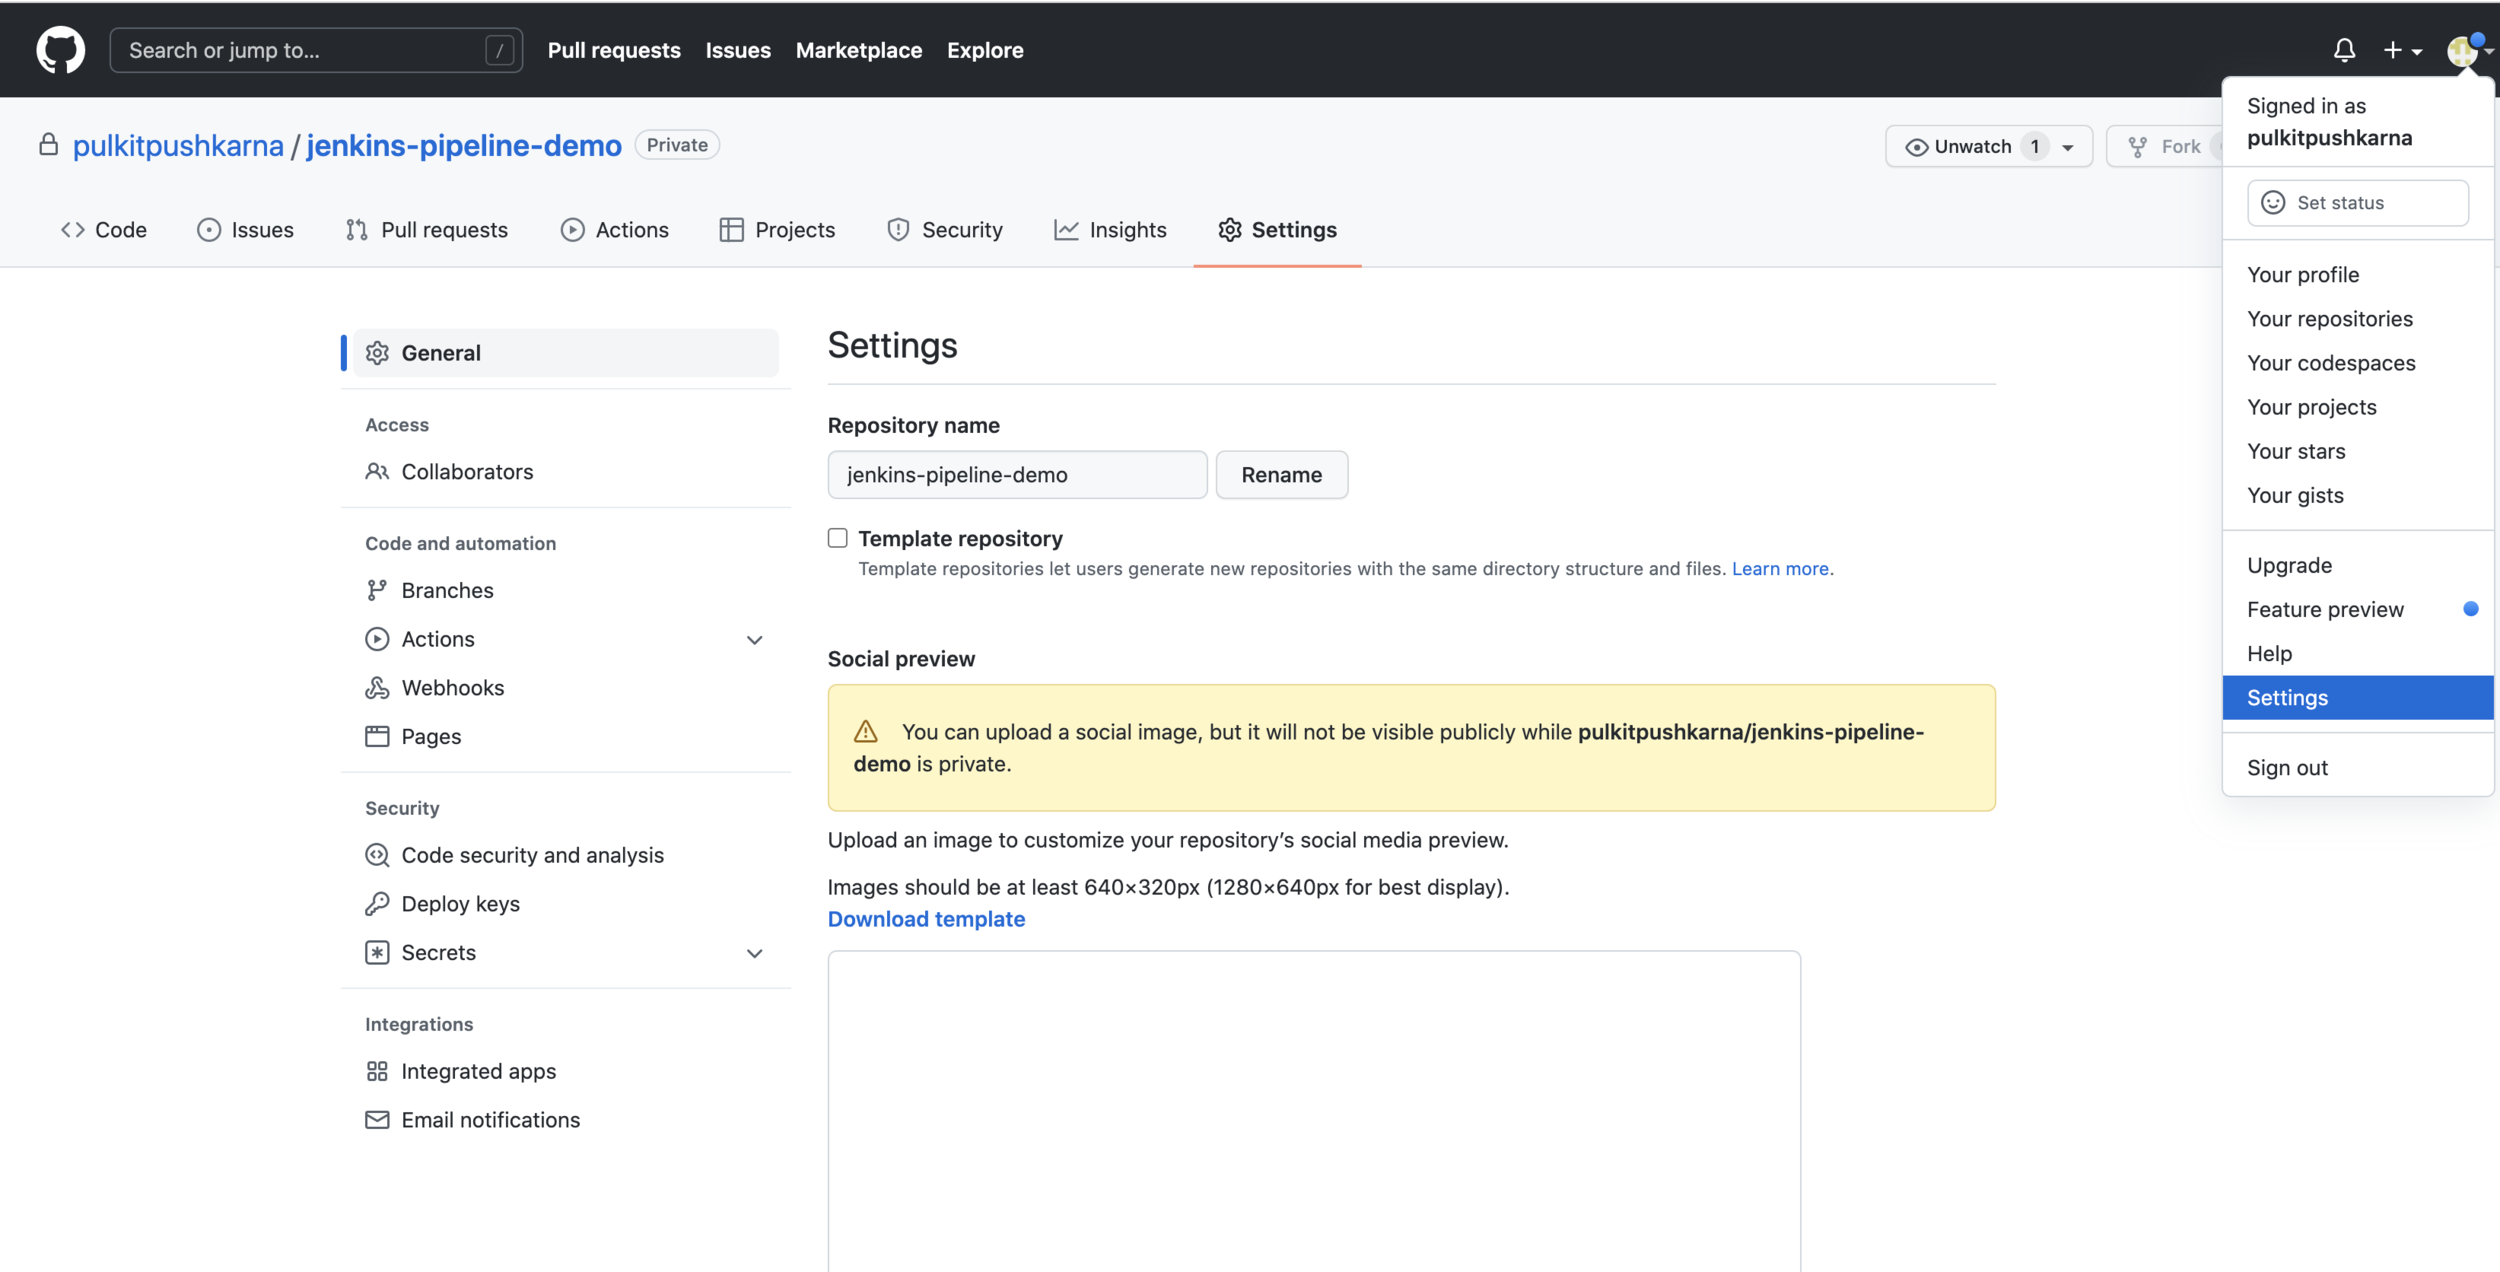
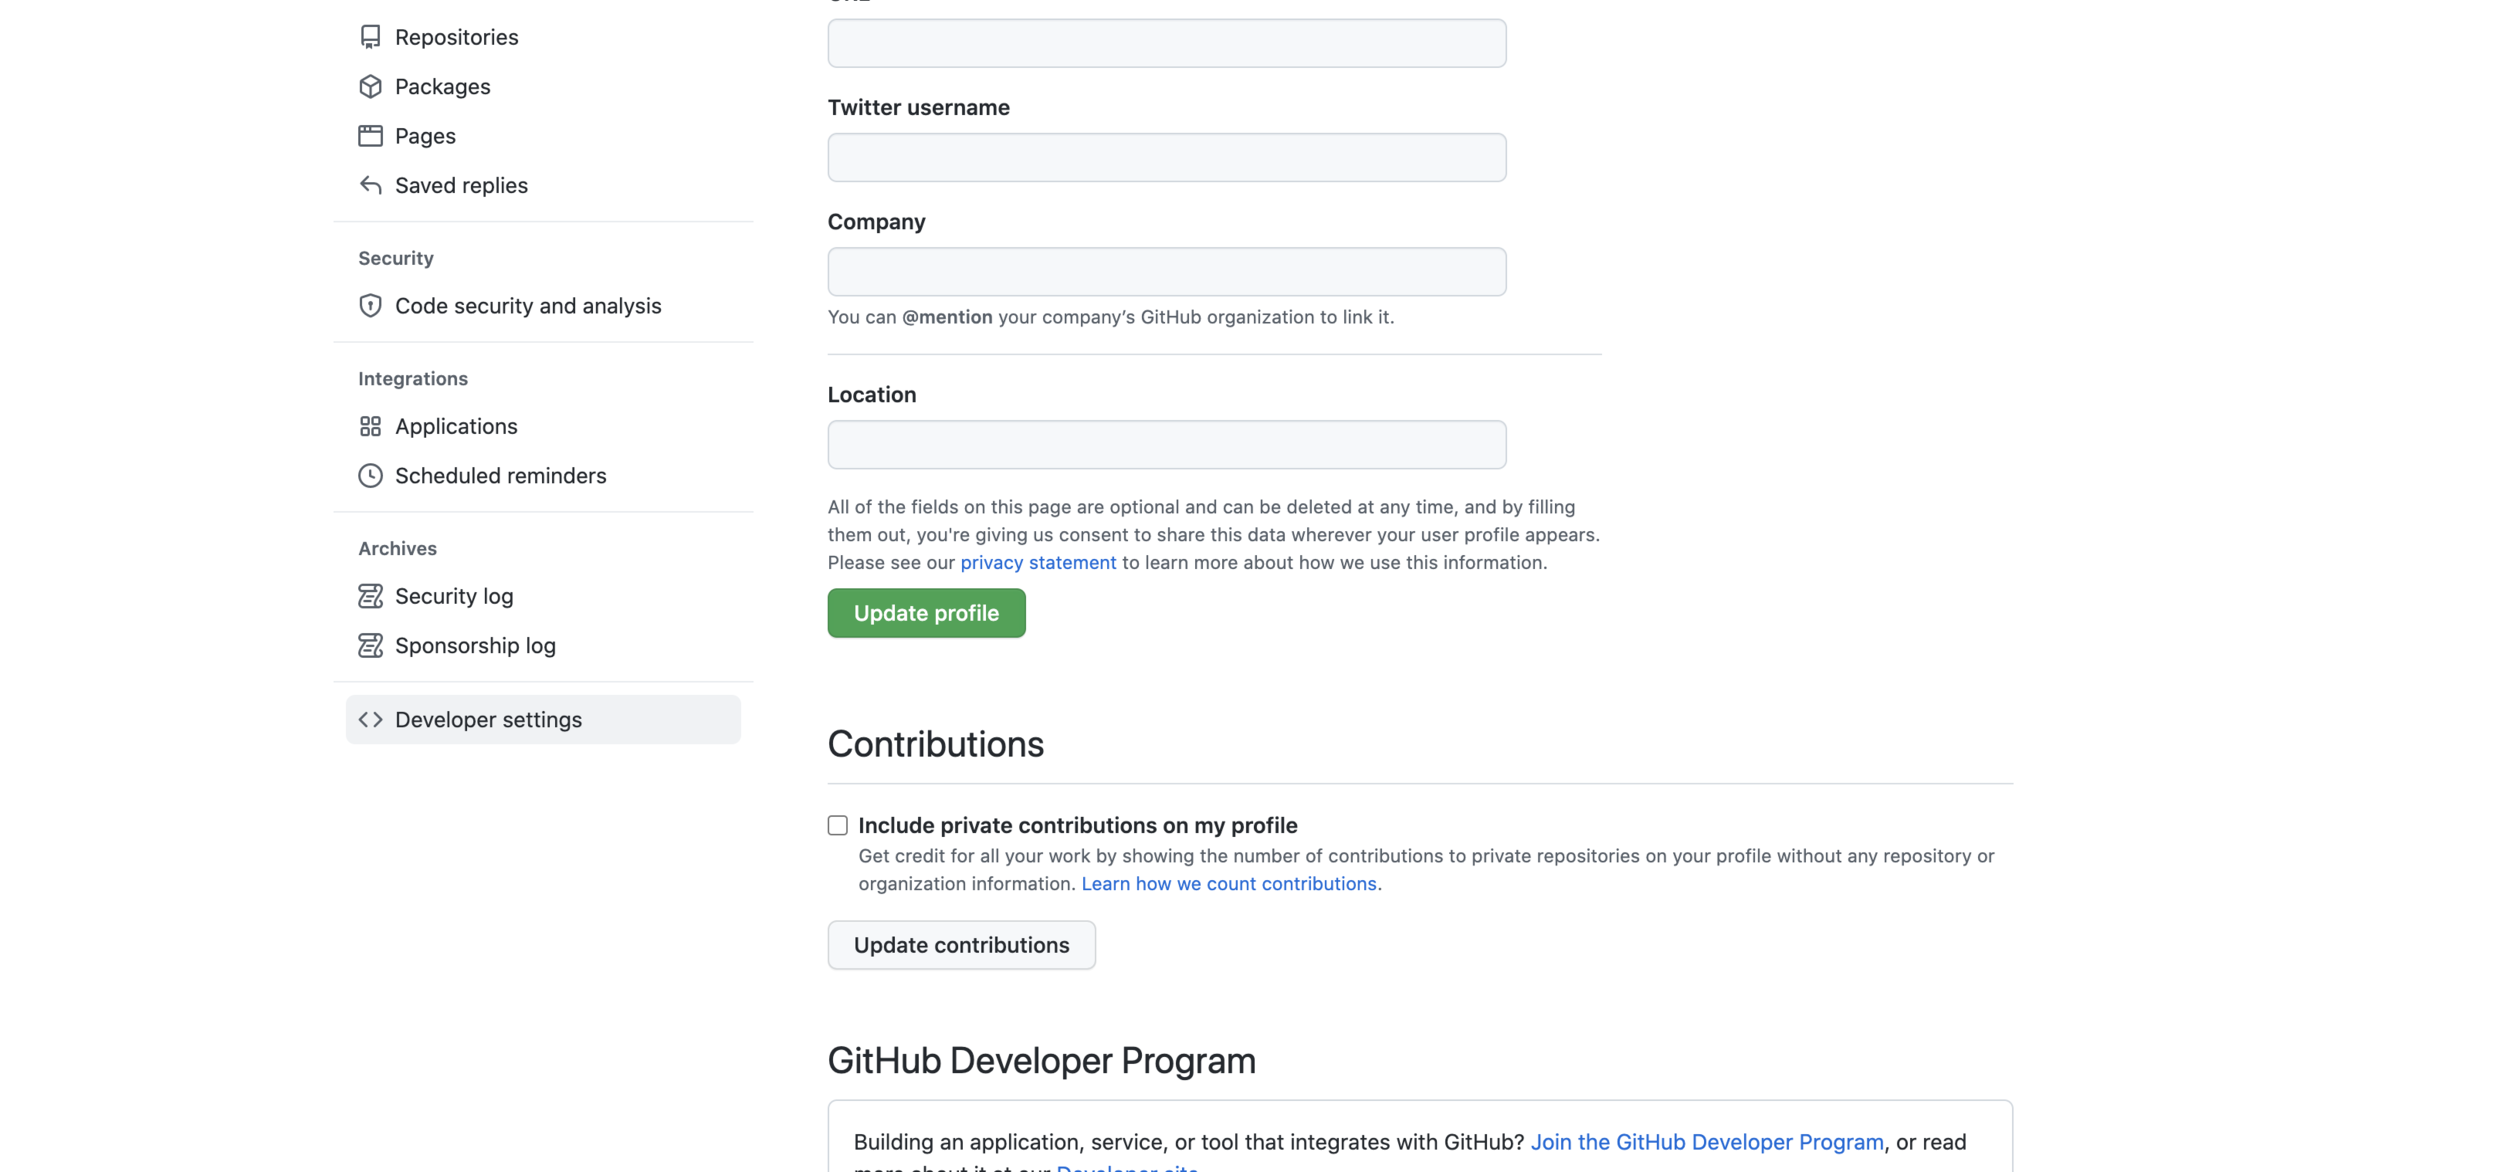
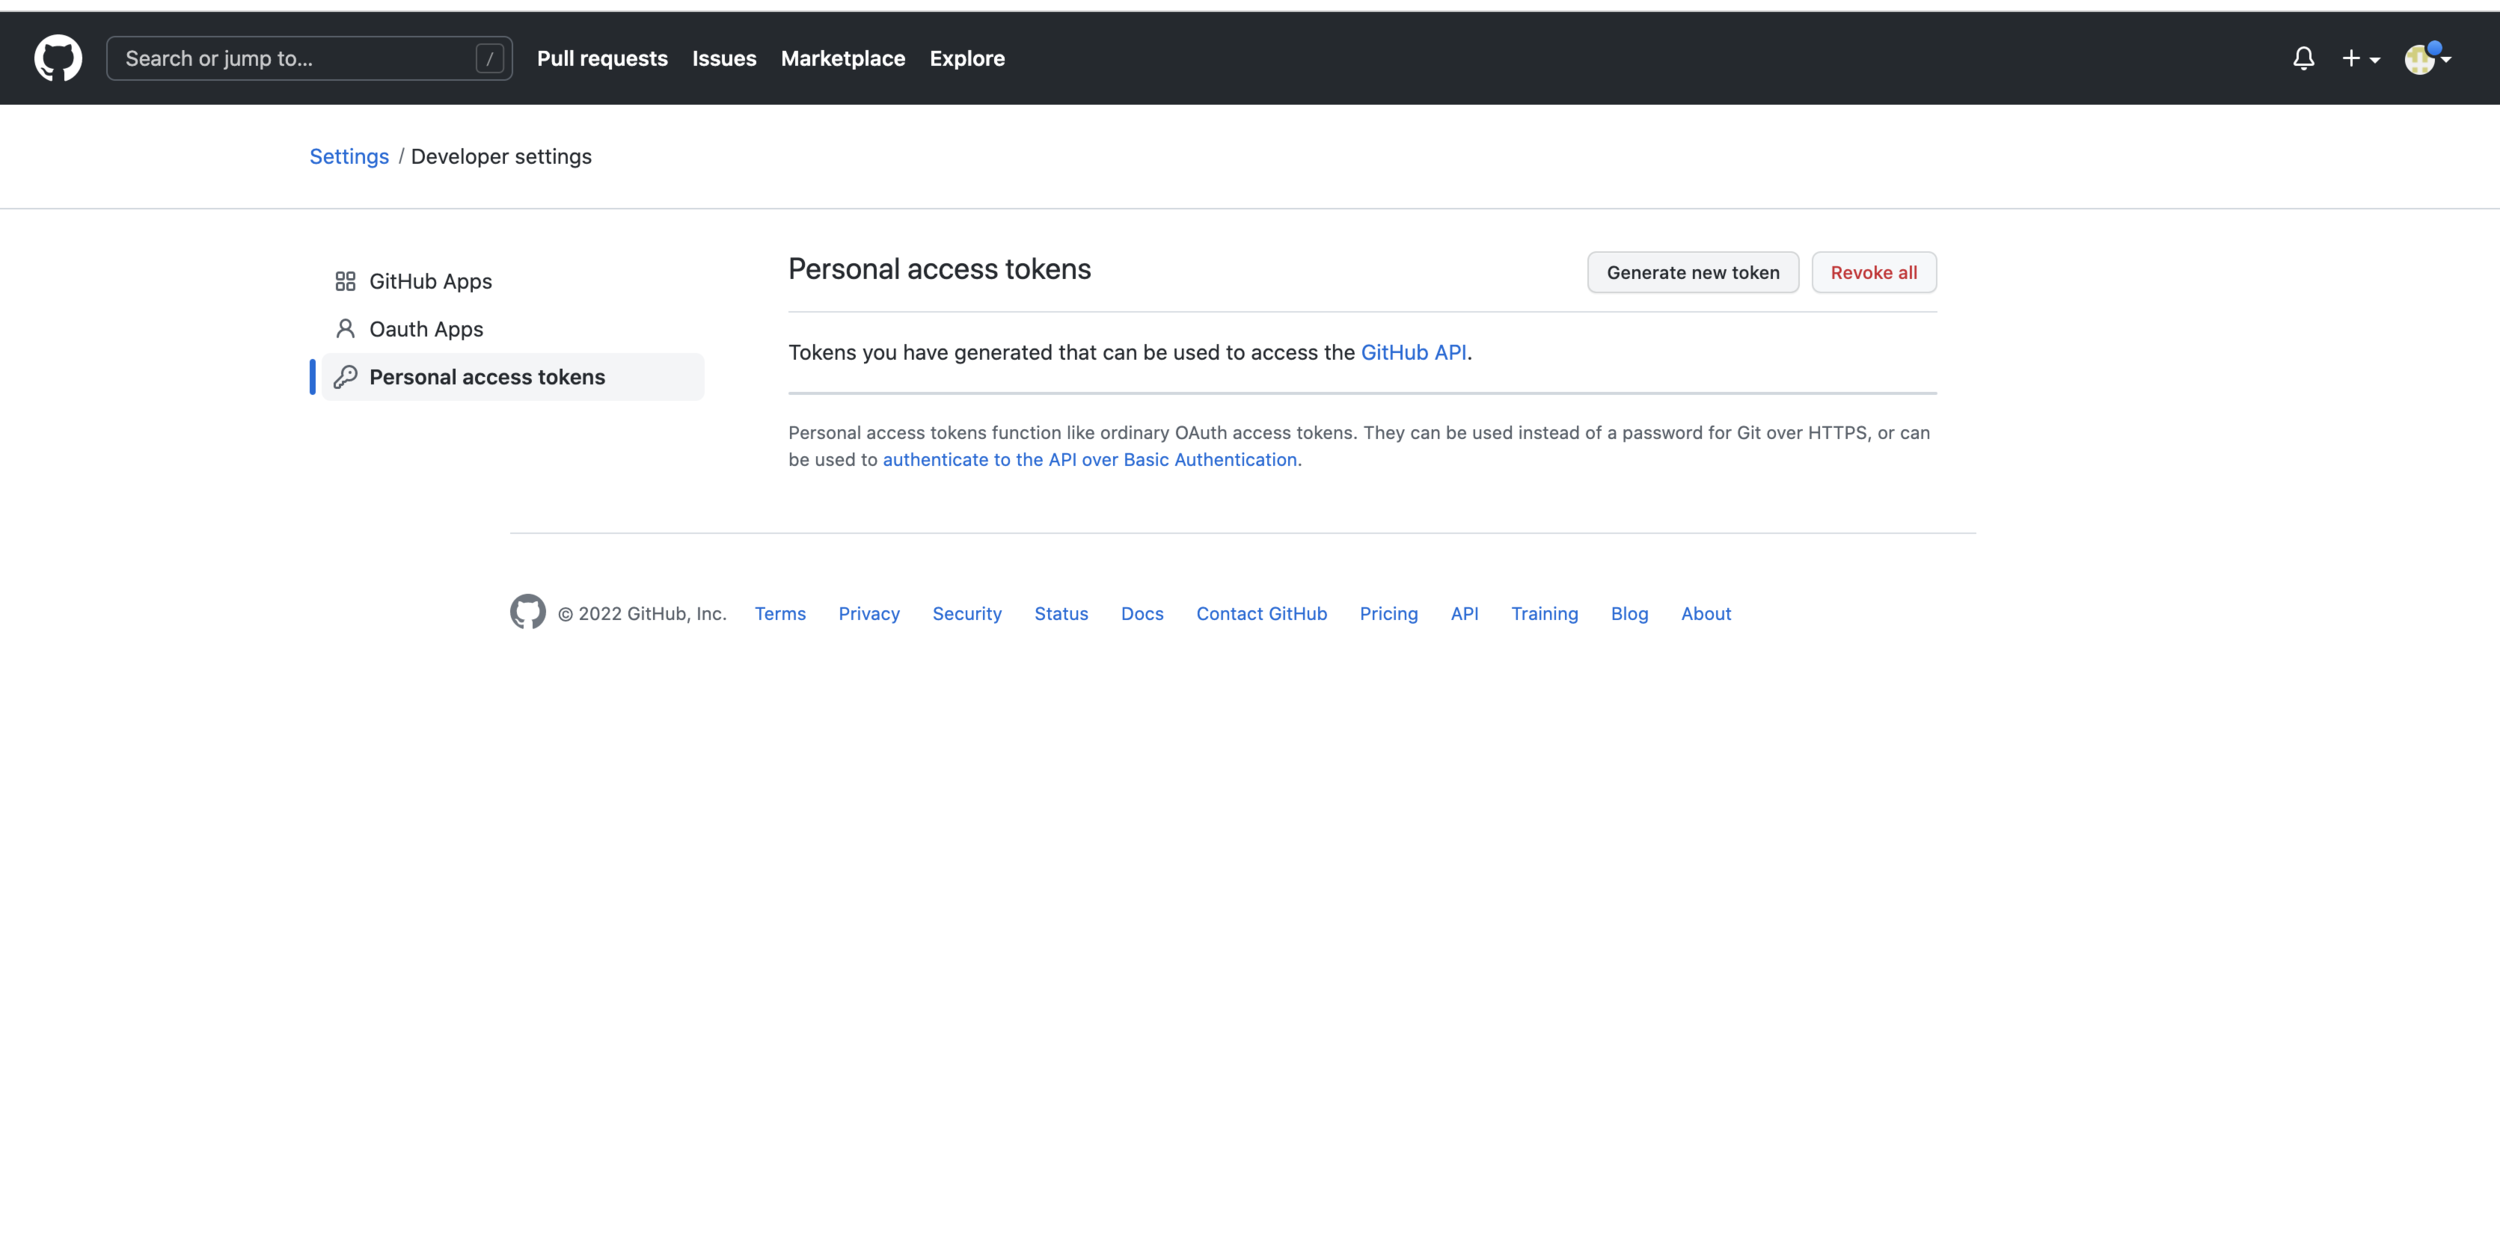
Go to Developer Settings
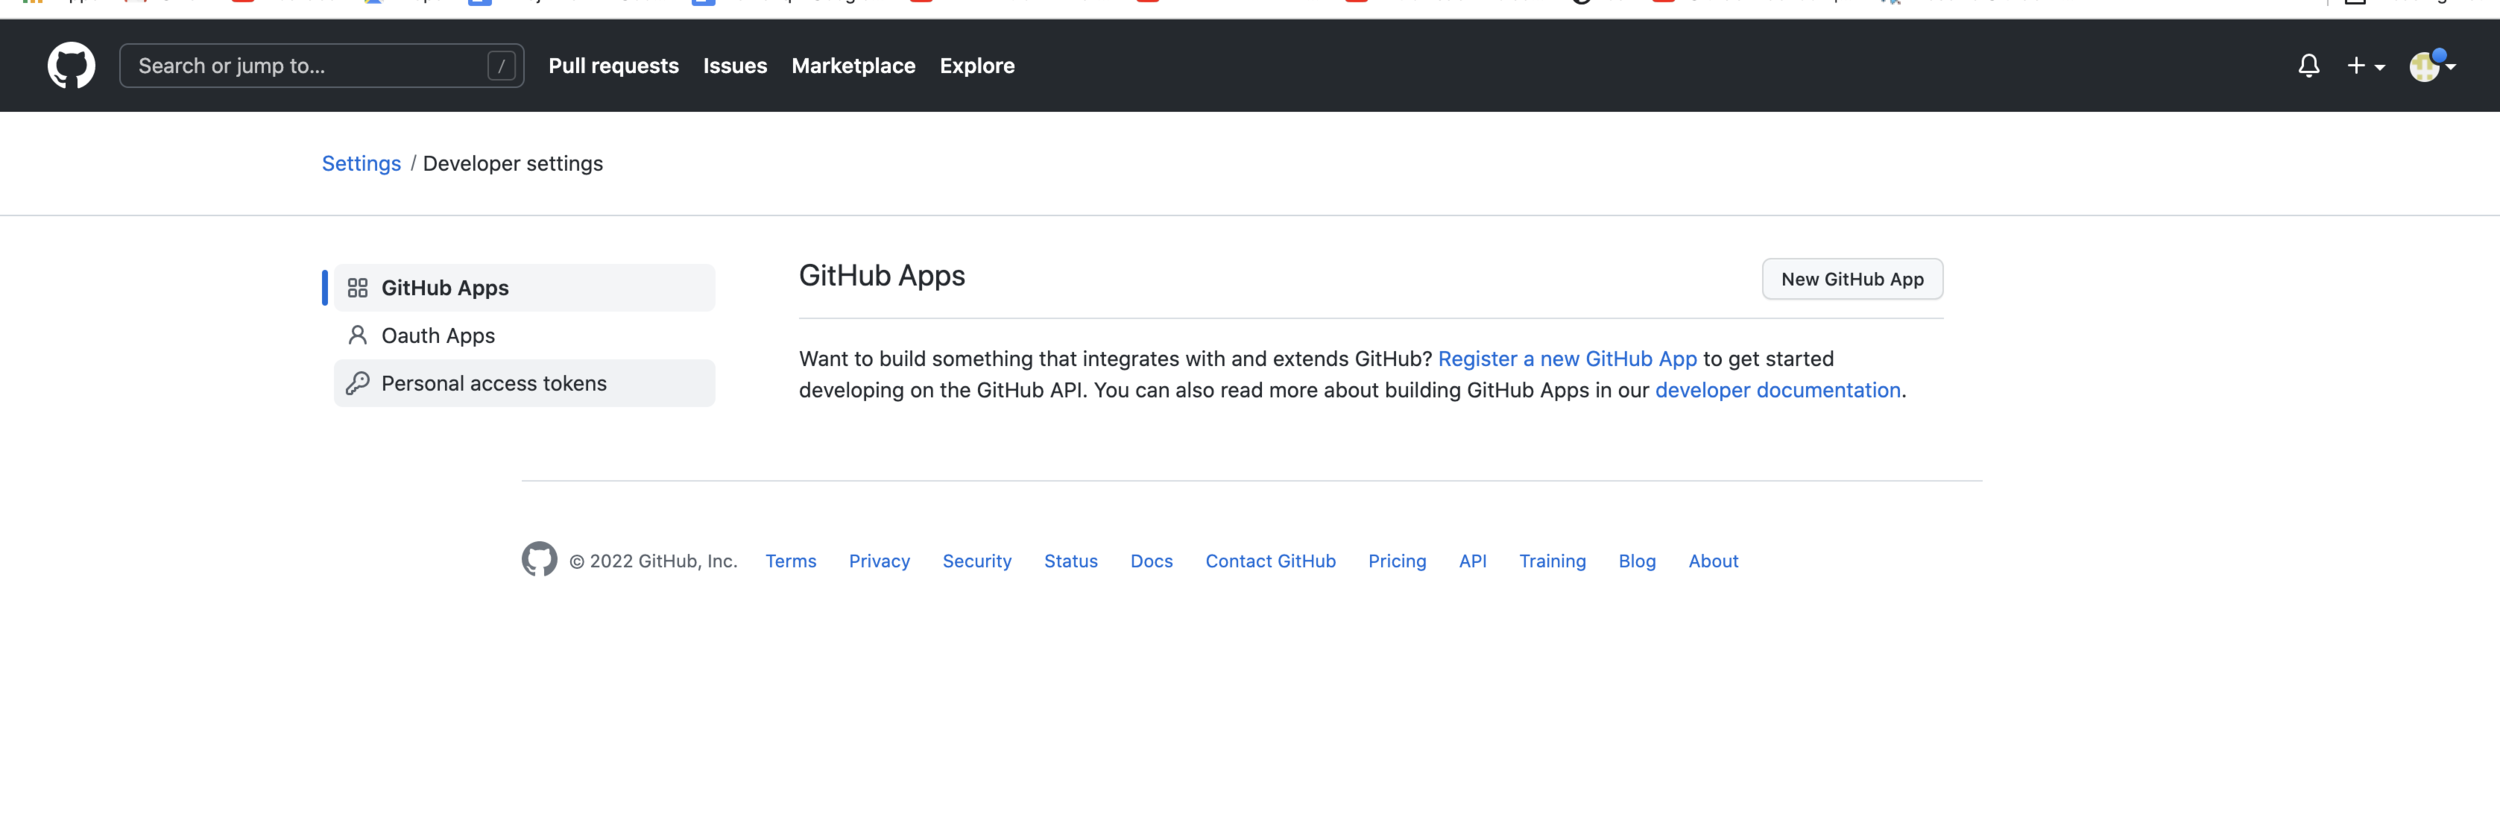
Go to Personal access tokens
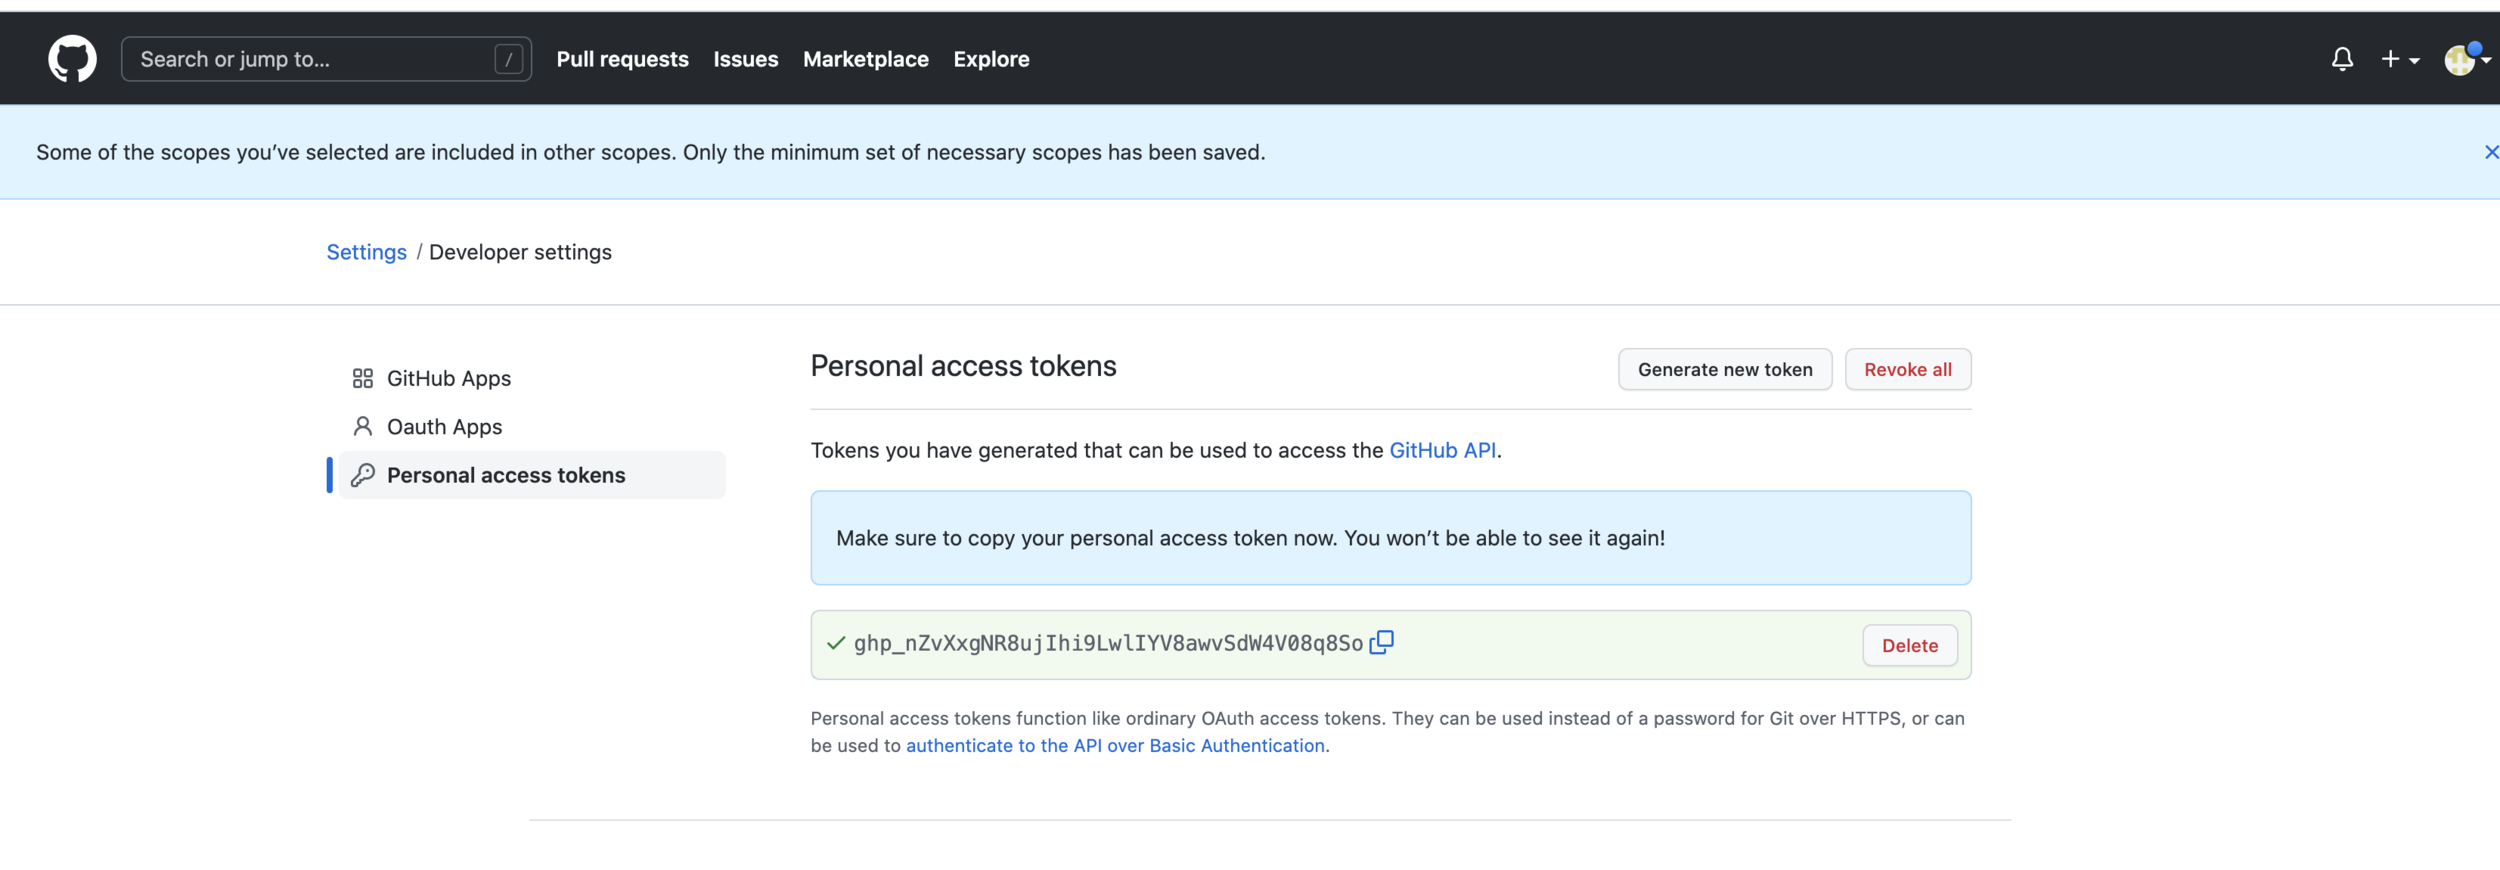
Generate Token
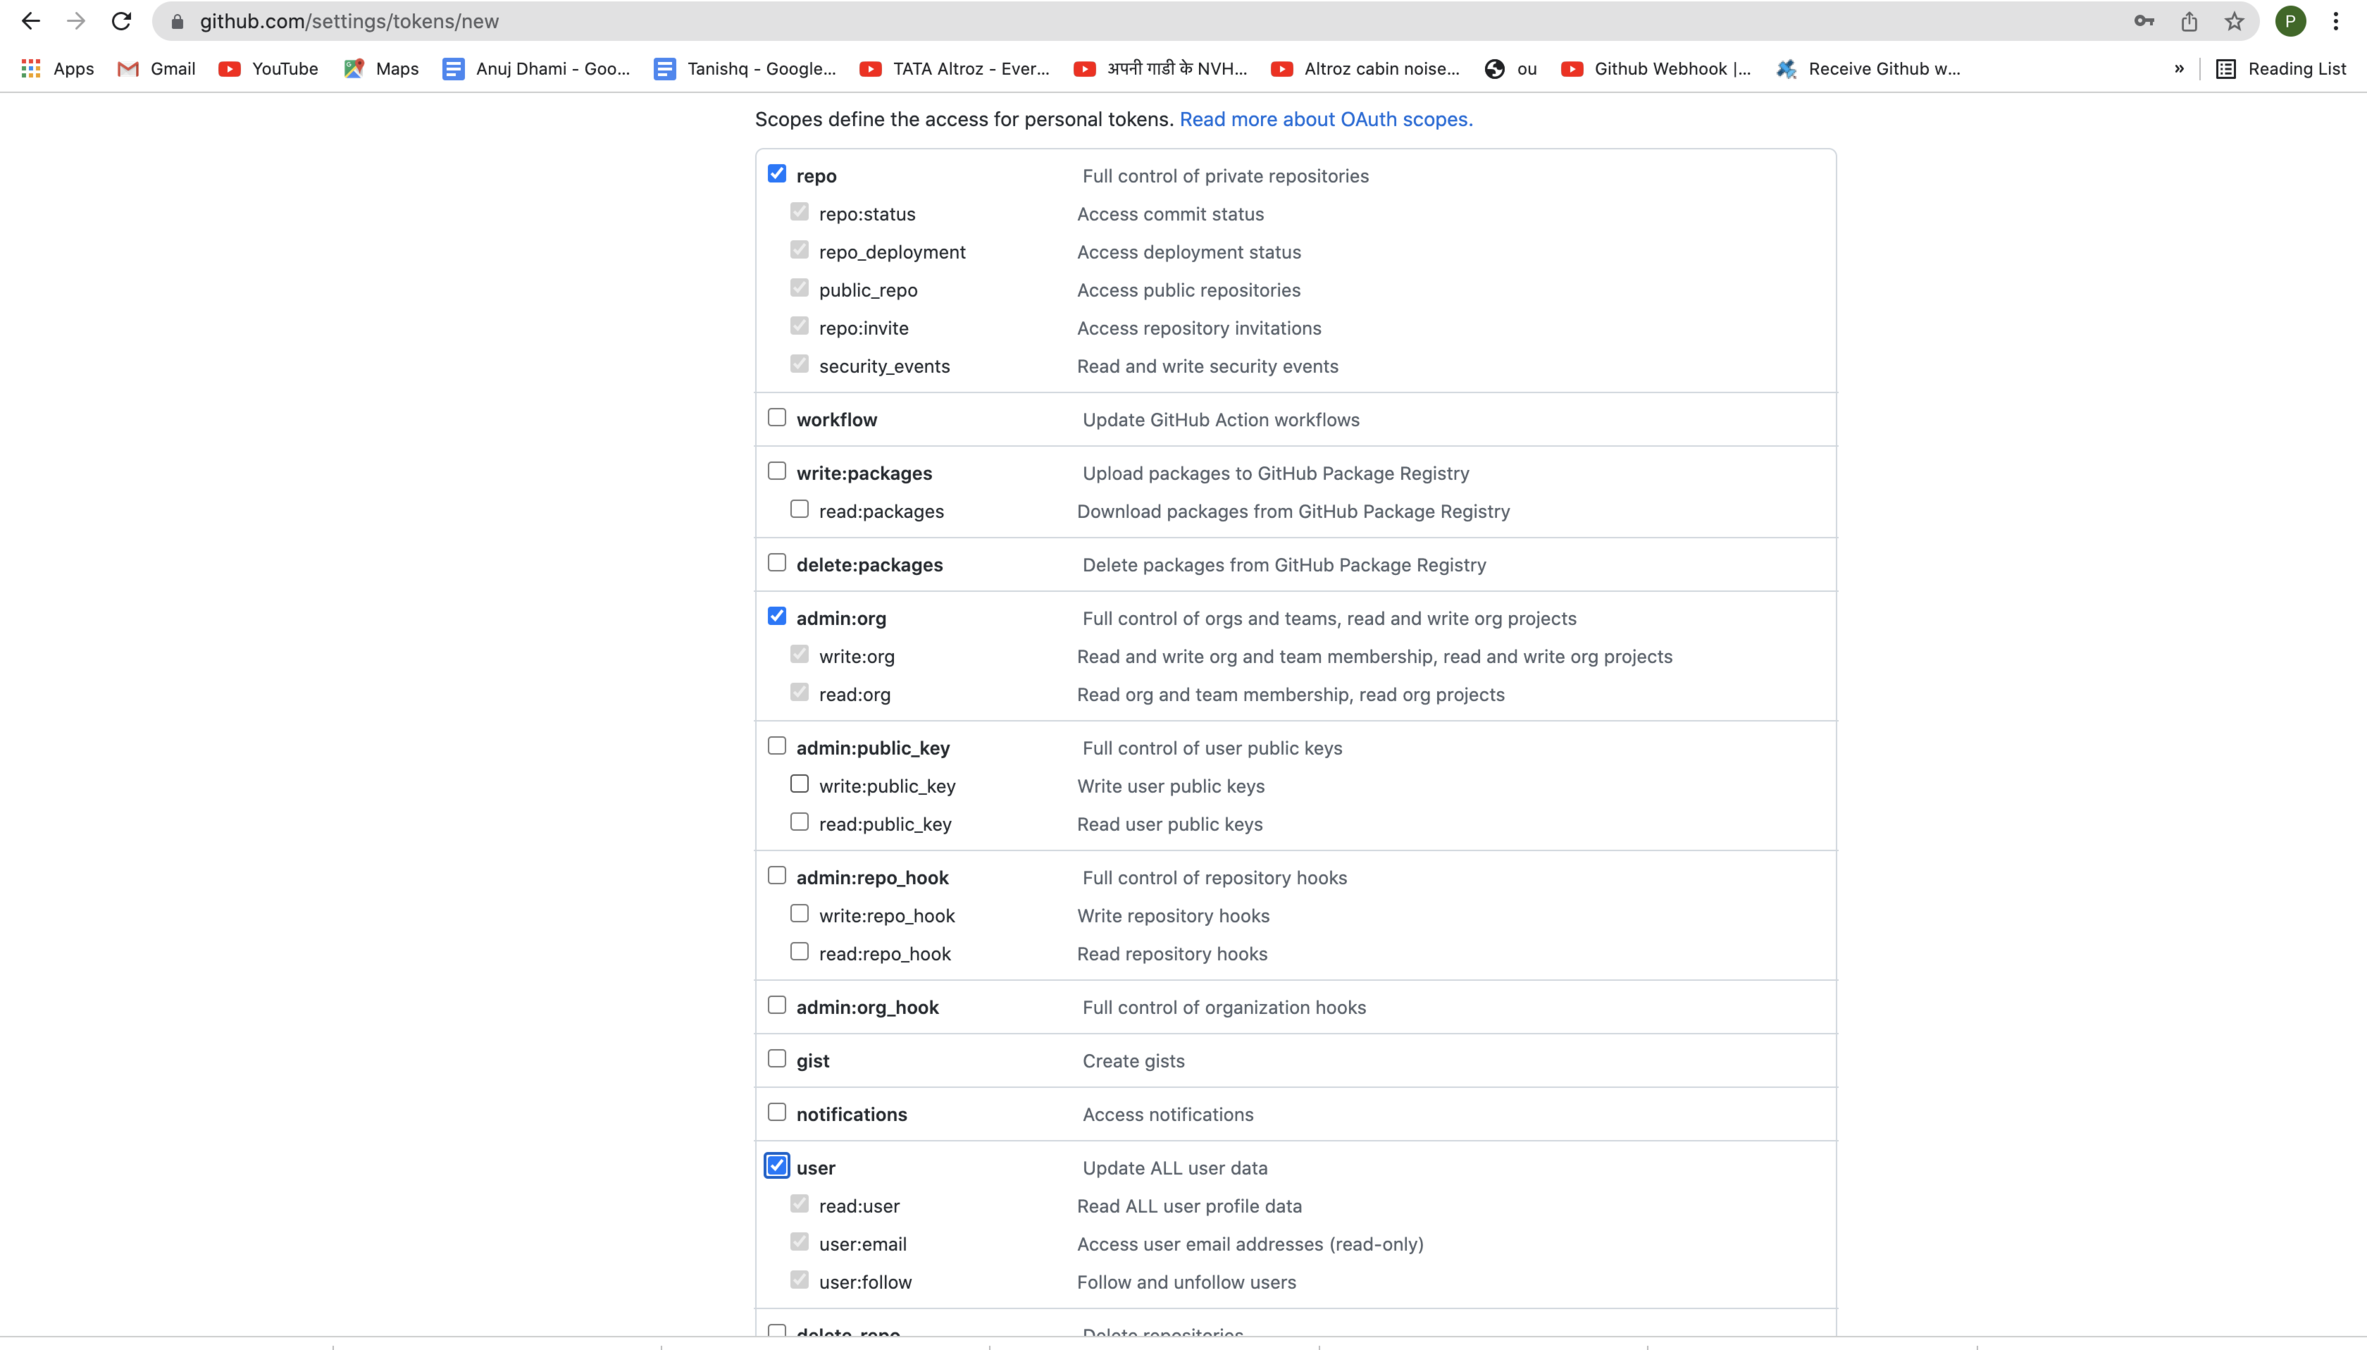
Check repo, admin:org and user checkboxes, add the Note and generate token
Create a pipeline job

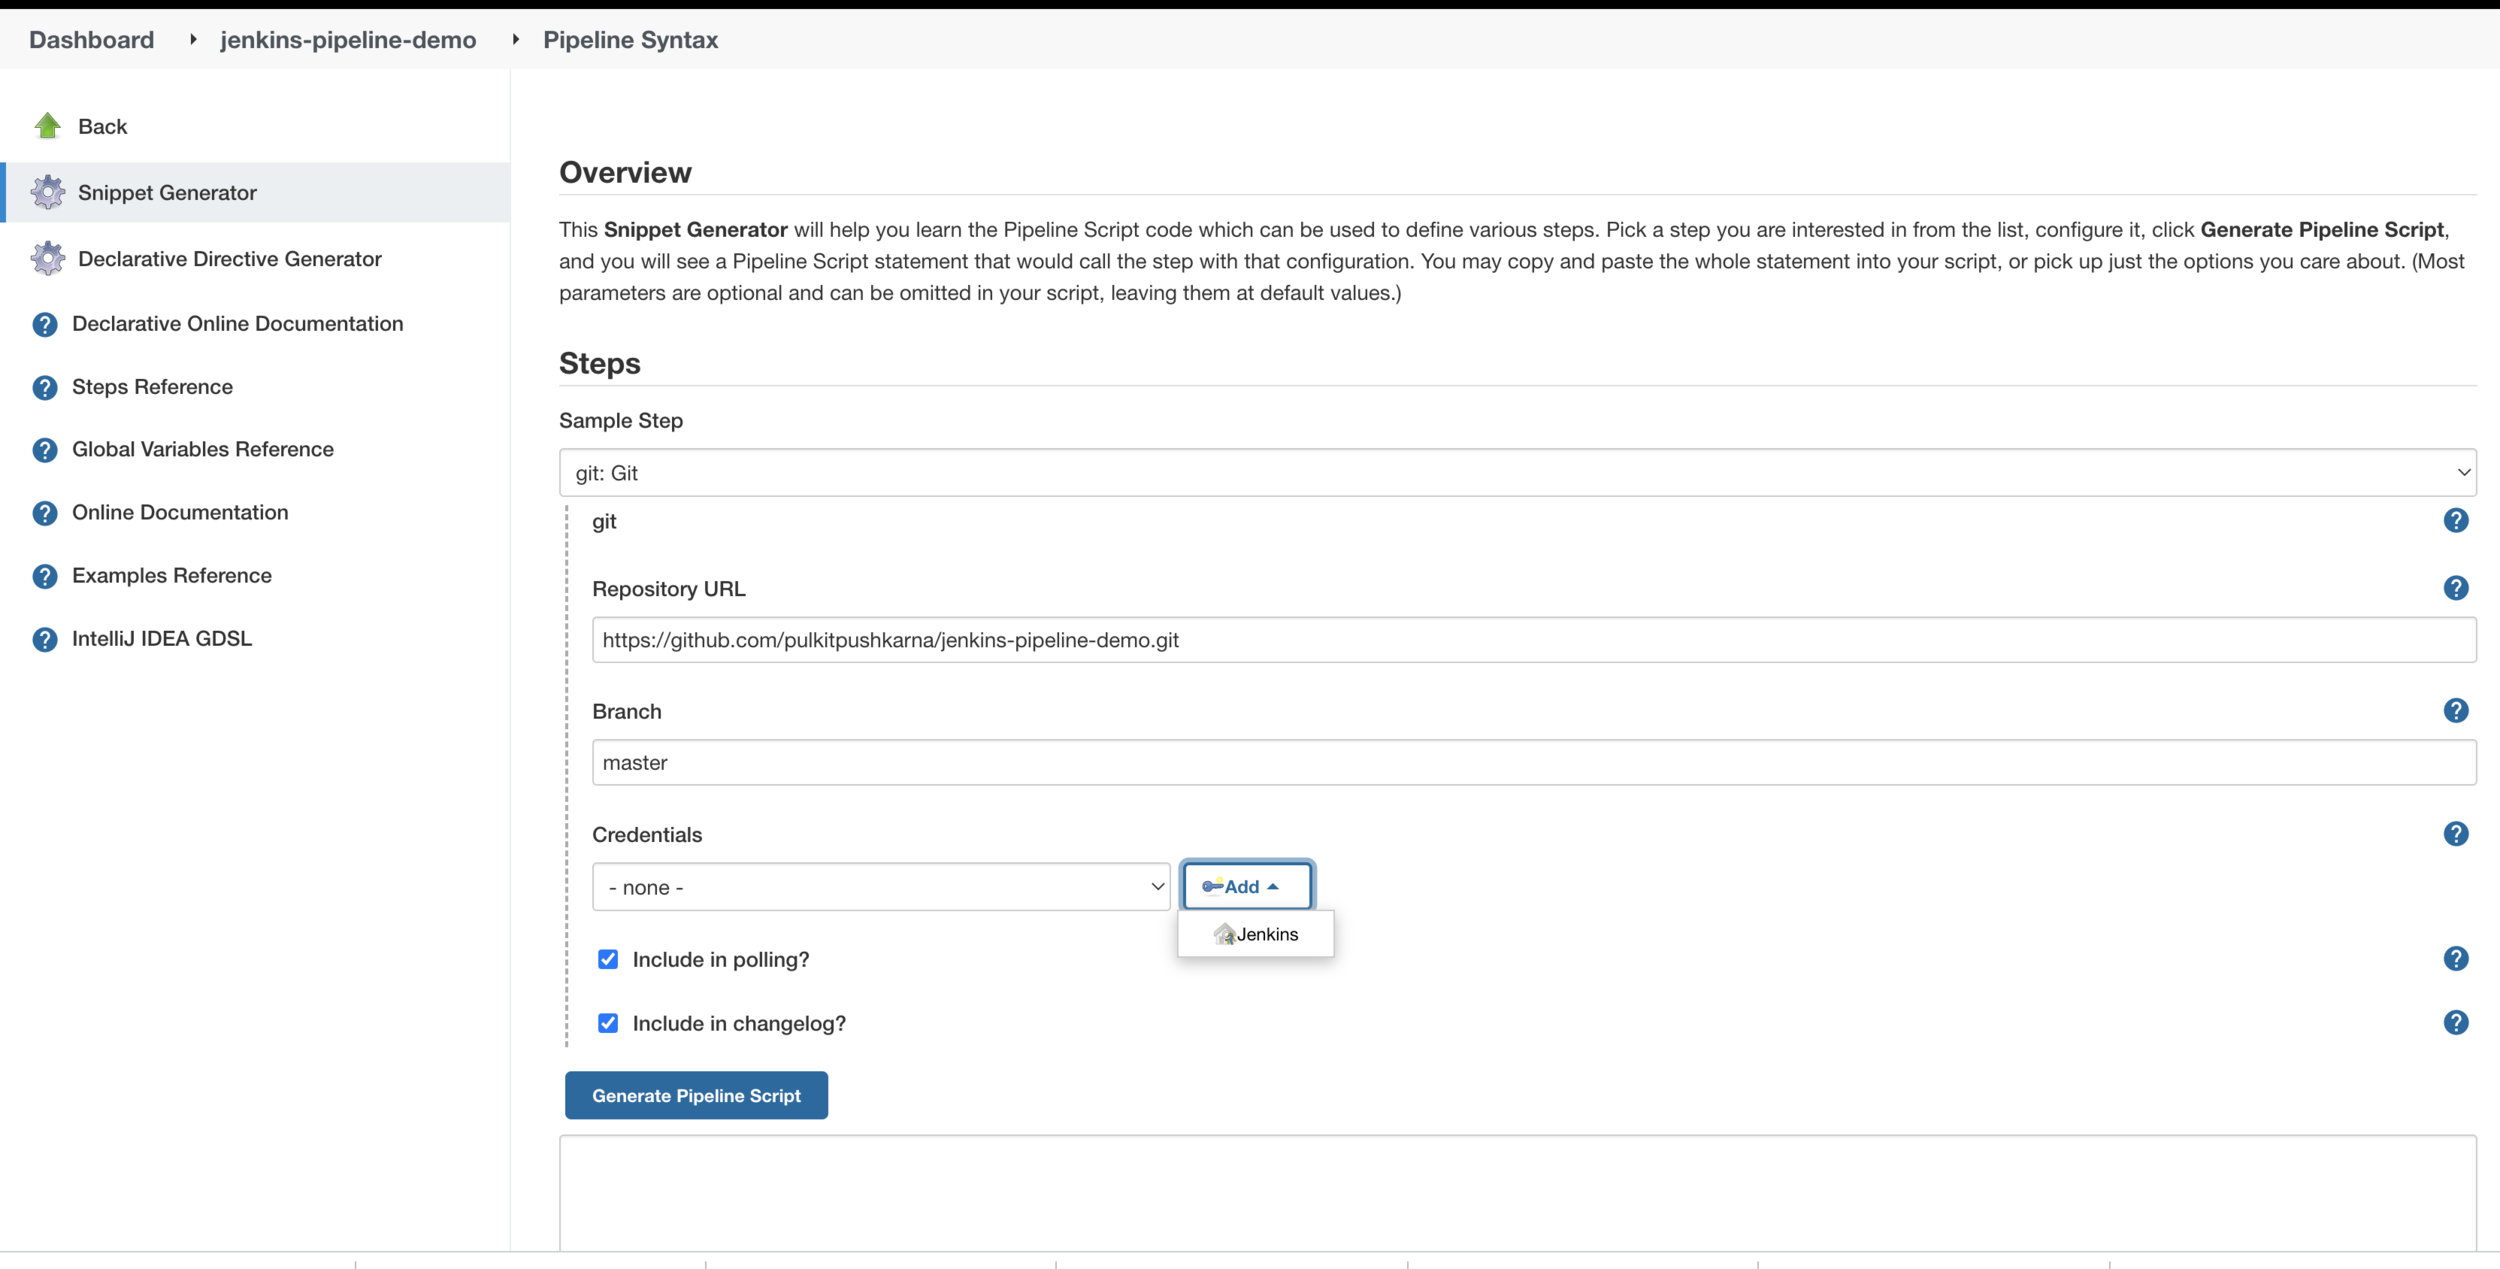
Provide the git hub private repo http url
Add the github token in jenkins
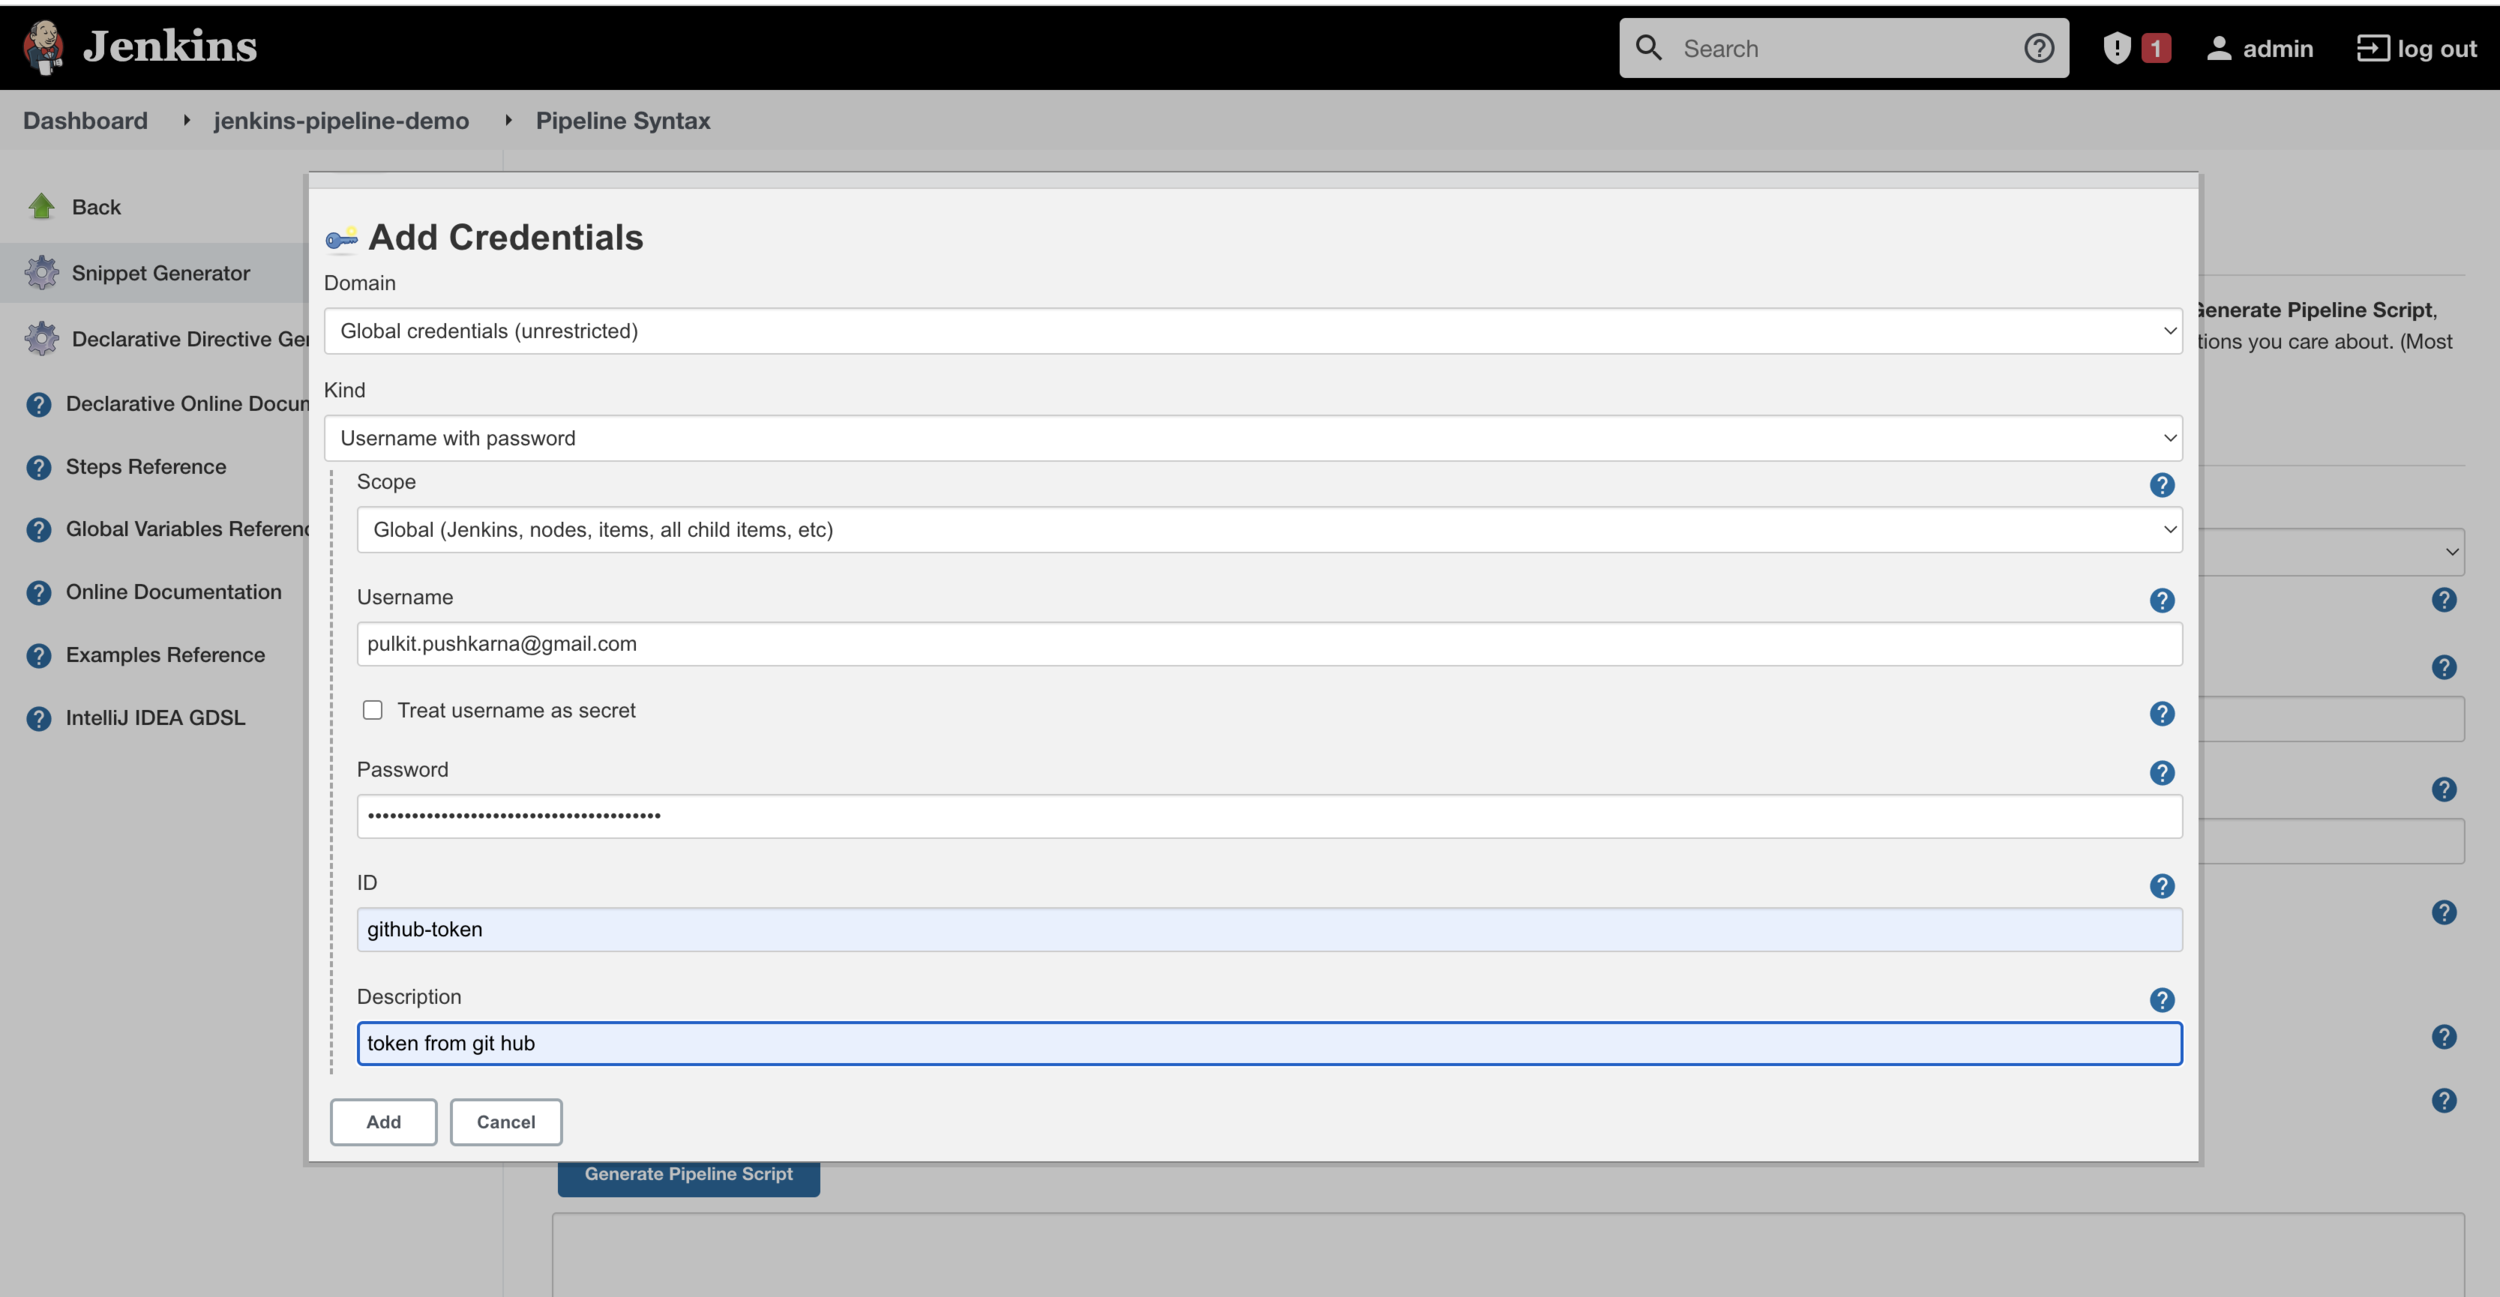
For password enter the github token

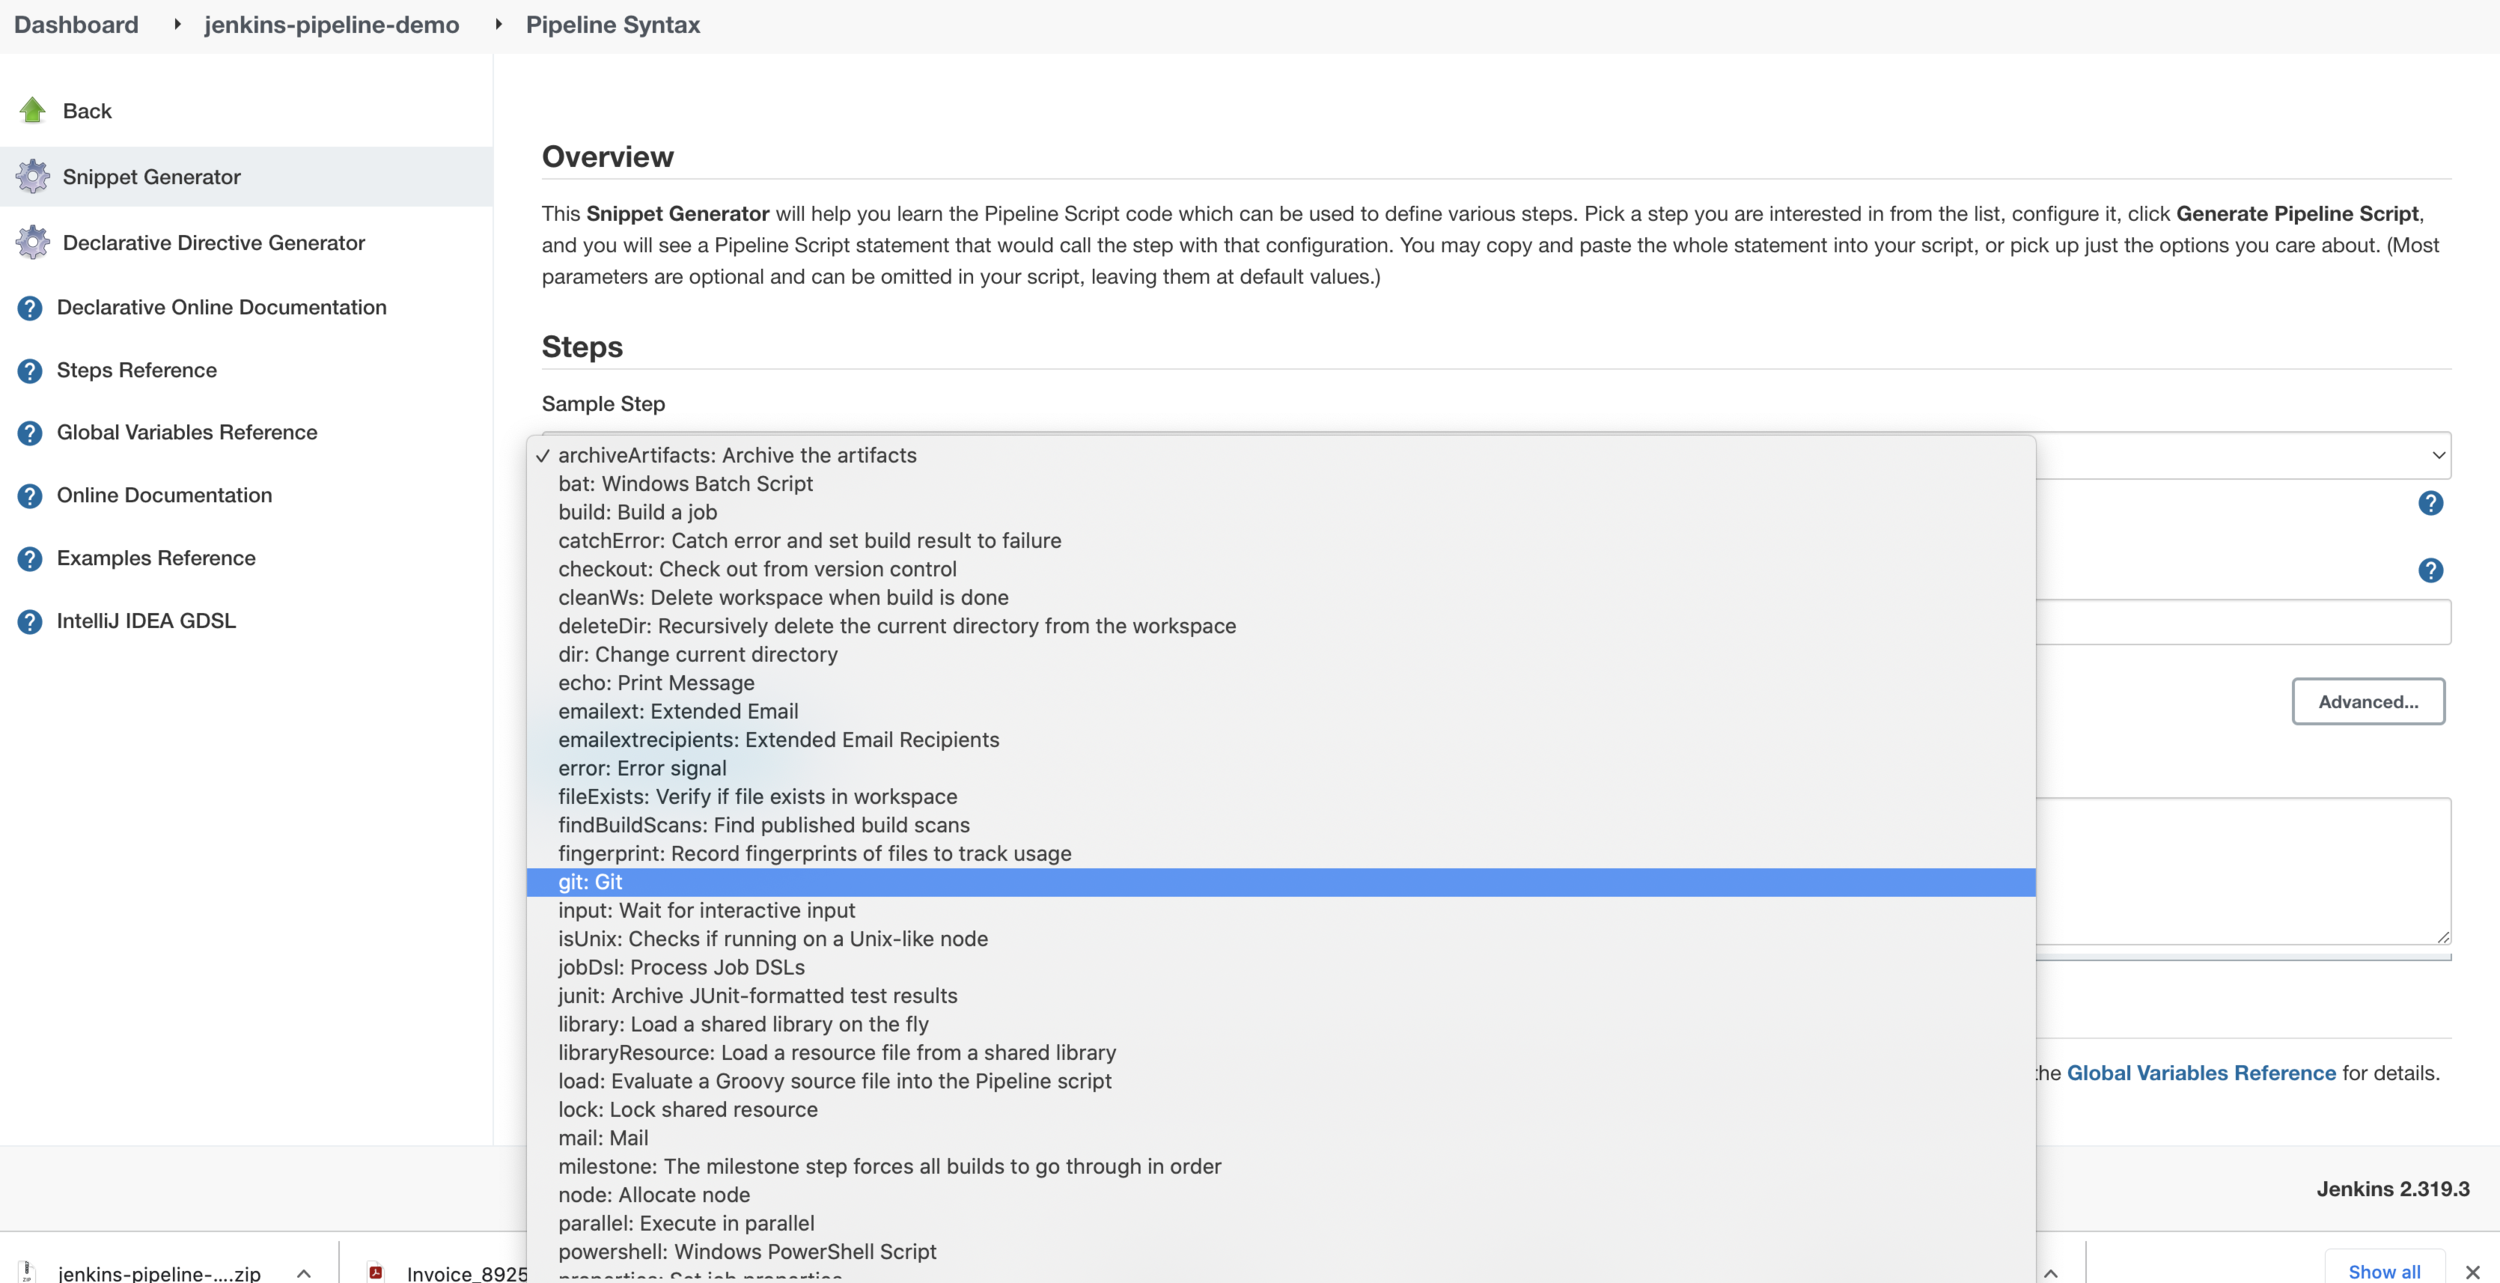
Generate the script
Add the script to jenkins pipeline
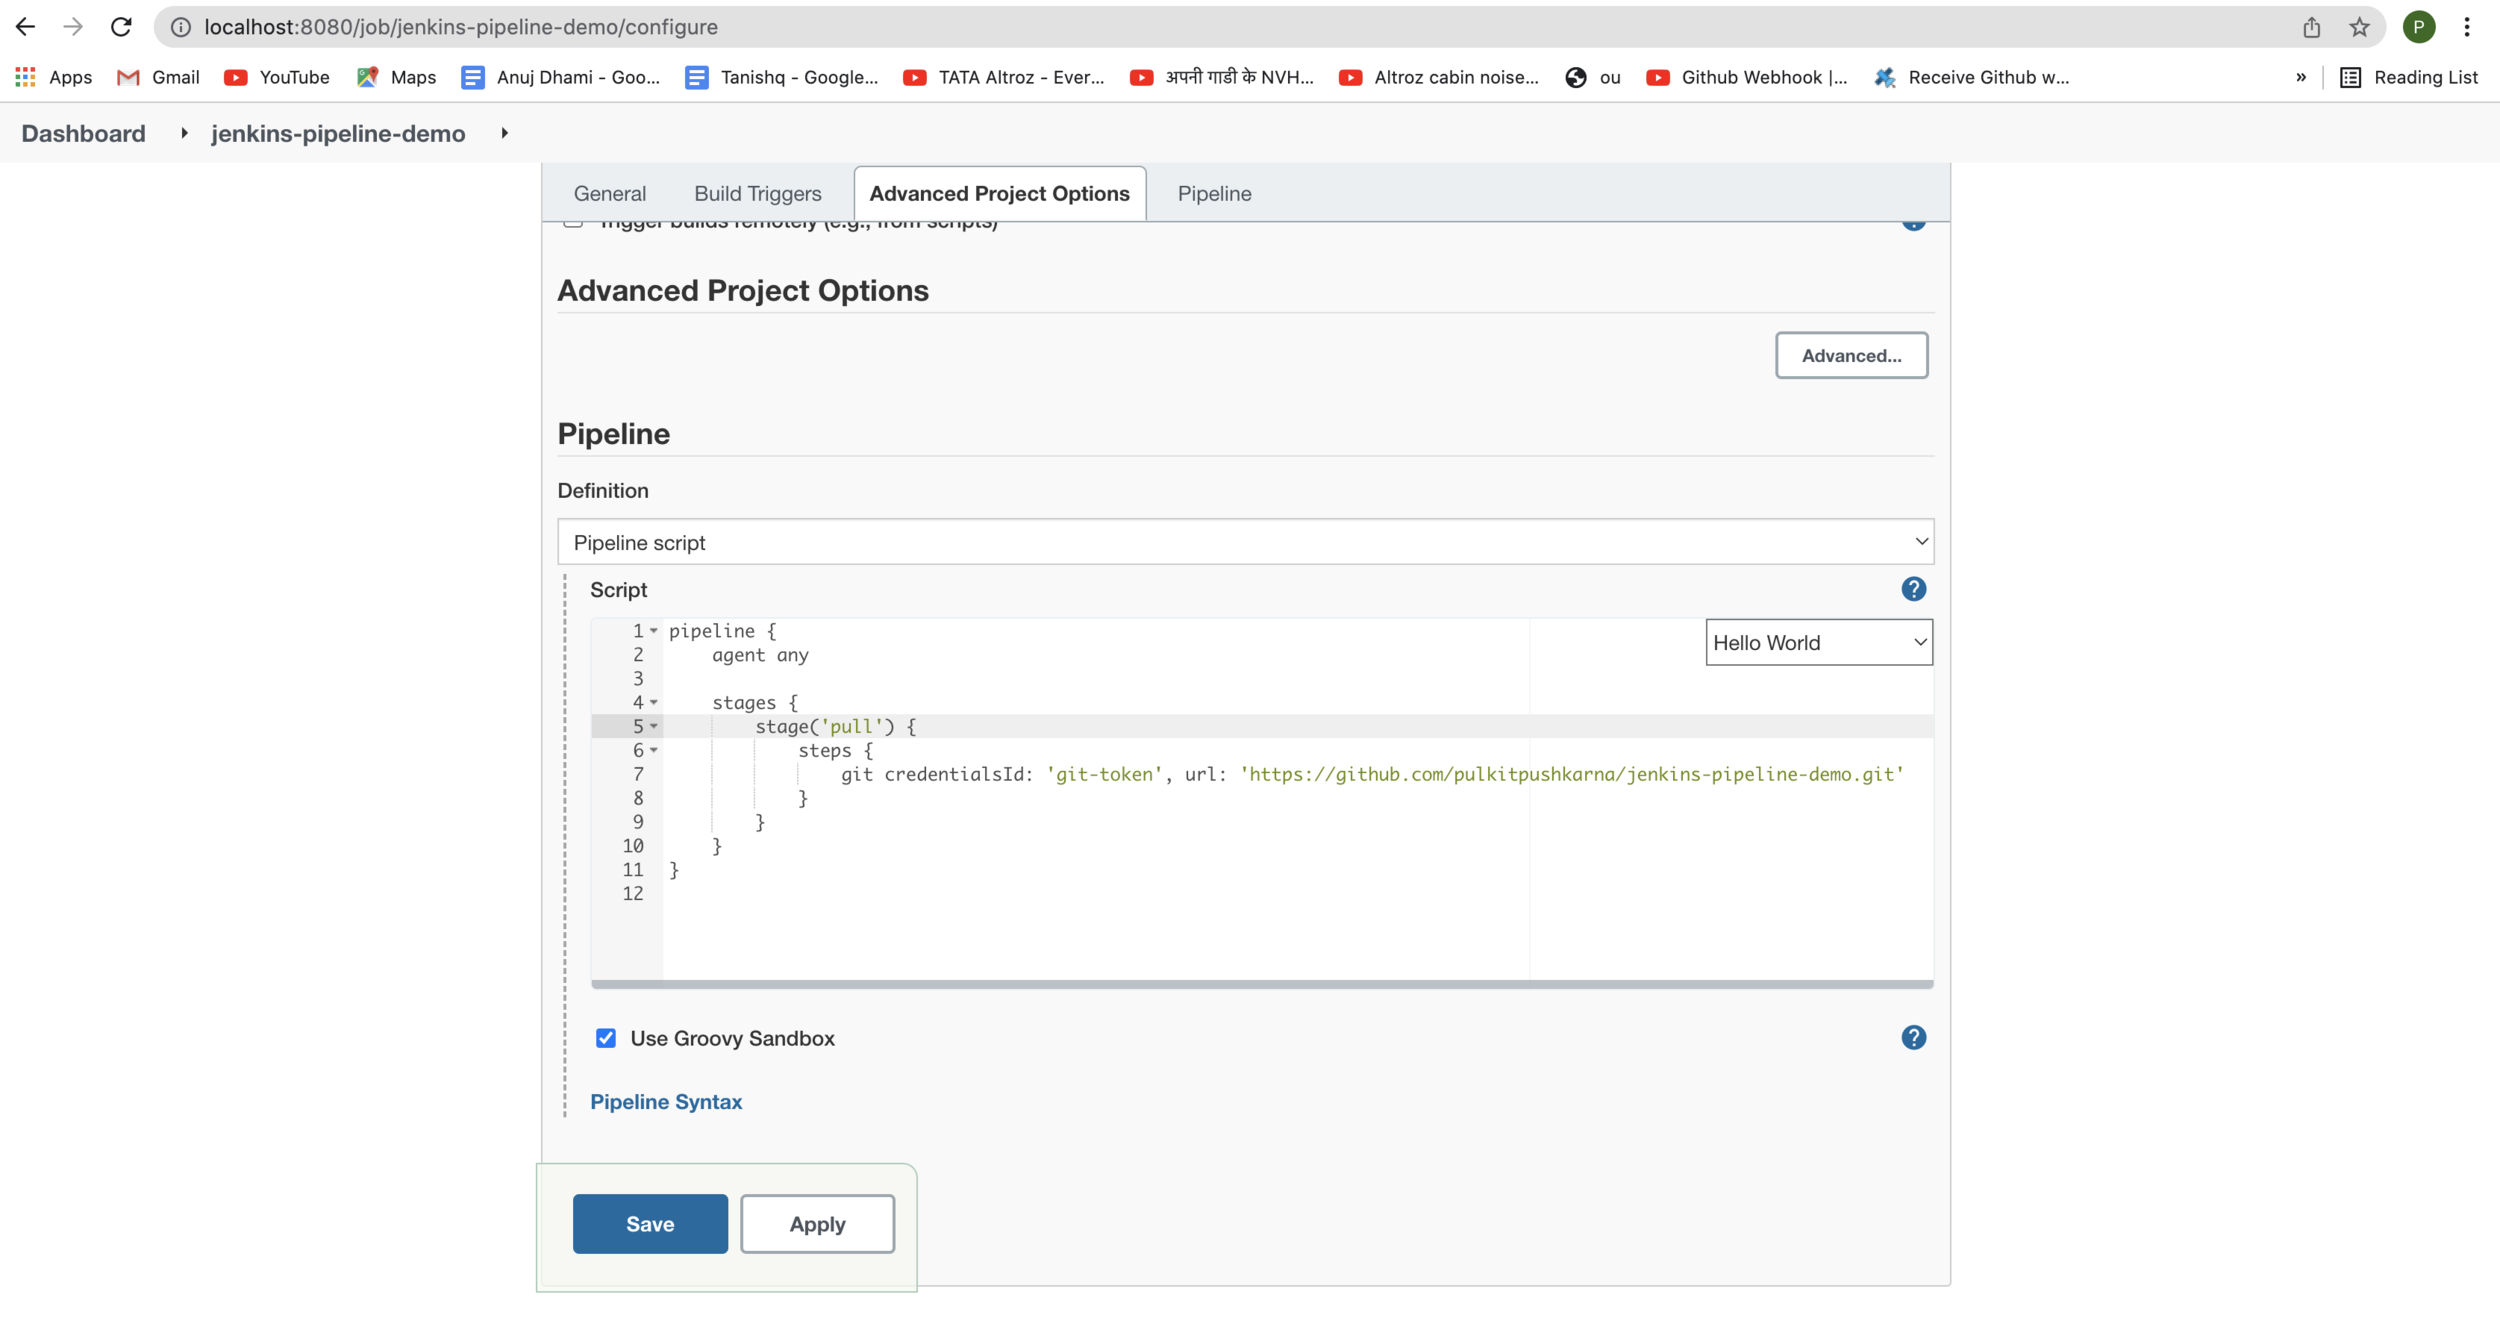
Run the job to check whether the pull is working properly
Add test and build stages in pipeline
pipeline {
    agent any

    stages {
        stage('Pull') {
            steps {
                git credentialsId: 'git-token', url: 'https://github.com/pulkitpushkarna/jenkins-pipeline-demo.git'
            }
        }
        stage('Test') {
            steps {
                sh './gradlew test'
            }
        }
        stage('Build') {
            steps {
                sh './gradlew bootJar'
            }
        }
    }
}
Exercise 1
- Configure Email Notification in Jenkins
- Send mail post build failure
- Create a jenkins pipeline project which clones tests and builds the a private git repo Spring Boot App
Add Build, Push and Deploy docker image steps in pipeline
pipeline {
    agent any

    stages {
        stage('Pull') {
            steps {
                git credentialsId: 'git-token', url: 'https://github.com/pulkitpushkarna/jenkins-pipeline-demo.git'
            }
        }
        stage('Test') {
            steps {
                sh './gradlew test'
            }
        }
        stage('Build') {
            steps {
                sh './gradlew bootJar'
            }
        }
        stage('Create Image') {
            steps{
                sh '/usr/local/bin/docker image build -t pulkitpushkarna/jenkins-pipeline-demo .'
            }
        }
        stage('Push Image') {
            steps{
                sh '/usr/local/bin/docker push pulkitpushkarna/jenkins-pipeline-demo'
            }
        }
        stage('Deploy') {
            steps{
                sh '/usr/local/bin/docker stop jenkins-pipeline-demo || true && /usr/local/bin/docker rm jenkins-pipeline-demo || true'
                sh '/usr/local/bin/docker container run -p 8612:8611 -d --name jenkins-pipeline-demo pulkitpushkarna/jenkins-pipeline-demo'
            }
        }
    }
}
Send Failure and Success Mails post build
pipeline {
    agent any

    stages {
        stage('Pull') {
            steps {
                git credentialsId: 'git-token', url: 'https://github.com/pulkitpushkarna/jenkins-pipeline-demo.git'
            }
        }
        stage('Test') {
            steps {
                sh './gradlew test'
            }
        }
        stage('Build') {
            steps {
                sh './gradlew bootJar'
            }
        }
        stage('Create Image') {
            steps{
                sh '/usr/local/bin/docker image build -t pulkitpushkarna/jenkins-pipeline-demo .'
            }
        }
        stage('Push Image') {
            steps{
                sh '/usr/local/bin/docker push pulkitpushkarna/jenkins-pipeline-demo'
            }
        }
        stage('Deploy') {
            steps{
                sh '/usr/local/bin/docker stop jekins-pipeline-demo || true && /usr/local/bin/docker rm jekins-pipeline-demo || true'
                sh '/usr/local/bin/docker container run -p 8612:8611 -d --name jekins-pipeline-demo pulkitpushkarna/jenkins-pipeline-demo'
            }
        }
    }
    post {
        always {
             echo 'This will always run'
         }
         success {
             mail bcc: 'pulkit.pushkarna@gmail.com', body: "Project: ${env.JOB_NAME} Build Number: ${env.BUILD_NUMBER}  URL de build: ${env.BUILD_URL}", cc: 'pulkit.pushkarna@gmail.com', from: 'pulkit.pushkarna@gmail.com', replyTo: '', subject: "Success CI: Project name -> ${env.JOB_NAME}", to: 'pulkit.pushkarna@gmail.com'
         }
         failure {
              mail bcc: 'pulkit.pushkarna@gmail.com', body: "Project: ${env.JOB_NAME} Build Number: ${env.BUILD_NUMBER}  URL de build: ${env.BUILD_URL}", cc: 'pulkit.pushkarna@gmail.com', from: 'pulkit.pushkarna@gmail.com', replyTo: '', subject: "Failed CI: Project name -> ${env.JOB_NAME}", to: 'pulkit.pushkarna@gmail.com'
         }

         changed {
             echo 'This will run only if the state of the Pipeline has changed'
         }
    }
}
Trigger jenkins pipeline or git commit
Introduce Parameter for Image version in docker
pipeline {
    agent any

    stages {
        stage('Pull') {
            steps {
                git credentialsId: 'git-token', url: 'https://github.com/pulkitpushkarna/jenkins-pipeline-demo.git'
            }
        }
        stage('Test') {
            steps {
                sh './gradlew test'
            }
        }
        stage('Build') {
            steps {
                sh './gradlew bootJar'
            }
        }
        stage('Create Image') {
            steps{
                sh '/usr/local/bin/docker image build -t pulkitpushkarna/jenkins-pipeline-demo:$imageVersion .'
            }
        }
        stage('Push Image') {
            steps{
                sh '/usr/local/bin/docker push pulkitpushkarna/jenkins-pipeline-demo:$imageVersion'
            }
        }
        stage('Deploy') {
            steps{
                sh '/usr/local/bin/docker stop jekins-pipeline-demo || true && /usr/local/bin/docker rm jekins-pipeline-demo || true'
                sh '/usr/local/bin/docker container run -p 8612:8611 -d --name jekins-pipeline-demo pulkitpushkarna/jenkins-pipeline-demo:$imageVersion'
            }
        }
    }
    post {
        always {
             echo 'This will always run'
         }
         success {
             mail bcc: 'pulkit.pushkarna@gmail.com', body: "Project: ${env.JOB_NAME} Build Number: ${env.BUILD_NUMBER}  URL de build: ${env.BUILD_URL}", cc: 'pulkit.pushkarna@gmail.com', from: 'pulkit.pushkarna@gmail.com', replyTo: '', subject: "Success CI: Project name -> ${env.JOB_NAME}", to: 'pulkit.pushkarna@gmail.com'
         }
         failure {
              mail bcc: 'pulkit.pushkarna@gmail.com', body: "Project: ${env.JOB_NAME} Build Number: ${env.BUILD_NUMBER}  URL de build: ${env.BUILD_URL}", cc: 'pulkit.pushkarna@gmail.com', from: 'pulkit.pushkarna@gmail.com', replyTo: '', subject: "Failed CI: Project name -> ${env.JOB_NAME}", to: 'pulkit.pushkarna@gmail.com'
         }

         changed {
             echo 'This will run only if the state of the Pipeline has changed'
         }
    }
}
Exercise 2
- Extend the jenkins pipeline to perform the following operations
- Create new image
- push new image
- Deploy container
- Send success and Failure messages Post deployment.
Ansible
- Ansible is simple open source IT engine which automates application deployment, intra service orchestration, cloud provisioning and many other IT tools.
- Ansible uses playbook to describe automation jobs, and playbook uses very simple language i.e. YAML
- Ansible is designed for multi-tier deployment. Ansible does not manage one system at time, it models IT infrastructure by describing all of your systems are interrelated.
-
Mainly, there are two types of machines when we talk about deployment −
-
Control machine − Machine from where we can manage other machines.
-
Remote machine − Machines which are handled/controlled by control machine.
-
Playbook Example
---
   name: install and configure DB
   hosts: testServer
   become: yes

   vars:
      oracle_db_port_value : 1521

   tasks:
   -name: Install the Oracle DB
      yum: <code to install the DB>

   -name: Ensure the installed service is enabled and running
   service:
      name: <your service name>
Create an ansible playbook
---
  - name: "Ansible Basic"
    hosts: localhost
    connection: local
    tasks:

    - name: "just execute a ls -lrt command"
      command: ls -lrt
      register: "output"

    - debug: var=output.stdout_lines
first.yaml
Run the playbook
ansible-playbook first.yamlCreate ansible file for deployment for running docker image
run-image.yaml
---
  - name: "Ansible with docker image"
    hosts: localhost
    connection: local
    tasks:

    - name: "Run docker image"
      command: docker container run -p 8613:8611 -d --name jekins-pipeline-demo-2 pulkitpushkarna/jenkins-pipeline-demo
      register: "output"

    - debug: var=output.stdout_lines
Run the playbook
ansible-playbook run-image.yamlIntegrating Ansible with Jenkins
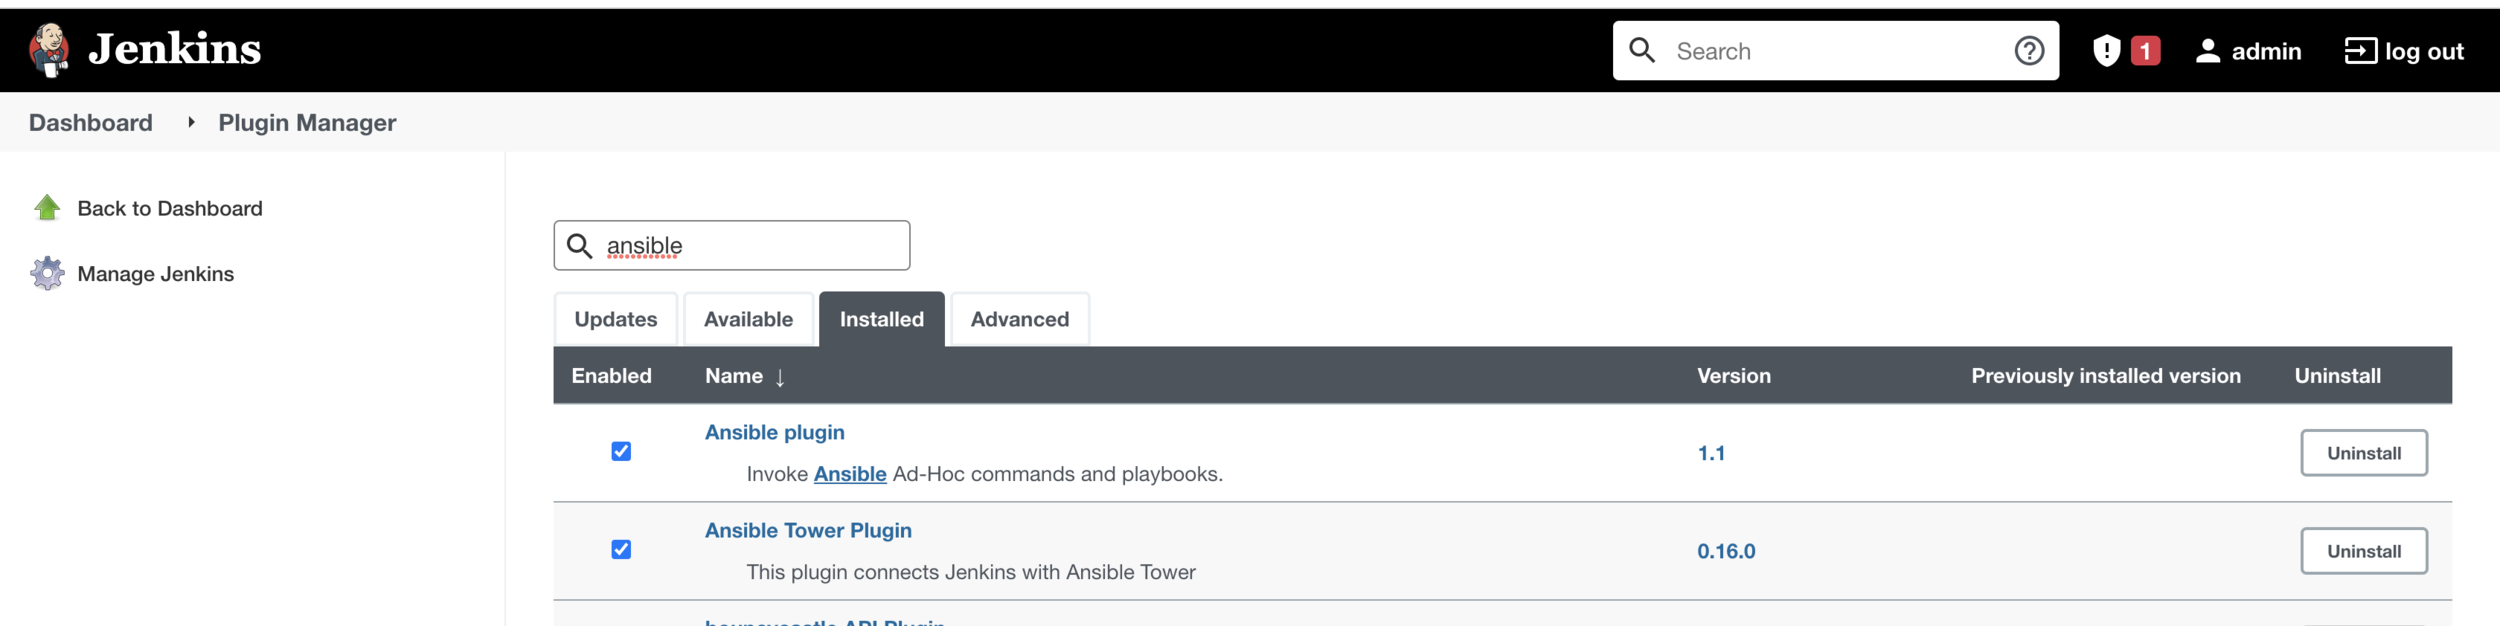
Make sure that ansible plugin is installed
Pipeline for runnning ansible from docker
pipeline {
    agent any

    stages {
        stage('Test Ansible') {
            steps {
                sh '/usr/local/bin/ansible-playbook /Users/pulkitpushkarna/projects/ansible-yaml-files/first.yaml'
            }
        }
    }
}
run-image.yaml
---
  - name: "Ansible with docker image"
    hosts: localhost
    connection: local
    tasks:

    - name: "Run docker image"
      command: /usr/local/bin/docker container run -p 8612:8611 -d --name jenkins-pipeline-demo pulkitpushkarna/jenkins-pipeline-demo
      register: "output"

    - debug: var=output.stdout_lines
jenkins pipeline to using ansible for deployment
pipeline {
    agent any

    stages {
        stage('Pull') {
            steps {
                git credentialsId: 'git-token', url: 'https://github.com/pulkitpushkarna/jenkins-pipeline-demo.git'
            }
        }
        stage('Test') {
            steps {
                sh './gradlew test'
            }
        }
        stage('Build') {
            steps {
                sh './gradlew bootJar'
            }
        }
        stage('Create Image') {
            steps{
                sh '/usr/local/bin/docker image build -t pulkitpushkarna/jenkins-pipeline-demo:$imageVersion .'
            }
        }
        stage('Push Image') {
            steps{
                sh '/usr/local/bin/docker push pulkitpushkarna/jenkins-pipeline-demo:$imageVersion'
            }
        }
        stage('Deploy') {
            steps{
                sh '/usr/local/bin/docker stop jenkins-pipeline-demo || true && /usr/local/bin/docker rm jenkins-pipeline-demo || true'
                // sh '/usr/local/bin/docker container run -p 8612:8611 -d --name jekins-pipeline-demo pulkitpushkarna/jenkins-pipeline-demo:$imageVersion'
                sh '/usr/local/bin/ansible-playbook /Users/pulkitpushkarna/projects/ansible-yaml-files/run-image.yaml'
            }
        }
    }
    post {
        always {
             echo 'This will always run'
         }
         success {
             mail bcc: 'pulkit.pushkarna@gmail.com', body: "Project: ${env.JOB_NAME} Build Number: ${env.BUILD_NUMBER}  URL de build: ${env.BUILD_URL}", cc: 'pulkit.pushkarna@gmail.com', from: 'pulkit.pushkarna@gmail.com', replyTo: '', subject: "Success CI: Project name -> ${env.JOB_NAME}", to: 'pulkit.pushkarna@gmail.com'
         }
         failure {
              mail bcc: 'pulkit.pushkarna@gmail.com', body: "Project: ${env.JOB_NAME} Build Number: ${env.BUILD_NUMBER}  URL de build: ${env.BUILD_URL}", cc: 'pulkit.pushkarna@gmail.com', from: 'pulkit.pushkarna@gmail.com', replyTo: '', subject: "Failed CI: Project name -> ${env.JOB_NAME}", to: 'pulkit.pushkarna@gmail.com'
         }

         changed {
             echo 'This will run only if the state of the Pipeline has changed'
         }
    }
}
Deploy on remote machine with ansible
pipeline {
    agent any

    stages {
        stage('Hello') {
            steps {
                sh '/usr/local/bin/ansible-playbook /Users/pulkitpushkarna/projects/ansible-yaml-files/remote-deploy.yaml --key-file /Users/pulkitpushkarna/projects/ansible-yaml-files/demo-instance.pem --user ubuntu'
            }
        }
    }
}
job pipeline

Entry for the host

Jenkins for Java Developers
By Pulkit Pushkarna


