INTRODUCTION TO REACT
간단한 자기소개
- 웹프로그래밍 스쿨 1기
- Python, Django
- Tumblbug에서 React
- Full Stack Developer
희망하는 수업방식
- 적극적인 여러분의 참여 😂
- 수업보다는 팀 프로젝트
- 덩케르크 정신

8일 과정을 마치면
- 미니프로젝트 각 1 EA
- React 및 관련 생태계에 대한 준수한 이해
- 문제 해결 능력 / 학습력
FRONTEND
- FRONTEND?
- 요새 핫한 이유?
- jQuery와 비교했을 때?
React = ❤️
- VIEW를 담당
- VIEW를 담당함과 동시에 그 VIEW를 조종할 수 있음
- 쉽다
HTML + CSS = REACT 🍚
<!DOCTYPE html>
<html>
  <head>
    <meta charset="UTF-8" />
    <script src="https://unpkg.com/react@latest/dist/react.js"></script>
    <script src="https://unpkg.com/react-dom@latest/dist/react-dom.js"></script>
    <script src="https://unpkg.com/babel-standalone@6.15.0/babel.min.js"></script>
  </head>
  <body>
    <h1>
      Welcome to React Everyone!
    </h1>
    <div id="root"></div>
    <script type="text/babel">
      class TitleComponent extends React.Component {
        render() {
          return (
            <h1>
              This is the Title component
            </h1>
          )
        }
      }
      class DescriptionComponent extends React.Component {
        render() {
          return (
            <p>
              This is the Description
            </p>
          )
        }
      }
      class Article extends React.Component {
        render() {
          return (
            <div>
              <TitleComponent />
              <DescriptionComponent />
            </div>
          )
        }
      }
      ReactDOM.render(
        <Article />,
        document.getElementById('root')
      );
    </script>
  </body>
</html>
정말 간단한 실습
- html안에 코드를 다 작성?
- css? asset?
- 브라우저 매번 새로고침?
- 로컬 서버가 아님
- 에러 / 경고 알림 없음
- ....
create-react-app
-
NO CONfiguration
-
SINGLE DEPENDENCY
-
NO LOCK-IN
Title Text
import React, { Component } from 'react';
import logo from './logo.svg';
import './App.css';

class App extends Component {
  render() {
    return (
      <div className="App">
        <div className="App-header">
          <img src={logo} className="App-logo" alt="logo" />
          <h2>Welcome to React</h2>
        </div>
        <p className="App-intro">
          To get started, edit <code>src/App.js</code> and save to reload.
        </p>
      </div>
    );
  }
}

export default App;
Inside App.js
Title Text
import React, { Component } from 'react';
import logo from './logo.svg';
import './App.css';

...

export default App;
import and export
Title Text
class App extends Component {
  render() {
    return (
      <div className="App">
        <div className="App-header">
          <img src={logo} className="App-logo" alt="logo" />
          <h2>Welcome to React</h2>
        </div>
        <p className="App-intro">
          To get started, edit <code>src/App.js</code> and save to reload.
        </p>
      </div>
    );
  }
}
className, {logo}
App.css를 한번 봅시다
Title Text
import React, { Component } from 'react';
import logo from './logo.svg';
import './App.css';

class App extends Component {
  render() {
    return (
      <div className="App">
        <div className="App-header">
          <img src={logo} className="App-logo" alt="logo" />
          <h2>Welcome to React</h2>
        </div>
        <p className="App-intro">
          To get started, edit <code>src/App.js</code> and save to reload.
        </p>
      </div>
    );
  }
}

export default App;
- import, export => Component들을 모듈화
- 우리가 알던 방식으로 css styling (sass, scss)
Title Text
import React, { Component } from 'react';
import logo from './logo.svg';
import './App.css';

class App extends Component {
  render() {
    return (
      <div className="App">
        <AppHeader></AppHeader>
        <AppIntro></AppIntro>
      </div>
    );
  }
}

export default App;
Component화를 해봅시다
our mini project
Vocabs App
vocabs app은
- 단어장 생성 / 수정 / 삭제 기능
- 단어장 내 단어 추가 / 삭제 / 수정 기능
- 단어장 기준으로 퀴즈 기능
따로 만들어보고 싶은 프로젝트가 있으면따로 진행하셔도 좋습니다
이쁜 Bootstrap
어떤 페이지들이 필요할까요?
- 단어장 목록을 보여주는 페이지
- 단어장을 보여주는 페이지
- 퀴즈 목록을 보여주는 페이지
- 퀴즈를 볼 수 있는 페이지
- ...
<SHOWCASE>
지난 수업 시간 복습
-
Components
-
Components
-
COMPONENTS
지난 수업 시간 복습
-
MAKING Components
- Using HTML, CSS
-
Components As Modules
-
Reusable COMPONENTS
- Using this.props (this.props.children)
Quiz #1
props는 해당 COMPONENT에서 값을 변경할 수 있다
COMPONENT =
View를 생성하는 FUNCTION
const MenuList = (menuName, price, rating) => {
    return (
        <div>
            <h1>{menuName}</hi>
            <span>{price}</span>
            <Ratings
                numberOfStars={rating}
            />
        </div>
    )
}
함수 내에서 함수의 입력값을 바꾸는 것 🙅🏽
하지만 불가능하지는 않습니다.
(사실 자식 Component에서 부모 CoMponent state를 바꾸는일은 자주 있습니다)
Quiz #2
COMPONENT안의 this.state는 변경이 가능하다
this.state 는 변할 수 없는 immutable

STATE 를 올바르게 다루는 팁
- this.state를 직접 바꾸지 말자
- this.setState는 비동기로 작동한다
- this.setState는 서로 Merge가 된다
QUIZ #3
state는 해당 Component에서만 사용할 수 있다
하위 컴포넌트에서 사용할 수는 있습니다.
다만 props로 넘겨줄 뿐
Quiz #4
모든 COMPONENT에는 render 가 정의되어야 한다
state, props를 이용한 간단한 실습
Component,
State,
Props,
onClick,
setState,
Class Methods
Team a
Team B
52
48
1 points
1 points
1 points
1 points
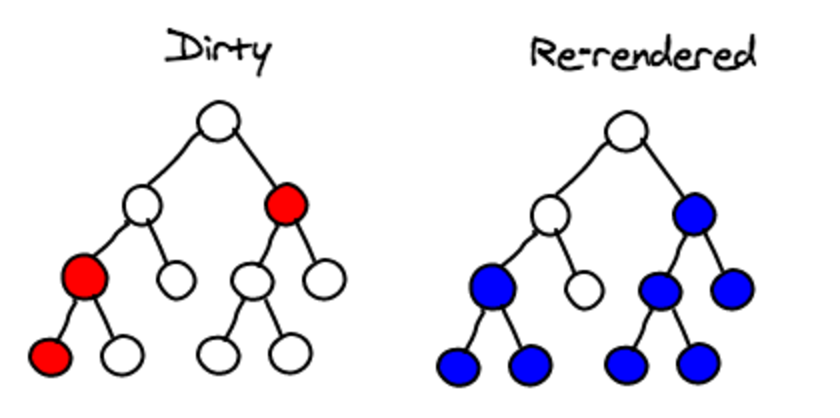
모든 Component에는
생명주기가 있습니다
왜?
-
COMPONENT는 다다익선?
-
component는 Render 기능이 전부?
REACT에는 다양한 생명주기 hook을 제공
class ReactComponent extends React.Component {
    componentDidMount = () => {}
    componentWillUnmount = () => {}
    componentDidUpdate = (previousProps, previousState) => {}
}
componentDidMount method
componentWillUnmount method
import React from 'react'


export default class QuizComponent extends React.Component {
  constructor(props) {
    super(props);
    console.log("Inside constructor");
  }

  componentWillMount = () => {
    console.log("I will mount soon");
  }

  componentDidMount = () => {
    console.log("I have just mounted");
  }

  componentWillUnmount = () => {
    console.log("I will soon be unmounted");
  }

  render = () => {
    console.log("I have just rendered");
    return (
      <div>
      </div>
    );
  }
}
console.log 순서?
간단한 실습
<Clock />
class Clock extends React.Component {
  constructor(props) {
    super(props);
    this.state = {date: new Date()};
  }

  componentDidMount = () => {
    this.timerID = setInterval(
      () => this.tick(),
      1000
    );
  }

  componentWillUnmount = () => {
    clearInterval(this.timerID);
  }

  tick = () => {
    this.setState({
      date: new Date()
    });
  }

  render = () => {
    return (
      <div>
        <h1>Hello, world!</h1>
        <h2>It is {this.state.date.toLocaleTimeString()}.</h2>
      </div>
    );
  }
}
LETS ADD ROUTING!
그 전에 직접 한번 만들어봅시다
REACT-ROUTER v4
window.location.pathname
REACT-ROUTER v4

day two review
this.setState({})
Team a
Team B
52
48
1 points
1 points
1 points
1 points
Team a
Team B
52
48
1 points
1 points
1 points
1 points
state, props,
methods
state, props,
methods
lifecycle hooks
❔
routing Q&A
* window.location.pathname을 바꾸면 Component는 update가 된다
routing q&A
* 우리는 직접 ROUTING되는 SPA를 만들 수 있다
routing q&A
* COMPONENT는 NULL을 RENDER할 수 없다
day
tHREE
Preview
* 직방 프런트엔드 개발자의 삶
서버에서 받은 zigbang data를 이용하여 View를 만듭니다
* Array, Object 조작 실습
ziGBANG data를 우리의 입맛대로 조작합니다
* 백엔드 개발자의 삶
REST API server를 만듭니다
* 직방 프런트엔드 개발자의 삶
서버에서 받은 zigbang data를 이용하여 View를 만듭니다
$ git clone https://github.com/paulsoh/VocabBuilder

$ cd VocabBuilder
$ yarn install

$ git checkout Q-Making-View-For-Zigbang-Data* 직방 프런트엔드 개발자의 삶
조금의 편리 기능을 추가합니다 (보증금 순, 월세 순으로 정렬)
$ git checkout Q-Applying-Filters-For-Zigbang-DataLODASH(underscore)
A modern JavaScript utility library delivering modularity, performance & extras.
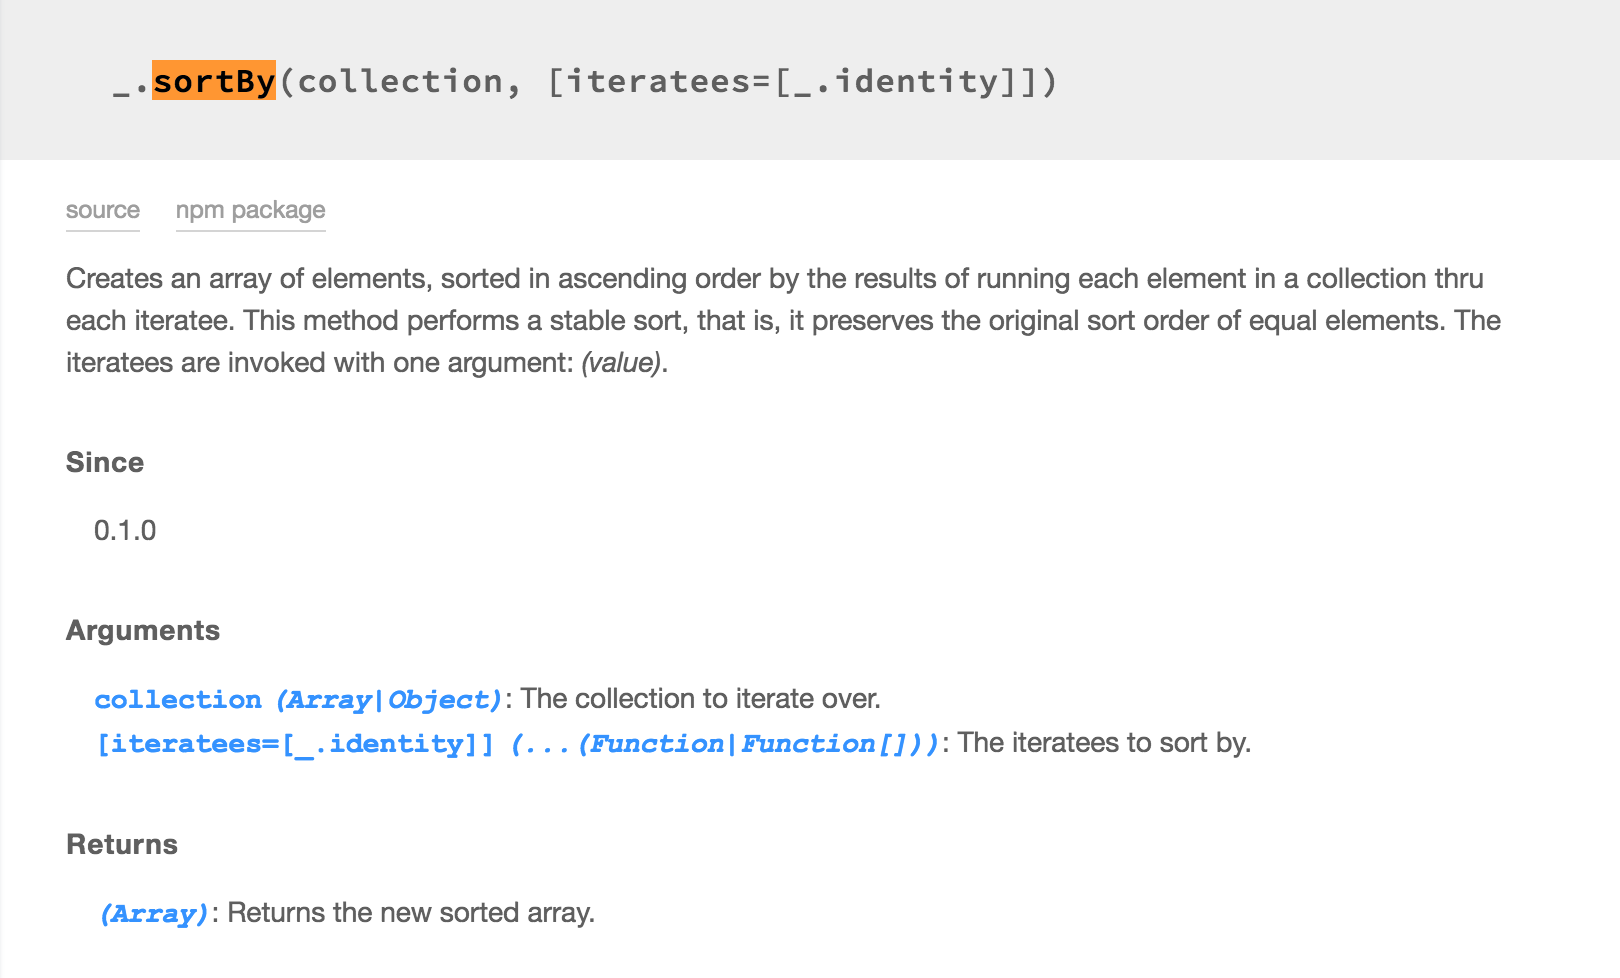
import _ from 'lodash';

var users = [
  { 'user': 'fred',   'age': 48 },
  { 'user': 'barney', 'age': 36 },
  { 'user': 'fred',   'age': 40 },
  { 'user': 'barney', 'age': 34 }
];

_.sortBy(users, [function(o) { return o.user; }]);
// => objects for [['barney', 36], ['barney', 34], ['fred', 48], ['fred', 40]]

_.sortBy(users, ['user', 'age']);
// => objects for [['barney', 34], ['barney', 36], ['fred', 40], ['fred', 48]]
* Array, object 조작 실습
ziGBANG data를 우리의 입맛대로 조작합니다
- .map
- .filter
- .forEach
- .reduce
- .sort
- .find
* USING LODASH...
다음 물음에 대한 답을 구해보세요
$ git checkout Q-Use-Lodash-Like-A-Boss-
가장 보증금이 비싼 방의 주소는?
-
agent_no가 26002인 사람이 올린 매물(방)의 개수?
-
모든 방의 조회수의 합은?
* 백엔드 개발자의 삶
REST API server를 만듭니다
* 백엔드 개발자의 삶
가짜 데이터베이스 한번 만들어봅시다
ASSIGNMENT
* 월세가 70만원 이상인 매물 개수를 기준으로 집값 비싼 지역구 목록
* [{local: 서초동, count: 15} , {잠원동: 12, ...}, ...]
* 제목에서 가장 빈번하게 나타나는 단어들 목록
* [{word: '초대박', count: 23, ...}, {...}, {...}, ...]
* 여러분의 APP에서 사용할 DB 구조(schema) 생성
* 가짜 DATA 많이 만들어 놓기
* 입력 FORM COMPONENT 만들기
-
가장 보증금이 비싼 방의 주소는?
-
모든 방의 조회수의 합은?
ASSIGNMENT
FULL STACK DEV SETUP COMPLETE
GET /WORDSLIST
GET /WORDSLIST/1
GET /WORDSLIST/1/words
step 1
fetch api
axios와 비슷한 promise 기반의 http request api
Native api (순정)
fetch(url)
.then(()=>{
// 응답(data)을 받고 싶은 곳
})
.catch(()=> {
// 에러를 받고 싶은 곳
})
fetch(url)
.then(()=>{
// 응답을 조금 더 처리하는 곳
})
.THEN(()=>{
// 응답(data)을 받는 곳
})
.catch(()=> {
// 에러를 받는 곳
})
fetch(url)
.then(()=>{})
.THEN(()=>{})
.catch(()=> {
// 어디서 발생한 Error를 잡아줄까요?
})
fetch(url)
.then(()=>{})
.THEN(()=>{})
.catch(()=> {
// 다.
})
DEBUGGING할 때 힘들 수 있음
fetch(url)
.then(()=>{})
.CATCH(()=>{})
.THEN(()=>{})
.catch(()=> {})
어제 직방 개발자 체험으로 준비된 우리
-
api 요청을 하는 법 ✅
-
react 생명주기 이용하는 법 ✅
-
통신 시 발생할 수 있는 예외 경우 처리하는 법 ✅
🙆🏽 🤦🏽♀️
Q-fullstack-step-one-get
FULL STACK DEV SETUP COMPLETE
post /WORDSLIST
post /WORDSLIST/1
post /WORDSLIST/1/words
step 2
FULL STACK DEV SETUP COMPLETE
post /WORDSLIST
post /WORDSLIST/1
POST /WORDSLIST/1/WORDS
POST /word
step 2
FULL STACK DEV SETUP COMPLETE
fetch(url, { option})
.then().catch()
step 2
FULL STACK DEV SETUP COMPLETE
forms(inputs)
step 2
text input, checkbox, radio, select
events
onclick,
onchange,
onsubmit
...
onchange는 언제 호출되나요?
input에서 value는 어떤 역할을 하나요?
우리가 입력하는 것을 component가 알게 하기 위해서는 어떻게 하면 좋을까요?
state 🤝 value
word list를 입력할 수 있는 기능
단어장 이름을 입력하세요
단어장에 대한 간단한 설명을 입력하세요
생성
취소
Q-fullstack-step-two-forms
입력값 유효성 검사기능
단일 입력 기준 유효한가?
유효하지 않으면? 에러 표시
form 기준 입력 유효한가?
유효하지 않으면? 추가 불가
this.ref ... focus
<input
ref={(input) => {
this.textInput = input;
}}
/>
😂
input을 component화 해보겠습니다
중복포비아
Q-fullstack-step-three-post
-
입력값을 component에 올려놓는 법 ✅
-
fetch로 POST 요청 보내는 법 ✅
-
통신 시 발생할 수 있는 예외 경우 처리하는 법 ✅
🙆🏽 🤦🏽♀️
assignment - day 4
-
put 구현
-
dELETE 구현
-
word post 구현
- words list view using our api
- word list view using our api
- input forms
- type=text
- type=checkbox
- type=textarea
- more events
- on change
- double binding
통신을 하는 살아있는 APP을 만듭니다
fetch api
Assignments
* MAKE YOU DATABASE SCHEMA
DATA STRUCTURE MANIPULATION
List, object를 입맛대로 조작할 수 있는 것
IntroductionToReact
By Soh Paul
IntroductionToReact
FastCampus, Introduction to React


