Simplifying FRC robot code

Randall Hauch
Coach & mentor
Zach Anderson
Alumni & mentor

What is Strongback?
A new open source Java library
that you can use in your FRC robot code.
You can even become a contributor!
The traditional approach
WPILib for Java
RoboRIO
Your robot code
Tests
Unit tests almost always require hardware!
The better way
WPILib for Java
RoboRIO
Your robot code
STRONGBACK
The better way
Your robot code
Tests
STRONGBACK
STRONGBACK-TESTING
testing without robot hardware!
Testing without robot hardware
Unit tests to test individual classes
are easy to write, easy to run.
Run them all the time.
They'll help tell you if you've broken something that used to work.
Strongback
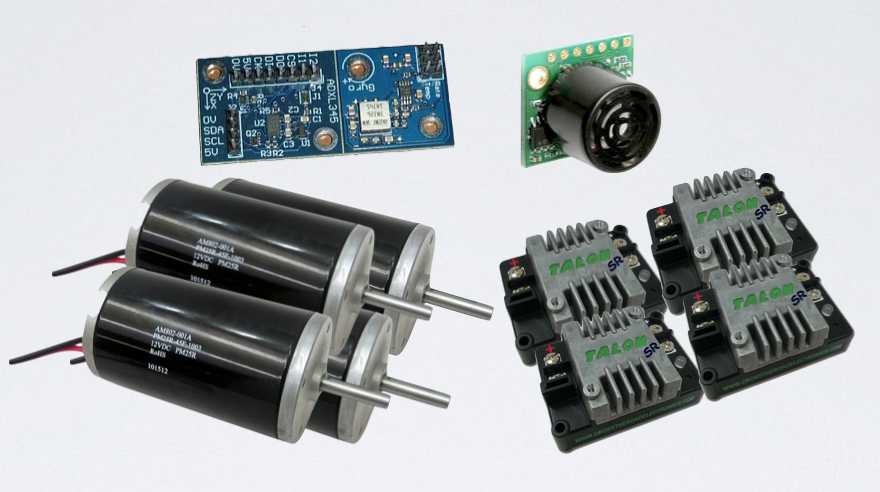
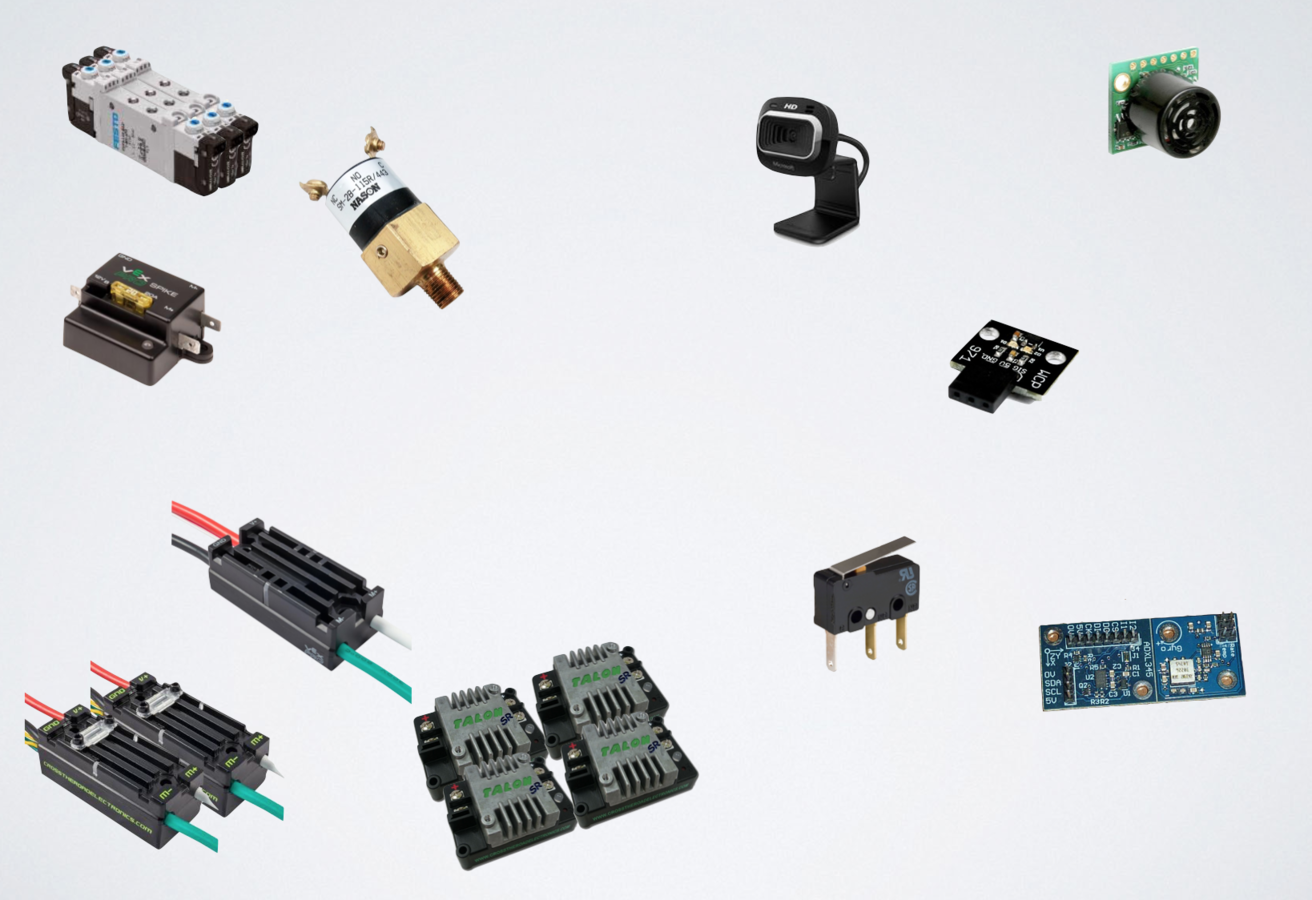
Part 1: Hardware Components
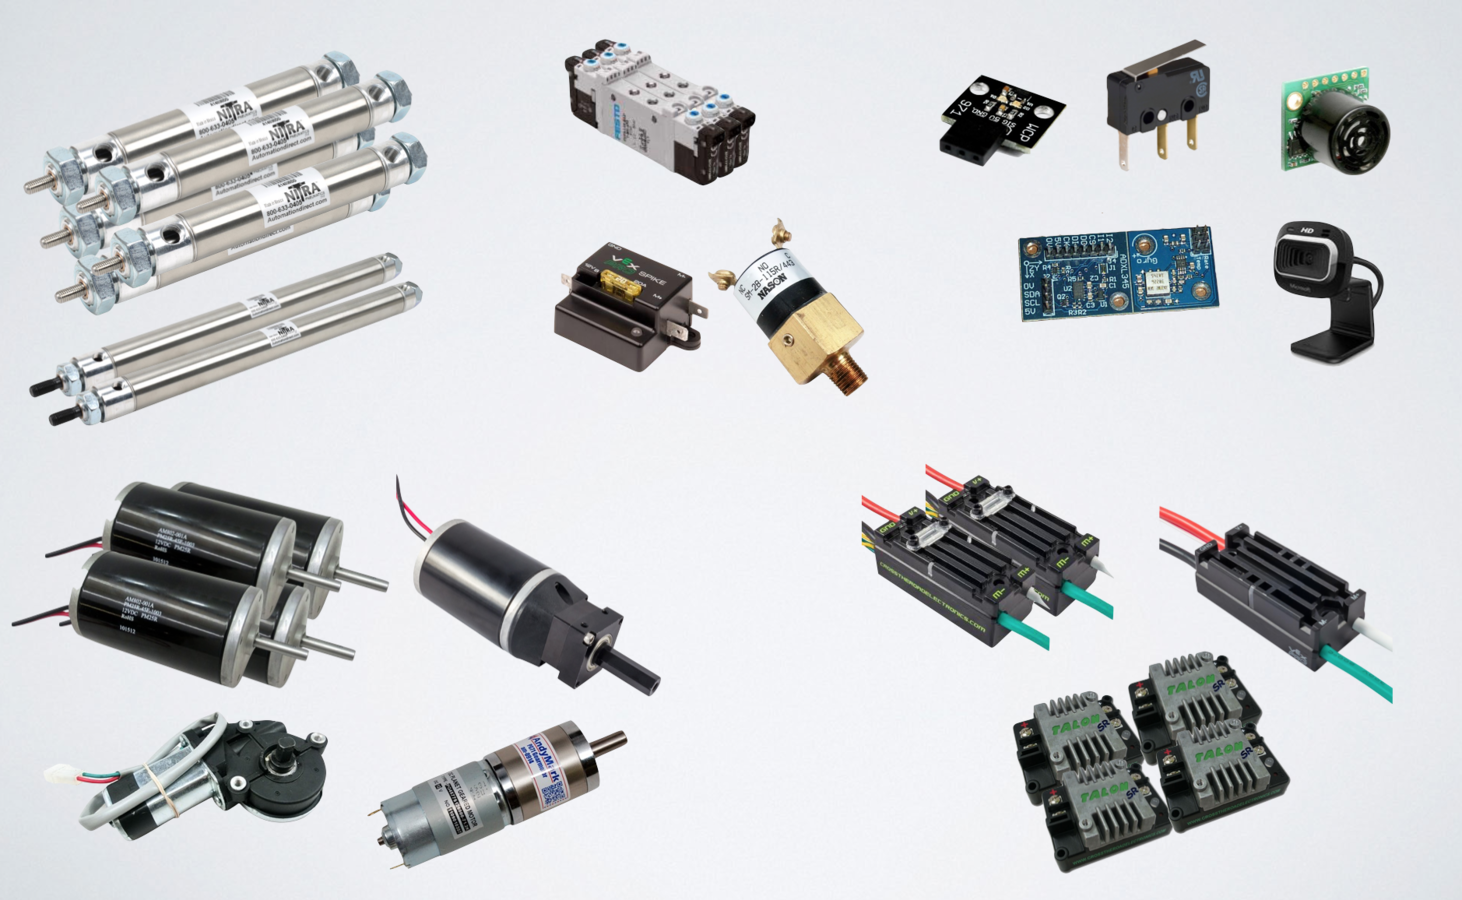
Actuators & sensors
Actuators & sensors

Drive Subsystem
Ramp Subsystem
Guardrail
Subsystem
Compressor
Subsystem
Vision
Subsystem
Wrist Subsystem
Kicker Subsystem
Arm Subsystem
Code for subsystems
Drive Subsystem
Create class for subsystem
Add references to hardware objects
Add logic
- Motor controllers, analog inputs, analog outputs, digital inputs, digital outputs
- Expose methods for subsystem behavior
Code for subsystems
Drive Subsystem
Tests would instantiate this subsystem
The subsystem would create hardware instances
Fails even before we can test anything
- Attempts to communicate with the actual hardware
- Creates lots of other hardware classes
NOT TESTABLE!
Created interfaces for
each type of devices
Created interfaces for
each type of devices
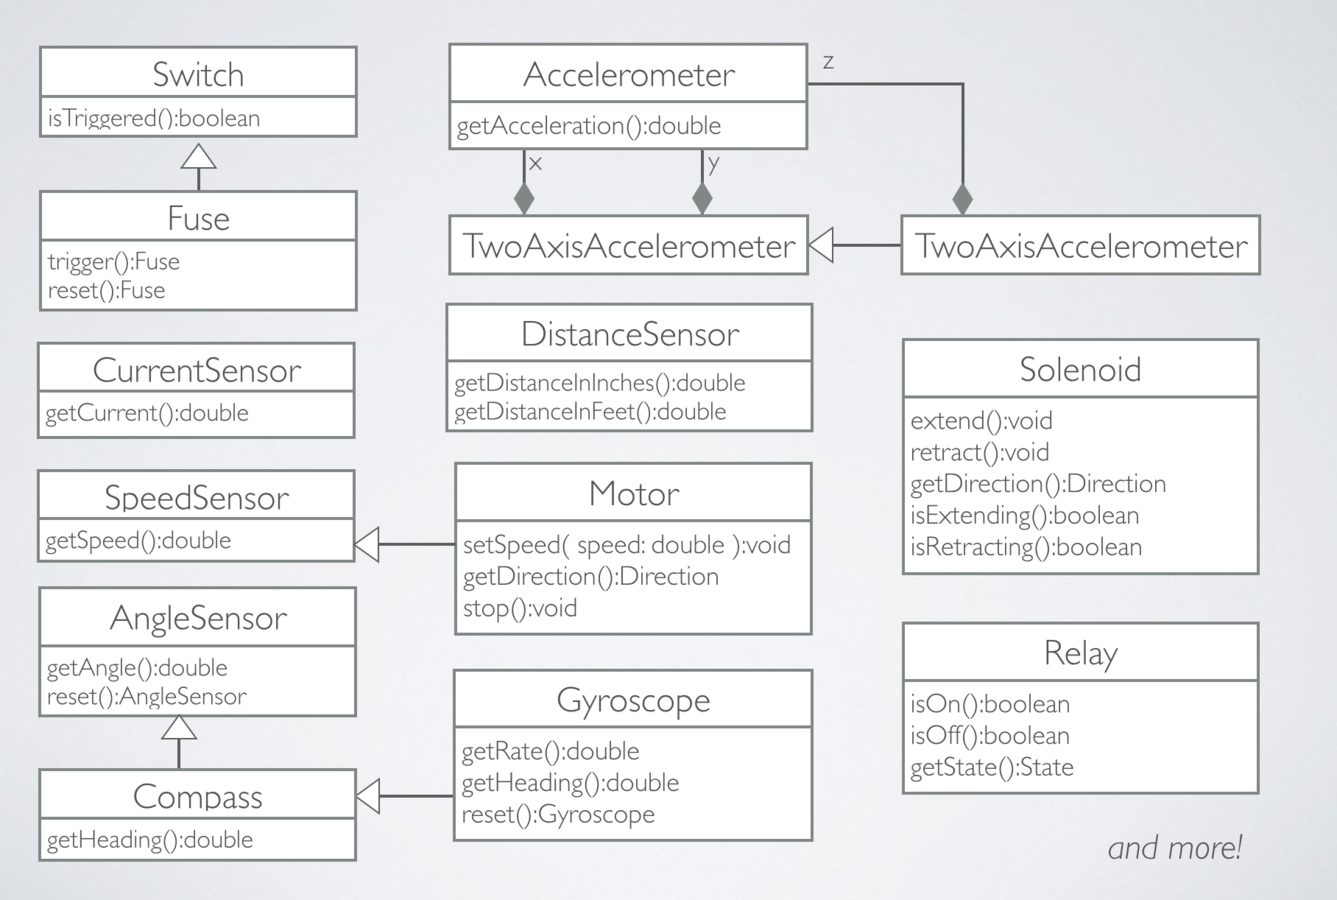
Traditionally use WPILib directly
DigitalInput
edu.wpi.first.wpilibj
SubsystemX
This is not testable
Subsystems use abstractions
Switch
isTriggered():boolean
SubsystemX
Using Hardware implementations on the robot
SubsystemX
HardwareSwitch
DigitalInput
edu.wpi.first.wpilibj
Switch
isTriggered():boolean
And mocks in tests
SubsystemX
MockSwitch
Switch
isTriggered():boolean
setTriggered():MockSwitch
setNotTriggered():MockSwitch
setTriggered(boolean):MockSwitch
SubsystemXTest
Example robot
public class SimpleTankDriveRobot extends IterativeRobot {

    private TankDrive drive;
    private ContinuousRange driveSpeed;
    private ContinuousRange turnSpeed;

    @Override
    public void robotInit() {
        ...
        Motor left = Motor.compose(Hardware.Motors.talon(1), Hardware.Motors.talon(2));
        Motor right = Motor.compose(Hardware.Motors.talon(3), Hardware.Motors.talon(4)).invert();
        drive = new TankDrive(left, right);

        FlightStick joystick = Hardware.HumanInterfaceDevices.logitechAttack3D(1);
        driveSpeed = joystick.getPitch();
        turnSpeed = joystick.getRoll().invert();

        ...
    }

    @Override
    public void teleopPeriodic() {
        drive.arcade(driveSpeed.read(), turnSpeed.read());
    }
}
Strongback
Part 2: Commands
Commands
Robots often do multiple things at once.
Commands provide a very simple, composeable, and testable way to organize the code
to control these different activities.
Commands can be used in both autonomous and teleoperated modes.
Without commands
// First swivel the arm to the correct angle (within +/- 1 degree) ...
while ( true ) {
    double diff = swivelAngle.computeHeadingChangeTo(30.0,1);
    if ( diff < 0.0 ) {
        swivelMotor.setSpeed(-0.4);
    } else if ( diff > 0.0 ) {
        swivelMotor.setSpeed(0.4);
    } else {
       swivelMotor.stop();
       break;
    }
}

// Raise the shoulder to the correct angle ...
while ( true ) {
    double diff = shoulderAngle.getAngleChangeTo(64.0,1);
    if ( diff < 0.0 ) {
        shoulderMotor.setSpeed(-0.4);
    } else if ( shoulderAngle.getAngleChangeTo(64.0,1) > 0.0 ) {
        shoulderMotor.setSpeed(0.4);
    } else {
       shoulderMotor.stop();
       break;
    }
}

// Move the elbow to the correct angle ...
while ( true ) {
    double diff = elbowAngle.getAngleChangeTo(83.0,1);
    if ( diff < 0.0 ) {
        elbowMotor.setSpeed(-0.4);
    } else if ( diff > 0.0 ) {
        elbowMotor.setSpeed(0.4);
    } else {
       elbowMotor.stop();
       break;
    }
}

// Open the claw ...
claw.retract();
Without commands
Difficult to make robot do
multiple things at once.
With commands
Put each movement into separate command,
and submit the commands to be run
asynchronously
With commands
public class SwivelArm extends Command {
    private final Motor swivel;
    private final Compass angle;
    private final double speed;
    private final double desiredAngle;
    private final double tolerance;
    public SwivelArm( Motor swivel, Compass angle, double speed,
                      double desiredAngleInDegrees, double toleranceInDegrees ) {
        super(swivel);
        this.swivel = swivel;
        this.angle = angle;
        this.speed = Math.abs(speed);
        this.desiredAngle = desiredAngleInDegrees;
        this.tolerance = toleranceInDegrees;
    }
    @Override
    public boolean execute() {
        double diff = angle.computeHeadingChangeTo(desiredAngleInDegrees,toleranceInDegrees);
        if ( diff == 0.0 ) {
            swivel.stop();
            return true;
        }
        if ( diff < 0.0 ) {
            swivel.setSpeed(-speed);
        } else {
            swivel.setSpeed(speed);
        }
        return false;
    }
}
With commands
public class OpenClaw extends Command {
    private final Solenoid solenoid;
    public OpenClaw( Solenoid solenoid ) {
        super(solenoid);
        this.solenoid = solenoid;
    }
    @Override
    public boolean execute() {
        this.solenoid.retract();
        return true;
    }
}

public class CloseClaw extends SolenoidOperation {
    private final Solenoid solenoid;
    public CloseClaw( Solenoid solenoid ) {
        super(solenoid);
        this.solenoid = solenoid;
    }
    @Override
    public boolean execute() {
        this.solenoid.extend();
        return true;
    }
}
With commands
Strongback.submit(new SwivelArm(swivelMotor,swivelAngle,0.4,30.0,1.0));
Strongback.submit(new RotateShoulder(shoulderMotor,shoulderAngle,0.4,64.0,1.0));
Strongback.submit(new RotateElbow(elbowMotor,elbowAngle,0.4,83.0,1.0));
Strongback.submit(new OpenClaw(claw));
Submit them when needed
in teleop or autonomous
They'll all run concurrently
and in the background.
They'll even stop if new commands
with same requirements are submitted.
Grouping commands
Create a command group that
consists of other commands but
but runs as a single command.
CommandGroup.runSimultaneously(
       new SwivelArm(swivel,swivelAngle,speed,swivelTargetAngle,tolerance));
       new RotateShoulder(shoulder,shoulderAngle,speed,shoulderTargetAngle,tolerance));
       new RotateElbow(elbow,elbowAngle,speed,elbowTargetAngle,tolerance));
       openClaw ? new OpenClaw(claw) : new CloseClaw(claw));
       );
Strongback
Part 3: Switch Reactor
Switch Reactor
Register functions that should be called when a switch changes state.
Switch Reactor
SwitchReactor reactor = Strongback.switchReactor();
Gamepad gamepad = ...
reactor.onTriggered(gamepad.getRightTrigger(),
                    ()->Strongback.submit(new FireRepeatedlyCommand()));
reactor.onUnTriggered(gamepad.getRightTrigger(),
                      ()->Strongback.submit(new StopFireCommand()));
SwitchReactor reactor = Strongback.switchReactor();
Gamepad gamepad = ...
reactor.onTriggeredSubmit(gamepad.getRightTrigger(),
FireRepeatedlyCommand::new);
reactor.onUnTriggeredSubmit(gamepad.getRightTrigger(),
StopFireCommand::new);or
Strongback
Part 4: Data and Event Recorders
Strongback can record
Multiple channels of discrete numeric values
recorded at specific, regular intervals
spurious and infrequent events.
and
Strongback's DataRecorder
Records automatically on a constant interval
but you have to give it things to measure.
Strongback's DataRecorder
public interface DataRecorder {

    DataRecorder register(String name, IntSupplier supplier);

    DataRecorder register(String name, double scale,
                          DoubleSupplier supplier) {...}

    DataRecorder register(String name, Switch swtch);

    DataRecorder register(String name, SpeedSensor sensor);
}
Strongback.dataRecorder().register(...);called with
Strongback's DataRecorder
public class SimpleTankDriveRobot extends IterativeRobot {

    @Override
    public void robotInit() {
        Strongback.configure()
                  .useExecutionPeriod(20, TimeUnit.MILLISECONDS)
                  .initialize();

        ...
        Strongback.dataRecorder()
                  .register("Battery Volts",1000, battery)
                  .register("Current load", 1000, current)
                  .register("Left Motors",  left)
                  .register("Right Motors", right)
                  .register("Trigger",      trigger)
                  .register("Throttle",     1000, throttle::read)
                  .register("Drive Speed",  1000, driveSpeed::read)
                  .register("Turn Speed",   1000, turnSpeed::read)
                  .register("X-Accel",      1000, xAccel::getAcceleration)
                  .register("Y-Accel",      1000, yAccel::getAcceleration)
                  .register("Z-Accel",      ()->zAccel.getAcceleration()*1000));
    }
Strongback's EventRecorder
You have to give it every event
you want recorded.
Strongback's EventRecorder
public class SimpleTankDriveRobot extends IterativeRobot {
    @Override
    public void robotInit() {
        ...
        FlightStick joystick = Hardware.HumanInterfaceDevices.logitechAttack3D(1);
        ...

        // Capture the state change of the trigger ...
        Strongback.switchReactor().
                  .onTriggered(joystick.getTrigger(),
                               ()->Strongback.eventRecorder().record("Trigger",true))
                  .onUnTriggered(joystick.getTrigger(),
                                 ()->Strongback.eventRecorder().record("Trigger",false));
        ...
    }
Strongback.eventRecorder().record("LaunchEvent",true);or
What can you do with it?
Strongback records to a memory mapped file (very fast and efficient) on the RoboRIO.
After disabling the robot, you can download
the binary file, convert it to CSV with
$ strongback.sh log-decoder data.logand then ...
Post-process it
with your tool of choice.
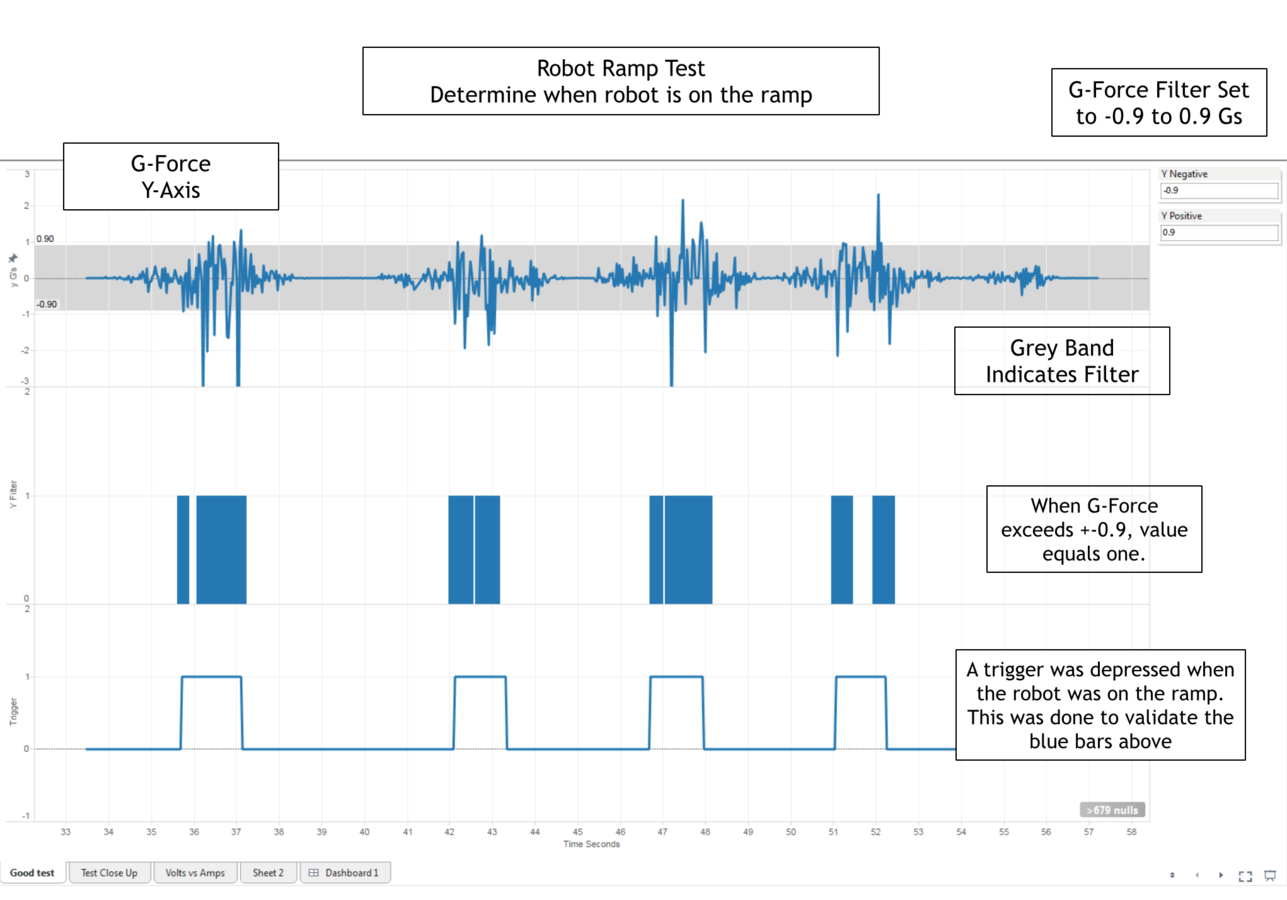
with Tableau
Strongback
Part 5: Executor
Executor
(Few will need this.)
Sometimes you want to run something
in the background
every cycle of the robot
(about every 20ms)
Really, the Executor is what
Strongback uses to run
commands, the switch reactor, and the data & event recorders.
But you can use it if you want.
@FunctionalInterface
public interface Executable {
    /**
     * Perform an execution at a given moment within the robot match.
     *
     * @param timeInMillis the time in the match (in milliseconds)
     * when this execution is being called
     */
    public void execute(long timeInMillis);
}
You implement this interface
Executable myComponent = ...
Strongback.executor().register(myComponent);
And then call Strongback to run it
Executable myComponent = ...
Strongback.executor().unregister(myComponent);
And to stop it
Careful, though
Strongback runs all asynchronous code on a single thread.
If you put too much on that thread,
it won't run fast enough and
you'll see this error message in the log:
ERROR: Unable to execute all activities within 20 milliseconds!Strongback
Part 6: Logging
Strongback.logger().debug("Got to here!");Simple
or
try {
    ...
} catch ( Throwable t ) {
    Strongback.logger().error(t,"Whoa, what happened?!");
}
or
Strongback.logger().warn("Something may have gone wrong!");Getting Started with Strongback
Step 1: Download

Step 2: Install
$ unzip strongback-1.0.0.zip -d ~/Simply unzip or untar
into your home directory
Step 1 & 2 with Terminal
$ curl -OL https://github.com/strongback/strongback-java/releases/download/v1.0.0/strongback-1.0.0.zip
$ unzip strongback-1.0.0.zip -d ~/
Step 3: Add to PATH
$ export PATH=~/strongback/java/bin:$PATHStep 4: Create project
$ cd path/to/eclipse/workspace
$ strongback.sh new-project -e -p com.myteam.robot -r MyRobotProject
Step 5: Build project
$ cd MyRobotProject
$ ant clean compile test deploy
or
$ ant clean test deployGive it a try
and join the community!
Using Strongback
By strongback
Using Strongback
Learn how to use Strongback to simplify and test the code for your FRC robot.