About me
- 周昱安(Zet)
- 國立中央大學資工所 – Web 智慧與資料探勘實驗室
- EXMA-Square 實習前端工程師
- 熱衷於前端技術開發與學習
- 主要使用 React 社群的解決方案

Functional Programming
Functional Programming
-
函數式程式設計(Functional Programming)是一種程式設計範式,其以函數作為構成程式的主要單位,將所有問題抽象成帶有動作的函數並組合呼叫
-
思維上比較接近數學上套用各種公式來解決問題,能夠將一個複雜的問題分拆解析成更好理解與管理的處理流程
-
JavaScript 是以原型(Prototype)為基礎的多範式程式語言,也就是說物件導向與函數式都只是 JavaScript 支援的其中一種範式而已
-
在現代化的前端技術中被廣泛採用,React 生態圈中的相關技術大多都深受函數式程式設計的思想影響
一等公民函數
一等公民函數
-
一個程式語言是否支援函數式程式設計範式有一個必要的先決條件,就是該語言中的函數是否為一等公民(First-Class)
-
所謂一等公民,即函數在語言中可以被當作值來運算,可以被當作其他函數的參數或回傳值來進行傳遞、加工與延遲呼叫
-
JavaScript 中的函數為一等公民,因此基本上可以支援函數式程式設計
const printSomething = function() {
  console.log('something');
}

setTimeout(printSomething, 2000);
$('#btn').click(function() {
console.log('clicked');
});[1, 2, 3].map(num => num + 1);
// => [2, 3, 4]純函數
純函數
- 一個函數若要被稱為純函數(Pure Function),必須滿足以下條件:
- 當呼叫時傳入相同的參數則永遠會得到相同的回傳值
-
沒有任何「與函數本身以外的環境互動」的副作用
- 存取函數外部的變數
- 存取 I/O
- 發送 AJAX
- 操作 DOM
- ....
let num = 1;
const f1 = () => {
  num += 1;
}
f1();
console.log(num); // 2
let num = 1;
const f2 = () => num + 1;
f2();
console.log(num); // 1
num = f2(num);
console.log(num); // 2let num = 1;
const f3 = (n) => n + 1;
f3(num);
console.log(num); // 1
num = f3(num);
console.log(num); // 2影響外部資料
依賴外部資料
Pure
純函數的好處
- 可移植性(Portable):
- 純函數中所有可能變化的依賴必須經由參數來輸入,且沒有與外部環境互動的副作用,因此函數的依賴非常清楚明白,易於移植到其他環境作為他用
- 這種「參考透明性」讓程式能更容易被推理並預期其執行結果,進而擁有更好的可維護性
純函數的好處
- 可緩存性(Cacheable):
- 由於純函數在相同輸入時永遠會得到相同輸出,因此可以藉由比較傳入的參數來判斷能否直接回傳已紀錄的緩存結果,或是真正需要執行計算
const squareNumber = memorize(x => x * x);

squareNumber(4);
// => 16
squareNumber(4); // 從緩存中取得當參數為 4 的結果
// => 16

squareNumber(5);
// => 25
squareNumber(5); // 從緩存中取得當參數為 5 的結果
// => 25
純函數的好處
- 可測試性(Testable):
- 純函數能讓測試更加容易,我們不用偽造函數所需要的外部環境,只需要簡單的給予測試用的參數,再檢查回傳的結果是否如預期即可
純函數的好處
- 適合平行處理:
- 純函數沒有對於外部環境的引用與存取,也沒有副作用,因此不會發生有同時存取共享之記憶體的 Race Condition 問題,適合用於平行處理
高階函數
高階函數
- 高階函數(Higher-Order Function)為滿足以下條件之一的函數
- 接收一或多個函數作為參數
- 返回一個函數
- 常用於對函數進行修飾與再包裝
const decorate = (f) => (x) => f(x) - 3;
const addTen = (x) => x + 10;

const addSeven = decorate(addTen);
addSeven(5);
// => 12
Currying
Currying
-
Currying 是指把多參數的函數變成一次能動態接收一個到多個參數的函數
- 將接受多個參數的函數,轉換成接受接一到多個參數的函數,並且返回一個接受剩餘參數的新函數
- 以此類推,當只剩餘最後一個參數要接收時,該函數回傳最後運算的結果
// 原函數
const add = function(x, y) {
  return x + y
};

// Currying 之後
add = function(x) {
  return function(y) {
    return x + y;
  };
};

// ES6 Arrow Function 的寫法
add = x => y => x + y

const increment = add(1);
const addTen = add(10);

increment(2);
// => 3

addTen(2);
// => 12
組合函數
- Currying 讓函數進行分段拆解,以易於重複利用與組合
- 配合 compose 這種高階函數的設計,便可以做到便利的組合各種函數
- 組合出來的函數被呼叫並獲得參數時,會將該參數傳給 compose 中最右邊的函數,然後將其返回值再當作參數傳給其左邊的函數,以此類推
- Redux 中有提供 compose 函數的實作
import { compose } from 'redux'

compose(f1, f2, f3)(x);
// 等同於
f1(f2(f3(x)));


const f = x => 2 * x + 1
const g = x => x ** 2
const h = compose(g, f);
h(4); // 81- f(x) = 2x+1
- g(x) = x^2
- h = (g o f)(x)
= g(f(x))
= (2x + 1) ^ 2
組合函數
import { compose } from 'redux'

const map = func => array => array.map(func);
const filter = func => array => array.filter(func);

const increaseAll = map(x => x + 1);
const takeEven = filter(x => x % 2 == 0);
const increaseAllAndTakeEven = compose(takeEven, increaseAll);

increaseAllAndTakeEven([1, 2, 3, 4, 5]); // [2, 4, 6];
JavaScript 中的 Class
Class
- JavaScript 沒有真正的類別
- JavaScript 基於 Prototype 來實現物件導向的設計模式
- 傳統寫法是透過 Constructor Function 定義並產生新 Instance
function Macbook(data) {
  this.brand = 'Apple';
  this.model = data.model;
  this.cpu = data.cpu;
  this.ram = data.ram;
  this.ssd = data.ssd;
}

Macbook.models = {
  2014: ['2014 Mid'],
  2015: ['2015 Early'],
  2016: [
    '2016 Late Without TouchBar',
    '2016 Late With TouchBar'
  ]
};

Macbook.getModelsByYear = function(year) {
  return Macbook.models[year];
};


Macbook.prototype.reboot = function () {
  console.log('do reboot...');
};
var mbpr = new Macbook({
model: '2016 Late Without TouchBar',
cpu: 'i7-6660U',
ram: '16G',
ssd: '512G'
});
console.log(mbpr);
/*
Macbook {
brand: "Apple",
model: "2016 Late Without TouchBar",
cpu: "i7-6660U",
ram: "16G",
ssd: "512G"
} */
mbpr.reboot();
// "do reboot..."
console.log(Macbook.getModelsByYear(2016));
/* [
"2016 Late Without TouchBar",
"2016 Late With TouchBar"
] */Class
- ES6+ 提供了 Class 語法糖,能使用更貼近物件導向語言的寫法
- 使用 Class 語法定義出來的仍是 Function
class Macbook {
  brand = 'Apple';
  constructor({model, cpu, ram, ssd}) {
    this.model = model;
    this.cpu = cpu;
    this.ram = ram;
    this.ssd = ssd;
  }

  reboot() {
    console.log('do reboot...');
  }

  static models = {
    2014: ['2014 Mid'],
    2015: ['2015 Early'],
    2016: [
      '2016 Late Without TouchBar',
      '2016 Late With TouchBar'
    ]
  };

  static getModelsByYear(year) {
    return Macbook.models[year];
  }
}
class MacbookPro extends Macbook{
constructor(data) {
super(data);
}
isPro = true;
}
const mbpr = new MacbookPro({
model: '2016 Late Without TouchBar',
cpu: 'i7-6660U',
ram: '16G',
ssd: '512G'
});
console.log(mbpr);
/*
MacbookPro {
brand: "Apple",
model: "2016 Late Without TouchBar",
cpu: "i7-6660U",
isPro: true,
ram: "16G",
ssd: "512G"
} */為何前端需要函數式程式設計
為何前端需要函數式程式設計
-
前端程式非常難以推理
-
前端的全域變數與副作用操作太多
-
DOM 操作
-
事件處理
-
localStorage、Cookie
-
-
前端是非同步的
-
AJAX
-
-
為何前端需要函數式程式設計
-
函數式程式設計強調將運算過程封裝成片段的純函數,利用高階函數的特性,能夠彈性的組合與修飾邏輯片段
-
將副作用隔離,來讓主要的資料運算流程保持 Pure,能夠使前端程式碼的可推測性大幅提升
-
React 將副作用隔離到 Virtual DOM 的封裝
-
事件處理、DOM 操作
-
-
Redux 將副作用隔離到 Action,若這個副作用操作流程會被重複使用,可抽象化成 Middleware
-
React
理解 React 的核心原理:
Reconciliation 流程
Reconciler & Renderer
React 的工作分為兩個部分:
-
Reconciler(react):將你定義的 UI 組合出一個虛擬的畫面結構
-
Renderer(react-dom):以這個虛擬結構作為依據,產生出對應的實際 DOM
<!DOCTYPE html>
<html>
  <body>
    <div id="root"></div>
  </body>
  <script src="/dist/bundle.js"></script>
</html>
import React from 'react';
import ReactDOM from 'react-dom'
const reactElement = (
React.createElement('div', { className: 'box' },
React.createElement('button', { onClick: () => alert('clicked') }, 'click me')
)
);
ReactDOM.render(reactElement, document.getElementById('root'));Virtual DOM(Reconciler)
-
Virtual DOM 是一份純資料的 Tree 物件結構,映射對應到實際的 DOM
-
使用 React.createElement 函數來產生 Tree 節點(React Element)
-
Virtual DOM 為自定義組件提供了中介的虛擬層,讓開發者能以聲明式的方式定義 UI 的顯示邏輯與行為
-
我們透過定義組件來表達「UI 什麼情況該如何呈現」,而「要用什麼手段來達到這個畫面改變(如何產生和操作 DOM)」 ,React 則會自動幫你完成 (react-dom 這個 Renderer 的工作)
React.createElement('div', null,
  React.createElement(AlertButton, { text: 'HelloJS' }),
  React.createElement(AlertButton, { text: 'React' }),
  React.createElement(AlertButton, { text: 'Basic' })
)
Why Virtual DOM ?
-
UI 開發最大的兩個問題與挑戰就是「可重用性」與「反應變化」
-
然而 Web 中建構 UI 的媒介 – DOM,並沒有直接滿足以下需求的能力:
-
自定義資料抽象化
-
複雜情形的組合與重用
-
綁定資料來源以自動反應顯示結果與變化
-
-
因此 React 建立了一個虛擬結構層,來間接實現這些對於 UI 開發來說相當重要的能力
-
我們對於 Virtual DOM 這個虛擬結構層以組件的形式定義想要的 UI 呈現結構,而 Renderer 則會幫我們將其自動轉換成對應的實際 DOM 結果
One-way Data Flow
-
One-way Data Flow(單向資料流)
- UI 是你的應用程式的資料去延伸的顯示結果
-
只有因為資料改變,才能導致 UI 的顯示結果自動跟著改變
-
這個因果關係永遠不能逆向
-
UI 只能被動的隨資料而反應變化
-
UI 不能反過來主動直接修改資料或是修改 UI 自己的顯示結果
-
Always Redraw
-
React 如何實現單向資料流:當 UI 的來源資料有變化時
-
不需要關心整份資料中具體是變化了哪些部分
-
先把 UI 畫面全部洗掉,然後再依據完整的最新資料全部重新產生 UI 畫面,通常可以保證顯示結果一定是正確的
-
-
然而每次都重繪全部的實體 DOM 顯然在效能考量之下是不可行的,但是重繪 Virtual DOM 則成本相對降低許多,因此 React 實作了一套 Reconciliation 演算法來實現這個概念與流程
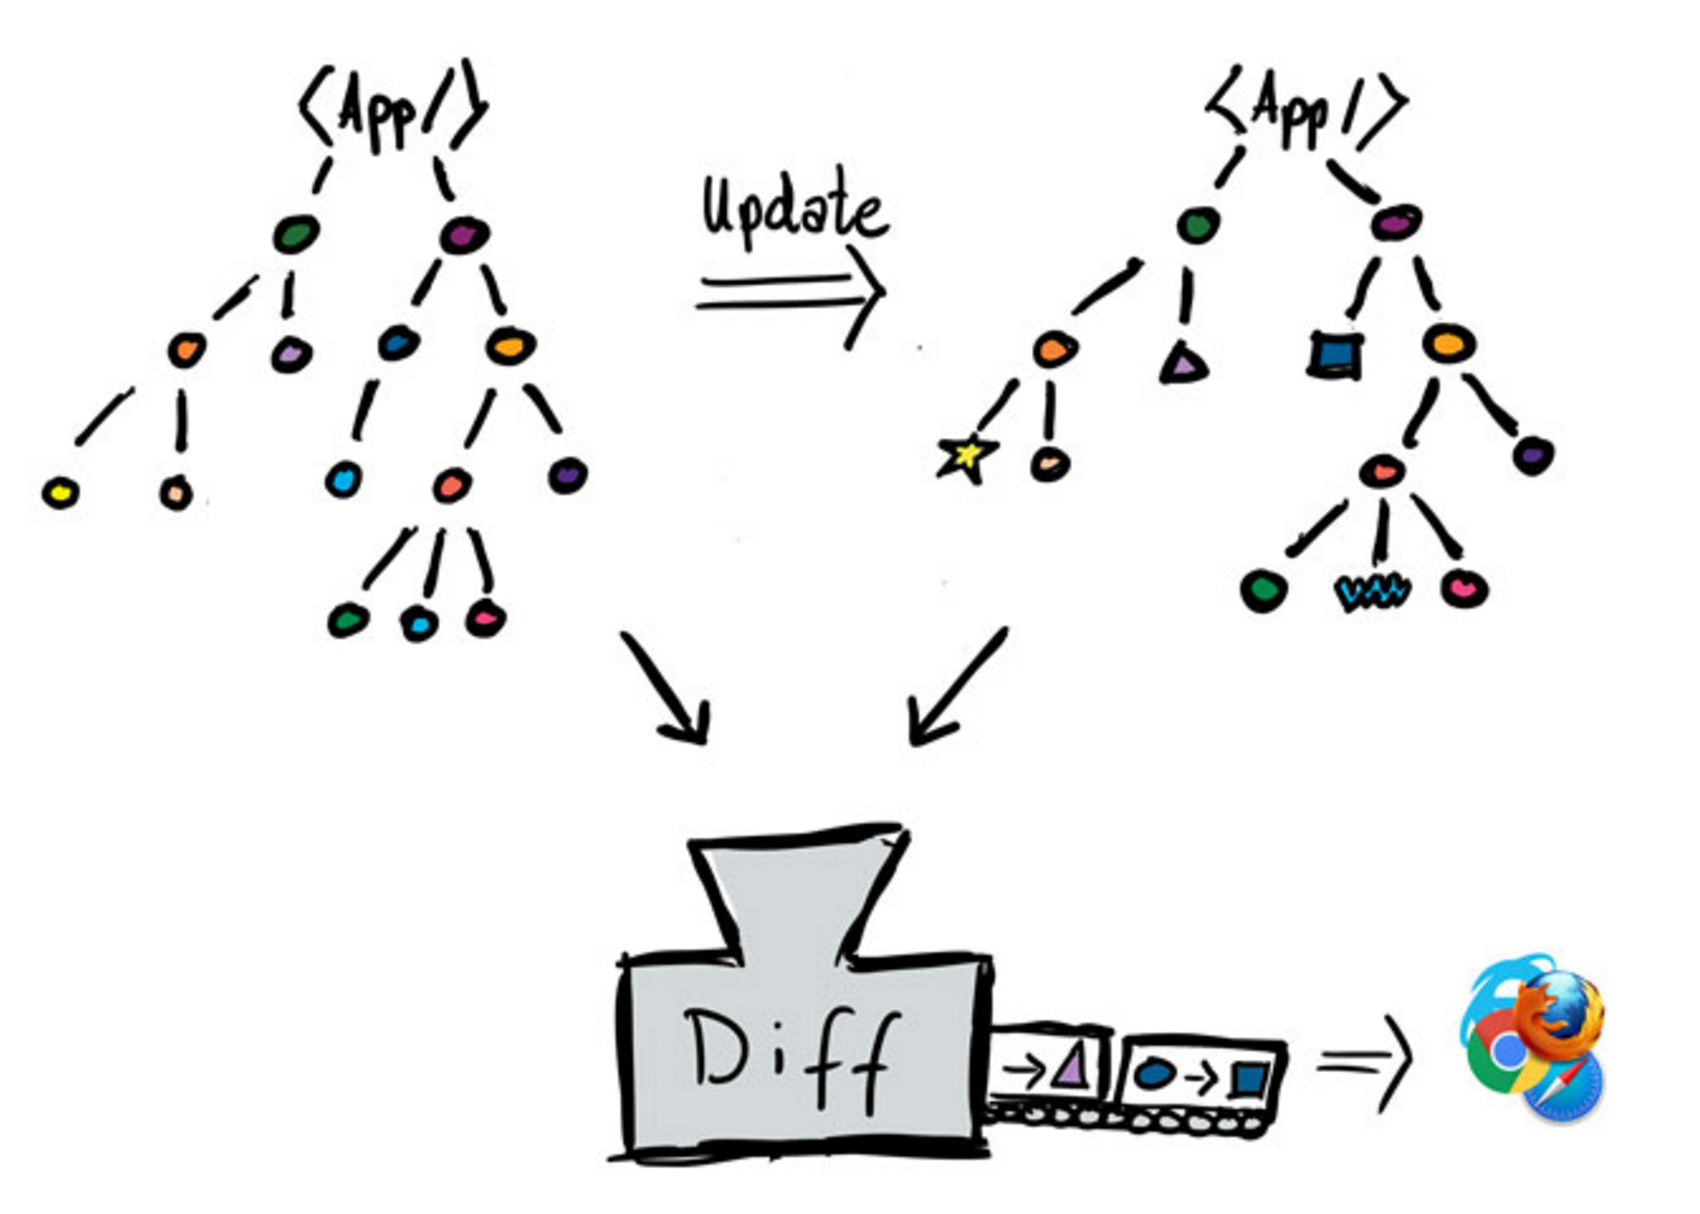
Reconciliation(Diff 演算法)
當畫面需要改變時,根據最新的資料重繪出新的 Virtual DOM Tree,
並與改變前的舊 Virtual DOM Tree 進行全面式的比較與計算,
其中被發現新舊差異的地方,才真的會在實際的 DOM 上發生操作改變
JSX 使用技巧
JSX
-
JSX 是 React 在使用的一種特殊 JavaScript 語法糖
-
能夠讓你以可讀性較高的語法來定義 React UI 結構
-
語法長得很像 HTML,但本質上完全不是 HTML
-
瀏覽器看不懂,需要翻譯成原本的 React.createElement 語法才能正常的在瀏覽器上執行
<div className="box">
  <button onClick={() => alert('clicked')}>click me</button>
</div>
React.createElement("div", {"className": "box"},
React.createElement("button", {"onClick": () => alert("clicked")}, "click me")
)Babel Compile
JSX 語法
-
JSX 是 React.createElement 函數的語法糖,用來建立 Virtual DOM 節點結構
-
支援原生 HTML DOM 有的標籤以及自訂的 Component Class 標籤
-
嚴格標籤閉合
-
與 HTML 重要的語法差異
-
class → className
-
所有 property 名稱改以駝峰式命名,EX:onclick → onClick
-
若想要傳遞的 Props 的值是固定字串的話,可以直接使用雙引號,其他情況則需要使用大括號來包住
-
<div>
  <h2 className="title">Title</h2>
  <NumberItem number={100}/>
  <br/>
</div>
表達式的印出顯示
-
使用 { } 語法來填入 JavaScript 表達式(一個值),其中可直接當作顯示內容印出的型別有:
-
React Element:當作子節點插入
-
String:直接印出
-
Number:轉成字串後直接印出
-
Array:攤平成多個表達式後印出(如果 item 的值也是這些可印的型別)
-
Boolean、Null、Undefined:什麼都不印,直接忽略
-
-
可以在組件之間用 Props 傳遞,但不能當顯示內容印出的型別有:
-
Object
-
Function
-
條件判斷式
- JSX 中不可以直接寫 if / else,因為實際上是一個 React Element 物件結構
- 使用 && 運算子來達到 if 判斷式的效果
- 使用三元運算子來達到 if / else 判斷式的效果
<div>
  {(a > 100) && (
    <AlertButton text="HelloJS"/>
  )}
  <AlertButton text="React"/>
  <AlertButton text="Basic"/>
</div>
<div>
{(a > 100) ? (
<AlertButton text="HelloJS"/>
): (
<AlertButton text="React"/>
)}
<AlertButton text="Basic"/>
</div>迭代輸出顯示內容
- 使用陣列型別的 map 函數批量迭代產生 React Element 或其他顯示內容的陣列
- 當陣列中的 item 是 React Element 時,應該要給予一個唯一的 key,以優化重繪時的 Reconciliation 效率
<div>
  {numbers.map((number, key) => (
    <button key={key}>{number}</button>
  ))}
</div>
效能調教:Pure Render
Pure Render
- 當一個組件的 Props 與 State 沒有改變時,render 出的結果永遠一致的話,我們稱其為一個 Pure Render 的 Component
- 這意謂著一個 Pure Render 的 Component 如果 Props 與 State 沒有改變的話,就不需要真正進行重繪,以節省效能
-
根據 Props 與 State 是否改變來判定是否需要重繪,只是一種基本的減少效能浪費的手段
- 所有的 Props 或 State 中都是只要有其中一個改變,重繪就會發生
- 若需要更精細的效能調教,應該進行 shouldComponentUpdate 生命週期的實作來自行判斷,避免某些非必要的大型子樹重繪的情況
- 基本上,絕大多數的組件都應該要是 Pure Render,才容易測試、維護
Pure Render
- 常見的 Pure Render 的使用方式
- 自行實作 shouldComponentUpdate,用 shallow equal 檢查 Props 和 State 有無改變,以決定是否需要重繪組件
- 使用 PureRenderMixin
- Class Component 無法使用,不推薦
- 使用 React.PureComponent
- 建議使用
- 直接將組件繼承的由 React.Component 改成 React.PureComponent 就行
class Button extends React.PureComponent {
  render() {
    return (
      <button>{this.props.text}</button>
    )
  }
}
導致 Pure Render 失效的常見錯誤
// 每次 render,style 都是新的 object
<List style={{ color: 'silver'}} />

// 每次 render,itmes 都是新的 array
<IAmPure items={items.map(item => item + 1)} />

// 每次 render,onClick 都是新的 function
<List onClick={e => console.log(e)} />- 將 Props 傳入臨時產生的實字(literal),導致每次 render() 呼叫時都是產生新的對象,Pure Render 失效
- 物件
- 陣列
- 函數
導致 Pure Render 失效的常見錯誤
class Input extends React.PureComponent {
  handleChange(e) {
    console.log(e.target.value);
  }

  render() {
    return (
      <input onChange={this.handleChange.bind(this)}/>
    )
  }
}
class Input extends React.PureComponent {
constructor(props) {
super(props);
this.handleChange = this.handleChange.bind(this);
}
handleChange(e) {
console.log(e.target.value);
}
render() {
return (
<input onChange={this.handleChange}/>
)
}
}class Input extends React.PureComponent {
handleChange = (e) => {
console.log(e.target.value);
}
render() {
return (
<input onChange={this.handleChange}/>
)
}
}詳解組件生命週期
組件的生命週期
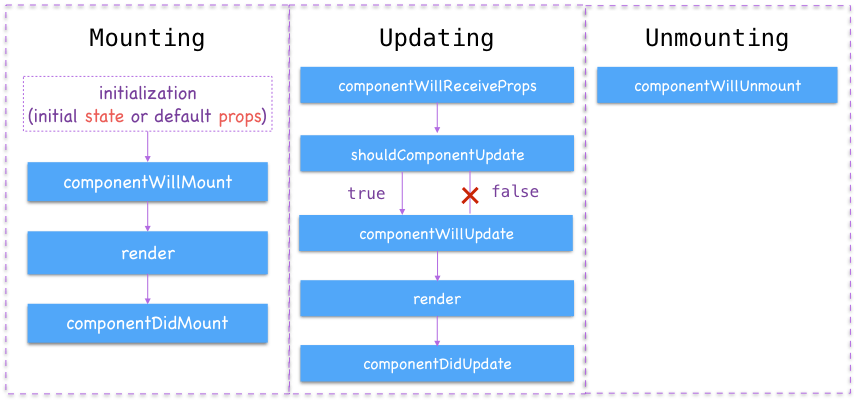
Initialization
- 組件實例首次被產生時,會先進行初始化的流程
- 載入預設 Props(defaultProps)
- 如果一個 defaultProps 中有設定的值在傳入的Props 中是 undefined 的話,則填入 defaultProps 中的預設值
- 初始化類別的成員變數(例如 this.state)
- 執行 Constructor
- Constructor 會傳入 Props
- 如果有寫 Constructor,其內容必須呼叫 super(props) 來呼叫父類別(React.Component)的 Constructor 並傳入 Props
- super(props) 建議寫在 Constructor 的第一行,未呼叫 super(props) 前無法使用 this
- 多數情況下,你不需要自己寫 Constructor
- Constructor 不可以是 Async Function
- 載入預設 Props(defaultProps)
class App extends React.Component {
  render() {
    return (
      <Test/>
    )
  }
}

class Test extends React.Component {
  static defaultProps = {
    num: 100
  }

  state = {
    active: true
  }

  constructor(props) {
    // 此處仍不能使用 this
    super(props);
    // 呼叫 super 方法並傳入 props 之後,
    // 便可以使用 this.props
    console.log(this.props); // { num: 100 }
    console.log(this.state); // { active: true }
  }

  render() {
    return (
      <div>text</div>
    )
  }
}
componentWillMount()
class App extends React.Component {
  state = {
    data: 0
  }

  componentWillMount() {
    this.setState({
      data: 1
    })
  }

  render() {
    return (
      <div>{this.state.data}</div>
    )
  }
}- 組件即將被首次渲染並產生 DOM 前會呼叫此生命週期(僅一次)
- 此處呼叫 setState 方法並不會導致重繪流程發生,而是同步的立即更新 this.state
- 此生命週期是 Server-Side Rendering 時,除了 constructor 與 render 以外唯一會呼叫的生命週期
- 避免在此處進行有副作用的操作,以免造成組件首次渲染失敗
render()
class App extends React.Component {
  state = {
    data: 0
  }

  componentWillMount() {
    this.setState({
      data: 1
    })
  }

  render() {
    return (
      <div>{this.state.data}</div>
    )
  }
}- 定義組件顯示結構的生命週期
- 所有組件都必須實作此方法
- 必須僅回傳單一個 React Element,因此 JSX 語法結構中第一層只能有一個節點
- 此處禁止呼叫 setState 方法,因為會導致無窮迴圈
- 這個方法不可以是 Async Function
componentDidMount()
class App extends React.Component {
  state = {
    data: ''
  }

  componentDidMount = async() => {
    const { data } = await this.fetchAPI();
    this.setState({ data });
  }

  fetchAPI = async() => {
    const response = await fetch('https://api.myjson.com/bins/jtkux');
    return await response.json();
  }

  render() {
    return (
      <div>{this.state.data}</div>
    )
  }
}- 組件被首次渲染並完成產生 DOM 之後會呼叫此生命週期(僅一次)
- 通常 UI 首次載入後要執行的事情會在此處呼叫,包含某些可能有副作用的操作
- 呼叫 AJAX
- DOM 操作
- 通常 UI 首次載入後要執行的事情會在此處呼叫,包含某些可能有副作用的操作
componentWillReceiveProps(nextProps)
class Button extends React.Component {
  componentWillReceiveProps(nextProps) {
    console.log(this.props); // old props
    console.log(nextProps);  // new props
  }

  render() {
    return (
      <button>{this.props.text}</button>
    )
  }
}- 當組件接收到新的 Props 時會首先觸發此生命週期
- 接收新的 Props 作為參數,此時 this.props 裡還是舊的 Props
- Props 沒有改變時也有可能導致此生命週期被呼叫,例如當父組件重繪而連帶導致此組件也被再度呼叫時
- 組件自己呼叫 setState 而導致重繪時並不會觸發此生命週期
- 此生命週期內呼叫 setState 並不會導致重繪流程發生,而是同步的立即更新 this.state
- 通常此處用於比較新舊 Props 之後需要立即改變 State 而呼叫 setState 的情境
class Button extends React.Component {
  shouldComponentUpdate(nextProps, nextState) {
    return this.props.text != nextProps.text;
  }

  render() {
    return (
      <button>{this.props.text}</button>
    )
  }
}-
這個生命週期用於決定組件是否真的要進行重繪,是影響 React 應用程式效能的關鍵
- 當這個方法回傳 true 時,重繪流程繼續進行;反之則中斷重繪流程,讓組件保持原狀態
- 通常會透過比較新舊 Props 或 State,來判斷是真的要進行重繪或可以跳過此次重繪以節省效能
- 此處禁止使用 setState,因為會導致無窮迴圈
- 使用 forceUpdate() 方法來發起重繪時不會觸發,強制繼續重繪
shouldComponentUpdate(nextProps, nextState)
componentWillUpdate(nextProps, nextState)
class Button extends React.Component {
  componentWillUpdate(nextProps, nextState) {

  }

  render() {
    return (
      <button>{this.props.text}</button>
    )
  }
}- 組件正式開始重繪前會觸發的生命週期,發生在 render() 之前
- 父組件重新呼叫或組件自己 setState ,兩種情況都會觸發此生命週期
- 此處禁止使用 setState,因為會導致無窮迴圈
componentDidUpdate(prevProps, prevState)
class NewsList extends React.Component {
  state = {
    newsList: []
  }

  componentDidMount() {
    this.loadNewsListPage(1);
  }

  componentDidUpdate(prevProps, prevState) {
    if (prevProps.page != this.props.page) {
      this.loadNewsListPage(this.props.page);
    }
  }

  async loadNewsListPage(page) {
    const response = await fetch(`/api/news/list/${page}`);
    this.setState({
      newsList: await response.json()
    });
  }

  render() {
    return (
      <div>
        {this.state.newsList.map(item => {
          <NewsListItem {...item} key={item.id}/>
        })}
      </div>
    )
  }
}-
組件重繪完成且 DOM 也更新完成後會觸發的生命週期,發生在 render() 之後
- 此時重繪已經完成,引此 this.props 與 this.state 中已是新資料,舊資料由參數傳入
-
此處適合處理一些因為資料改變(Props 或 State)而必須呼叫的副作用操作
- 呼叫 AJAX
- DOM 操作
componentWillUnmount()
class App extends React.Component {
  componentDidMount() {
    window.addEventListener('scroll', this.handleWindowScrolling);
  }

  componentWillUnmount() {
    window.removeEventListener('scroll', this.handleWindowScrolling);
  }

  handleWindowScrolling() {
    console.log('scrolling')
  }

  render() {
    return (
      <div/>
    )
  }
}-
組件被從結構中移除前觸發此生命週期,適合用於清理那些曾被組件產生,但不再需要執行的副作用操作
- 清除事件監聽與綁定
- 取消還沒回傳的 AJAX
- 還原那些沒有被 Virtual DOM 追蹤的 DOM 操作
利用高階組件進行抽象化重用
組件間的抽象化重用
- 在開發 React 組件時,常會遇到某些功能需要被不同的多個組件共用的情況,此時就需要進行抽象化重用,來幫助你的應用程式更為簡潔與容易維護
- React 應用中實現抽象化重用有兩種主要的方法
- Mixin
- 高階組件(Higher-Order Component)
Mixin
- 物件導向中的多重繼承雖然強大但是過於危險,會令程式碼越來越難以追蹤,因此多數物件導向語言都會使用一些折衷的方案,像是 Mixin 或是 Interface,來實現一種類似多重繼承但是副作用較有限的效果
- React 早期版本的 createClass 方法就有支援 Mixin 的機制,其會將 Mixin 中定義的方法直接混入組件定義當中
- 目前主流的 Class Component 並不支援 Mixin 機制
import React from 'react'
import PureRenderMixin from 'react-addons-pure-render-mixin'

React.createClass({
  mixins: [PureRenderMixin],
  render: function() {
    return (
      <div>foo</div>
    )
  }
});
Mixin 的問題
- Mixin 的方式在 React 社群的演進當中漸漸被放棄,由於它有幾個較大的問題:
- 破壞原有組件的封裝
- Mixin 會對組件直接混入方法,給原有組件帶來新的特性(Props、State、生命週期實作),這意味著這個組件將會有某些「不可見」的狀態需要我們去維護,但實際上這非常困難,尤其是如果這個 Mixin 還依賴其它的 Mixin 的話
- 命名衝突
- Mixin 將特性直接混入,因此被多個 Mixin 混入的組件依然是單一的平面結構,那麼這些 Mixin 中使用的命名在不可知的情況下是很難以避免衝突的,尤其如果這個 Mixin 是由第三方套件所提供的話
-
增加組件的邏輯複雜性
- Mixin 直接以平面的方式混入的作法,背離了函數式程式設計中儘量保持 Pure 並且將副作用隔離的思想,容易讓組件變得複雜且混亂,難以追蹤邏輯的走向,導致到最後幾乎變得無法維護
- 破壞原有組件的封裝
- 針對這些困擾,React 社群提出了新的方式來取代 Mixin,那就是高階組件
高階組件
- 高階組件(Higher-Order)的概念就是從高階函數而來的,其接收一個 React 組件作為參數,回傳一個增強(Enhanced)或包裝過的新 React 組件
- 高階組件能讓我們的程式碼更具有可重用性與可維護性
- 最主流的實作方式是「屬性代理」
- 常見的例子有 react-redux 的 connect 方法、react-router 的 withRouter 方法
class App extends React.PureComponent {
  render() {
    console.log(this.props);
    return (
      <div>App</div>
    )
  }
}

const addName = (WrappedComponent) => {
  return class extends React.PureComponent {
    name = 'Zet';

    render() {
      return (
        <WrappedComponent
          {...this.props}
          name={this.name}
        />
      )
    }
  }
}

export default addName(App);
高階組件
- 屬性代理意味著在這個高階組件將包在原組件外層,代理所有原本應直接傳入到原組件的 Props,中途攔截並作出處理,然後再將之轉傳給原組件
- 高階組件這種層層包裹的方式能夠在不損害原組件架構的情況下將狀態或方法傳入原組件,以達到抽象化邏輯並重用增強組件的效果
class App extends React.PureComponent {
  render() {
    console.log(this.props);
    return (
      <div>App</div>
    )
  }
}

const addName = (WrappedComponent) => {
  return class extends React.PureComponent {
    name = 'Zet';

    render() {
      return (
        <WrappedComponent
          {...this.props}
          name={this.name}
        />
      )
    }
  }
}

export default addName(App);
高階組件
- 控制 Props
- 藉由屬性代理的方法,高階組件可以讀取、添加、編輯、或移除攔截到的 Props,以進行功能的添加
- 需要小心編輯或移除攔截到的 Props,處理不當可能導致下層的組件某些依賴遺失而導致其他功能失效
class App extends React.PureComponent {
  render() {
    console.log(this.props);
    return (
      <div>App</div>
    )
  }
}

const addName = (WrappedComponent) => {
  return class extends React.PureComponent {
    name = 'Zet';

    render() {
      return (
        <WrappedComponent
          {...this.props}
          name={this.name}
        />
      )
    }
  }
}

export default addName(App);
高階組件
- 使用其他元素包裹原組件
- 我們還可以使用其他元素來在 render 時包住原組件
- 通常是為了樣式或排版佈局
class App extends React.PureComponent {
  render() {
    console.log(this.props);
    return (
      <div>App</div>
    )
  }
}

const addBorder = (WrappedComponent) => {
  return class extends React.PureComponent {
    styles = {
      border: '1px solid #DDD'
    }

    render() {
      return (
        <div style={styles}>
          <WrappedComponent
            {...this.props}
            name={this.name}
          />
        </div>
      )
    }
  }
}

export default addBorder(App);
高階組件
- Mixin
- 直接將特性混進原組件中,會直接破壞原組件的架構或造成命名衝突
- 高階組件
- 層層包裹的概念,每層組件之間隔離環境不互相影響,僅透過 Props 將功能所需的東西層層往下傳遞
- 原組件並不會趕知道高階組件的存在,只需要把增強的功能套在其身上,在設計適當的 Props 傳下來就行了,從而避免如使用 Mixin 會造成的副作用
組件
Mixin
Mixin
組件
Mixin
高階組件
CSS 樣式處理
React 中的樣式處理方案
- React 社群有幾種比較常見的 CSS 樣式處理方案
- 外部 CSS
- React 與 CSS 分離,使用全域的方式引入 CSS 或是靠 Webpack 的 style-loader 打入
- CSS in JS
- 使用 inline-style:例如 Radium
- 產生真正的 CSS 程式碼:例如 styled-components
- 外部 CSS
styled-components
-
完全的 CSS in JS
- 完全在 JavaScript 中撰寫 CSS 樣式程式碼,因此不需要像是 SASS 或 PostCSS 等 Processor,直接使用 JavaScript 的邏輯能力來組織樣式即可
-
使用字串的方式來撰寫樣式語法:
- 與原本的 CSS 開發體驗接近,不需要再用駝峰式屬性名
-
會產生真正的 CSS 程式碼,支援所有 CSS 特性
- 在 JavaScript 中撰寫的樣式最後會被產生成真正的 CSS 程式碼並打進 <head> 中,而非半殘且效能低落的 inline-style,因此可以使用 Media Query 或偽元素等完整的 CSS 功能
-
自動處理命名作用域
- 產生出來的樣式的皆會自動產生隨機的對應名,避免 CSS 全域樣式命名衝突的問題
class App extends React.PureComponent {
  render() {
    return (
      <div>
        <Button>Button</Button>
      </div>
    )
  }
}

const bgColor = '#009688';

const Button = styled.button`
  color: #FFF;
  background-color: ${bgColor};
  padding: 8px;
  border: 1px solid #DDD;
  border-radius: 10px;
`
styled-components
- 樣式即組件
- styled-components 將樣式直接依附於產生出的組件上面,因此能夠更有效的管理組件的樣式依賴,也能透過重用組件的方式來重用樣式,或是將樣式從組件上複製出來並產生其他組件
- 傳送給 styled 產生出的組件的 Props,都會原封不動得轉傳給內部的 HTML Tag 類型的元素
- 樣式產生出來的隨機 className 會自動的附在組件上,無需自行手動填寫
class App extends React.PureComponent {
  handleClick = () => {
    alert('clicked!');
  }
  render() {
    return (
      <div>
        <Button onClick={this.handleClick}>Click me</Button>
      </div>
    )
  }
}

const Button = styled.button`
  color: #FFF;
  background-color: #009688;
  padding: 8px;
  border: 1px solid #DDD;
  border-radius: 10px;
`
styled-components
- 支援巢狀結構語法
- 支援如 SASS 般的巢狀結構語法,能夠方便的撰寫層級的樣式
const Button = styled.button`
  color: #FFF;
  background-color: #009688;
  padding: 8px;
  border: 1px solid #DDD;
  border-radius: 10px;

  &:hover {
    background-color: green;
  }
`
styled-components
- 組件 Props 與樣式狀態變化映射
- 由於樣式被封裝在高階組件上,因此可以很直覺的直接使用自定義的 Props 來將組件狀態映射到樣式的狀態變化上
- 不再需要蹩腳的手動組 className
- 在樣式中插入一個接收 Props 並回傳字串的函數
class App extends React.PureComponent {
  state = {
    active: true
  }
  handleClick = () => {
    this.setState({
      active: !this.state.active
    })
  }

  render() {
    return (
      <div>
        <Button
          onClick={this.handleClick}
          active={this.state.active}
        >
          Click me
        </Button>
      </div>
    )
  }
}

const Button = styled.button`
  color: #FFF;
  background-color: #009688;
  padding: 8px;
  border: 1px solid #DDD;
  border-radius: 10px;
  opacity: ${props => props.active ? '1' : '0.5'};
`
styled-components
- Styled Everything
- 經由 styled 方法所產出來的組件,可以再次傳入 styled 方法進行二度加工
- 自行定義的組件或第三方套件的組件,只要其內部有進行 this.props.className 的接收的話,就可以傳入 styled 方法進行樣式添加
const Button = styled.button`
  color: #FFF;
  background-color: #009688;
  padding: 8px;
  border: 1px solid #DDD;
  border-radius: 10px;
  opacity: ${props => props.active ? '1' : '0.5'};

  &:hover {
    background-color: green;
  }
`

const RedTextButton = styled(Button)`
  color: red;
`
class ButtonText extends React.PureComponent {
render() {
return (
<span
className={this.props.className}
>
{this.props.text}
</span>
)
}
}
const BlueButtonText = styled(ButtonText)`
color: blue;
`Redux
理解 Redux 的核心原理:
Pure Reducer & Immutable State
三大原則
- 單一資料來源
- 整個前端應用的 State 都被儲存在一顆 Object Tree 當中,成為唯一的 Store
- 在 React 中,所有 Component 都共用這個 Store
- State 是唯讀的
- 唯一改變 State 的方法就是呼叫 Action,Action 負責定義發生的事件的種類
- 使用純函數來執行 State 的修改
- 為了描述這個 Action 實際上要如何改變 State Tree,我們需要定義 Reducer
View
( React )
Store
Action
Reducer
pass
by
dispatch
畫面需要改變
產生 action
return
newState
資料變更
Server
One-Way Dataflow
為何要分 Action 與 Reducer
- 將帶有副作用的邏輯隔離到 Action 或 Middleware
- 將乾淨的純運算放在 Reducer
- 將副作用隔離能夠提升程式邏輯的可預測性與可維護性
- Action 與 Reducer 可以是一對一或多對一關係,方便純運算被進行抽象化重用
為何 Reducer 必須是 Pure 的
- Redux 並不追蹤每次 State 改變時,確切到底是改變了哪些部分
- Redux 假設你的所有 Reducer 的處理的都 Pure 的,因此 State 在固定的 Action 依序傳入後,應永遠會運算出相同的結果
- 一旦其中有一處運算結果是不受保證的(不 Pure),就代表這個 State 被更新的流程不可靠,隨時都有可能出現錯誤的 State 結果
為何 State 不可以被直接修改
- Reducer 每次執行時會傳入舊的 State 作為參數,返回完整的新的 State
- Redux 並不追蹤每次 State 改變時,確切到底是改變了哪些部分,因此 Redux 是透過比較「整個 State 的參考是否仍一樣」來得知 State 到底是不是被更新過
- 而在 JavaScript 中,物件在被當作參數傳入函數時是傳參考,因此在 Reducer 中直接修改 State 物件的屬性的話,會導致 State 真的被修改到但參考仍為原者,因此 Redux 透過 Reducer 來推算 State 的流程以及辨識 State 是否有更新的機制都將不再有效
const initialState = { num: 0, name: '' };
export default (state = initialState, action) => {
  switch (action.type) {
    case 'CHANGE_NAME':
      return {
        ...state,
        name: action.payload.name
      }

    case 'INCREMENT':
      return {
        ...state,
        num: state.num + 1
      }

    default:
      return state;
  }
}
Middleware 與
處理非同步 Action
被隔離在 Reducer 外的副作用
- Redux 希望能夠將所有副作用都隔離在 Reducer 之外,以確保 State 運算流程的可靠性以及更好的可預測性
- 然而在預設情況下傳入 dispatch 方法的參數隻能是 Action Object,否則會被擋在 Reducer 外面並發生錯誤
- 為了也不要將大量含副作用的流程塞進 React 組件裡面,因此我們需要 Middleware 介於其中來幫我們管理副作用以及非同步的流程
- 社群中主流的副作用管理 Middleware
Redux Thunk 運作流程
dispatch
Redux
Thunk
Middleware
Reducer
action is a function
=> pass dispatch and call it
action is an object
function createThunkMiddleware(extraArgument) {
  return ({ dispatch, getState }) => next => action => {
    if (typeof action === 'function') {
      return action(dispatch, getState, extraArgument);
    }

    return next(action);
  };
}

const thunk = createThunkMiddleware();
thunk.withExtraArgument = createThunkMiddleware;

export default thunk;
const fooAction = (num) => (dispatch) => {
dispatch({ type: 'ADD_NUM', payload: { num } });
dispatch({ type: 'ADD_NUM', payload: { num: num + 1 } });
dispatch({ type: 'ADD_NUM', payload: { num: num + 2 } });
}
// in react component
this.props.dispatch(fooAction(10));Call AJAX
-
當你呼叫一個非同步 API,有兩個關鍵的時間點:你開始呼叫的的時候,以及當你收到回應 (或是失敗) 的時候。
-
所以一個請求的行為應該可以分為下列四種狀態:
-
尚未開始請求(status: null)
-
請求中,還沒得到結果(status: request)
-
得到結果並成功(status: success)
-
得到結果但失敗 (status: failure)
-
設計 Action 物件
-
你可以將上述中會發生的三種情況(除掉預設本來就是還沒請請求的狀態),設計成對應的三種 Action
{ type: 'FETCH_POSTS_REQUEST' }

{ type: 'FETCH_POSTS_SUCCESS', response: { ... } }

{ type: 'FETCH_POSTS_FAILURE', error: 'Oops' }
設計 State 結構與 Reducer
const initState = {
  status: null,
  data: [],
  error: null
}

function postReducer(state = initState, action) {
  switch (action.type) {
    case FETCH_POSTS_REQUEST:
      return {
        ...state,
        status: 'request'
      };
    case FETCH_POSTS_SUCCESS:
      return {
        ...state,
        status: 'success',
        data: action.response
      }
    case FETCH_POSTS_FAILURE:
      return {
        ...state,
        status: 'failure',
        error: action.error
      }
    default:
      return state;
  }
}
設計 Thunk 函數
-
使用Redux Thunk 來讓 dispatch 方法可以接收一個函數,並將 AJAX 的非同步副作用集中於此處理
function fetchPosts() {
  return async (dispatch) => {
    dispatch({
      type: FETCH_POSTS_REQUEST
    });

    try {
      const httpResponse = await fetch('/posts');
      if (httpResponse.status != 200) {
        throw new Error(`${httpResponse.status(httpResponse.statusText)}`);
      }

      dispatch({
        type: FETCH_POSTS_SUCCESS,
        response: await httpResponse.json()
      });
    } catch (error) {
      console.error(error);
      dispatch({
        type: FETCH_POSTS_FAILURE,
        error: error.message
      });
    }
  }
}
Thanks!
進階 React & Redux
By tz5514


