ReactJS
Concept
HTML? DOM?
-
HTML 是一種方便開發者撰寫的語言,只是純文字
-
DOM 是瀏覽器渲染引擎中真正存在的物件節點
-
頁面初始化時,渲染引擎會依照 HTML 程式碼的內容產生出 DOM
<!DOCTYPE html>
<html>
  <body>
    <div>
      <button>按鈕</button>
    </div>
  </body>
</html>
<!DOCTYPE html>
<html>
<body></body>
<script>
const div = document.createElement('div');
document.body.appendChild(div);
const button = document.createElement('button');
button.innerText('按鈕');
div.appendChild(button);
</script>
</html>Demo
UI 元件是依據當前資料來產生
y = f(x)
componentInstance = componentClass(data)
函數式運算
僅僅是 UI
-
React 本身並不是一個完整的前端框架,而是一個只處理 View 的函式庫,也就是負責 DOM 的產生與操作
-
React 是一個中間媒介,連結了 UI 純粹的定義層面與 DOM 的實際層面
-
基本上,React 本身只做以下兩件工作;
-
讓你定義 UI 的藍圖
-
幫你把這個 UI 渲染到到使用者的瀏覽器畫面上
-
React 捨棄了傳統的 HTML 開發方式,
改成完全由 JavaScript 來代管 DOM 的產生與操作,
實現 100% 純粹的 Client-Side Rendering。
聲明式的定義前端 UI
-
前端 UI 程式碼本身,應該要足以完整的自我表達其擁有的行為與可能的顯示變化
-
UI 渲染無法避免邏輯,將 UI 的定義直接在 JavaScript 中進行,有助於提高 UI 的自我表達能力
class ProductItem extends React.Component {
  handleButtonClick = () => {
    alert(this.props.price);
  }

  render() {
    return (
      <div className="item">
        <div className="title">{this.props.title}</div>
        <div className="price">{this.props.price}</div>
        <button onClick={this.handleButtonClick}>購買</button>
      </div>
    );
  }
}
JSX
-
JSX 是 React 在使用的一種特殊 JavaScript 語法糖
-
能夠讓你以可讀性較高的語法來定義想要產生的 DOM 結構
-
語法長得很像 HTML,但本質上完全不是 HTML
-
瀏覽器看不懂,需要翻譯成原生的 JS 程式碼才能正常的在瀏覽器上執行
<div className="item">
  <div className="title">{this.props.title}</div>
  <div className="price">{this.props.price}</div>
  <button onClick={this.handleButtonClick}>購買</button>
</div>
React.createElement("div", {"className": "item"},
React.createElement("div", {"className": "title"}, this.props.title),
React.createElement("div", {"className": "price"}, this.props.price),
React.createElement("button", {onClick: this.handleButtonClick}, "購買")
);Component
-
自定義元件藍圖 ( Component Class ),可以嵌套或拼裝
-
讓前端 UI 程式碼有更好的可組合性與可重用性
-
每個 Component 的第一層,只能有一個根節點元素
class ProductItem extends React.Component {
handleButtonClick = () => {
alert(this.props.price);
}
render() {
return (
<div className="item">
<div className="title">{this.props.title}</div>
<div className="price">{this.props.price}</div>
<button onClick={this.handleButtonClick}>購買</button>
</div>
);
}
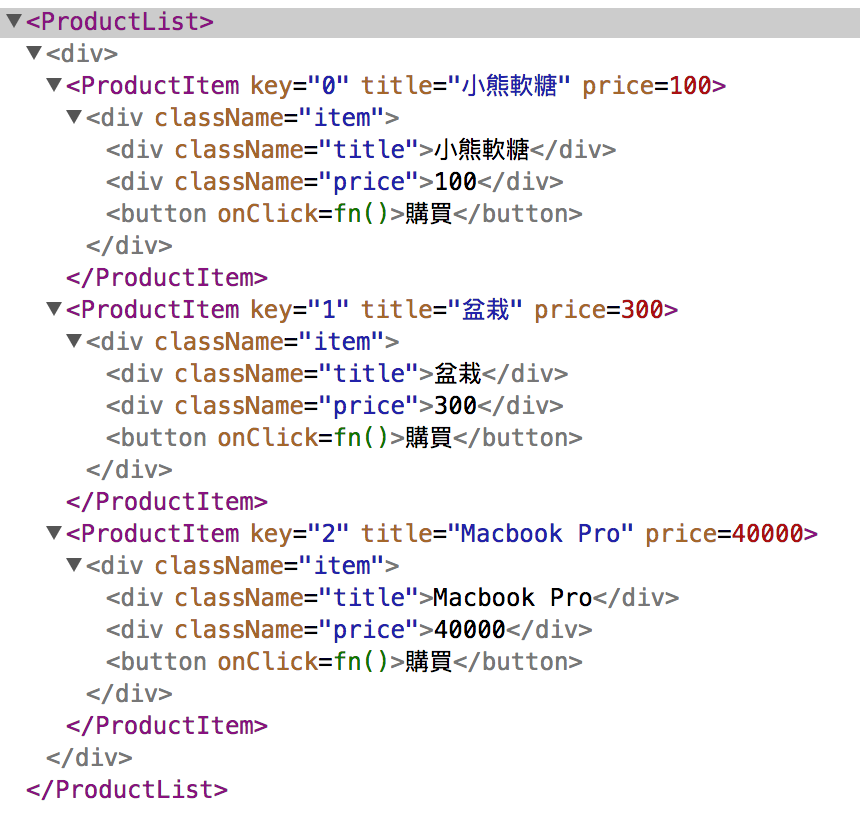
}class ProductList extends React.Component {
render() {
return (
<div>
{dataList.map(data => (
<ProductItem title={data.title} price={data.price}/>
))}
</div>
);
}
}
ReactDOM.render(<ProductList/>, document.getElementsById('root'));Component
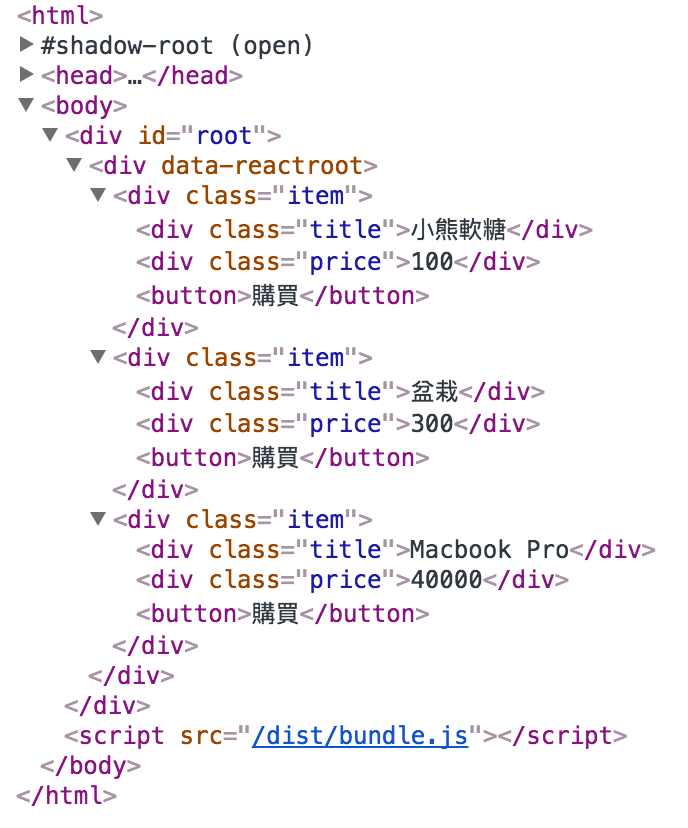
Virtual DOM
-
Virtual DOM 是一份純資料的 Tree 物件,對應到實際的 DOM
-
Virtual DOM 為自定義 Component 提供了中介的虛擬層,讓開發者能描述 UI 樣貌與邏輯
-
我們透過定義 Component 來表達「UI 什麼情況該如何呈現」。而「要用什麼手段來達到這個畫面改變(如何操作 DOM)」 ,React 則會自動幫你做,而且絕大多數情況下都比你自己來要做的更好
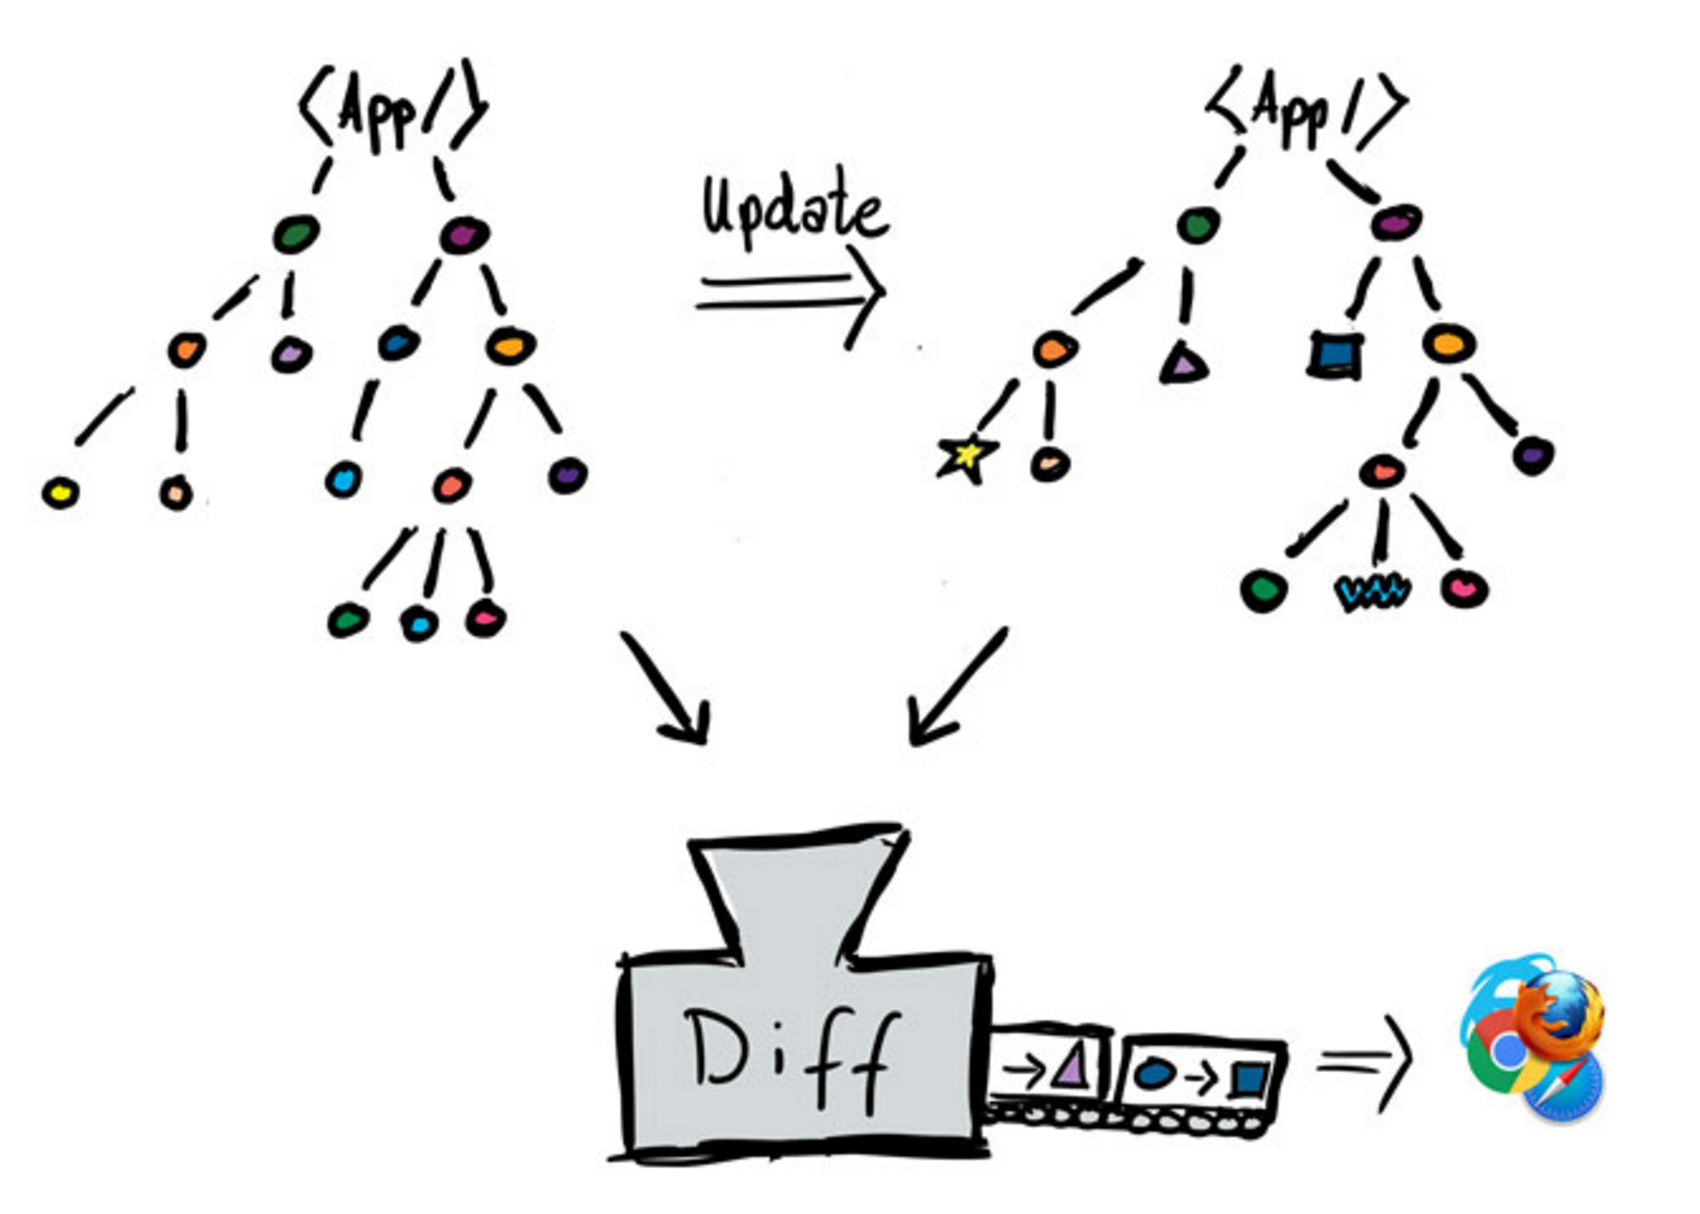
Always Redraw
-
Single Source of Truth
-
UI 元件要如何顯示,資料是唯一變因
-
只有因為資料改變才能導致 UI 元件跟著改變
-
-
把畫面全部洗掉,然後再依據最新資料重新畫,顯示結果通常一定是正確的
-
每次都重繪全部的實體 DOM 顯然是不可行,但是重繪 VDOM 則成本相對降低許多
Always Redraw
當畫面需要改變時,根據最新的資料重繪出新的 VDOM Tree,
並與改變前的舊 VDOM Tree 進行全面式的比較與計算,
其中新舊差異的地方,才真的會在實際的 DOM 上發生操作改變
Props
Props
-
Component 外部(父 Component)傳遞給 Component 內部的靜態參數
-
抽象化出跟問題有關的參數,方便 Component 進行重用
-
Props 傳遞到 Component 內部後,應是不可變更的固定值
-
當 Component 外部改變傳遞進來的 Props 時,Component 內部會自動發起重繪
class ProductItem extends React.Component {
  handleButtonClick = () => {
    alert(this.props.price);
  }

  render() {
    return (
      <div className="item">
        <div className="title">{this.props.title}</div>
        <div className="price">{this.props.price}</div>
        <button onClick={this.handleButtonClick}>購買</button>
      </div>
    );
  }
}
class ProductList extends React.Component {
render() {
return (
<div>
{dataList.map(data => (
<ProductItem title={data.title} price={data.price}/>
))}
</div>
);
}
}
ReactDOM.render(<ProductList/>, document.getElementsById('root'));propTypes & defaultProps
-
propTypes
-
檢查傳入的 props 型別
-
-
defaultProps
-
該 props 外部沒有傳入時的預設值
-
class ProductItem extends React.Component {
  static propTypes = {
    title: React.PropTypes.string,
    price: React.PropTypes.number
  }

  static defaultProps = {
    title: '預設的商品標題',
    price: 0
  }
}
this.props.children
-
取得 component 的子節點內容
class SomeThing extends React.Component {
  render() {
    console.log(this.props.children);
    return (
      <div/>
    );
  }
}

<SomeThing>
  <button id="btn1">按鈕1</button>
  <button id="btn2">按鈕2</button>
</SomeThing>
State
State
-
Component 內部私有的動態狀態值
-
在內部使用 this.setState 方法進行修改
-
在內部調用修改後,Component 會自動發起畫面重繪
-
State 的預設值,對 this.state 物件來指定
class ProductList extends Component {
  state = {
    data: [{
      title: '小熊軟糖',
      price: 100
    }, {
      title: '盆栽',
      price: 300
    }, {
      title: 'Macbook Pro',
      price: 40000
    }]
  }

  componentDidMount() {
    setTimeout(() => {
      this.setState({
        data: [
          ...this.state.data, {
            title: '新增商品',
            price: 9999
          }
        ]
      });
    }, 5000);
  }


  render() {
    return (
      <div>
        {this.state.data.map((data, index) => (
          <ProductItem
            title={data.title}
            price={data.price}
          />
        ))}
      </div>
    );
  }
}
JSX
JSX 語法
-
嚴格標籤閉合
-
支援原生 HTML 有的標籤以及自訂的 Component 標籤
-
與 HTML 重要的語法差異:class → className
-
使用 { } 來填入 JavaScript 的表達式(一個值)
<input type="text"/>

<br/>

<img src=""/>
JSX 中的迭代輸出
- 使用陣列的 .map() 方法批量迭代產生 component
class ProductList extends React.Component {
  render() {
    return (
      <div>
        {dataList.map(data => (
          <ProductItem title={data.title} price={data.price}/>
        ))}
      </div>
    );
  }
}
JSX 中的條件判斷式
- JSX 中不可以直接寫 if / else,因為實際上是一個物件結構
- 使用 && 運算子來達到 if 判斷式的效果
- 使用三元運算子來達到 if / else 判斷式的效果
<div className="item">
  <div className="title">{this.props.title}</div>
  {(this.props.price > 500) && (
    <div className="price">{this.props.price}</div>
  )}
  <button onClick={this.handleButtonClick}>購買</button>
</div>
<div className="item">
<div className="title">{this.props.title}</div>
{(this.props.price > 500) ? (
<div className="price">{this.props.price}</div>
) : (
<div>一個很便宜的商品</div>
)}
<button onClick={this.handleButtonClick}>購買</button>
</div>物件解構填入 Props
-
使用「...object」來將物件解構並填入當作多個 Props
class SomeThing extends React.Component {
  render() {
    const propsObject = {
      name: 'Zet',
      gender: 'male'
    }

    return (
      <div>
        <Person {...propsObject}/>
      </div>
    );
  }
}
Inline Style
-
使用 JavaScript Object 來撰寫,並填入 HTML 類型的 element 的 style props 當中
-
Property:名稱改用駝峰式命名
-
Value:數字的預設單位是 px,其他數字單位或非數字的值要使用字串來表示
const styles = {
  fontSize: 20,
  marginLeft: '20%'
}

<button style={styles}>按鈕</button>
Lifecycle
組件的生命週期
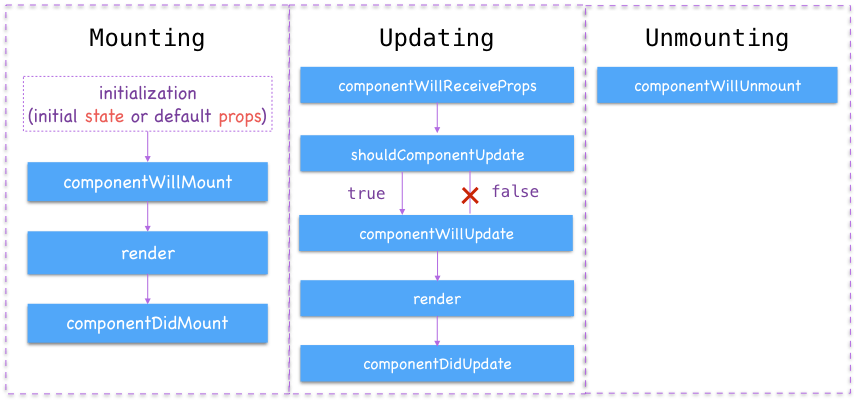
render()
- 每個 React Component 都必需定義的方法,負責決定要繪製的 UI 之構成(Virtual DOM 資料結構)
- 每次重繪的生命週期中都會被呼叫到並執行
- 通常有三種情況會觸發重繪:
- 從外部 ( 父 component ) 傳入的 props 改變時
- 在內部 ( component 自己裡面 ) 調用 this.setState() 方法時
- 手動呼叫 this.forceUpdate() 方法時
componentDidMount
- 在 Component 初始化並且首次繪製完成時發生,重繪時不會發生
- 在 Component 被從畫面中拆除之前,只會發生一次
Input Dataflow
Input
- 原生的HTML <input> 元素是自帶資料狀態的
- 在 React 中,有兩種處理方式
- Uncontrolled:依照原來的自帶資料狀態
- Controlled:使用單向資料流,獨立地點存放 input 中的資料並綁定 UI
class UncontrolledInputExample extends Component {
  handleInputChange = (event) => {
    console.log(event.target.value);
  }

  render() {
    return (
      <input
        type="text"
        defaultValue="hello"
        onChange={this.handleInputChange}
      />
    );
  }
}
class ControlledInputExample extends Component {
state = {
inputText: 'hello'
}
handleInputChange = (event) => {
console.log(event.target.value);
this.setState({
inputText: event.target.value
});
}
render() {
return (
<input
type="text"
value={this.state.inputText}
onChange={this.handleInputChange}
/>
);
}
}Uncontrolled Input
-
input 本身自己管理資料狀態,不與資料來源綁定
-
使用 defaultValue 或 defaultChecked 來設定預設值
class UncontrolledInputExample extends React.Component {
  handleInputChange = (event) => {
    console.log(event.target.value);
  }

  render() {
    return (
      <input
        type="text"
        defaultValue="hello"
        onChange={this.handleInputChange}
      />
    );
  }
}
Controlled Input
-
input 自己本身不存放資料,也不能改變自己的值,與指定的資料來源綁定
-
使用 value 或 checked 來指定綁定的資料
-
使用 onChange 來指定接收資料的函數
class ControlledInputExample extends Component {
  state = {
    inputText: 'hello'
  }

  handleInputChange = (event) => {
    console.log(event.target.value);
    this.setState({
      inputText: event.target.value
    });
  }

  render() {
    return (
      <input type="text" value={this.state.inputText} onChange={this.handleInputChange}/>
    );
  }
}
Redux Basic
Flux
- Flux 是 Facebook 為了搭配 React 而提出的一套 Dataflow 設計模式,用來解決前端狀態資料的管理,社群有相當多基於此概念的實作品
- 採用單向資料流 ( One-way Dataflow) 的概念
- Facebook 官方有推出一套同名的 Flux 實作品,不過現在已被 Redux 取代其主流地位
如果不使用 Flux...
- Component 們之間沒有共用的狀態資料儲存地點
- 你的 React Component 所有的狀態都儲存在各自的 this.state 當中,這導致不同 Component 之間想互相通知 State 的改變的話,需要層層的傳遞 callback function,前端狀態管理異常複雜
Redux
- Redux 是 JavaScript 的狀態容器,提供可預測化的資料狀態管理
- 由 Flux 演變而來,但避開了 Flux 的複雜性,非常單純易用
- 由 React 社群大神 Dan Abramov 所開發,日前他被 Facebook 招募,Redux 也納入 Facebook 官方項目,成為前端狀態管理的主流解決方案
- 跟 React 沒有相依關係,可以單獨使用或搭配其他前端框架使用
- Redux DevTools
三大原則
- 單一資料來源
- 整個前端應用的 State 都被儲存在一顆 Object Tree 當中,成為唯一的 Store
- 在 React 中,所有 Component 都共用這個 Store
- State 是唯讀的
- 唯一改變 State 的方法就是呼叫 Action,Action 負責定義發生的事件的種類
- 使用純函數來執行 State 的修改
- 為了描述這個 Action 實際上要如何改變 State Tree,我們需要定義 Reducer
View
( React )
Store
Action
Reducer
pass
by
dispatch
畫面需要改變
產生 action
return
newState
資料變更
Server
One-Way Dataflow
Action
-
Action 負責定義發生的事件種類與想要傳遞的參數,必須是一個純 Object
{
  type: 'increment',
  value: 1
}
Reducer
-
Action 只是描述了有事情發生,並沒有指明要如何更新 State,而 Reducer 正是要負責做這件事
-
Reducer 是一個純函數,接收完整的舊的 State 和當前 Action,回傳完整的新的 State
-
你不應該直接修改傳入的舊 State,而是應該回傳一個更新資料後的新 State
-
若找不到符合的 Action Type,也一定要把舊的 State 照舊回傳
function reducer(state = 0, action) {
  switch (action.type) {
    case 'increment':
      return state + action.value;
    case 'decrement':
      return state - action.value;
    default:
      return state;
  }
}
Store
-
Redux 的 createStore() 方法:傳入 Reducer 以建立一個 Store
-
Store 有以下幾個重要功能
-
存取 State 資料:使用 store.getState() 方法,可以取得 Store 裡目前最新的 State
-
store.dispatch() 方法:來發起一個 Action 以更新 State
-
store.subscribe() 方法:當 State 發生改變時,呼叫 Callback
-
const store = createStore(reducer);

store.subscribe(() => {
  console.log(store.getState());
});

store.dispatch({
  type: 'increment',
  value: 1
});
combineReducers
-
用來建立 Store 的 Reducer Function 只能有一個,因此如果你因為程式碼可維護性而分開寫了很多個 Reducer 的話,可以使用 Redux 的 combindReducers 方法將其合併成一個大 Reducer
const rootReducer = combineReducers({
  number: numberReducer,
  todos: todosReducer
});

const store = createStore(rootReducer);
Redux with React
Smart / Dumb Component
-
Smart Component(State Container)
-
向 Redux 存取資料並傳遞進 Dumb Component
-
-
Dumb Component (Display Component)
-
不知道外界發生什麼,只負責依據 Props 印出資料或調用 Callback
-
| Smart Component | Dumb Component | |
|---|---|---|
| 位於 | 外層 | 內層 |
| 能直接與 Redux 溝通 | 是 | 否 |
| 讀取資料 | 從 Redux 獲取 State | 從傳入的 Props 獲取資料 |
| 修改資料 | 透過 dispatch 方法 向 Redux 發送 Action |
從傳入的 Props 調用 Callback |
react-redux
class CounterContainer extends Component {
  dispatchIncrementNumber = (value) => {
    this.props.dispatch(incrementNumber(value));
  }

  dispatchDecrementNumber = (value) => {
    this.props.dispatch(decrementNumber(value));
  }
  render() {
    return (
      <Counter
        value={this.props.number}
        dispatchIncrementNumber={this.dispatchIncrementNumber}
        dispatchDecrementNumber={this.dispatchDecrementNumber}
      />
    );
  }
}

export default connect(state => ({
  number: state.number
}))(CounterContainer);- 使用 connect() 方法來製造資料綁定器,並用資料綁定器綁定指定的 React Component
Async Action
Call AJAX
-
當你呼叫一個非同步 API,有兩個關鍵的時間點:你開始呼叫的的時候,以及當你收到回應 (或是失敗) 的時候。
-
所以一個請求的行為應該可以分為下列四種狀態:
-
尚未開始請求(status: null)
-
請求中,還沒得到結果(status: request)
-
得到結果並成功(status: success)
-
得到結果但失敗 (status: failure)
-
設計 Action
-
你可以將上述中會發生的三種情況(除掉預設本來就是還沒請請求的狀態),設計成對應的三種 Action
{ type: 'FETCH_POSTS_REQUEST' }

{ type: 'FETCH_POSTS_SUCCESS', response: { ... } }

{ type: 'FETCH_POSTS_FAILURE', error: 'Oops' }
設計 State 結構與 Reducer
const initState = {
  status: null,
  data: [],
  error: null
}

function postReducer(state = initState, action) {
  switch (action.type) {
    case FETCH_POSTS_REQUEST:
      return {
        ...state,
        status: 'request'
      };
    case FETCH_POSTS_SUCCESS:
      return {
        ...state,
        status: 'success',
        data: action.reponse
      }
    case FETCH_POSTS_FAILURE:
      return {
        ...state,
        status: 'failure',
        error: action.error
      }
    default:
      return state;
  }
}
Redux Thunk
-
使用Redux Thunk 來讓 dispatch 方法可以接收一個函數
function fetchPosts() {
  return async (dispatch) => {
    dispatch({
      type: FETCH_POSTS_REQUEST
    });

    try {
      const httpResponse = await fetch('/posts');
      if (httpResponse.status != 200) {
        throw new Error(`${httpResponse.status(httpResponse.statusText)}`);
      }

      dispatch({
        type: FETCH_POSTS_SUCCESS,
        response: await httpResponse.json()
      });
    } catch (error) {
      console.error(error);
      dispatch({
        type: FETCH_POSTS_FAILURE,
        error: error.message
      });
    }
  }
}
Redux Thunk 運作原理
dispatch
Redux
Thunk
Middleware
Reducer
action is a function
=> pass dispath and call it
action is a object
EXMA-Training-React & Redux
By tz5514


