


Woongjae Lee
Daangn - Frontend Core Team ex) NHN Dooray - Frontend Team Leader ex) ProtoPie - Studio Team
Lead Software Engineer @ProtoPie
Microsoft MVP
TypeScript Korea User Group Organizer
Marktube (Youtube)
이 웅재
헷갈리는 함수 레벨 스코프
중복 선언이 가능
생략도 가능
호이스팅
// var.js

// 1. 헷갈리는 함수 레벨 스코프

(function() {
  if (true) {
    var variable = 'function scope';
  }

  console.log(variable);
})();
// var.js
// 2. 중복 선언이 가능
(function() {
var variable = 'function scope';
var variable = 'duplicated';
console.log(variable);
})();// var.js
// 3. 생략도 가능
(function() {
variable = 'no var';
console.log(variable);
})();
console.log(variable);// var.js
// 4. 호이스팅
(function() {
console.log(variable);
var variable = 'hoisted';
})();
(function() {
var variable;
console.log(variable);
variable = 'hoisted';
})();블록 레벨 스코프
중복 선언 => SyntaxError
호이스팅 => ReferenceError
// let.js

// 1. 블록 레벨 스코프
{
  let variable = 'block scope';

  console.log(variable);
}

// 2. 중복 선언 => SyntaxError
{
  let variable = 'block scope';
  let variable = 'duplicated';

  console.log(variable);
}

// 3. 호이스팅 => ReferenceError
{
  console.log(variable);
  let variable = 'hoisted';
}
Primitive
Reference
// const.js

// Primitive
let a = 'a';
a = 'b';
a;

const c = 'c';
c = 'd'; // TypeError
c;
// const.js
// Reference
let e = {
foo: 'foo',
};
e = {
bar: 'bar',
};
e;
const f = {
foo: 'foo',
};
// f = {
// foo: 'bar',
// }; TypeError
f.foo = 'bar';
f;`문자열`
`${자바스크립트 표현식}`
// string.js

const name = 'Mark';

console.log('안녕하세요.\n제 이름은 ' + name + ' 입니다.');

console.log(`안녕하세요.
제 이름은 ${name} 입니다.`);
자신의 this 를 만들지 않는다.
생성자로 사용할 수 없다.
항상 익명 함수
리턴만 있으면, {} 생략
인자가 하나면, () 생략
// arrow.js

function Foo() {
  this.name = 'Mark';

  setTimeout(function() {
    console.log(this.name);
  }, 1000);

  setTimeout(() => {
    console.log(this.name);
  }, 1000);
}

const foo = new Foo();
// arrow.js
// 익명 함수를 변수에 대입해서 사용
const a = () => {
return '리턴';
};
console.log(a());
// 리턴이 바로 표현 가능하면, { return } 생략
const b = () => '리턴';
console.log(b());
// 매개변수가 한개면 () 생략
const c = props => `리턴 ${props}`;
console.log(c('프롭스'));
함수의 this 로 인자로 넣은 "디스" 를 사용하는 함수를 만들어 리턴
// bind.js

function hello() {
  console.log(`안녕하세요 ${this.name}`);
}

const mark = {
  name: 'Mark',
};

const helloMark = hello.bind(mark);

helloMark();

const anna = {
  name: 'Anna',
};

const helloAnna = hello.bind(anna);

helloAnna();
구조 분해 할당
배열, 객체
// destructuring.js

const foo = {
  a: '에이',
  b: '비이',
};

const { a, b } = foo;
console.log(a, b);

const bar = ['씨이', '디이'];

const [c, d] = bar;
console.log(c, d);

const { a: newA, b: newB } = foo;
console.log(newA, newB);
...
배열, 객체
1 레벨 깊이 복사
// spread.js

function sum(a, b, c) {
  return a + b + c;
}

console.log(sum(1, 2, 3));

const numbers = [2, 3, 4];

console.log(sum(...numbers));
// spread.js
// 1 레벨 깊이
const obj = { a: 3, b: 4, c: 5 };
const cloned = { ...obj, a: 6 };
cloned.c = 10;
console.log(obj, cloned);
// spread.js

//  2 레벨 깊이
const obj1 = { a: { b: 100 } };

const obj1Cloned = { ...obj1 };
obj1Cloned.a.b = 200;

console.log(obj1, obj1Cloned);

const obj2 = { a: { b: 100 } };

const obj2Cloned = { ...obj2, a: { ...obj2.a } };
obj2Cloned.a.b = 200;

console.log(obj2, obj2Cloned);
// rest.js
function rest1(...args) {
console.log(args);
}
rest1('mark', 37, 'korea');
function rest2(name, ...args) {
console.log(name, args);
}
rest2('mark', 37, 'korea');과거 비동기 처리를 위한 선택
// callback.js

function foo(callback) {
  setTimeout(() => {
    // 로직
    callback();
  }, 1000);
}

foo(() => {
  console.log('end');
});
console.log('이것이 먼저 실행');
Promise 객체를 만들고, 로직 처리 후 성공과 실패를 알려준다.
then 과 catch 를 통해 메인 로직에 전달한다.
// promise.js

function foo() {
  return new Promise((resolve, reject) => {
    setTimeout(() => {
      // 로직
      resolve();
    }, 1000);
  });
}

foo().then(() => {
  console.log('end');
});
console.log('이것이 먼저 실행');
기본적으로 Promise 를 사용한다.
then 과 catch 를 통해 메인 로직에 전달한다.
async 키워드가 붙은 함수 안에서만 await 키워드를 사용할 수 있다.
// async.js

function foo() {
  return new Promise((resolve, reject) => {
    setTimeout(() => {
      // 로직
      resolve();
    }, 1000);
  });
}

(async () => {
  await foo();
  console.log('end');
  console.log('이것이 먼저 실행');
})();
function* 으로 만들어진 함수를 호출하면 반환되는 객체이다.
function* 에서 yield 를 호출하여, 다시 제어권을 넘겨준다.
제너레이터 객체에 next() 함수를 호출하면, 다음 yield 지점까지 간다.
// generator.js

function* foo() {
  console.log(0.5);
  yield 1;
  console.log(1.5);
  yield 2;
  console.log(2.5);
  yield 3;
  console.log(3.5);
}

const g = foo();
console.log(g.next().value);
console.log(g.next().value);
console.log(g.next().value);
console.log(g.next().value);
console.log(g.next().value);
// generator.js

// 핸들
let handle = null;

// 비동기 함수
function bar() {
  setTimeout(() => {
    handle.next('hello');
  }, 1000);
}

// 핸들을 통해 컨트롤을 넘기는 제너레이터 함수
function* baz() {
  const text = yield bar();
  console.log(text);
}

handle = baz();
handle.next();nvm install 14.15.1
nvm use 14.15.1
nvm alias default 14.15.1Angular vs React vs Vue
View 를 다루는 라이브러리
Only Rendering & Update
NOT included another functionality (ex. http client, ...)
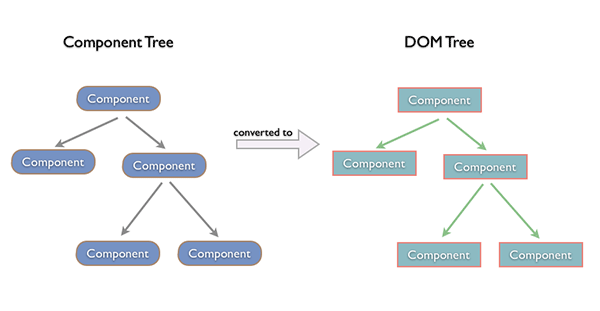
Component Based Development
독립적인 코드 블럭 (HTML + CSS + JavaScript)
작업의 단위
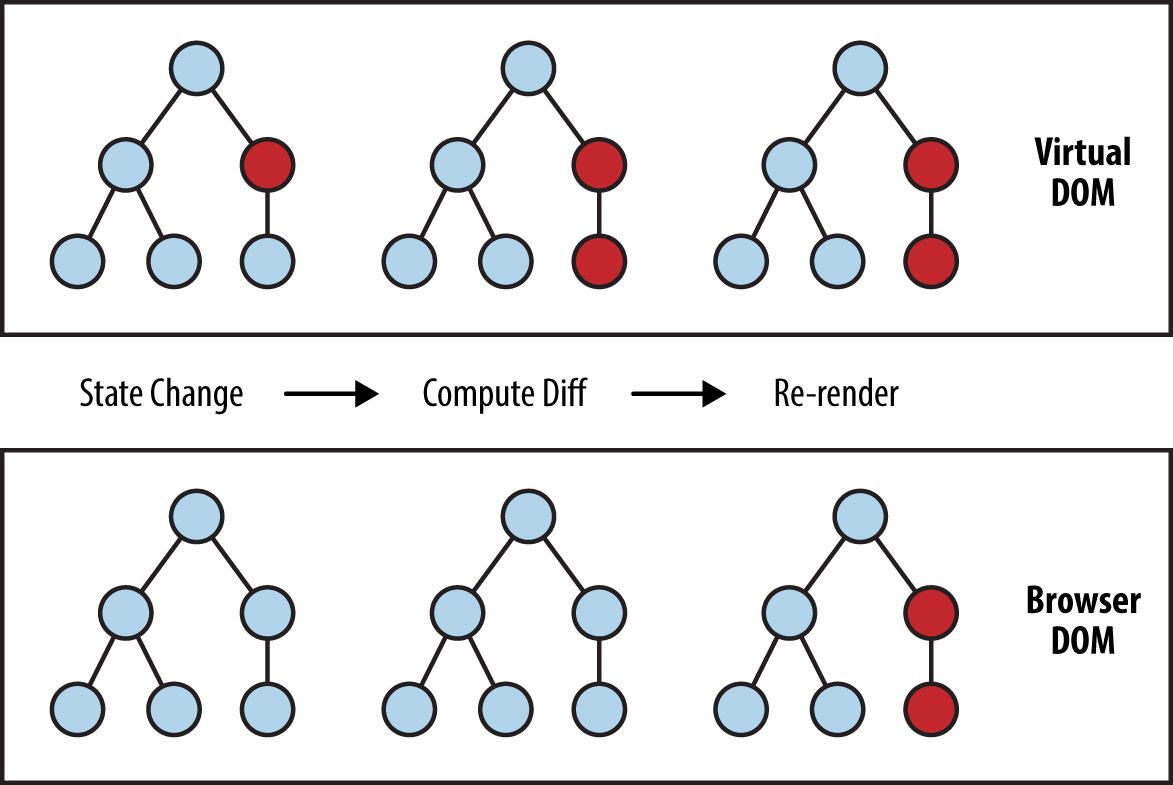
Virtual DOM
이제는 DOM 을 직접 다루지 않음.
JSX
NOT Templates
transpile to JS (Babel, TypeScript)
CSR & SSR
<!-- HTMLElement -->

<img src="이미지 주소"/>

<button class="클래스 이름">버튼</button>

<!-- 내가 만든 컴포넌트 -->

<내가지은이름1 name="Mark" />

<내가지은이름 prop={false}>내용</내가지은이름>

<!--

- src, class, name, props 밖에서 넣어주는 데이터
- 문서(HTML), 스타일(CSS), 동작(JS) 를 합쳐서 내가 만든 일종의 태그

-->리액트의 핵심 모듈 2개로 리액트가 하는 일 알아보기
// 1. 리액트 컴포넌트 => HTMLElement 연결하기
import ReactDOM from 'react-dom';

// 2. 리액트 컴포넌트 만들기
import React from 'react';ReactDOM.render(
<HelloMessage name="Taylor" />,
document.getElementById('hello-example'),
);class HelloMessage extends React.Component {
render() {
return (
<div>
Hello {this.props.name}
</div>
);
}
}
ReactDOM.render(
<HelloMessage name="Taylor" />,
document.getElementById('hello-example')
);리액트 컴포넌트를 만들 때 사용하는 API 모음
CDN 을 통한 리액트 라이브러리 사용
<!-- ex1.html : CDN 을 통해 React, ReactDOM 가져오기 -->
<!DOCTYPE html>
<html lang="en">
  <head>
    <meta charset="UTF-8" />
    <meta name="viewport" content="width=device-width, initial-scale=1.0" />
    <meta http-equiv="X-UA-Compatible" content="ie=edge" />
    <title>Document</title>
  </head>
  <body>
    <script
      crossorigin
      src="https://unpkg.com/react@16/umd/react.development.js"
    ></script>
    <script
      crossorigin
      src="https://unpkg.com/react-dom@16/umd/react-dom.development.js"
    ></script>
    <script type="text/javascript">
      // Global 에 React 와 ReactDOM 객체가 생성
      console.log(React);
      console.log(ReactDOM);
    </script>
  </body>
</html>HTML 로 문서 구조를 잡고,
CSS 로 스타일을 입히고,
JavaScript 로 DOM 을 조작합니다.
<!-- ex2.html : 고전 프론트엔드 -->
<!DOCTYPE html>
<html lang="en">
  <head>
    <meta charset="UTF-8" />
    <meta name="viewport" content="width=device-width, initial-scale=1.0" />
    <meta http-equiv="X-UA-Compatible" content="ie=edge" />
    <title>Document</title>
    <style>
      * {margin: 0;padding: 0;border: 0;}
      #root p {color: white;font-size: 20px;background-color: green;text-align: center;width: 200px;}
      #btn_plus {background-color: red;border: 2px solid #000000;font-size: 15px;width: 200px;}
    </style>
  </head>
  <body>
    <div id="root"></div>
    <button id="btn_plus">+</button>
    <script type="text/javascript">
      const root = document.querySelector("#root");
      const btn_plus = document.querySelector("#btn_plus");

      let i = 0;

      root.innerHTML = `<p>init : 0</p>`;

      btn_plus.addEventListener("click", () => {
        root.innerHTML = `<p>init : ${++i}</p>`;
      });
    </script>
  </body>
</html>
컴포넌트를 정의하고,
실제 DOM 에 컴포넌트를 그려준다.
<!-- ex3.html : 컴포넌트를 만들고, 실제 DOM 에 그린다. -->
<!DOCTYPE html>
<html lang="en">
  <head>...</head>
  <body>
    <div id="root"></div>
    <button id="btn_plus">+</button>
    <script type="text/javascript">
      // react 라이브러리가 하는 일
      const component = {
        message: "init",
        count: 0,
        render() {
          return `<p>${this.message} : ${this.count}</p>`;
        }
      };

      // react-dom 라이브러리가 하는 일
      function render(dom, component) {
        // 컴포넌트를 render 하고, DOM 에 그려준다.
        root.innerHTML = component.render();
      }

      render(document.querySelector("#root"), component);

      document.querySelector("#btn_plus").addEventListener("click", () => {
        // 외부에서 컴포넌트의 값을 변경하는 행위
        component.message = "update";
        component.count = component.count + 1;

        render(document.querySelector("#root"), component);
      });
    </script>
  </body>
</html>컴포넌트를 정의하고,
실제 DOM 에 컴포넌트를 그려준다.
<!-- ex4.html : React 로 컴포넌트를 만들고, 실제 DOM 에 그린다. -->
<!DOCTYPE html>
<html lang="en">
  <head>...</head>
  <body>
    <div id="root"></div>
    <button id="btn_plus">+</button>
    <script crossorigin src="https://unpkg.com/react@16/umd/react.development.js"></script>
    <script crossorigin src="https://unpkg.com/react-dom@16/umd/react-dom.development.js"></script>
    <script type="text/javascript">
      const Component = props => {
        return React.createElement(
          "p",
          null,
          `${props.message} ${props.count}`
        );
      };

      let i = 0;

      ReactDOM.render(
        React.createElement(Component, { message: "init", count: i }, null),
        document.querySelector("#root")
      );

      document.querySelector("#btn_plus").addEventListener("click", () => {
        i++;
        ReactDOM.render(
          React.createElement(Component, { message: "update", count: i }, null),
          document.querySelector("#root")
        );
      });
    </script>
  </body>
</html>순수 JavaScript (그렇다면 순수하지 않은 것은??)
<!-- ex5.html : React.createElement 로 컴포넌트를 만들기 -->
<!DOCTYPE html>
<html lang="en">
  <head>...</head>
  <body>
    <div id="root"></div>
    <script crossorigin src="https://unpkg.com/react@16/umd/react.development.js"></script>
    <script crossorigin src="https://unpkg.com/react-dom@16/umd/react-dom.development.js"></script>
    <script type="text/javascript">
      //   React.createElement(
      //     type, // 태그 이름 문자열 | React 컴포넌트 | React.Fragment
      //     [props], // 리액트 컴포넌트에 넣어주는 데이터 객체
      //     [...children] // 자식으로 넣어주는 요소들
      //   );

      // 1. 태그 이름 문자열 type
      //   ReactDOM.render(
      //     React.createElement('h1', null, `type 이 "태그 이름 문자열" 입니다.`),
      //     document.querySelector('#root'),
      //   );

      // 2. React 컴포넌트 type
      //   const Component = props => {
      //     return React.createElement('p', null, `type 이 "React 컴포넌트" 입니다.`);
      //   };

      //   ReactDOM.render(
      //     React.createElement(
      //       Component,
      //       null,
      //       null
      //     ),
      //     document.querySelector("#root")
      //   );

      // 3. React Fragment type
      //   ReactDOM.render(
      //     React.createElement(
      //       React.Fragment,
      //       null,
      //       `type 이 "React Fragment" 입니다.`
      //     ),
      //     document.querySelector("#root")
      //   );

      // 4. props 를 통해 데이터를 주입
      //   const Component = props => {
      //     return React.createElement(
      //       'p',
      //       null,
      //       `message 는 "${props.message}" 입니다.`,
      //     );
      //   };

      //   ReactDOM.render(
      //     React.createElement(
      //       Component,
      //       { message: '이것은 메세지 입니다.' },
      //       null,
      //     ),
      //     document.querySelector('#root'),
      //   );

      // 5. props 에 들어가는 children
      //   const Component = props => {
      //     return React.createElement(
      //       'p',
      //       null,
      //       `message 는 "${props.message}" 입니다.`,
      //       `props.children 은 "${props.children}" 입니다.`,
      //     );
      //   };

      //   ReactDOM.render(
      //     React.createElement(
      //       Component,
      //       { message: '이것은 메세지 입니다.' },
      //       '이것은 children 입니다.',
      //     ),
      //     document.querySelector('#root'),
      //   );

      // 6. 리액트 엘리먼트에 style 추가
      //   ReactDOM.render(
      //     React.createElement(
      //       'h1',
      //       { style: { color: 'red' } },
      //       `type 이 "태그 이름 문자열" 입니다.`,
      //     ),
      //     document.querySelector('#root'),
      //   );

      // 7. 복잡한 컴포넌트
      //   ReactDOM.render(
      //     React.createElement(
      //       'div',
      //       { style: { backgroundColor: 'red', width: 100, height: 100 } },
      //       React.createElement(
      //         'div',
      //         { style: { backgroundColor: 'green', width: 50, height: 50 } },
      //         null,
      //       ),
      //       React.createElement(
      //         'div',
      //         { style: { backgroundColor: 'yellow', width: 50, height: 50 } },
      //         null,
      //       ),
      //     ),
      //     document.querySelector('#root'),
      //   );
    </script>
  </body>
</html>By Woongjae Lee
Fast Campus Frontend Developer School 17th


