


Woongjae Lee
Daangn - Frontend Core Team ex) NHN Dooray - Frontend Team Leader ex) ProtoPie - Studio Team
Lead Software Engineer @ProtoPie
Microsoft MVP
TypeScript Korea User Group Organizer
Marktube (Youtube)
이 웅재
JSX 문법으로 작성된 코드는 순수한 JavaScript 로 컴파일 하여 사용한다.
누가 해주나요?? => babel
JSX 문법 => React.createElement
<!-- ex6.html : React.createElement => JSX -->
<!DOCTYPE html>
<html lang="en">
  <head>...</head>
  <body>
    <div id="root"></div>
    <script crossorigin src="https://unpkg.com/react@16/umd/react.development.js"></script>
    <script crossorigin src="https://unpkg.com/react-dom@16/umd/react-dom.development.js"></script>
    <script src="https://unpkg.com/@babel/standalone/babel.min.js"></script>
    <script type="text/babel">
      //   React.createElement(
      //     type, // 태그 이름 문자열 | React 컴포넌트 | React.Fragment
      //     [props], // 리액트 컴포넌트에 넣어주는 데이터 객체
      //     [...children] // 자식으로 넣어주는 요소들
      //   );

      // 1. 태그 이름 문자열 type
      //   ReactDOM.render(
      //     React.createElement('h1', null, `type 이 "태그 이름 문자열" 입니다.`),
      //     document.querySelector('#root'),
      //   );

      //   ReactDOM.render(
      //     <h1>type 이 "태그 이름 문자열" 입니다.</h1>,
      //     document.querySelector('#root'),
      //   );

      // 2. React 컴포넌트 type
      //   const Component = props => {
      //     return React.createElement('p', null, `나는 컴포넌트입니다.`);
      //   };

      //   ReactDOM.render(
      //     React.createElement(
      //       Component,
      //       null,
      //       `type 이 "React 컴포넌트" 입니다.`
      //     ),
      //     document.querySelector("#root")
      //   );

      //   const Component = props => {
      //     return <p>type 이 "React 컴포넌트" 입니다.</p>;
      //   };

      //   ReactDOM.render(<Component />, document.querySelector('#root'));

      // 3. React Fragment type
      //   ReactDOM.render(
      //     React.createElement(
      //       React.Fragment,
      //       null,
      //       `type 이 "React Fragment" 입니다.`
      //     ),
      //     document.querySelector("#root")
      //   );

      //   ReactDOM.render(
      //     <>`type 이 "React Fragment" 입니다.</>,
      //     document.querySelector('#root'),
      //   );

      // 4. props 를 통해 데이터를 주입
      //   const Component = props => {
      //     return React.createElement(
      //       'p',
      //       null,
      //       `message 는 "${props.message}" 입니다.`,
      //     );
      //   };

      //   ReactDOM.render(
      //     React.createElement(
      //       Component,
      //       { message: '이것은 메세지 입니다.' },
      //       null,
      //     ),
      //     document.querySelector('#root'),
      //   );

      //   const Component = props => {
      //     return <p>message 는 "{props.message}" 입니다.</p>;
      //   };

      //   ReactDOM.render(
      //     <Component message="이것은 메세지 입니다." />,
      //     document.querySelector('#root'),
      //   );

      // 5. props 에 들어가는 children
      //   const Component = props => {
      //     return React.createElement(
      //       'p',
      //       null,
      //       `message 는 "${props.message}" 입니다.`,
      //       `props.children 은 "${props.children}" 입니다.`,
      //     );
      //   };

      //   ReactDOM.render(
      //     React.createElement(
      //       Component,
      //       { message: '이것은 메세지 입니다.' },
      //       '이것은 children 입니다.',
      //     ),
      //     document.querySelector('#root'),
      //   );

      //   const Component = props => {
      //     return (
      //       <p>
      //         message 는 "{props.message}" 입니다. props.children 은 "
      //         {props.children}" 입니다.
      //       </p>
      //     );
      //   };

      //   ReactDOM.render(
      //     <Component message="이것은 메세지 입니다.">
      //       이것은 children 입니다.
      //     </Component>,
      //     document.querySelector('#root'),
      //   );

      // 6. 리액트 엘리먼트에 style 추가
      //   ReactDOM.render(
      //     React.createElement(
      //       'h1',
      //       { style: { color: 'red' } },
      //       `type 이 "태그 이름 문자열" 입니다.`,
      //     ),
      //     document.querySelector('#root'),
      //   );

      //   ReactDOM.render(
      //     <h1 style={{ color: 'red' }}>type 이 "태그 이름 문자열" 입니다.</h1>,
      //     document.querySelector('#root'),
      //   );

      // 7. 복잡한 컴포넌트
      //   ReactDOM.render(
      //     React.createElement(
      //       'div',
      //       { style: { backgroundColor: 'red', width: 100, height: 100 } },
      //       React.createElement(
      //         'div',
      //         { style: { backgroundColor: 'green', width: 50, height: 50 } },
      //         null,
      //       ),
      //       React.createElement(
      //         'div',
      //         { style: { backgroundColor: 'yellow', width: 50, height: 50 } },
      //         null,
      //       ),
      //     ),
      //     document.querySelector('#root'),
      //   );

      //   ReactDOM.render(
      //     <div style={{ backgroundColor: 'red', width: 100, height: 100 }}>
      //       <div style={{ backgroundColor: 'green', width: 50, height: 50 }} />
      //       <div style={{ backgroundColor: 'yellow', width: 50, height: 50 }} />
      //     </div>,
      //     document.querySelector('#root'),
      //   );
    </script>
  </body>
</html><!-- ex7.html : JSX 문법 -->
<!DOCTYPE html>
<html lang="en">
<head>...</head>
<body>
<div id="root"></div>
<script crossorigin src="https://unpkg.com/react@16/umd/react.development.js"></script>
<script crossorigin src="https://unpkg.com/react-dom@16/umd/react-dom.development.js"></script>
<script src="https://unpkg.com/@babel/standalone/babel.min.js"></script>
<script type="text/babel">
// 1. 최상위 요소가 하나여야 합니다.
// 2. 최상위 요소 리턴하는 경우, ( ) 로 감싸야 합니다.
// const Comp1 = props => {
// return (
// <h1>제목</h1>
// <h2>부제목</h2>
// );
// }
// const Comp2 = props => {
// return (
// <div>
// <h1>제목</h1>
// <h2>부제목</h2>
// </div>
// );
// };
// 3. 자식들을 바로 랜더링하고 싶으면, <>자식들</> 를 사용합니다. => Fragment
// const Comp3 = props => {
// return (
// <>
// <h1>제목</h1>
// <h2>부제목</h2>
// </>
// );
// };
// 4. 자바스크립트 표현식을 사용하려면, {표현식} 를 이용합니다.
// const Comp4 = props => {
// return (
// <div>
// <h1>제목</h1>
// <h2>{props.children}</h2>
// </div>
// );
// };
// 5. if 문은 사용할 수 없습니다.
// 삼항 연산자 혹은 && 를 사용합니다.
// const Comp5 = props => {
// return (
// <div>
// <h1>제목</h1>
// <h2>{props.children}</h2>
// {props.isShow ? '있다' : '없다.'}
// {props.isShow && '있을 때만 나온다'}
// </div>
// );
// };
// 6. style 을 이용해 인라인 스타일링이 가능합니다.
// const Comp6 = props => {
// return (
// <div>
// <h1
// style={{
// color: 'red',
// }}
// >
// 제목
// </h1>
// <h2>부제목</h2>
// </div>
// );
// };
// 7. class 대신 className 을 사용해 class 를 적용할 수 있습니다.
// const Comp7 = props => {
// return (
// <div>
// <h1 className="title">제목</h1>
// <h2>부제목</h2>
// </div>
// );
// };
// 8. 자식요소가 있으면, 꼭 닫아야 하고, 자식요소가 없으면 열면서 닫아야 합니다.
// <p>어쩌구</p>
// <br />
// const Comp7 = props => {
// return (
// <div>
// <h1 className="title">제목</h1>
// <br />
// <h2>부제목</h2>
// </div>
// );
// };
</script>
</body>
</html>컴포넌트 내부에 상태가 있다면 ?
class
컴포넌트 내부에 상태가 없다면 ?
라이프사이클을 사용해야 한다면 ?
class
라이프사이클에 관계 없다면 ?
function
class
function
import React from 'react';

class ClassComponent extends React.Component {
  render() {
    return (<div>Hello</div>);
  }
}

// 사용
<ClassComponent />import React from 'react';
function FunctionalComponent() {
return <div>Hello</div>;
}
const FunctionalComponent = () => <div>Hello</div>;
// 사용
<FunctionalComponent />Props 는 컴포넌트 외부에서 컴포넌트에게 주는 데이터입니다.
State 는 컴포넌트 내부에서 변경할 수 있는 데이터입니다.
둘 다 변경이 발생하면, 랜더가 다시 일어날 수 있습니다.
Props 와 State는 를 바탕으로 컴포넌트를 그립니다.
그리고 Props 와 State 가 변경되면, 컴포넌트를 다시 그립니다.
컴포넌트를 그리는 방법을 기술하는 함수가 랜더 함수 입니다.
<!-- ex8-1.html : 함수로 리액트 컴포넌트 만들기 -->
<!DOCTYPE html>
<html lang="en">
  <head>
    <meta charset="UTF-8" />
    <meta name="viewport" content="width=device-width, initial-scale=1.0" />
    <meta http-equiv="X-UA-Compatible" content="ie=edge" />
    <title>Document</title>
  </head>
  <body>
    <div id="root"></div>
    <script
      crossorigin
      src="https://unpkg.com/react@16/umd/react.development.js"
    ></script>
    <script
      crossorigin
      src="https://unpkg.com/react-dom@16/umd/react-dom.development.js"
    ></script>
    <script src="https://unpkg.com/@babel/standalone/babel.min.js"></script>

    <script type="text/babel">
      function Component(props) {
        return (
          <div>
            <h1>{props.message} 이것은 함수로 만든 컴포넌트 입니다.</h1>
          </div>
        );
      }

      ReactDOM.render(
        <Component message="안녕하세요!!!" />,
        document.querySelector('#root'),
      );
    </script>
  </body>
</html>
props 설정
function Component(props) {
  return (
    <div>
      <h1>{props.message} 이것은 함수로 만든 컴포넌트 입니다.</h1>
    </div>
  );
}props 사용
<!-- ex8-2.html : 클래스로 리액트 컴포넌트 만들기 -->
<!DOCTYPE html>
<html lang="en">
  <head>
    <meta charset="UTF-8" />
    <meta name="viewport" content="width=device-width, initial-scale=1.0" />
    <meta http-equiv="X-UA-Compatible" content="ie=edge" />
    <title>Document</title>
  </head>
  <body>
    <div id="root"></div>
    <script
      crossorigin
      src="https://unpkg.com/react@16/umd/react.development.js"
    ></script>
    <script
      crossorigin
      src="https://unpkg.com/react-dom@16/umd/react-dom.development.js"
    ></script>
    <script src="https://unpkg.com/@babel/standalone/babel.min.js"></script>

    <script type="text/babel">
      class Component extends React.Component {
        render() {
          return (
            <div>
              <h1>
                {this.props.message} 이것은 클래스를 상속하여 만든 컴포넌트
                입니다.
              </h1>
            </div>
          );
        }
      }

      ReactDOM.render(
        <Component message="안녕하세요!!!" />,
        document.querySelector('#root'),
      );
    </script>
  </body>
</html>props 설정
class Component extends React.Component {
  render() {
    return (
      <div>{this.props.p}</div>
    );
  }
}props 사용
<!-- ex9.html : defaultProps 설정 -->
<!DOCTYPE html>
<html lang="en">
  <head>
    <meta charset="UTF-8" />
    <meta name="viewport" content="width=device-width, initial-scale=1.0" />
    <meta http-equiv="X-UA-Compatible" content="ie=edge" />
    <title>Document</title>
  </head>
  <body>
    <div id="root"></div>
    <script
      crossorigin
      src="https://unpkg.com/react@16/umd/react.development.js"
    ></script>
    <script
      crossorigin
      src="https://unpkg.com/react-dom@16/umd/react-dom.development.js"
    ></script>
    <script src="https://unpkg.com/@babel/standalone/babel.min.js"></script>

    <script type="text/babel">
      class Component extends React.Component {
        static defaultProps = {
          message: '안녕하세요!!!',
        };
        render() {
          return (
            <div>
              {this.props.message} 이것은 클래스를 상속하여 만든 컴포넌트
              입니다.
            </div>
          );
        }
      }

      //   Component.defaultProps = {
      //     message: '안녕하세요!!!',
      //   };

      ReactDOM.render(<Component />, document.querySelector('#root'));
    </script>
  </body>
</html>
state 초기값 설정
class Component extends React.Component {
  state = {
    s: '스테이트'
  };
  render() {
    return (
      <div>{this.state.s}</div>
    );
  }
}state 사용
class Component extends React.Component {
  constructor(props) {
    super(props);
    this.state = {s: '스테이트'};
  }
  render() {
    return (
      <div>{this.state.s}</div>
    );
  }
}state 값 업데이트
class Component extends React.Component {
  state = {
    s: '스테이트'
  };
  render() {
    return (
      <div onClick={() => {
        this.setState({s: '새 스테이트'});
      }}>{this.state.s}</div>
    );
  }
}class Comp extends React.Component {
render() {
return (
<div>
<button onClick={() => {
console.log('clicked');
}}>클릭</button>
</div>
);
}
}<!-- ex10.html : 이벤트를 이용하여 state 바꾸기 -->
<!DOCTYPE html>
<html lang="en">
<head>
<meta charset="UTF-8" />
<meta name="viewport" content="width=device-width, initial-scale=1.0" />
<meta http-equiv="X-UA-Compatible" content="ie=edge" />
<title>Document</title>
<style>
* {
margin: 0;
padding: 0;
border: 0;
}
</style>
</head>
<body>
<div id="root"></div>
<script
crossorigin
src="https://unpkg.com/react@16/umd/react.development.js"
></script>
<script
crossorigin
src="https://unpkg.com/react-dom@16/umd/react-dom.development.js"
></script>
<script src="https://unpkg.com/@babel/standalone/babel.min.js"></script>
<script type="text/babel">
class Component extends React.Component {
state = { message: 'init', count: 0 };
render() {
return (
<>
<p
style={{
color: 'white',
fontSize: 20,
backgroundColor: 'green',
textAlign: 'center',
width: 200,
}}
>
{this.state.message} {this.state.count}
</p>
<button
style={{
backgroundColor: 'red',
border: '2px solid #000000',
fontSize: 15,
width: 200,
}}
onClick={() => {
this.setState({
message: 'update',
count: this.state.count + 1,
});
}}
>
+
</button>
</>
);
}
}
ReactDOM.render(<Component />, document.querySelector('#root'));
</script>
</body>
</html>
Design simple views for each state in your application, and React will efficiently update and render just the right components when your data changes.
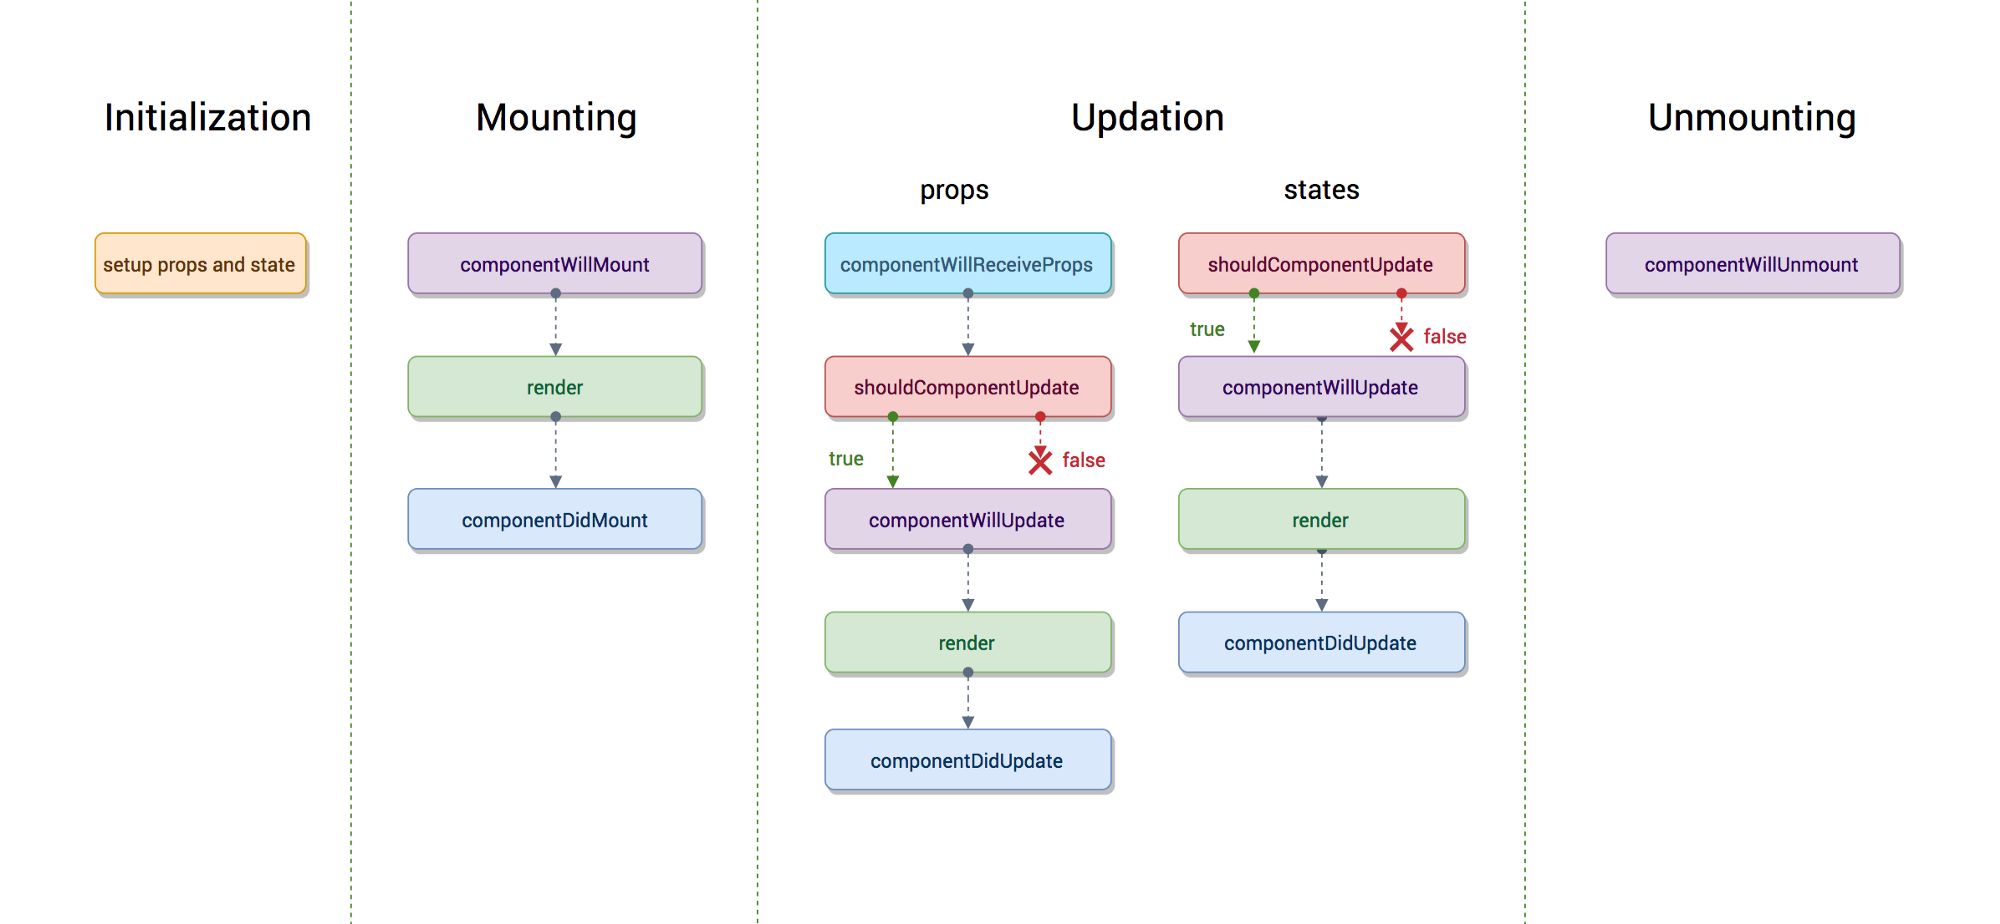
constructor
componentWillMount
render (최초 랜더)
componentDidMount
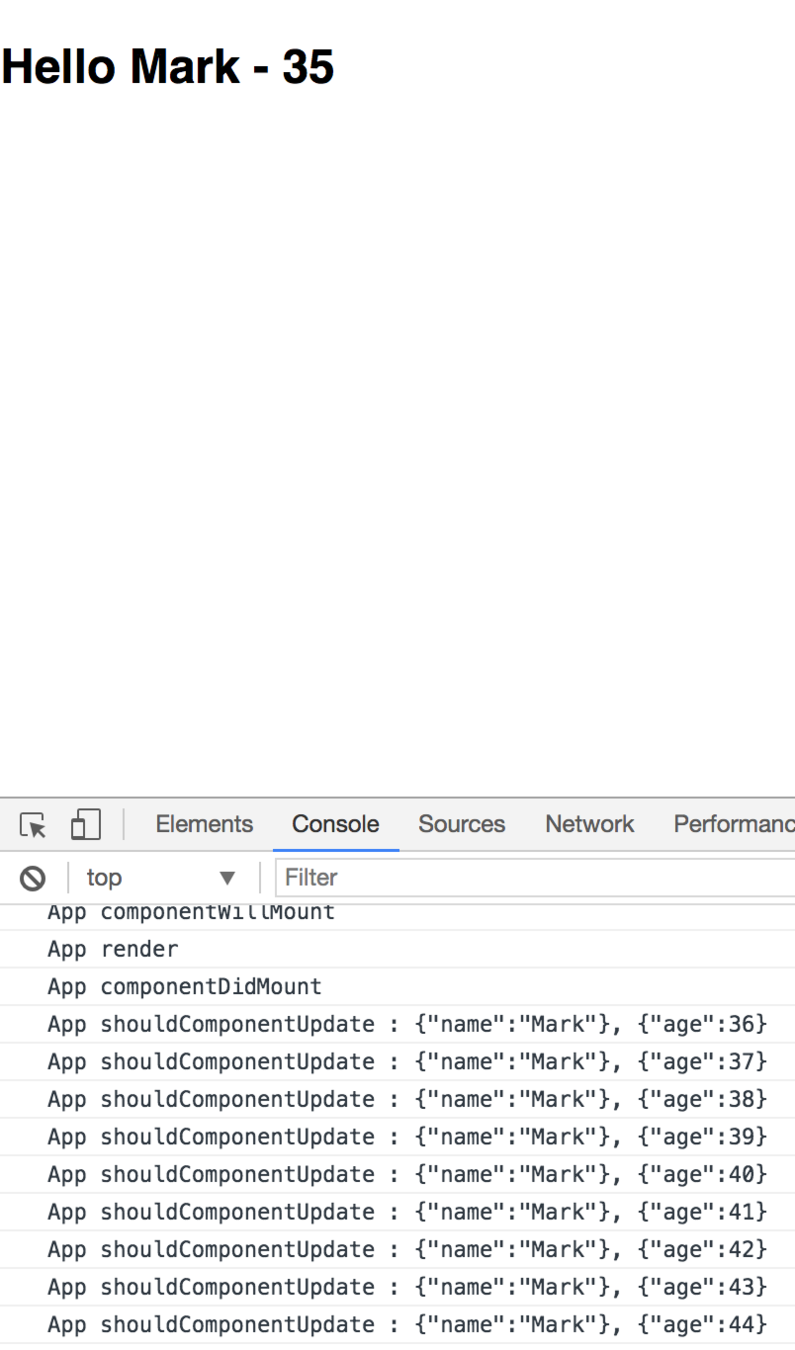
class App extends React.Component {
  _interval;

  constructor(props) {
    console.log('App constructor');
    super(props);
    this.state = {
      age: 37,
    };
  }

  componentWillMount() {
    console.log('App componentWillMount');
  }

  componentDidMount() {
    console.log('App componentDidMount');
    this._interval = window.setInterval(() => {
      this.setState({
        age: this.state.age + 1,
      });
    }, 1000);
  }

  componentWillUnmount() {
    console.log('App componentWillUnmount');
    clearInterval(this._interval);
  }

  render() {
    console.log('App render');
    return (
      <div>
        <h2>
          Hello {this.props.name} - {this.state.age}
        </h2>
      </div>
    );
  }
}
constructor
componentWillMount
render
componentDidMount
componentWillReceiveProps
shouldComponentUpdate
componentWillUpdate
render
componentDidUpdate
  componentWillReceiveProps(nextProps) {
    console.log(
      `App componentWillReceiveProps : ${JSON.stringify(
        this.props
      )} => ${JSON.stringify(nextProps)}`
    );
  }

  shouldComponentUpdate(nextProps, nextState) {
    console.log(
      `App shouldComponentUpdate : ${JSON.stringify(
        this.props
      )} => ${JSON.stringify(nextProps)}, ${JSON.stringify(
        this.state
      )} => ${JSON.stringify(nextState)}`
    );
    return true;
  }

  componentWillUpdate(nextProps, nextState) {
    console.log(
      `App componentWillUpdate : ${JSON.stringify(
        this.props
      )} => ${JSON.stringify(nextProps)}, ${JSON.stringify(
        this.state
      )} => ${JSON.stringify(nextState)}`
    );
  }

  componentDidUpdate(prevProps, prevState) {
    console.log(
      `App componentDidUpdate : ${JSON.stringify(
        prevProps
      )} => ${JSON.stringify(this.props)}, ${JSON.stringify(
        prevState
      )} => ${JSON.stringify(this.state)}`
    );
  }
componentWillReceiveProps
shouldComponentUpdate
componentWillUpdate
render
componentDidUpdate
props 를 새로 지정했을 때 바로 호출됩니다.
여기는 state 의 변경에 반응하지 않습니다.
여기서 props 의 값에 따라 state 를 변경해야 한다면,
setState 를 이용해 state 를 변경합니다.
그러면 다음 이벤트로 각각 가는것이 아니라 한번에 변경됩니다.
props 만 변경되어도
state 만 변경되어도
props & state 둘다 변경되어도
newProps 와 new State 를 인자로 해서 호출
return type 이 boolean 입니다.
true 면 render
false 면 render 가 호출되지 않습니다.
이 함수를 구현하지 않으면, 디폴트는 true
컴포넌트가 재 랜더링 되기 직전에 불립니다.
여기선 setState 같은 것을 쓰면 아니됩니다.
컴포넌트가 재 랜더링을 마치면 불립니다.
componentWillUnmpunt
class App extends React.Component {
  _interval;

  constructor(props) {
    console.log('App constructor');
    super(props);
    this.state = {
      age: 37,
    };
  }

  componentDidMount() {
    console.log('App componentDidMount');
    this._interval = window.setInterval(() => {
      this.setState({
        age: this.state.age + 1,
      });
    }, 1000);
  }

  componentWillUnmount() {
    console.log('App componentWillUnmount');
    clearInterval(this._interval);
  }

  render() {
    console.log('App render');
    return (
      <div>{this.state.age < 50 && <Button />}</div>
    );
  }
}
componentWillUnmount
class Button extends React.Component {
  componentWillUnmount() {
    console.log('Button componentWillUnmount');
  }

  render() {
    return <>hello</>;
  }
}constructor
componentWillMount => getDerivedStateFromProps
render
componentDidMount
componentWillReceiveProps => getDerivedStateFromProps
shouldComponentUpdate
render
componentWillUpdate => getSnapshotBeforeUpdate
(dom 에 적용)
componentDidUpdate
componentWillUnmount
constructor
static getDerivedStateFromProps
render (최초 랜더)
componentDidMount
import React from 'react';

class App extends React.Component {
  state = {
    age: 0,
  };

  static getDerivedStateFromProps(nextProps, prevState) {
    console.log(nextProps, prevState);
    if (prevState.age !== nextProps.age) {
      return { age: nextProps.age };
    }

    return null;
  }

  render() {
    console.log('App render');
    return <div>{this.state.age}</div>;
  }
}

export default App;
getDerivedStateFromProps
static getDerivedStateFromProps (props 변경)
shouldComponentUpdate (state 변경)
render
getSnapshotBeforeUpdate
(dom 에 적용)
componentDidUpdate
import React from "react";
import "./App.css";

let i = 0;

export default class App extends React.Component {
  state = { list: [] };

  getSnapshotBeforeUpdate(prevProps, prevState) {
    if (prevState.list.length === this.state.list.length) return null;
    const list = document.querySelector("#list");
    return list.scrollHeight - list.scrollTop;
  }

  componentDidUpdate(prevProps, prevState, snapshot) {
    if (snapshot === null) return;
    const list = document.querySelector("#list");
    list.scrollTop = list.scrollHeight - snapshot;
  }

  componentDidMount() {
    setInterval(() => {
      this.setState({
        list: [...this.state.list, i++],
      });
    }, 1000);
  }

  render() {
    return (
      <div id="list" style={{ height: 100, overflow: "scroll" }}>
        {this.state.list.map((i) => (
          <div>{i}</div>
        ))}
      </div>
    );
  }
}
getSnapshotBeforeUpdate
componentWillUnmount
componentDidCatch
import React from 'react';

class Button extends React.Component {
  render() {
    test();
    return <div>hello</div>;
  }
}

class App extends React.Component {
  state = {
    hasError: false,
  };

  componentDidCatch(error, info) {
    // Display fallback UI
    this.setState({ hasError: true });
    // You can also log the error to an error reporting service
    // logErrorToMyService(error, info);
  }

  render() {
    if (this.state.hasError) {
      return <div>에러 화면</div>;
    }
    return (
      <div>
        <Button />
      </div>
    );
  }
}

export default App;
componentDidCatch
By Woongjae Lee
Fast Campus Frontend Developer School 17th


