


Woongjae Lee
Daangn - Frontend Core Team ex) NHN Dooray - Frontend Team Leader ex) ProtoPie - Studio Team
Lead Software Engineer @NHN Dooray (2021~)
Lead Software Engineer @ProtoPie (2016 ~ 2021)
Microsoft MVP
TypeScript Korea User Group Organizer
Marktube (Youtube)
이 웅재
nvm install 16.14.2

nvm use 16.14.2

nvm alias default 16.14.2npx create-react-app tic-tac-toenpm 5.2.0 이상부터 함께 설치된 커맨드라인 명령어
npx create-react-app 프로젝트이름
이런 곳에 있습니다.
{
  "name": "tic-tac-toe",
  "version": "0.1.0",
  "private": true,
  "dependencies": {
    "@testing-library/jest-dom": "^5.16.4",
    "@testing-library/react": "^13.1.1",
    "@testing-library/user-event": "^13.5.0",
    "react": "^18.0.0",
    "react-dom": "^18.0.0",
    "react-scripts": "5.0.1",
    "web-vitals": "^2.1.4"
  },
  "scripts": {
    "start": "react-scripts start",
    "build": "react-scripts build",
    "test": "react-scripts test",
    "eject": "react-scripts eject"
  },
  "eslintConfig": {
    "extends": [
      "react-app",
      "react-app/jest"
    ]
  },
  "browserslist": {
    "production": [
      ">0.2%",
      "not dead",
      "not op_mini all"
    ],
    "development": [
      "last 1 chrome version",
      "last 1 firefox version",
      "last 1 safari version"
    ]
  }
}
"react": "^18.0.0"
"react-dom": "^18.0.0"
"react-scripts": "5.0.1"
"@testing-library/jest-dom": "^5.16.4"
"@testing-library/react": "^13.1.1"
"@testing-library/user-event": "^13.5.0"
"web-vitals": "^2.1.4"
npm install serve -g
serve -s buildeject 를 이용하면, cra 로 만든 프로젝트에서 cra 를 제거합니다.
이는 돌이킬 수 없기 때문에 결정하기 전에 신중해야 합니다.
보통 cra 내에서 해결이 안되는 설정을 추가해야 할 때 합니다.
{
  "name": "tic-tac-toe",
  "version": "0.1.0",
  "private": true,
  "dependencies": {
    "@babel/core": "^7.16.0",
    "@pmmmwh/react-refresh-webpack-plugin": "^0.5.3",
    "@svgr/webpack": "^5.5.0",
    "@testing-library/jest-dom": "^5.16.4",
    "@testing-library/react": "^13.1.1",
    "@testing-library/user-event": "^13.5.0",
    "babel-jest": "^27.4.2",
    "babel-loader": "^8.2.3",
    "babel-plugin-named-asset-import": "^0.3.8",
    "babel-preset-react-app": "^10.0.1",
    "bfj": "^7.0.2",
    "browserslist": "^4.18.1",
    "camelcase": "^6.2.1",
    "case-sensitive-paths-webpack-plugin": "^2.4.0",
    "css-loader": "^6.5.1",
    "css-minimizer-webpack-plugin": "^3.2.0",
    "dotenv": "^10.0.0",
    "dotenv-expand": "^5.1.0",
    "eslint": "^8.3.0",
    "eslint-config-react-app": "^7.0.1",
    "eslint-webpack-plugin": "^3.1.1",
    "file-loader": "^6.2.0",
    "fs-extra": "^10.0.0",
    "html-webpack-plugin": "^5.5.0",
    "identity-obj-proxy": "^3.0.0",
    "jest": "^27.4.3",
    "jest-resolve": "^27.4.2",
    "jest-watch-typeahead": "^1.0.0",
    "mini-css-extract-plugin": "^2.4.5",
    "postcss": "^8.4.4",
    "postcss-flexbugs-fixes": "^5.0.2",
    "postcss-loader": "^6.2.1",
    "postcss-normalize": "^10.0.1",
    "postcss-preset-env": "^7.0.1",
    "prompts": "^2.4.2",
    "react": "^18.0.0",
    "react-app-polyfill": "^3.0.0",
    "react-dev-utils": "^12.0.1",
    "react-dom": "^18.0.0",
    "react-refresh": "^0.11.0",
    "resolve": "^1.20.0",
    "resolve-url-loader": "^4.0.0",
    "sass-loader": "^12.3.0",
    "semver": "^7.3.5",
    "source-map-loader": "^3.0.0",
    "style-loader": "^3.3.1",
    "tailwindcss": "^3.0.2",
    "terser-webpack-plugin": "^5.2.5",
    "web-vitals": "^2.1.4",
    "webpack": "^5.64.4",
    "webpack-dev-server": "^4.6.0",
    "webpack-manifest-plugin": "^4.0.2",
    "workbox-webpack-plugin": "^6.4.1"
  },
  "scripts": {
    "start": "node scripts/start.js",
    "build": "node scripts/build.js",
    "test": "node scripts/test.js"
  },
  "eslintConfig": {
    "extends": [
      "react-app",
      "react-app/jest"
    ]
  },
  "browserslist": {
    "production": [
      ">0.2%",
      "not dead",
      "not op_mini all"
    ],
    "development": [
      "last 1 chrome version",
      "last 1 firefox version",
      "last 1 safari version"
    ]
  },
  "jest": {
    "roots": [
      "<rootDir>/src"
    ],
    "collectCoverageFrom": [
      "src/**/*.{js,jsx,ts,tsx}",
      "!src/**/*.d.ts"
    ],
    "setupFiles": [
      "react-app-polyfill/jsdom"
    ],
    "setupFilesAfterEnv": [
      "<rootDir>/src/setupTests.js"
    ],
    "testMatch": [
      "<rootDir>/src/**/__tests__/**/*.{js,jsx,ts,tsx}",
      "<rootDir>/src/**/*.{spec,test}.{js,jsx,ts,tsx}"
    ],
    "testEnvironment": "jsdom",
    "transform": {
      "^.+\\.(js|jsx|mjs|cjs|ts|tsx)$": "<rootDir>/config/jest/babelTransform.js",
      "^.+\\.css$": "<rootDir>/config/jest/cssTransform.js",
      "^(?!.*\\.(js|jsx|mjs|cjs|ts|tsx|css|json)$)": "<rootDir>/config/jest/fileTransform.js"
    },
    "transformIgnorePatterns": [
      "[/\\\\]node_modules[/\\\\].+\\.(js|jsx|mjs|cjs|ts|tsx)$",
      "^.+\\.module\\.(css|sass|scss)$"
    ],
    "modulePaths": [],
    "moduleNameMapper": {
      "^react-native$": "react-native-web",
      "^.+\\.module\\.(css|sass|scss)$": "identity-obj-proxy"
    },
    "moduleFileExtensions": [
      "web.js",
      "js",
      "web.ts",
      "ts",
      "web.tsx",
      "tsx",
      "json",
      "web.jsx",
      "jsx",
      "node"
    ],
    "watchPlugins": [
      "jest-watch-typeahead/filename",
      "jest-watch-typeahead/testname"
    ],
    "resetMocks": true
  },
  "babel": {
    "presets": [
      "react-app"
    ]
  }
}
webpack
파일 확장자에 맞는 loader 에게 위임
babel-loader
js
jsx
css
css-loader
최종 배포용 파일
babel config
어떤 문법을 번역할건지 설정
The pluggable linting utility for JavaScript and JSX
mkdir eslint-test

cd eslint-test

npm init -y

npm install eslint -D

npx eslint --init
{
"env": {
"commonjs": true,
"es6": true,
"node": true
},
"extends": "eslint:recommended",
"globals": {
"Atomics": "readonly",
"SharedArrayBuffer": "readonly"
},
"parserOptions": {
"ecmaVersion": 2018
},
"rules": {
"semi": [
"error",
"always"
]
}
}rules 을 추가합니다.
// index.js
console.log("hello")
{
"name": "tic-tac-toe",
"version": "0.1.0",
"private": true,
"dependencies": {
"react": "^16.8.6",
"react-dom": "^16.8.6",
"react-scripts": "3.0.1"
},
"scripts": {
"start": "react-scripts start",
"build": "react-scripts build",
"test": "react-scripts test",
"eject": "react-scripts eject"
},
"eslintConfig": {
"extends": "react-app",
"rules": {
"semi": [
"error",
"always"
]
}
},
"browserslist": {
"production": [
">0.2%",
"not dead",
"not op_mini all"
],
"development": [
"last 1 chrome version",
"last 1 firefox version",
"last 1 safari version"
]
}
}.eslintrc.json
An opinionated code formatter
mkdir prettier-test

cd prettier-test

npm init -y

npm i prettier -D
// index.js
console.log('hello')// index.js
console.log("hello")* replace *
Prettier 에서 불필요하거나, Prettier 와 충돌할 수 있는 모든 규칙을 끕니다.
이 구성은 규칙을 끄기만 하기 때문에 다른 설정과 함께 사용하는 것이 좋습니다.
{
  ...
  "eslintConfig": {
    "extends": [
      "react-app",
      "prettier"
    ]
  },
  ...
}Git hooks made easy
mkdir husky-test

cd husky-test

npm init -y

git init

npm i huskey -D

npm set-script prepare "husky install"

npm run prepare

npx husky add .husky/pre-commit "CI=true npm test"

git add -A

git commit -m "Keep calm and commit"Run linters on git staged files
npm i lint-staged -D{
...,
"scripts": {
...,
"lint-staged": "lint-staged"
},
...,
"lint-staged": {
"*.{js,jsx}": [
"eslint --fix",
"prettier --write"
]
}
}
개발 모드
Angular vs React vs Vue
View 를 다루는 라이브러리
Only Rendering & Update
NOT included another functionality (ex. http client, ...)
Component Based Development
독립적인 코드 블럭 (HTML + CSS + JavaScript)
작업의 단위
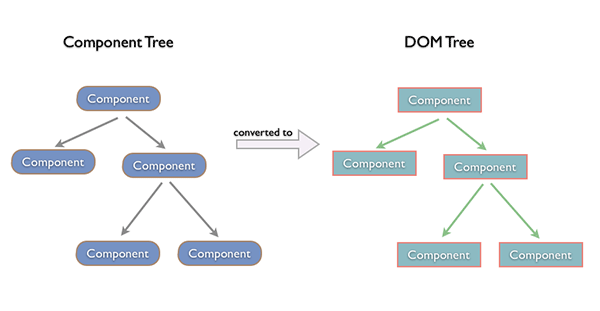
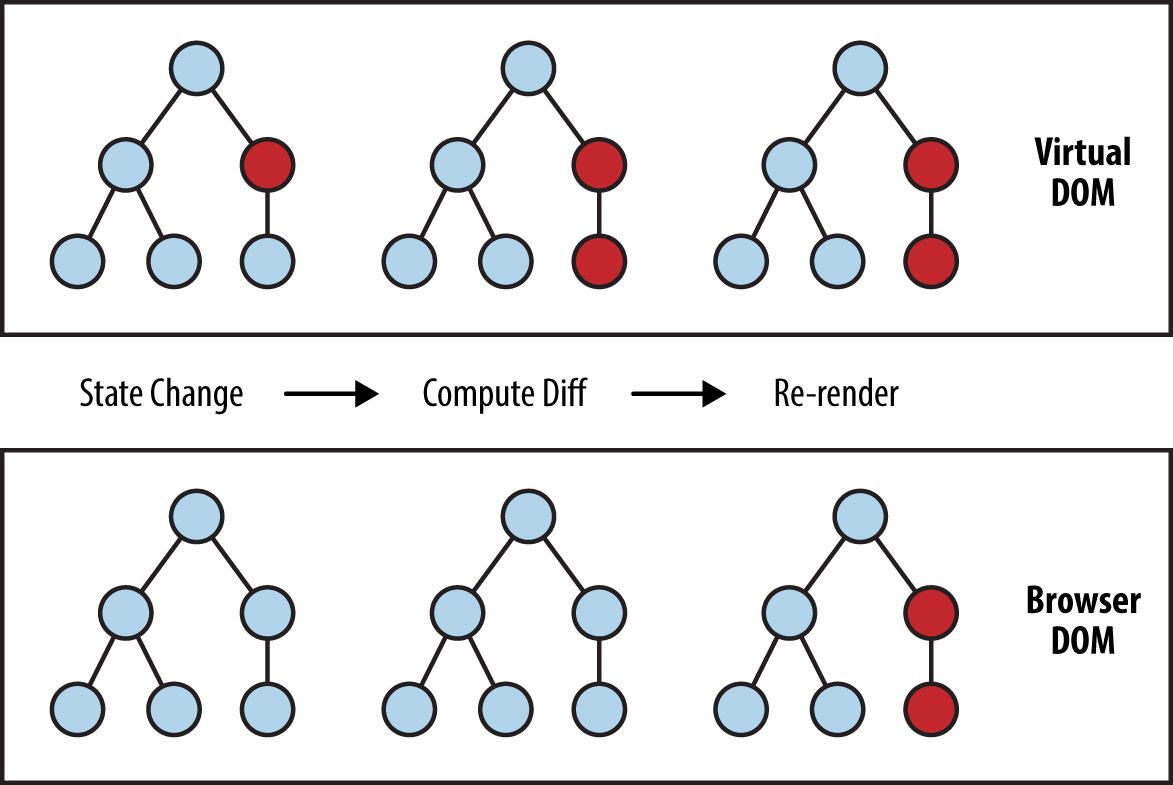
Virtual DOM
이제는 DOM 을 직접 다루지 않음.
JSX
NOT Templates
transpile to JS (Babel, TypeScript)
CSR & SSR
<!-- HTMLElement -->

<img src="이미지 주소"/>

<button class="클래스 이름">버튼</button>

<!-- 내가 만든 컴포넌트 -->

<내가지은이름1 name="Mark" />

<내가지은이름 prop={false}>내용</내가지은이름>

<!--

- src, class, name, props 밖에서 넣어주는 데이터
- 문서(HTML), 스타일(CSS), 동작(JS) 를 합쳐서 내가 만든 일종의 태그

-->리액트의 핵심 모듈 2개로 리액트가 하는 일 알아보기
// 1. 리액트 컴포넌트 => HTMLElement 연결하기
import ReactDOM from 'react-dom';

// 2. 리액트 컴포넌트 만들기
import React from 'react';ReactDOM.render(
<HelloMessage name="Taylor" />,
document.getElementById('hello-example'),
);class HelloMessage extends React.Component {
render() {
return (
<div>
Hello {this.props.name}
</div>
);
}
}
ReactDOM.render(
<HelloMessage name="Taylor" />,
document.getElementById('hello-example')
);리액트 컴포넌트를 만들 때 사용하는 API 모음
CDN 을 통한 리액트 라이브러리 사용
mkdir what-is-react

cd what-is-react

npm init -y

npx serve
<!-- ex1.html : CDN 을 통해 React, ReactDOM 가져오기 -->
<!DOCTYPE html>
<html lang="en">
<head>
<meta charset="UTF-8" />
<meta name="viewport" content="width=device-width, initial-scale=1.0" />
<meta http-equiv="X-UA-Compatible" content="ie=edge" />
<title>Document</title>
</head>
<body>
<script
crossorigin
src="https://unpkg.com/react@17/umd/react.development.js"
></script>
<script
crossorigin
src="https://unpkg.com/react-dom@17/umd/react-dom.development.js"
></script>
<script type="text/javascript">
// Global 에 React 와 ReactDOM 객체가 생성
console.log(React);
console.log(ReactDOM);
</script>
</body>
</html>HTML 로 문서 구조를 잡고,
CSS 로 스타일을 입히고,
JavaScript 로 DOM 을 조작합니다.
<!-- ex2.html : 고전 프론트엔드 -->
<!DOCTYPE html>
<html lang="en">
  <head>
    <meta charset="UTF-8" />
    <meta name="viewport" content="width=device-width, initial-scale=1.0" />
    <meta http-equiv="X-UA-Compatible" content="ie=edge" />
    <title>Document</title>
    <style>
      * {margin: 0;padding: 0;border: 0;}
      #root p {color: white;font-size: 20px;background-color: green;text-align: center;width: 200px;}
      #btn_plus {background-color: red;border: 2px solid #000000;font-size: 15px;width: 200px;}
    </style>
  </head>
  <body>
    <div id="root"></div>
    <button id="btn_plus">+</button>
    <script type="text/javascript">
      const root = document.querySelector("#root");
      const btn_plus = document.querySelector("#btn_plus");

      let i = 0;

      root.innerHTML = `<p>init : 0</p>`;

      btn_plus.addEventListener("click", () => {
        root.innerHTML = `<p>init : ${++i}</p>`;
      });
    </script>
  </body>
</html>
컴포넌트를 정의하고,
실제 DOM 에 컴포넌트를 그려준다.
<!-- ex3.html : 컴포넌트를 만들고, 실제 DOM 에 그린다. -->
<!DOCTYPE html>
<html lang="en">
  <head>...</head>
  <body>
    <div id="root"></div>
    <button id="btn_plus">+</button>
    <script type="text/javascript">
      // react 라이브러리가 하는 일
      const component = {
        message: "init",
        count: 0,
        render() {
          return `<p>${this.message} : ${this.count}</p>`;
        }
      };

      // react-dom 라이브러리가 하는 일
      function render(dom, component) {
        // 컴포넌트를 render 하고, DOM 에 그려준다.
        root.innerHTML = component.render();
      }

      render(document.querySelector("#root"), component);

      document.querySelector("#btn_plus").addEventListener("click", () => {
        // 외부에서 컴포넌트의 값을 변경하는 행위
        component.message = "update";
        component.count = component.count + 1;

        render(document.querySelector("#root"), component);
      });
    </script>
  </body>
</html>컴포넌트를 정의하고,
실제 DOM 에 컴포넌트를 그려준다.
<!-- ex4.html : React 로 컴포넌트를 만들고, 실제 DOM 에 그린다. -->
<!DOCTYPE html>
<html lang="en">
  <head>...</head>
  <body>
    <div id="root"></div>
    <button id="btn_plus">+</button>
    <script crossorigin src="https://unpkg.com/react@17/umd/react.development.js"></script>
    <script crossorigin src="https://unpkg.com/react-dom@17/umd/react-dom.development.js"></script>
    <script type="text/javascript">
      const Component = props => {
        return React.createElement(
          "p",
          null,
          `${props.message} ${props.count}`
        );
      };

      let i = 0;

      ReactDOM.render(
        React.createElement(Component, { message: "init", count: i }, null),
        document.querySelector("#root")
      );

      document.querySelector("#btn_plus").addEventListener("click", () => {
        i++;
        ReactDOM.render(
          React.createElement(Component, { message: "update", count: i }, null),
          document.querySelector("#root")
        );
      });
    </script>
  </body>
</html>순수 JavaScript (그렇다면 순수하지 않은 것은??)
<!-- ex5.html : React.createElement 로 컴포넌트를 만들기 -->
<!DOCTYPE html>
<html lang="en">
  <head>...</head>
  <body>
    <div id="root"></div>
    <script crossorigin src="https://unpkg.com/react@17/umd/react.development.js"></script>
    <script crossorigin src="https://unpkg.com/react-dom@17/umd/react-dom.development.js"></script>
    <script type="text/javascript">
      //   React.createElement(
      //     type, // 태그 이름 문자열 | React 컴포넌트 | React.Fragment
      //     [props], // 리액트 컴포넌트에 넣어주는 데이터 객체
      //     [...children] // 자식으로 넣어주는 요소들
      //   );

      // 1. 태그 이름 문자열 type
      //   ReactDOM.render(
      //     React.createElement('h1', null, `type 이 "태그 이름 문자열" 입니다.`),
      //     document.querySelector('#root'),
      //   );

      // 2. React 컴포넌트 type
      //   const Component = props => {
      //     return React.createElement('p', null, `type 이 "React 컴포넌트" 입니다.`);
      //   };

      //   ReactDOM.render(
      //     React.createElement(
      //       Component,
      //       null,
      //       null
      //     ),
      //     document.querySelector("#root")
      //   );

      // 3. React Fragment type
      //   ReactDOM.render(
      //     React.createElement(
      //       React.Fragment,
      //       null,
      //       `type 이 "React Fragment" 입니다.`
      //     ),
      //     document.querySelector("#root")
      //   );

      // 4. props 를 통해 데이터를 주입
      //   const Component = props => {
      //     return React.createElement(
      //       'p',
      //       null,
      //       `message 는 "${props.message}" 입니다.`,
      //     );
      //   };

      //   ReactDOM.render(
      //     React.createElement(
      //       Component,
      //       { message: '이것은 메세지 입니다.' },
      //       null,
      //     ),
      //     document.querySelector('#root'),
      //   );

      // 5. props 에 들어가는 children
      //   const Component = props => {
      //     return React.createElement(
      //       'p',
      //       null,
      //       `message 는 "${props.message}" 입니다.`,
      //       `props.children 은 "${props.children}" 입니다.`,
      //     );
      //   };

      //   ReactDOM.render(
      //     React.createElement(
      //       Component,
      //       { message: '이것은 메세지 입니다.' },
      //       '이것은 children 입니다.',
      //     ),
      //     document.querySelector('#root'),
      //   );

      // 6. 리액트 엘리먼트에 style 추가
      //   ReactDOM.render(
      //     React.createElement(
      //       'h1',
      //       { style: { color: 'red' } },
      //       `type 이 "태그 이름 문자열" 입니다.`,
      //     ),
      //     document.querySelector('#root'),
      //   );

      // 7. 복잡한 컴포넌트
      //   ReactDOM.render(
      //     React.createElement(
      //       'div',
      //       { style: { backgroundColor: 'red', width: 100, height: 100 } },
      //       React.createElement(
      //         'div',
      //         { style: { backgroundColor: 'green', width: 50, height: 50 } },
      //         null,
      //       ),
      //       React.createElement(
      //         'div',
      //         { style: { backgroundColor: 'yellow', width: 50, height: 50 } },
      //         null,
      //       ),
      //     ),
      //     document.querySelector('#root'),
      //   );
    </script>
  </body>
</html>
JSX 문법으로 작성된 코드는 순수한 JavaScript 로 컴파일 하여 사용한다.
누가 해주나요?? => babel
JSX 문법 => React.createElement
<!-- ex6.html : React.createElement => JSX -->
<!DOCTYPE html>
<html lang="en">
  <head>...</head>
  <body>
    <div id="root"></div>
    <script crossorigin src="https://unpkg.com/react@17/umd/react.development.js"></script>
    <script crossorigin src="https://unpkg.com/react-dom@17/umd/react-dom.development.js"></script>
    <script src="https://unpkg.com/@babel/standalone/babel.min.js"></script>
    <script type="text/babel">
      //   React.createElement(
      //     type, // 태그 이름 문자열 | React 컴포넌트 | React.Fragment
      //     [props], // 리액트 컴포넌트에 넣어주는 데이터 객체
      //     [...children] // 자식으로 넣어주는 요소들
      //   );

      // 1. 태그 이름 문자열 type
      //   ReactDOM.render(
      //     React.createElement('h1', null, `type 이 "태그 이름 문자열" 입니다.`),
      //     document.querySelector('#root'),
      //   );

      //   ReactDOM.render(
      //     <h1>type 이 "태그 이름 문자열" 입니다.</h1>,
      //     document.querySelector('#root'),
      //   );

      // 2. React 컴포넌트 type
      //   const Component = props => {
      //     return React.createElement('p', null, `나는 컴포넌트입니다.`);
      //   };

      //   ReactDOM.render(
      //     React.createElement(
      //       Component,
      //       null,
      //       `type 이 "React 컴포넌트" 입니다.`
      //     ),
      //     document.querySelector("#root")
      //   );

      //   const Component = props => {
      //     return <p>type 이 "React 컴포넌트" 입니다.</p>;
      //   };

      //   ReactDOM.render(<Component />, document.querySelector('#root'));

      // 3. React Fragment type
      //   ReactDOM.render(
      //     React.createElement(
      //       React.Fragment,
      //       null,
      //       `type 이 "React Fragment" 입니다.`
      //     ),
      //     document.querySelector("#root")
      //   );

      //   ReactDOM.render(
      //     <>`type 이 "React Fragment" 입니다.</>,
      //     document.querySelector('#root'),
      //   );

      // 4. props 를 통해 데이터를 주입
      //   const Component = props => {
      //     return React.createElement(
      //       'p',
      //       null,
      //       `message 는 "${props.message}" 입니다.`,
      //     );
      //   };

      //   ReactDOM.render(
      //     React.createElement(
      //       Component,
      //       { message: '이것은 메세지 입니다.' },
      //       null,
      //     ),
      //     document.querySelector('#root'),
      //   );

      //   const Component = props => {
      //     return <p>message 는 "{props.message}" 입니다.</p>;
      //   };

      //   ReactDOM.render(
      //     <Component message="이것은 메세지 입니다." />,
      //     document.querySelector('#root'),
      //   );

      // 5. props 에 들어가는 children
      //   const Component = props => {
      //     return React.createElement(
      //       'p',
      //       null,
      //       `message 는 "${props.message}" 입니다.`,
      //       `props.children 은 "${props.children}" 입니다.`,
      //     );
      //   };

      //   ReactDOM.render(
      //     React.createElement(
      //       Component,
      //       { message: '이것은 메세지 입니다.' },
      //       '이것은 children 입니다.',
      //     ),
      //     document.querySelector('#root'),
      //   );

      //   const Component = props => {
      //     return (
      //       <p>
      //         message 는 "{props.message}" 입니다. props.children 은 "
      //         {props.children}" 입니다.
      //       </p>
      //     );
      //   };

      //   ReactDOM.render(
      //     <Component message="이것은 메세지 입니다.">
      //       이것은 children 입니다.
      //     </Component>,
      //     document.querySelector('#root'),
      //   );

      // 6. 리액트 엘리먼트에 style 추가
      //   ReactDOM.render(
      //     React.createElement(
      //       'h1',
      //       { style: { color: 'red' } },
      //       `type 이 "태그 이름 문자열" 입니다.`,
      //     ),
      //     document.querySelector('#root'),
      //   );

      //   ReactDOM.render(
      //     <h1 style={{ color: 'red' }}>type 이 "태그 이름 문자열" 입니다.</h1>,
      //     document.querySelector('#root'),
      //   );

      // 7. 복잡한 컴포넌트
      //   ReactDOM.render(
      //     React.createElement(
      //       'div',
      //       { style: { backgroundColor: 'red', width: 100, height: 100 } },
      //       React.createElement(
      //         'div',
      //         { style: { backgroundColor: 'green', width: 50, height: 50 } },
      //         null,
      //       ),
      //       React.createElement(
      //         'div',
      //         { style: { backgroundColor: 'yellow', width: 50, height: 50 } },
      //         null,
      //       ),
      //     ),
      //     document.querySelector('#root'),
      //   );

      //   ReactDOM.render(
      //     <div style={{ backgroundColor: 'red', width: 100, height: 100 }}>
      //       <div style={{ backgroundColor: 'green', width: 50, height: 50 }} />
      //       <div style={{ backgroundColor: 'yellow', width: 50, height: 50 }} />
      //     </div>,
      //     document.querySelector('#root'),
      //   );
    </script>
  </body>
</html><!-- ex7.html : JSX 문법 -->
<!DOCTYPE html>
<html lang="en">
<head>...</head>
<body>
<div id="root"></div>
<script crossorigin src="https://unpkg.com/react@17/umd/react.development.js"></script>
<script crossorigin src="https://unpkg.com/react-dom@17/umd/react-dom.development.js"></script>
<script src="https://unpkg.com/@babel/standalone/babel.min.js"></script>
<script type="text/babel">
// 1. 최상위 요소가 하나여야 합니다.
// 2. 최상위 요소 리턴하는 경우, ( ) 로 감싸야 합니다.
// const Comp1 = props => {
// return (
// <h1>제목</h1>
// <h2>부제목</h2>
// );
// }
// const Comp2 = props => {
// return (
// <div>
// <h1>제목</h1>
// <h2>부제목</h2>
// </div>
// );
// };
// 3. 자식들을 바로 랜더링하고 싶으면, <>자식들</> 를 사용합니다. => Fragment
// const Comp3 = props => {
// return (
// <>
// <h1>제목</h1>
// <h2>부제목</h2>
// </>
// );
// };
// 4. 자바스크립트 표현식을 사용하려면, {표현식} 를 이용합니다.
// const Comp4 = props => {
// return (
// <div>
// <h1>제목</h1>
// <h2>{props.children}</h2>
// </div>
// );
// };
// 5. if 문은 사용할 수 없습니다.
// 삼항 연산자 혹은 && 를 사용합니다.
// const Comp5 = props => {
// return (
// <div>
// <h1>제목</h1>
// <h2>{props.children}</h2>
// {props.isShow ? '있다' : '없다.'}
// {props.isShow && '있을 때만 나온다'}
// </div>
// );
// };
// 6. style 을 이용해 인라인 스타일링이 가능합니다.
// const Comp6 = props => {
// return (
// <div>
// <h1
// style={{
// color: 'red',
// }}
// >
// 제목
// </h1>
// <h2>부제목</h2>
// </div>
// );
// };
// 7. class 대신 className 을 사용해 class 를 적용할 수 있습니다.
// const Comp7 = props => {
// return (
// <div>
// <h1 className="title">제목</h1>
// <h2>부제목</h2>
// </div>
// );
// };
// 8. 자식요소가 있으면, 꼭 닫아야 하고, 자식요소가 없으면 열면서 닫아야 합니다.
// <p>어쩌구</p>
// <br />
// const Comp7 = props => {
// return (
// <div>
// <h1 className="title">제목</h1>
// <br />
// <h2>부제목</h2>
// </div>
// );
// };
</script>
</body>
</html>컴포넌트 내부에 상태가 있다면 ?
class
컴포넌트 내부에 상태가 없다면 ?
라이프사이클을 사용해야 한다면 ?
class
라이프사이클에 관계 없다면 ?
function
class
function
import React from 'react';

// 정의
class ClassComponent extends React.Component {
  render() {
    return (<div>Hello</div>);
  }
}

// 사용
<ClassComponent />import React from 'react';
// 정의 1
function FunctionComponent() {
return <div>Hello</div>;
}
// 정의 2
const FunctionComponent = () => <div>Hello</div>;
// 사용
<FunctionComponent />Props 는 컴포넌트 외부에서 컴포넌트에게 주는 데이터입니다.
State 는 컴포넌트 내부에서 변경할 수 있는 데이터입니다.
둘 다 변경이 발생하면, 랜더가 다시 일어날 수 있습니다.
Props 와 State 를 바탕으로 컴포넌트를 그립니다.
그리고 Props 와 State 가 변경되면, 컴포넌트를 다시 그립니다.
컴포넌트를 그리는 방법을 기술하는 함수가 랜더 함수 입니다.
<!-- ex8-1.html : 함수로 리액트 컴포넌트 만들기 -->
<!DOCTYPE html>
<html lang="en">
  <head>...</head>
  <body>
    <div id="root"></div>
    <script crossorigin src="https://unpkg.com/react@17/umd/react.development.js"></script>
    <script crossorigin src="https://unpkg.com/react-dom@17/umd/react-dom.development.js"></script>
    <script src="https://unpkg.com/@babel/standalone/babel.min.js"></script>
    <script type="text/babel">
      function Component(props) {
        return (
          <div>
            <h1>{props.message} 이것은 함수로 만든 컴포넌트 입니다.</h1>
          </div>
        );
      }

      ReactDOM.render(
        <Component message="안녕하세요!!!" />,
        document.querySelector('#root'),
      );
    </script>
  </body>
</html>
props 설정
function Component(props) {
  return (
    <div>
      <h1>{props.message} 이것은 함수로 만든 컴포넌트 입니다.</h1>
    </div>
  );
}props 사용
<!-- ex8-2.html : 클래스로 리액트 컴포넌트 만들기 -->
<!DOCTYPE html>
<html lang="en">
  <head>...</head>
  <body>
    <div id="root"></div>
    <script crossorigin src="https://unpkg.com/react@17/umd/react.development.js"></script>
    <script crossorigin src="https://unpkg.com/react-dom@17/umd/react-dom.development.js"></script>
    <script src="https://unpkg.com/@babel/standalone/babel.min.js"></script>
    <script type="text/babel">
      class Component extends React.Component {
        render() {
          return (
            <div>
              <h1>
                {this.props.message} 이것은 클래스를 상속하여 만든 컴포넌트
                입니다.
              </h1>
            </div>
          );
        }
      }

      ReactDOM.render(
        <Component message="안녕하세요!!!" />,
        document.querySelector('#root'),
      );
    </script>
  </body>
</html>props 설정
class Component extends React.Component {
  render() {
    return (
      <div>{this.props.p}</div>
    );
  }
}props 사용
<!-- ex9.html : defaultProps 설정 -->
<!DOCTYPE html>
<html lang="en">
  <head>...</head>
  <body>
    <div id="root"></div>
    <script crossorigin src="https://unpkg.com/react@17/umd/react.development.js"></script>
    <script crossorigin src="https://unpkg.com/react-dom@17/umd/react-dom.development.js"></script>
    <script src="https://unpkg.com/@babel/standalone/babel.min.js"></script>
    <script type="text/babel">
      class Component extends React.Component {
        static defaultProps = {
          message: '안녕하세요!!!',
        };
        render() {
          return (
            <div>
              {this.props.message} 이것은 클래스를 상속하여 만든 컴포넌트
              입니다.
            </div>
          );
        }
      }

      //   Component.defaultProps = {
      //     message: '안녕하세요!!!',
      //   };

      ReactDOM.render(<Component />, document.querySelector('#root'));
    </script>
  </body>
</html>
state 초기값 설정
class Component extends React.Component {
  state = {
    s: '스테이트'
  };
  render() {
    return (
      <div>{this.state.s}</div>
    );
  }
}state 사용
class Component extends React.Component {
  constructor(props) {
    super(props);
    this.state = {s: '스테이트'};
  }
  render() {
    return (
      <div>{this.state.s}</div>
    );
  }
}state 값 업데이트
class Component extends React.Component {
  state = {
    s: '스테이트'
  };
  render() {
    return (
      <div onClick={() => {
        this.setState({s: '새 스테이트'});
      }}>{this.state.s}</div>
    );
  }
}class Comp extends React.Component {
render() {
return (
<div>
<button onClick={() => {
console.log('clicked');
}}>클릭</button>
</div>
);
}
}<!-- ex10.html : 이벤트를 이용하여 state 바꾸기 -->
<!DOCTYPE html>
<html lang="en">
<head>
<meta charset="UTF-8" />
<meta name="viewport" content="width=device-width, initial-scale=1.0" />
<meta http-equiv="X-UA-Compatible" content="ie=edge" />
<title>Document</title>
<style>
* { margin: 0; padding: 0; border: 0; }
</style>
</head>
<body>
<div id="root"></div>
<script crossorigin src="https://unpkg.com/react@16/umd/react.development.js"></script>
<script crossorigin src="https://unpkg.com/react-dom@16/umd/react-dom.development.js"></script>
<script src="https://unpkg.com/@babel/standalone/babel.min.js"></script>
<script type="text/babel">
class Component extends React.Component {
state = { message: 'init', count: 0 };
render() {
return (
<>
<p
style={{
color: 'white',
fontSize: 20,
backgroundColor: 'green',
textAlign: 'center',
width: 200,
}}
>
{this.state.message} {this.state.count}
</p>
<button
style={{
backgroundColor: 'red',
border: '2px solid #000000',
fontSize: 15,
width: 200,
}}
onClick={() => {
this.setState({
message: 'update',
count: this.state.count + 1,
});
}}
>
+
</button>
</>
);
}
}
ReactDOM.render(<Component />, document.querySelector('#root'));
</script>
</body>
</html>
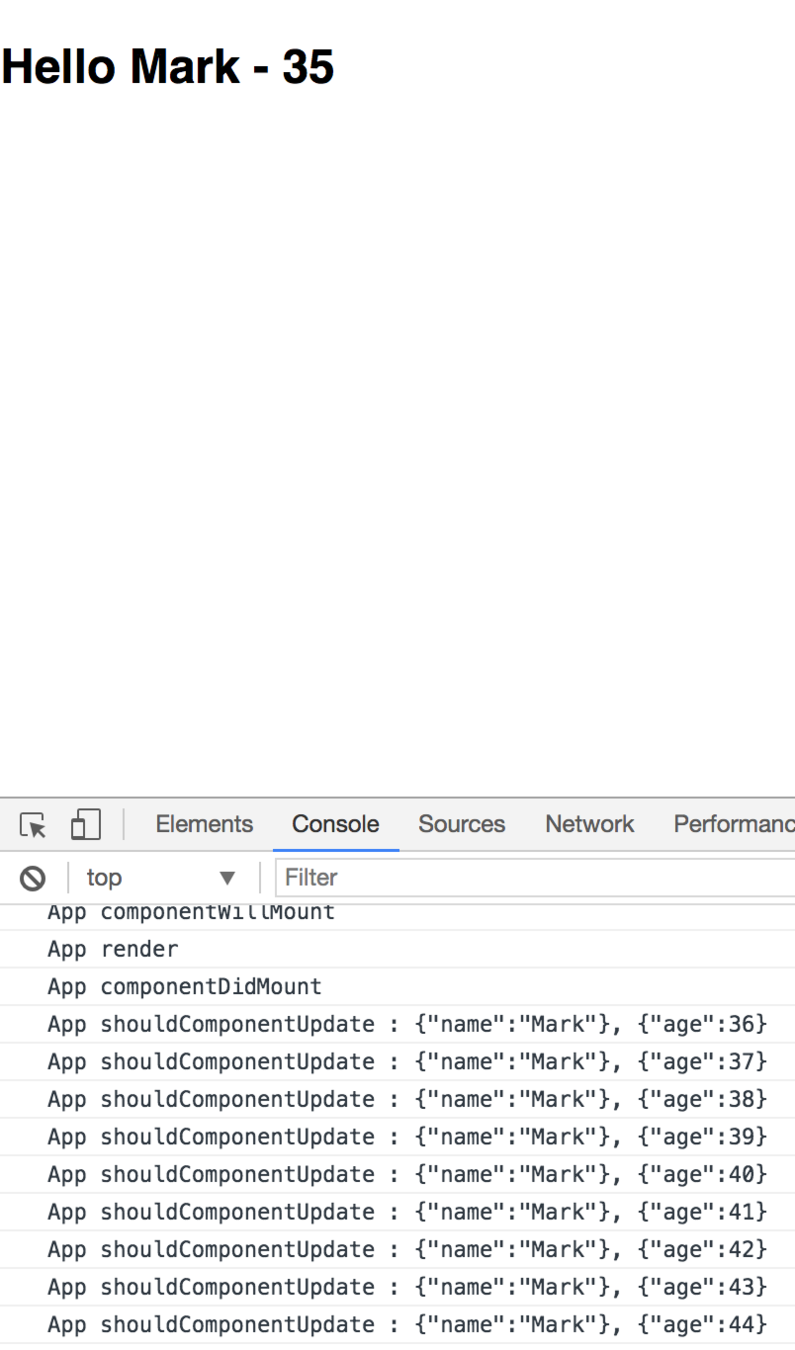
Design simple views for each state in your application, and React will efficiently update and render just the right components when your data changes.
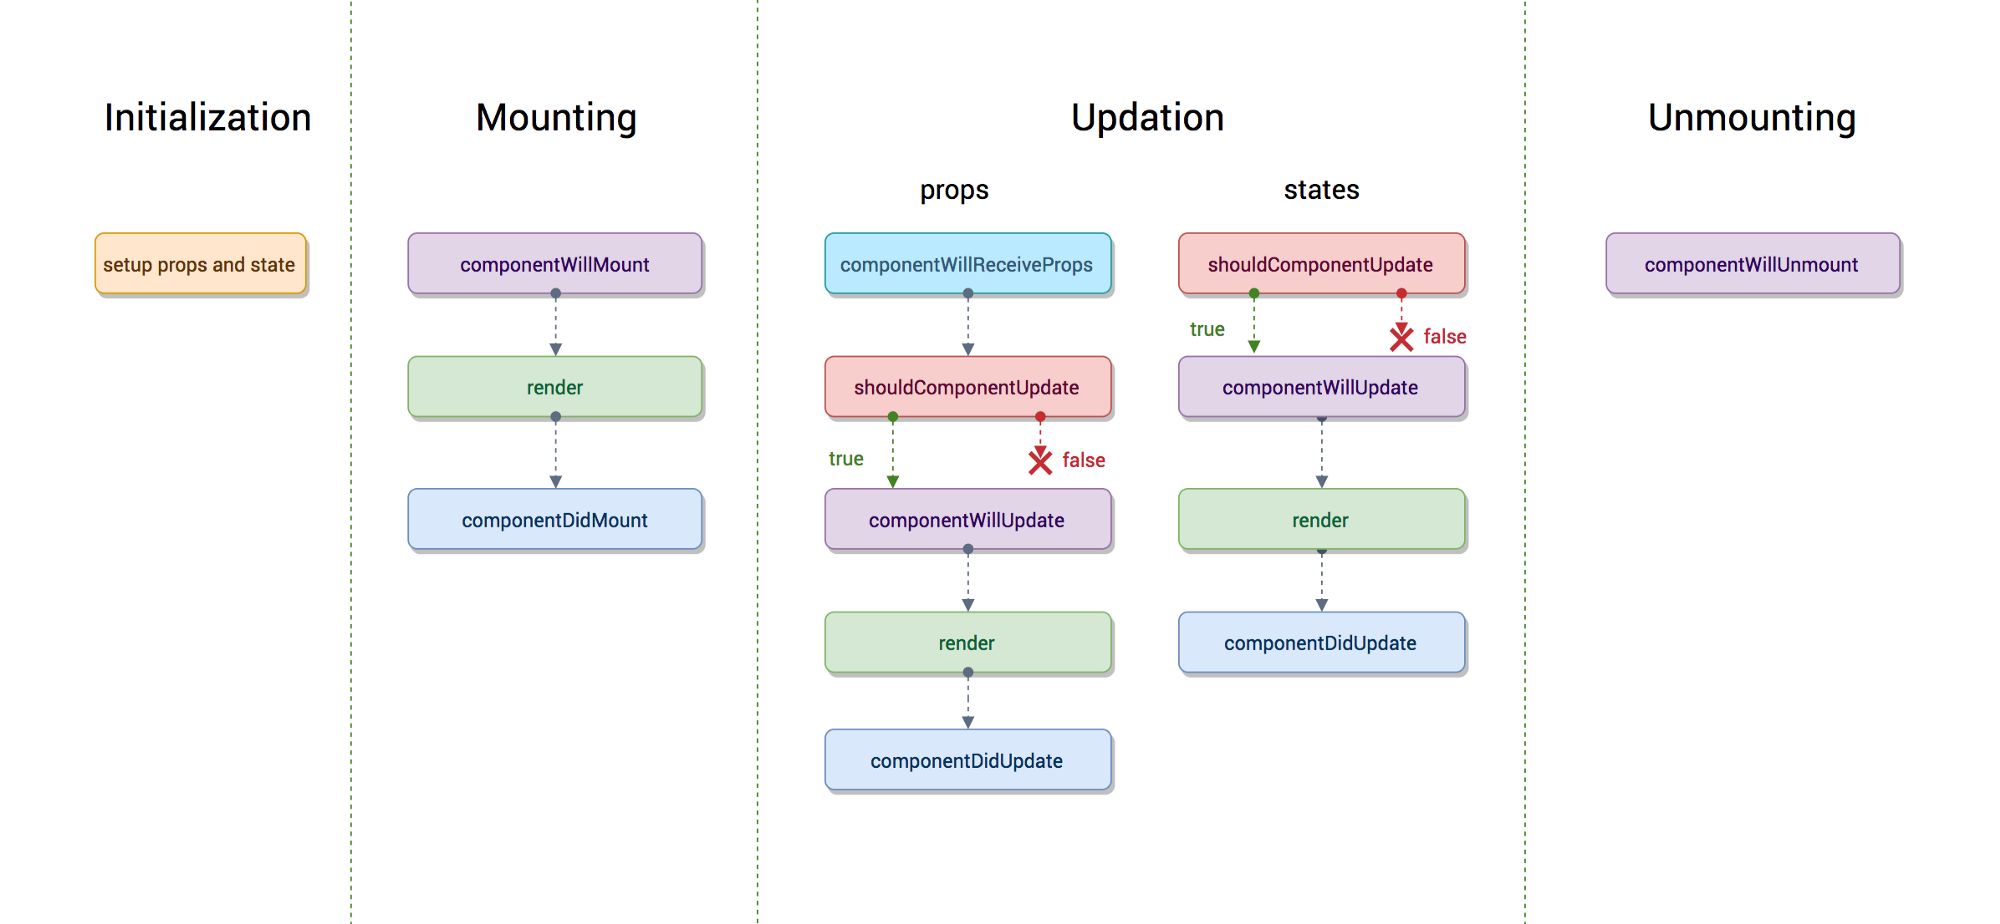
constructor
componentWillMount
render (최초 랜더)
componentDidMount
class App extends React.Component {
  _interval;

  constructor(props) {
    console.log('App constructor');
    super(props);
    this.state = {
      age: 37,
    };
  }

  componentWillMount() {
    console.log('App componentWillMount');
  }

  componentDidMount() {
    console.log('App componentDidMount');
    this._interval = window.setInterval(() => {
      this.setState({
        age: this.state.age + 1,
      });
    }, 1000);
  }

  componentWillUnmount() {
    console.log('App componentWillUnmount');
    clearInterval(this._interval);
  }

  render() {
    console.log('App render');
    return (
      <div>
        <h2>
          Hello {this.props.name} - {this.state.age}
        </h2>
      </div>
    );
  }
}
constructor
componentWillMount
render
componentDidMount
componentWillReceiveProps
shouldComponentUpdate
componentWillUpdate
render
componentDidUpdate
  componentWillReceiveProps(nextProps) {
    console.log(
      `App componentWillReceiveProps : ${JSON.stringify(
        this.props
      )} => ${JSON.stringify(nextProps)}`
    );
  }

  shouldComponentUpdate(nextProps, nextState) {
    console.log(
      `App shouldComponentUpdate : ${JSON.stringify(
        this.props
      )} => ${JSON.stringify(nextProps)}, ${JSON.stringify(
        this.state
      )} => ${JSON.stringify(nextState)}`
    );
    return true;
  }

  componentWillUpdate(nextProps, nextState) {
    console.log(
      `App componentWillUpdate : ${JSON.stringify(
        this.props
      )} => ${JSON.stringify(nextProps)}, ${JSON.stringify(
        this.state
      )} => ${JSON.stringify(nextState)}`
    );
  }

  componentDidUpdate(prevProps, prevState) {
    console.log(
      `App componentDidUpdate : ${JSON.stringify(
        prevProps
      )} => ${JSON.stringify(this.props)}, ${JSON.stringify(
        prevState
      )} => ${JSON.stringify(this.state)}`
    );
  }
componentWillReceiveProps
shouldComponentUpdate
componentWillUpdate
render
componentDidUpdate
props 를 새로 지정했을 때 바로 호출됩니다.
여기는 state 의 변경에 반응하지 않습니다.
여기서 props 의 값에 따라 state 를 변경해야 한다면,
setState 를 이용해 state 를 변경합니다.
그러면 다음 이벤트로 각각 가는것이 아니라 한번에 변경됩니다.
props 만 변경되어도
state 만 변경되어도
props & state 둘다 변경되어도
newProps 와 new State 를 인자로 해서 호출
return type 이 boolean 입니다.
true 면 render
false 면 render 가 호출되지 않습니다.
이 함수를 구현하지 않으면, 디폴트는 true
컴포넌트가 재 랜더링 되기 직전에 불립니다.
여기선 setState 같은 것을 쓰면 아니됩니다.
컴포넌트가 재 랜더링을 마치면 불립니다.
componentWillUnmpunt
class App extends React.Component {
  _interval;

  constructor(props) {
    console.log('App constructor');
    super(props);
    this.state = {
      age: 37,
    };
  }

  componentDidMount() {
    console.log('App componentDidMount');
    this._interval = window.setInterval(() => {
      this.setState({
        age: this.state.age + 1,
      });
    }, 1000);
  }

  componentWillUnmount() {
    console.log('App componentWillUnmount');
    clearInterval(this._interval);
  }

  render() {
    console.log('App render');
    return (
      <div>{this.state.age < 50 && <Button />}</div>
    );
  }
}
componentWillUnmount
class Button extends React.Component {
  componentWillUnmount() {
    console.log('Button componentWillUnmount');
  }

  render() {
    return <>hello</>;
  }
}constructor
componentWillMount => getDerivedStateFromProps
render
componentDidMount
componentWillReceiveProps => getDerivedStateFromProps
shouldComponentUpdate
render
componentWillUpdate => getSnapshotBeforeUpdate
(dom 에 적용)
componentDidUpdate
componentWillUnmount
constructor
static getDerivedStateFromProps
render (최초 랜더)
componentDidMount
import React from 'react';

class App extends React.Component {
  state = {
    age: 0,
  };

  static getDerivedStateFromProps(nextProps, prevState) {
    console.log(nextProps, prevState);
    if (prevState.age !== nextProps.age) {
      return { age: nextProps.age };
    }

    return null;
  }

  render() {
    console.log('App render');
    return <div>{this.state.age}</div>;
  }
}

export default App;
getDerivedStateFromProps
static getDerivedStateFromProps (props 변경)
shouldComponentUpdate (state 변경)
render
getSnapshotBeforeUpdate
(dom 에 적용)
componentDidUpdate
import React from "react";
import "./App.css";

let i = 0;

export default class App extends React.Component {
  state = { list: [] };

  getSnapshotBeforeUpdate(prevProps, prevState) {
    if (prevState.list.length === this.state.list.length) return null;
    const list = document.querySelector("#list");
    return list.scrollHeight - list.scrollTop;
  }

  componentDidUpdate(prevProps, prevState, snapshot) {
    if (snapshot === null) return;
    const list = document.querySelector("#list");
    list.scrollTop = list.scrollHeight - snapshot;
  }

  componentDidMount() {
    setInterval(() => {
      this.setState({
        list: [...this.state.list, i++],
      });
    }, 1000);
  }

  render() {
    return (
      <div id="list" style={{ height: 100, overflow: "scroll" }}>
        {this.state.list.map((i) => (
          <div>{i}</div>
        ))}
      </div>
    );
  }
}
getSnapshotBeforeUpdate
componentWillUnmount
componentDidCatch
import React from 'react';

class Button extends React.Component {
  render() {
    test();
    return <div>hello</div>;
  }
}

class App extends React.Component {
  state = {
    hasError: false,
  };

  componentDidCatch(error, info) {
    // Display fallback UI
    this.setState({ hasError: true });
    // You can also log the error to an error reporting service
    // logErrorToMyService(error, info);
  }

  render() {
    if (this.state.hasError) {
      return <div>에러 화면</div>;
    }
    return (
      <div>
        <Button />
      </div>
    );
  }
}

export default App;
componentDidCatch
/
/profile
/about
Client (Browser)
Server
/
/profile
/about
Client (Browser)
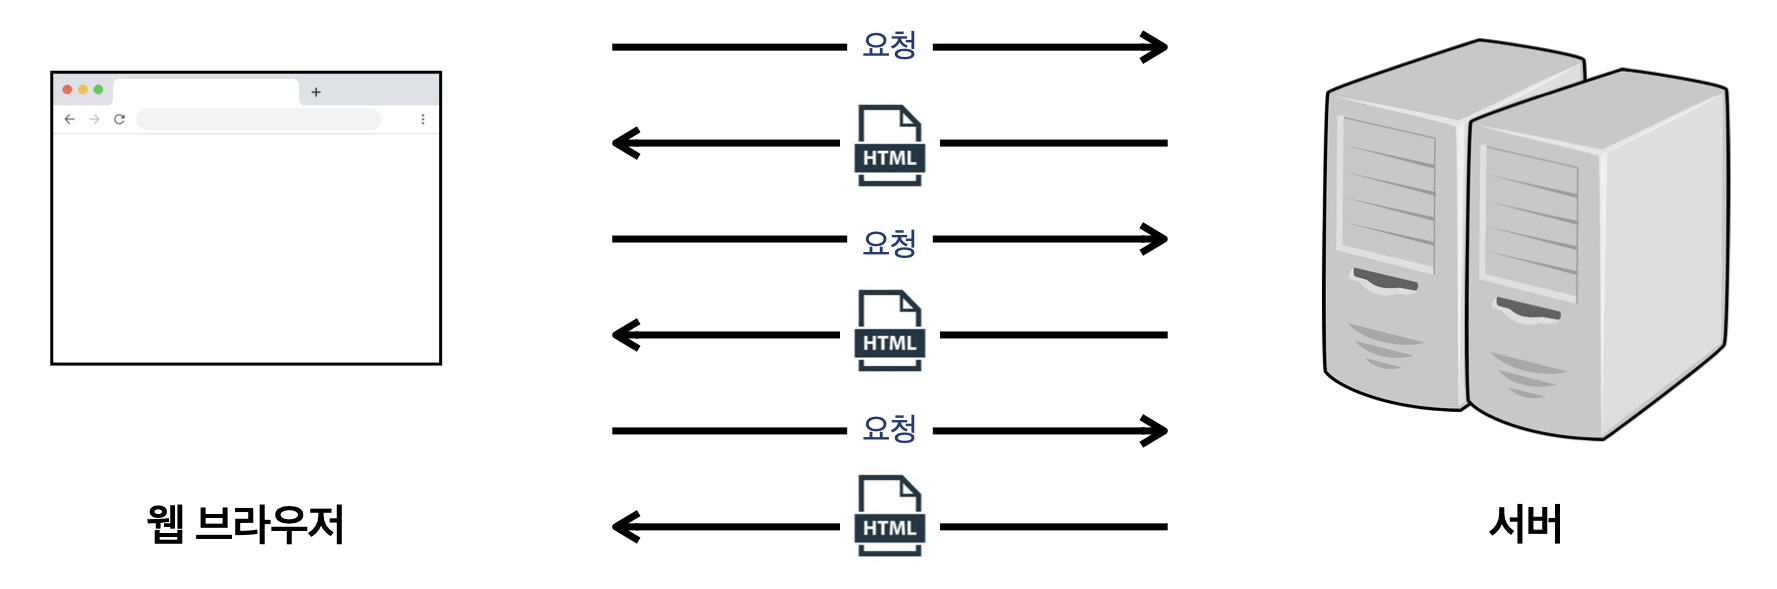
브라우저에서 최초에 '/' 경로로 요청을 하면,
React Web App 을 내려줍니다.
내려받은 React App 에서 '/' 경로에 맞는 컴포넌트를 보여줍니다.
React App 에서 다른 페이지로 이동하는 동작을 수행하면,
새로운 경로에 맞는 컴포넌트를 보여줍니다.
npm i react-router-domcra 에 기본 내장된 패키지가 아닙니다.
react-router-dom 은 Facebook 의 공식 패키지는 아닙니다.
가장 대표적인 라우팅 패키지입니다.
'/' => Home 컴포넌트
'/profile' => Profile 컴포넌트
'/about' => About 컴포넌트
// src/pages/Home.jsx

export default function Home() {
  return <div>Home 페이지 입니다.</div>;
}
// src/pages/Profile.jsx
export default function Profile() {
return <div>Profile 페이지 입니다.</div>;
}// src/pages/About.jsx
export default function About() {
return <div>About 페이지 입니다.</div>;
}// src/App.js
import { BrowserRouter, Routes, Route } from "react-router-dom";
import Home from "./pages/Home";
import About from "./pages/About";
import Profile from "./pages/Profile";
function App() {
return (
<BrowserRouter>
<Routes>
<Route path="/" element={<Home />} />
<Route path="about" element={<About />} />
<Route path="profile" element={<Profile />} />
</Routes>
</BrowserRouter>
);
}
export default App;
- Route 컴포넌트에 경로(path) 와 컴포넌트(element) 를 설정하여 나열해줍니다.

- Routes 로 Route 들을 감싸줍니다.

- 브라우저에서 요청한 경로에 Route 의 path 가 들어있으면 해당 component 를 보여줍니다.import { BrowserRouter, Routes, Route } from "react-router-dom";
import Home from "./pages/Home";
import About from "./pages/About";
import Profile from "./pages/Profile";
function App() {
return (
<BrowserRouter>
<Routes>
<Route path="/" element={<Home />} />
<Route path="profile" element={<Profile />} />
<Route path="profile/:id" element={<Profile />} />
<Route path="about" element={<About />} />
</Routes>
</BrowserRouter>
);
}
export default App;
<Route path="/profile/:id" element={<Profile />} />import { useParams } from "react-router-dom";
const Profile = () => {
const { id } = useParams();
console.log(id, typeof id);
return (
<div>
<h2>Profile 페이지입니다.</h2>
{id && <p>id 는 {id} 입니다.</p>}
</div>
);
};
export default Profile;
const { id } = useParams();typeof id => 'string'
import { BrowserRouter, Routes, Route } from "react-router-dom";
import Home from "./pages/Home";
import About from "./pages/About";
import Profile from "./pages/Profile";

function App() {
  return (
    <BrowserRouter>
      <Routes>
        <Route path="/" element={<Home />} />
        <Route path="profile" element={<Profile />} />
        <Route path="profile/:id" element={<Profile />} />
        <Route path="about" element={<About />} />
      </Routes>
    </BrowserRouter>
  );
}

export default App;
<Route path="/about" element={<About />} />// src/pages/About.jsx
import { useLocation } from "react-router";
const About = () => {
const location = useLocation();
console.log(location.search);
return <div>About 페이지 입니다.</div>;
};
export default About;
const location = useLocation();// src/pages/About.jsx
import { useLocation } from "react-router";
const About = () => {
const { search } = useLocation();
const searchParams = new URLSearchParams(search);
const name = searchParams.get("name");
console.log(name);
return (
<div>
<h2>About 페이지 입니다.</h2>
{name && <p>name 은 {name} 입니다.</p>}
</div>
);
};
export default About;
new URLSearchParams(location.search);// src/pages/About.jsx
import { useLocation } from "react-router";
import qs from "qs";
const About = () => {
const { search } = useLocation();
const query = qs.parse(search, { ignoreQueryPrefix: true });
const { name } = query;
console.log(name);
return (
<div>
<h2>About 페이지 입니다.</h2>
{name && <p>name 은 {name} 입니다.</p>}
</div>
);
};
export default About;const query = qs.parse(search, { ignoreQueryPrefix: true });import { BrowserRouter, Routes, Route } from "react-router-dom";
import Home from "./pages/Home";
import About from "./pages/About";
import Profile from "./pages/Profile";
import NotFound from "./pages/NotFound";
function App() {
return (
<BrowserRouter>
<Routes>
<Route path="/" element={<Home />} />
<Route path="profile" element={<Profile />} />
<Route path="profile/:id" element={<Profile />} />
<Route path="about" element={<About />} />
<Route path="*" element={<NotFound />} />
</Routes>
</BrowserRouter>
);
}
export default App;
const NotFound = () => <div>페이지를 찾을 수 없습니다.</div>;

export default NotFound;
<Link to="/">Home</Link><a href="/">Home</a>앱을 새로고침하면서 경로를 이동합니다.
import { Link } from 'react-router-dom';
브라우저의 주소를 바꾸고,
맞는 Route 로 화면을 변경합니다.
import { BrowserRouter, Routes, Route } from "react-router-dom";
import Home from "./pages/Home";
import About from "./pages/About";
import Profile from "./pages/Profile";
import NotFound from "./pages/NotFound";
import Links from "./components/Links";

function App() {
  return (
    <BrowserRouter>
      <Links />
      <Routes>
        <Route path="/" element={<Home />} />
        <Route path="profile" element={<Profile />} />
        <Route path="profile/:id" element={<Profile />} />
        <Route path="about" element={<About />} />
        <Route path="*" element={<NotFound />} />
      </Routes>
    </BrowserRouter>
  );
}

export default App;
import { Link } from "react-router-dom";

const Links = () => (
  <ul>
    <li>
      <Link to="/">Home</Link>
    </li>
    <li>
      <Link to="/profile">Profile</Link>
    </li>
    <li>
      <Link to="/profile/1">Profile/1</Link>
    </li>
    <li>
      <Link to="/about">About</Link>
    </li>
    <li>
      <Link to="/about?name=mark">About?name=mark</Link>
    </li>
  </ul>
);

export default Links;
import { NavLink } from 'react-router-dom';
className, style 는 객체가 아니라 함수로 isActive 를 통한 스타일 지정이 가능합니다.
Route 가 동시에 매치될 수 있기 때문에 end 가 있습니다.
import { BrowserRouter, Routes, Route } from "react-router-dom";
import Home from "./pages/Home";
import About from "./pages/About";
import Profile from "./pages/Profile";
import NotFound from "./pages/NotFound";
import Links from "./components/Links";
import NavLinks from "./components/NavLinks";

function App() {
  return (
    <BrowserRouter>
      <Links />
      <NavLinks />
      <Routes>
        <Route path="/" element={<Home />} />
        <Route path="profile" element={<Profile />} />
        <Route path="profile/:id" element={<Profile />} />
        <Route path="about" element={<About />} />
        <Route path="*" element={<NotFound />} />
      </Routes>
    </BrowserRouter>
  );
}

export default App;
import { NavLink, useLocation } from "react-router-dom";

const activeStyle = { color: "green" };

const NavLinks = () => {
  const { search } = useLocation();
  return (
    <ul>
      <li>
        <NavLink
          to="/"
          style={({ isActive }) => (isActive ? activeStyle : undefined)}
        >
          Home
        </NavLink>
      </li>
      <li>
        <NavLink
          to="/profile"
          style={({ isActive }) => (isActive ? activeStyle : undefined)}
          end
        >
          Profile
        </NavLink>
      </li>
      <li>
        <NavLink
          to="/profile/1"
          style={({ isActive }) => (isActive ? activeStyle : undefined)}
        >
          Profile/1
        </NavLink>
      </li>
      <li>
        <NavLink
          to="/about"
          style={({ isActive }) =>
            isActive && search === "" ? activeStyle : undefined
          }
        >
          About
        </NavLink>
      </li>
      <li>
        <NavLink
          to="/about?name=mark"
          style={({ isActive }) =>
            isActive && search === "?name=mark" ? activeStyle : undefined
          }
        >
          About?name=mark
        </NavLink>
      </li>
    </ul>
  );
};

export default NavLinks;
import { Navigate } from 'react-router-dom';

// jsx
<Navigate to="/" />
import { BrowserRouter, Routes, Route, Navigate } from "react-router-dom";
import Home from "./pages/Home";
import About from "./pages/About";
import Profile from "./pages/Profile";
import Links from "./components/Links";
import NavLinks from "./components/NavLinks";
function App() {
return (
<BrowserRouter>
<Links />
<NavLinks />
<Routes>
<Route path="/" element={<Home />} />
<Route path="profile" element={<Profile />} />
<Route path="profile/:id" element={<Profile />} />
<Route path="about" element={<About />} />
<Route path="*" element={<Navigate to="/" replace={true} />} />
</Routes>
</BrowserRouter>
);
}
export default App;
import { BrowserRouter, Routes, Route, Navigate } from "react-router-dom";
import Home from "./pages/Home";
import About from "./pages/About";
import Profile from "./pages/Profile";
import Links from "./components/Links";
import NavLinks from "./components/NavLinks";
import Login from "./pages/Login";

function App() {
  return (
    <BrowserRouter>
      <Links />
      <NavLinks />
      <Routes>
        <Route path="/" element={<Home />} />
        <Route path="/login" element={<Login />} />
        <Route path="profile" element={<Profile />} />
        <Route path="profile/:id" element={<Profile />} />
        <Route path="about" element={<About />} />
        <Route path="*" element={<Navigate to="/" replace={true} />} />
      </Routes>
    </BrowserRouter>
  );
}

export default App;
const navigate = useNavigate();// src/pages/Login.jsx
import { useNavigate } from "react-router-dom";
const Login = () => {
const navigate = useNavigate();
function login() {
setTimeout(() => {
navigate("/");
}, 1000);
}
return (
<div>
<h2>Login 페이지 입니다.</h2>
<button onClick={login}>로그인하기</button>
</div>
);
};
export default Login;
파일 확장자에 맞는 loader 에게 위임
babel-loader
.js
.jsx
.css
style-loader
css-loader
최종 배포용 파일
babel config
어떤 문법을 번역할건지 설정
npx create-react-app style-loaders-example

cd style-loaders-example

npm run eject
// "postcss" loader applies autoprefixer to our CSS.
// "css" loader resolves paths in CSS and adds assets as dependencies.
// "style" loader turns CSS into JS modules that inject <style> tags.
// In production, we use MiniCSSExtractPlugin to extract that CSS
// to a file, but in development "style" loader enables hot editing
// of CSS.
// By default we support CSS Modules with the extension .module.css
{
test: cssRegex, // /\.css$/
exclude: cssModuleRegex, // /\.module\.css$/
use: getStyleLoaders({
importLoaders: 1,
sourceMap: isEnvProduction && shouldUseSourceMap,
}),
// Don't consider CSS imports dead code even if the
// containing package claims to have no side effects.
// Remove this when webpack adds a warning or an error for this.
// See https://github.com/webpack/webpack/issues/6571
sideEffects: true,
},import './App.css'; // Adds support for CSS Modules (https://github.com/css-modules/css-modules)
// using the extension .module.css
{
test: cssModuleRegex, // /\.module\.css$/
use: getStyleLoaders({
importLoaders: 1,
sourceMap: isEnvProduction && shouldUseSourceMap,
modules: true,
getLocalIdent: getCSSModuleLocalIdent,
}),
},import styles from './App.module.css'; // Opt-in support for SASS (using .scss or .sass extensions).
// By default we support SASS Modules with the
// extensions .module.scss or .module.sass
{
test: sassRegex, // /\.(scss|sass)$/
exclude: sassModuleRegex, // /\.module\.(scss|sass)$/
use: getStyleLoaders(
{
importLoaders: 2,
sourceMap: isEnvProduction && shouldUseSourceMap,
},
'sass-loader'
),
// Don't consider CSS imports dead code even if the
// containing package claims to have no side effects.
// Remove this when webpack adds a warning or an error for this.
// See https://github.com/webpack/webpack/issues/6571
sideEffects: true,
},import './App.scss';
import './App.sass'; // Adds support for CSS Modules, but using SASS
// using the extension .module.scss or .module.sass
{
test: sassModuleRegex, // /\.module\.(scss|sass)$/
use: getStyleLoaders(
{
importLoaders: 2,
sourceMap: isEnvProduction && shouldUseSourceMap,
modules: true,
getLocalIdent: getCSSModuleLocalIdent,
},
'sass-loader'
),
},import styles from './App.module.scss';
import styles from './App.module.sass';// App.js
import './App.css';<div className="App">
<header className="App-header">
<img src={logo} className="App-logo" alt="logo" />
<p>
Edit <code>src/App.js</code> and save to reload.
</p>
<a
className="App-link"
href="https://reactjs.org"
target="_blank"
rel="noopener noreferrer"
>
Learn React
</a>
</header>
</div>.App {
text-align: center;
}
.App-logo {
height: 40vmin;
}
.App-header {
background-color: #282c34;
min-height: 100vh;
display: flex;
flex-direction: column;
align-items: center;
justify-content: center;
font-size: calc(10px + 2vmin);
color: white;
}
.App-link {
color: #09d3ac;
}.App
.App-header
.App-logo
.App-link
.App {
text-align: center;
}
.App .logo {
height: 40vmin;
}
.App .header {
background-color: #282c34;
min-height: 100vh;
display: flex;
flex-direction: column;
align-items: center;
justify-content: center;
font-size: calc(10px + 2vmin);
color: white;
}
.App .link {
color: #09d3ac;
}
.App
.App .header
.App .logo
.App .link
<div className="App">
<header className="header">
<img src={logo} className="logo" alt="logo" />
<p>
Edit <code>src/App.js</code> and save to reload.
</p>
<a
className="link"
href="https://reactjs.org"
target="_blank"
rel="noopener noreferrer"
>
Learn React
</a>
</header>
</div>.App {
text-align: center;
.logo {
height: 40vmin;
}
.header {
background-color: #282c34;
min-height: 100vh;
display: flex;
flex-direction: column;
align-items: center;
justify-content: center;
font-size: calc(10px + 2vmin);
color: white;
}
.link {
color: #09d3ac;
}
}
.App
.App .header
.App .logo
.App .link
<div className="App">
<header className="header">
<img src={logo} className="logo" alt="logo" />
<p>
Edit <code>src/App.js</code> and save to reload.
</p>
<a
className="link"
href="https://reactjs.org"
target="_blank"
rel="noopener noreferrer"
>
Learn React
</a>
</header>
</div>npm i sassimport styles from './App.module.css';
console.log(styles);.App {
text-align: center;
}
.App-logo {
height: 40vmin;
}
.App-header {
background-color: #282c34;
min-height: 100vh;
display: flex;
flex-direction: column;
align-items: center;
justify-content: center;
font-size: calc(10px + 2vmin);
color: white;
}
.App-link {
color: #09d3ac;
}
import styles from './App.module.scss';
console.log(styles);.App {
text-align: center;
.logo {
animation: App-logo-spin infinite 20s linear;
height: 40vmin;
pointer-events: none;
}
.header {
background-color: #282c34;
min-height: 100vh;
display: flex;
flex-direction: column;
align-items: center;
justify-content: center;
font-size: calc(10px + 2vmin);
color: white;
}
.link {
color: #61dafb;
}
}
@keyframes App-logo-spin {
from {
transform: rotate(0deg);
}
to {
transform: rotate(360deg);
}
}import logo from "./logo.svg";
import styles from "./App.module.css";
const App = () => {
console.log(styles);
return (
<div className={styles["App"]}>
<header className={styles["App-header"]}>
<img src={logo} className={styles["App-logo"]} alt="logo" />
<p>
Edit <code>src/App.js</code> and save to reload.
</p>
<a
className={styles["App-link"]}
href="https://reactjs.org"
target="_blank"
rel="noopener noreferrer"
>
Learn React
</a>
</header>
</div>
);
};
export default App;
- Button.module.css
- Button.jsx
import styles from './Button.module.css';
const Button = props => <button className={styles.button} {...props} />;
export default Button;.button {
background: transparent;
border-radius: 3px;
border: 2px solid palevioletred;
color: palevioletred;
margin: 0 1em;
padding: 0.25em 1em;
font-size: 20px;
}
import styles from './Button.module.css';
export default class Button extends React.Component {
state = {
loading: false,
};
startLoading = () => {
console.log('start');
this.setState({ loading: true });
setTimeout(() => {
this.setState({ loading: false });
}, 1000);
};
render() {
const { loading } = this.state;
return (
<button
className={
loading ? `${styles.button} ${styles.loading}` : styles.button
}
{...this.props}
onClick={this.startLoading}
/>
);
}
}.button {
background: transparent;
border-radius: 3px;
border: 2px solid palevioletred;
color: palevioletred;
margin: 0 1em;
padding: 0.25em 1em;
font-size: 20px;
}
.loading {
border: 2px solid grey;
color: grey;
}
npm i classnamesimport classNames from 'classnames';
console.log(classNames('foo', 'bar')); // "foo bar"
console.log(classNames('foo', 'bar', 'baz')); // "foo bar baz"
console.log(classNames({ foo: true }, { bar: true })); // "foo bar"
console.log(classNames({ foo: true }, { bar: false })); // "foo"
console.log(classNames(null, false, 'bar', undefined, 0, 1, { baz: null }, '')); // "bar 1"
console.log(classNames(styles.button, styles.loading)); // Button_button__2Ce79 Button_loading__XEngF
import styles from './Button.module.css';
import classNames from 'classnames';
export default class Button extends React.Component {
state = {
loading: false,
};
startLoading = () => {
console.log('start');
this.setState({ loading: true });
setTimeout(() => {
this.setState({ loading: false });
}, 1000);
};
render() {
const { loading } = this.state;
return (
<button
className={
loading ? classNames(styles.button, styles.loading) : styles.button
}
{...this.props}
onClick={this.startLoading}
/>
);
}
}import classNames from 'classnames/bind';
const cx = classNames.bind(styles);
console.log(cx('button', 'loading')); // Button_button__2Ce79 Button_loading__XEngF
console.log(cx('button', { loading: false })); // Button_button__2Ce79import styles from './Button.module.css';
import classNames from 'classnames/bind';
const cx = classNames.bind(styles);
export default class Button extends React.Component {
state = {
loading: false,
};
startLoading = () => {
console.log('start');
this.setState({ loading: true });
setTimeout(() => {
this.setState({ loading: false });
}, 1000);
};
render() {
const { loading } = this.state;
return (
<button
className={cx('button', { loading })}
{...this.props}
onClick={this.startLoading}
/>
);
}
}npx create-react-app styled-components-example
cd styled-components-example
npm i styled-components
code .
npm startimport logo from './logo.svg';
import './App.css';
import StyledButton from './components/StyledButton';
function App() {
return (
<div className="App">
<header className="App-header">
<img src={logo} className="App-logo" alt="logo" />
<p>
<StyledButton>버튼</StyledButton>
</p>
</header>
</div>
);
}
export default App;import styled from 'styled-components';
const StyledButton = styled.button``;
export default StyledButton;
import styled from 'styled-components';
const StyledButton = styled.button`
background: transparent;
border-radius: 3px;
border: 2px solid palevioletred;
color: palevioletred;
margin: 0 1em;
padding: 0.25em 1em;
`;
export default StyledButton;import StyledButton from './components/StyledButton';
function App() {
return (
<div className="App">
<p>
<StyledButton>버튼</StyledButton>
</p>
</div>
);
}
export default App;import styled, { css } from 'styled-components';
const StyledButton = styled.button`
background: transparent;
border-radius: 3px;
border: 2px solid palevioletred;
color: palevioletred;
margin: 0 1em;
padding: 0.25em 1em;
${props =>
props.primary &&
css`
background: palevioletred;
color: white;
`};
`;
export default StyledButton;import StyledButton from './components/StyledButton';
function App() {
return (
<div className="App">
<p>
<StyledButton>버튼</StyledButton>
<StyledButton primary>Primary 버튼</StyledButton>
</p>
</div>
);
}
export default App;import styled, { css } from 'styled-components';
const StyledButton = styled.button`
background: transparent;
border-radius: 3px;
border: 2px solid palevioletred;
color: palevioletred;
margin: 0 1em;
padding: 0.25em 1em;
`;
const PrimaryStyledButton = styled(StyledButton)`
background: palevioletred;
color: white;
`;
export default PrimaryStyledButton;import styled from 'styled-components';
const StyledButton = styled.button`
background: transparent;
border-radius: 3px;
border: 2px solid palevioletred;
color: palevioletred;
margin: 0 1em;
padding: 0.25em 1em;
font-size: 1em;
display: inline-block;
text-decoration: none;
`;
export default StyledButton;
import StyledButton from './components/StyledButton';
function App() {
return (
<div className="App">
<p>
<StyledButton as="a" href="/">
a 태그 버튼
</StyledButton>
<StyledButton>버튼</StyledButton>
</p>
</div>
);
}
export default App;
import styled from 'styled-components';
const StyledButton = styled.button`
background: transparent;
border-radius: 3px;
border: 2px solid palevioletred;
color: palevioletred;
margin: 0 1em;
padding: 0.25em 1em;
font-size: 1em;
display: inline-block;
`;
export default StyledButton;import StyledButton from './components/StyledButton';
const UppercaseButton = props => (
<button {...props} children={props.children.toUpperCase()} />
);
function App() {
return (
<div className="App">
<p>
<StyledButton as={UppercaseButton}>button</StyledButton>
<StyledButton>button</StyledButton>
</p>
</div>
);
}
export default App;
import styled from 'styled-components';
function MyButton({ className, children }) {
return <button className={className}>MyButton {children}</button>;
}
const StyledButton = styled(MyButton)`
background: transparent;
border-radius: 3px;
border: 2px solid palevioletred;
color: palevioletred;
margin: 0 1em;
padding: 0.25em 1em;
font-size: 1em;
`;
export default StyledButton;
import StyledButton from './components/StyledButton';
function App() {
return (
<div className="App">
<p>
<StyledButton>button</StyledButton>
</p>
</div>
);
}
export default App;
import styled from 'styled-components';
const StyledButton = styled('button')`
background: transparent;
border-radius: 3px;
border: 2px solid palevioletred;
color: palevioletred;
margin: 0 1em;
padding: 0.25em 1em;
font-size: 1em;
`;
export default StyledButton;import StyledButton from './components/StyledButton';
function App() {
return (
<div className="App">
<p>
<StyledButton>button</StyledButton>
</p>
</div>
);
}
export default App;
import styled from 'styled-components';
const StyledButton = styled.button`
background: transparent;
border-radius: 3px;
border: 2px solid ${props => props.color || 'palevioletred'};
color: ${props => props.color || 'palevioletred'};
margin: 0 1em;
padding: 0.25em 1em;
font-size: 1em;
`;
export default StyledButton;import StyledButton from './components/StyledButton';
function App() {
return (
<div className="App">
<p>
<StyledButton>button</StyledButton>
<StyledButton color="red">red button</StyledButton>
<StyledButton color="green">green button</StyledButton>
</p>
</div>
);
}
export default App;import styled from 'styled-components';
const StyledButton = styled.button`
background: transparent;
border-radius: 3px;
border: 2px solid palevioletred;
color: palevioletred;
margin: 0 1em;
padding: 0.25em 1em;
:hover {
border: 2px solid red;
}
`;
export default StyledButton;import StyledButton from './components/StyledButton';
function App() {
return (
<div className="App">
<p>
<StyledButton>버튼</StyledButton>
</p>
</div>
);
}
export default App;import styled from 'styled-components';
const StyledButton = styled.button`
background: transparent;
border-radius: 3px;
border: 2px solid palevioletred;
color: palevioletred;
margin: 0 1em;
padding: 0.25em 1em;
::before {
content: '@';
}
`;
export default StyledButton;import StyledButton from './components/StyledButton';
function App() {
return (
<div className="App">
<p>
<StyledButton>버튼</StyledButton>
</p>
</div>
);
}
export default App;import styled from 'styled-components';
const StyledButton = styled.button`
background: transparent;
border-radius: 3px;
border: 2px solid palevioletred;
color: palevioletred;
margin: 0 1em;
padding: 0.25em 1em;
&:hover {
border: 2px solid red;
}
`;
export default StyledButton;import StyledButton from './components/StyledButton';
function App() {
return (
<div className="App">
<p>
<StyledButton>버튼</StyledButton>
</p>
</div>
);
}
export default App;import styled from 'styled-components';
const StyledButton = styled.button`
background: transparent;
border-radius: 3px;
border: 2px solid palevioletred;
color: palevioletred;
margin: 0 1em;
padding: 0.25em 1em;
& ~ & {
border: 2px solid red;
}
& + & {
border: 2px solid green;
}
`;
export default StyledButton;import StyledButton from './components/StyledButton';
function App() {
return (
<div className="App">
<p>
<StyledButton>버튼</StyledButton>
<StyledButton>버튼</StyledButton>
<StyledButton>버튼</StyledButton>
<button>버튼</button>
<StyledButton>버튼</StyledButton>
</p>
</div>
);
}
export default App;import styled from 'styled-components';
const StyledButton = styled.button`
background: transparent;
border-radius: 3px;
border: 2px solid palevioletred;
color: palevioletred;
margin: 0 1em;
padding: 0.25em 1em;
&.orange {
border: 2px solid orange;
}
`;
export default StyledButton;import StyledButton from './components/StyledButton';
function App() {
return (
<div className="App">
<p>
<StyledButton className="orange">버튼</StyledButton>
</p>
<p className="orange">
<StyledButton>버튼</StyledButton>
</p>
</div>
);
}
export default App;import styled from 'styled-components';
const StyledButton = styled.button`
background: transparent;
border-radius: 3px;
border: 2px solid palevioletred;
color: palevioletred;
margin: 0 1em;
padding: 0.25em 1em;
.orange {
color: orange;
}
`;
export default StyledButton;import StyledButton from './components/StyledButton';
function App() {
return (
<div className="App">
<p>
<StyledButton>
<a className="orange">버튼</a>
</StyledButton>
</p>
</div>
);
}
export default App;import styled from 'styled-components';
const StyledButton = styled.button`
border: 1px solid palevioletred;
`;
export default StyledButton;import StyledButton from './components/StyledButton';
import { createGlobalStyle } from 'styled-components';
const GlobalStyle = createGlobalStyle`
button {
color: palevioletred;
}
`;
function App() {
return (
<div className="App">
<p>
<GlobalStyle />
<StyledButton>버튼</StyledButton>
<button>버튼</button>
</p>
</div>
);
}
export default App;import styled from 'styled-components';
const StyledButton = styled.button`
border: 1px solid palevioletred;
`;
export default StyledButton;import StyledButton from './components/StyledButton';
import { createGlobalStyle } from 'styled-components';
const GlobalStyle = createGlobalStyle`
button${StyledButton} {
color: palevioletred;
}
`;
function App() {
return (
<div className="App">
<p>
<GlobalStyle />
<StyledButton>버튼</StyledButton>
<button>버튼</button>
</p>
</div>
);
}
export default App;import styled from 'styled-components';
const StyledA = styled.a.attrs(props => ({
href: props.href || 'https://www.fastcampus.co.kr',
color: props.color || 'palevioletred',
target: '_BLANK',
}))`
color: ${props => props.color};
`;
export default StyledA;import StyledA from './components/StyledA';
function App() {
return (
<div className="App">
<p>
<StyledA>링크</StyledA>
<StyledA color="red">링크</StyledA>
</p>
</div>
);
}
export default App;import styled, { keyframes } from 'styled-components';
const slide = keyframes`
from {
margin-top: 0em;
}
to {
margin-top: 1em;
}
`;
const StyledButton = styled.button`
display: inline-block;
color: palevioletred;
font-size: 1em;
margin: 1em;
padding: 0.25em 1em;
border: 2px solid palevioletred;
border-radius: 3px;
animation: ${slide} 0.3s ease-in;
`;
export default StyledButton;import StyledButton from './components/StyledButton';
function App() {
return (
<div className="App">
<p>
<StyledButton>Slide Button</StyledButton>
</p>
</div>
);
}
export default App;npx create-react-app react-shadow-example
cd react-shadow-example
npm i react-shadow
code .
npm start/* index.css */
body {
margin: 0;
font-family: -apple-system, BlinkMacSystemFont, "Segoe UI", "Roboto", "Oxygen",
"Ubuntu", "Cantarell", "Fira Sans", "Droid Sans", "Helvetica Neue",
sans-serif;
-webkit-font-smoothing: antialiased;
-moz-osx-font-smoothing: grayscale;
}
code {
font-family: source-code-pro, Menlo, Monaco, Consolas, "Courier New",
monospace;
}
p {
color: red;
}
.App {
text-align: center;
}
.App-logo {
height: 40vmin;
pointer-events: none;
}
@media (prefers-reduced-motion: no-preference) {
.App-logo {
animation: App-logo-spin infinite 20s linear;
}
}
.App-header {
background-color: #282c34;
min-height: 100vh;
display: flex;
flex-direction: column;
align-items: center;
justify-content: center;
font-size: calc(10px + 2vmin);
color: white;
}
.App-link {
color: #61dafb;
}
@keyframes App-logo-spin {
from {
transform: rotate(0deg);
}
to {
transform: rotate(360deg);
}
}import logo from "./logo.svg";
import root from "react-shadow";
const styles = `...`;
function App() {
return (
<root.div>
<div className="App">
  <header className="App-header">
    <img src={logo} className="App-logo" alt="logo" />
    <p>
      Edit <code>src/App.js</code> and save to reload.
    </p>
    <a
      className="App-link"
      href="https://reactjs.org"
      target="_blank"
      rel="noopener noreferrer"
    >
      Learn React
    </a>
  </header>
</div>
<style type="text/css">{styles}</style>
</root.div>
);
}
export default App;
Higher Order Component
advanced technique in React for reusing component logic.
not part of the React API
a pattern that emerges from React’s compositional nature.
HOC = function(컴포넌트) { return 새로운 컴포넌트; }import React from "react";
import { withRouter } from "react-router-dom";
const LoginButton = props => {
console.log(props);
function login() {
setTimeout(() => {
props.history.push("/");
}, 1000);
}
return <button onClick={login}>로그인하기</button>;
};
export default withRouter(LoginButton);보통 with 가 붙은 함수가 HOC 인 경우가 많다.
export default withRouter(LoginButton);Use HOCs For Cross-Cutting Concerns
Don’t Mutate the Original Component. Use Composition.
Pass Unrelated Props Through to the Wrapped Component
Maximizing Composability
Wrap the Display Name for Easy Debugging
Don’t Use HOCs Inside the render Method
Static Methods Must Be Copied Over
Refs Aren’t Passed Through (feat. React.forwardRef)
render() {
  // A new version of EnhancedComponent is created on every render
  // EnhancedComponent1 !== EnhancedComponent2
  const EnhancedComponent = enhance(MyComponent);
  // That causes the entire subtree to unmount/remount each time!
  return <EnhancedComponent />;
}
function enhance(WrappedComponent) {
class Enhance extends React.Component {/*...*/}
// Must know exactly which method(s) to copy :(
Enhance.staticMethod = WrappedComponent.staticMethod;
return Enhance;
}// Define a static method
WrappedComponent.staticMethod = function() {/*...*/}
// Now apply a HOC
const EnhancedComponent = enhance(WrappedComponent);
// The enhanced component has no static method
typeof EnhancedComponent.staticMethod === 'undefined' // trueimport hoistNonReactStatic from 'hoist-non-react-statics';
function enhance(WrappedComponent) {
class Enhance extends React.Component {/*...*/}
hoistNonReactStatic(Enhance, WrappedComponent);
return Enhance;
}// Instead of...
MyComponent.someFunction = someFunction;
export default MyComponent;
// ...export the method separately...
export { someFunction };
// ...and in the consuming module, import both
import MyComponent, { someFunction } from './MyComponent.js';
npx create-react-app controlled-uncontrolled-exampleimport React from 'react';
export default class Controlled extends React.Component {
state = { value: '' };
render() {
return (
<div>
<input />
</div>
);
}
}import React from 'react';
export default class Controlled extends React.Component {
state = { value: '' };
render() {
const { value } = this.state;
return (
<div>
<input value={value} onChange={this._change} />
</div>
);
}
_change = e => {
// console.log(e.target.value);
this.setState({ value: e.target.value });
};
}import React from 'react';
export default class Controlled extends React.Component {
state = { value: '' };
render() {
const { value } = this.state;
return (
<div>
<input value={value} onChange={this._change} />
<button onClick={this._click}>전송</button>
</div>
);
}
_change = e => {
// console.log(e.target.value);
this.setState({ value: e.target.value });
};
_click = () => {
console.log('최종 결과', this.state.value);
};
}
import React from 'react';

export default class Controlled extends React.Component {
  state = { value: '' };

  render() {
    const { value } = this.state;
    return (
      <div>
        <input value={value} onChange={this._change} />
        <button onClick={this._click}>전송</button>
      </div>
    );
  }

  _change = e => {
    // console.log(e.target.value);
    this.setState({ value: e.target.value });
  };

  _click = () => {
    console.log('최종 결과', this.state.value);
  };
}
import React from 'react';

export default class Uncontrolled extends React.Component {
  _input = React.createRef();

  render() {
    return (
      <div>
        <input ret={this._input} />
      </div>
    );
  }
}
import React from 'react';

export default class Uncontrolled extends React.Component {
  _input = React.createRef();

  render() {
    return (
      <div>
        <input ref={this._input} />
        <button onClick={this._click}>전송</button>
      </div>
    );
  }

  _click = () => {
    console.log('최종 결과', this._input.current.value);
  };
}
import React from 'react';

const Uncontrolled = () => {
  const inputRef = React.createRef();

  function click() {
    console.log('최종 결과', inputRef.current.value);
  }

  return (
    <div>
      <input ref={inputRef} />
      <button onClick={click}>전송</button>
    </div>
  );
};

export default Uncontrolled;1) Basic Hooks
2) Custom Hooks
3) Additional Hooks
useState
useEffect
useContext (Context API 에서 다룹니다.)
npx create-react-app react-hooks-exampleimport React from 'react';
export default class Example1 extends React.Component {
state = {
count: 0,
};
render() {
const { count } = this.state;
return (
<div>
<p>You clicked {count} times</p>
<button onClick={this.click}>Click me</button>
</div>
);
}
click = () => {
this.setState({ count: this.state.count + 1 });
};
}
import React, { useState } from 'react';

const Example2 = () => {
  const [count, setCount] = useState(0);

  function click() {
    setCount(count + 1);
  }

  return (
    <div>
      <p>You clicked {count} times</p>
      <button onClick={click}>Click me</button>
    </div>
  );
};

export default Example2;
const [스테이트 값, 스테이트 변경 함수] = useState(스테이트 초기값);
import React, { useState } from 'react';

const Example3 = () => {
  const [state, setState] = useState({ count: 0 });

  function click() {
    setState({ count: state.count + 1 });
  }

  return (
    <div>
      <p>You clicked {state.count} times</p>
      <button onClick={click}>Click me</button>
    </div>
  );
};

export default Example3;
const [스테이트 값, 스테이트 변경 함수] = useState(스테이트 초기값);
컴포넌트 사이에서 상태와 관련된 로직을 재사용하기 어렵습니다.
컨테이너 방식 말고, 상태와 관련된 로직
복잡한 컴포넌트들은 이해하기 어렵습니다.
Class 는 사람과 기계를 혼동시킵니다.
컴파일 단계에서 코드를 최적화하기 어렵게 만든다.
this.state 는 로직에서 레퍼런스를 공유하기 때문에 문제가 발생할 수 있다.
좋은 것일까 ?
import React from 'react';

export default class Example4 extends React.Component {
  state = { count: 0 };
  componentDidMount() {
    console.log('componentDidMount', this.state.count);
  }

  componentDidUpdate() {
    console.log('componentDidUpdate', this.state.count);
  }

  render() {
    const { count } = this.state;
    return (
      <div>
        <p>You clicked {count} times</p>
        <button onClick={this.click}>Click me</button>
      </div>
    );
  }

  click = () => {
    this.setState({ count: this.state.count + 1 });
  };
}
import React, { useState, useEffect } from 'react';

const Example5 = () => {
  const [count, setCount] = useState(0);

  useEffect(() => {
    console.log('componentDidMount & componentDidUpdate', count);
  });

  function click() {
    setCount(count + 1);
  }

  return (
    <div>
      <p>You clicked {count} times</p>
      <button onClick={click}>Click me</button>
    </div>
  );
};

export default Example5;
import React from 'react';

export default class Example6 extends React.Component {
  state = {
    time: new Date(),
  };
  _timer = null;

  componentDidMount() {
    this._timer = setInterval(() => {
      this.setState({ time: new Date() });
    }, 1000);
  }

  componentWillUnmount() {
    clearInterval(this._timer);
  }

  render() {
    const { time } = this.state;
    return <div>{time.toISOString()}</div>;
  }
}
import React, { useState, useEffect } from 'react';

const Example7 = () => {
  const [time, setTime] = useState(new Date());

  useEffect(() => {
    const timer = setInterval(() => {
      setTime(new Date());
    }, 1000);
    return () => {
      clearInterval(timer);
    };
  }, []);

  return <div>{time.toISOString()}</div>;
};

export default Example7;
function Counter() {
  const [count, setCount] = useState(0);

  useEffect(() => {
    document.title = `You clicked ${count} times`;
  });

  function click() {
    setCount(count + 1);
  }

  return (
    <div>
      <p>You clicked {count} times</p>
      <button onClick={click}>Click me</button>
    </div>
  );
}from 리액트
"컴포넌트야,
state가 0 일 때의 UI를 보여줘."
from 컴포넌트
from 리액트
"좋아. UI를 업데이트 하겠어.
이봐 브라우저, 나 DOM에 뭘 좀 추가하려고 해."
from 브라우저
"좋아, 화면에 그려줄게."
리액트
좋아, 이제 컴포넌트 컴포넌트가 준 이펙트를 실행할거야.
() => { document.title = 'You clicked 0 times' } 를 실행.
from 컴포넌트
"이봐 리액트, 내 상태를 1 로 변경해줘."
from 리액트
"상태가 1 일때의 UI를 줘."
from 컴포넌트
"여기 랜더링 결과물로 <p>You clicked 1 times</p> 가 있어."
"그리고 모든 처리가 끝나고 이 이펙트를 실행하는 것을 잊지 마."
() => { document.title = 'You clicked 1 times' }.
from 리액트
"좋아. UI를 업데이트 하겠어.
이봐 브라우저, 나 DOM에 뭘 좀 추가하려고 해."
from 브라우저
"좋아, 화면에 그려줄게."
리액트
좋아, 이제 컴포넌트 컴포넌트가 준 이펙트를 실행할거야.
() => { document.title = 'You clicked 1 times' } 를 실행.
useSomething
// hooks/useWindowWidth.js

import { useState, useEffect } from 'react';

export default function useWindowWidth() {
  const [width, setWidth] = useState(window.innerWidth);
  useEffect(() => {
    const onResize = () => setWidth(window.innerWidth);
    window.addEventListener('resize', onResize);
    return () => {
      window.removeEventLister('resize', onResize);
    };
  }, []);

  return width;
}// hocs/withHasMounted.js
import React from 'react';
export default function withHasMounted(Component) {
class WrapperComponent extends React.Component {
state = {
hasMounted: false,
};
componentDidMount() {
this.setState({
hasMounted: true,
});
}
render() {
const { hasMounted } = this.state;
return <Component {...this.props} hasMounted={hasMounted} />;
}
}
WrapperComponent.displayName = `withHasMounted(${Component.name})`;
return WrapperComponent;
}
// hooks/useHasMounted.js

import { useState, useEffect } from 'react';

export default function useHasMounted() {
  const [hasMounted, setHasMounted] = useState(false);
  useEffect(() => {
    setHasMounted(true);
  }, []);

  return hasMounted;
}
useReducer
useCallback, useMemo
useRef, useImperativeHandle,
useLayoutEffect
useDebugValue
다수의 하윗값을 포함하는 복잡한 정적 로직을 만드는 경우
다음 state가 이전 state에 의존적인 경우
Redux 를 안다면 쉽게 사용 가능
import React, { useReducer, useEffect } from 'react';

const Example8 = ({ count }) => {
  const [state, dispatch] = useReducer(reducer, { count });
  useEffect(() => {
    setTimeout(() => {
      dispatch({ type: 'PLUS' });
    }, 2000);
  }, []);

  function click() {
    dispatch({ type: 'PLUS' });
  }

  return (
    <div>
      <p>You clicked {state.count} times</p>
      <button onClick={click}>Click me</button>
    </div>
  );
};

export default Example8;
const reducer = (state, action) => {
  if (action.type === 'PLUS') {
    return {
      count: state.count + 1,
    };
  }
  return state;
};
import React, { useState } from 'react';

function sum(persons) {
  console.log('sum...');
  return persons.map(person => person.age).reduce((l, r) => l + r, 0);
}

const Example9 = () => {
  const [value, setValue] = useState('');
  const [persons] = useState([{ name: 'Mark', age: 38 }, { name: 'Hanna', age: 27 }]);

  function change(e) {
    setValue(e.target.value);
  }

  const count = sum(persons);

  return (
    <div>
      <input value={value} onChange={change} />
      <p>{count}</p>
    </div>
  );
};

export default Example9;
import React, { useState, useMemo } from 'react';

function sum(persons) {
  console.log('sum...');
  return persons.map(person => person.age).reduce((l, r) => l + r, 0);
}

const Example9 = () => {
  const [value, setValue] = useState('');
  const [persons] = useState([{ name: 'Mark', age: 38 }, { name: 'Hanna', age: 27 }]);

  function change(e) {
    setValue(e.target.value);
  }

  const count = useMemo(() => sum(persons), [persons]);

  return (
    <div>
      <input value={value} onChange={change} />
      <p>{count}</p>
    </div>
  );
};

export default Example9;
import React, { useState } from 'react';

const Example10 = () => {
  const [value, setValue] = useState('');
  const [persons, setPersons] = useState([
    { id: 0, name: 'Mark', age: 38 },
    { id: 1, name: 'Hanna', age: 27 },
  ]);

  function change(e) {
    setValue(e.target.value);
  }

  function click(id) {
    setPersons(
      persons => persons.map(person =>
        person.id === id
          ? { ...person, age: person.age + 1 }
          : { ...person },
      )
    );
  }

  return (
    <div>
      <input value={value} onChange={change} />
      {persons.map(person => (
        <Person {...person} key={person.id} click={click} />
      ))}
    </div>
  );
};

export default Example10;
const Person = React.memo(({ id, name, age, click }) => {
  console.log('Person...');
  function onClick() {
    click(id);
  }
  return (
    <div>
      {name}, {age} <button onClick={onClick}>+</button>
    </div>
  );
});
import React, { useState } from 'react';

const Example10 = () => {
  const [value, setValue] = useState('');
  const [persons, setPersons] = useState([
    { id: 0, name: 'Mark', age: 38 },
    { id: 1, name: 'Hanna', age: 27 },
  ]);

  function change(e) {
    setValue(e.target.value);
  }

  const click = useCallback(id => {
    setPersons(persons => {
      return persons.map(person =>
        person.id === id
          ? {
              ...person,
              age: person.age + 1,
            }
          : {
              ...person,
            },
      );
    });
  }, []);

  return (
    <div>
      <input value={value} onChange={change} />
      {persons.map(person => (
        <Person {...person} key={person.id} click={click} />
      ))}
    </div>
  );
};

export default Example10;
const Person = React.memo(({ id, name, age, click }) => {
  console.log('Person...');
  function onClick() {
    click(id);
  }
  return (
    <div>
      {name}, {age} <button onClick={onClick}>+</button>
    </div>
  );
});
import React, { useRef, useEffect, useState } from 'react';

const Example11 = () => {
  const [count, setCount] = useState(0);
  const inputCreateRef = React.createRef();
  const inputUseRef = useRef();
  console.log(inputCreateRef.current);
  console.log(inputUseRef.current);
  useEffect(() => {
    setTimeout(() => {
      setCount(count => count + 1);
    }, 1000);
  });
  return (
    <div>
      <p>{count}</p>
      <input ref={inputCreateRef} />
      <input ref={inputUseRef} />
    </div>
  );
};

export default Example11;
npx create-react-app component-communication<A /> 컴포넌트에서 button 에 onClick 이벤트를 만들고,
button 을 클릭하면, <A /> 의 state 를 변경하여, <B /> 로 내려주는 props 를 변경
<B /> 의 props 가 변경되면, <C /> 의 props 에 전달
<C /> 의 props 가 변경되면, <D /> 의 props 로 전달
<D /> 의 props 가 변경되면, <E /> 의 props 로 전달
// A 컴포넌트
<div>
    <B />
    <button>클릭</button>
</div>
// B 컴포넌트
<div>
<C />
</div>// C 컴포넌트
<div>
<D />
</div>// D 컴포넌트
<div>
<E />
</div>// E 컴포넌트
<div>
{props.value}
</div>import React from "react";
class A extends React.Component {
state = {
value: "아직 안바뀜"
};
render() {
console.log("A render");
return (
<div>
<B {...this.state} />
<button onClick={this._click}>E 의 값을 바꾸기</button>
</div>
);
}
_click = () => {
this.setState({
value: "E 의 값을 변경"
});
};
}
export default A;
const B = props => (
  <div>
    <p>여긴 B</p>
    <C {...props} />
  </div>
);

const C = props => (
  <div>
    <p>여긴 C</p>
    <D {...props} />
  </div>
);

const D = props => (
  <div>
    <p>여긴 D</p>
    <E {...props} />
  </div>
);

const E = props => (
  <div>
    <p>여긴 E</p>
    <h3>{props.value}</h3>
  </div>
);<A /> 에 함수를 만들고, 그 함수 안에 state 를 변경하도록 구현, 그 변경으로 인해 p 안의 내용을 변경.
만들어진 함수를 props 에 넣어서, <B /> 로 전달
<B /> 의 props 의 함수를 <C /> 의 props 로 전달
<C /> 의 props 의 함수를 <D /> 의 props 로 전달
<D /> 의 Props 의 함수를 <E /> 의 props 로 전달, <E /> 에서 클릭하면 props 로 받은 함수를 실행
// A 컴포넌트
<div>
    <B />
    <p>{state.value}</p>
</div>
// B 컴포넌트
<div>
<C />
</div>// C 컴포넌트
<div>
<D />
</div>// D 컴포넌트
<div>
<E />
</div>// E 컴포넌트
<div>
<button>클릭</button>
</div>import React from "react";
class A extends React.Component {
state = {
value: "아직 안바뀜"
};
render() {
console.log("A render");
return (
<div>
<h3>{this.state.value}</h3>
<B change={this.change} />
</div>
);
}
change = () => {
this.setState({
value: "A 의 값을 변경"
});
};
}
export default A;
const B = props => (
  <div>
    <p>여긴 B</p>
    <C {...props} />
  </div>
);

const C = props => (
  <div>
    <p>여긴 C</p>
    <D {...props} />
  </div>
);

const D = props => (
  <div>
    <p>여긴 D</p>
    <E {...props} />
  </div>
);

const E = props => {
  function click() {
    props.change();
  }
  return (
    <div>
      <p>여긴 E</p>
      <button onClick={click}>클릭</button>
    </div>
  );
};
npx create-react-app react-context-example데이터를 Set 하는 놈
가장 상위 컴포넌트 => 프로바이더
데이터를 Get 하는 놈
모든 하위 컴포넌트에서 접근 가능
컨슈머로 하는 방법
클래스 컴포넌트의 this.context 로 하는 방법
펑셔널 컴포넌트의 useContext 로 하는 방법
일단 컨텍스트를 생성한다.
컨텍스트.프로바이더 를 사용한다.
value 를 사용
import React from 'react';

const PersonContext = React.createContext();

export default PersonContext;
import React from 'react';
import ReactDOM from 'react-dom';
import './index.css';
import App from './App';
import * as serviceWorker from './serviceWorker';
import PersonContext from './contexts/PersonContext';

const persons = [
  { id: 0, name: 'Mark', age: 38 },
  { id: 1, name: 'Hanna', age: 27 },
];

ReactDOM.render(
  <PersonContext.Provider value={persons}>
    <App />
  </PersonContext.Provider>,
  document.getElementById('root'),
);

// If you want your app to work offline and load faster, you can change
// unregister() to register() below. Note this comes with some pitfalls.
// Learn more about service workers: https://bit.ly/CRA-PWA
serviceWorker.unregister();
컨텍스트를 가져온다.
컨텍스트.컨슈머를 사용한다.
value 를 사용
import React from 'react';
import PersonContext from '../contexts/PersonContext';

const Example1 = () => (
  <PersonContext.Consumer>
    {value => <ul>{JSON.stringify(value)}</ul>}
  </PersonContext.Consumer>
);

export default Example1;
import React from 'react';
import logo from './logo.svg';
import './App.css';
import Example1 from './components/Example1';

export default function App() {
  return (
    <div className="App">
      <header className="App-header">
        <img src={logo} className="App-logo" alt="logo" />
        <Example1 />
      </header>
    </div>
  );
}static contextType 에 컨텍스트를 설정한다.
this.context => value 이다.
import React from 'react';
import PersonContext from '../contexts/PersonContext';

export default class Example2 extends React.Component {
  static contextType = PersonContext;

  render() {
    return <ul>{JSON.stringify(this.context)}</ul>;
  }
}

// Example2.contextType = PersonContext;
import React from 'react';
import logo from './logo.svg';
import './App.css';
import Example1 from './components/Example1';
import Example2 from './components/Example2';
export default function App() {
return (
<div className="App">
<header className="App-header">
<img src={logo} className="App-logo" alt="logo" />
<Example1 />
<Example2 />
</header>
</div>
);
}
useContext 로 컨텍스트를 인자로 호출한다.
useContext 의 리턴이 value 이다.
import React, { useContext } from 'react';
import PersonContext from '../contexts/PersonContext';

const Example3 = () => {
  const value = useContext(PersonContext);

  return <ul>{JSON.stringify(value)}</ul>;
};

export default Example3;
import React from 'react';
import logo from './logo.svg';
import './App.css';
import Example1 from './components/Example1';
import Example2 from './components/Example2';
import Example3 from './components/Example3';

export default function App() {
  return (
    <div className="App">
      <header className="App-header">
        <img src={logo} className="App-logo" alt="logo" />
        <Example1 />
        <Example2 />
        <Example3 />
      </header>
    </div>
  );
}
필요할 때만 랜더한다.
랜더 전후의 일치 여부를 판단하는 규칙
서로 다른 타입의 두 엘리먼트는 서로 다른 트리를 만들어낸다.
개발자가 key prop 을 통해,
여러 렌더링 사이에서 어떤 자식 엘리먼트가 변경되지 않아야 할지 표시해 줄 수 있다.
class App extends React.Component {
  state = {
    count: 0
  };
  componentDidMount() {
    setInterval(() => {
      this.setState({
        count: this.state.count + 1
      });
    }, 1000);
  }
  render() {
    if (this.state.count % 2 === 0) {
      return (
        <div>
          <Foo />
        </div>
      );
    }
    return (
      <span>
        <Foo />
      </span>
    );
  }
}
class Foo extends React.Component {
componentDidMount() {
console.log("Foo componentDidMount");
}
componentWillUnmount() {
console.log("Foo componentWillUnmount");
}
render() {
return <p>Foo</p>;
}
}class App extends React.Component {
state = {
count: 0
};
componentDidMount() {
setInterval(() => {
this.setState({
count: this.state.count + 1
});
}, 1000);
}
render() {
if (this.state.count % 2 === 0) {
return <div className="before" title="stuff" />;
}
return <div className="after" title="stuff" />;
}
}class App extends React.Component {
state = {
count: 0
};
componentDidMount() {
setInterval(() => {
this.setState({
count: this.state.count + 1
});
}, 1000);
}
render() {
if (this.state.count % 2 === 0) {
return <div style={{ color: "red", fontWeight: "bold" }} />;
}
return <div style={{ color: "green", fontWeight: "bold" }} />;
}
}class App extends React.Component {
state = {
count: 0
};
componentDidMount() {
setInterval(() => {
this.setState({
count: this.state.count + 1
});
}, 1000);
}
render() {
if (this.state.count % 2 === 0) {
return <Foo name="Mark" />;
}
return <Foo name="Anna" />;
}
}class Foo extends React.Component {
state = {};
componentDidMount() {
console.log("Foo componentDidMount");
}
componentWillUnmount() {
console.log("Foo componentWillUnmount");
}
static getDerivedStateFromProps(nextProps, prevState) {
console.log("Foo getDerivedStateFromProps", nextProps, prevState);
return {};
}
render() {
console.log("Foo render");
return <p>Foo</p>;
}
}class App extends React.Component {
state = {
count: 0
};
componentDidMount() {
setTimeout(() => {
this.setState({
count: this.state.count + 1
});
}, 3000);
}
render() {
if (this.state.count % 2 === 0) {
return (
<ul>
<Foo>first</Foo>
<Foo>second</Foo>
</ul>
);
}
return (
<ul>
<Foo>first</Foo>
<Foo>second</Foo>
<Foo>third</Foo>
</ul>
);
}
}class Foo extends React.Component {
state = {};
componentDidMount() {
console.log("Foo componentDidMount", this.props.children);
}
componentWillUnmount() {
console.log("Foo componentWillUnmount");
}
static getDerivedStateFromProps(nextProps, prevState) {
console.log("Foo getDerivedStateFromProps", nextProps, prevState);
return {};
}
render() {
console.log("Foo render", this.props.children);
return <p>{this.props.children}</p>;
}
}class App extends React.Component {
state = {
count: 0
};
componentDidMount() {
setTimeout(() => {
this.setState({
count: this.state.count + 1
});
}, 3000);
}
render() {
if (this.state.count % 2 === 0) {
return (
<ul>
<Foo>second</Foo>
<Foo>third</Foo>
</ul>
);
}
return (
<ul>
<Foo>first</Foo>
<Foo>second</Foo>
<Foo>third</Foo>
</ul>
);
}
}class Foo extends React.Component {
state = {};
componentDidMount() {
console.log("Foo componentDidMount", this.props.children);
}
componentWillUnmount() {
console.log("Foo componentWillUnmount");
}
static getDerivedStateFromProps(nextProps, prevState) {
console.log("Foo getDerivedStateFromProps", nextProps, prevState);
return {};
}
render() {
console.log("Foo render", this.props.children);
return <p>{this.props.children}</p>;
}
}class App extends React.Component {
state = {
count: 0
};
componentDidMount() {
setTimeout(() => {
this.setState({
count: this.state.count + 1
});
}, 3000);
}
render() {
if (this.state.count % 2 === 0) {
return (
<ul>
<Foo key="2">second</Foo>
<Foo key="3">third</Foo>
</ul>
);
}
return (
<ul>
<Foo key="1">first</Foo>
<Foo key="2">second</Foo>
<Foo key="3">third</Foo>
</ul>
);
}
}class Foo extends React.Component {
state = {};
componentDidMount() {
console.log("Foo componentDidMount", this.props.children);
}
componentWillUnmount() {
console.log("Foo componentWillUnmount");
}
static getDerivedStateFromProps(nextProps, prevState) {
console.log("Foo getDerivedStateFromProps", nextProps, prevState);
return {};
}
render() {
console.log("Foo render", this.props.children);
return <p>{this.props.children}</p>;
}
}class App extends React.Component {
state = {
text: "",
persons: [
{ id: 1, name: "Mark", age: 37 },
{ id: 2, name: "Anna", age: 26 },
]
};
render() {
console.log("App render");
const { text, persons } = this.state;
return (
<div>
<input type="text" value={text} onChange={this._change} />
<button onClick={this._click}>click</button>
<ul>
{persons.map(p => (
<Person {...p} key={p.id} />
))}
</ul>
</div>
);
}
_change = e => {
this.setState({
...this.state,
text: e.target.value
});
};
_click = () => {
console.log(this.state.text);
};
}class Person extends React.Component {
render() {
console.log("Person render");
const { name, age } = this.props;
return (
<ul>
{name} / {age}
</ul>
);
}
}class App extends React.Component {
state = {
text: "",
persons: [
{ id: 1, name: "Mark", age: 37 },
{ id: 2, name: "Anna", age: 26 },
]
};
render() {
console.log("App render");
const { text, persons } = this.state;
return (
<div>
<input type="text" value={text} onChange={this._change} />
<button onClick={this._click}>click</button>
<ul>
{persons.map(p => (
<Person {...p} key={p.id} />
))}
</ul>
</div>
);
}
_change = e => {
this.setState({
...this.state,
text: e.target.value
});
};
_click = () => {
console.log(this.state.text);
};
}class Person extends React.Component {
shouldComponentUpdate(previousProps) {
for (const key in this.props) {
if (previousProps[key] !== this.props[key]) {
return true;
}
}
return false;
}
render() {
console.log("Person render");
const { name, age } = this.props;
return (
<ul>
{name} / {age}
</ul>
);
}
}class App extends React.Component {
state = {
text: "",
persons: [
{ id: 1, name: "Mark", age: 37 },
{ id: 2, name: "Anna", age: 26 },
]
};
render() {
console.log("App render");
const { text, persons } = this.state;
return (
<div>
<input type="text" value={text} onChange={this._change} />
<button onClick={this._click}>click</button>
<ul>
{persons.map(p => (
<Person {...p} key={p.id} />
))}
</ul>
</div>
);
}
_change = e => {
this.setState({
...this.state,
text: e.target.value
});
};
_click = () => {
console.log(this.state.text);
};
}class Person extends React.PureComponent {
render() {
console.log("Person render");
const { name, age } = this.props;
return (
<ul>
{name} / {age}
</ul>
);
}
}class App extends React.Component {
state = {
text: "",
persons: [
{ id: 1, name: "Mark", age: 37 },
{ id: 2, name: "Anna", age: 26 },
]
};
render() {
console.log("App render");
const { text, persons } = this.state;
return (
<div>
<input type="text" value={text} onChange={this._change} />
<button onClick={this._click}>click</button>
<ul>
{persons.map(p => (
<Person {...p} key={p.id} onClick={() => {}} />
))}
</ul>
</div>
);
}
_change = e => {
this.setState({
...this.state,
text: e.target.value
});
};
_click = () => {
console.log(this.state.text);
};
}const Person = React.memo(props => {
console.log("Person render");
const { name, age } = props;
return (
<ul>
{name} / {age}
</ul>
);
});<!DOCTYPE html>
<html lang="en">
<head>
...
<title>React App</title>
</head>
<body>
<noscript>You need to enable JavaScript to run this app.</noscript>
<div id="root"></div>
<div id="modal"></div>
</body>
</html>
body {...}
#modal {
position: absolute;
top: 0;
left: 0;
}
import ReactDOM from 'react-dom';
const Modal = ({ children }) =>
ReactDOM.createPortal(children, document.querySelector('#modal'));
export default Modal;
const Home = () => {
const [visible, setVisible] = useState(false);
const show = () => setVisible(true);
const hide = () => setVisible(false);
return (
<div>
<h1>Home</h1>
<button onClick={click}>open</button>
<NaviContainer />
<BooksContainer />
{visible && (
<Modal>
<div
style={{
width: '100vw',
height: '100vh',
background: 'rgba(0, 0, 0, 0.5)',
}}
onClick={hide}
>
Hello
</div>
</Modal>
)}
</div>
);
};SPA Deploy
git clone https://github.com/xid-mark/tic-tac-toe.git
cd tic-tac-toe
npm ci
npm run buildnpm install serve -g
serve -s build{
"Version": "2012-10-17",
"Statement": [
{
"Sid": "PublicReadGetObject",
"Effect": "Allow",
"Principal": "*",
"Action": [
"s3:GetObject"
],
"Resource": [
"arn:aws:s3:::react-camp/*"
]
}
]
}sudo apt-get update
sudo apt-get upgrade
wget http://nginx.org/keys/nginx_signing.key
sudo apt-key add nginx_signing.key
sudo rm -rf nginx_signing.key
sudo nano /etc/apt/sources.list
```
deb http://nginx.org/packages/mainline/ubuntu/ trusty nginx
deb-src http://nginx.org/packages/mainline/ubuntu/ trusty nginx
```
sudo apt-get update
sudo apt-get upgrade
sudo apt-get install nginx
nginx -vserver {
listen 80;
server_name localhost;
root /home/ubuntu/tic-tac-toe/build;
index index.html;
location / {
try_files $uri $uri/ /index.html;
}
}npm i expressconst express = require('express');
const path = require('path');
const app = express();
app.use(express.static(path.join(__dirname, 'build')));
// app.get('/', function(req, res) {
app.get('*', function(req, res) {
res.sendFile(path.join(__dirname, 'build', 'index.html'));
});
app.listen(9000);
By Woongjae Lee
리액트 기업교육


