


Woongjae Lee
Daangn - Frontend Core Team ex) NHN Dooray - Frontend Team Leader ex) ProtoPie - Studio Team
2woongjae@gmail.com
2017.07
2018.01
import {observable} from 'mobx';
export class AgeState {
@observable private _age = 35;
constructor(age: number) {
this._age = age;
}
public getAge(): number {
return this._age;
}
public setAge(age: number): void {
this._age = age;
}
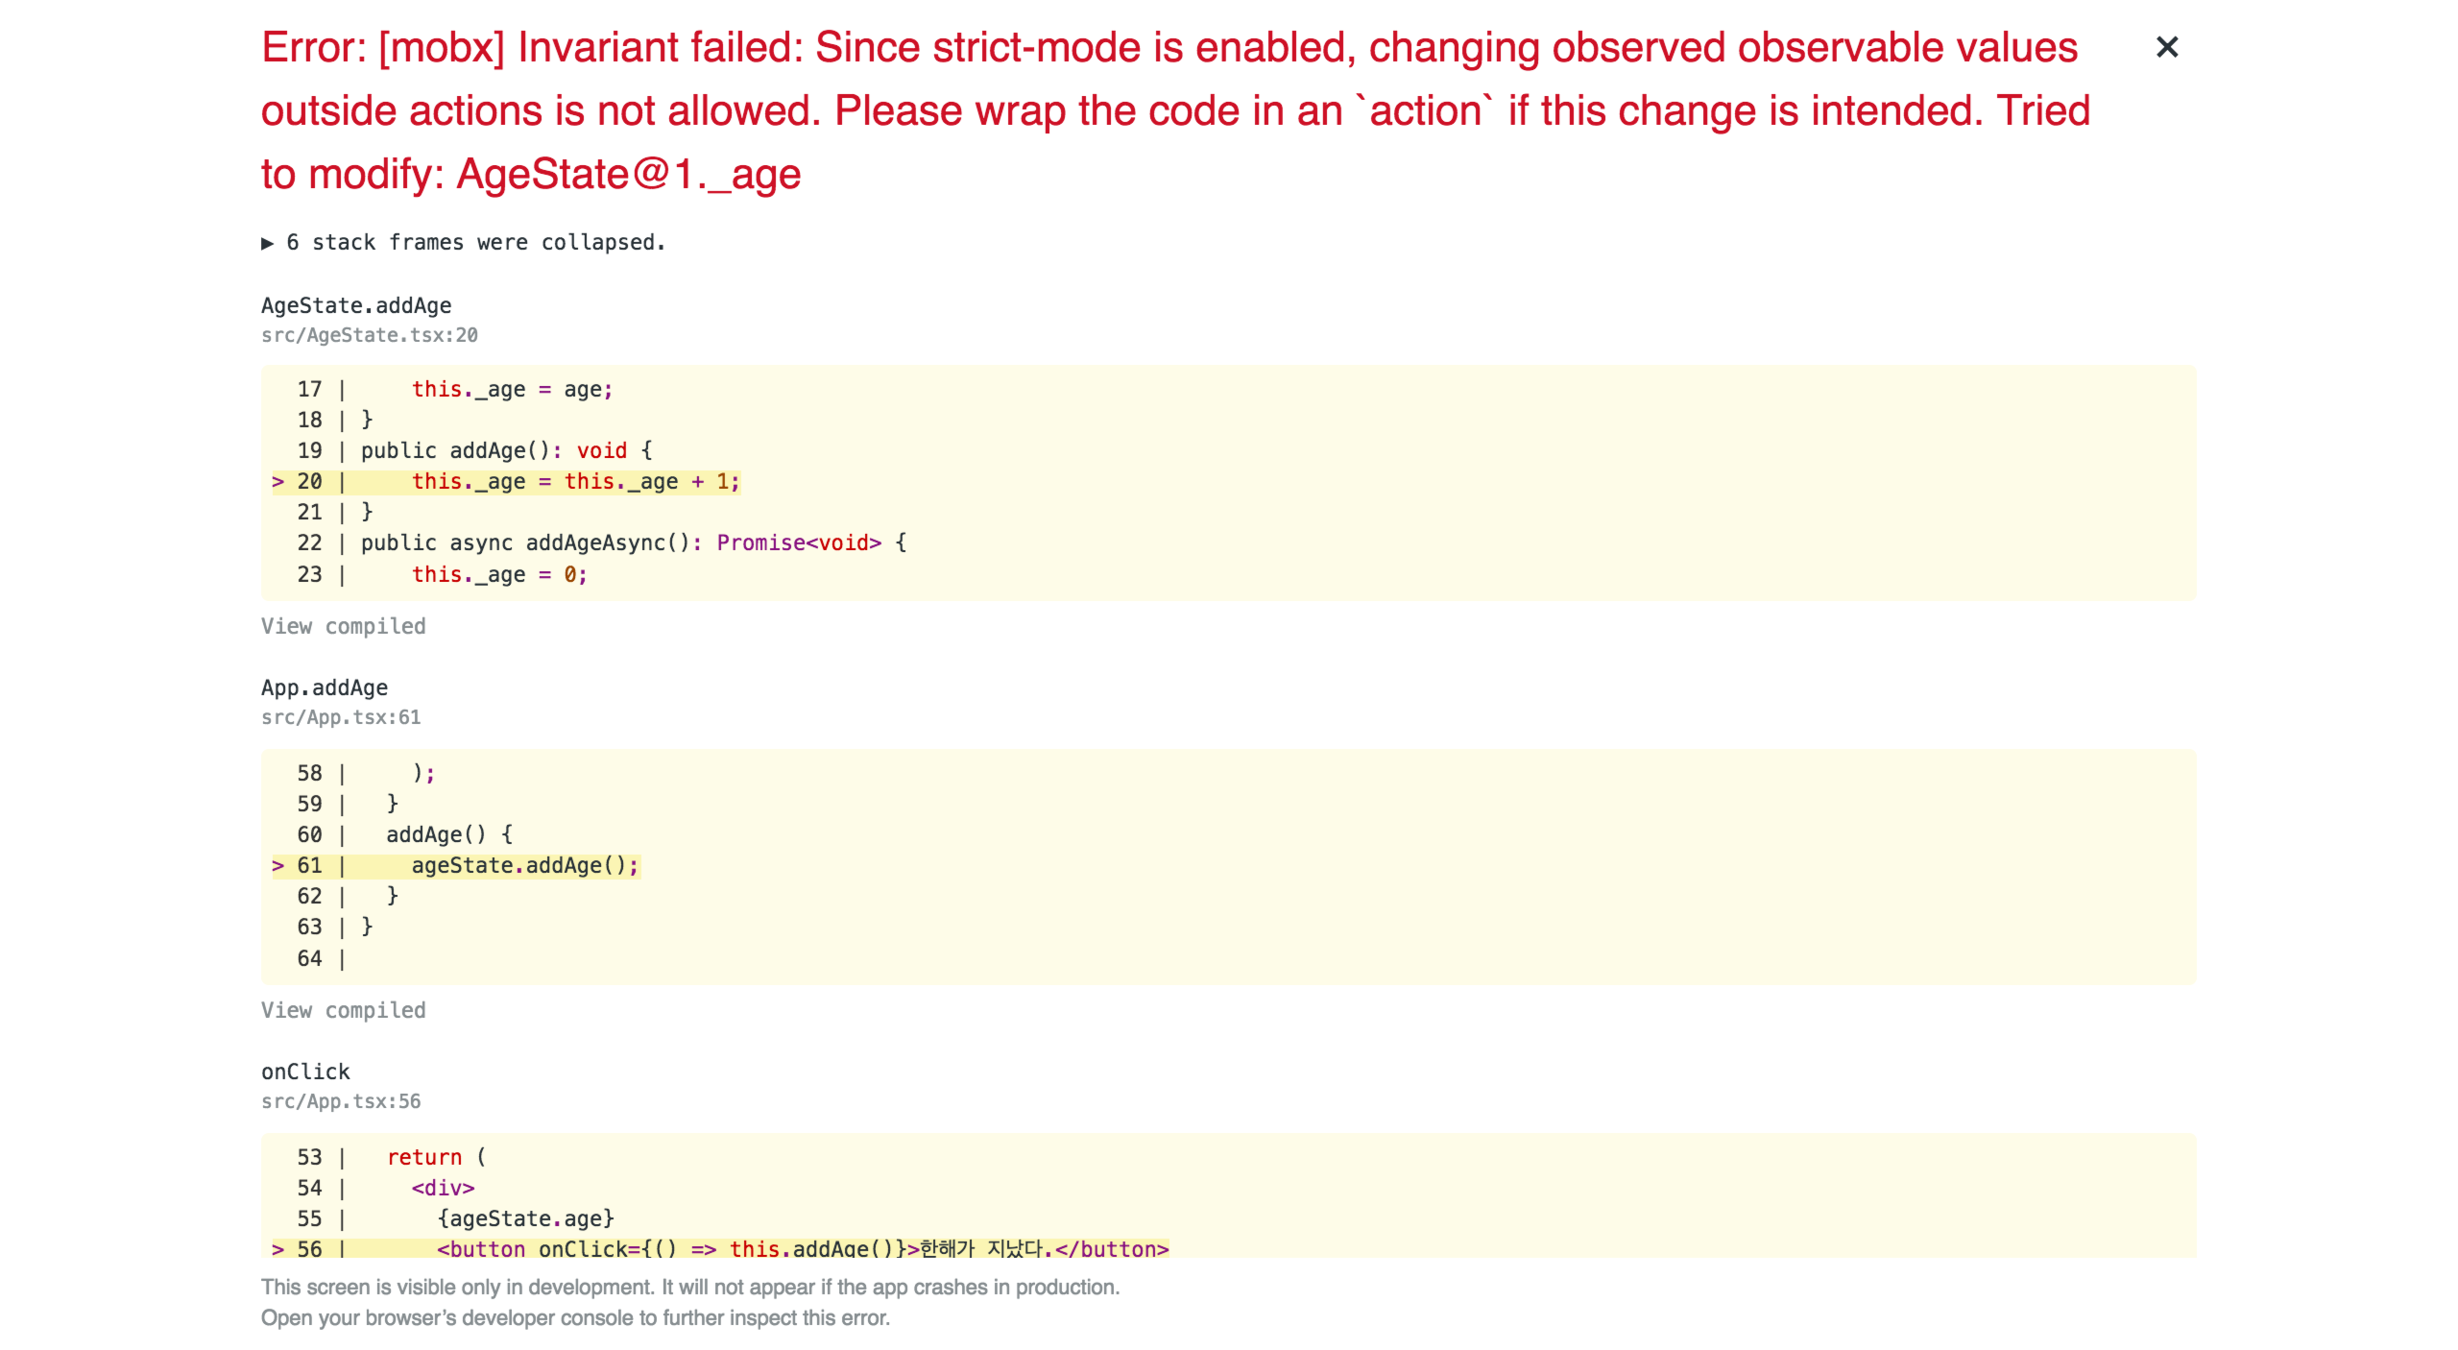
public addAge(): void {
this._age = this._age + 1;
}
}import * as React from 'react';
import './App.css';
import {AgeState} from './AgeState';
import {observer} from 'mobx-react';
const logo = require('./logo.svg');
const ageState = new AgeState(35);
@observer class App extends React.Component<{}, {}> {
constructor(props: {}) {
super(props);
this.addAge = this.addAge.bind(this);
}
render() {
return (
<div className="App">
<div className="App-header">
<img src={logo} className="App-logo" alt="logo" />
<h2>Welcome to React</h2>
</div>
<p className="App-intro">
{ageState.getAge()}
<button onClick={() => this.addAge()}>한해가 지났다.</button>
</p>
</div>
);
}
addAge() {
const age = ageState.getAge();
ageState.setAge(age + 1);
// ageState.addAge();
}
}
export default App;~/Project/workshop-201801
➜ npx create-react-app mobx-ts-quick-start --scripts-version=react-scripts-ts
~/Project/workshop-201801 took 1m 47s
➜ cd mobx-ts-quick-start/
Project/workshop-201801/mobx-ts-quick-start is 📦 v0.1.0 via ⬢ v8.9.4
➜ npm i mobx mobx-react -D
+ mobx-react@4.3.5
+ mobx@3.4.1
added 3 packages in 12.528s
Project/workshop-201801/mobx-ts-quick-start is 📦 v0.1.0 via ⬢ v8.9.4 took 13s
➜ npm install autobind-decorator -D
+ autobind-decorator@2.1.0
added 1 package in 9.727s{
"compilerOptions": {
"outDir": "build/dist",
"module": "esnext",
"target": "es5",
"lib": ["es6", "dom"],
"sourceMap": true,
"allowJs": true,
"jsx": "react",
"moduleResolution": "node",
"rootDir": "src",
"forceConsistentCasingInFileNames": true,
"noImplicitReturns": true,
"noImplicitThis": true,
"noImplicitAny": true,
"strictNullChecks": true,
"suppressImplicitAnyIndexErrors": true,
"noUnusedLocals": true,
"experimentalDecorators": true
},
"exclude": [
"node_modules",
"build",
"scripts",
"acceptance-tests",
"webpack",
"jest",
"src/setupTests.ts"
]
}
import * as React from 'react';
import * as ReactDOM from 'react-dom';
import App from './App';
import registerServiceWorker from './registerServiceWorker';
import './index.css';
import { observable, action, useStrict } from 'mobx';
import { Provider } from 'mobx-react';

useStrict(true);

export class Store {
  @observable test: number[] = [];
  @action
  add(): void {
    this.test.push(Math.round(Math.random() * 100));
  }
}

const store = new Store();

ReactDOM.render(
  <Provider store={store}>
    <App />
  </Provider>,
  document.getElementById('root') as HTMLElement
);
registerServiceWorker();
import * as React from 'react';
import autobind from 'autobind-decorator';
import { observer, inject } from 'mobx-react';
import './App.css';
import { Store } from './index';

interface AppProps {
  store?: Store;
}

@inject('store')
@observer
class App extends React.Component<AppProps, {}> {
  render() {
    const store = this.props.store as Store;
    return (
      <div className="App">
        <p>{JSON.stringify(store.test)}</p>
        <button onClick={this.click}>추가</button>
      </div>
    );
  }
  @autobind
  click() {
    const store = this.props.store as Store;
    store.add();
  }
}

export default App;
import { observable } from 'mobx';

// array 에 사용
const list = observable([1, 2, 4]);

// boolean 에 사용
const isLogin = observable(true);

// literal 객체에 사용
const age = observable({
    age: 35
});

// 클래스의 멤버 변수에 데코레이터로 사용
class AgeStore {
    @observable
    private _age = 35;
}

const ageStore = new AgeStore();const StatelessApp = observer(() => {
function addAge(): void {
ageState.addAge();
}
return (
<div>
{ageState.getAge()}
<button onClick={() => addAge()}>한해가 지났다.</button>
</div>
);
});
@observer
class App extends React.Component<{}, {}> {
constructor(props: {}) {
super(props);
this.addAge = this.addAge.bind(this);
}
render() {
return (
<div>
{ageState.getAge()}
<button onClick={() => this.addAge()}>한해가 지났다.</button>
</div>
);
}
addAge() {
ageState.addAge();
}
}class AgeState {
constructor() {
extendObservable(this, {
_age: 35,
age: computed(function() {
return (this._age > 40) ? this._age : 0;
})
})
}
}
class AgeState {
@observable private _age: number = 35;
@computed
get age(): number {
return (this._age > 40) ? this._age : 0;
}
}ref.child('todos').on('value', action((snapshot: firebase.database.DataSnapshot) => {
if (snapshot) {
const list = snapshot.val();
const todos = [];
if (list !== null) {
for (const key of Object.keys(list)) {
todos.push({
id: key,
text: list[key]
});
}
}
this.todos = todos;
}
}));
@action addTodo = (text: string) => {
const ref = db.ref();
ref.child('todos').push().set(text);
}ReactDOM.render(
<Provider store={ageState}>
<App />
</Provider>,
document.getElementById('root') as HTMLElement
);
@inject('store')
@observer
class App extends React.Component<{ store?: IAgeState; }, {}> {
render() {
const store = this.props.store as IAgeState;
return (
<div className="App">
<DevTools />
<p className="App-intro">
{store.age}
<button onClick={() => store.addAge()}>한해가 지났다.</button>
<button onClick={() => store.addAgeAsync()}>깃헙 비동기 호출</button>
</p>
</div>
);
}
}~/Project/workshop-201801
➜ npx create-react-app mobx-ts-todo --scripts-version=react-scripts-ts
~/Project/workshop-201801 took 1m 47s
➜ cd mobx-ts-todo/
Project/workshop-201801/mobx-ts-todo is 📦 v0.1.0 via ⬢ v8.9.4
➜ npm i mobx mobx-react -D
+ mobx@3.4.1
+ mobx-react@4.3.5
added 3 packages in 13.521s
Project/workshop-201801/mobx-ts-todo is 📦 v0.1.0 via ⬢ v8.9.4
➜ npm i firebase -D
> grpc@1.8.4 install /Users/mark/Project/workshop-201801/mobx-ts-todo/node_modules/grpc
> node-pre-gyp install --fallback-to-build --library=static_library
[grpc] Success: "/Users/mark/Project/workshop-201801/mobx-ts-todo/node_modules/grpc/src/node/extension_binary/node-v57-darwin-x64-unknown/grpc_node.node" is installed via remote
+ firebase@4.9.0
added 144 packages in 32.816s
Project/workshop-201801/mobx-ts-todo is 📦 v0.1.0 via ⬢ v8.9.4 took 34s
➜ npm install autobind-decorator -D
+ autobind-decorator@2.1.0
added 1 package in 8.553simport { observable } from 'mobx';
export class TodoStore {
@observable todos = [];
}
export default new TodoStore();import * as React from 'react';
import * as ReactDOM from 'react-dom';
import App from './App';
import registerServiceWorker from './registerServiceWorker';
import './index.css';
import { useStrict } from 'mobx';
import { Provider } from 'mobx-react';
import todoStore from './stores/todoStore';
useStrict(true);
ReactDOM.render(
<Provider todoStore={todoStore}>
<App />
</Provider>,
document.getElementById('root') as HTMLElement
);
registerServiceWorker();
import * as React from 'react';
import { observer } from 'mobx-react';
import autobind from 'autobind-decorator';

interface TodoInputProps {
  addTodo(text: string): void;
}

@observer
class TodoInput extends React.Component<TodoInputProps, {}> {
  private _input: HTMLInputElement;
  render() {
    return (
      <div>
        <input
          type="text"
          ref={ref => (this._input = ref as HTMLInputElement)}
        />
        <button onClick={this._addTodo}>저장</button>
      </div>
    );
  }
  @autobind
  private _addTodo(): void {
    const input = this._input;
    if (input.value !== '') {
      this.props.addTodo(input.value);
      input.value = '';
    }
  }
}

export default TodoInput;
import * as React from 'react';
import { observer } from 'mobx-react';

interface TodoListProps {
  todos: { id: string; text: string }[];
  deleteTodo(id: string): void;
}

@observer
class TodoInput extends React.Component<TodoListProps, {}> {
  render() {
    const list = this.props.todos.map(todo => (
      <li key={todo.id}>
        {todo.text}
        <button onClick={() => this.props.deleteTodo(todo.id)}>삭제</button>
      </li>
    ));
    return (
      <div>
        <ul>{list}</ul>
      </div>
    );
  }
}

export default TodoInput;
{
  "rules": {
    ".read": true,
    ".write": true
  }
}import { observable, action } from 'mobx';
import * as firebase from 'firebase';
import autobind from 'autobind-decorator';
const config = {
apiKey: 'AIzaSyD4Ywl6RRaFrSy8ZXL10hsSl6orA2PF5hc',
databaseURL: 'https://mobx-ts-todo.firebaseio.com',
projectId: 'mobx-ts-todo'
};
firebase.initializeApp(config);
const db: firebase.database.Database = firebase.database();
export class TodoStore {
@observable todos: { id: string; text: string }[] = [];
constructor() {
const ref = db.ref();
ref.child('todos').on(
'value',
action((snapshot: firebase.database.DataSnapshot) => {
if (snapshot) {
const list = snapshot.val();
const todos = [];
if (list !== null) {
for (const key of Object.keys(list)) {
todos.push({
id: key,
text: list[key]
});
}
}
this.todos = todos;
}
})
);
}
@autobind
@action
addTodo(text: string) {
const ref = db.ref();
ref
.child('todos')
.push()
.set(text);
}
@autobind
@action
deleteTodo(id: string) {
const ref = db.ref();
ref
.child('todos')
.child(id)
.remove();
}
}
export default new TodoStore();
import * as React from 'react';
import { observer, inject } from 'mobx-react';
import TodoInput from '../components/TodoInput';
import TodoList from '../components/TodoList';
import { TodoStore } from '../stores/todoStore';

interface TodoProps {
  todoStore?: TodoStore;
}

@inject('todoStore')
@observer
class Todo extends React.Component<TodoProps, {}> {
  render() {
    const todoStore = this.props.todoStore as TodoStore;
    return (
      <div className="App">
        <TodoInput addTodo={todoStore.addTodo} />
        <TodoList todos={todoStore.todos} deleteTodo={todoStore.deleteTodo} />
      </div>
    );
  }
}

export default Todo;
By Woongjae Lee
코드버스킹 워크샵 - React with TypeScript 세번째 (2018년 1월 버전)


