Route Resolver
by Kumar Ratnam Pandey
Introduction
Angular provides Navigation Guards, which let us control the navigation flow of our application’s users. Guards like CanActivate, CanDeactivate and CanLoad are great when it comes to taking the decision if a user is allowed to activate a certain route, leaving a certain route, or even asynchronously loading a route.
However, one thing that these guards don’t allow us to do, is to ensure that certain data is loaded before a route is actually activated. For example, in a contacts application where we’re able to click on a contact to view a contact’s details, the contact data should’ve been loaded before the component we’re routing to is instantiated, otherwise we might end up with a UI that already renders its view and a few moments later, the actual data arrives. Route resolvers allow us to do exactly that and in upcoming slides we’re going to explore how they work!
Defining Resolvers
As mentioned earlier, route resolvers allow us to provide the needed data for a route, before the route is activated. There are different ways to create a resolver and we’ll start with the easiest: a function. A resolver is a function that returns either Observable<any>, Promise<any> or just data.
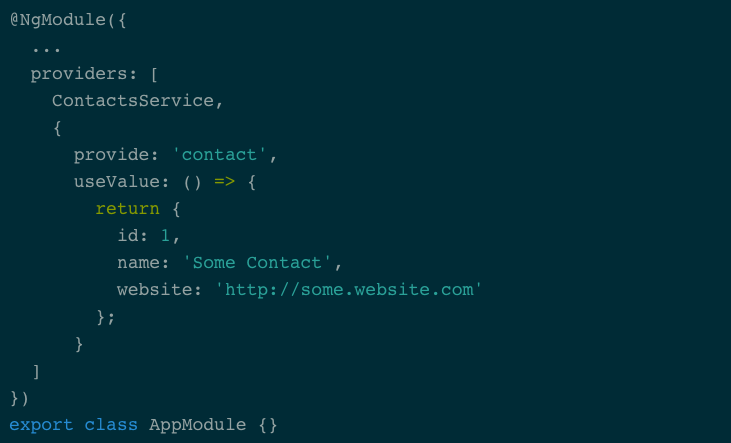
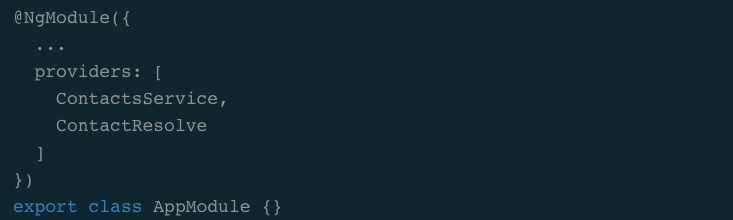
Resolvers need to be registered via providers.
Here’s a resolver function that resolves with a static contact object:
Defining Resolvers (Contd.)
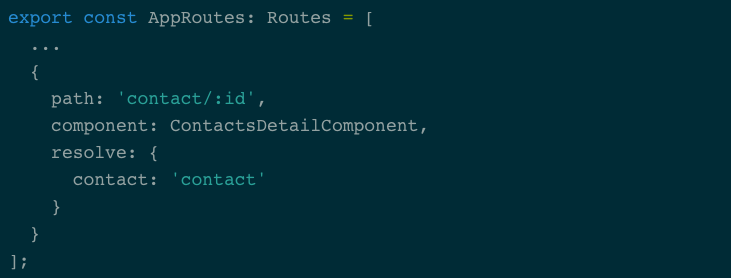
Let’s ignore for a second that we don’t always want to return the same contact object when this resolver is used. The point here is that we can register a simple resolver function using Angular’s dependency injection. Now, how do we attach this resolver to a route configuration? That’s pretty straight forward. All we have to do is add a resolve property to a route configuration, which is an object where each key points to a resolver.
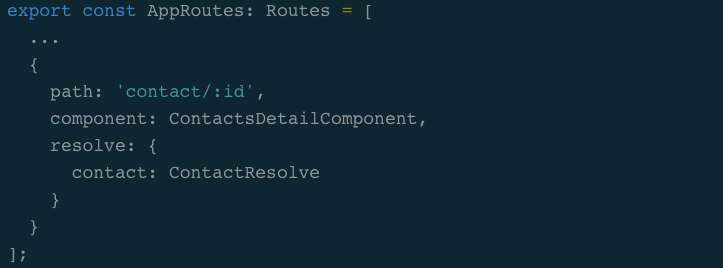
Here’s how we add our resolver function to our route configuration:
Defining Resolvers (Contd.)
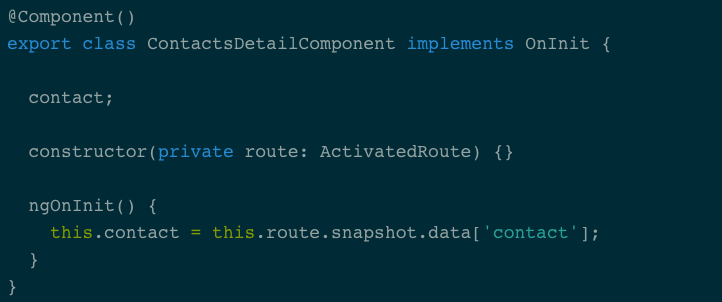
Now, the next thing we need to do is to change the way ContactsDetailComponent gets hold of the contact object. Everything that is resolved via route resolvers is exposed on an ActivatedRoute’s data property. In other words, for now we can get rid of the ContactsService dependency like this:
Now, the next thing that we need is a resolver with Dependency Injection .
Resolvers with Dependencies
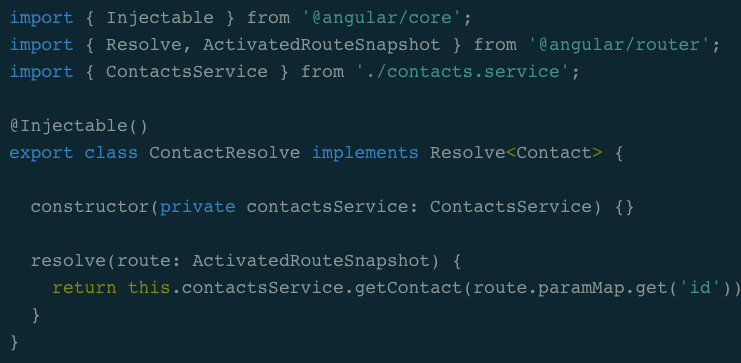
As we know, Dependency Injection works on class constructors, so what we need is a class. We can create resolvers as classes as well. The only thing we need to do, is to implement the Resolve interface, which ensures that our resolver class has a resolve() method.
Here's what our contact resolver could look like as class implementation:
Resolvers with Dependencies (Contd.)
As soon as our resolver is a class, our provider configuration becomes simpler as well, because the class can be used as provider token.
And of course, we use the same token to configure the resolver on our routes:
Hopefully this gave you a better idea of how route resolvers in Angular work!
THANK YOU!!

Route Resolver in Anular 2+
By Ratnam Pandey


