Introduction to Nipype
By Sourav Singh
The human brain has 100 billion neurons, each neuron connected to 10 thousand other neurons. Sitting on your shoulders is the most complicated object in the known universe.
-Michio Kaku
What will be covered in the talk
- Overview of Nipype
- What is nipype?
- Nipype Architecture
- Creating Workflows and Pipelines
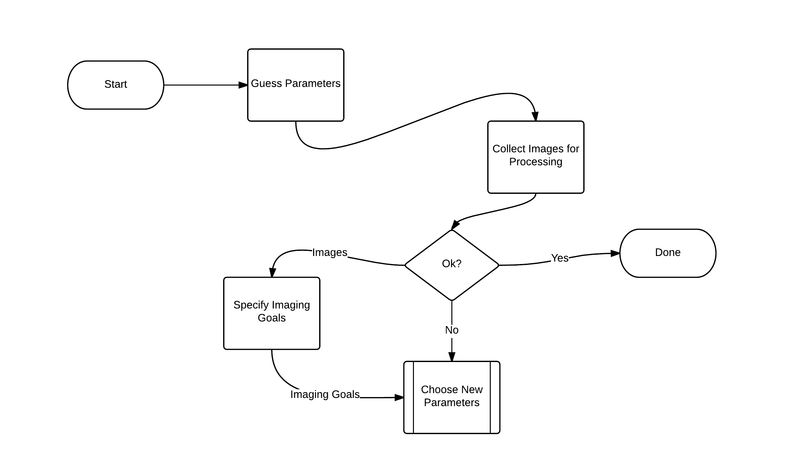
Neuroinformatics:The Process
Outer Level Data Flow in NeuroImaging
Brain Imaging softwares
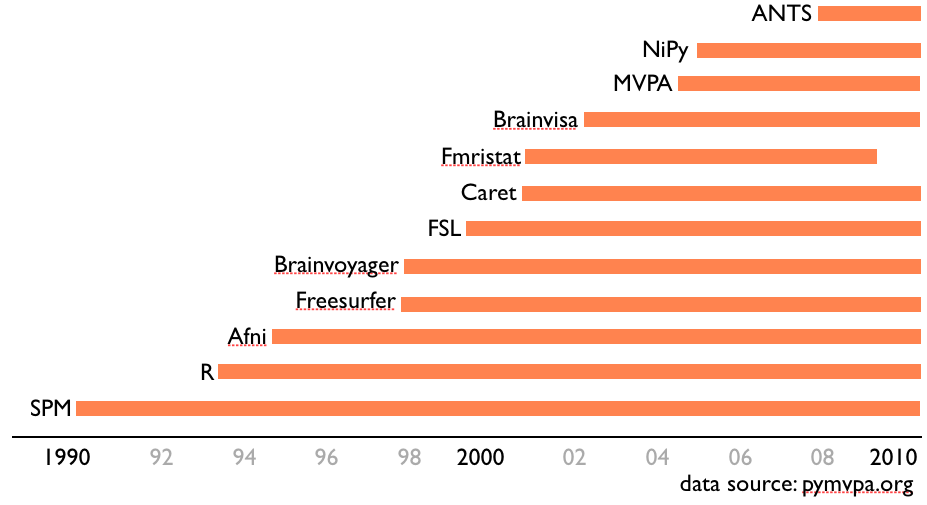
Too many options to choose from....
Big Data Computing
- As research on more and more subjects are being done,it is becoming difficult to keep track of all the additions being made.
- Scientists require studies done over a period of time to make certain inferences on the project.
- Which mean a lot of data will be collected by scientists,more than what they could keep track of.
- The 1000 Functional Connectome Project was a one project which gave rise to a need for processing massive data and enabling Data Sharing amongst other scientists.
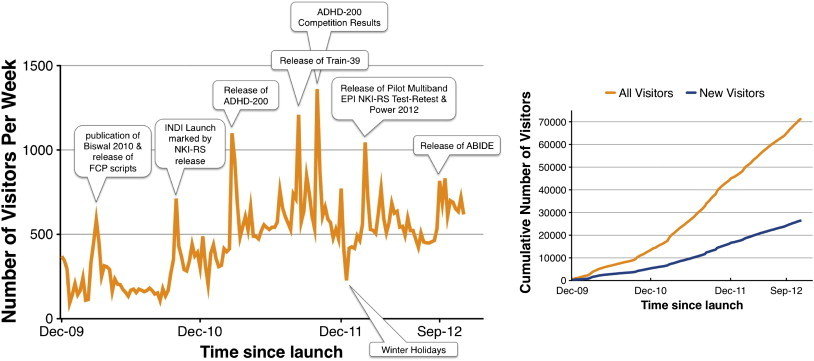
The Rise of Massive Data
Taken from Making data sharing work: The FCP/INDI experience by Marten Mennes,Bharat P Biswal,F. Xavier Castellanos and Michael P. Milham
Leads to conflict
Neuroscientist-
Developer-
- Which package should I develop for?
- How do I share my package or software?
- Creating a package which can support multiple computer architectures.
- Which package should I use?
- How do I use these packages?
- Why should I use these packages?
And more questions...
How do we:
- Training People
- Develop New Tools for research
- Perform research which could be reproducible by other researchers
- How to work with different packages,interfaces,file formats
Hence Nipype comes into picture
Why use Python?
- Easy to learn
- cross-platform
- extensive infrastructure for scientific computing
- more institutions are adopting it as part of development.
- Conduct Data Analysis by using RPython,Octave,Scilab.
- Easily Understandable by Neuroscientists
- Neuroscientists can create their own packages easily according to their requirements.
What is Nipype?
Nipype Architecture
- Interface
- Engine
- Executable Plugins
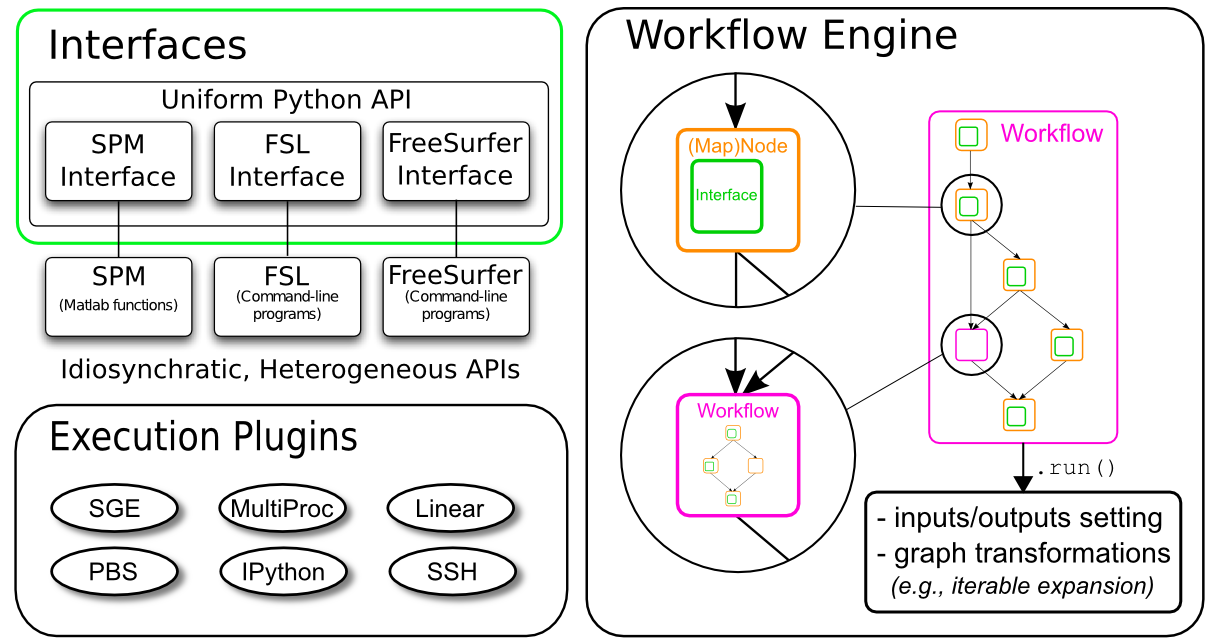
Nipype:Engine
- Node/MapNode:Wraps an Interface for use in a Workflow
- Workflow:A graph whose nodes are of type Node, MapNode, or Workflow and whose edge represent data flow.

Nipype:Executable Plugins
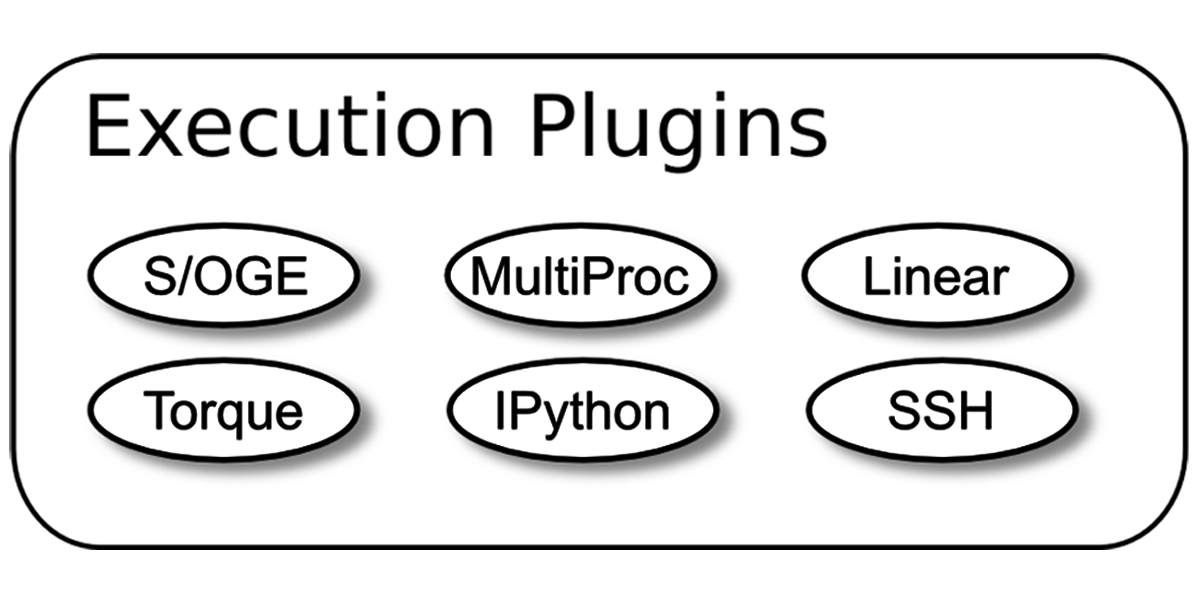
Plugins:Component that describes how the workflow should be executed.
Installing and environment of Nipype
Installing Nipype:
- Nipype is available from @NeuroDebian, PyPI and Github
- Dependencies:numpy,scipy,IPython,nibabel
Running Nipype:
- Ensure tools are installed and accessible
- Nipype is an umbrella project under Nipy and not a substitute for the imaging packages like ANTS,FSL,AFNI
Softwares used in Nipype
- FreeCamino,for working with diffusion MRI
- nilearn,Machine Learning package for Neuro-Imaging written in Python
- SPM to record brain activity for functional neuroimaging experiments
- MNE,Magnetoencephalography (MEG) and Electroencephalography (EEG) in Python
- AFNI,for processing and analyzing fMRI data
Working with Nipype
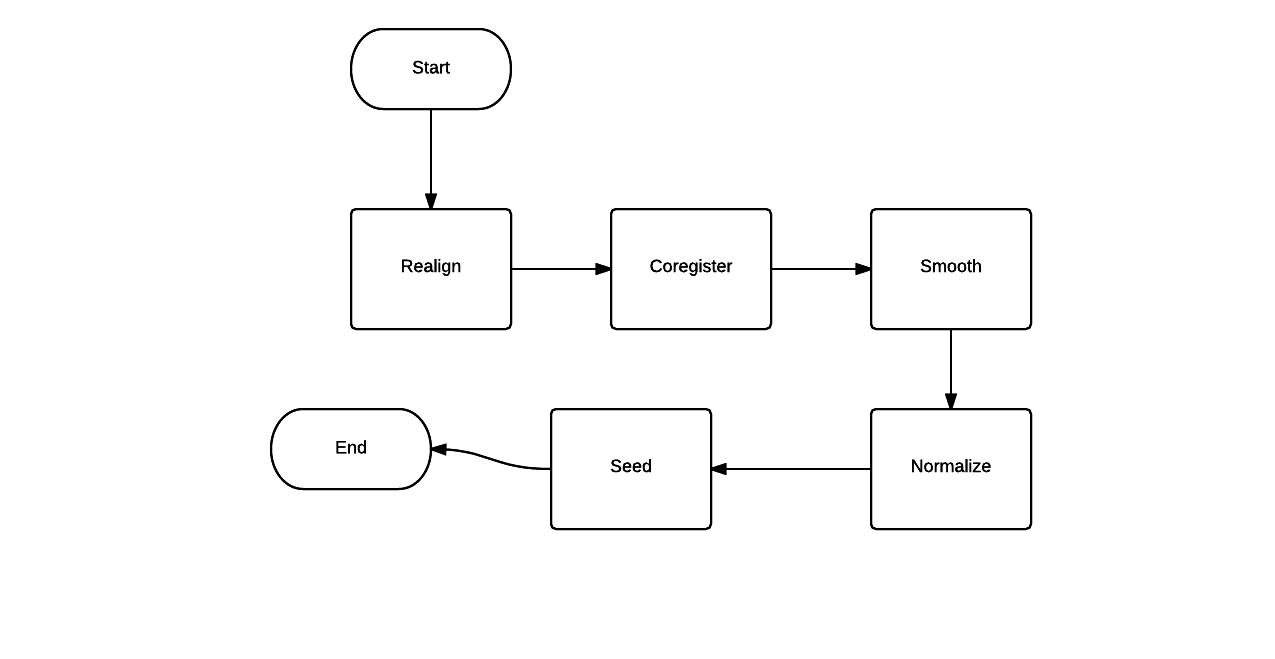
An Example to for fMRI Registration
- Obtain an Image of the MRI scan in question
- Realign the MRI scan to adjust for minor corrections and head adjustments.
- Coregistration to link the fMRI scans according to the anatomical scans
- Normalisation to fit the images according to the size of the brain
- Seeding to improve the quality of the final imaging.
Create a Workflow
- Workflow is a pipeline to process data
- Directed acyclic graph which represents data flow
- Nodes are processes
- Edges show the flow of data
- Defining the input and output of processing node is a must.
Input of the Workflow will be a fMRI scan done and output will be the final fMRI scan after processing.
Starting a First Level fMRI analysis
Step 1:Import Necessary Modules
from os.path import join as opj
from nipype.interfaces.afni import Despike
from nipype.interfaces.freesurfer import (BBRegister, ApplyVolTransform,
                                          Binarize, MRIConvert, FSCommand)
from nipype.interfaces.spm import (SliceTiming, Realign, Smooth, Level1Design,
                                   EstimateModel, EstimateContrast)
from nipype.interfaces.utility import Function, IdentityInterface
from nipype.interfaces.io import FreeSurferSource, SelectFiles, DataSink
from nipype.algorithms.rapidart import ArtifactDetect
from nipype.algorithms.misc import TSNR
from nipype.algorithms.modelgen import SpecifySPMModel
from nipype.pipeline.engine import Workflow, Node, MapNode
Define behaviors for MATLAB and Freesurfer and setting your parameters
Import locations to your MATLAB and Freesurfer
from nipype.interfaces.matlab import MatlabCommand
MatlabCommand.set_default_paths('/usr/local/MATLAB/R2015b/toolbox/spm12')
MatlabCommand.set_default_matlab_cmd("matlab -nodesktop -nosplash")

fs_dir = '~/nipype_tutorial/freesurfer'
FSCommand.set_default_subjects_dir(fs_dir)
Define parameters-
experiment_dir = '~/nipype_tutorial'          # location of experiment folder

output_dir = 'output_fMRI_example_1st'        # name of 1st-level output folder
working_dir = 'workingdir_fMRI_example_1st'   # name of 1st-level working directory

number_of_slices = 40                         # number of slices in volume
TR = 2.0                                      # time repetition of volume
fwhm_size = 6                                 # size
Creating nodes for preprocessing
# Slicetiming - correct for slice wise acquisition

interleaved_order = range(1,number_of_slices+1,2) + range(2,number_of_slices+1,2)
sliceTiming = Node(SliceTiming(num_slices=number_of_slices,
                               time_repetition=TR,
                               time_acquisition=TR-TR/number_of_slices,
                               slice_order=interleaved_order,
                               ref_slice=2),name="sliceTiming")

# Realign - correct for motion and other head bobs

realign = Node(Realign(register_to_mean=True),name="realign")


# Smooth - to smooth the images with a given kernel

smooth=pe.Node(interface=fs.smooth(),name="Smooth")
smooth.inputs.surface_fwhm=4
#smooth.inputs.surface_fwhm=8
#smooth.iterables('surface_fwhm',[4,6,8]) to run a subgraph several times.In this case,3 times for different attributes


#BBRegister - coregister a volume to the Freesurfer anatomical surface

bbregister = Node(BBRegister(init='header',contrast_type='t2',out_fsl_file=True),name='bbregister')

#Seed and connect two nodes together

extract_timeseries=pe.Node(afni.Maskave(),name="extract_timeseries")
correlation_map=pe.Node(afni.Fim(),name="correlation_map")
wf_connect(extract_timeseries,"out_file",correlation_map,"in_file")

#Normalize

normalize=pe.Node(interface=spm.Normalize(),name="Normalize")
Connecting the nodes together in a Workflow
#Create a workflow

workflow=pe.Workflow(name="first_level_analysis")


#Connect the different nodes in a single workflow together
workflow.connect(realign,"mean_image",coregister,"source")
workflow.connect(smooth,"source",BBregister,"register")
Start Level-1 Design Analysis of the Data
# Level1Design - Generate a design matrix

level1design = Node(Level1Design(bases={'hrf': {'derivs': [0, 0]}},timing_units='secs',interscan_interval=LA,model_serial_correlations='AR(1)'),name="lLevel1design")

# EstimateContrast - estimates contrasts based on general linear model

conestimate = Node(EstimateContrast(), name="conestimate")

# Volume Transformation - transform contrasts into anatomical space
applyVolReg = MapNode(ApplyVolTransform(fs_target=True),name='applyvolReg',iterfield=['source_file'])

# MRIConvert - to generate and zip the output files
mriconvert = MapNode(MRIConvert(out_type='nii.gz'),name='mriconvert',iterfield=['in_file'])
Taken from Beginner's Tutorial by Michael Notter
Additional Resources
Acknowledgements and Special Thanks
Satrajit Ghosh
Chris Filo Gorgolewski
Russel Poldrack
Michael Notter
Luke Chang
Blake Davey
Michael Waskom
Julia Huntenburg
Stephen H Koslow
Adriana Di Martino
Dr Cameron Craddock
Dr Ivan J Roijals Miras
Tim Leslie
Juergen Dukart
Marten Mennes
Bharat P Biswal
F.Xavier Castellanos
Michael P.Milham
Alexandre Gramfort
Josh Carp
Michael F.Huerta
Introduction to Nipype
By Sourav Singh
Introduction to Nipype
This is a presentation on Nipype,introducing people to nipype.