Raspberry
Workshop
Ali Nik & Radi Almac
Content
- What is a Raspberry?
- Why Rasberry?
- Generations of Raspberry
- Parts of the raspberry
- Operating System
- Linux commands
- Bash
- GPIOs
- Compile/Run (C,Python)
- IoT?
- Q & A
#!/bin/bash
Topic="Raspberry Workshop"

SubTopic[0]="What is a Raspberry"
SubTopic[1]="Why Rasberry"
SubTopic[2]="Generations of Raspberry"
SubTopic[3]="Parts of the raspberry"
SubTopic[4]="Operating System"
SubTopic[5]="SSH"
SubTopic[6]="GNU/Linux"
SubTopic[7]="Bash"
SubTopic[8]="GPIOs"
SubTopic[9]="Compile/Run (C,Python)"
SubTopic[10]="IoT?"
SubTopic[11]="Q & A"

getContent(){
    echo ${SubTopic[$1]}
}

echo $Topic
getContent $1

#Run: bash workshop.sh 0
What is a Raspberry?
Is a low cost, credit-card sized computer.
Enables people of all ages to explore computing.
It’s capable of doing everything you’d expect a desktop computer to do.


Why Raspberry?
It’s Cheap!
It’s Tiny
Can Run A Variety Of Operating Systems
Is Really Versatile
You Can Overclock It


Generations of Raspberry
Raspberry Pi 1
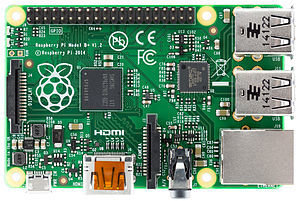
Release date
February 2012
CPU
Memory
Storage
700 MHz single-core ARM1176JZF-S (model A, A+, B, B+, CM)[2]
256 MB[3] (model A, A+, B rev 1) 512 MB (model B rev 2, B+, CM)
SDHC slot (model A and B), MicroSDHC slot (model A+ and B+), 4 GB eMMC IC chip (model CM)
Raspberry Pi 1 model B+
Power
1.5 - 3.5 W
Raspberry Pi 2
Release date
February 2012
CPU
Memory
Storage
900 MHz quad-core ARM Cortex-A7
1 GB RAM
MicroSDHC slot
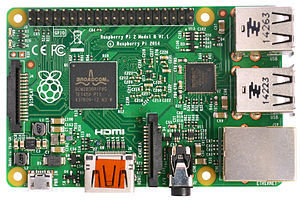
Raspberry Pi 2 model B
Power
4.0 W
Raspberry Pi 3
Release date
29 February 2016
CPU
Memory
Storage
1200 MHz quad-core ARM Cortex-A53
1 GB RAM
MicroSDHC slot
Raspberry Pi 3 model B
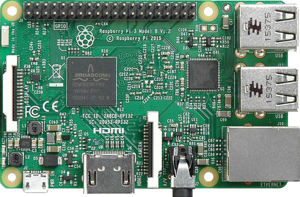
Power
4.0 W
Raspberry Pi Zero
Release date
November 2015
CPU
Memory
Storage
1000 MHz single-core ARM1176JZF-S
512 MB RAM
MicroSDHC slot
Raspberry Pi Zero
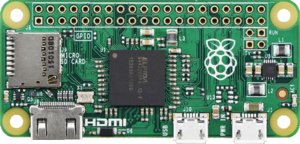
Power
Price
0.8 W
US$5
Parts of the Raspberry

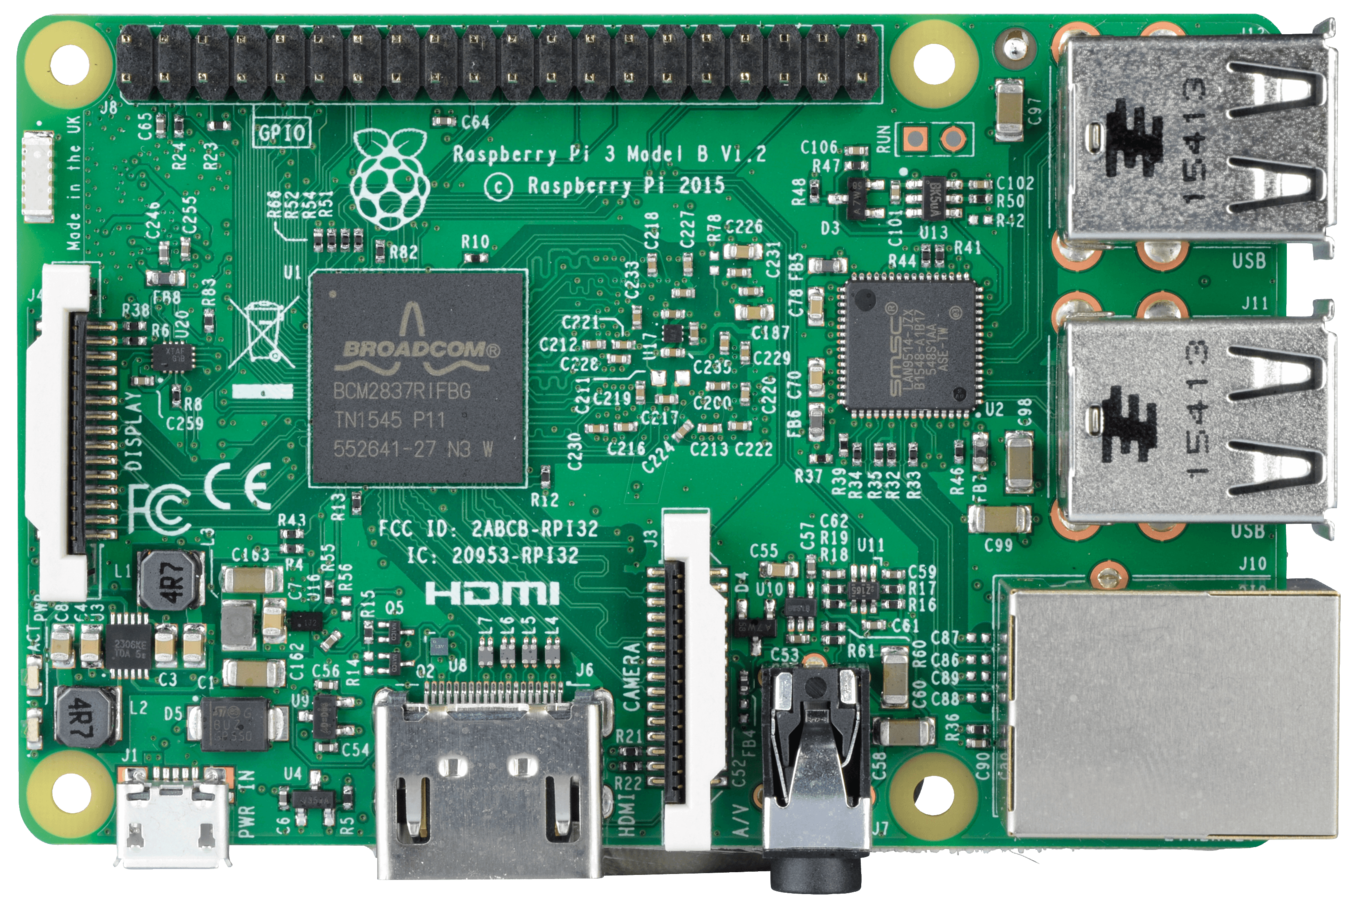
GPIO Header
CSI Camera Port
Audio/Video Out
USB 2.0
Ethernet Out
HDMI Out
SD Card Slot
Micro USB Power
Broadcomm BCM2837
Status LED
DSI Display Port
Operating System
Most Popular operating systems
- Raspbian
- Ubuntu MATE
- Snappy Ubuntu
- Pidora
- Linutop
- SARPi
- Arch Linux ARM
- Gentoo Linux
- FreeBSD
- Kali Linux
- RISC OS Pi
SSH
SSH?
Secure Shell is a cryptographic network protocol for secure data communication, remote command-line login, remote command execution, and other secure network services between two networked computers.
We will use a SSH client to connect to the Raspberry Pi remotely over a Local Area Network (LAN)
Software and configurations
No additional software is required, but we need to activate SSH service
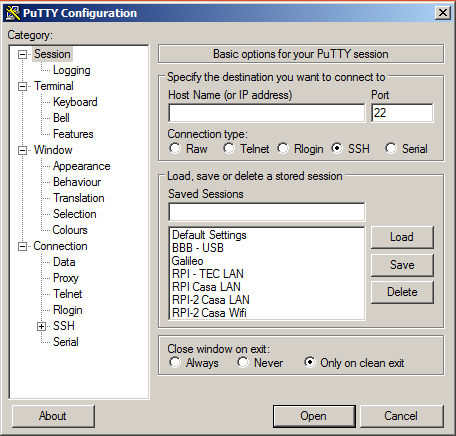
*Putty: Free SSH and telnet client
*Xming:
pi@raspberrypi ~ $ sudo raspi-config
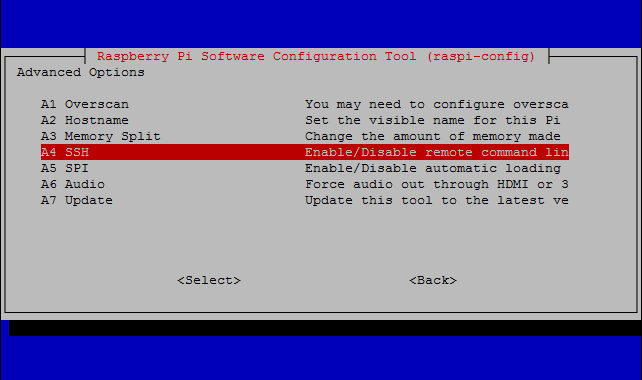
Restart your Pi and login again.
Advanced Options >>
SSH >>
Enable
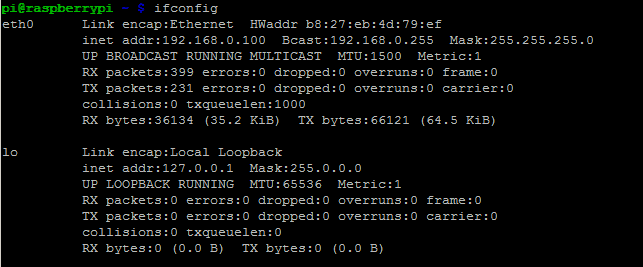
IP Address
pi@raspberrypi ~ $ ifconfigA list of networks will appear, look at eth0 and save the IP Address.
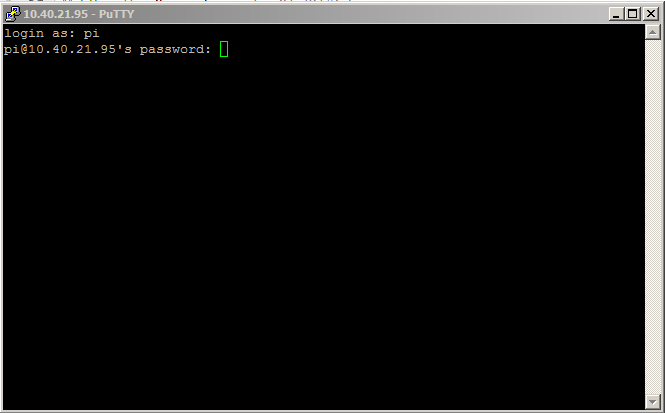
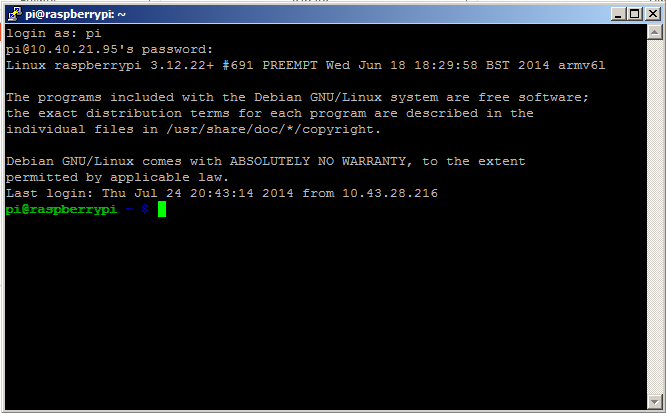
Using SSH in PuTTY
Password:
raspberryUser:
piGraphic mode?
In windows VNC Server
pi@raspberrypi ~ $ xtightvncviewer raspberrypi.local:1In Linux

(such as Xming)
(such as TightVncServer)
GNU/Linux
What is GNU/Linux?
Four main parts make up a GNU/Linux system:
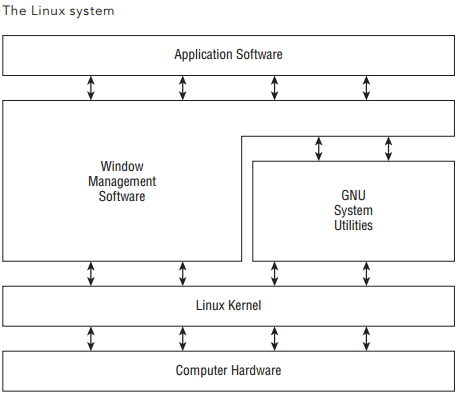
- The Linux kernel
- The GNU utilities
- A graphical desktop environment
- Application software
Linux Kernel
The kernel is primarily responsible for four main functions:
- System memory management
- Software program management
- Hardware management
- Filesystem management
System File
| Directory | Usage |
|---|---|
| / | root of the virtual directory ,where normally ,no files are placed |
| /bin | binary directory,where many GNU user-level utilities aare stored |
| /boot | boot directory,where boot files are stored |
| /div | device directory,where Linux creates devices nodes |
| /etc | system configuration files directory |
| /lib | library directory,where system and application library files are stored |
| /media | media directory ,a common place for mount points used for removable media |
| /mnt | mount directory,another common place for mount points for removable media |
| /opt | optional directory ,often used to store third-party software oackages and data file |
| Directory | Usage |
|---|---|
| /proc | process directory ,where current hardware and process information is stored |
| /root | root home directory |
| /sbin | system binary directory,where many GNU admin-level utilities are stored |
| /run | run directory,where runtime data is held during system operation |
| /srv | service directory,where system hardware information files are stored |
| /tmp | temporary directory |
| /usr | user binary directory,where the bulk of GNU user-level utilities and data files are stored |
| /var | variable directory ,for files that change frequently,such as log files |
| /sys | system directory,where system hardware information files are stored |
The Shell
- The GNU/Linux shell is a special interactive utility.
- It provides a way for users to start programs, manage files on the filesystem, and manage processes running on the Linux system.
- It allows you to enter text commands, and then it interprets the commands and executes them in the kernel.
Bash
The default shell used in all Linux distributions is the bash
shell. The bash shell was developed by the GNU project as a replacement for the standard Unix shell, called the Bourne shell (after its creator). The bash shell name is a play on this wording, referred to as the “Bourne again shell.”
Bash
The default prompt symbol for the bash is the dollar sign ($).
I will be using the "$ " in my codes to represent terminal input, you don't need to type it.
You can check more basic commands
| Name | Shortcut key | Description |
|---|---|---|
| Cupy | shift+ctrl+C | Copies the selected text |
| Past | shift+ctrl+V | Pastes text |
| Full screen | F11 | Toggles on/off the terminal window filling the entire desktop |
| Zoom in | ctrl++ | Enlarges the font size in the window |
| Zoom out | ctrl+- | Reduces the font size in the window |
| Normal size | ctlr+0 | Returns the font size to default |
| Find | shift+ctrl+F | Opens find window to provide designated text search options |
Basic commands
Display current directory:
$ pwdNow create an empty file:
Display the content of the folder:
$ touch file.txt$ ls -lhDisplay a string:
Create a variable and display its content:
$ echo "Hello world!"
Hello world!
$ var="Hello world!"
$ echo $var
Hello world!
$ echo var
var$ rm file.zip
$ rm -R dirDelete
More commands
| Command | Action |
|---|---|
| Sudo shutdown-h now | turn off your Pi |
| Sudo reboot | Reboot your Pi |
| Sudo raspi-config | Open configuration window |
| Sudo su | Switch to root user |
| Startx | Start graphic mode |
| cd name _of_folder | Change to a specific directory |
| cd .. | Go back one directory |
| cd / | Go back to the main directory |
| Is | Display list of files and folders |
Bash

Scripts
If you need to write code that needs to run more than one time, you must consider to writing down in a file and then execute it when you need it.
Scripts needs to have at the first line the shebang.
#!/bin/bash
The shebang is used to tell the system the name of the interpreter that should be used to execute the script that follows.
Hello world!
- Now time to write our first script
- We will use an editor to write our script.
- Two popular editors: the traditional vi and the user friendly nano
- I will use vi
$ vi hello_world.sh
Hello world!
#!/bin/bash

# This is a comment
echo 'Hello World!'
# "" and '' have the same effect
Type ( i) and later the code:
Save script. (Press Esc and then :wq Enter)
We can execute file type:
$ sh hello_world.shOutput:
Hello World!The other way to execute the file is to make it an executable file
chmod 755 hello_world.sh
$ ls -l hello_world
-rwxr-xr-x 1 pi pi 63 2015-10-07 10:10 hello_world
Execute file
$ ./hello_world.sh
Hello World!
If statment
We can evaluate an expression:
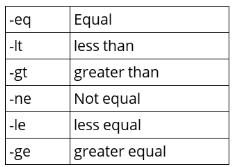
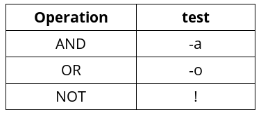
#!/bin/bash

x=1

if [ $x -eq 10 ]; then
    echo "x is equal to 10"
elif [ $x -gt 10]; then
    echo "x es greater than 10"
else
    echo "x is less than 10"
fi
For loop
Example 1:
Example 2:
Example 3:
Example 4:
#!/bin/bash

for i in $( ls ); do
    echo item: $i
done
#!/bin/bash
n="1 2 3 4 5 6 7 8"
for i in $n; do
echo "number: "$i
done#!/bin/bash
for i in `seq 10`; do
echo i
done#!/bin/bash
for i in `seq 1 2 10`; do
echo i
doneWhile loop
Example 1:
Example 2:
Older UNIX shells like Borne shell and ksh88 have clumsy, inefficient way of doing arithmetic based on external expr command
#!/bin/bash

count=0
while [ $count -lt 10 ]; do
    echo $count
    count=`expr $count + 1`
done
#!/bin/bash
count=0
while [ $count -lt 10 ]; do
echo $count
count=$((count + 1))
doneParameters
You can send parameters to a script. Write:
Execute file by typing:
#!/bin/bash

echo $0
echo $1
echo $2
echo $#
$ sh myscript.sh Hello World
myscript.sh
Hello
World
2Program 1
Make a script that prints a count depending on the first parameter
?
Program 2
Validate if a given number is odd
?
Program 3
Calculate the factorial number of a given number (0-9)
?
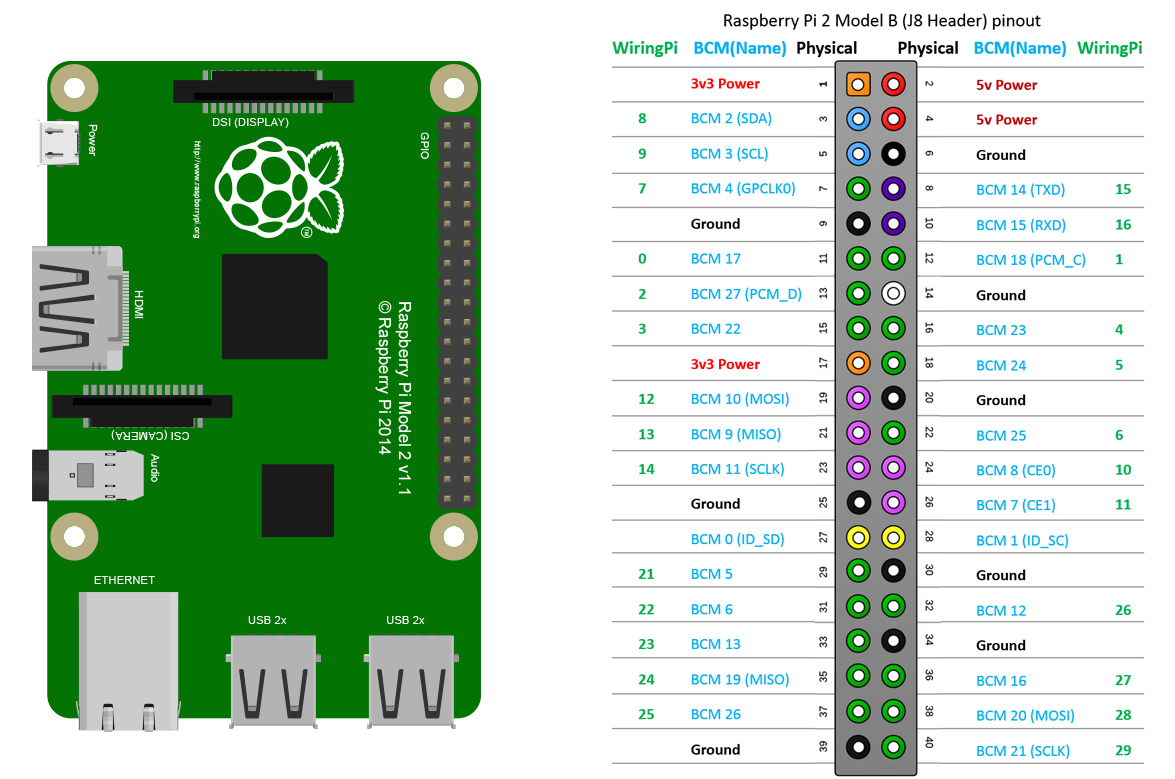
GPIOs

General Purpose Input Output
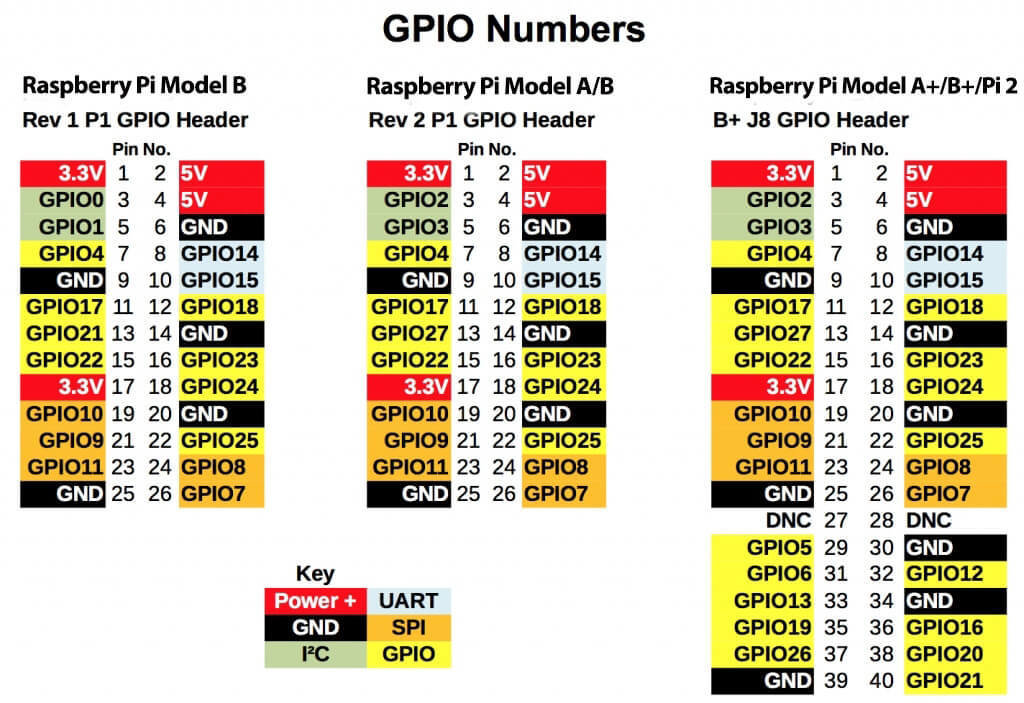
About GPIOs
* All GPIOs are 3.3 V tolerant
* They can provide maximum 16 mA, but not exceeding 50 mA from all at the same time
* 3.3 V pin can deliver 50 mA maximum
* 5 V pin can deliver your power supply – 700 mA for the raspberry*
Differences having an OS
Several inputs:
You have a mouse, keyboard, Ethernet connection, monitor, SD card without need to connect additional electronics
Filesystem:
Being able to read and write data in the Linux file system will make many projects much easier.
Linux tools:
Packaged in the Raspberry Pi’s Linux distribution is a set of core command-line utilities, which let you work with files, control processes, and automate many different tasks.
Languages:
There are many programming languages out there and embedded Linux systems like the Raspberry Pi give you the flexibility to choose whichever language you’re most comfortable with
Program
We will turn on and off and LED
Connect and LED to GPIO25 using a 330 ohm resistor

Digital Output: Lighting Up an LED
You can then use the Linux command line to turn the LED on and off.
Steps:
1) Connect to raspberry (SSH)
2) In order to access the input and output pins from the command line, you’ll need to run the commands as root, the superuseraccount on the Raspberry Pi. To start running commands as root, type sudo su at the command line and press enter:
The root account has administrative access to all the functions and files on the system and there is very little protecting you from damaging the operating system if you type a command that can harm it.
pi@raspberrypi ~ $ sudo su
root@raspberrypi:/home/pi#
Digital Output: Lighting Up an LED
3) Before you can use the command line to turn the LED on pin 25 on and off, you need to export the pin to the userspace(in other words, make the pin available for use outside of the confines of the Linux kernel), this way:
root@raspberrypi:/home/pi# echo 25 > /sys/class/gpio/exportThe echo command writes the number of the pin you want to use (25) to the export file, which is located in the folder /sys/class/gpio. When you write pin numbers to this special file, it creates a new directory in /sys/class/gpio that has the control files for the pin. In this case, it created a new directory called /sys/class/gpio/gpio25.
Digital Output: Lighting Up an LED
4) Change to that directory with the cd command and list the contents of it with ls:
root@raspberrypi:/home/pi# cd /sys/class/gpio/gpio25
root@raspberrypi:/sys/class/gpio/gpio25# ls
active_low direction edge power subsystem uevent value
The echo command writes the number of the pin you want to use (25) to the export file, which is located in the folder /sys/class/gpio. When you write pin numbers to this special file, it creates a new directory in /sys/class/gpio that has the control files for the pin. In this case, it created a new directory called /sys/class/gpio/gpio25.
Digital Output: Lighting Up an LED
5) The directionfile is how you’ll set this pin to be an input (like a button) or an output (like an LED). Since you have an LED connected to pin 25 and you want to control it, you’re going to set this pin as an output:
root@raspberrypi:/sys/class/gpio/gpio25# echo out > direction6) To turn the LED on, you’ll use the echo command again to write the number 1 to the value file:
root@raspberrypi:/sys/class/gpio/gpio25# echo 1 > value7) After pressing enter, the LED will turn on! Turning it off is as simple as using echo to write a zero to the value file:
root@raspberrypi:/sys/class/gpio/gpio25# echo 0 > valueVirtual Files
The files that you’re working with aren’t actually files on the Raspberry Pi’s SD card, but rather are a part of Linux’s virtual file system, which is a system that makes it easier to access low-level functions of the board in a simpler way.
For example, you could turn the LED on and off by writing to a particular section of the Raspberry Pi’s memory, but doing so would require more coding and more caution.
Program
We will read a digital input and display its status “0” for GND and “1” for 3.3v.
Connect the following diagram
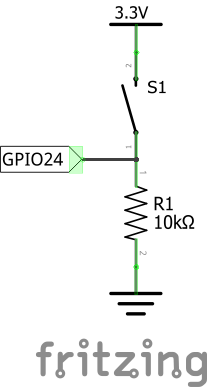
Digital Input
Almost same instructions. Remember to run commands as root.
root@raspberrypi:/home/pi# echo 24 > /sys/class/gpio/export
root@raspberrypi:/home/pi# cd /sys/class/gpio/gpio24
root@raspberrypi:/sys/class/gpio/gpio24# echo in > direction
root@raspberrypi:/sys/class/gpio/gpio24# cat value
0
(1) Export the pin input to userspace.
(2) Change directory.
(3) Set the direction of the pin to input.
(4) Read the value of the of the pin using cat command.
(5) Print the result of the pin, zero when you aren’t not pressing the button.
Compile/Run (C,Python)
Python GPIOs
We can use Python to control the GPIOs.
Open Python by typing on the Linux console:
sudo pythonFirst make sure this library its already installed on the Raspberry Pi. In console type:
>>> import RPi.GPIO as GPIOIf you don’t get an error, you’re all set.
Close the console
How to install Python library
Type the following command on the Linux console
$ wget http://pypi.python.org/packages/source/R/RPi.GPIO/RPi.GPIO-0.6.2.tar.gz
$ tar zxf RPi.GPIO-0.1.0.tar.gz
$ cd RPi.GPIO-0.1.0
$ sudo python setup.py install
The instructions here refer to an early version of RPi.GPIO. Please search the web for the latest version and replace the version numbers in the instructions below. On newer Raspbian distributions library is included.
Installing and Testing GPIO in Python
On the Python console type:
>>> import RPi.GPIO as GPIO
>>> GPIO.setmode(GPIO.BCM)
>>> GPIO.setup(25, GPIO.OUT)
>>> GPIO.output(25, GPIO.HIGH)
>>> GPIO.output(25, GPIO.LOW)
>>> exit()
1) Import GPIO library
2) Use BCM convention for the names of the GPIOs
3) Pin 25 as output
4) Turn on pin 25 (send 3.3v)
5) Turn off pin 25 (connect to ground)
6) Close python interpreter
BCM is for Broadcom BCM 2835 chip, the chip that is containned in the Raspberry Pi. When we set mode as BCM we are telling to the library that I want to use the real pin names of the BCM chip. There are other configurations that we will not use in this class (such as board).
Blinking an LED
We will use a Python Script.
Create a new file, name it blink.py
Write the following code:
import RPi.GPIO as GPIO
import time
GPIO.setmode(GPIO.BCM)
GPIO.setup(25, GPIO.OUT)
while True:
    GPIO.output(25, GPIO.HIGH)
    time.sleep(1)
    GPIO.output(25, GPIO.LOW)
    time.sleep(1)
touch blink.py
vi blink.pyRun:
pi@raspberrypi ~ $ sudo python blink.pyYour LED should now be blinking!!!
Hit Ctrl+C to stop the script and return to the command line
Read a Button
import RPi.GPIO as GPIO
import time
GPIO.setmode(GPIO.BCM)
GPIO.setup(18, GPIO.IN, pull_up_down=GPIO.PUD_UP)
count = 0
while True:
    inputValue = GPIO.input(18)
    if (inputValue == False):
        count = count + 1
        print("Button pressed " + str(count) + " times.")
        time.sleep(.3)    	#Wait for the user
    time.sleep(.01)  #So the CPU is not at 100%
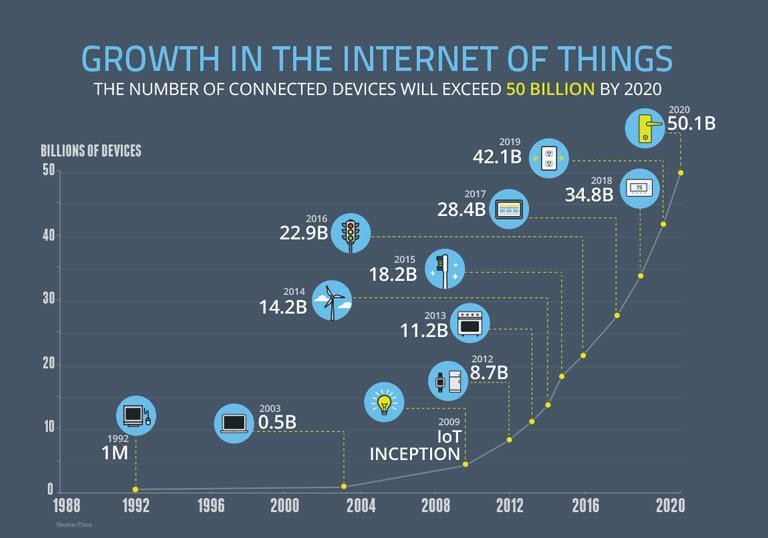
IoT?


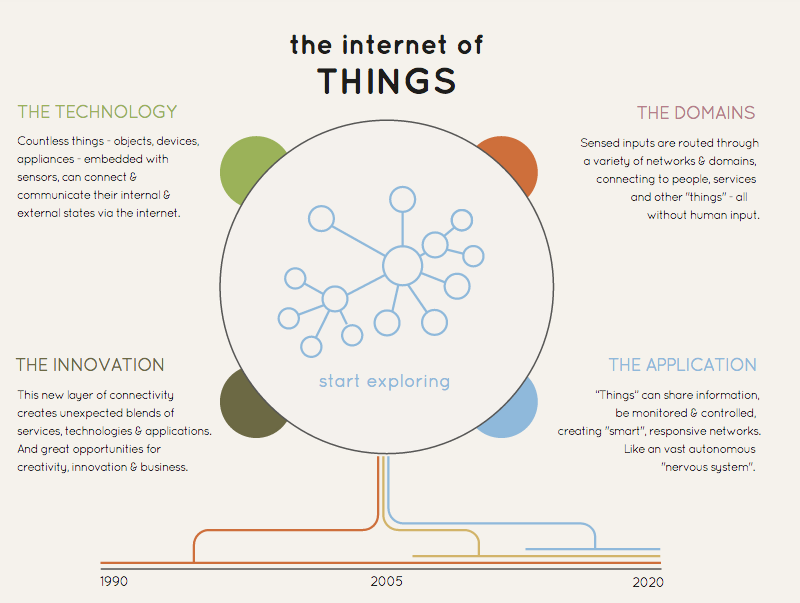
What kind of things?

How will the things be used?

Amazing IoT Project
Open this link Now !
Q & A

Thanks for your attention !
Copy of Raspberry Pi Workshop
By 0xanik
Copy of Raspberry Pi Workshop
Raspberry Pi Workshop - Software Freedom Day 2016 - Tehran Ali Nik & Radi Almac


