


Bart
Hello. I'm using Slides for sharing knowledge about blockchain and miscellaneous projects of mine.
A Good Friday Special, by Blockbar • π • March 30th, 2018
@blockbar070
If you are using cryptocurrencies, you know how to trade coins/tokens. You can use centralized services like Binance/Poloniex/Kraken/ShapeShift. Or decentralized services like ...
Bisq?
There are not many decentralized exchanges (DEXs) in use yet. Partly this is because of the lack of liquidity. This will change.
In the year 2018 DEXs will become main stream.
What? #1
Ok, so Decentralized EXchanges will become main stream. This is nice, because it makes life safer, easier & more fun.
Using a DEX has many advantages compared to a CEX.
What? #2
One of the most promising decentralized exchanges is BarterDEX. Partly this is because it swaps coins directly from coin to coin without using a proxy token. It's really just a protocol for swapping of coins using the native blockchains of the two coins you want to swap. BarterDEX is also promising because the development of everything related to it goes extremely fast and is well thought out.
You can already use BarterDEX (beta) for a few months now. It works. Now it has to grow.
BarterDEX is a good DEX, in heavy development.
What? #3
No one will use a DEX which order book is empty. From the beginning there has to be an order book of asks and bids to make it an interesting platform to use.
You can be the one that fills the order books with coin pairs for others to swap. If you give liquidity to BarterDEX, you can have more profit on trades than you'd have on centralized exchanges. In example: on every trade done by others you might earn 5% of profit. This gives you some easy money, and you support the adoption of the DEX.
Offer liquidity => Support this DEX & Earn money.
What? #4
LP stands for Liquidity Provider. At the end of this workshop
In this workshop you learn how to be a liquidity provider.
What? #5
To make it easy to have your LP node online 24/7, you could install BarterDEX on a Raspberry Pi (= cheap computer). Alternatives are running a bigger PC full time or renting a server.
A Raspberry Pi is a fairly cheap mini computer that can run Linux, Android, Windows and other operating systems. The computer doesn't need a lot of electricity. Because it's small it can easly run next to your router, fulltime. This makes it easy to use as a 'home server'. In example for videos, photos, your website(s), email, home automation. Or Storj / Golem. Or use the Pi for running BarterDEX.
You could use a Raspberry Pi to run BarterDEX 24 / 7.
What? #6
To make it easy to have your LP node online 24/7, you could install BarterDEX on a Raspberry Pi (= cheap computer). Alternatives are running a bigger PC full time or renting a server.
Basics:
1 Some knowledge of using cryptocurrencies
2 Preferably you own at least 2 cryptocurrencies (20+ EUR)
3 Curiosity (so no fear of using a terminal :)
4 A computer, preferably running Mac or Linux
If you want to be LP & want to offer liquidity to the network:
* A Raspberry Pi find your shop, i.e. Kiwi Electronics
* A 2.5 A micro USB connection your phone charger, or similar
* A microSD card, at least 16G i.e. this one
If you prepare, it might save time and give some extra understanding.
These are some resources you could check:
* BarterDEX section (Part III) in Komodo whitepaper
* Video showing the BarterDEX graphical user interface
* Download BarterDEX (you need to use a terminal to use it)
More advanced stuff:
* BarterDEX FAQ (in docs)
@blockbar070
@The_Hague_Tech π 2018-03-30
11.00 Introduction by barv
11.15 Komodo & BarterDEX by diesmaster
11.45 Scope of the course by bartwr
12.00 Installing & using BarterDEX
13.00 Lunch! sponsored by
13.45 Become a LP
Do a trade using BarterDEX
(talk by barv & diesmaster)
Git installed?
Easy installation
In your terminal: npm install
.you want to trade
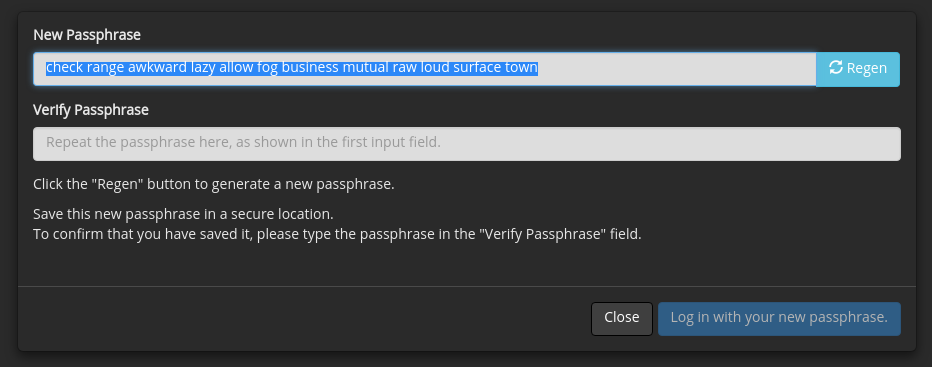
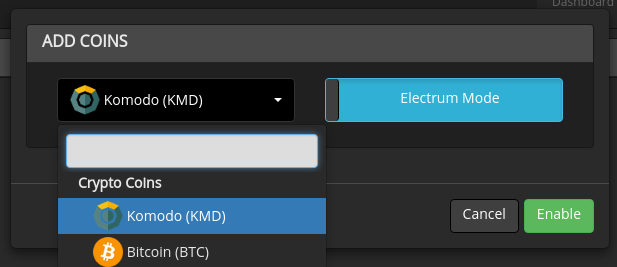
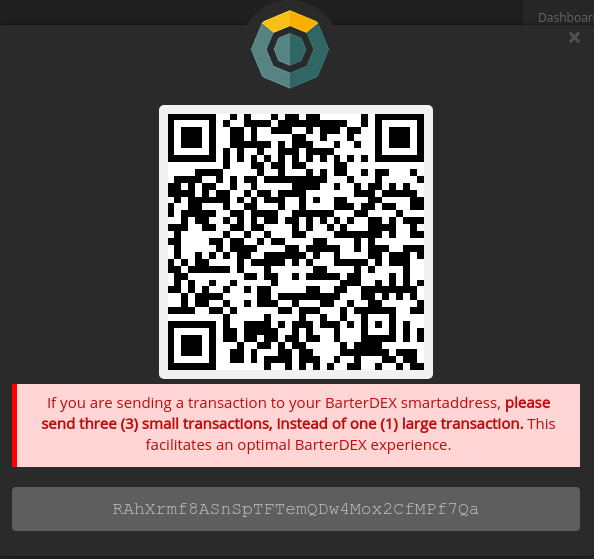
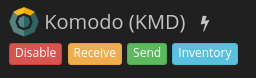
In your portfolio you, click one of the Receive buttons.
Send the right type of tokens to your smart address in BarterDEX. If you are unsure: ask someone to double check
check range awkward lazy allow fog business mutual raw loud surface town
Repeat for other coins.
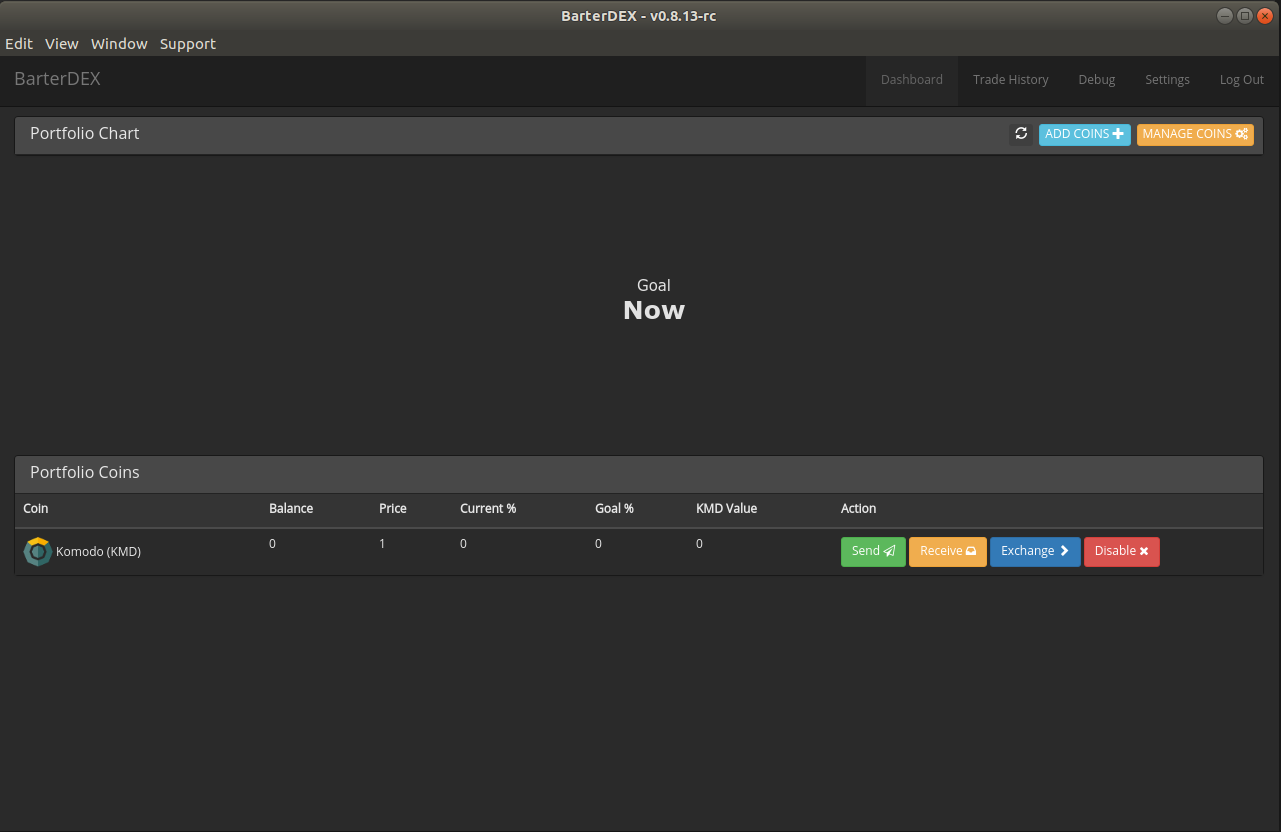
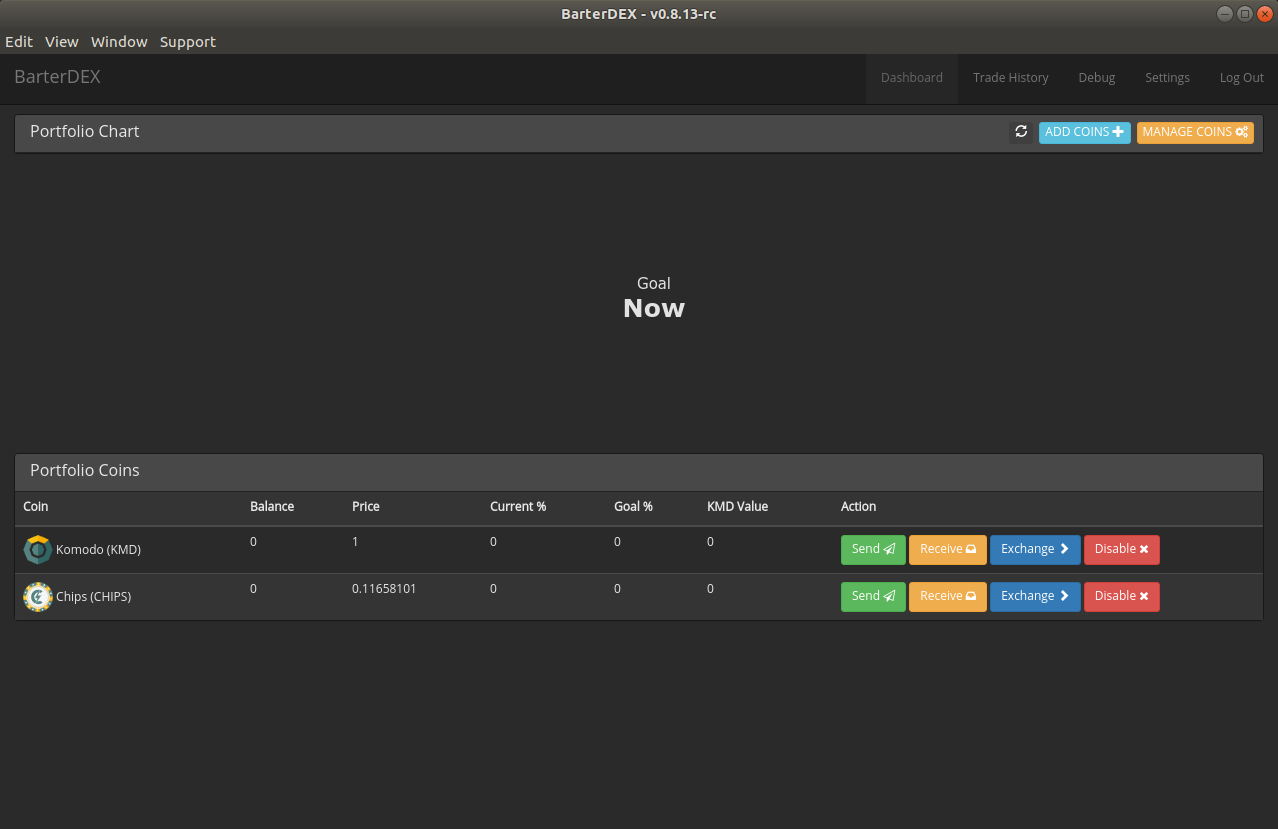
One of the end results could be:
* 30 KMD
* 250 CHIPS
From that moment you can give liquidity for:
* KMD => CHIPS
* CHIPS => KMD
BarterDEX does not use balances but UTXO's while doing trades. It needs small unspent transactions.
To make a better set of UTXO's for use for BarterDEX, you can easily split your balance into small UTXO's.
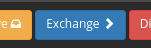
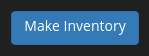
1. Click on Exchange next to a
coin you own.
2. Click the Inventory button
3. Click Make Inventory
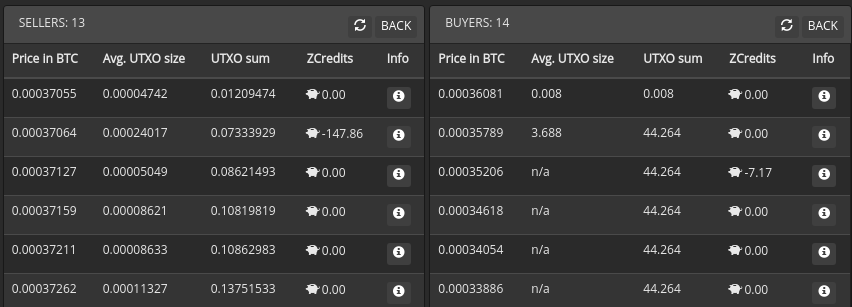
Click on Exchange next to a coin you own.
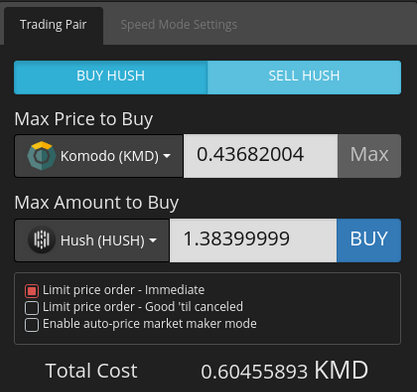
In the order book: Click a sellers row.
Optional: Fill in the amount you want to buy.
<= Now click BUY
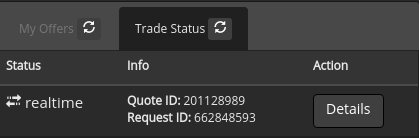
You can follow the realtime status of your trade in the Trade Status tab.
<= Sometimes it takes a while before a
trade appears here. If > 3 minutes: retry.
your first trade.
Set up your LP using the GUI
GUI = Graphical User Interface
1. Select a trading pair.
2. Check Enable auto-price market maker mode
3. Define the margin percentage
4. Click Set auto buy margin %
5. Done! You're now a Liquidity Provider (keep your GUI open)
Easy.
We're going to run BarterDEX from a terminal. Choose:
Prepare your Raspberry Pi
Before we start configuring your Raspberry Pi, let's check if you have everything. You need:
To use the Raspberry Pi, we need an OS. We can for example use Linux. In this guide we use NOOBS for installing Raspbian.
On your laptop:
On your Pi:
After some time Raspbian will be succesfully installed.
If you want to access the Raspberry Pi using SSH, you can do the following.
On your laptop:
On your Pi:
From now you can easily connect with your Pi, by executing the following command in your Terminal (or using Putty if you have Windows):
    ssh pi@192.168.1.23
                               ^ IP-adres van de Raspberry Pi
It's nice if you can use the graphical user interface of the Pi without the need of a keyboard, mouse & screen.
We can have a remote desktop connection with our Pi to interact. For this we need a tool like VNC.
With these actions you'll enable VNC on your Pi:
With these actions you'll start a remote desktop connection from your desktop.
For the first run, it's most easy if you connect a keyboard, mouse, screen.
Connect keyboard/mouse/screen and boot up your Pi.
Now update all the things
sudo apt update
sudo apt full-upgrade -y
Run BarterDEX from a terminal
on your laptop or pi
The following slides show parts of this GitHub wiki page.
Install the following packages:
sudo apt-get update
sudo apt-get install cmake git libcurl4-openssl-dev build-essential
Then, install nanomsg:
Linux
cd ~
git clone https://github.com/nanomsg/nanomsg
cd nanomsg
cmake . -DNN_TESTS=OFF -DNN_ENABLE_DOC=OFF
make -j2
sudo make install
sudo ldconfig
MacOS
brew install nanomsg
^ You'll need to install homebrew (Google how to do it)
Clone the SuperNET repo from github & Install:
cd ~
git clone https://github.com/jl777/SuperNET
cd ~/SuperNET/iguana/exchanges
git checkout dev
./install
Remember that you generated a seed / passphrase, using the BarterDEX GUI?
We are going to run BarterDEX using the command line. Let's fill in your private passphrase:
cp passphrase ../dexscripts/passphrase
cd ../dexscripts
nano passphrase
Enter your passphrase.
Press CTRL+X then Y then ENTER to save the file.
To securely interact with BarterDEX.
To interact with BarterDEX securely, you need a userpass. Once this is setup correctly you can start running BarterDEX!
To get your userpass, run BarterDEX:
cd ~/SuperNET/iguana/dexscripts
./client &
./setpassphrase
pkill -15 marketmaker
Copy it.
Edit the userpass file:
cd ~/SuperNET/iguana/exchanges
cp userpass ../dexscripts/userpass
cd ../dexscripts
nano userpass
Enter your userpass.
Press CTRL+X then Y then ENTER to save the file.
BarterDEX is now installed on your system.
Every time you want to run BarterDEX,
open a new terminal window and type the following:
cd ~/SuperNET/iguana/dexscripts
./client &                                               # <- This can take a while
./setpassphrase
And, don't close it.
Open a new terminal window to issue all other scripts/API calls. You'll learn about them next.
Almost there. You want to define what coins can be traded by others.
You configure tradable coins by editing the file electrum. If you like the configuration, save the file.
See http://pad.supernet.org/electrum-servers for electrum servers you can add to the electrum file.
Save the file and enable the coins you defined:
./electrum
See the contents of ./auto_chipskmd
cat ./auto_chipskmd
Start your auto trade bot:
./auto_chipskmd
You can also create other files like this one, for trading other pairs then just chips/kmd.
You run your LP node as follows:
cd ~/SuperNET/iguana/dexscripts
./client &
./setpassphrase
(OPEN NEW TERMINAL)
./electrum
(START AUTO TRADING)
./auto_chipskmd
You end the process like this:
pkill -15 marketmaker
Now your Raspberry Pi is configured well, you can make the Liquidity Provider process autostart on boot.
When you power up your Raspberry Pi, it will automatically start offering liquidity. You even don't need other cables/hardware than the power cable!
In the next step you will learn how to autostart your script on boot.
# Create a file for the auto start scripts:

sudo touch /etc/init.d/lp
# Make sure the script can be executed:

sudo chmod 755 /etc/init.d/lp
# Activate the auto start scripts:

sudo update-rc.d lp defaults
The file /etc/init.d/lp will contain the script you want to automatically execute everytime the Pi boots.
Let's define what should happen on boot: nano /etc/init.d/lp
pkill -15 marketmaker
cd ~/SuperNET/iguana/dexscripts
./client &
sleep 120
./setpassphrase
sleep 30
./electrum
sleep 5
./auto_chipskmd
3. Save and exit: Ctrl+X, Y, Enter
If you ever want to start the process manually, run:
/etc/init.d/lp
By Bart
This guide learns you how to install & use BarterDEX. Next to that, it shows you how to be a liquidity provider, using your laptop or Raspberry Pi. Previous Meetup event: https://www.meetup.com/blockbar/events/bwwqkpyxfbnc/


