Git & GitHub

Git

If you get stuck and can't deal with the command line

  1. Persevere
  2. There's always:
    1. GitHub Desktop
    2. Atlassian SourceTree
    3. Git Tower (they have cheat sheets!)

What is git?

  • Git is a 'Version Control System'
  • It allows you to 'save' where you're up to
  • as you make changes it keeps track of the differences in files. Each time it saves the differences (or deltas)
  • This can be useful because you can:
    • Keep different copies depending on:
      • Brand
      • Environment (i.e. dev, UAT, prod, etc.)
  • It is a 'distributed' system, which means that unlike 2nd gen. version control systems (like subversion), people can keep their own repository and only share what they think is ready in the main repository

Getting/Setting Up a git repository

GIT Two Ways

  • A directory of code which is under version control is called a repository (or repo, for short)
    1. Create your own repo (locally) - when you start a project
      • you initialise a repository (git init)
    2. Copy an existing repo - when someone else has
      • you clone the repository (git clone <repo url> [<new folder name>])
      • gives you a 'working copy' that knows about its remote and is in a directory named the same as the project
      • Use this method to
        • use the basics of someone's work, or
        • collaborate with them (see pull requests later)
  • These are one-time operations!!

Clone via HTTPS or SSH

  • If it's short term, then https is fine
    • You'll be asked for your creds every time, unless:
  • SSH is preferable

De-git-ing

  • Once you git init, you'll see a .git directory
    • delete the .git directory

dotfiles (keeping & ignoring)

  • git doesn't track directories. To add an empty directory, create a file named .gitkeep inside it
  • you should keep a list of files to ignore in a .gitignore
    • you can put filepaths and globs (e.g. **/*.js) in a .gitignore file
      • node_modules <-- a directory
      • .DS_Store <-- a file mac generates
      • *.log <-- log files
      • .env <-- files with secrets
      • dist <-- your built product
    • it is traditional to keep your node_modules and your locally-optimised (build or dist) directories out of source control
  • example for standard front-end project
  • example for node projects
  • vscode addon

A word on large files

Using a git repo

The 3 'trees' of git

  • Git has 3 file trees that it keeps track of:
    • Working Tree
      • files that you are currently working on that git is monitoring - so not 'untracked'
    • The 'index' (aka 'staging')
      • files that you have selected for commit
    • HEAD
      • The last state of your local repository

Once you have a local copy...

  • You have a working directory (or work tree)
  • You make changes to the files in it
  • You add them in batches to fix one problem at a time to the index (aka staging) where you can ensure that this is the code you want to push
    • If you create new files, they are untracked. You'll need to add
  • You then commit them to your local repository
  • When you're ready to share with others you push them to a 'remote repository' (i.e. someone else's repo)
  • So, the process is in 3 phases:
    1. stage (group all relevant local changes as part of this commit)
    2. commit (accept this group of changes with a message that says what they achieve)
    3. push (send your changes to the remote repository)

The Basic Process

  • The vast majority of the time you will simply do:
     
    • git add -A (or git add <files>)
    • git commit -m "some message"
    • git push [remote name] [remote branch]
      • when ready to publish
      • You may need to pull and merge if collaborating
         
  • The rest of this presentation will teach you what that means and some other fineries...

Seeing Changes/State

  • git status - shows you the state of the files in the working directory and staging areas
  • git log will show you the list of things committed to your local repo (on the branch you are on!)
    • q to quit
    • git log --stat to see what changes were made (diff report)
      • git log -p shows actual changes
    • git log --all --decorate --oneline --graph

    • git log --branches=* - to see commits on all 'branches'

  • git diff [<filepath>] shows differences to last commit
    • git diff <commit1> <commit2> [<filepath>]
  • git show <commit> [--stat] [ -- <filepath>]
  • ​gitk will open a repository browser (if installed)

Untracked Files

  • If you add files into a git repository and do git status you will see they arrive in their initial state of 'untracked'
  • Git knows they are there but is not actively monitoring them for changes
  • To start monitoring them we use git add (see next slide)
  • By default, git add adds files straight to staging
  • To avoid this you can do git add -N <file>
    • This adds files to the working tree BUT does not stage them
  • git clean - removes them

Stage Changes

  • git add <path or flags>
  • git add . (stages new and modified files in the current directory)
  • git add * (stages all files, but not dot files)
  • git add -A (stages everything, including updates and deletions)
  • git add -u (stages only modified and deleted files)
  • git add -p (interactive!!!!)
  • There are a lot of flags but not very relevant
    • -v verbose
    • -n (--dry-run): show if files exist in version control
    • -f force: don't do this unless absolutely necessary
  • Un-staging: git reset HEAD [<file/directories[s]> or *]

Commit Changes

  • git commit -m "<message>"
  • if you just do git commit it will force you into vim to leave a message. You can type a message, then :wq to save & exit; or ctrl + c to quit and try again
    • To amend the last commit message git commit --amend -m "<better message>"
    • IF YOU FORGET TO INCLUDE SOME FILES add them then git commit --amend (--no-edit if you want to use the same msg)
  • You can do repeated commits before pushing your changes
  • The last commit you did is called the HEAD
  • Each commit gets a Secure Hash Algorithm or SHA (e.g. 78asdf78as6d7f9as) to identify it (use first 7-10 for short)

Undoing Commit Changes

  • git reset HEAD~1 (remove last commit)
    • now check status
    • You cannot remove a specific commit (For that, see git revert)
  • reset has modes
    • --soft: removes commit & put changes back to staging

    • --mixed (default): removes commit & put changes back to working dir 

    • --hard: removes commit & reverts tracked files to the previous state (git clean to remove untracked), effectively deleting changes

  • This stuff works if your changing stuff locally. IF YOU'VE PUSHED, then git revert is your friend!

Checkout

  • git checkout allows you to move to a place in the history of any part of the repository.
  • Later we'll use it to move between branches but here we can use it to move between commits
  • When you move to another commit from the head, git creates a new branch for you with that state loaded. It will describe it to you as being in a HEADLESS STATE.
    • Do not panic! As the message says, you can play around here and when you leave it will be discarded
    • If you want to get back then just git checkout <branch>
    • If you want to keep changes, having messed around, then git checkout -b <new-branch-name> and then that becomes a permanent part of your code that you can merge in with the main part later...

Reversing Changes

  • Removing from git (without deleting from file system) git rm --cached [<file/directories[s]>]
  • hard reset the repo to a SHA
  • Resetting a file: git reset HEAD -- file.txt
    • git reset HEAD~1 -- file1.txt file2.txt
    • git checkout <SHA or HEAD> file.txt
  • Undoing a commit: git revert <sha> - attempts to undo the changes made by a single commit. It creates a new commit in the HEAD position of the line

Branches

A branch is just a version of the codebase

Dealing with master/main

  • As a sign of support for the BLM movement technologists have changed the name of the old master branch to main
  • This is not automatic
    • To change manually: 
      • git branch -M main (if you're on master)
      • ​git branch -m master main (from anywhere
    • From 2.28 onwards you can put an entry in the config that deals with this: 
      git config --global init.defaultBranch main

Branches

  • Branches are a key part to GIT
  • Branches allow us to keep different versions of the codebase. Reasons:
    • for different environments (e.g. dev vs prod)
    • features, bugfixes, etc.
      • branches created to try something out without affecting the main body of the code
  • See your branches held
    • locally: git branch
    • remotely: git branch -r
    • all git branch -a
    • IF you've not committed anything these branches won't show! (commit to main before switching away!)
  • visualisation

Working on a Branch

  • When you first checkout a copy of a repo, or create one locally, you're on the master branch
  • To switch to another branch: git checkout <branch name> or git switch <branchname>
  • To create a new branch and switch: git checkout -b <branchname> or git switch -c <branchname>

Merging changes

  • You can merge one branch into another via git merge​ <branchname>
  • Git does intelligent merging and that generally works
  • There are git plugins that let you see the difference and choose what to merge (e.g. gitk)

Manually Merging changes

  • You'll see something like this in your files:
<<<<<<<<<<<<<<<<< HEAD
console.log('Hello');
=================
console.log('Hello world');
>>>>>>>>>>>>>>>>> s67d8f6s7d86fs789d6
  • If the auto-merge fails you'll see:
  • you'll have to go into your files and manually resolve by deleting the chaff, adding and committing
AutoMerging index.html
CONFLICT (content): Merge conflict in index.html
Automatic merging failed: Fix conlicts and merge the result

Rebasing

  • Personally, I'd prefer merge at your stage
  • It means 'apply these changes as if I'd branched from a later point than I did'
  • Tutorial here https://www.youtube.com/watch?v=ElRzTuYln0M (using 'interactive mode' - which is amazing!)

Stashing

  • You have changes to tracked files that are not committed
  • You suddenly need to change branch
    • Or you may realise you want to apply those changes to a different branch
  • You try to checkout but git won't let you until you commit them. Solution:
  • git stash - this temporarily stores your changes in a stack (i.e. you can do this repeatedly) and returns your branch to a settled state. You can then change branch
  • When you return later you can do git stash apply or git stash pop (applies but then removes from the stash) to get the changes back

Remote Repos

Sending your work somewhere else...

Remote Repos

  • If you cloned, then you have at least one remote repo
  • You can list the remotes using: git remote
    • use the -v flag for verbose
  • You can add a remote: git remote add <name> <git url>
  • and remove with git remote remove <name>
  • and rename it with git remote rename <old name> <new name>

Getting updates from remote

  • Once hooked up to a remote repo, Git won't let you push your changes unless you've got the latest changes from the remote in your local repository
  • To see the latest you can do a git fetch <remote> [<branch>] (this brings the changes but does not apply them)
    • git fetch === git fetch origin master
  • If you git status now you'll see those changes, including the number of commits ahead or behind you are from the remote
  • To apply the changes to the local after a fetch, you can git merge
    • ​This ^^ is the safest way of getting changes
  • THE QUICKEST is git pull, which auto-magically fetches and merges the changes from remote
  • To get a remote branch, just check it out git checkout <remoteBranchName>

Sending changes to remote

  • git push <repo> <branchname> (e.g. git push origin main)
    • push to a different branch remotely:
      • git push <remote> <local branch name>:<destination branch name>
  • Adding -u (upstream) the first time sets up tracking between the local and remote repos, and is a one-time operation
    • There are lots of flags to force. Generally don't.​
  • Push access
    • generally, unless you're set up, you can't push your changes to someone else's repo for obvious reasons
    • To get access, you generally have to hand over your 'public key'
    • See here for more. (The same principles apply outside of github)

What is it?

  • It's a massive cloud-based system for storing git repos
  • You get an account
    • You can store you own repos
    • You can look at other people's through the web interface
    • You can edit your own via that interface
    • You can look at/get copies of other people's work (git clone)
    • You can keep a list of your favourite repos using the 'star' button
    • You can log a bug on the issues tab (read the rules!)

Forking

  • You can use the fork button to create your own version of another person's work
  • Forking is the repo-level equivalent of branch
  • You will have their initial history, then your own
  • You can use this if you want it to be the basis of your own take on the software, or
  • You can use it to collaborate (See next slide)

Pull Requests

  • Used for collaboration
  • Once you've edited the code to add your suggestions, etc. you can do the equivalent of 'suggesting a merge'
  • This is called  a pull request
  • You press the big pull request button and give comments
  • The owners of the other repo can either
    • accept, in which case the code is merged, or
    • Reply with comments and ask you to change things until they are acceptable

Competitors

Some useful aliases

Conflicts (use like git conflicts)

git config  --global alias.overview "log --graph --format=format:'%C(bold blue)%h%C(reset) - %C(bold green)(%ar)%C(reset) %C(white)%an%C(reset)%C(bold yellow)%d%C(reset) %C(dim white)- %s%C(reset)' --all"

Better logging (credit):

git config  --global alias.conflicts "diff --name-only --diff-filter=U"

Git & GitHub

By James Sherry

Git & GitHub

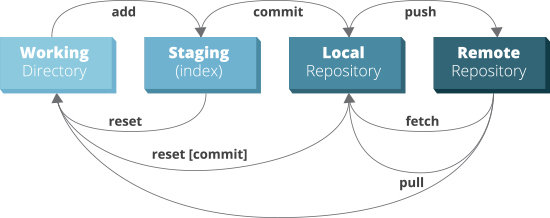
A basic workflow introduction

  • 1,681