Git and GitHub
Joel Ross
Autumn 2024
View of the Day
-
Admin and Q&A
-
Command Line Review (if needed)
-
Git and GitHub Practice
-
Git Branches and Merging
Reviewing
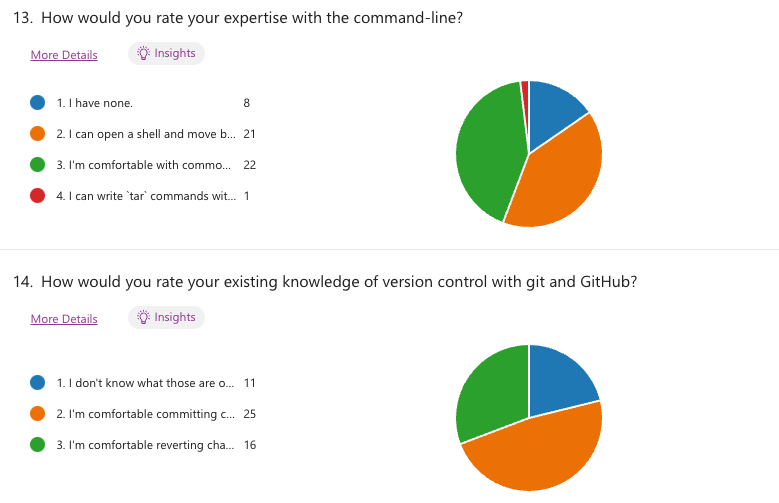
Q&A / Review Poll
Installing Git
Step 1. Install Git (see textbook)
# configure git to know who you are

git config --global user.email "your_email_address"

git config --global user.name "Your Full Name"
# check on command line that git is installed
git --versionCloning
You clone (download) a repository to your local machine. This creates a copy of that repo on your computer.

git clonerepo on your
machine
repo on GitHub


Clone Practice Code
For today's practice, accept the GitHub Classroom assignment and then clone your personal repository
Personal Access Tokens
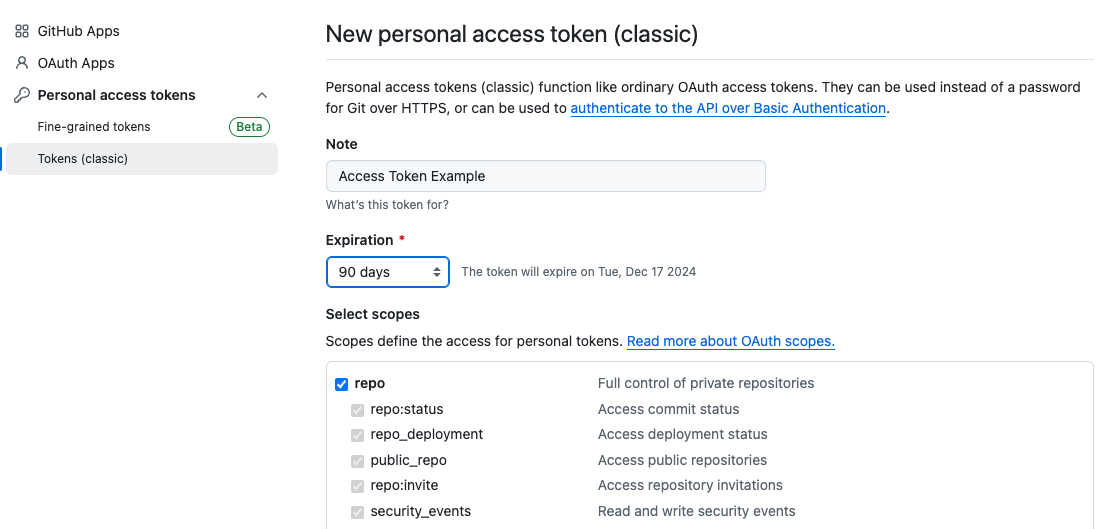
In order to clone repos from Github, you will need to set up an access token (like a password) for authentification. Do this under Github's Settings > Developer Settings
DO NOT PUT ONE REPO INSIDE OF ANOTHER!

Git Commands
git clone urlDownload repo to local machine. Creates a local copy.
git statusCheck status of repo
Make some changes!
Add another paragraph <p> (lorem ipsum text is fine) to the index.html file.
Can you include a hyperlink as well?
The Staging Area
Put changes in temporary storage before committing.

git add .Add everything in directory
Add file to staging area
git add FILENAMEuse this
Committing Changes
Store current snapshot of files in repository!
git commit -m "message"Commit changes
If you forget the -m option,
use :q (colon then q) to quit vi
Commit Message Etiquette
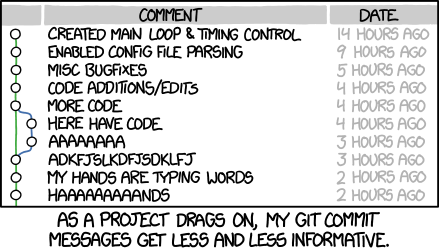
Use informative commit messages; they document changes for others. Messages should complete the sentence:
If applied, this commit will ________________.
Local Process

files
staging area
git add .git commit -m "message"repo
Push to GitHub
Upload commits to the GitHub cloud repo.
git pushPush to the remote
Using GitHub (Assignments)
edit files
staging area
git addgit commitgit cloneyour machine
git pushyour copy


follow assignment
link
More changes!
Add a <footer> that contains your name (as the author) for the page.
Commit and push your change to GitHub.
Branches
Branches allow for non-linear development and for naming different versions of code in the same repo. More on this later!
main
Branch Commands
git branchList available branches
git branch [my_branch]Create a new branch called "my_branch"
git checkout [my_branch]Switch to branch "my_branch"
git checkout -b [my_branch]Create and switch to branch "my_branch"
git branch -d [my_branch]Delete branch "my_branch"
Branch Practice!
-
Open the index.html file (in VS Code)
-
Create and
checkouta new branch called experiment -
Add a caption for the image (another paragraph below it)
-
Add and commit your change
-
checkoutthe main branch -
Add another introductory paragraph of content (before the image)
-
Commit your change
-
Switch between the experiment and main branches (clicking on VS Code in between). See the file contents changing?
Branches
main
main
experiment
experiment
HEAD
HEAD
HEAD
HEAD
git branch experiment

git checkout experiment

git commit

git commit

git checkout main

git commit

git checkout experiment
HEAD
HEAD
experiment
HEAD
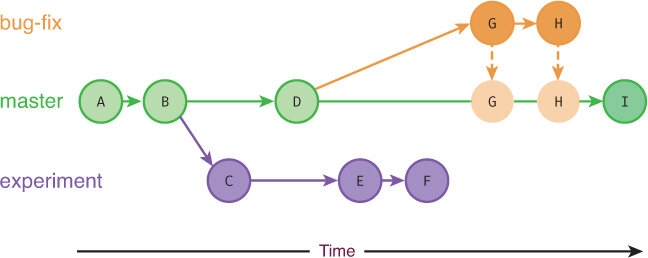
Merging
We can
merge two branches back together, producing a commit that contains the combined changes from both branches
main
main
experiment
HEAD
HEAD
Merging
git merge [other_branch] --no-editMerges changes from other_branch into the current branch.
A new commit is created on the current branch containing the merged content.
Merging Practice
-
Make sure you are on the main branch
(usegit branchto check; the current branch has a*) -
Use
git mergeto merge the experiment branch into main branch.-
If you get dropped into vi, hit
:wq(colon then w then q) to accept the message.
-
-
Check in VS Code that the file now contains both sets of changes!
Merging Practice II
-
You should be on the main branch.
-
Create and
checkouta new branch called danger -
On the danger branch, change the <h1> heading to say "Warning". Remember to
commityour change. -
checkoutthe main branch again. -
Change the <h1> heading to ve something about the dog.
commityour change. -
Use
git mergeto merge the danger branch into main branch
-
(Don't panic)

Merge Conflicts
A merge conflict occures when two commits from different branches include different changes to the same code. Git does not know which version to keep, so makes you choose.
Merge conflicts must be resolved manually
Merge conflicts are a common and normal part of merging. They are the "typos" and "bugs" of using git.
Resolving Merge Conflicts
In order to resolve a conflict, you need to edit the file (code) so that you pick which version to keep. git will add marker content where you need to make a decision:
<<<<<<< HEAD

// This is the code from the "local" version (the branch you merged INTO)
// a.k.a the version from the HEAD commit

const message = "I am an original";
const lyric = "I've got no strings to hold me down";

// There can be multiple lines that conflict, including lines being deleted

=======

// This is the code from the "remote" version (the branch you merged FROM)

const message = "I think I'm a clone now...";

// The lines need not be related in content, they've just changed in a way
// that git can't figure out which to keep!

>>>>>>> f292a3332aedc8df3e8e8cf22ca3debc214c6460
the two versions to pick from
a divider between the versions
end conflict area
git add .
git commit -m "Merge branch 'other'"- Use
git statusto see which files have merge conflicts. Note that files may have more than one!
- Fix the code so that it reflects the "final" version you want.
- Remember to delete the
<<<<<<<and=======and>>>>>>>!!
- Once you're satisfied that the conflicts are all resolved,
addandcommityour changes (the code you "modified" to resolve the conflict):
Resolving Merge Conflicts
Merge conflicts are normal and expected
Multiplayer Git
Collaboration
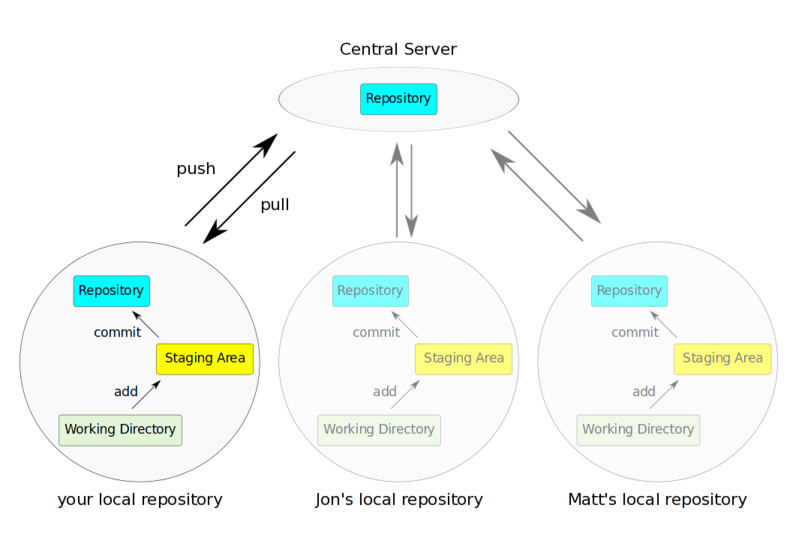
Multiple people's local repositories can be linked to the same remote repository, allowing them to push and pull to the same central location.
Collaboration Demo
-
Partner up with a partner ("Howdy pardn'r")
-
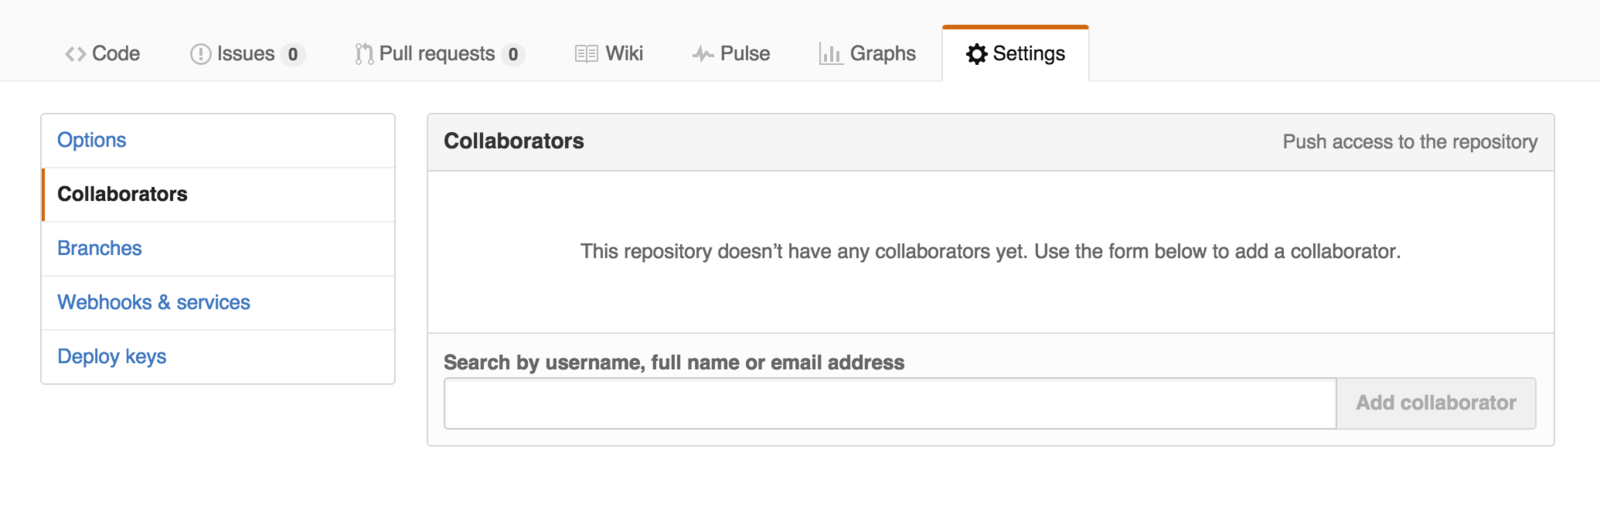
One person should add the other as a collaborator
-
The added person will then need to clone their partner's repo on their machine
-
Remember to do this in a different folder!
-
Collaboration Demo
-
Partner: edit the README.md file so it includes a message to your partner (be nice)
-
add and commit your change as usual.
-
-
Me: create a new partner.html file that includes a message to your partner (be nice)
-
add and commit as usual.
-
-
Partner: push their changes to Github
-
Then Me: push their changes to Github
-
What happened?!
-
Collaboration Demo
-
Me: pull to merge in Person 1's message
-
Both people should confirm the changes are local!
-
-
Partner: push your changes to Github
-
Me: pull in Person 2's message and merger
-
You both should now have up-to-date code!
-
Collaboration Demo II
-
Me: edit the partner.html file so that it has a different message. Change the existing line of code.
-
add and commit your change as usual.
-
-
Partner: edit the partner.html file so that it has a different message. Change the existing line of code.
-
add and commit as usual.
-
-
Partner: push their changes to Github
-
What happened?
-
-
Then Me: push their changes to Github.
But they need to pull first...
git add .
git commit -m "Merge branch 'other'"- Use
git statusto see which files have merge conflicts. Note that files may have more than one!
- Fix the code so that it reflects the "final" version you want.
- Remember to delete the
<<<<<<<and=======and>>>>>>>!!
- Once you're satisfied that the conflicts are all resolved,
addandcommityour changes (the code you "modified" to resolve the conflict):
Resolving Merge Conflicts
Any git questions?
Action Items!
-
Complete task list for Week 2 (items 1-9)
-
Read: Chapter 1-5 (especially 5)
-
-
Problem Set 01 due Wednesday (for reals!)
-
Problem Set 02 due Friday (for reals!)
-
Begin thinking about idea for your project
Next: CSS and Semantic HTML
info340au24-git
By Joel Ross


