Introduction to Agentic AI
LangGraph Introduction
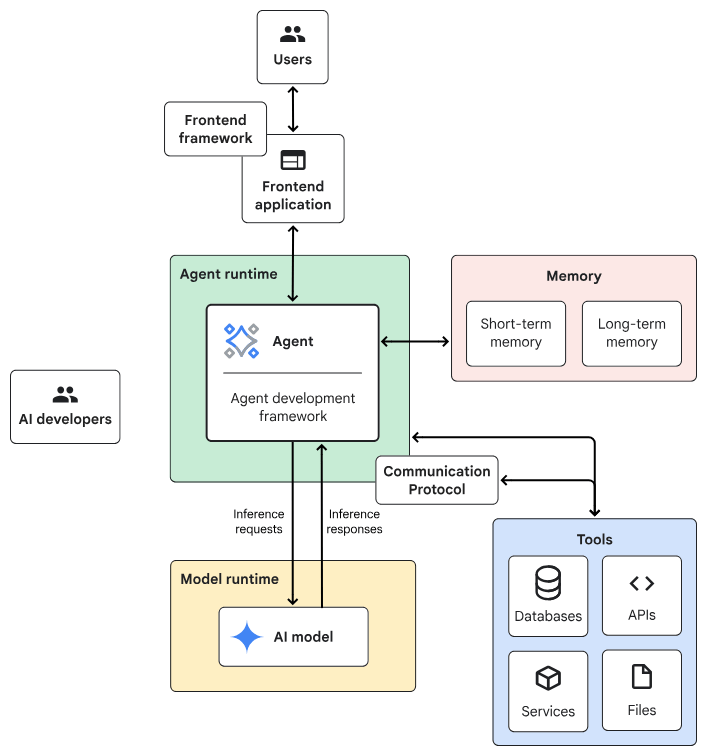
Agentic AI System Architecture
- Frontend:預先建構的元件、程式庫和工具集合,用於建構UI。
- Agent development framework:建構及架構agent的framework與程式庫。
- Tools:工具集合,例如 API、服務、函式與資源。
- Memory:儲存及回想資訊的子系統。
- Design Pattern:Agentic AI常見的運作方法。
- Agent runtime:執行、運算環境。
- AI 模型:核心推論引擎。
- Model runtime:用於代管及提供 AI 模型的基礎架構。
一般伺服器
Planner-Executor
AI伺服器
Chain-lit
React + FastAPI
Building Your First LangGraph
import random
from typing import TypedDict, Literal
from langgraph.graph import StateGraph, START, END

# 1. 定義 State
class BasicState(TypedDict):
    count: int

# 2. 定義節點 (Node)
def counter_node(state: BasicState):
    new_count = state["count"] + 1
    print(f"目前計數:{new_count}")
    return {"count": new_count}
# 增加一個中繼節點,純轉場用
def router_node(state: BasicState):
    return state

# 3. 定義條件判斷 (Conditional Edge)
def should_continue(state: BasicState) -> Literal["next_round", "stop"]:
    if state["count"] < 3:
        return "next_round"
    return "stop"

# (1/2)...續下頁...
First Langgraph Example
lg_agent.py(1/2)
builder = StateGraph(BasicState)
builder.add_node("counter", counter_node)
builder.add_node("router", router_node) # 新增的節點

builder.add_edge(START, "counter")
builder.add_edge("counter", "router") # counter 連到 router

# 條件邊從 router 發出
builder.add_conditional_edges(
    "router",
    should_continue,
    {
        "next_round": "counter", # router 連回 counter,不再是自己連自己
        "stop": END
    }
)

graph = builder.compile()

# 初始 count 設為 0 啟動
graph.invoke({"count": 0})lg_agent.py(1/2)
First Langgraph Example
from IPython.display import Image, display

# 產生 Mermaid 流程圖並顯示
try:
    print(graph.get_graph().draw_ascii())  印出文字版結構
    display(Image(graph.get_graph().draw_mermaid_png()))
except Exception:
    # 如果缺少相關繪圖套件,則印出文字版結構
    print(graph.get_graph().draw_ascii())
lg_agent.py(1/2)
First Langgraph Example視覺化 (Visualize)
pip install ipython pygraphviz grandalfBuilding Block of LangGraph
Langgraph Introduction Building Blocks
Graph based Architecture
information flow
Edge
State
Edge
Edge
Edge
Edge
State-Node-Edge
StateGraph
Graph based Architecture
Interactions from users, tools and LLMs.
Take State as an input and perform operations on this.

Edges help to redirect requests between Nodes
Langgraph Introduction Building Blocks
StateGraph
the container that holds your entire agent workflow
Langgraph Introduction Building Blocks: State
State: Central concept in LangGraph
User defined, necessary information for decision making process
from typing import TypedDict

class State(TypedDict):
    graph_state: str
from typing import TypedDict
class BasicState(TypedDict):
count: int範例1
應用:
1. 追蹤對話的輪數
2. 記錄特定事件發生的次數:呼叫工具次數、密碼輸入錯誤次數
3. 維護簡單分數或指標:遊戲計分、問卷進度
Langgraph Introduction Building Blocks: State
from typing import TypedDict

class BasicState(TypedDict):
    count: int
# 這是你的第一個節點
def counter_node(state: BasicState):
print("--- 正在執行計數節點 ---")
# 取得目前的 count,加 1 後回傳
return {"count": state["count"] + 1}範例1: State搭配Node
Langgraph Introduction Building Blocks: State
from typing import Annotated, TypedDict, List
from operator import add
class ChatState(TypedDict):
# 使用 Annotated 與 add,可以讓新訊息自動「附加」到舊訊息清單後方,而不是覆蓋掉
messages: Annotated[List[str], add]
user_id: str
turn_count: int
def chatbot_node(state: ChatState):
new_message = "你好!我是 AI 助手,有什麼我可以幫你的嗎?" # 模擬LLM產生的新訊息
# 注意:回傳的是一個 list,LangGraph 會執行:舊 messages + [new_message]
return {
"messages": [new_message],
"turn_count": state["turn_count"] + 1
}
def user_input_node(state: ChatState):
user_msg = "請問今天天氣如何?"
# 同樣回傳 list,它會自動排在 AI 訊息後面
return {
"messages": [user_msg],
"user_id": "user_123" # 這裡會直接覆蓋或設定 user_id
}範例2
應用:
1. 儲存對話上下文 (Context)
2. 追蹤特定使用者的對話輪數
使用Annotated建立context:定義 Reducer(合併邏輯)
自動將新訊息「加 (append)」到舊的清單後面。
Langgraph Introduction Building Blocks: State
from typing import TypedDict, Optional
class TaskState(TypedDict):
objective: str # 使用者要求的目標
current_step: str # 現正執行的步驟 (例如: "searching", "summarizing")
is_completed: bool # 任務是否已完成
final_report: Optional[str] # 最終生成的文案或報告內容
def summarize_node(state: TaskState):
print("--- 正在生成最終報告 ---")
raw_data = state["final_report"]
summary = f"【最終報告】{raw_data} 該語言目前廣泛用於 AI 領域。"
return {
"final_report": summary,
"is_completed": True, # 標記任務完成
"current_step": "done"
}
def research_node(state: TaskState):
print(f"--- 正在針對目標:{state['objective']} 進行搜尋 ---")
# 模擬搜尋獲取的資料
search_data = "搜尋結果:Python 是由 Guido van Rossum 創造的。"
return {
"current_step": "summarizing", # 更新下一步驟名稱
"final_report": search_data # 先把暫時的資料存入 report 欄位
}應用:
1. 「更新目前進度」,「產出階段性結果」
2. is_completed 為 True ,讓圖 (Graph) 導向END節點
範例3
node如何運作?
仍需搭配Edge, Conditional Edge,以及圖的串接
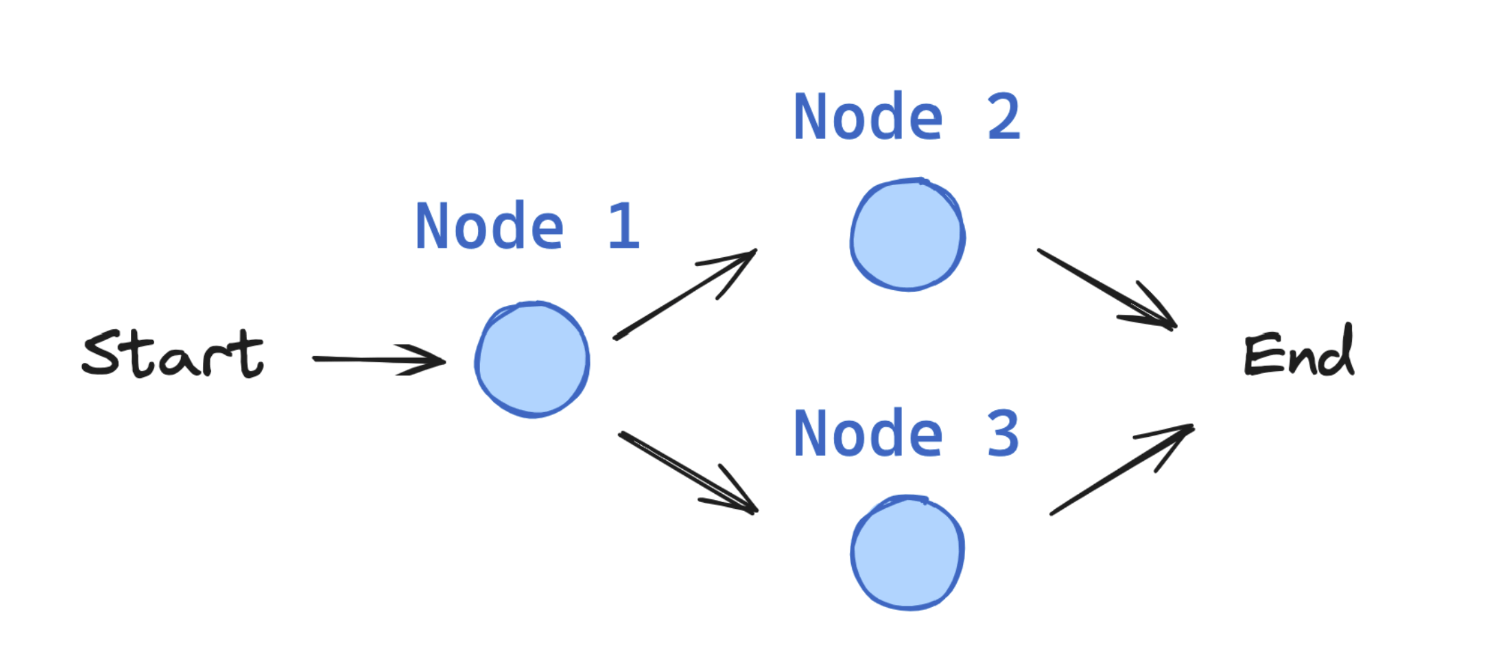
Langgraph Introduction Building Blocks: Node
Nodes: python functions.
(1) Takes the state as input (2) Performs some operation (3) Returns updates to the state
from typing import TypedDict
class State(TypedDict):
graph_state: str
def node_1(state: State):
print("---Node 1---")
return {"graph_state": state['graph_state'] +" I am"}
def node_2(state: State):
print("---Node 2---")
return {"graph_state": state['graph_state'] +" happy!"}
def node_3(state: State):
print("---Node 3---")
return {"graph_state": state['graph_state'] +" sad!"}Langgraph Introduction Building Blocks: Node
from typing import TypedDict

class BasicState(TypedDict):
    count: int

# 這是你的第一個節點
def counter_node(state: BasicState):
    print("--- 正在執行計數節點 ---")
    # 取得目前的 count,加 1 後回傳
return {"count": state["count"] + 1}Nodes can contain:
- LLM calls: Generate text or make decisions
- Tool calls: Interact with external systems
- Conditional logic: Determine next steps
- Human intervention: Get input from users
範例1
Langgraph Introduction Building Blocks: Node
from typing import Annotated, TypedDict, List, Union
from operator import add

class AgentState(TypedDict):
    question: str
    search_results: str  # 儲存搜尋到的資料
    answer: str          # 最終 AI 的回答

# 節點 1:搜尋 (模擬工具呼叫)
def search_node(state: AgentState):
    print("--- 正在執行搜尋工具 ---")
    query = state["question"]
    # [省略] 此處實務上會接搜尋引擎API如 Google 或 Tavily API
    results = f"關於 '{query}' 的搜尋結果:今天天氣晴朗,氣溫 25 度。"
    return {"search_results": results}

# 節點 2:產生回答 (LLM 呼叫)
def answer_node(state: AgentState):
    print("--- 正在產生最終回答 ---")
    context = state["search_results"]
    question = state["question"]
    # [省略] 此處實務上會將 context 交給 LLM 生成文字
    final_answer = f"根據資料({context}),您的問題 '{question}' 答案是:天氣很棒!"
    return {"answer": final_answer}
範例2
Langgraph Introduction Building Blocks: Edge
Edges connect nodes and define the possible paths. 分為兩種
(1) Direct: Always go from node A to node B (2) Conditional: Choose the next node based on the current state
import random
from typing import Literal

def decide_mood(state) -> Literal["node_2", "node_3"]:

    # Often, we will use state to decide on the next node to visit
    user_input = state['graph_state']

    # Here, let's just do a 50 / 50 split between nodes 2, 3
    if random.random() < 0.5:

        # 50% of the time, we return Node 2
        return "node_2"

    # 50% of the time, we return Node 3
    return "node_3"
Literal:型別提示,只能從指定的值當中任選一個。
from typing import TypedDict, Optional

class TaskState(TypedDict):
    objective: str           # 使用者要求的目標
    current_step: str        # 現正執行的步驟 (例如: "searching", "summarizing")
    is_completed: bool       # 任務是否已完成
    final_report: Optional[str] # 最終生成的文案或報告內容
def summarize_node(state: TaskState):
    print("--- 正在生成最終報告 ---")
    # ...略
    return {
        # ...略
    }
def research_node(state: TaskState):
    print(f"--- 正在針對目標:{state['objective']} 進行搜尋 ---")
    # ...略
    return {
        "current_step": "summarizing", # 更新下一步驟名稱
        "final_report": search_data    # 先把暫時的資料存入 report 欄位
    }

def should_continue(state: TaskState):
    # 根據 state 中的布林值決定去向
    if state["is_completed"]:
        return "end"
    return "continue"
應用:
1. 「更新目前進度」,「產出階段性結果」
2. is_completed 為 True ,讓圖 (Graph) 導向END節點
範例1
node如何運作?
除搭配Edge, Conditional Edge,仍需圖的串接
Langgraph Introduction Building Blocks: Edge
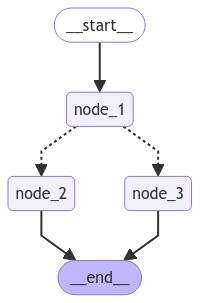
Langgraph Introduction Building Blocks: StateGraph
from IPython.display import Image, display
from langgraph.graph import StateGraph, START, END

# Build graph
builder = StateGraph(State)
builder.add_node("node_1", node_1)
builder.add_node("node_2", node_2)
builder.add_node("node_3", node_3)

# Logic
builder.add_edge(START, "node_1")
builder.add_conditional_edges("node_1", decide_mood)
builder.add_edge("node_2", END)
builder.add_edge("node_3", END)

# Add
graph = builder.compile()

# View
display(Image(graph.get_graph().draw_mermaid_png()))
The StateGraph is the container that holds your entire agent workflow.
LangGraph Agent Examples
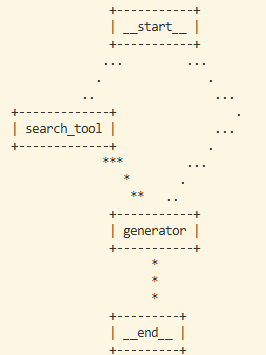
Langgraph Agent Example search & answer agent
知識搜尋機器人:
- Router:判斷問題是否需要搜尋。
- Search Node:模擬抓取外部資料。
- Generate Node:將資料彙整成回答。
Router
Router
from typing import TypedDict, Annotated, Literal
from operator import add
import random

# --- 1. 定義 State ---
class AgentState(TypedDict):
    question: str
    # 使用 Annotated[..., add] 讓搜尋結果可以累加(如果有多個搜尋節點的話)
    context: Annotated[list[str], add]
    answer: str
# --- 2. 定義節點 (Nodes) ---
def search_node(state: AgentState):
    print("🔍 [Node: Search] 正在搜尋相關資料...")
    # 這裡模擬搜尋行為
    mock_results = [f"關於 '{state['question']}' 的最新研究顯示:Python 是 AI 開發的首選。"]
    return {"context": mock_results}
def generate_node(state: AgentState):
    print("🧠 [Node: Generate] 正在整理回答...")
    info = "\n".join(state["context"])
    response = f"根據我找到的資料:{info}\n這就是您的答案!"
    return {"answer": response}
# --- 3. 定義路由邏輯 (Conditional Edge) ---
def router(state: AgentState) -> Literal["search", "generate"]:
    # 簡單判斷:如果 context 還是空的,就去搜尋
    if not state.get("context"):
        return "search"
    return "generate"
# 續下頁 (1/2)Mock版(1/2)
# 續上頁 (2/2)
# --- 4. 建構圖 ---
from langgraph.graph import StateGraph, START, END

builder = StateGraph(AgentState)

builder.add_node("search_tool", search_node)
builder.add_node("generator", generate_node)

# 設定流程
builder.add_conditional_edges(
    START,
    router,
    {
        "search": "search_tool",
        "generate": "generator"
    }
)

builder.add_edge("search_tool", "generator")
builder.add_edge("generator", END)

graph = builder.compile()

# --- 5. 執行測試 ---
print("--- 啟動機器人 ---")
result = graph.invoke({"question": "為什麼 AI 常用 Python?", "context": []})
print("\n最終回答:")
print(result["answer"])
Mock版(2/2)
Update #1: Local LLM, generate node
# ...
from langchain_ollama import ChatOllama

# 初始化 Ollama LLM
llm = ChatOllama(model="llama3.2", temperature=0)

# ...
# node definition: generate node
async def generate_node(state: AgentState):
    print("🧠 [Node: Generate] 正在透過 LLM 生成回答...")

    context = "\n".join(state["context"])

    prompt = f"""
    你是一個AI問答助手,根據一下資料回答問題,不要回答以外的內容

    參考資料:{context}
    問題:{state["question"]}

    請給出清楚、有條理的回答:
    """

    answer = await llm.ainvoke(prompt)
    return {"answer": answer}
#...
import asyncio
# ...
# test
print("--- 啟動機器人 ---")
result = asyncio.run(graph.ainvoke({"question": "為什麼 AI 常用 Python?", "context": []}))
print("最終回答:")
print(result["answer"])
Update #1: Local LLM, generate node
主程式
from typing import TypedDict, Annotated, Literal
from operator import add
from langchain_ollama import ChatOllama
from langchain_core.prompts import PromptTemplate
import asyncio


# 初始化 Ollama LLM
llm = ChatOllama(model="llama3.2", temperature=0)

# agent state definition
class AgentState(TypedDict):
    question: str  # 原始問題
    context: Annotated[list[str], add]  # 搜尋到的資料,可以累加(if there are many search node)
    answer: str  # 生成的答案

# node definition: search node
def search_node(state: AgentState):
    print("🔍 [Node: Search] 正在搜尋相關資料...")
    # 這裡模擬搜尋行為
    mock_results = [f"關於 '{state['question']}' 的最新研究顯示:Python 是 AI 開發的首選。"]
    return {"context": mock_results}

# node definition: generate node
async def generate_node(state: AgentState):
    print("🧠 [Node: Generate] 正在透過 LLM 生成回答...")

    context = "\n".join(state["context"])

    prompt = f"""
    你是一個AI問答助手,根據一下資料回答問題,不要回答以外的內容

    參考資料:{context}
    問題:{state["question"]}

    請給出清楚、有條理的回答:
    """

    answer = await llm.ainvoke(prompt)
    return {"answer": answer}

# conditional edge definition
def router(state: AgentState) -> Literal["search", "generate"]:
    # 簡單判斷:如果 context 還是空的,就去搜尋
    if not state.get("context"):
        return "search"
    return "generate"

# build graph
from langgraph.graph import StateGraph, START, END

builder = StateGraph(AgentState)

builder.add_node("search_tool", search_node)
builder.add_node("generator", generate_node)

# 設定流程
builder.add_conditional_edges(
    START,
    router,
    {
        "search": "search_tool",
        "generate": "generator"
    }
)

builder.add_edge("search_tool", "generator")
builder.add_edge("generator", END)

graph = builder.compile()

print(graph.get_graph().draw_ascii()) # 畫出流程圖

# test
print("--- 啟動機器人 ---")
result = asyncio.run(graph.ainvoke({"question": "為什麼 AI 常用 Python?", "context": []}))
print("最終回答:")
print(result["answer"])
Local LLM生成版-完成版
Update #2: search tool
# ...
from langchain_community.tools import DuckDuckGoSearchRun

search_tool = DuckDuckGoSearchRun()

#...
# node definition: search node
def search_node(state: AgentState):
    print("🔍 [Node: Search] 使用DuckDuckGo搜尋中...")

    query = state["question"]
    results = search_tool.run(query)

    # LangGraph 的 Annotated[list, add] 可自動累加
    return {"context": [results]}
pip install ddgs
Free search engine API, 不需要API KEY
Langgraph Agent Example Email processing system
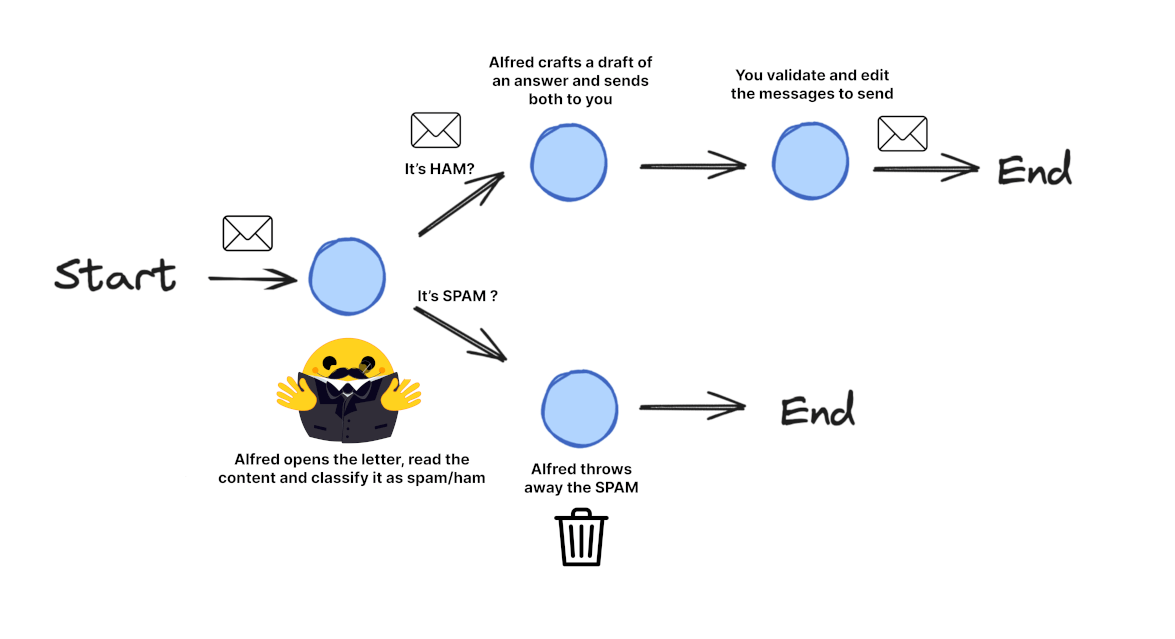
Langgraph Agent Example Email processing system
pip install langgraph langchain_openai langchain_ollama
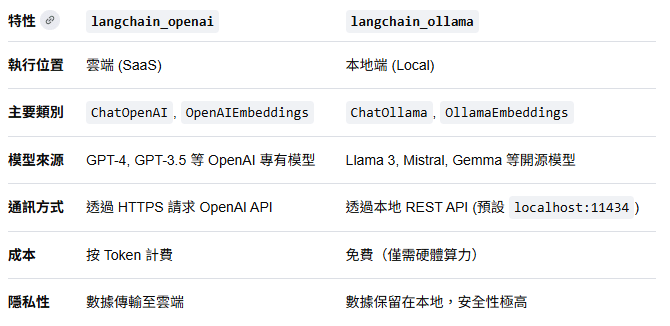
langchain_openai 也可用於Local LLM(openai compatiable)
Langgraph Agent Example Email processing system
import os
from typing import TypedDict, List, Dict, Any, Optional
from langgraph.graph import StateGraph, START, END
from langchain_openai import ChatOpenAI
from langchain_core.messages import HumanMessage

# 續下頁 (1/6)
Necessary modules
pip install langgraph langchain_openai langchain_ollama
Langgraph Agent Example Email processing system
# 續上頁(2/6)
class EmailState(TypedDict):
    # The email being processed
    email: Dict[str, Any]  # Contains subject, sender, body, etc.

    # Category of the email (inquiry, complaint, etc.)
    email_category: Optional[str]

    # Reason why the email was marked as spam
    spam_reason: Optional[str]

    # Analysis and decisions
    is_spam: Optional[bool]

    # Response generation
    email_draft: Optional[str]

    # Processing metadata
    messages: List[Dict[str, Any]]  # Track conversation with LLM for analysis

# 續下頁 (2/6)
Step1: Define states
Langgraph Agent Example Email processing system
# 續上頁(3/6)
# Initialize our LLM
model = ChatOpenAI(temperature=0)

def read_email(state: EmailState):
    """Alfred reads and logs the incoming email"""
    email = state["email"]

    # Here we might do some initial preprocessing
    print(f"Alfred is processing an email from {email['sender']} with subject: {email['subject']}")

    # No state changes needed here
    return {}

def classify_email(state: EmailState):
    """Alfred uses an LLM to determine if the email is spam or legitimate"""
    email = state["email"]

    # Prepare our prompt for the LLM
    prompt = f"""
    As Alfred the butler, analyze this email and determine if it is spam or legitimate.

    Email:
    From: {email['sender']}
    Subject: {email['subject']}
    Body: {email['body']}

    First, determine if this email is spam. If it is spam, explain why.
    If it is legitimate, categorize it (inquiry, complaint, thank you, etc.).
    """

    # Call the LLM
    messages = [HumanMessage(content=prompt)]
    response = model.invoke(messages)

    # Simple logic to parse the response (in a real app, you'd want more robust parsing)
    response_text = response.content.lower()
    is_spam = "spam" in response_text and "not spam" not in response_text

    # Extract a reason if it's spam
    spam_reason = None
    if is_spam and "reason:" in response_text:
        spam_reason = response_text.split("reason:")[1].strip()

    # Determine category if legitimate
    email_category = None
    if not is_spam:
        categories = ["inquiry", "complaint", "thank you", "request", "information"]
        for category in categories:
            if category in response_text:
                email_category = category
                break

    # Update messages for tracking
    new_messages = state.get("messages", []) + [
        {"role": "user", "content": prompt},
        {"role": "assistant", "content": response.content}
    ]

    # Return state updates
    return {
        "is_spam": is_spam,
        "spam_reason": spam_reason,
        "email_category": email_category,
        "messages": new_messages
    }

def handle_spam(state: EmailState):
    """Alfred discards spam email with a note"""
    print(f"Alfred has marked the email as spam. Reason: {state['spam_reason']}")
    print("The email has been moved to the spam folder.")

    # We're done processing this email
    return {}

def draft_response(state: EmailState):
    """Alfred drafts a preliminary response for legitimate emails"""
    email = state["email"]
    category = state["email_category"] or "general"

    # Prepare our prompt for the LLM
    prompt = f"""
    As Alfred the butler, draft a polite preliminary response to this email.

    Email:
    From: {email['sender']}
    Subject: {email['subject']}
    Body: {email['body']}

    This email has been categorized as: {category}

    Draft a brief, professional response that Mr. Hugg can review and personalize before sending.
    """

    # Call the LLM
    messages = [HumanMessage(content=prompt)]
    response = model.invoke(messages)

    # Update messages for tracking
    new_messages = state.get("messages", []) + [
        {"role": "user", "content": prompt},
        {"role": "assistant", "content": response.content}
    ]

    # Return state updates
    return {
        "email_draft": response.content,
        "messages": new_messages
    }

def notify_mr_hugg(state: EmailState):
    """Alfred notifies Mr. Hugg about the email and presents the draft response"""
    email = state["email"]

    print("\n" + "="*50)
    print(f"Sir, you've received an email from {email['sender']}.")
    print(f"Subject: {email['subject']}")
    print(f"Category: {state['email_category']}")
    print("\nI've prepared a draft response for your review:")
    print("-"*50)
    print(state["email_draft"])
    print("="*50 + "\n")

    # We're done processing this email
    return {}

# 續下頁 (3/6)
Step 2: Define Nodes
Langgraph Agent Example Email processing system
# 續上頁(4/6)
def route_email(state: EmailState) -> str:
    """Determine the next step based on spam classification"""
    if state["is_spam"]:
        return "spam"
    else:
        return "legitimate"

# 續下頁 (4/6)
Step 3: Define Routing Logic
Langgraph Agent Example Email processing system
# 續上頁(5/6)
# Create the graph
email_graph = StateGraph(EmailState)

# Add nodes
email_graph.add_node("read_email", read_email)
email_graph.add_node("classify_email", classify_email)
email_graph.add_node("handle_spam", handle_spam)
email_graph.add_node("draft_response", draft_response)
email_graph.add_node("notify_mr_hugg", notify_mr_hugg)

# Start the edges
email_graph.add_edge(START, "read_email")
# Add edges - defining the flow
email_graph.add_edge("read_email", "classify_email")

# Add conditional branching from classify_email
email_graph.add_conditional_edges(
    "classify_email",
    route_email,
    {
        "spam": "handle_spam",
        "legitimate": "draft_response"
    }
)

# Add the final edges
email_graph.add_edge("handle_spam", END)
email_graph.add_edge("draft_response", "notify_mr_hugg")
email_graph.add_edge("notify_mr_hugg", END)

# Compile the graph
compiled_graph = email_graph.compile()

# 續下頁 (5/6)
Step 4: Create the StateGraph and Define Edges
Langgraph Agent Example Email processing system
# 續上頁(6/6)
# Example legitimate email
legitimate_email = {
    "sender": "john.smith@example.com",
    "subject": "Question about your services",
    "body": "Dear Mr. Hugg, I was referred to you by a colleague and I'm interested in learning more about your consulting services. Could we schedule a call next week? Best regards, John Smith"
}

# Example spam email
spam_email = {
    "sender": "winner@lottery-intl.com",
    "subject": "YOU HAVE WON $5,000,000!!!",
    "body": "CONGRATULATIONS! You have been selected as the winner of our international lottery! To claim your $5,000,000 prize, please send us your bank details and a processing fee of $100."
}

# Process the legitimate email
print("\nProcessing legitimate email...")
legitimate_result = compiled_graph.invoke({
    "email": legitimate_email,
    "is_spam": None,
    "spam_reason": None,
    "email_category": None,
    "email_draft": None,
    "messages": []
})

# Process the spam email
print("\nProcessing spam email...")
spam_result = compiled_graph.invoke({
    "email": spam_email,
    "is_spam": None,
    "spam_reason": None,
    "email_category": None,
    "email_draft": None,
    "messages": []
})

# 續下頁 (6/6)
Step 5: Run the Application
Lesson 4: LangGraph Introduction
By Leuo-Hong Wang


