Angular Tutorial
第五課 Angular基礎之四
Service與Routing
Outline
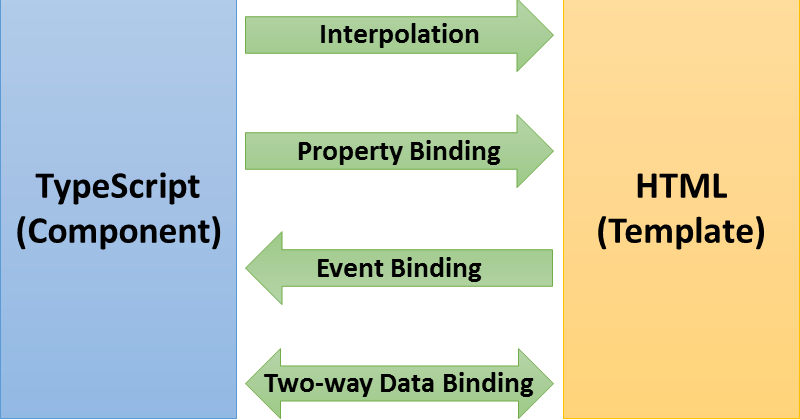
- 複習: 內插 屬性繫結 事件繫結
- Services: 資料服務 功能服務
- Routing: 頁面瀏覽
複習: 內插 屬性繫結 事件繫結
期中考檢討
屬性繫結與內插純量變數(1/5)
元件版型 (template)
<nav class="navbar navbar-expand-sm navbar-dark bg-dark">
  <div class="navbar-brand">
    <img [src]="logo" />
    {{ title }}
  </div>
  <!--略 -->
</nav>
import { Component } from '@angular/core';
@Component({
selector: 'app-navbar',
templateUrl: './navbar.component.html',
styleUrls: ['./navbar.component.css']
})
export class NavbarComponent {
title = '教士會館';
logo = '/assets/images/house_icon_white.png';
constructor() { }
}
元件 (component)
❷ 屬性繫結: 讀取TS檔定義的屬性
❶ 內插: 讀取TS檔定義的屬性
❶
❷
屬性繫結使用時機?
[引數]="屬性名稱"
屬性繫結與內插物件(2/5)
元件版型 (template)
<div class="col-md-5">
  <agm-map [latitude]="location.lat" [longitude]="location.lng" [zoom]="15">
    <agm-marker [latitude]="lat2" [longitude]="lng2"></agm-marker>
  </agm-map>
</div>
import { Component } from '@angular/core';
@Component({
selector: 'app-contact',
templateUrl: './contact.component.html',
styleUrls: ['./contact.component.css']
})
export class ContactComponent {
title = 'My first AGM project'; // 純量: 字串
lat2 = 25.174926; // 純量: 浮點數
lng2 = 121.4336303;
location = { // 物件: 兩個欄位
lat: 25.174926,
lng: 121.4336303
};
}元件 (component)
屬性繫結: 純量屬性
屬性繫結: 物件.欄位名稱
屬性繫結與內插陣列(3/5)
元件版型 (template)
<ul class="navbar-nav ml-auto">
  <li class="nav-item mr-5 display-5" *ngFor="let m of menu">
    <a href="#" class="nav-link">{{ m }}</a>
  </li>
</ul>
import { Component } from '@angular/core';
@Component({
selector: 'app-root',
templateUrl: './app.component.html',
styleUrls: ['./app.component.css']
})
export class AppComponent {
title = 'OnePageSite'; // 純量: 字串
menu = [ // 字串陣列
'回到首頁',
'鄰近景點',
'豐富菜色',
'營業項目',
'聯絡我們',
];
}元件 (component)
內插: 使用迴圈變數
迴圈語法
❷ 陣列名稱
❶ 自訂迴圈變數
?
❷
屬性繫結與內插物件陣列(4/5)
元件版型 (template)
<ul class="navbar-nav ml-auto">
  <li class="nav-item mr-5 display-5" *ngFor="let m of myMenu">
    <a href="{{ m.url }}" class="nav-link">{{ m.title }}</a>
  </li>
</ul>
import { Component } from '@angular/core';
@Component({
selector: 'app-root',
templateUrl: './app.component.html',
styleUrls: ['./app.component.css']
})
export class AppComponent {
title = 'OnePageSite'; // 純量: 字串
myMenu = [ // 物件陣列: 兩個欄位
{ title: '回到首頁', url: '#'},
{ title: '鄰近景點', url: '#hero-section'},
{ title: '豐富菜色', url: '#feature-section'},
{ title: '營業項目', url: '#product-section'},
{ title: '聯絡我們', url: '#contact-section'}
];
}元件 (component)
內插: 使用迴圈變數
迴圈語法
❷ 陣列名稱
❶ 自訂迴圈變數
<!-- 內插 或 屬性繫結? -->
  <a href="{{ m.url }}"> 內插
  <a [href]="m.url"> 屬性繫結
❷
屬性繫結與內插資料流向(5/5)
title = 'OnePageSite';
url = 'http://au.edu.tw/au4163';
price = 300;
內插
屬性繫結
<div class="container">
    <h1>{{ title }}</h1>
</div>
<div class="jumbotron">
<img [src]="url" />
</div>事件繫結
雙向繫結
事件繫結click事件(1/3)
元件版型 (template)
<div class="m-5">
  <button class="btn btn-lg" [class]="btnColor" (click)="clickme()">
    點選送出
  </button>
</div>
import { Component } from '@angular/core';

// ...[略]...
export class AppComponent {
  btnColor = 'btn-success'; // BS4: 綠色按鈕

  clickme() {    // <-- 事件處理器
    if (this.btnColor === 'btn-success') {
      this.btnColor = 'btn-primary';   // BS4: 藍色按鈕
    } else {
      this.btnColor = 'btn-success';
    }
  }
}
元件 (component)
事件繫結
❷ 指定處理器
❶ 綁定click事件
屬性繫結
按鈕顏色參考資料: Bootstrap 4官網 Buttons
❸ 撰寫處理器
事件繫結click事件(2/3)
元件版型 (template)
<div class="m-5">時段選擇:
  <select (change)="changeOption($event)">
    <option *ngFor="let day of weekdays">{{ day }}</option>
  </select>
</div>
<div>你選擇的項目是: {{ choice }}</div>
import { Component } from '@angular/core';
// ...[略]...
export class AppComponent {
weekdays = ['星期二', '星期三', '星期四', '星期五'];
choice = this.weekdays[0];
changeOption(e) { // 事件處理器
  console.log('已更換選項', e);
  this.choice = e.target.value;
}
}元件 (component)
事件繫結
❷ 指定處理器
❶ 綁定change事件
按鈕顏色參考資料: Bootstrap 4官網 Buttons
❹ 撰寫處理器
❸ 系統變數$event為參數
屬性繫結與內插資料流向(3/3)
changeOption(e) { // 事件處理器
console.log('已更換選項', e);
this.choice = e.target.value;
}內插
屬性繫結
<div class="m-5">時段選擇:
  <select (change)="changeOption($event)">
    <option">時段A</option>
    <option">時段B</option>
  </select>
</div>
事件繫結
雙向繫結
資料傳送: 需倚賴設定參數
Services
資料服務 功能服務
資料服務資料存取物件設計模式
元件
TS檔
HTML檔
屬性繫結
事件繫結
資料存取物件

如何設計為佳?
資料庫
資料模型TS
資料介面TS
資料服務
資料庫
實作
TS檔
使用
schema
對應
存取
元件
TS檔
HTML檔
屬性繫結
事件繫結
注入
呼叫服務
資料存取設計模式
❺
❶
❷
❸
❹
Angular App架構
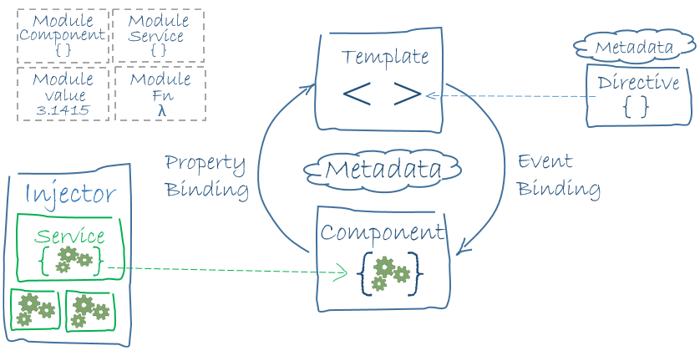
事件
屬性
app.component.html
app.component.ts
資料服務
功能服務
ng g service 服務名稱Angular App架構Services
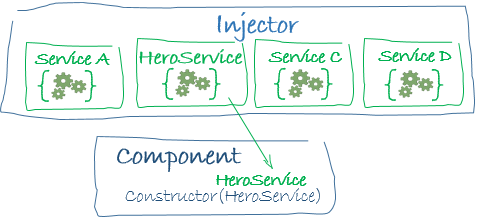
注入器
資料服務
功能服務

export class HeroService {
  log(msg: any)   { console.log(msg); }
  error(msg: any) { console.error(msg); }
  warn(msg: any)  { console.warn(msg); }
}
hero.service.ts
app.component.ts
import { HeroService } from './hero.service';constructor(public hs: HeroServicve){
this.hs.log('log服務');
}建立與使用Services
資料模型TS
資料介面TS
資料服務
資料庫
實作
TS檔
使用
schema
對應
存取
元件
TS檔
HTML檔
屬性繫結
事件繫結
注入
呼叫服務
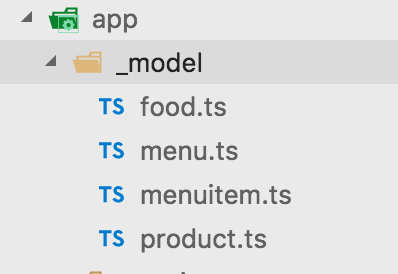
Ⓐ 新增_model資料夾
新增「資料模型.ts檔」
Ⓑ 在_model資料夾中
新增「資料界面.ts檔」
Ⓒ 建立服務
ng g service 服務名稱
實作資料存取
Ⓓ 使用服務
建立Service 新增資料模型
export class MenuItem {
    title: string; // 共兩個欄位
    url: string;

    constructor(t, u) { // 建立物件
        this.title = t;
        this.url = u;
    }
    // 另外可提供getTitle(), setTitle()等methods
}
資料模型:選單項目
Ⓐ資料模型
資料模型檔:新增_model資料夾,新增menuitem.ts
❶ 為class檔,提供欄位定義
❷ 提供建立物件功能
❸ 提供個別欄位存取功能
建立Service 建立資料介面
import { MenuItem } from './menuitem';

export interface Menu {
    items: MenuItem[];   // 選單項目陣列

    getMenu(): MenuItem[]; // 回傳選單
}
資料介面:選單
在_model資料夾,繼續新增menu.ts
❶ 引入選單項目if necessary
❷ 設定介面所需欄位此處只需一欄
❸ 設定介面應提供功能此處只有一個功能
Ⓑ 資料界面
建立Service 建立服務
import { Injectable } from '@angular/core';

@Injectable({
  providedIn: 'root',
})
export class MenuService {

  constructor() { }

}
Angular服務檔:預設內容
❶ 新增服務

❶ Injectable: 可注射(注入其他元件)
Ⓒ 建立服務
ng g service _services/menu❷ 'root': 代表所有元件都可用不需做其他設定
建立Service 建立服務
import { Injectable } from '@angular/core';
import { Menu } from '../_model/menu';

@Injectable({
  providedIn: 'root'
})
export class MenuService implements Menu {
  // 需定義介面設定的欄位

  constructor() {
  }

  // 需實作介面定義的所有函式
}
❷ 實作介面
❶ 引入資料介面檔
Ⓒ 建立服務
❷ implements: 實作介面檔
❸
❹
❺ 需建立資料(從資料來源讀取)
建立Service 建立服務
import { MenuItem } from './../_model/menuitem';
import { Injectable } from '@angular/core';
import { Menu } from '../_model/menu';

@Injectable({
  providedIn: 'root'
})
export class MenuService implements Menu {
  items: MenuItem[];

  constructor() {
    this.items = [
      new MenuItem('回到首頁', '#'),
      new MenuItem('鄰近景點', '#hero-section'),
      new MenuItem('豐富菜色', '#feature-section'),
      new MenuItem('營業項目', '#product-section'),
      new MenuItem('聯絡我們', '#contact-section'),
    ];
  }

  getMenu(): MenuItem[] {
    return this.items;
  }
}
❷ 實作介面
❸ 加入介面定義的欄位
Ⓒ 建立服務
❸ 因欄位需要,故引入
❺ 建立資料(資料來源: 直接設定)
❹ 實作介面定義的所有函式
建立Service 使用服務
import { MenuService } from './../_services/menu.service';
import { Component, OnInit } from '@angular/core';
import { MenuItem } from '../_model/menuitem';

@Component({
  selector: 'app-navbar',
  templateUrl: './navbar.component.html',
  styleUrls: ['./navbar.component.css']
})
export class NavbarComponent implements OnInit {
  title = '教士會館';
  newMenu: MenuItem[];

  logo = '/assets/images/house_icon_white.png';

  constructor(public ms: MenuService) { }

  ngOnInit() {
    this.newMenu = this.ms.getMenu();
  }

}
使用服務
❶ 注射服務: 在建構子中定義引數
❶ 引入
❷ 使用服務提供的函式
Ⓓ 使用服務
public 引數名稱: 服務名稱元件 (component)
建立Service 使用服務
<!-- 省略 -->
<ul class="navbar-nav ml-auto">
    <li class="nav-item mr-5" *ngFor="let menuitem of newMenu">
      <a href="{{ menuitem.url }}" class="nav-link">
        {{menuitem.title}}
      </a>
    </li>
</ul>
<!-- 省略 -->
使用服務
屬性繫結
Ⓓ 使用服務
版型 (component)
減少constructor複雜度
- Angular元件生命週期
- 使用ngOnInit()
元件生命週期
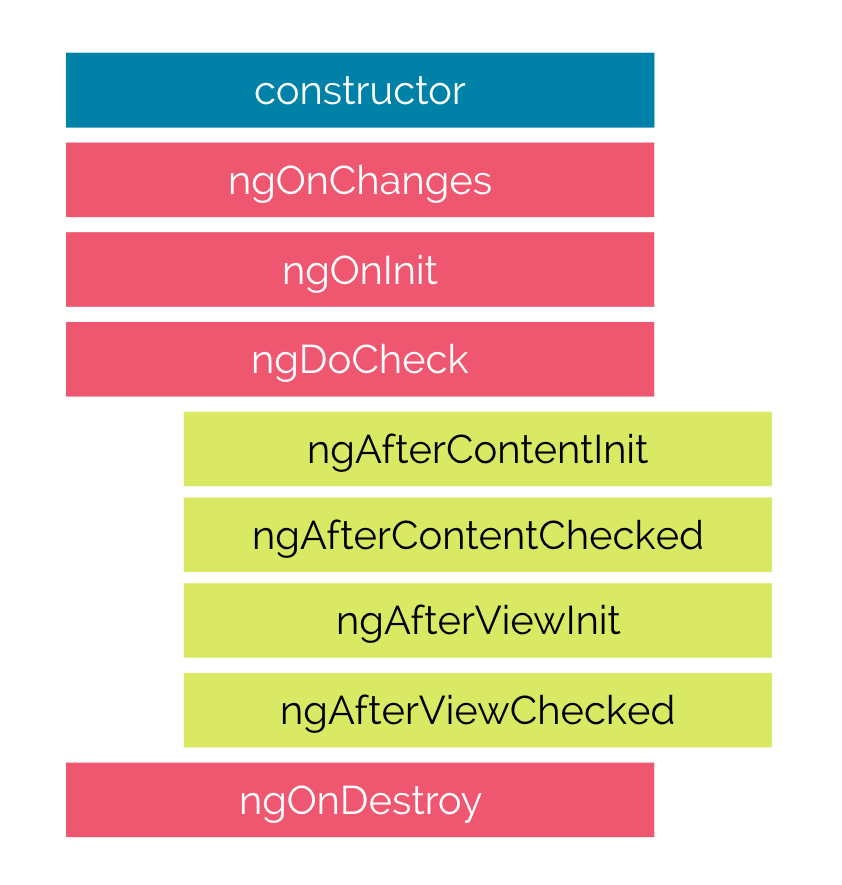
建立元件、指令
綁定的資料變數內容有所變動
<input [(ng-model)]="name">元件初始化,僅執行一次!
清除元件,歸還記憶體空間
元件生命週期ngOnInit
import { Component, OnInit } from '@angular/core';

...
export class NavbarComponent implements OnInit{
  ...
  constructor(private data: DataService) {}

  ngOnInit(): void {
    this.data.getSiteSettings().then(value=> this.settings = value);
  }
}
1. import OnInit
2. 無回傳值 (void)
練習
為下列Class建立 DAO
//....
export class FeatureComponent implements OnInit {
  food: Food[] = [
    {name:"素猴菇三杯雞(蛋奶素)", price: 300, img:"/assets/images/mushroom.jpg"},
    {name:"養生藥膳花雕雞",price: 300, img:"/assets/images/soup.jpg"},
    {name:"北海道鮭魚定食",price: 340, img:"/assets/images/fish.jpg"},
  ];
  ...
}
Router
- 單頁面應用程式SPA
單頁面應用程式single page applications
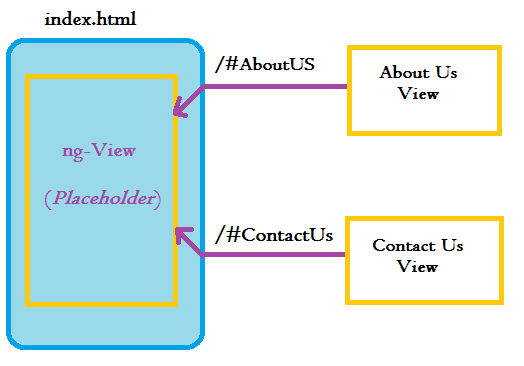
單頁面
about.component.ts
+
about.component.html
contact.component.ts
+
contact.component.html
使用Router
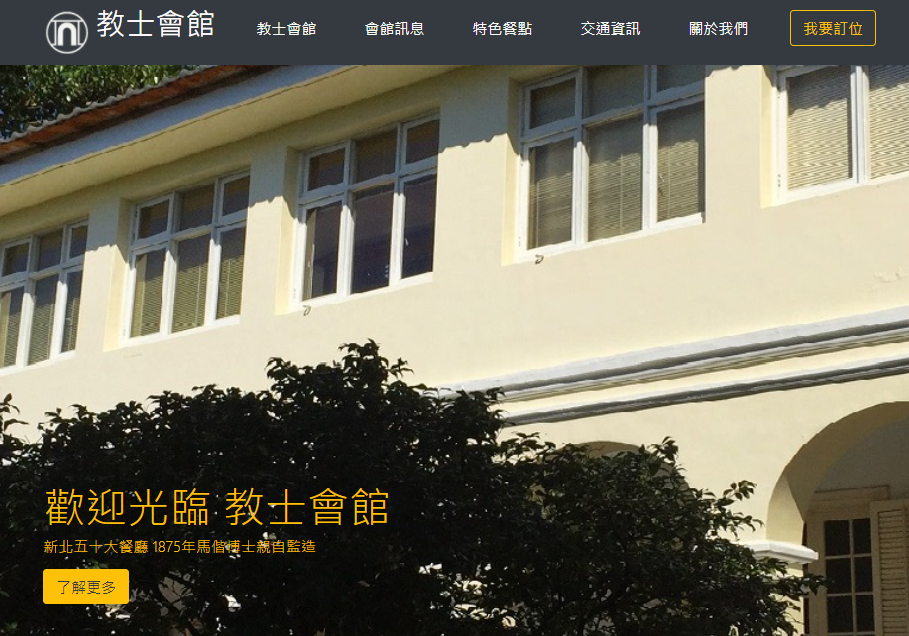
範例:兩個頁面
- 首頁
- 關於
新建第二個頁面
ng g component introng g component home使用Router
- 新建元件: 二個頁面 (home頁面 與 intro頁面)
- 新增AppRoutingModule
- 設定路徑(routes)
- 使用Routing相關指令
- <router-outlet>
- routerLink指令
使用Router新建元件(1/3)
ng g component introimport { Component, OnInit } from '@angular/core';
@Component({
selector: 'app-intro',
templateUrl: './intro.component.html',
styleUrls: ['./intro.component.css']
})
export class IntroComponent implements OnInit {
constructor() { }
ngOnInit() {
}
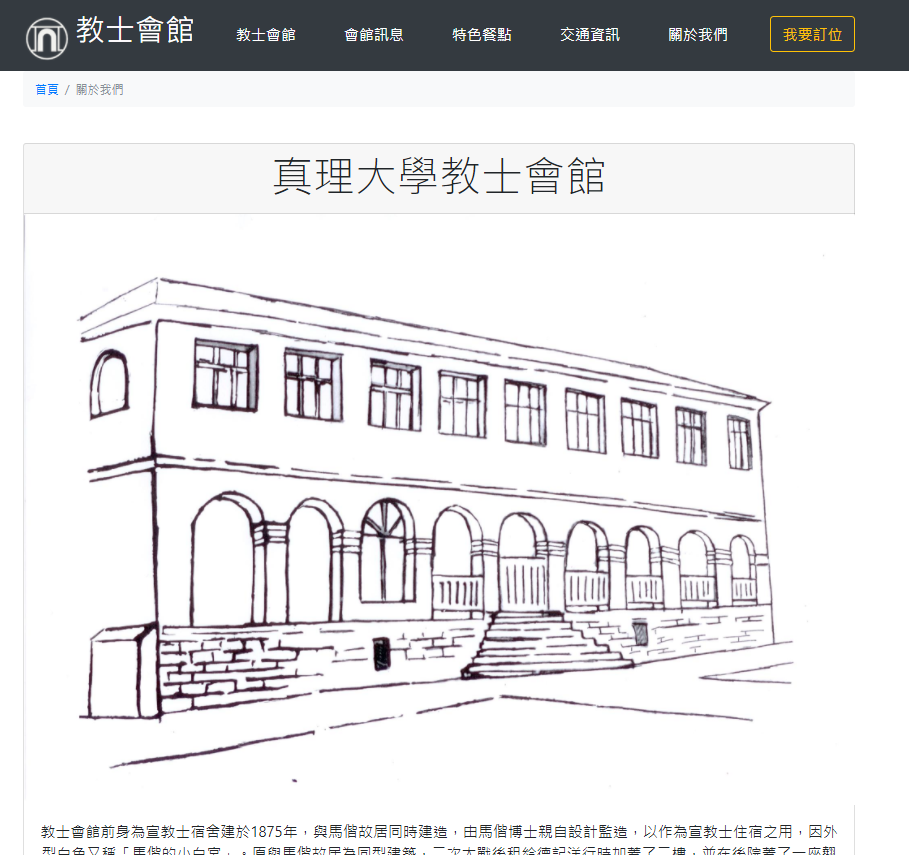
}<nav aria-label="breadcrumb" role="navigation">
<div class="container">
<ol class="breadcrumb bg-light">
<li class="breadcrumb-item"><a href="#">首頁</a></li>
<li class="breadcrumb-item active" aria-current="page">關於我們</li>
</ol>
</div>
</nav>
<div class="container">
<div class="card text-center my-5">
<div class="card-header">
<h1 class="display-4">真理大學教士會館</h1>
</div>
<img class="card-img-top" src="/assets/images/house_outline.jpg">
<div class="card-body">
<p style="font-size: 1.25rem">教士會館前身為宣教士宿舍建於1875年,與馬偕故居同時建造,由馬偕博士親自設計監造,以作為宣教士住宿之用,因外型白色又稱「馬偕的小白宮」。原與馬偕故居為同型建築,二次大戰後租給德記洋行時加蓋了二樓,並在後院蓋了一座翹脊古厝。 馬偕時代住過這裏的有華雅各、閏虔益、黎約翰、吳威廉等助理牧師。日治時代偉彼得牧師住得最久,因此有「偉牧師館」之名。後來被淡江中學租為學寮稱為「玄武寮」。1965年以後為真理大學教士會館。
</p>
</div>
</div>
</div>注意此元件的
- selector: 'app-intro'
- 元件類別名稱:IntroComponent
intro.component.html
新的Bootstrap元件
breadcrumb
intro.component.ts
使用Router新建元件(2/3)
.jumbotron{
  position: relative;
  background: #000 url("/assets/images/house_outline.jpg") center center;
  width: 100%;
  height: 800px;
  background-size: cover;
  overflow: hidden;
}
<nav aria-label="breadcrumb" role="navigation">
<div class="container">
<ol class="breadcrumb bg-light">
<li class="breadcrumb-item"><a href="#">首頁</a></li>
<li class="breadcrumb-item active" aria-current="page">
關於我們
</li>
</ol>
</div>
</nav>
Breadcrumb元件
intro.component.css
使用Router新建元件(3/3)
ng g component homeimport { Component, OnInit } from '@angular/core';
@Component({
selector: 'app-home',
templateUrl: './home.component.html',
styleUrls: ['./home.component.css']
})
export class HomeComponent implements OnInit {
constructor() { }
ngOnInit() {
}
}<app-navbar></app-navbar>
<app-jumbo></app-jumbo>
<app-hero></app-hero>
<app-feature></app-feature>
<app-product></app-product>
<app-contact></app-contact>將原來 AppComponent的內容改放到HomeComponent
home.component.html
AppComponent版型也貼到HomeComponent版型
home.component.ts
使用Router AppRoutingModule(1/5)
ng new新建專案時,第一個問題回答Y,自動產生 app-routing.module.ts
Router模組:AppRoutingModule
使用Router AppRoutingModule(2/5)
...
import { HomeComponent } from './app.component';
import { IntroComponent } from './intro/intro.component';

const routes: Routes = [
  {path: '', component: AppComponent},
  {path: 'introduction', component: IntroComponent}
];
摘錄app-routing.module.ts
路徑陣列
每一對路徑至少包含兩個屬性:
(1) path: url相對路徑 (例:http://localhost:4200/introduction)
(2) component: 要執行哪一個元件
使用Router使用<router-outlet>(3/5)
...
<router-outlet></router-outlet>
...
定義路徑
app.component.html
以http://localhost:4200/introduction 為例:
IntroComponent的HTML內容會顯示在
<router-outlet></router-outlet>之間
...
const routes: Routes = [
  {path: '', component: AppComponent},
  {path: 'introduction', component: IntroComponent}
];
摘錄app-routing.module.ts
使用Router使用<router-outlet>(4/5)
<app-navbar></app-navbar>

  <router-outlet></router-outlet>

  <app-contact></app-contact>
  <footer class="p-3 footer bg-dark text-muted">
    <div class="container">
      <p class="text-center">
        Copyright © 2017 教士會館. 版權所有
      </p>
    </div>
  </footer>
<router-outlet> 該放在哪裡?
app.component.html
app.component是個好地方
但並非一定要放在appComponent內
使用Router設定超連結: routerLink(5/5)
    ...
    menu: [
      { title: "教士會館", route: "/" },
      { title: "會館訊息", route: "/" },
      { title: "特色餐點", route: "/" },
      { title: "交通資訊", route: "/" },
      { title: "關於我們", route: "/introduction" }
    ],
    ...
<ul class="navbar-nav ml-auto">
<li class="nav-item mr-5 display-5 dropdown" *ngFor="let menuitem of menu">
<a [routerLink]="menuitem.route" class="text-white nav-link">
{{ menuitem.title }}
</a>
</li>
</ul>.ts檔
.html檔
綜合練習
- 單頁: 視情況由多種元件組成
- Router: 增加更多頁面
非同步執行:Promise
- 什麼是Promise?
什麼是Promise?
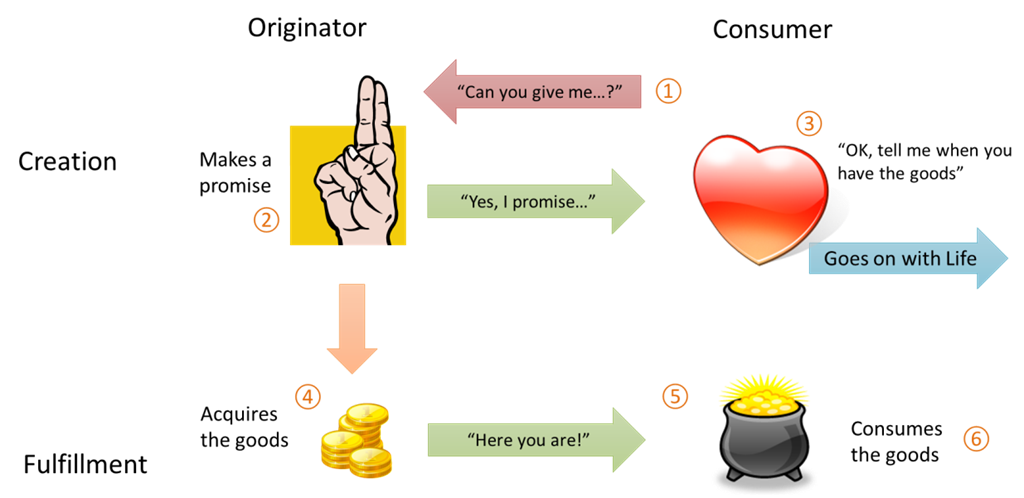
Consumer
不需停下等待
app端
提出要求
承諾
提供服務
服務端
什麼是Promise?
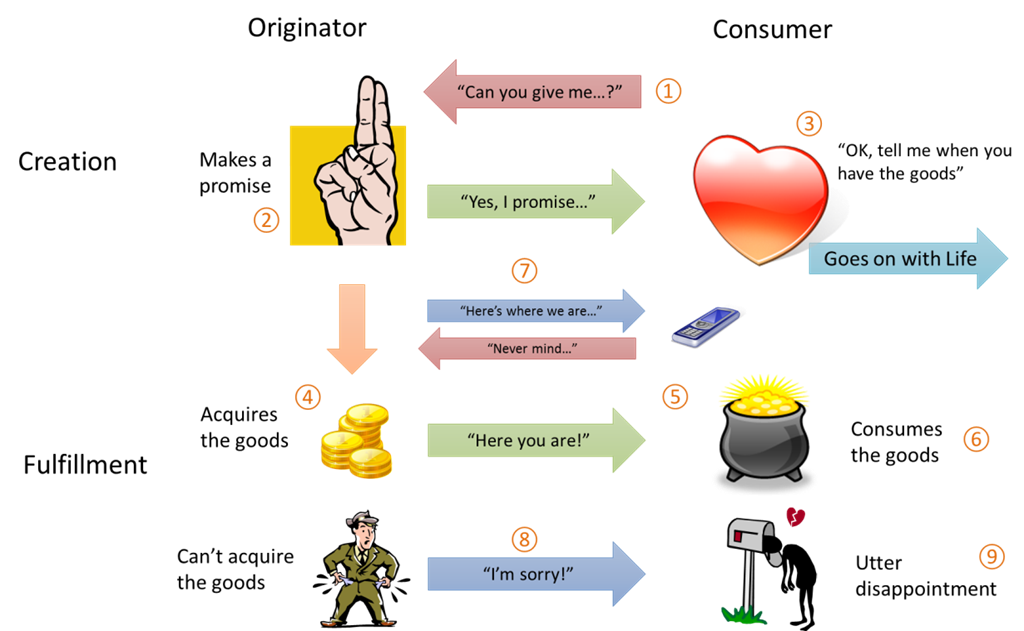
Consumer
不需停下等待
app端
提出要求
承諾
提供服務
服務端
提供失敗
繼續執行
???
練習
- 使用 ng g service建立服務
- 使用Promise處理資料服務
Angular Tutorial
By Leuo-Hong Wang
Angular Tutorial
第五課:Angular基礎之四 Services與Routing


