Lesson 2 - Snake

Learning Objectives
To be able to:
- Control the physics of an object through code rather than simulation
- Understand and apply the use of Tags for objects
- Understand and apply the changing of boundaries in a BoxCollider2D
Create a New 2D File
Insert a screenshot of a new file and name it "Snake"
Setting the Scene
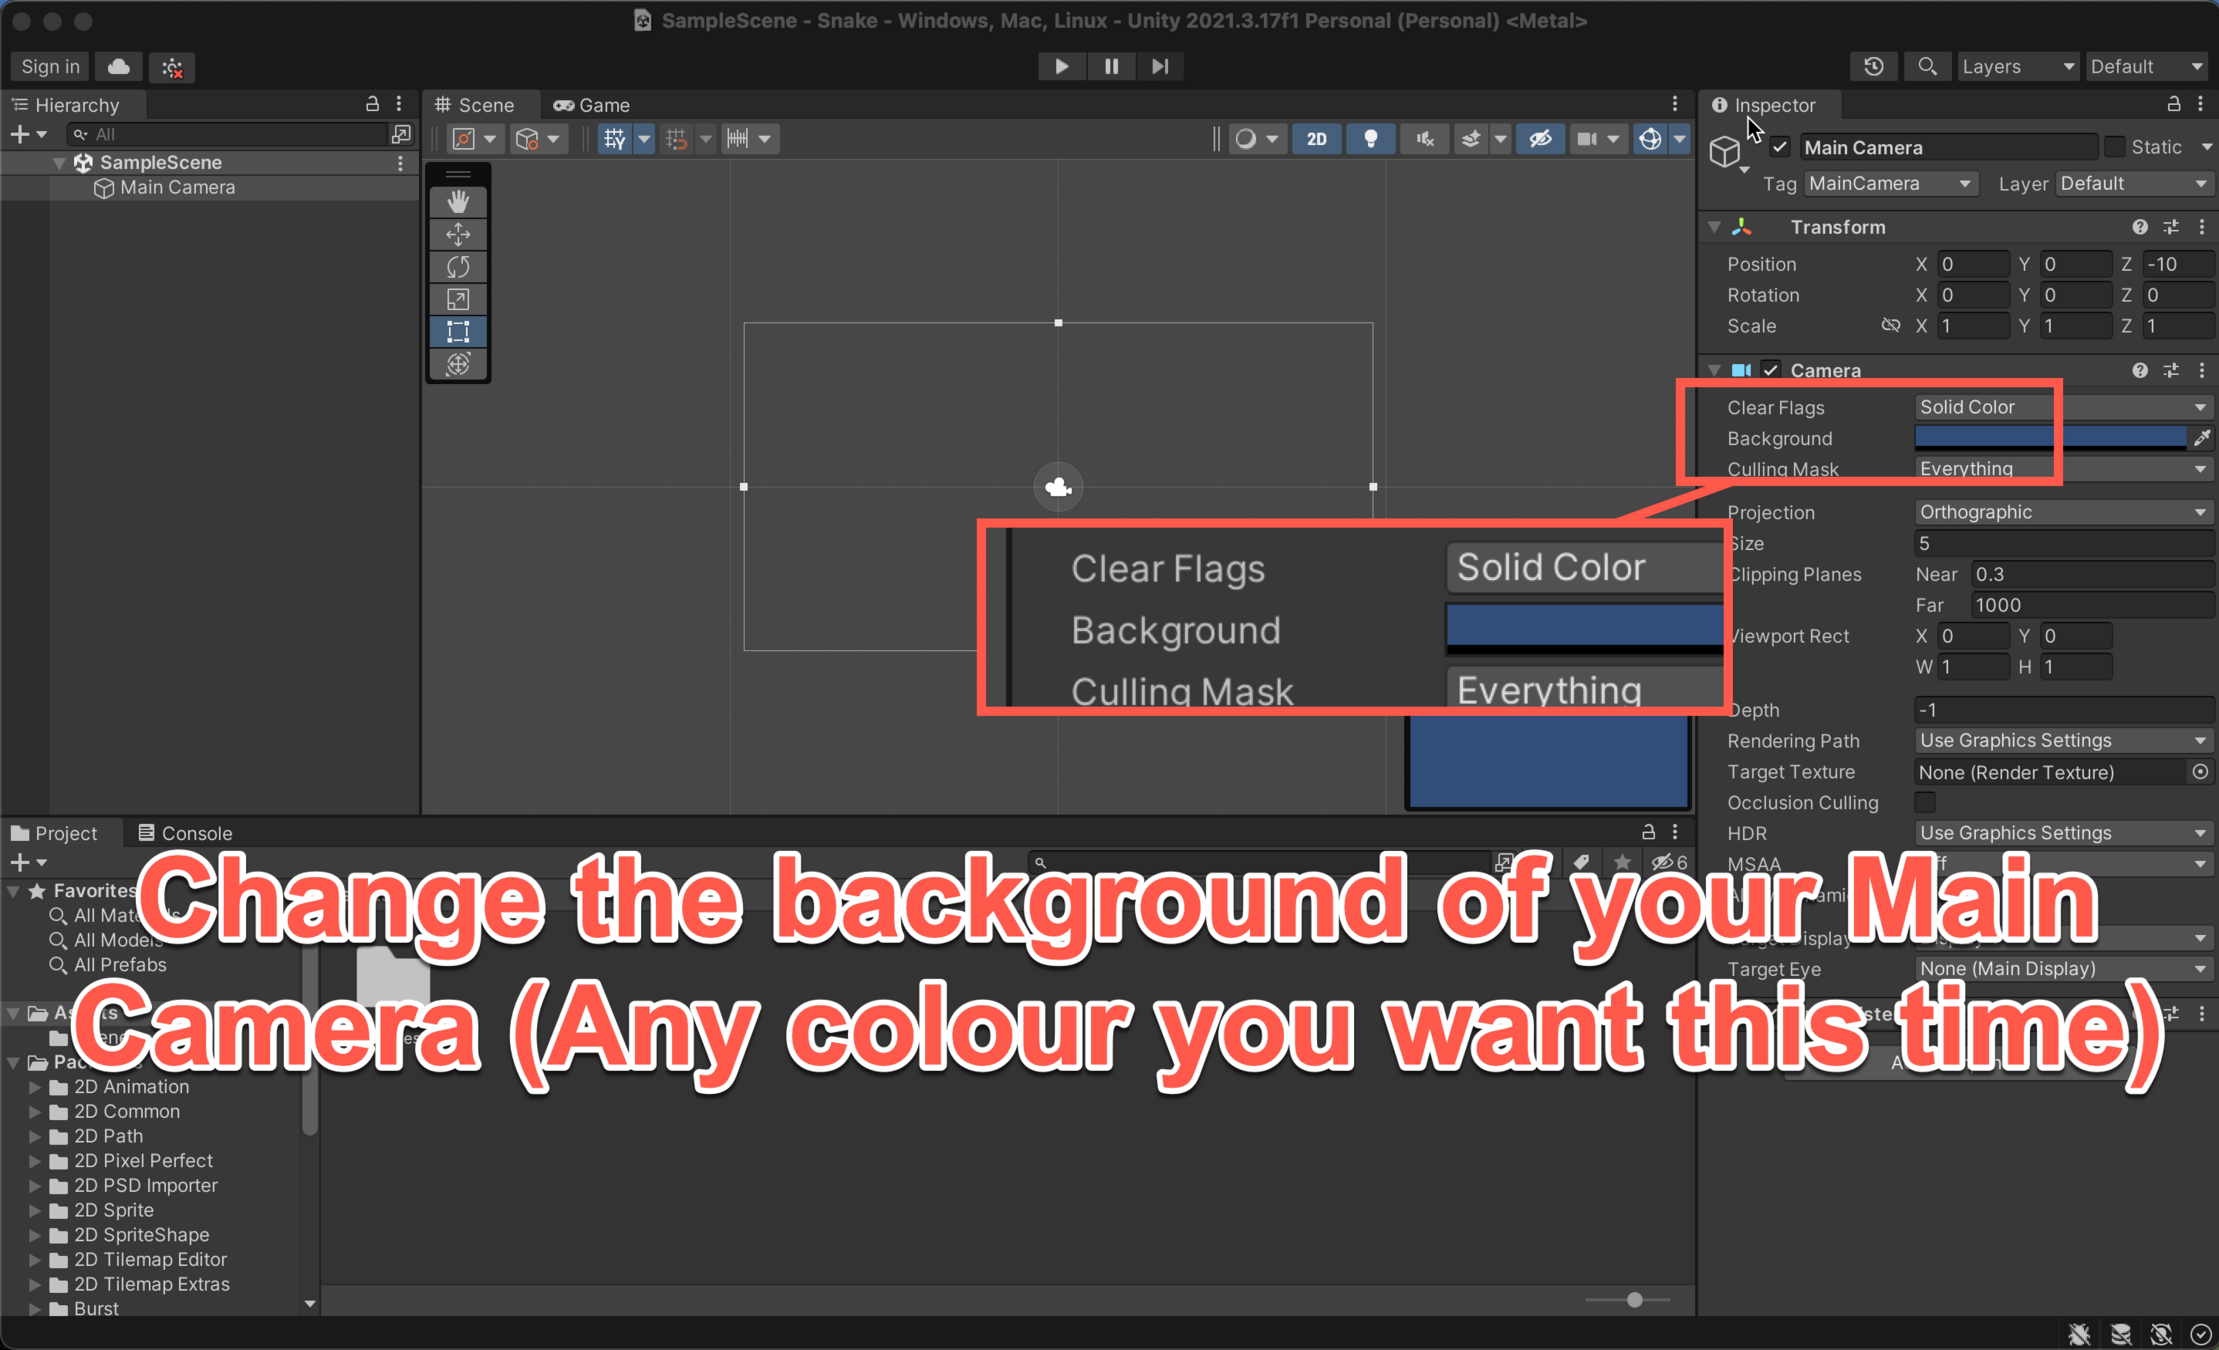
Setting the Scene
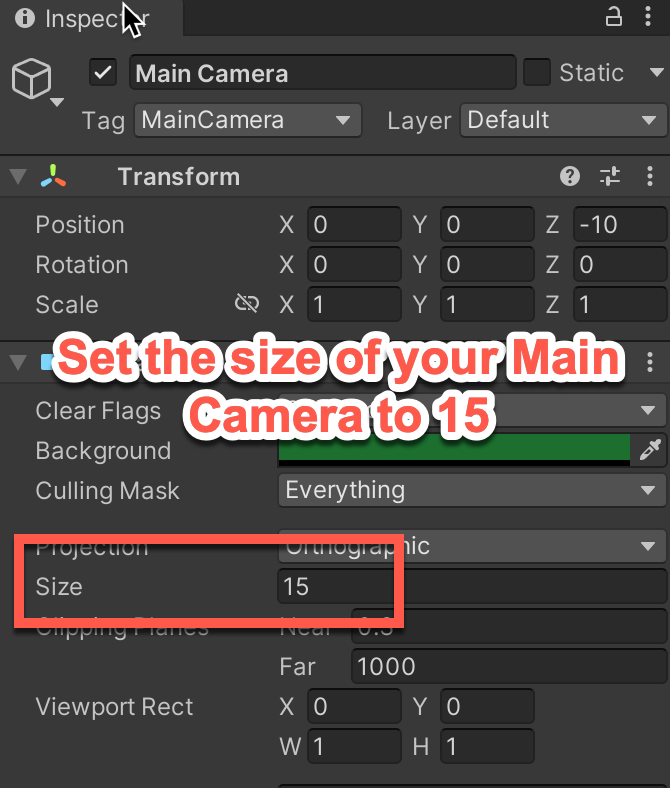
This will zoom out the camera overlooking your scene making object you add seem smaller without editing them.
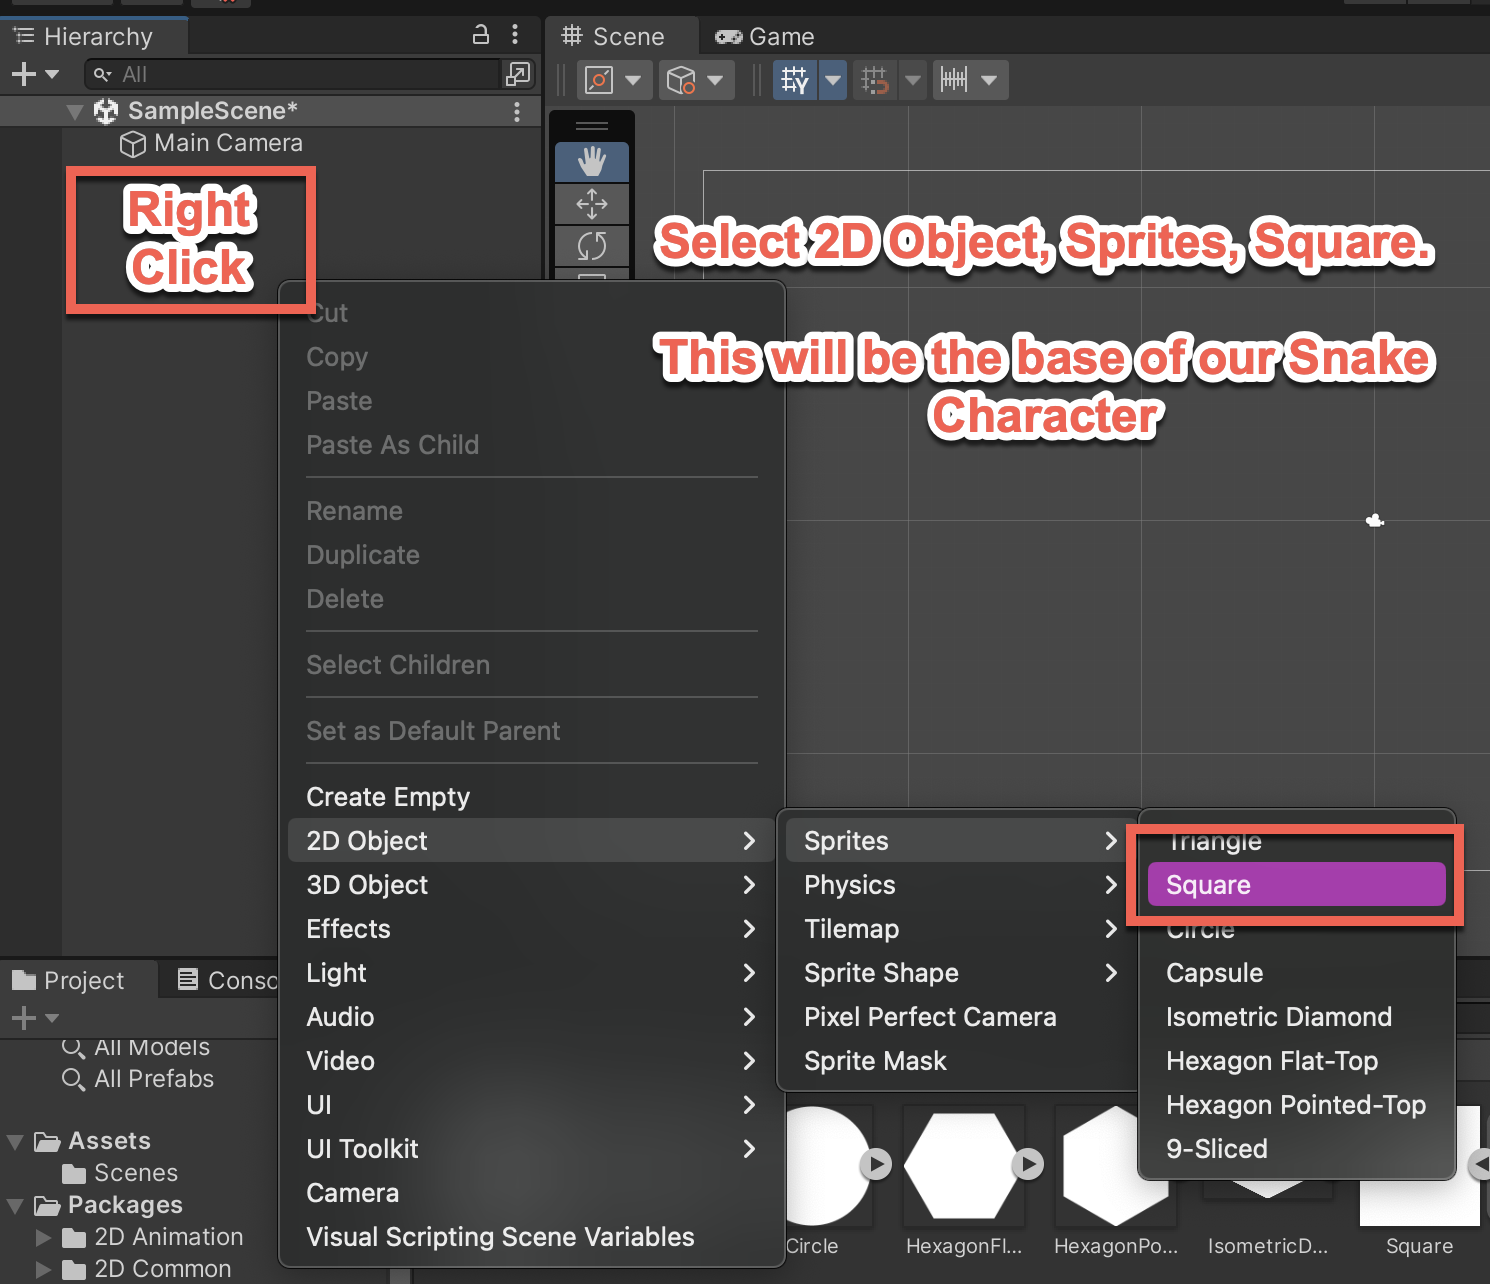
Building your Snake
Name the new Sprite "Snake"
It's time to build your main character!

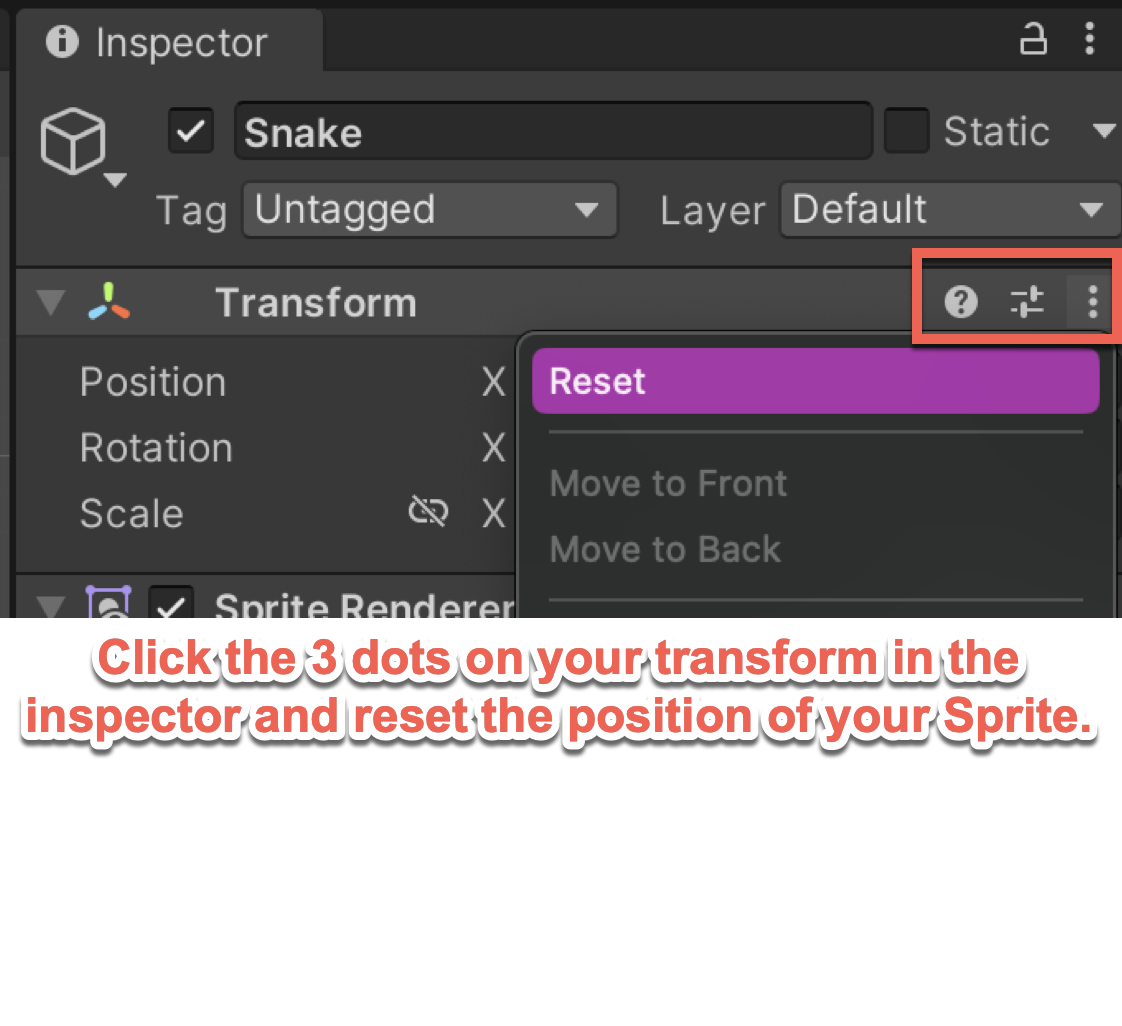
Building your Snake
Name the new Sprite "Snake"
Building your Snake
Building your Snake
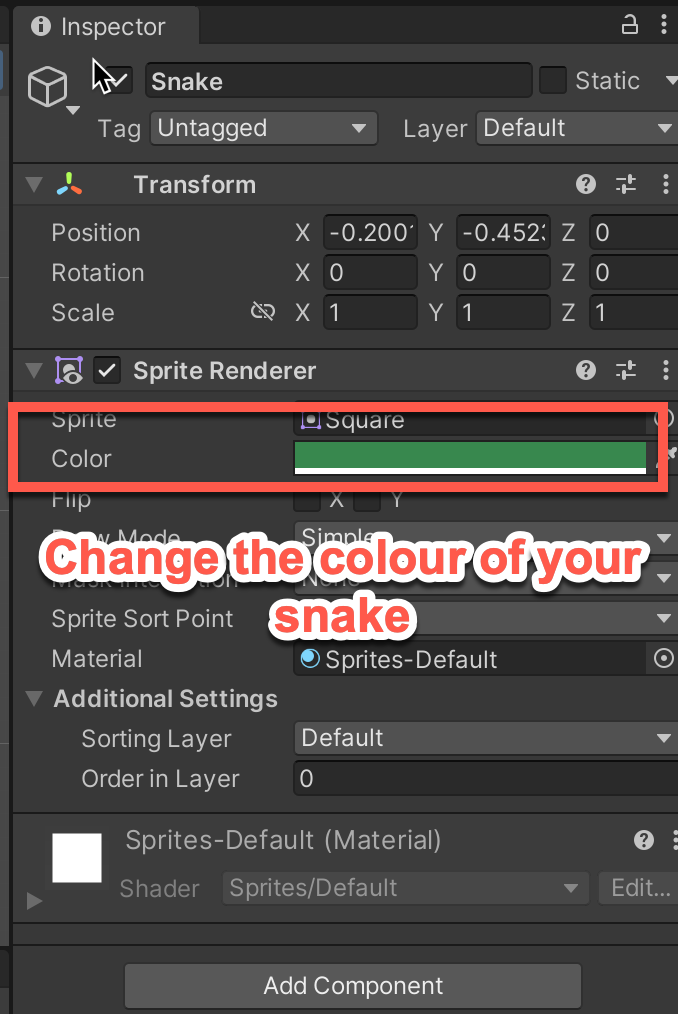
Building your Snake
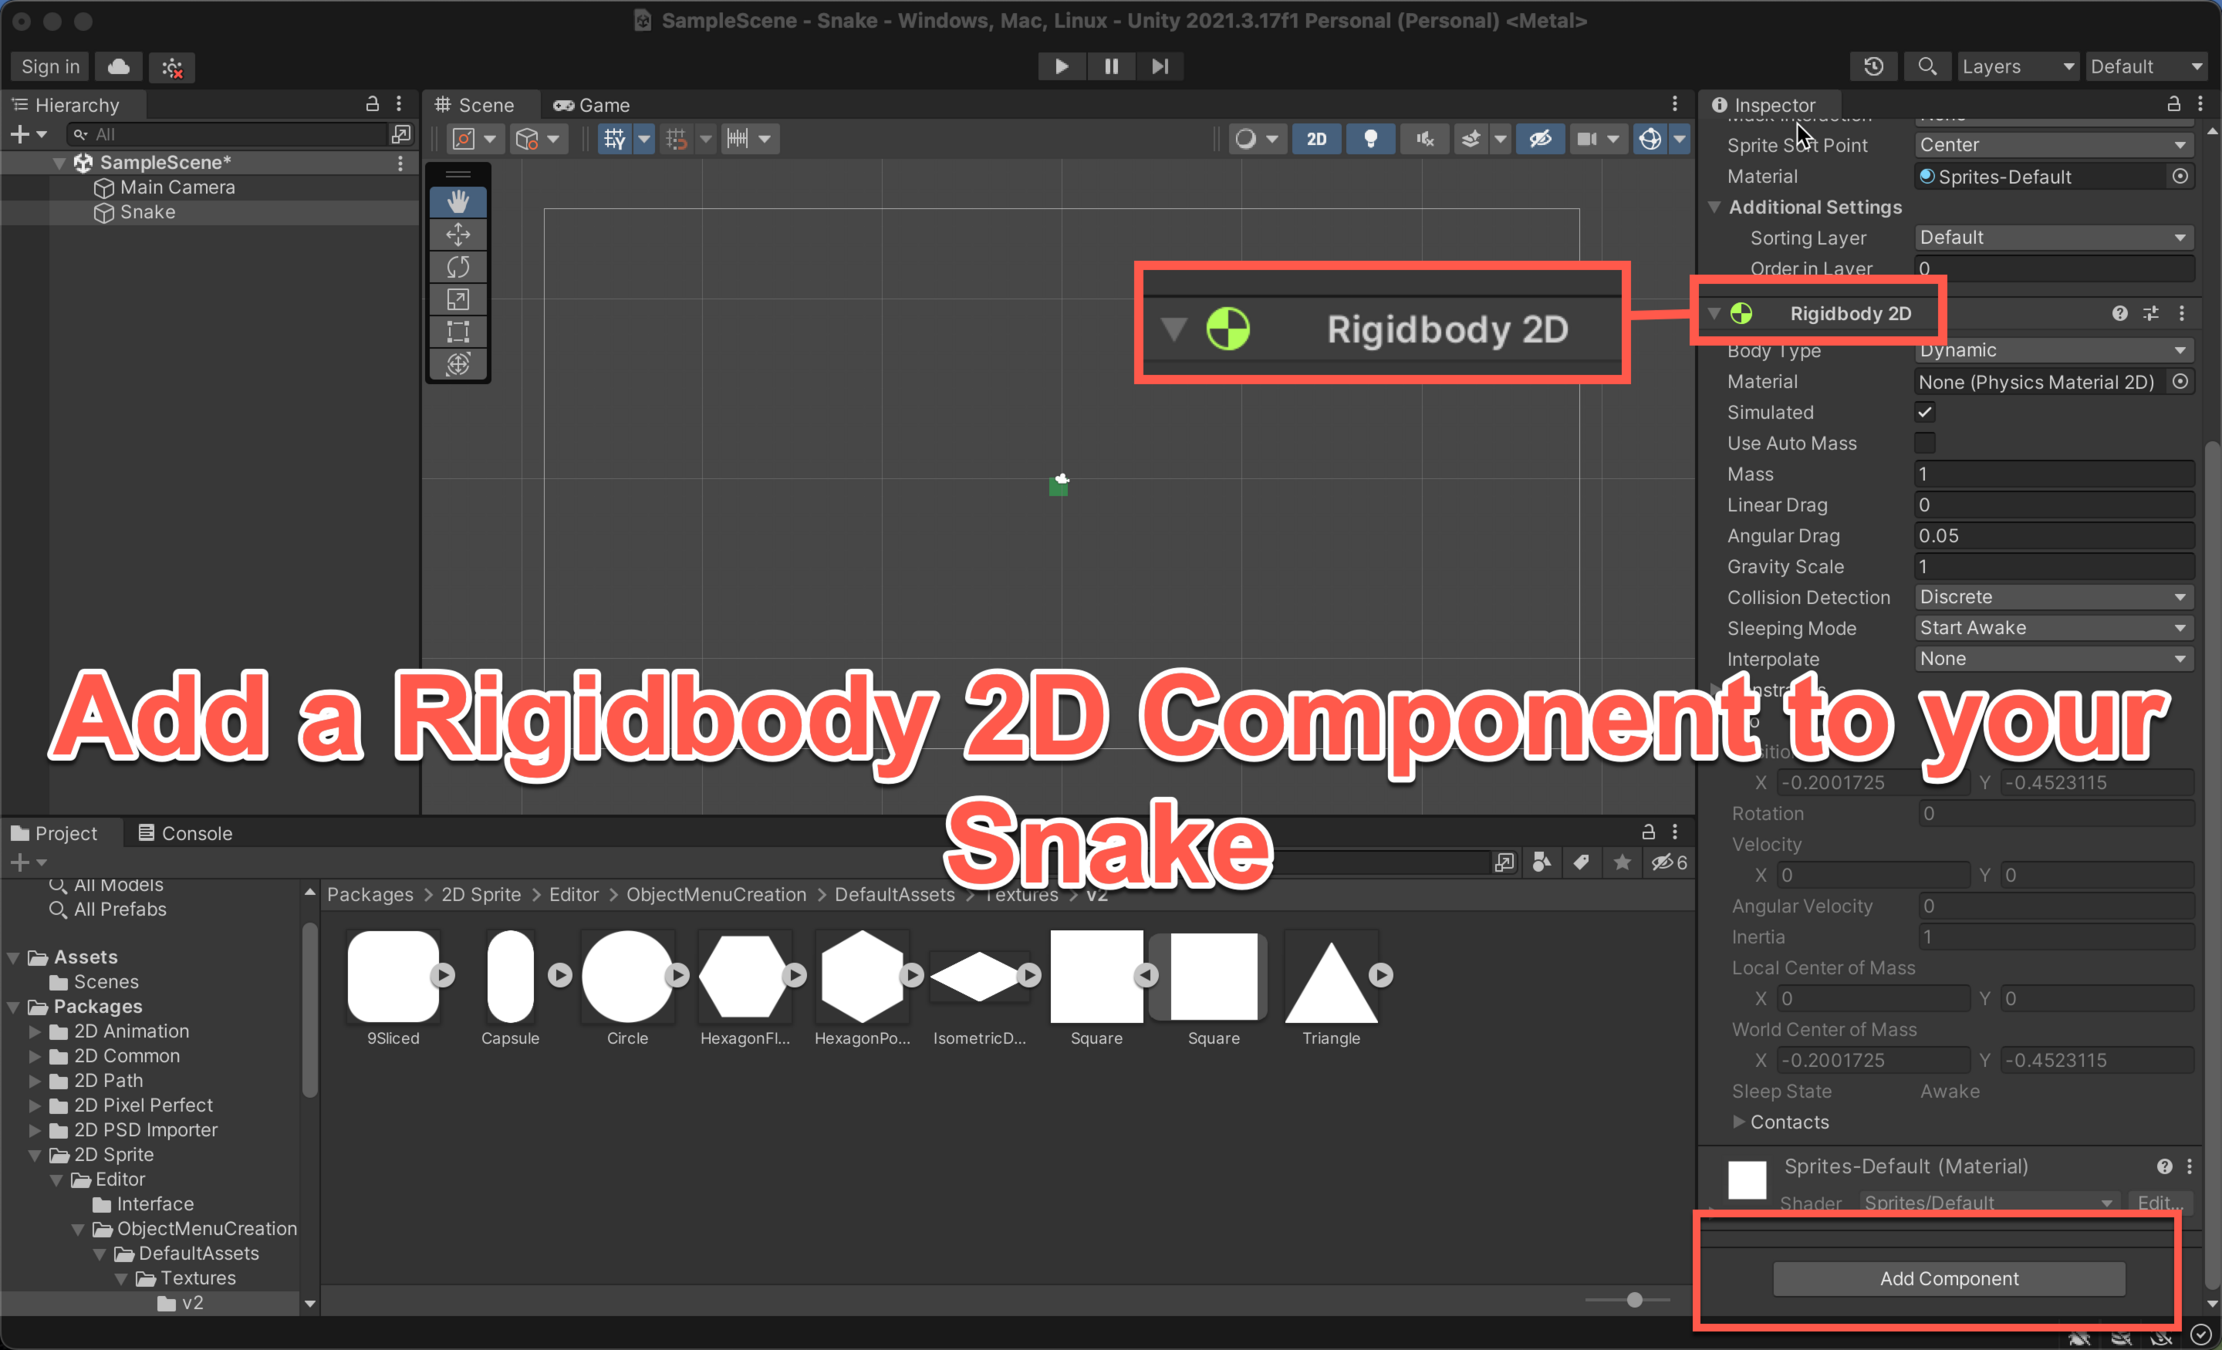
Building your Snake
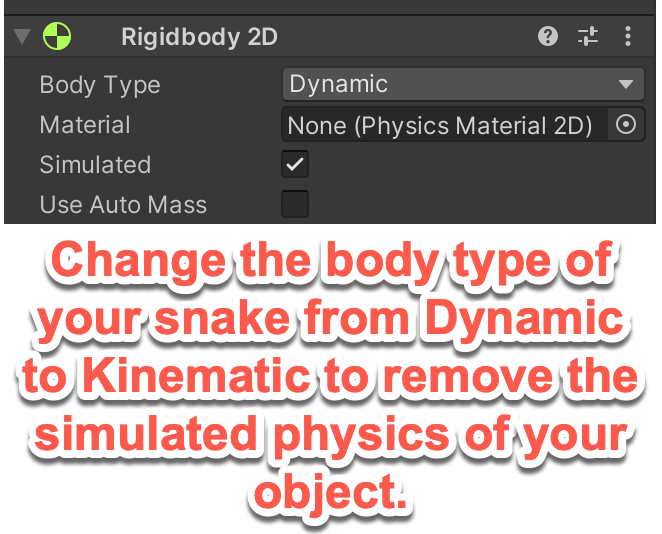
Building your Snake
Building your Snake
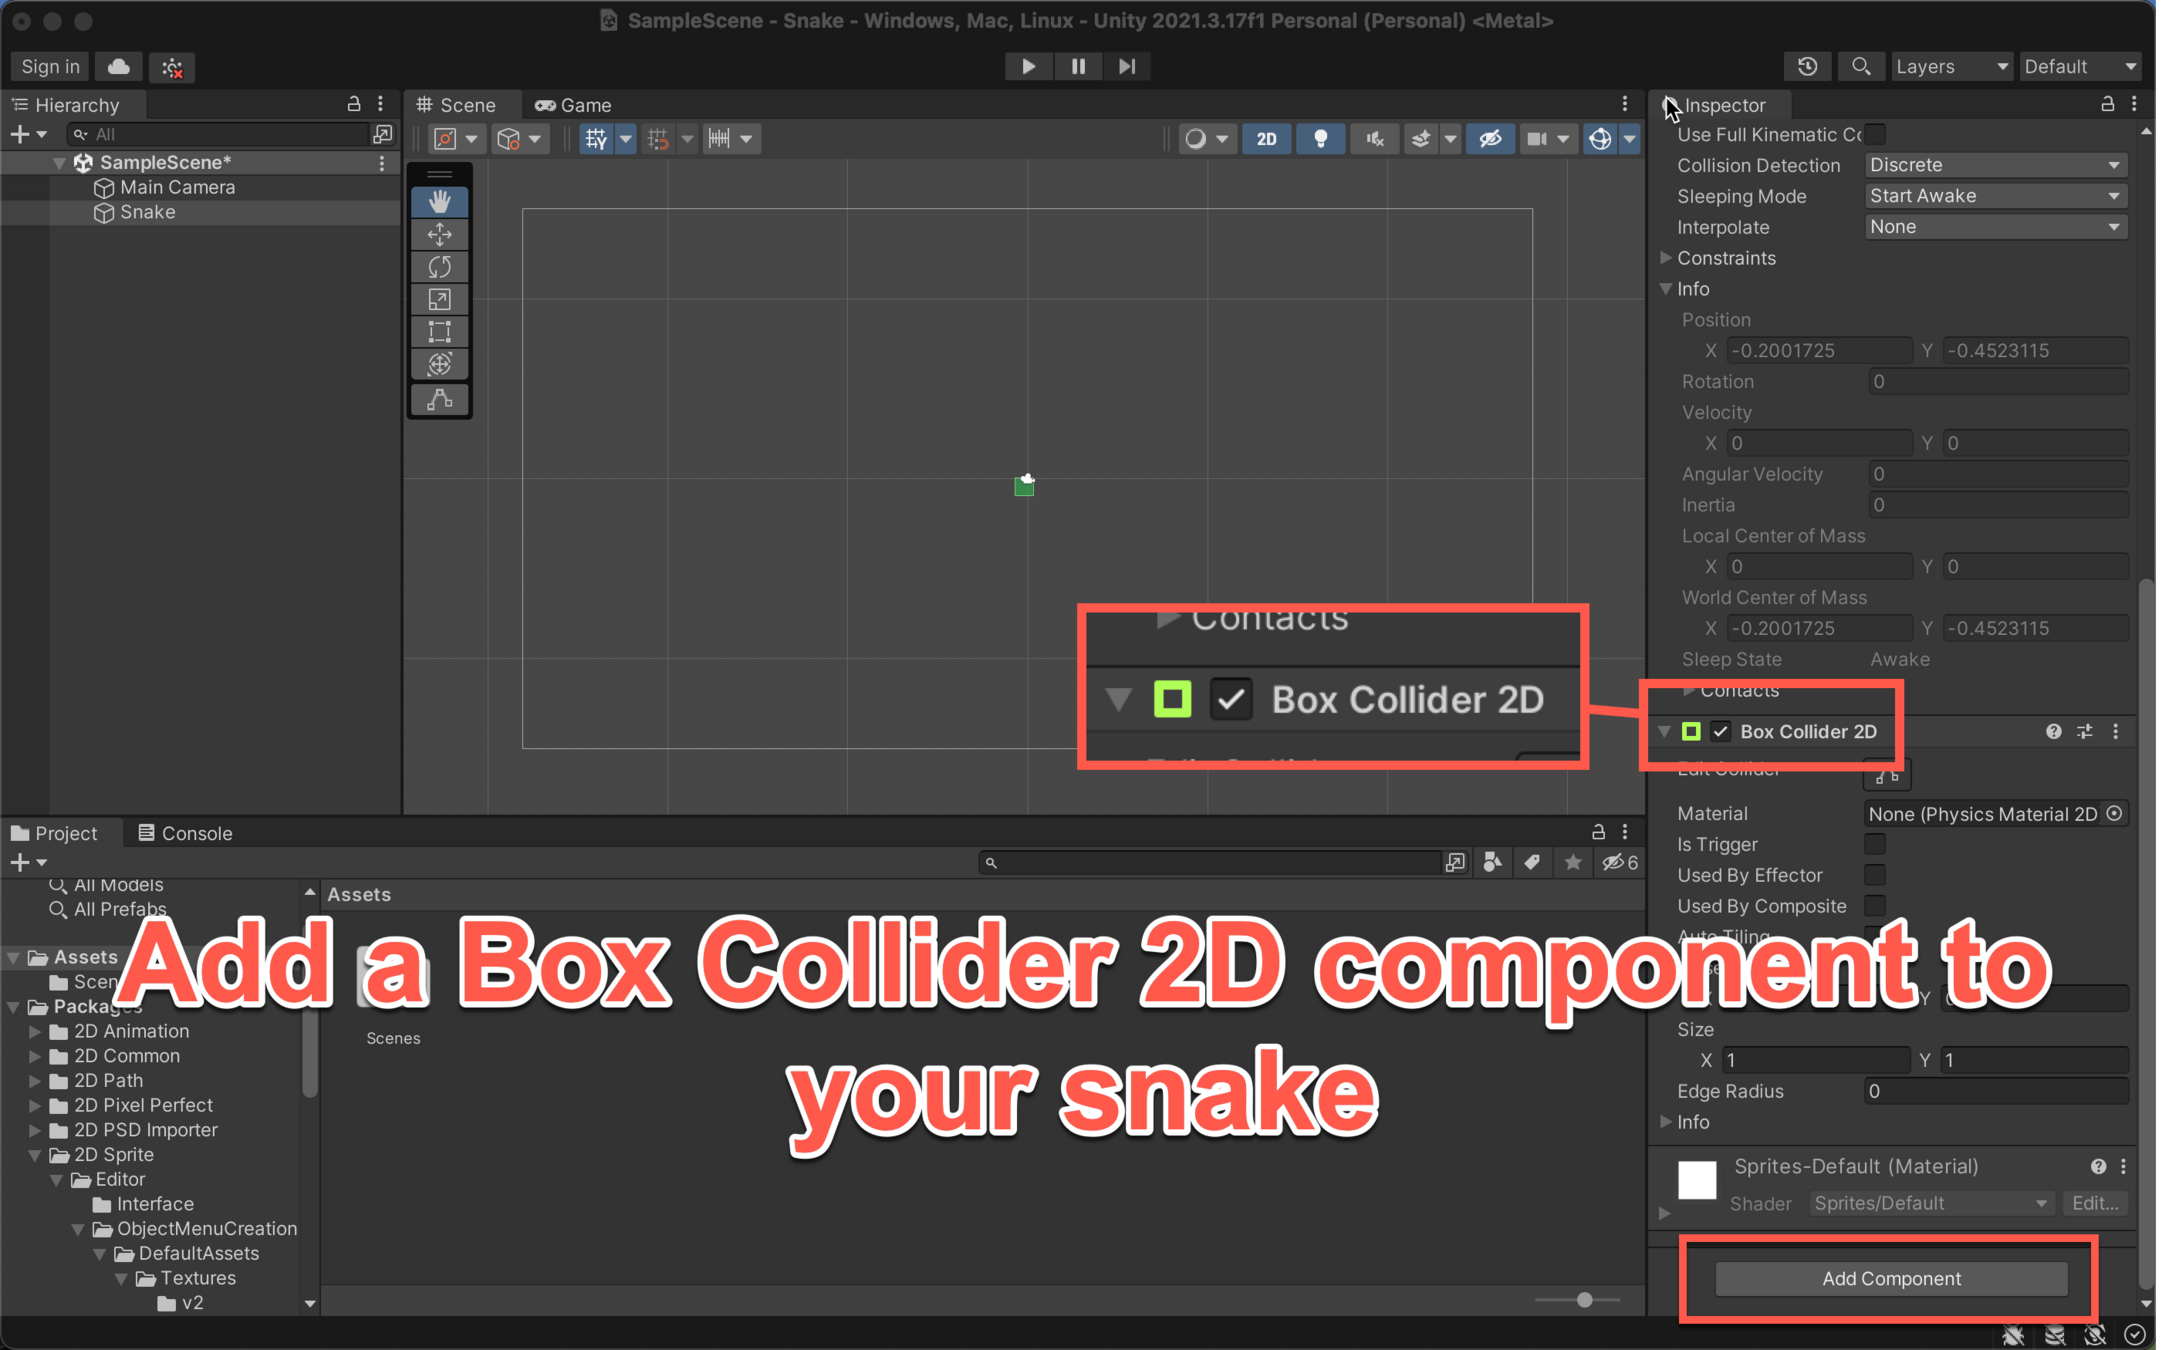
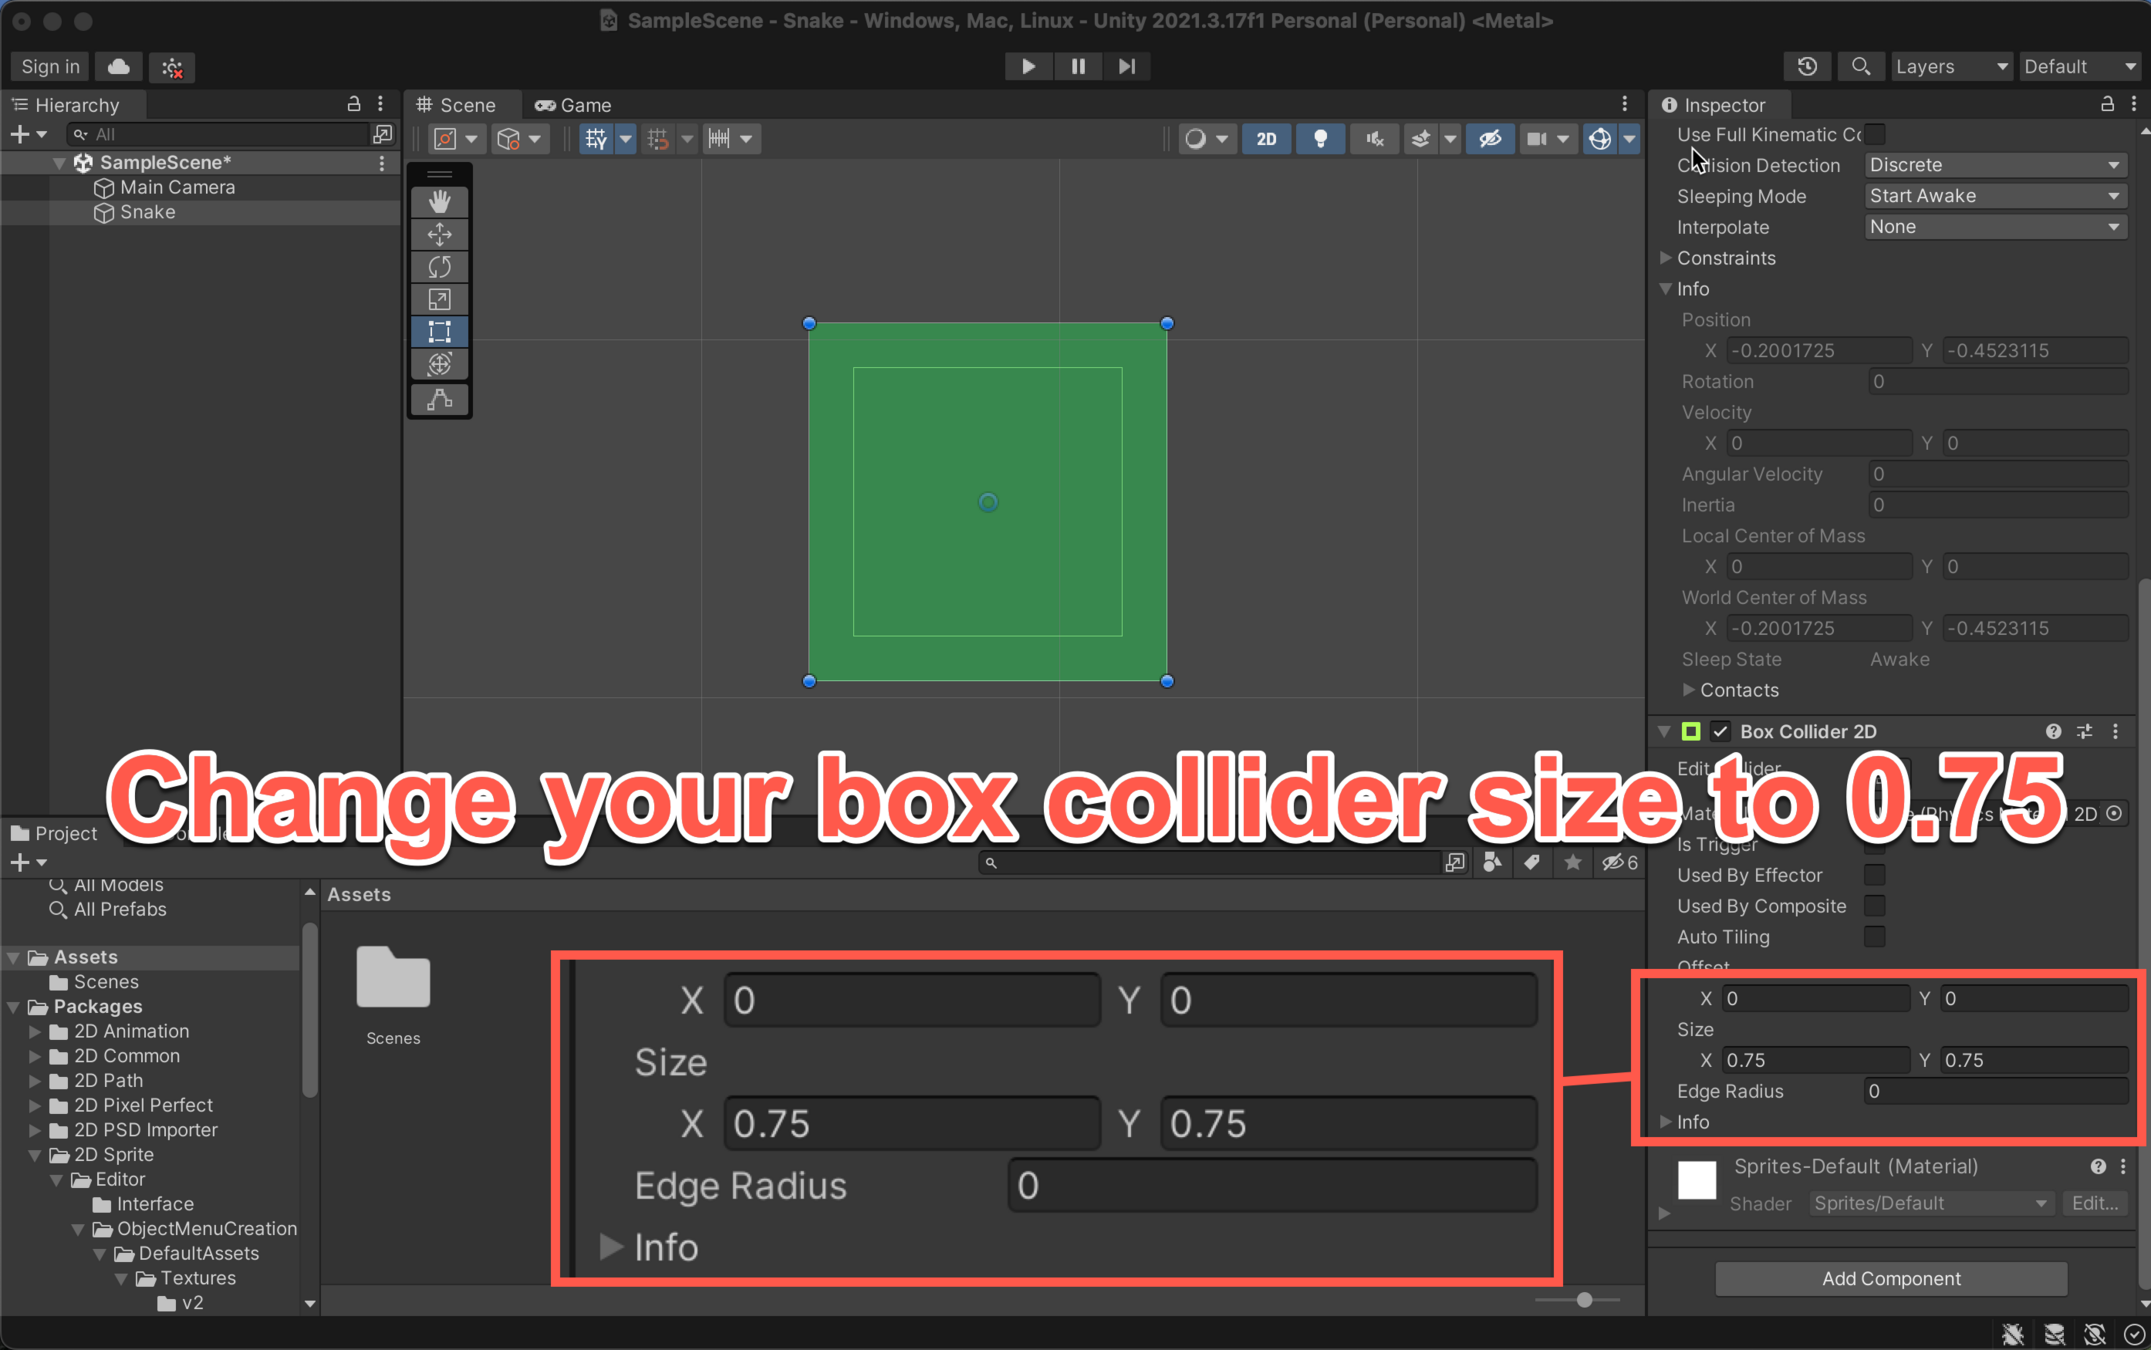
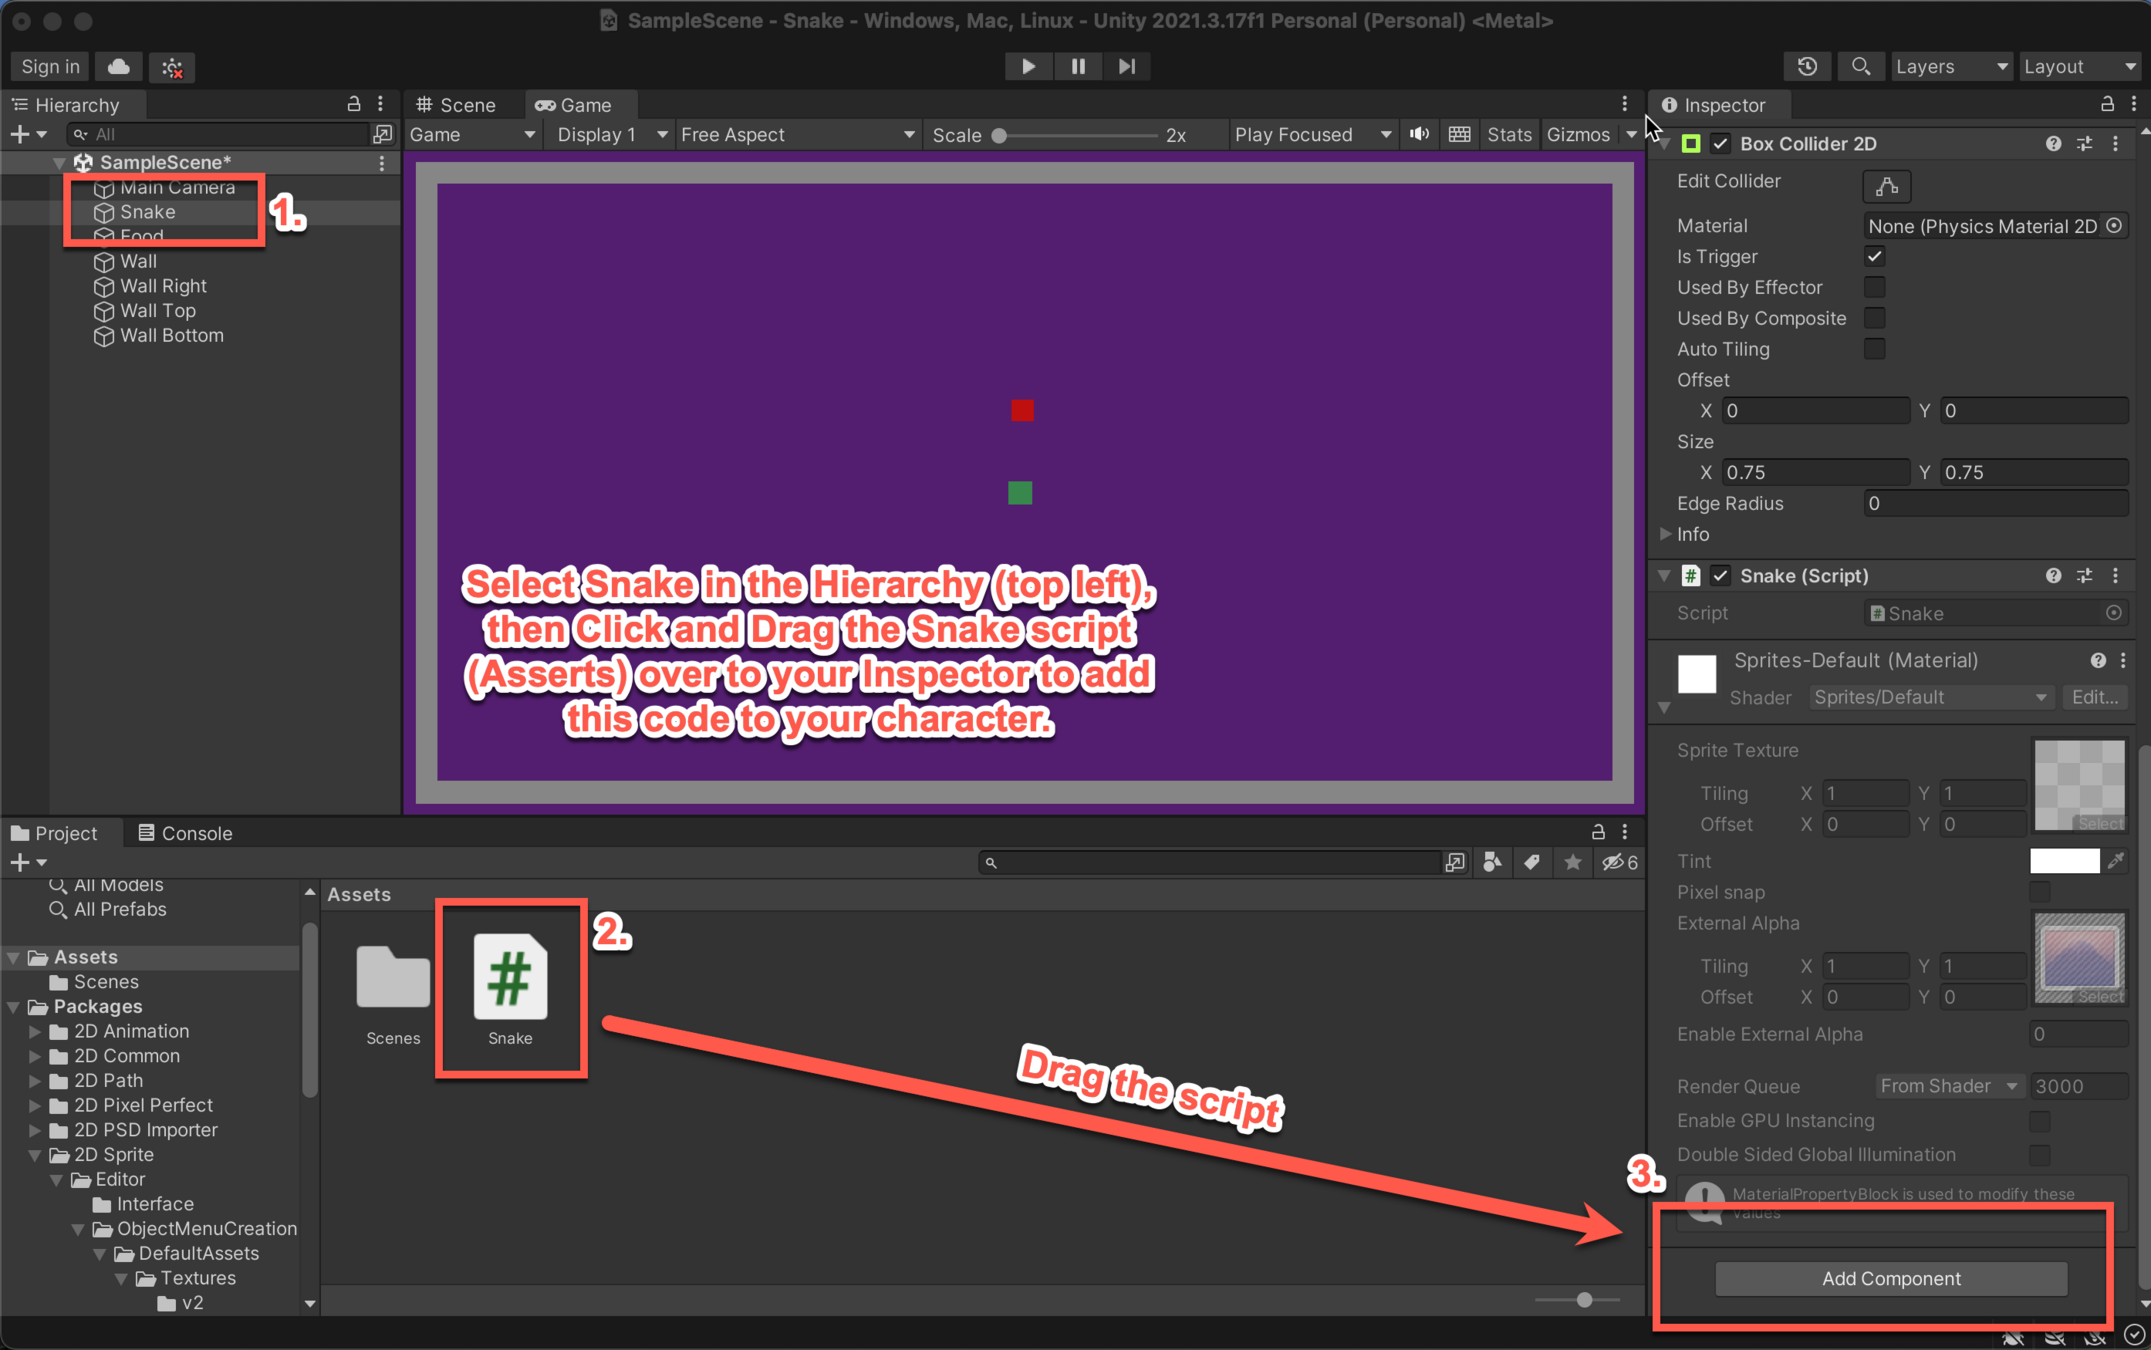
Instead of the collider being on the edge of the square, it is inside the square.
Shrinking your box collider down will prevent your snake from hitting itself once you eat an apple and grow!
Building your Snake
Building your Snake
That is now your character complete and you are ready to build the food object!

Building a Food Object
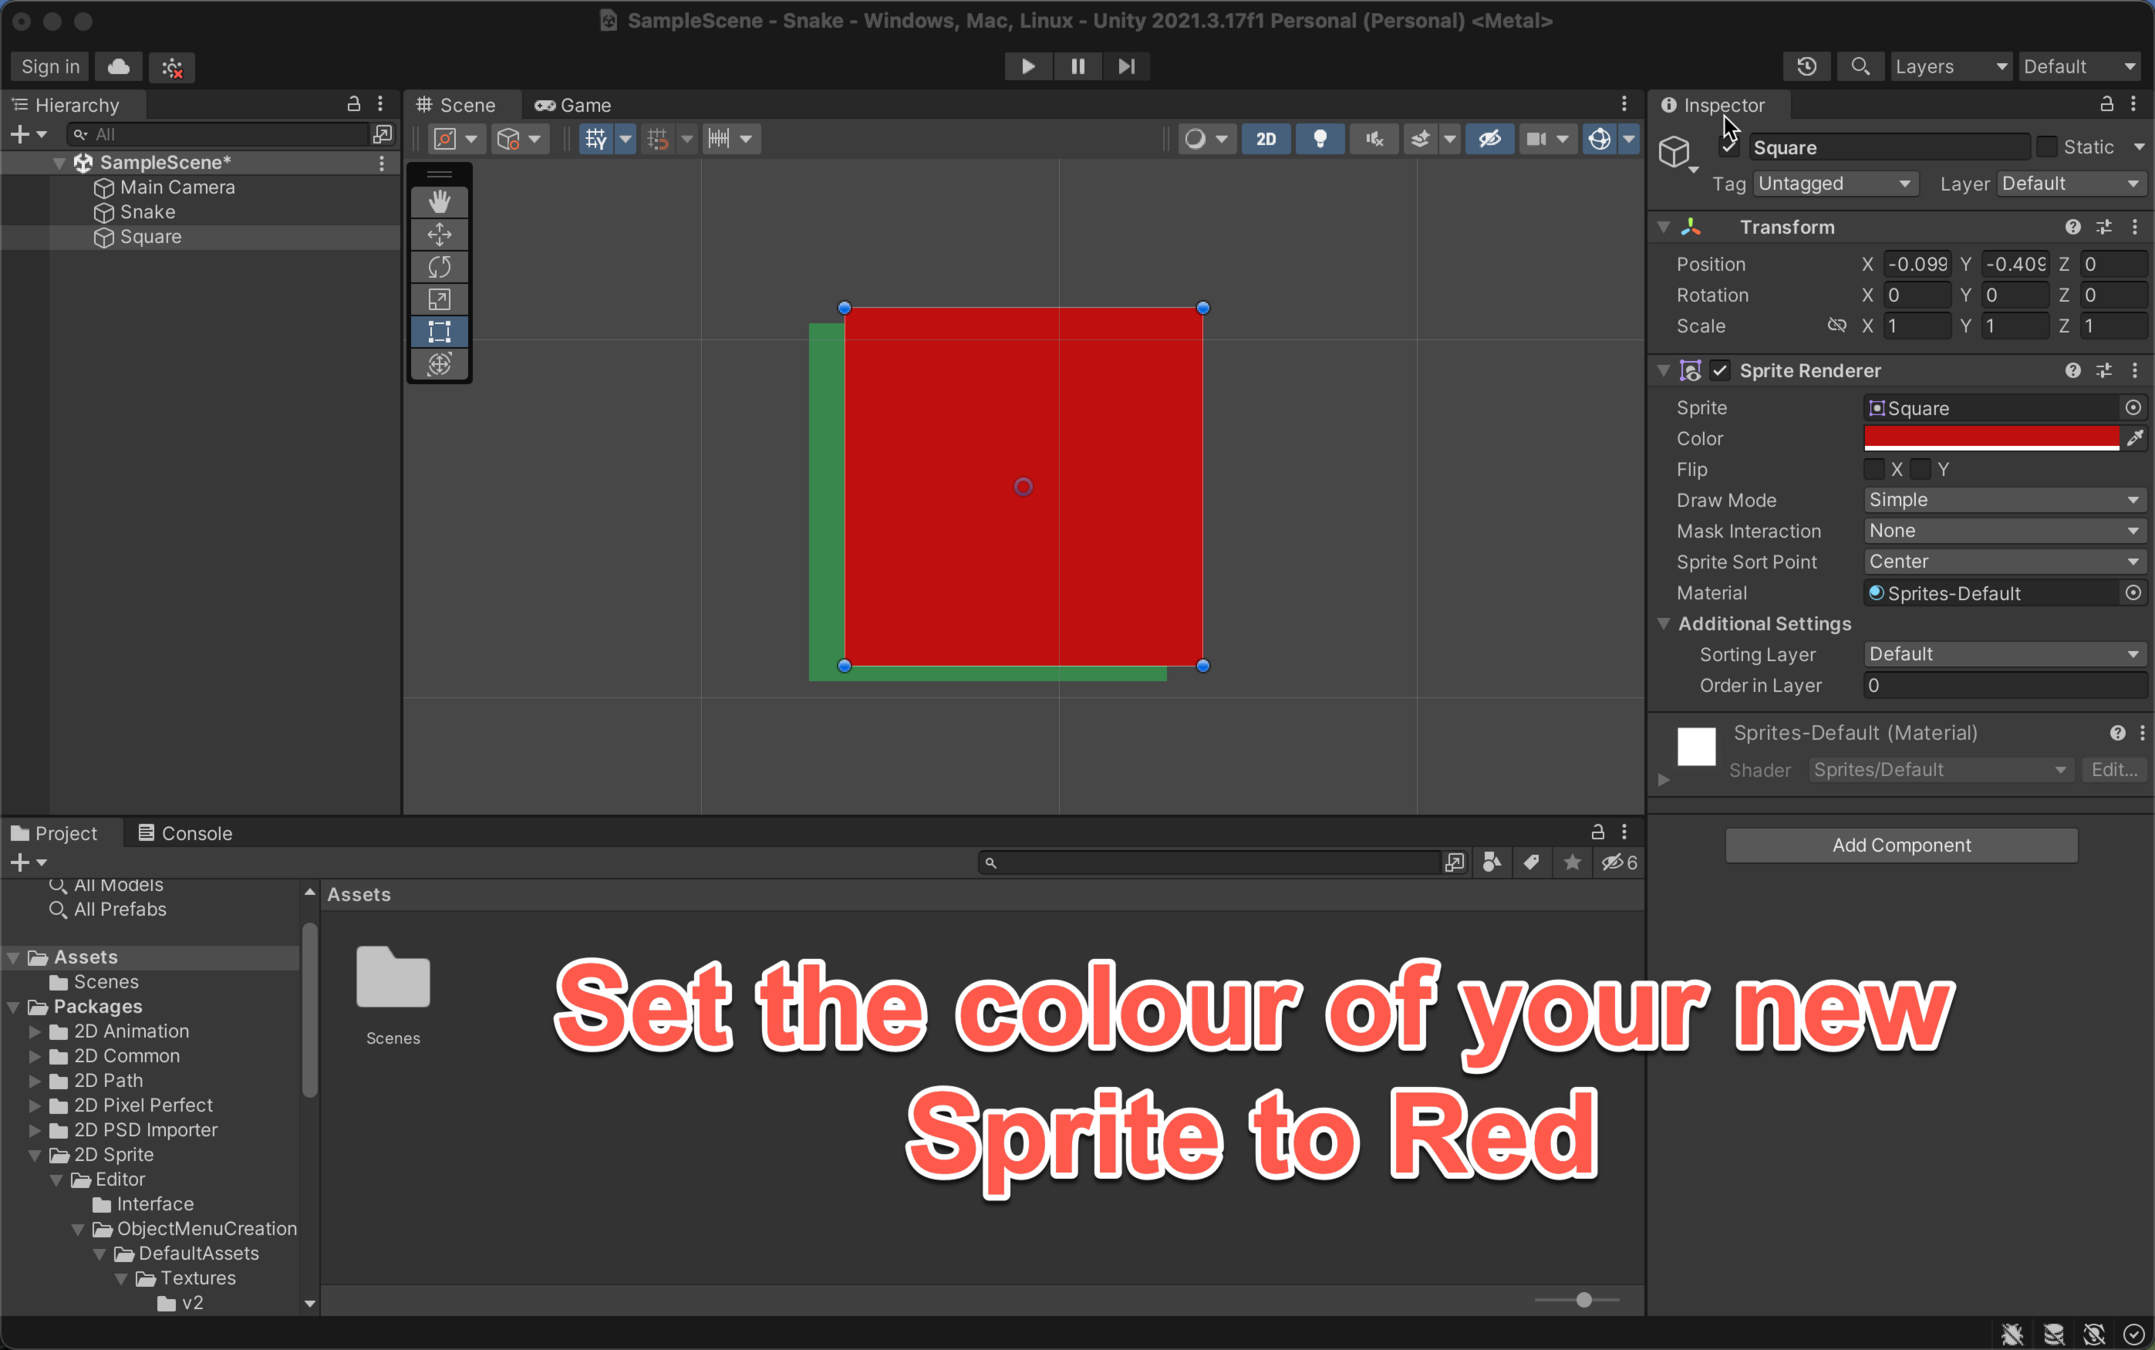
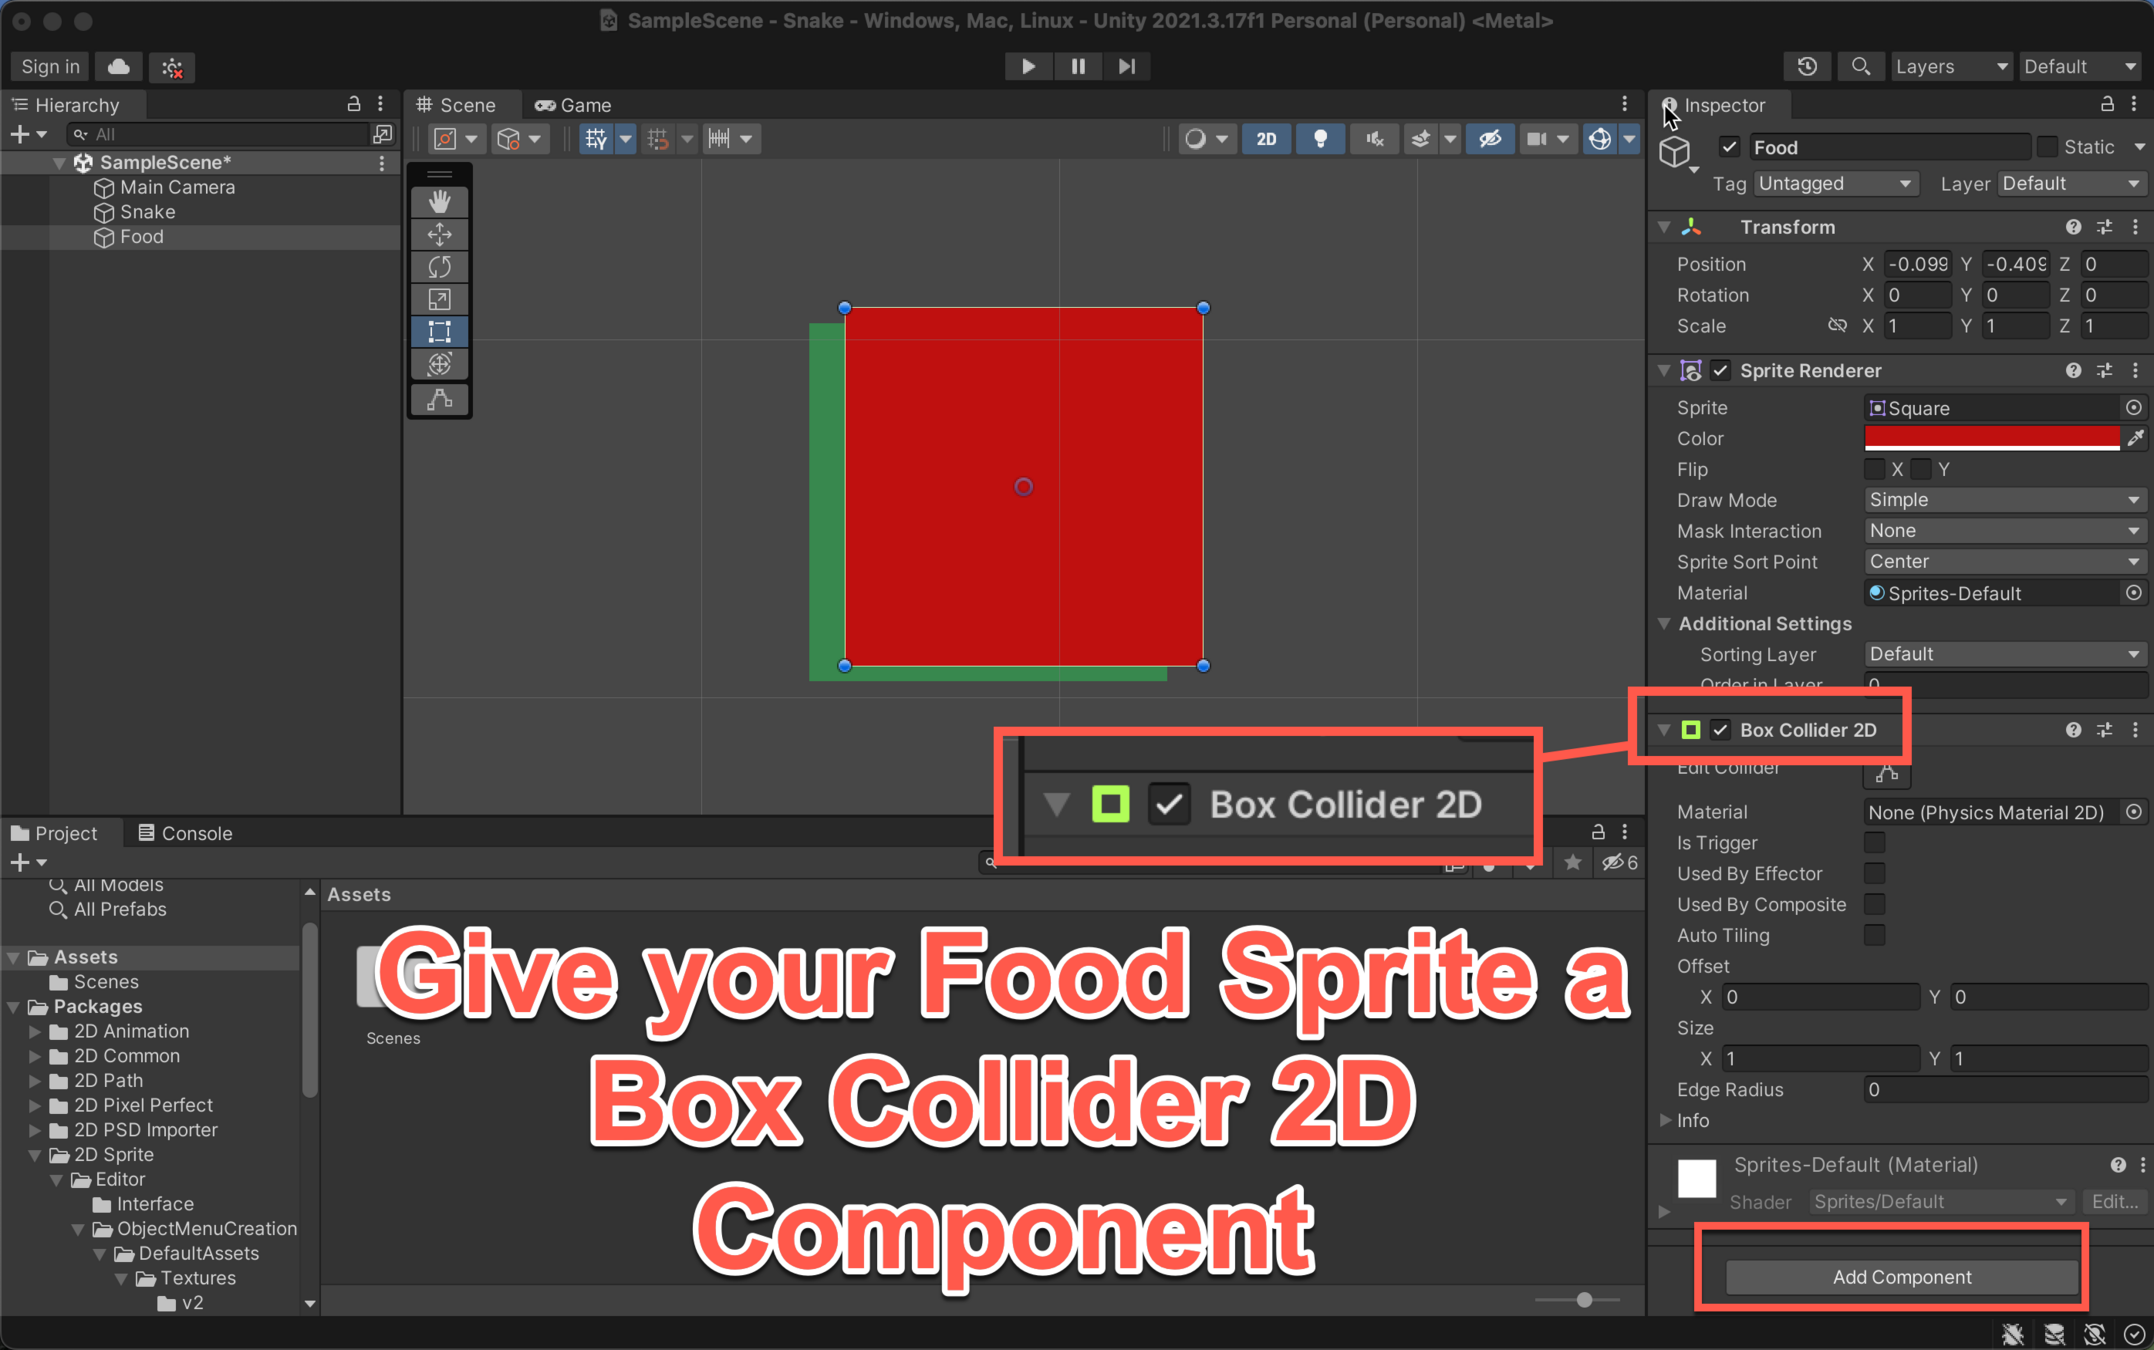
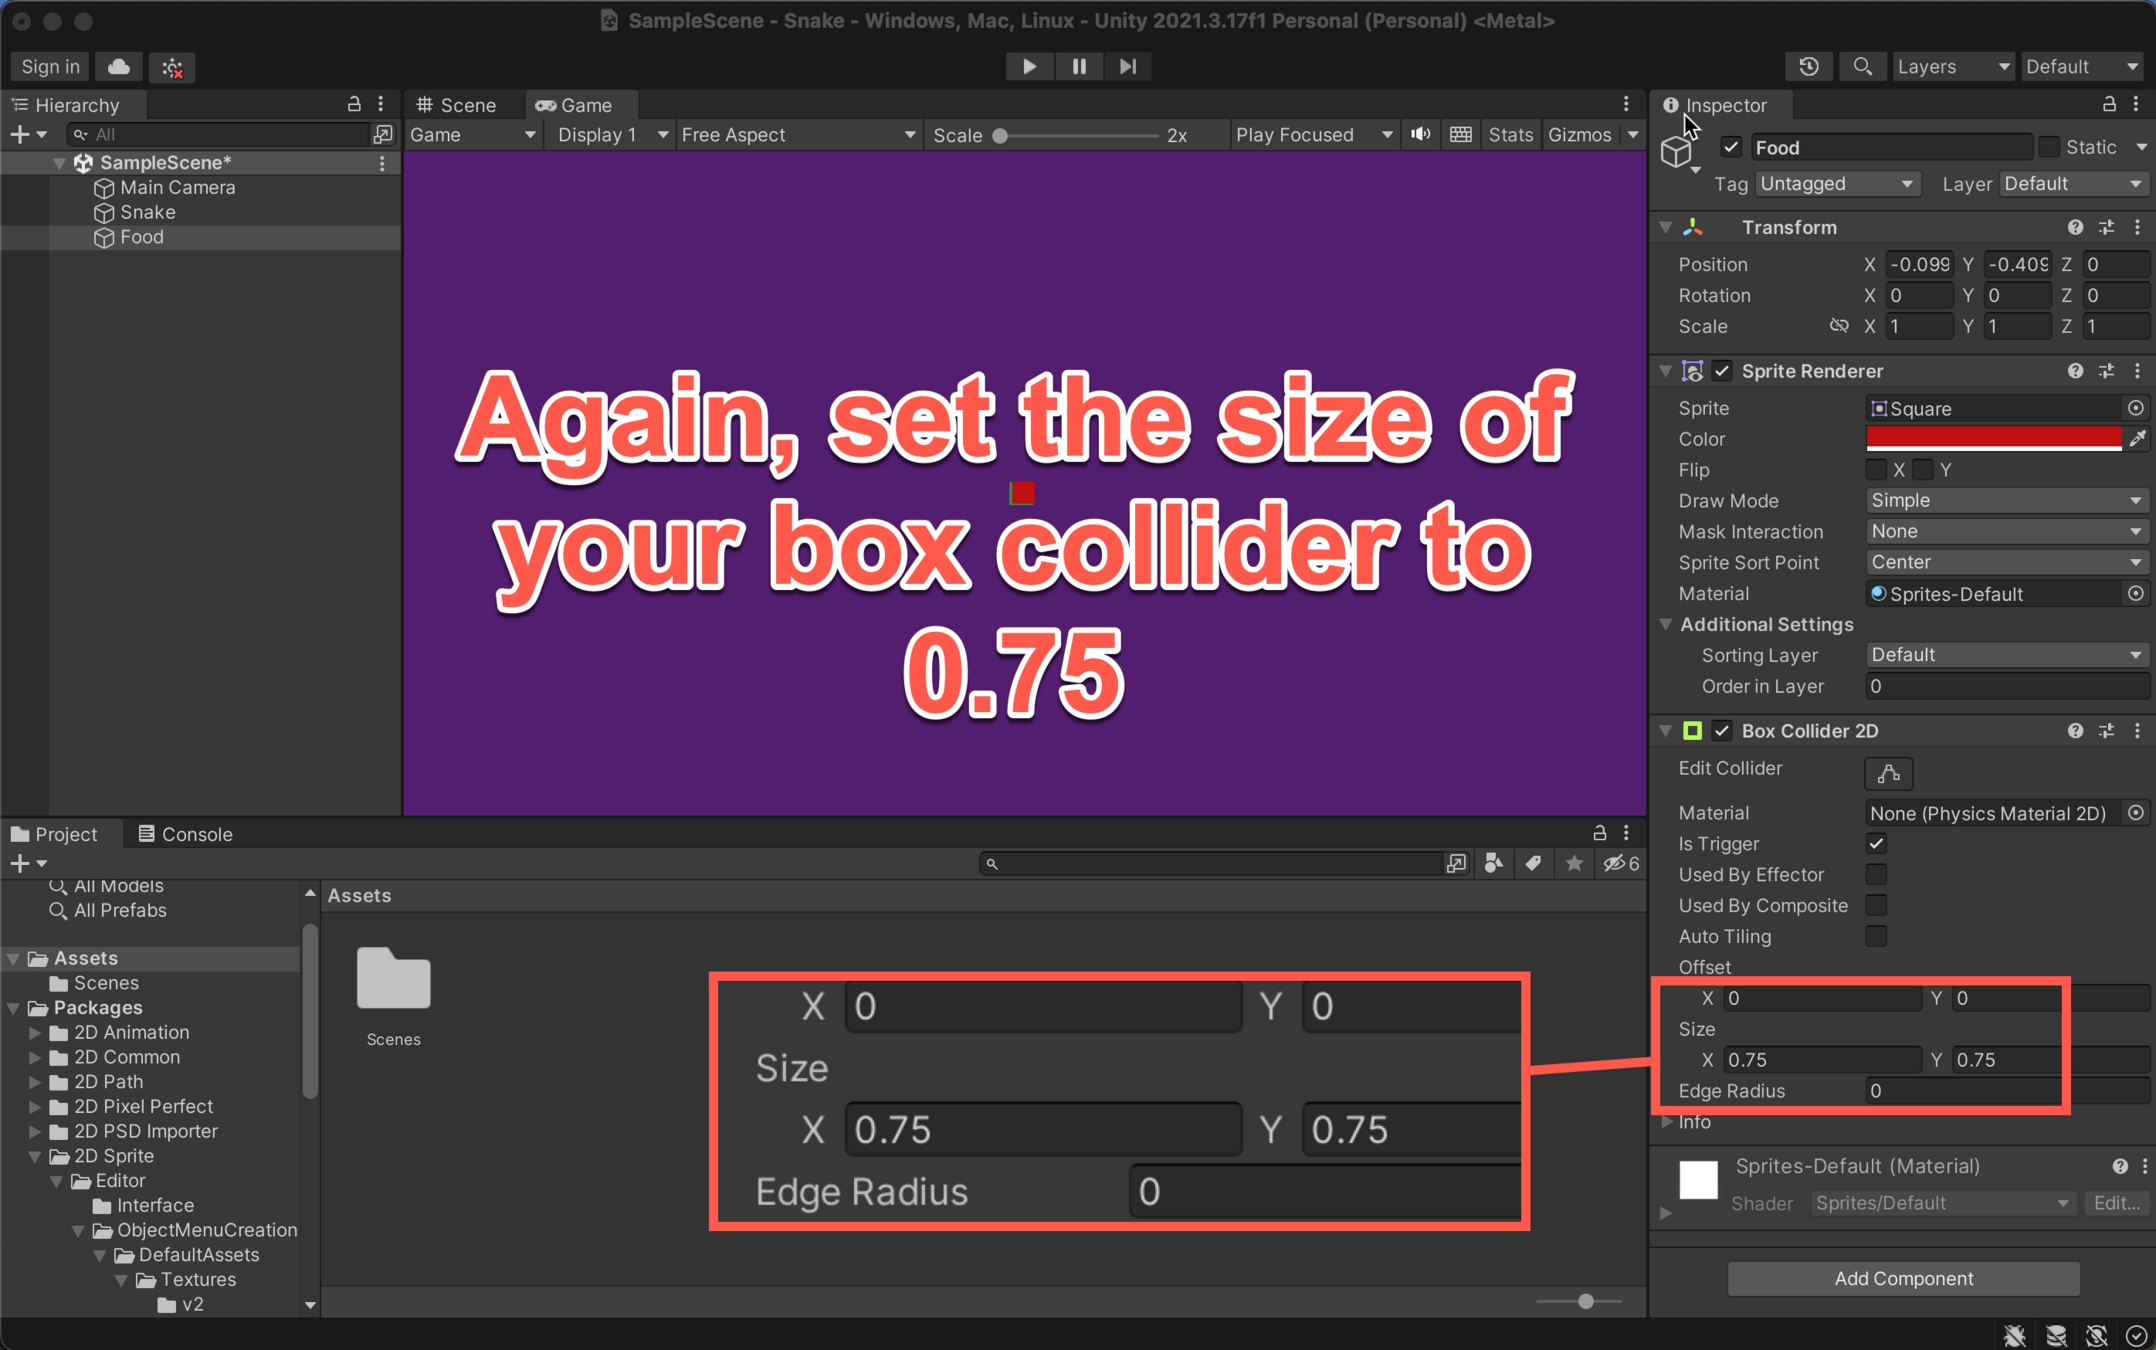
Name the new Sprite "Food"
Building a Food Object
Building a Food Object
Building a Food Object
Building a Food Object
Building a Food Object
Now your food is ready for your character to eat!

Building up the Boundaries
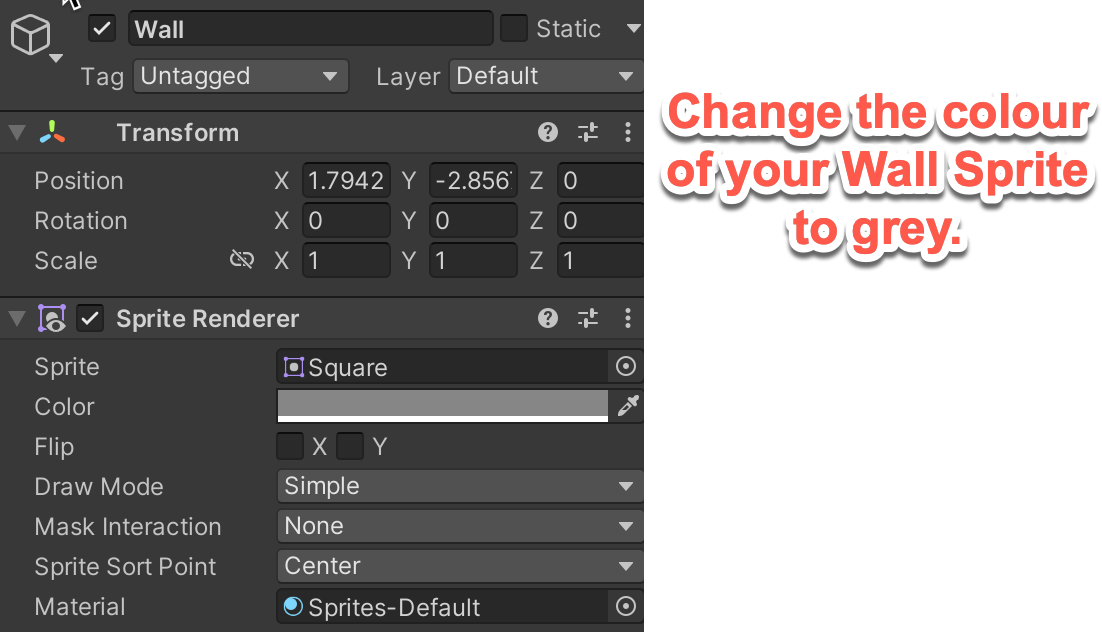
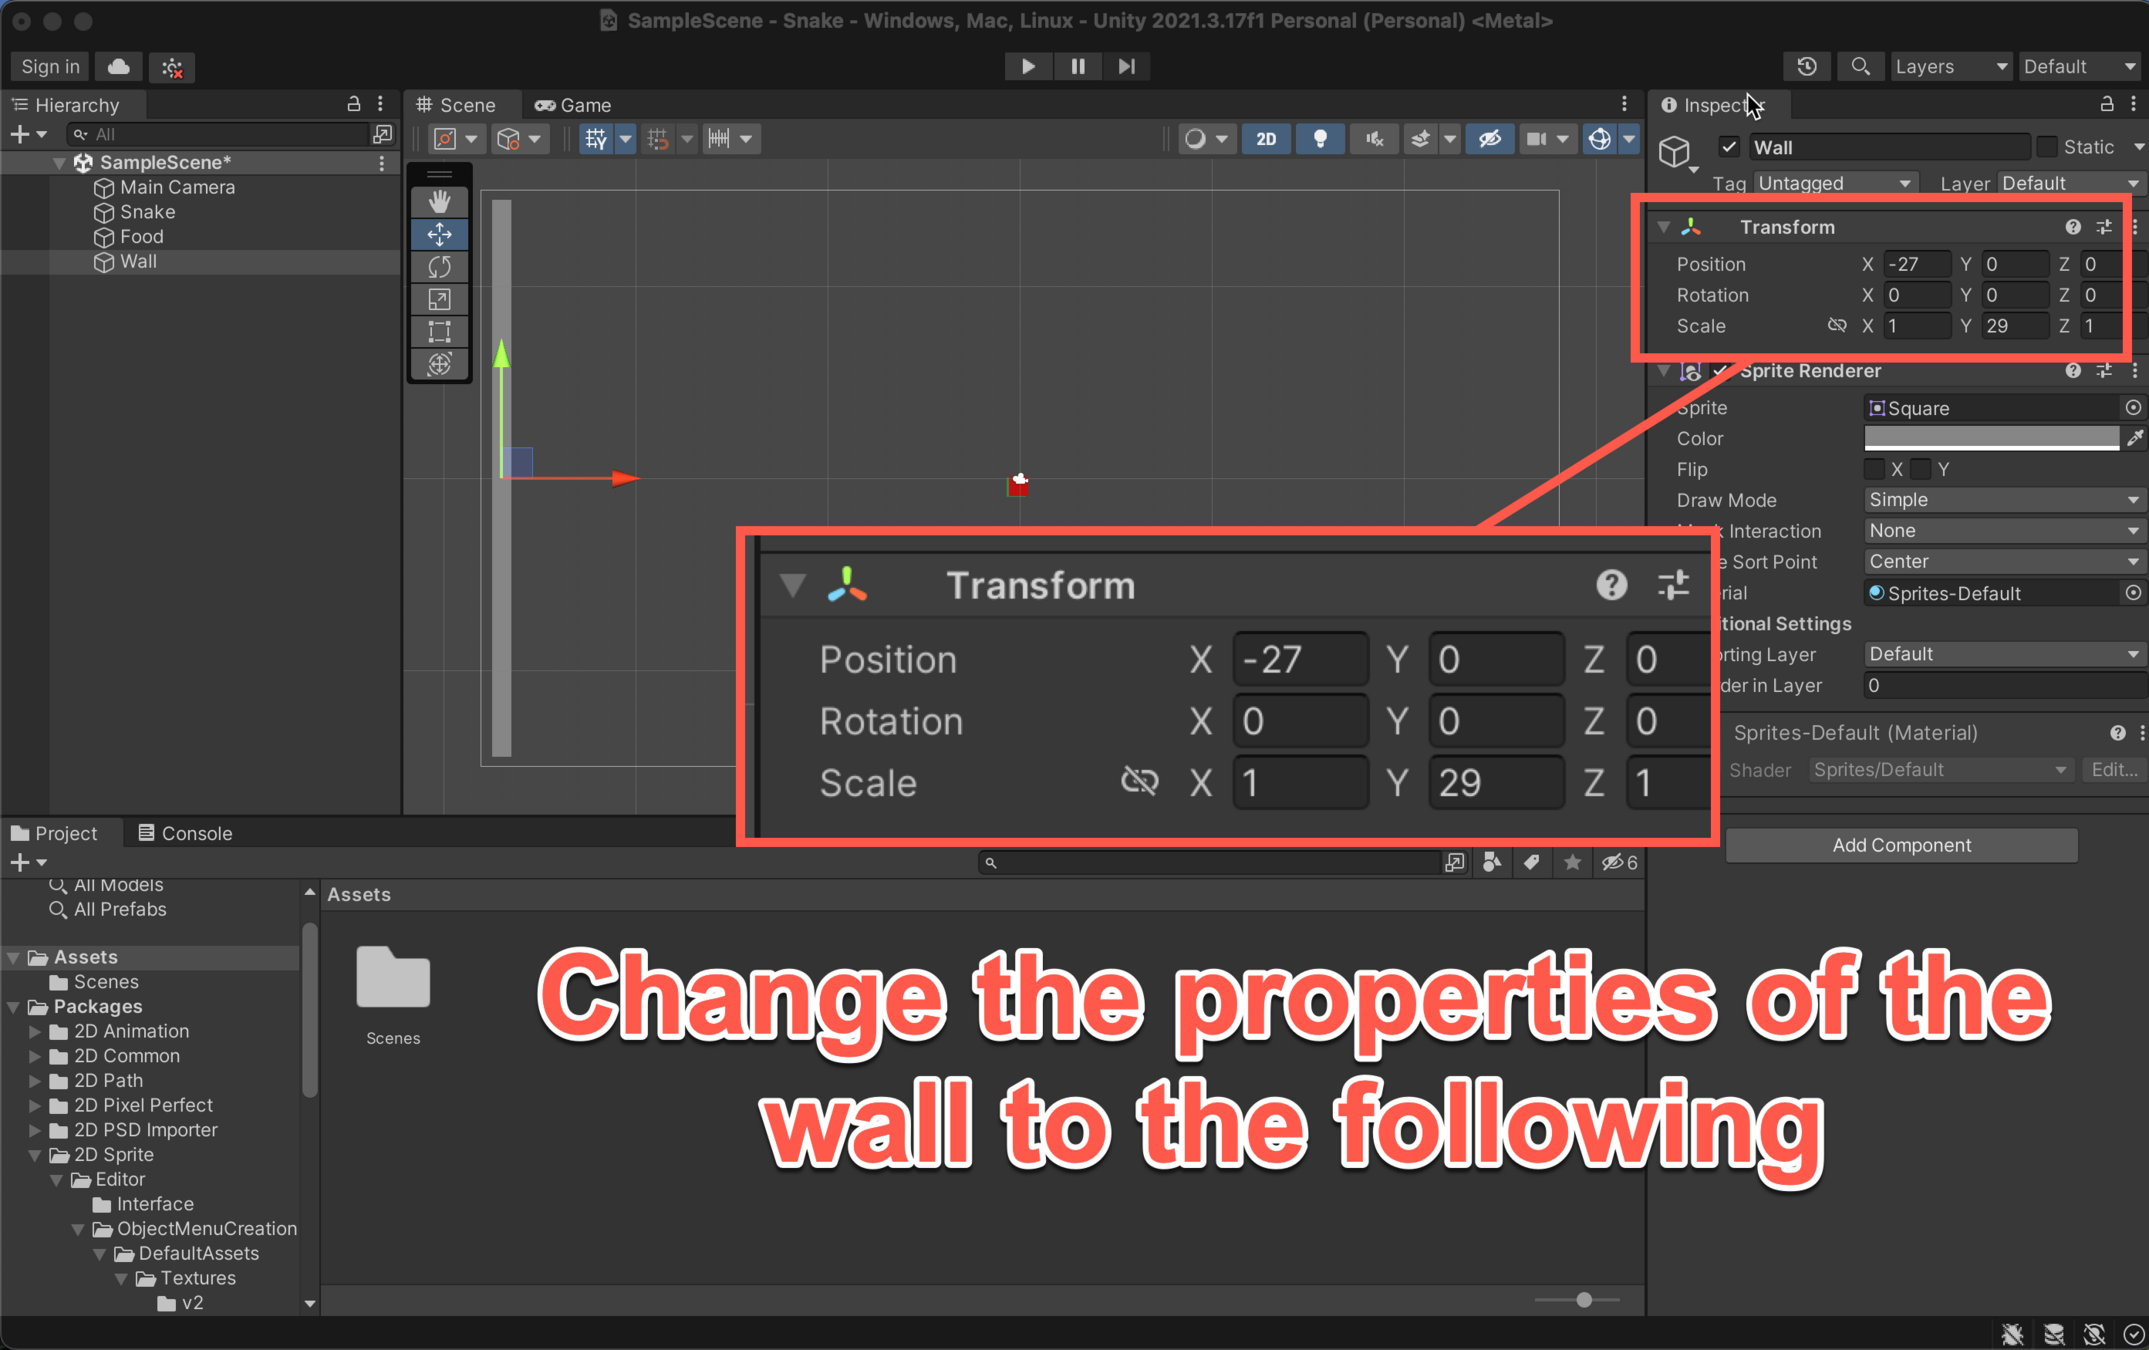
Name the new Sprite "Wall"
Building up the Boundaries
Building up the Boundaries
Building up the Boundaries
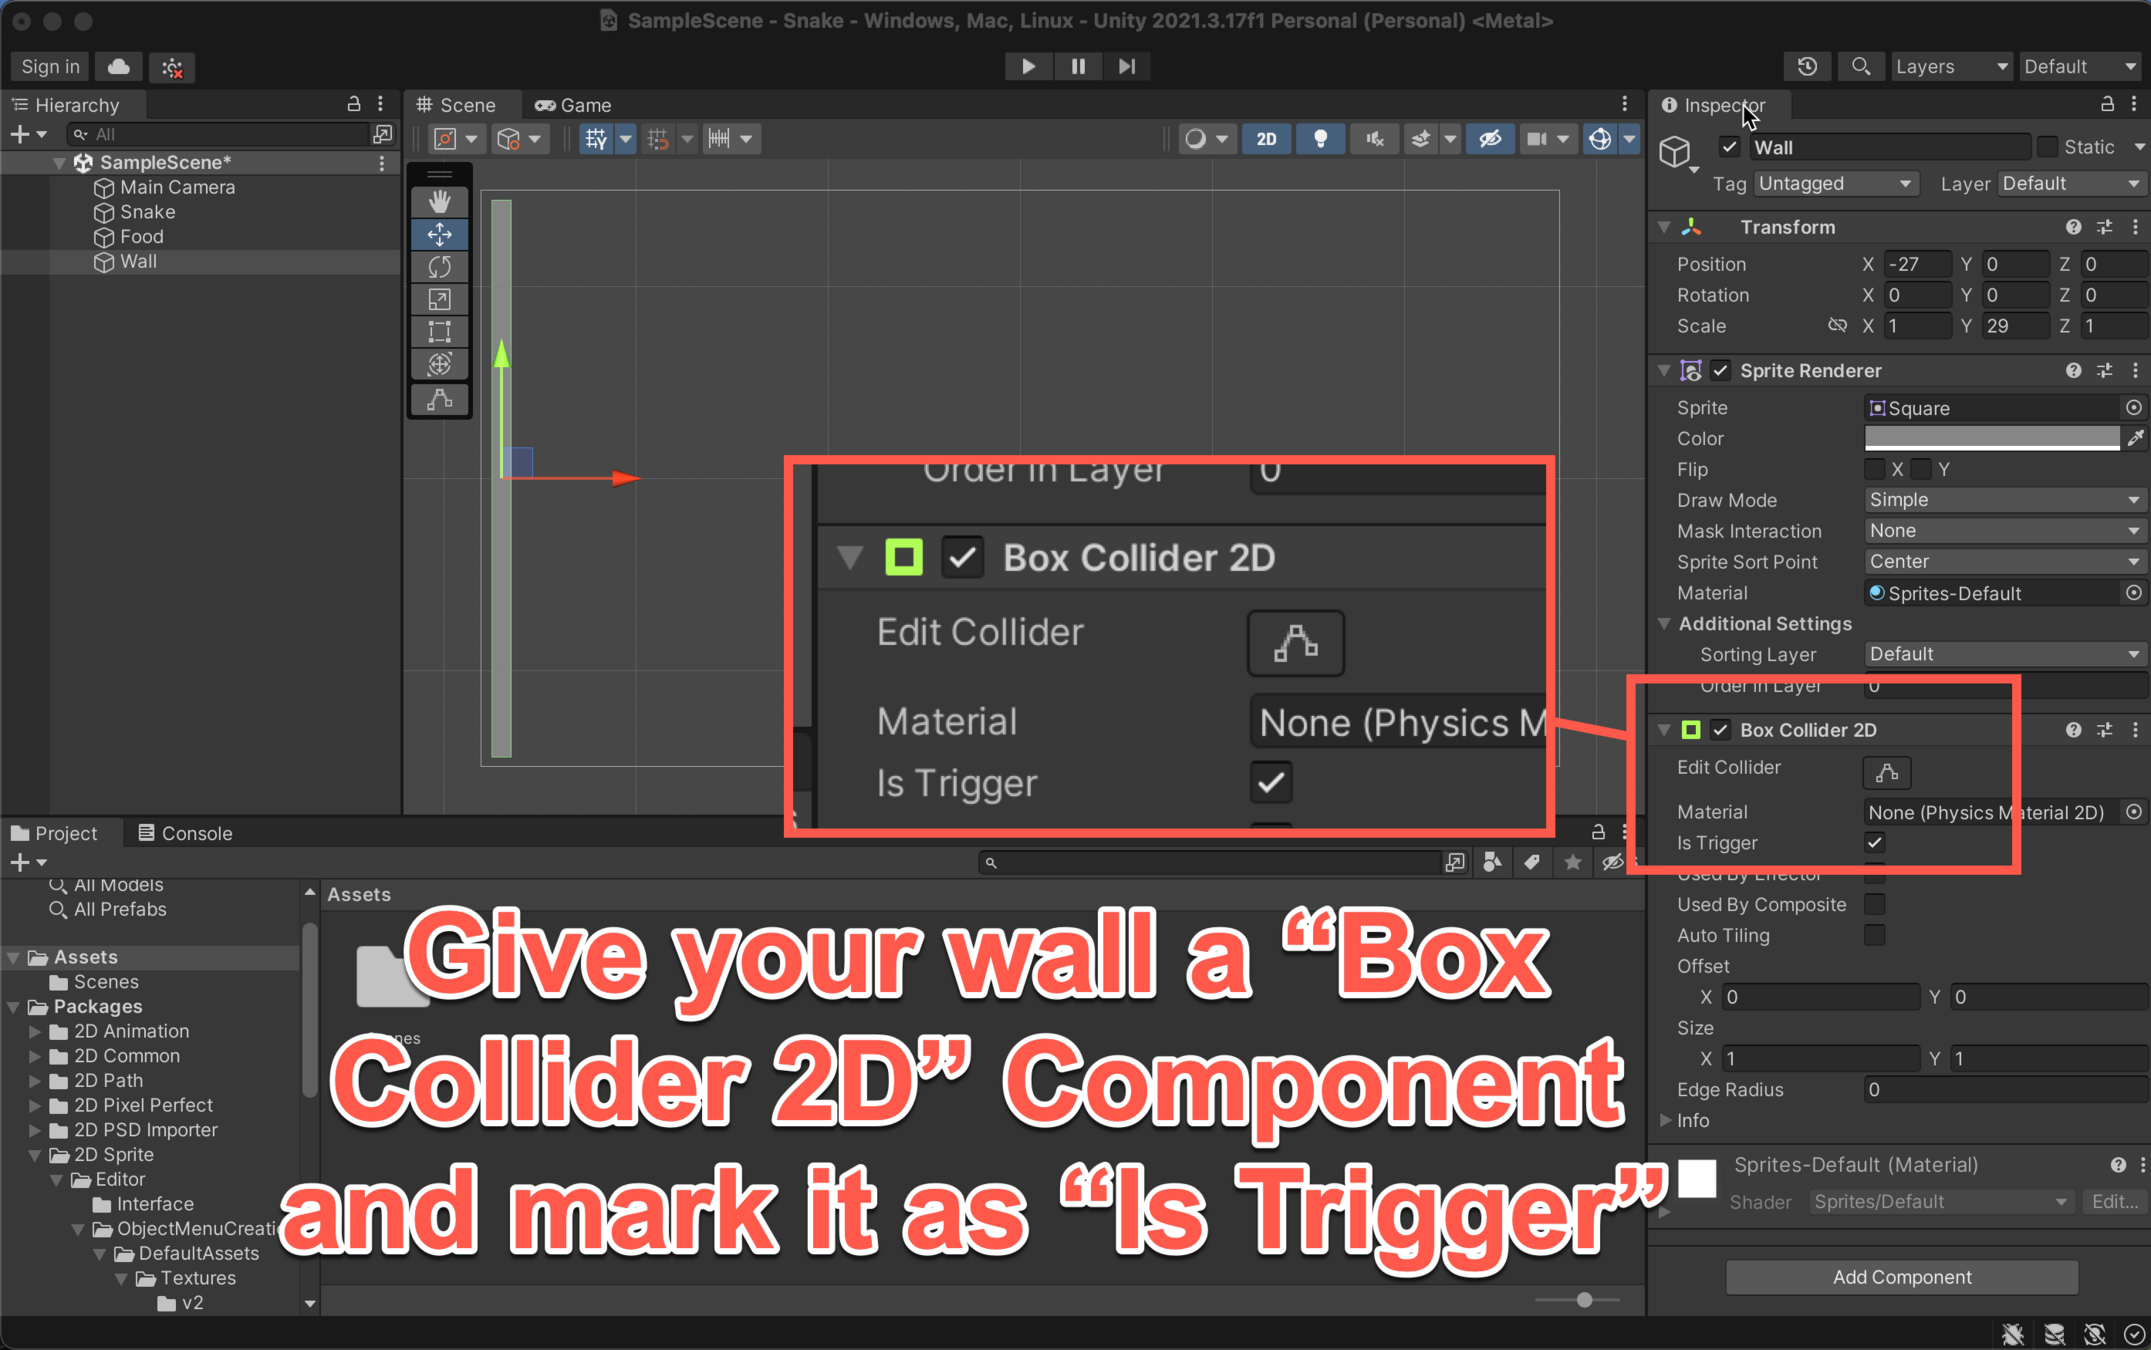
Building up the Boundaries

Name your new wall "Wall Right"
Building up the Boundaries
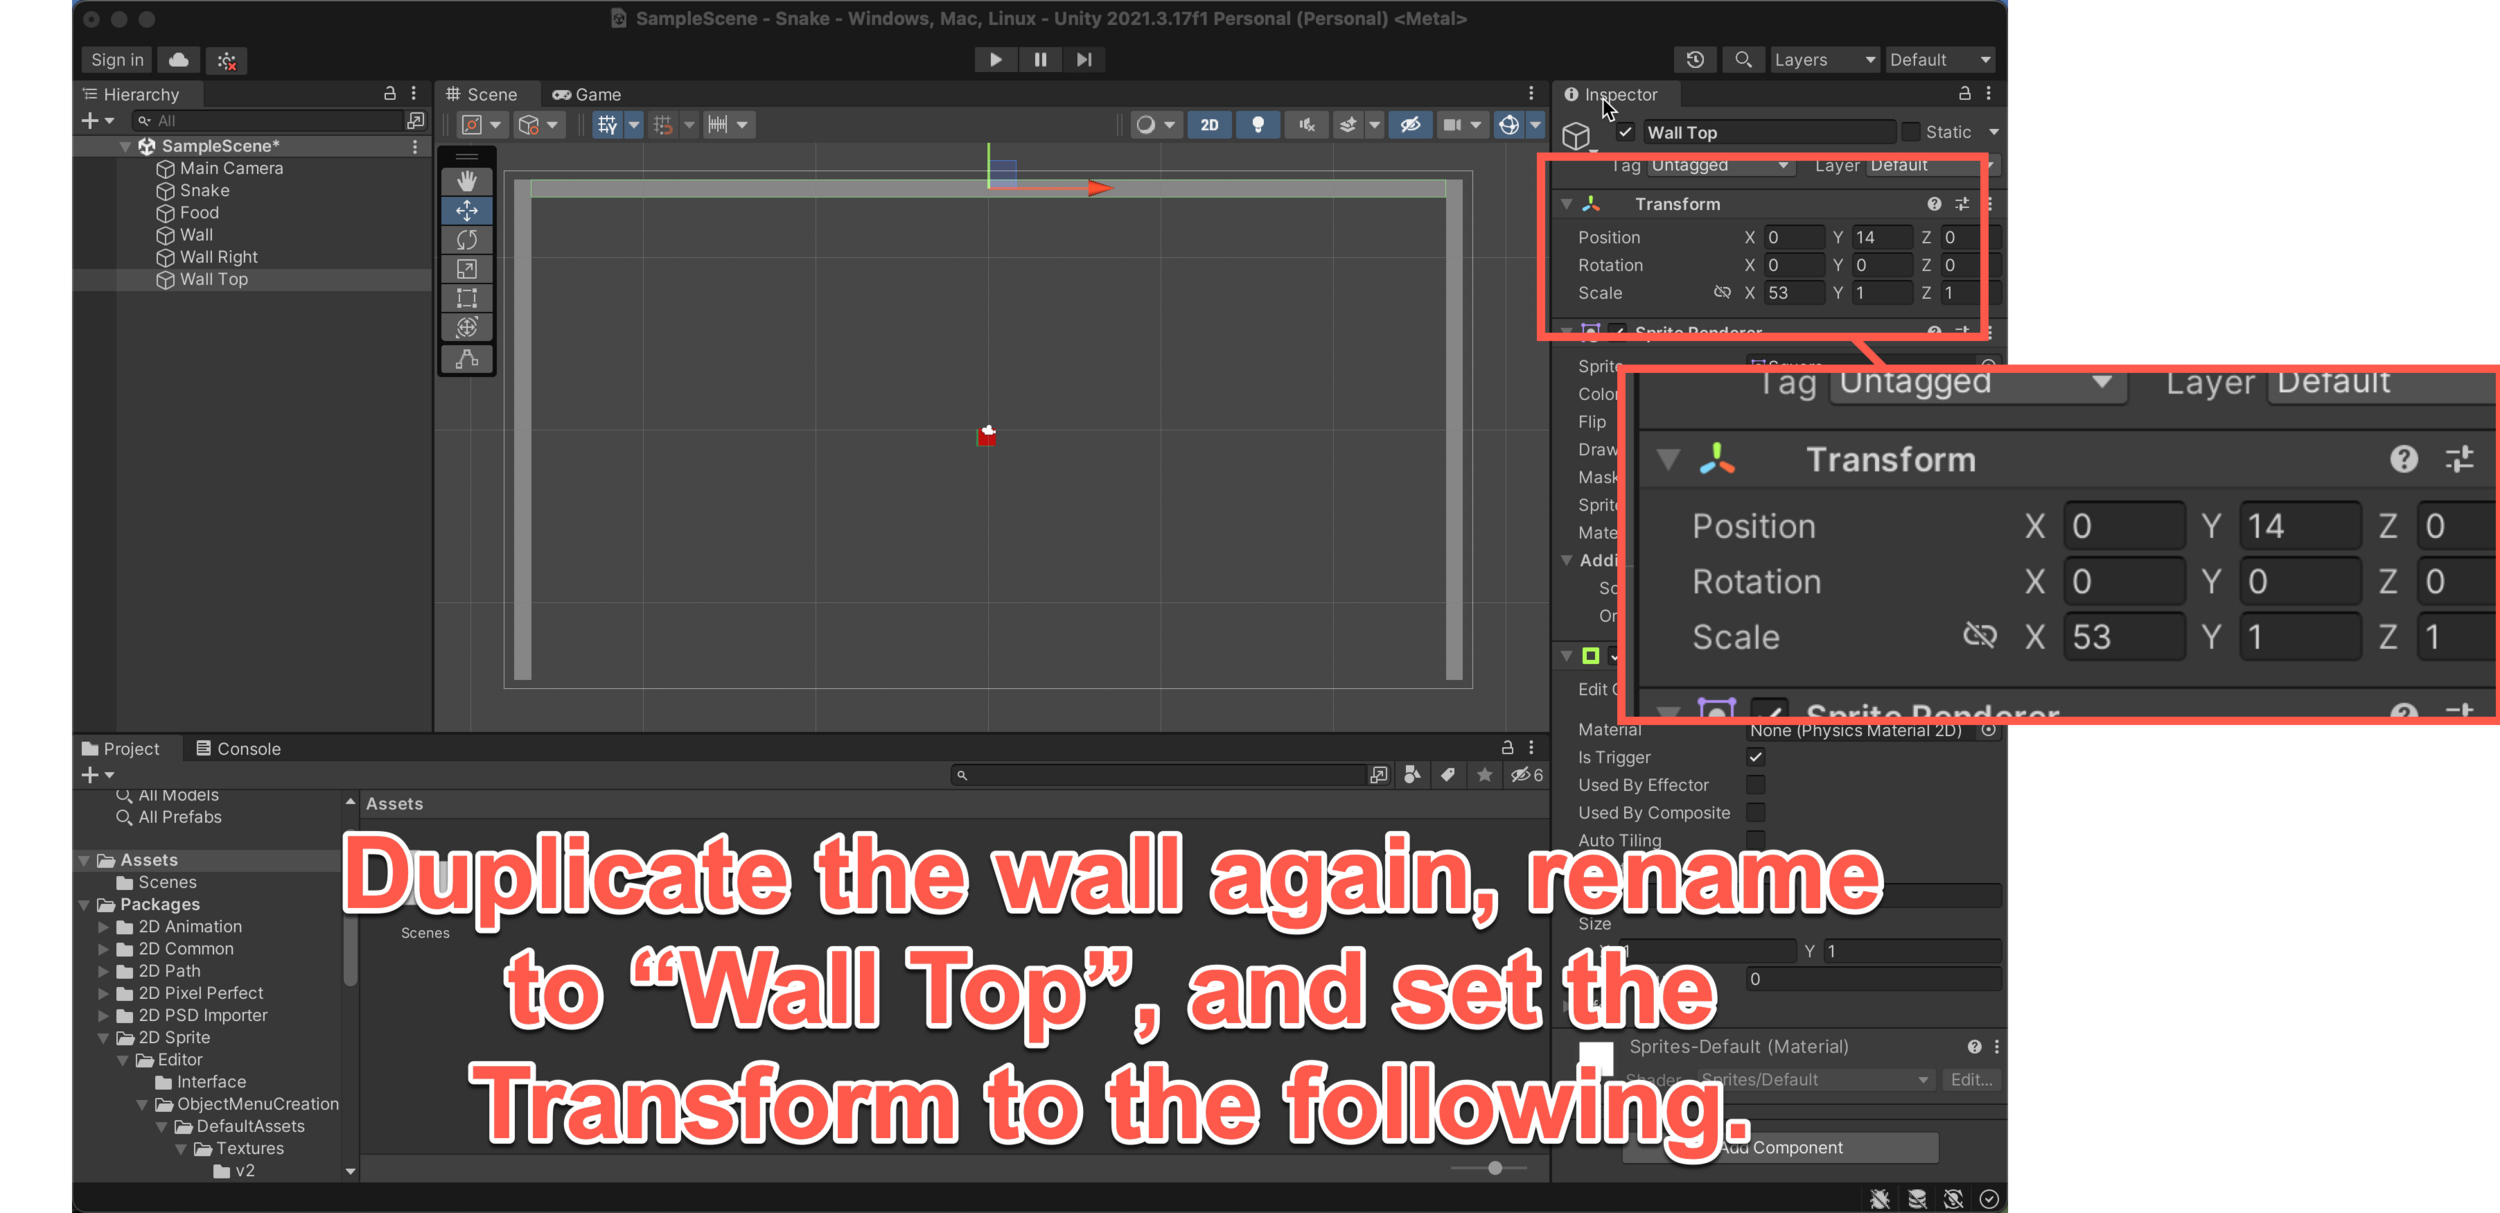
Building up the Boundaries
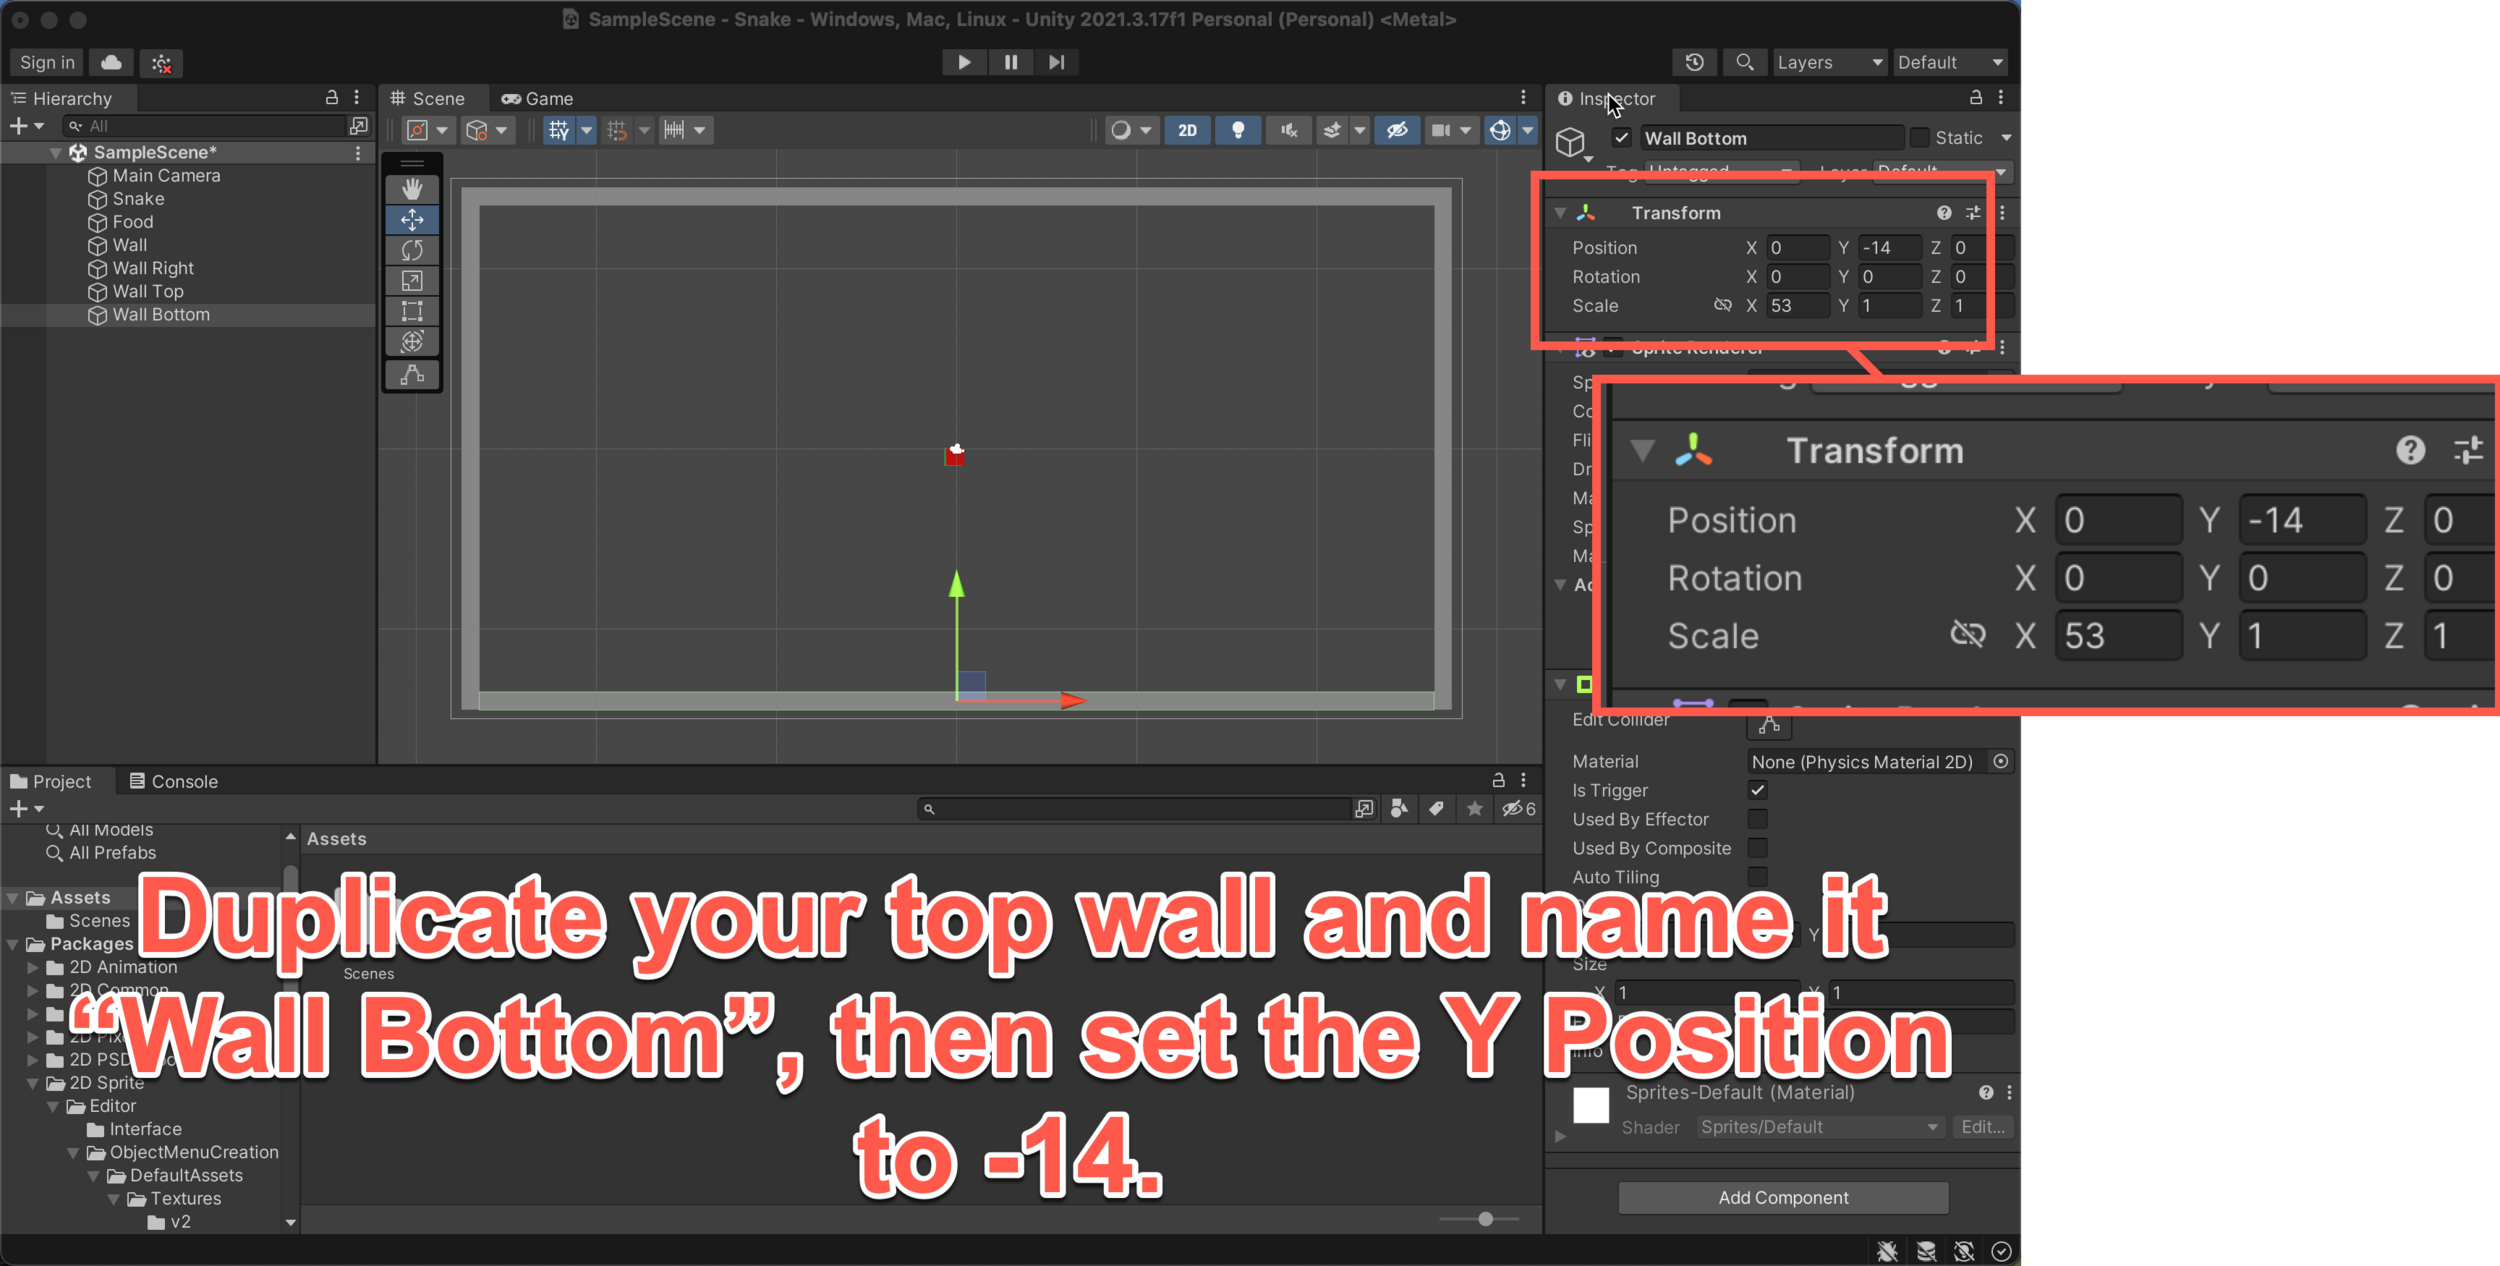
That completes our Scene Setup!

Adding Movement to your Main Character

As your Learning Objective said, you are going to be controlling the physics of your characters through code this time round.
But don't worry, it's not as scary as it sounds.
REMINDER
As you are typing out your code, make sure to copy all capital letters, brackets and semi colons EXACTLY as you see it on the slide!
If you don't your code isn't going to work and your characters won't move or eat the food pellets.
Adding Movement to your Main Character
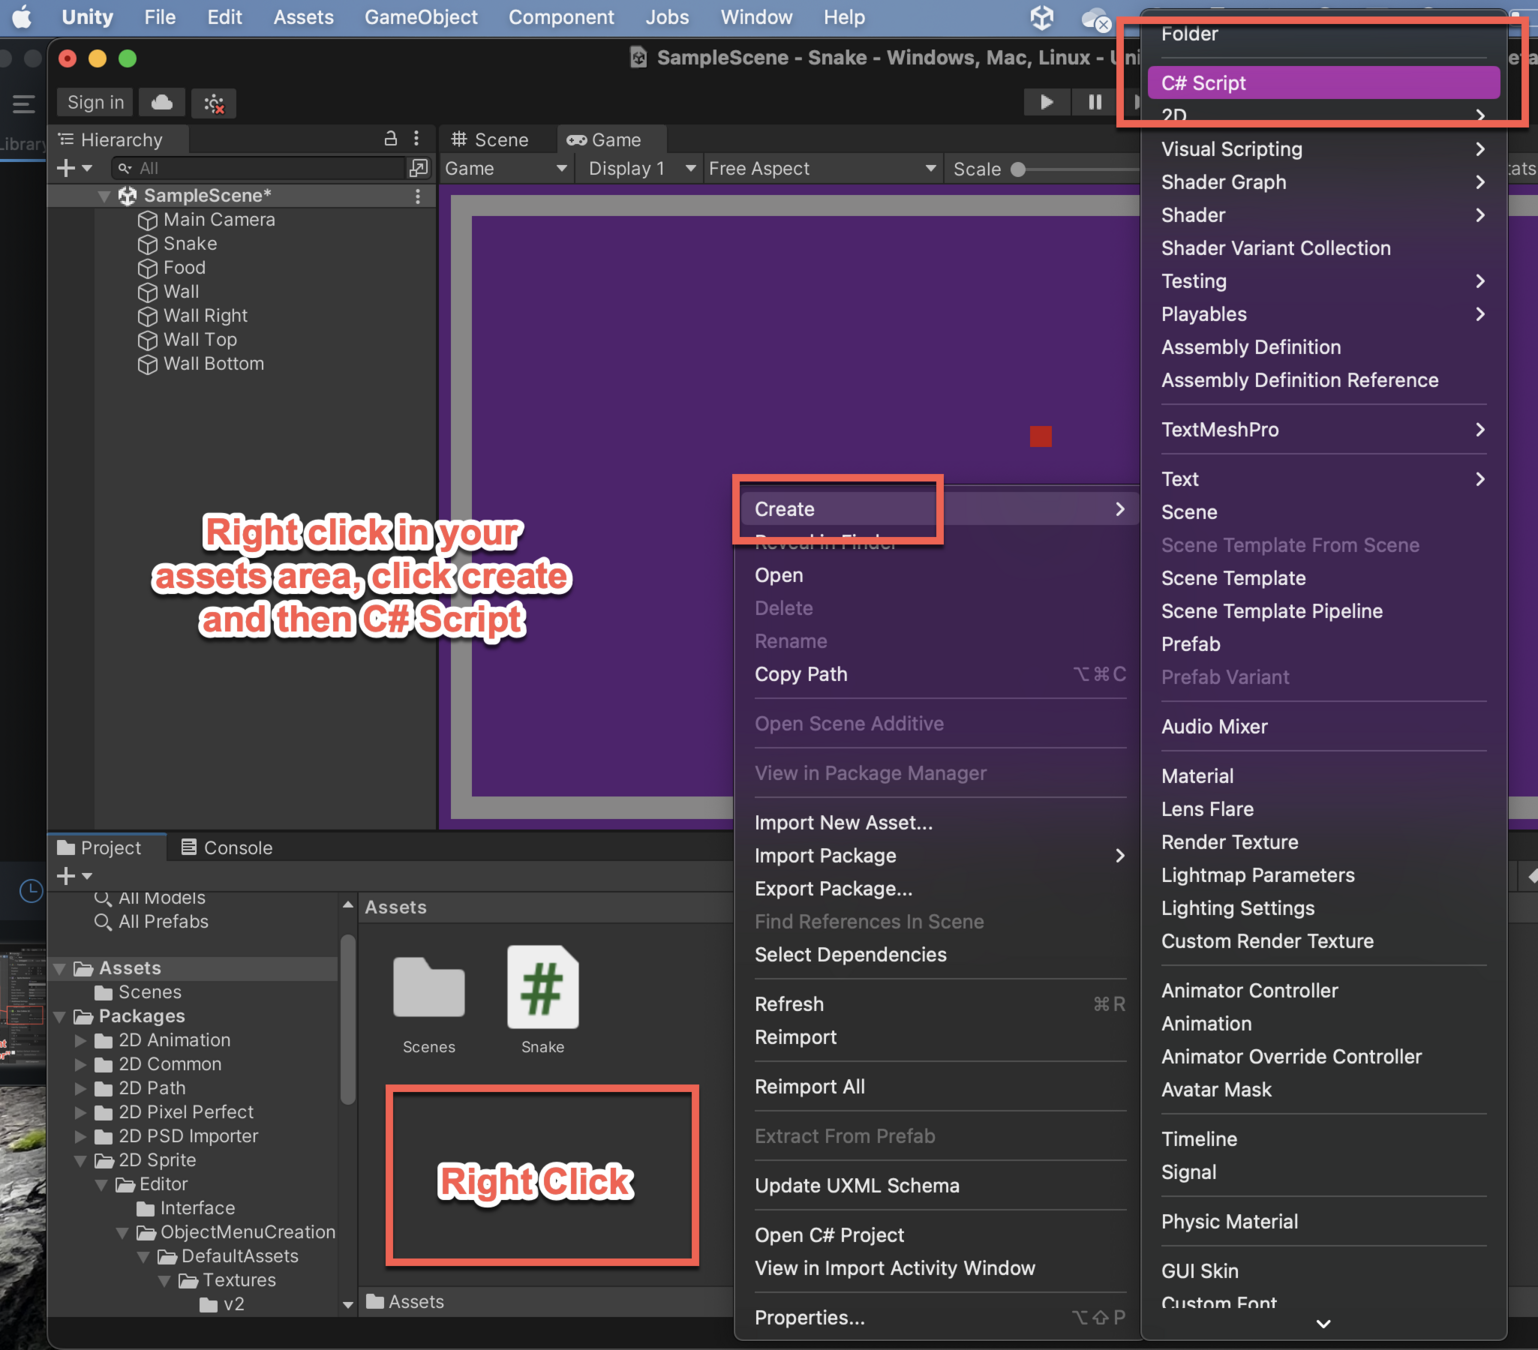
Step one is to create a new C# Script in your assets, make sure to name this script "Snake".
Then, double click your script to open the file.
Adding Movement to your Main Character
using System.Collections;
using System.Collections.Generic;
using UnityEngine;

public class Snake : MonoBehaviour
{
    // Start is called before the first frame update
    void Start()
    {

    }

    // Update is called once per frame
    void Update()
    {

    }
}
Initially, your code will look like this on the left.
The first thing we need to do is on Line 7, we need to tell our snake which way to travel when we start our game.
Add the line of code below to line 7 to tell our character to start by travelling to the right of the screen.
private Vector2 _direction = Vector2.right;Adding Movement to your Main Character
using System.Collections;
using System.Collections.Generic;
using UnityEngine;

public class Snake : MonoBehaviour
{
    private Vector2 _direction = Vector2.right;

    // Start is called before the first frame update
    void Start()
    {

    }

    // Update is called once per frame
    void Update()
    {

    }
}
Our Start() function will remain empty so we can delete lines 9-13.
Adding Movement to your Main Character
using System.Collections;
using System.Collections.Generic;
using UnityEngine;

public class Snake : MonoBehaviour
{
    private Vector2 _direction = Vector2.right;

    // Update is called once per frame
    void Update()
    {

    }
}
The Update() function is a routine that will update once per frame of our game. This is dependant on the speed of your computer but is useful for deciding when to change the direction of our main character.
Adding Movement to your Main Character
using System.Collections;
using System.Collections.Generic;
using UnityEngine;

public class Snake : MonoBehaviour
{
    private Vector2 _direction = Vector2.right;

    // Update is called once per frame
    void Update()
    {

    }
}
So inside of the Update() function (on line 12), can you add the following code to check for an arrow key being pressed and to update the direction of your character.
    private void Update()
    {
        if (Input.GetKeyDown(KeyCode.UpArrow)) {
            _direction = Vector2.up;
        } else if (Input.GetKeyDown(KeyCode.LeftArrow)) {
            _direction = Vector2.left;
        } else if (Input.GetKeyDown(KeyCode.DownArrow)) {
            _direction = Vector2.down;
        } else if (Input.GetKeyDown(KeyCode.RightArrow)) {
            _direction = Vector2.right;
        }
    }
Adding Movement to your Main Character
using System.Collections;
using System.Collections.Generic;
using UnityEngine;

public class Snake : MonoBehaviour
{
    private Vector2 _direction = Vector2.right;

    // Update is called once per frame
    private void Update()
    {
        if (Input.GetKeyDown(KeyCode.UpArrow)) {
            _direction = Vector2.up;
        } else if (Input.GetKeyDown(KeyCode.LeftArrow)) {
            _direction = Vector2.left;
        } else if (Input.GetKeyDown(KeyCode.DownArrow)) {
            _direction = Vector2.down;
        } else if (Input.GetKeyDown(KeyCode.RightArrow)) {
            _direction = Vector2.right;
        }
    }
}
Your code now will check if we have pressed a button and will update the direction of your character based on the key you have pressed.
Take a moment now to proof read your Update() function to make sure you have got your capital letters, your curly brackets "{}" and your semi colons ";" in the correct positions. Otherwise your character won't be able to move properly.
Adding Movement to your Main Character
using System.Collections;
using System.Collections.Generic;
using UnityEngine;

public class Snake : MonoBehaviour
{
    private Vector2 _direction = Vector2.right;

    // Update is called once per frame
    private void Update()
    {
        if (Input.GetKeyDown(KeyCode.UpArrow)) {
            _direction = Vector2.up;
        } else if (Input.GetKeyDown(KeyCode.LeftArrow)) {
            _direction = Vector2.left;
        } else if (Input.GetKeyDown(KeyCode.DownArrow)) {
            _direction = Vector2.down;
        } else if (Input.GetKeyDown(KeyCode.RightArrow)) {
            _direction = Vector2.right;
        }
    }
}
The final step in our code for the main character is to create a function that will tell the character itself how to move in this new direction.
Create a new line after line 21.
On this line write:
private void Fixed Update() {
Adding Movement to your Main Character
using System.Collections;
using System.Collections.Generic;
using UnityEngine;

public class Snake : MonoBehaviour
{
    private Vector2 _direction = Vector2.right;

    // Update is called once per frame
    private void Update()
    {
        if (Input.GetKeyDown(KeyCode.UpArrow)) {
            _direction = Vector2.up;
        } else if (Input.GetKeyDown(KeyCode.LeftArrow)) {
            _direction = Vector2.left;
        } else if (Input.GetKeyDown(KeyCode.DownArrow)) {
            _direction = Vector2.down;
        } else if (Input.GetKeyDown(KeyCode.RightArrow)) {
            _direction = Vector2.right;
        }
    }
    private void FixedUpdate()
    {
        this.transform.position = new Vector3(
            Mathf.Round(this.transform.position.x) + _direction.x,
            Mathf.Round(this.transform.position.y) + _direction.y,
            0.0f
        );
    }
}
Now add in the lines of code from line 24-28.
What we are doing here is saying at fixed intervals, give our character a new position (x, y and z), which should be the position we had plus our new position. Our z position will always be 0.0f because our game is 2D.
We also added Mathf.Round at the beginning of each new position which ensures we always give it a whole number.
Adding Movement to your Main Character
using System.Collections;
using System.Collections.Generic;
using UnityEngine;

public class Snake : MonoBehaviour
{
    private Vector2 _direction = Vector2.right;

    // Update is called once per frame
    private void Update()
    {
        if (Input.GetKeyDown(KeyCode.UpArrow)) {
            _direction = Vector2.up;
        } else if (Input.GetKeyDown(KeyCode.LeftArrow)) {
            _direction = Vector2.left;
        } else if (Input.GetKeyDown(KeyCode.DownArrow)) {
            _direction = Vector2.down;
        } else if (Input.GetKeyDown(KeyCode.RightArrow)) {
            _direction = Vector2.right;
        }
    }
    private void FixedUpdate()
    {
        this.transform.position = new Vector3(
            Mathf.Round(this.transform.position.x) + _direction.x,
            Mathf.Round(this.transform.position.y) + _direction.y,
            0.0f
        );
    }
}
Once you are happy with it, press CTRL + S to save your work and go back to Unity.
Take a moment now to proof read your Update() function to make sure you have got your capital letters, your curly brackets "{}" and your semi colons ";" in the correct positions. Otherwise your character won't be able to move properly.
Adding Movement to your Main Character
Adding Movement to your Main Character

Slowing down your Main Character
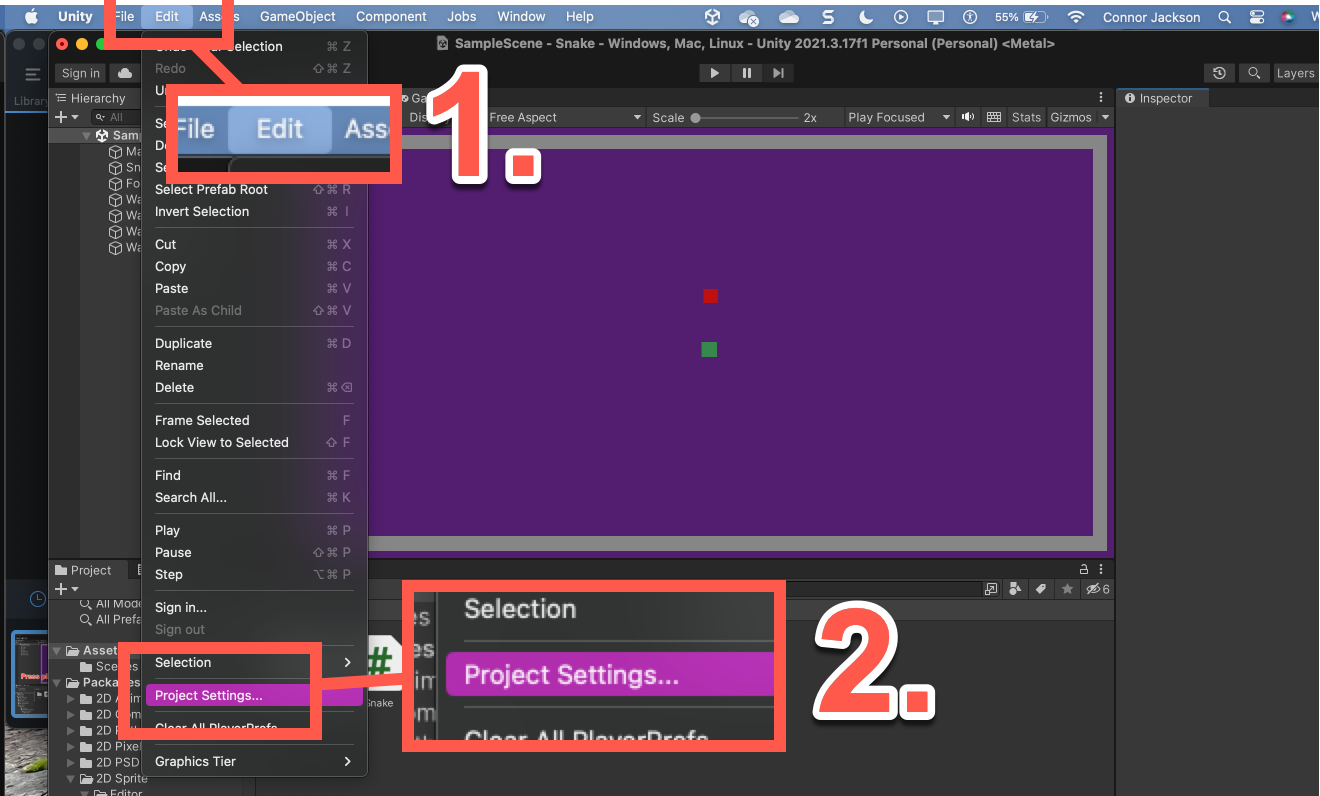
To slow down your character, we need to change the project settings so our FixedUpdate() has a longer wait time between refreshes.
To do this, can you go to Edit, then Project Settings.
Slowing down your Main Character
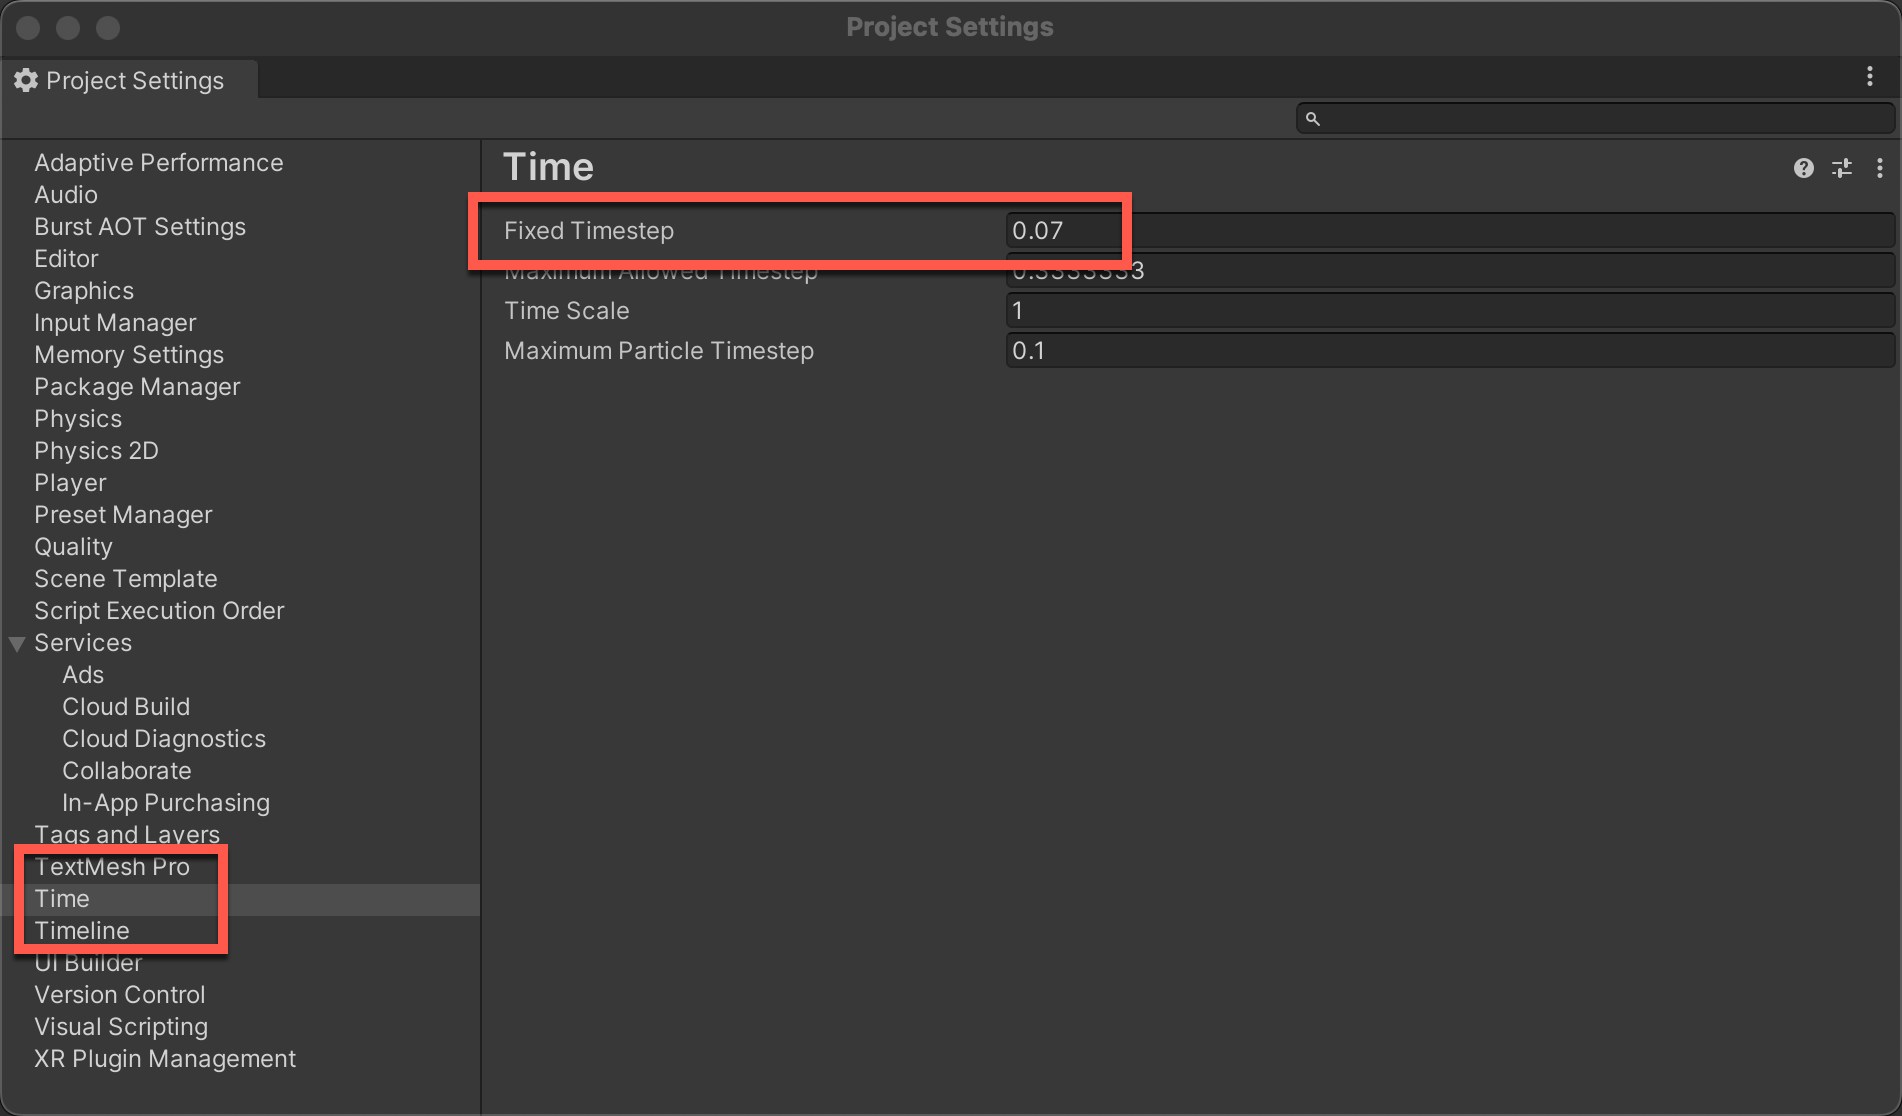
Now go to Time and the first box, Fixed Timestep, needs a value of 0.07
Main Character Complete

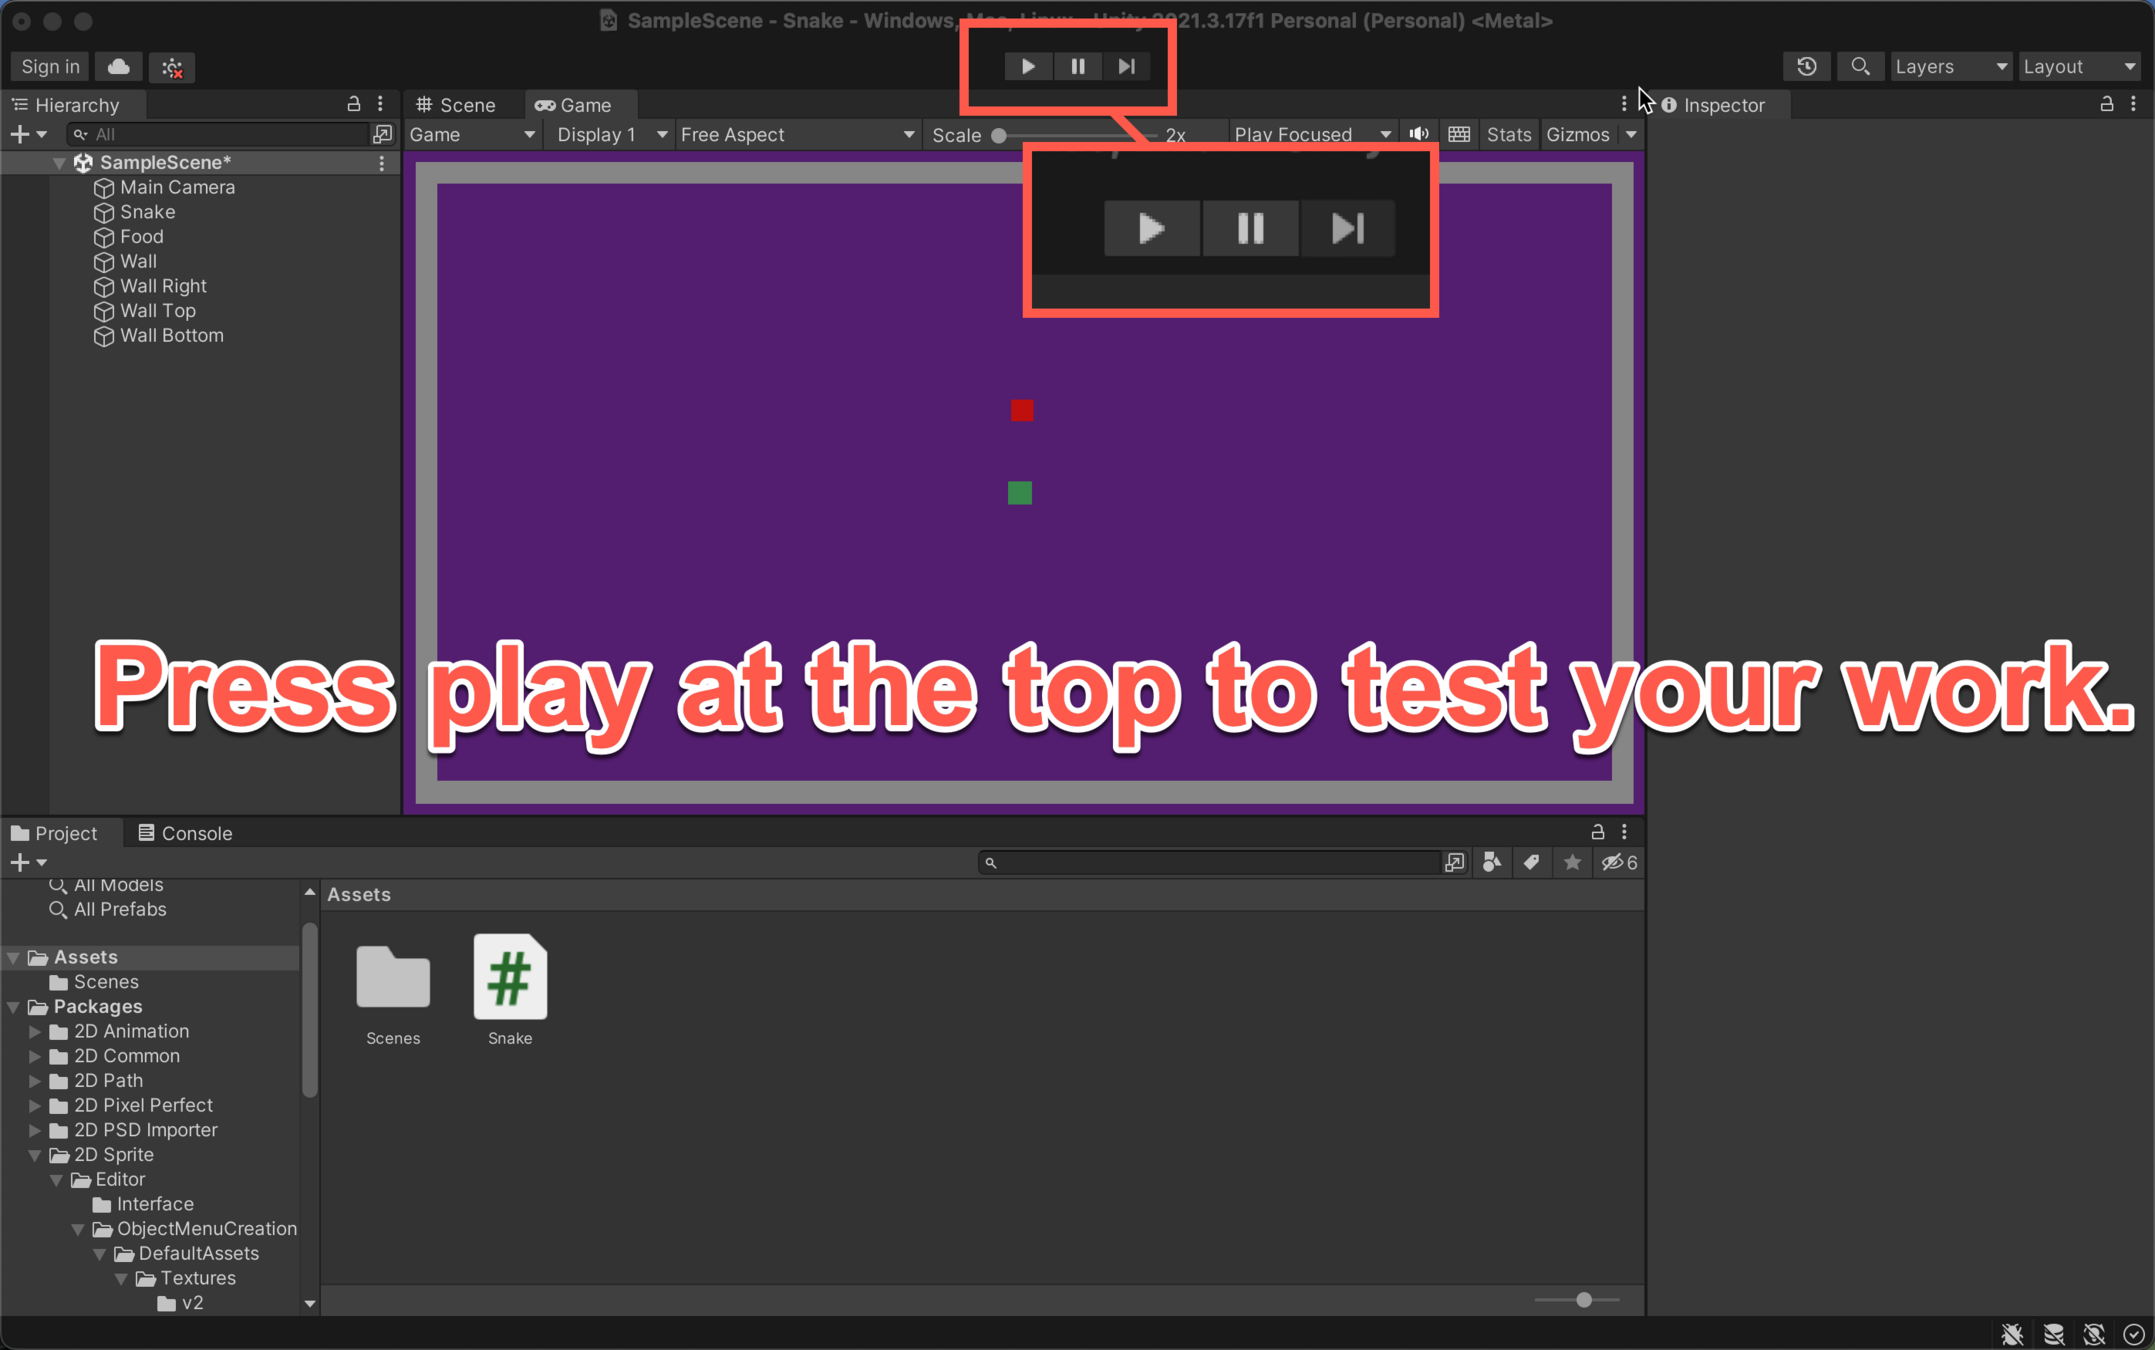
You can test your code again now to check it works properly.
Food Placement Logic
The next part of logic is to make your food appear in random places each time one gets eaten.

Food Placement Logic
Create a new Script and call it "Food"
Do not open the file yet.
Food Placement Logic
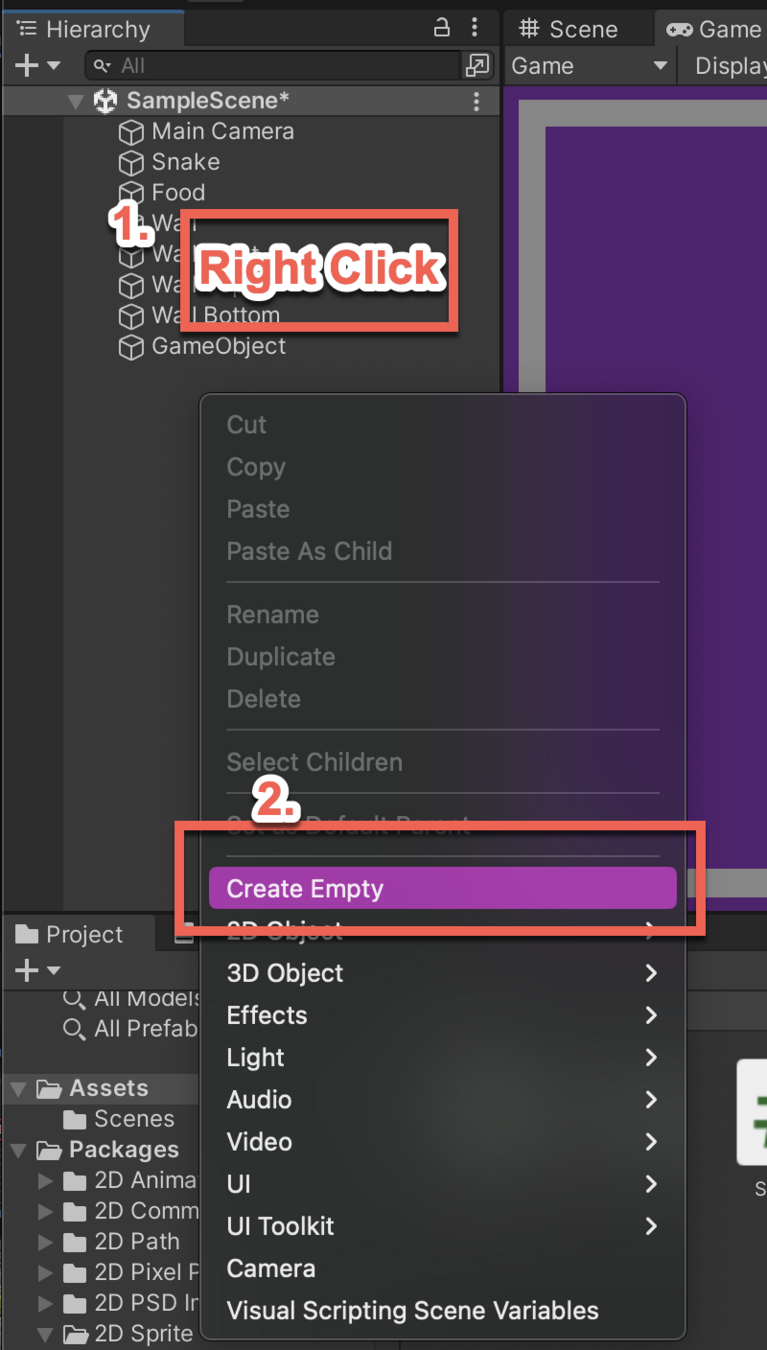
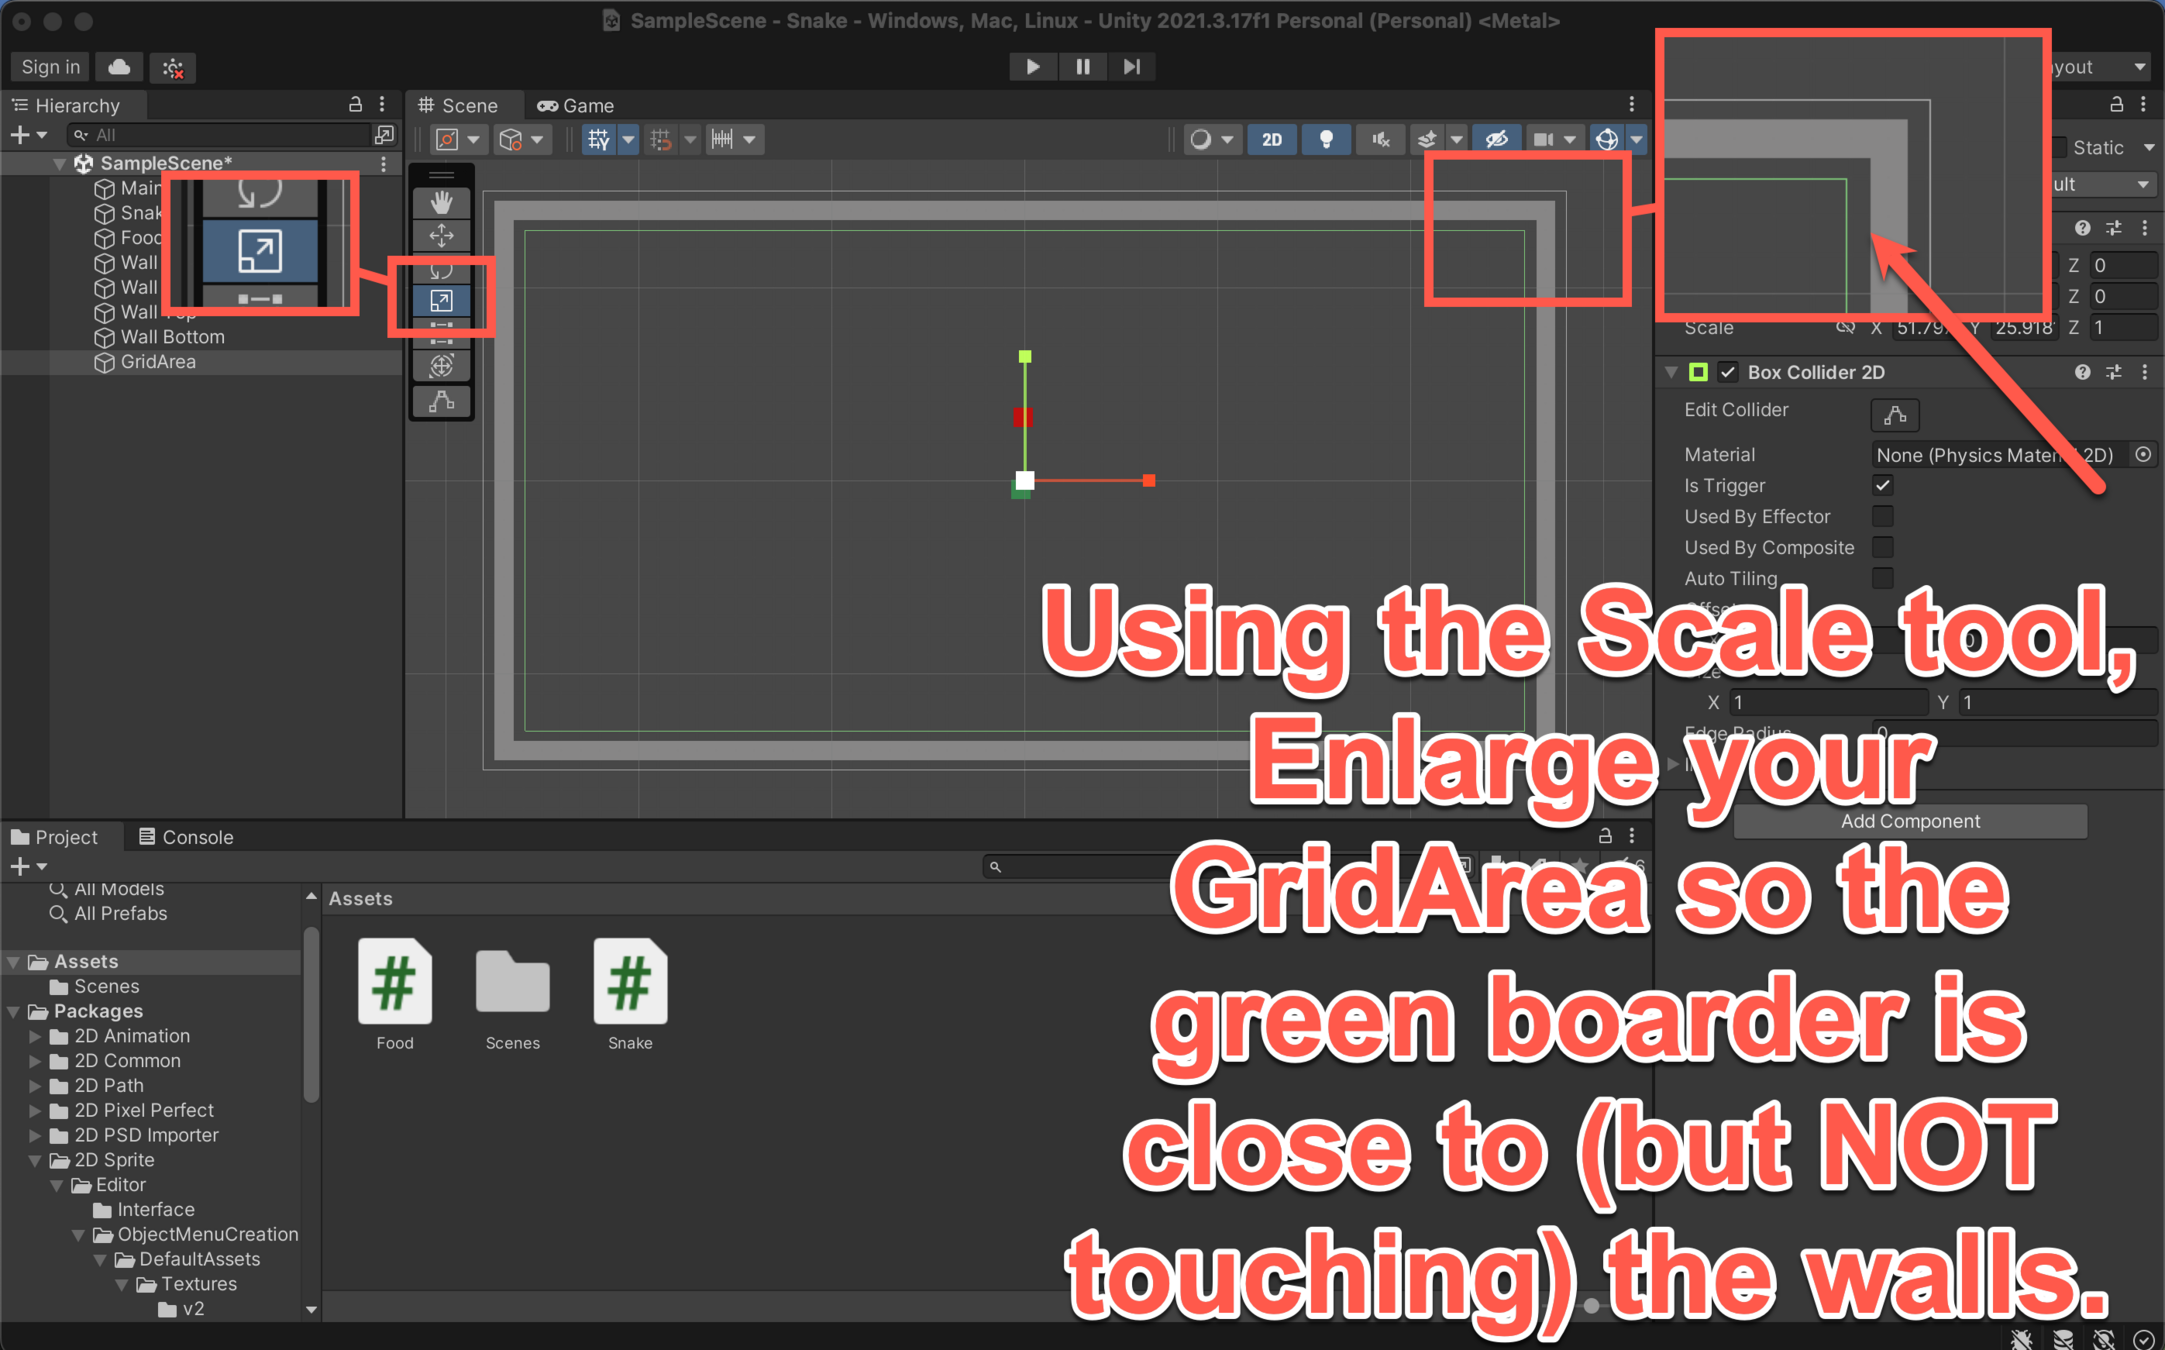
Currently if we are to make the food placement random, it could appear outside of our boundaries. Meaning we cannot eat it.
So we need to create a new invisible object that will set the perimeter of our food placement.
Name your new object "GridArea"
Food Placement Logic
VERY IMPORTANT!
In the inspector of GridArea, right click the three dots of the Transform, then press reset.
This will place your object back into the middle of your screen so we can have an even field of view across your screen.

Food Placement Logic

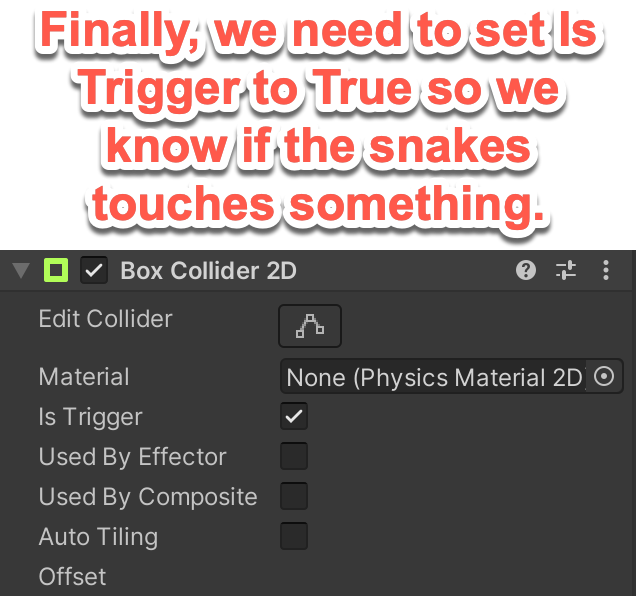
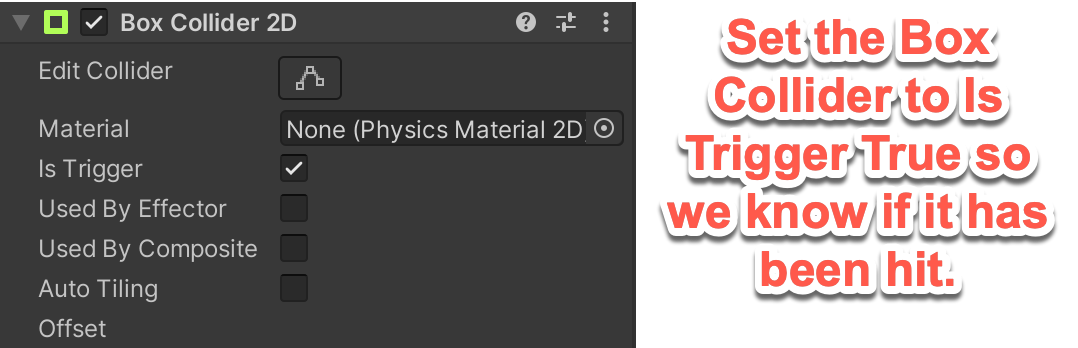
Add a box collider 2D to this, then tick 'Is Trigger'.
Food Placement Logic
Food Placement Logic
using System.Collections;
using System.Collections.Generic;
using UnityEngine;

public class Food : MonoBehaviour
{
    // Start is called before the first frame update
    void Start()
    {

    }

    // Update is called once per frame
    void Update()
    {

    }
}
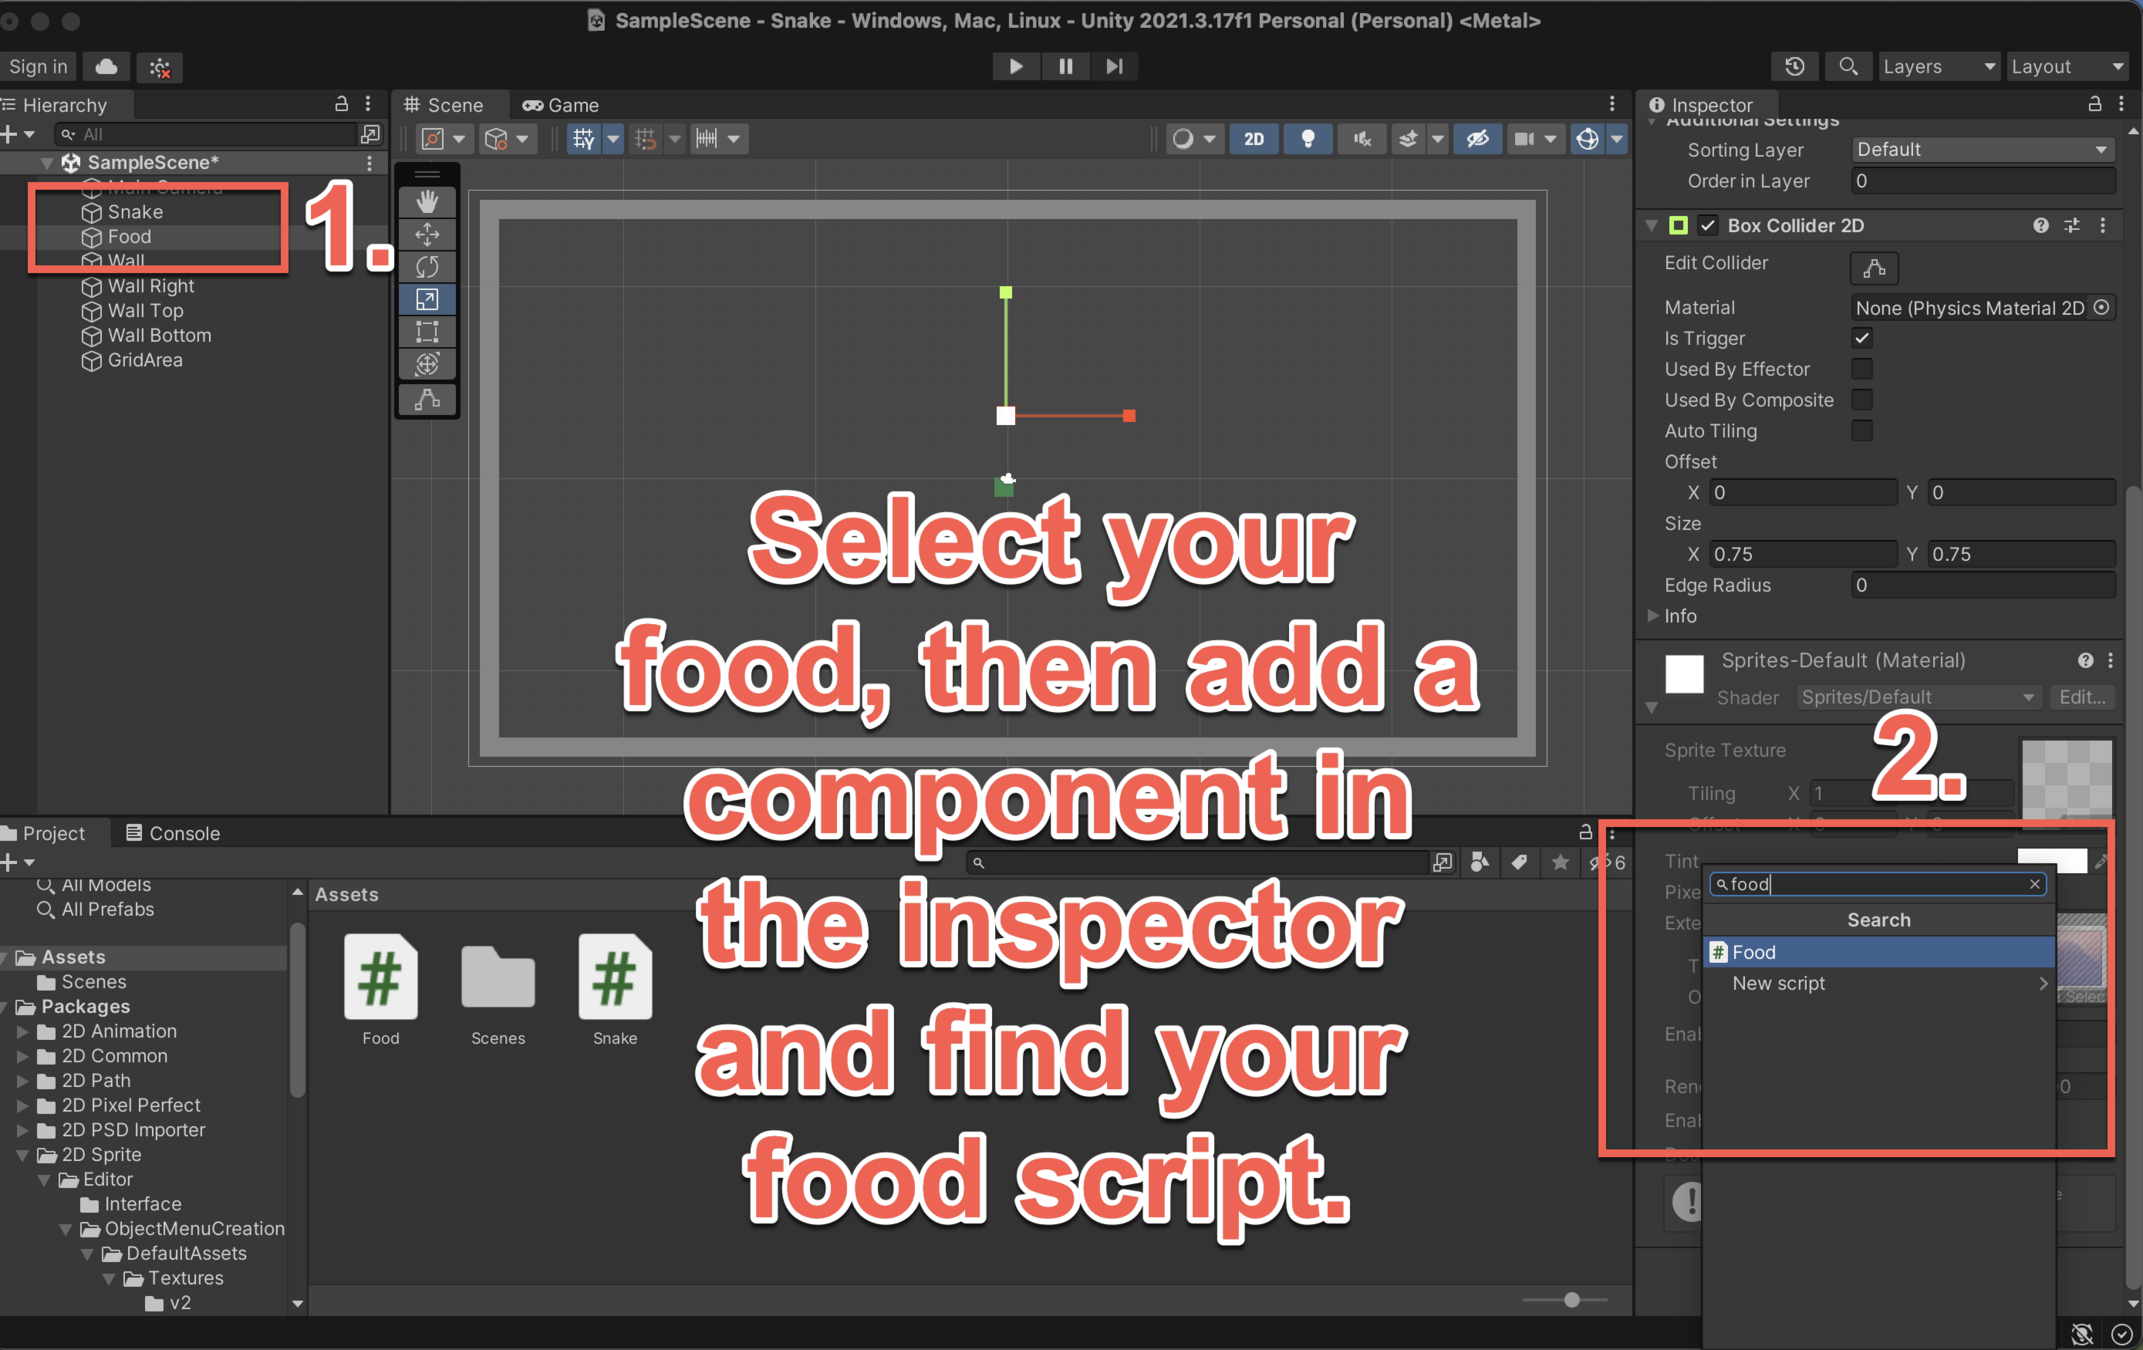
Open up your Food script.
The first thing we are going to do is remove our Update() function, lines 13-17.
Food Placement Logic
using System.Collections;
using System.Collections.Generic;
using UnityEngine;

public class Food : MonoBehaviour
{
    public BoxCollider2D gridArea;

    // Start is called before the first frame update
    void Start()
    {

    }

}
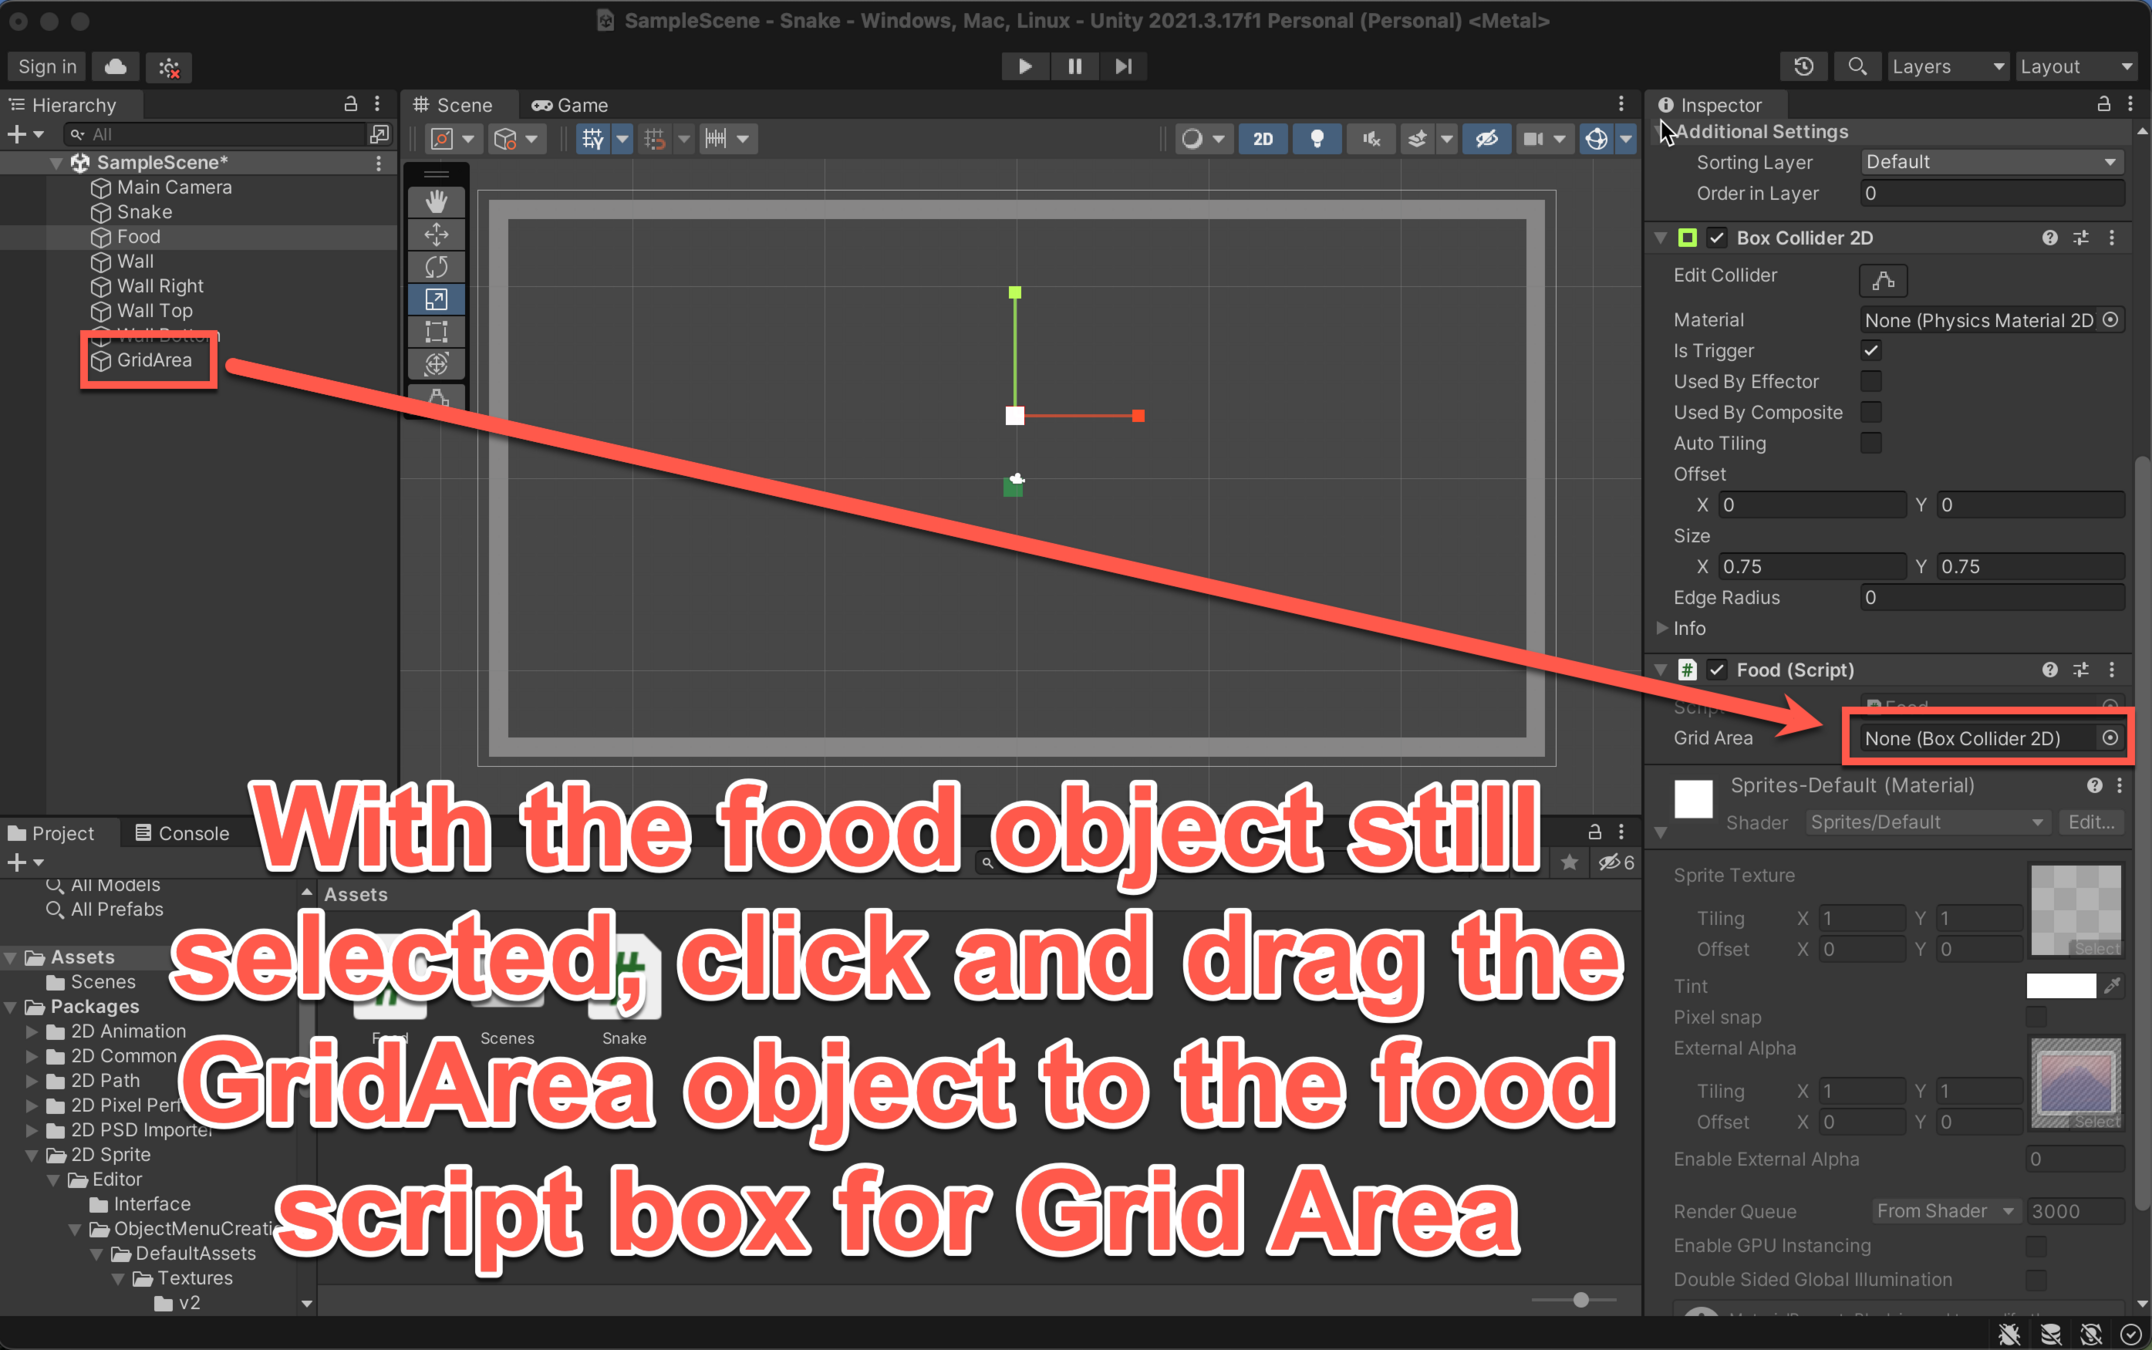
With Update() deleted, we need to get the information from our invisible area, so on line 7 add in "public BoxCollider2D gridArea;" and we will have access to the information in our script now.
Then we are going to create a random position for our food each time we eat it.
Food Placement Logic
using System.Collections;
using System.Collections.Generic;
using UnityEngine;

public class Food : MonoBehaviour
{
    public BoxCollider2D gridArea;

    // Start is called before the first frame update
    void Start()
    {

    }

    private void RandomisePosition()
    {
    	// Generate the boundaries of the invisible grid
    	Bounds bounds = this.gridArea.bounds;

        // Generate a random x and y position within the grid
        float x = Random.Range(bounds.min.x, bounds.max.x);
        float y = Random.Range(bounds.min.y, bounds.max.y);

        // Give the random position above to our food pellet
        this.transform.position = new Vector3(Mathf.Round(x), Mathf.Round(y), 0.0f);
    }
}
With Update() deleted, we need to get the information from our invisible area, so on line 7 add in "public BoxCollider2D gridArea;" and we will have access to the information in our script now.
Then we are going to create a random position for our food each time we eat it.
Don't forget to press CTRL + S to save your code.
Food Placement Logic
Food Placement Logic
Food Placement Logic
Your food is now capable of appearing in random positions within your playable area.
Next step: Detecting collisions between:
- Snake and food
- Snake and walls
- Snake and Snake
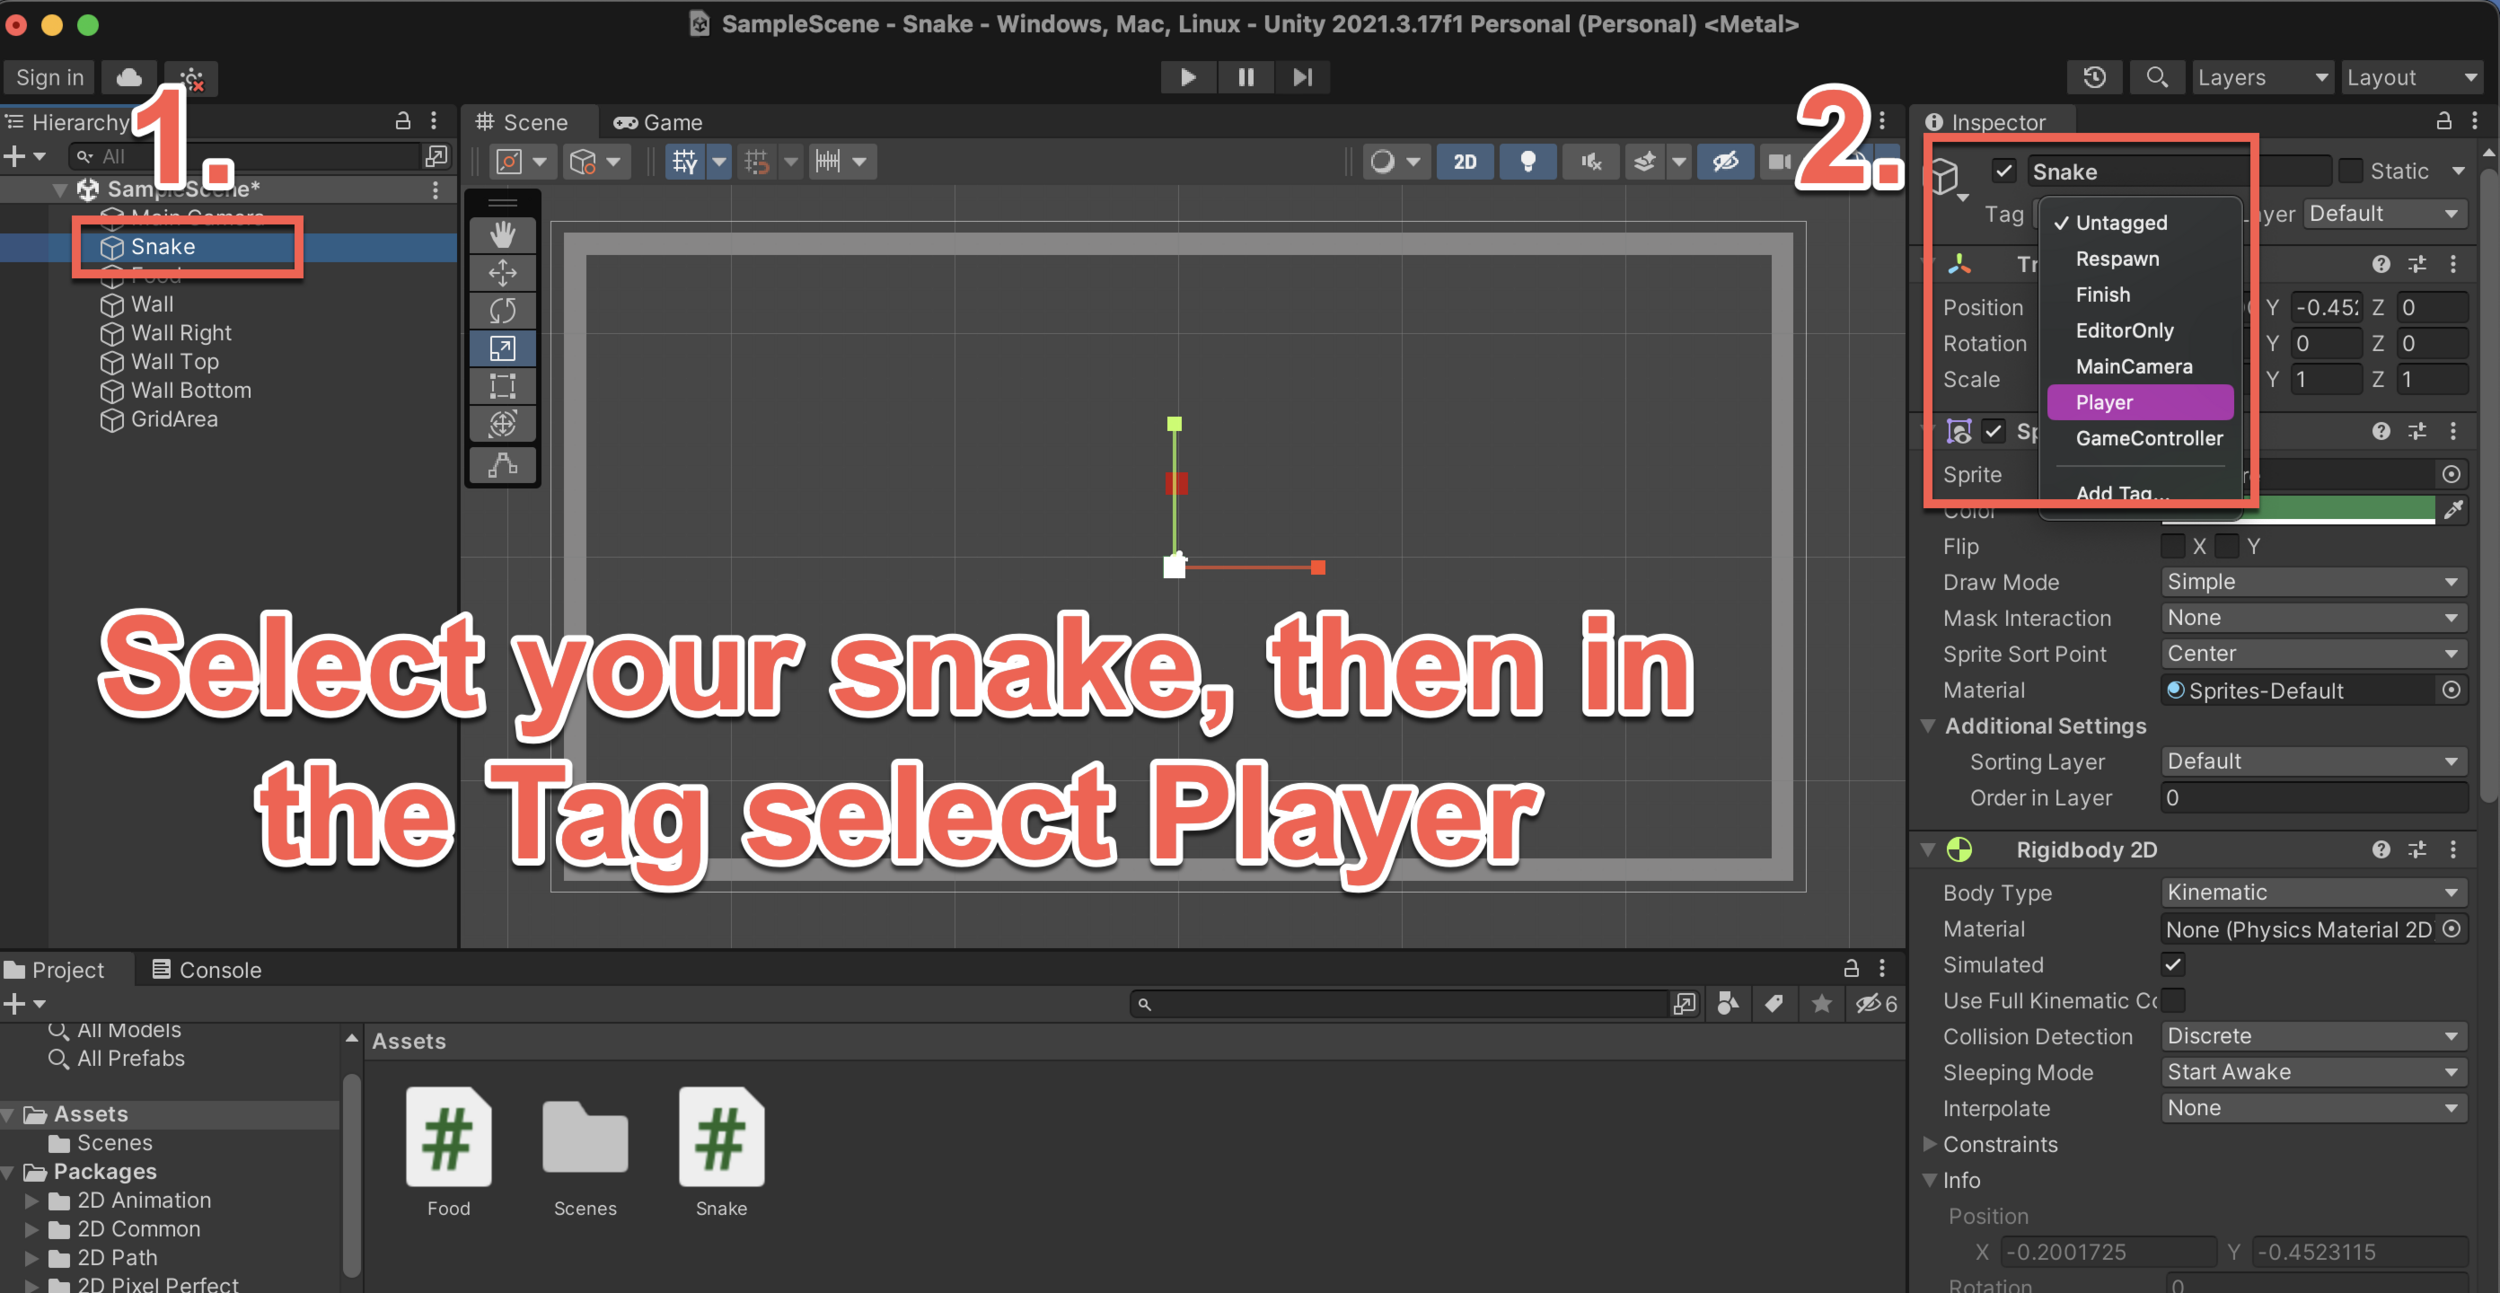
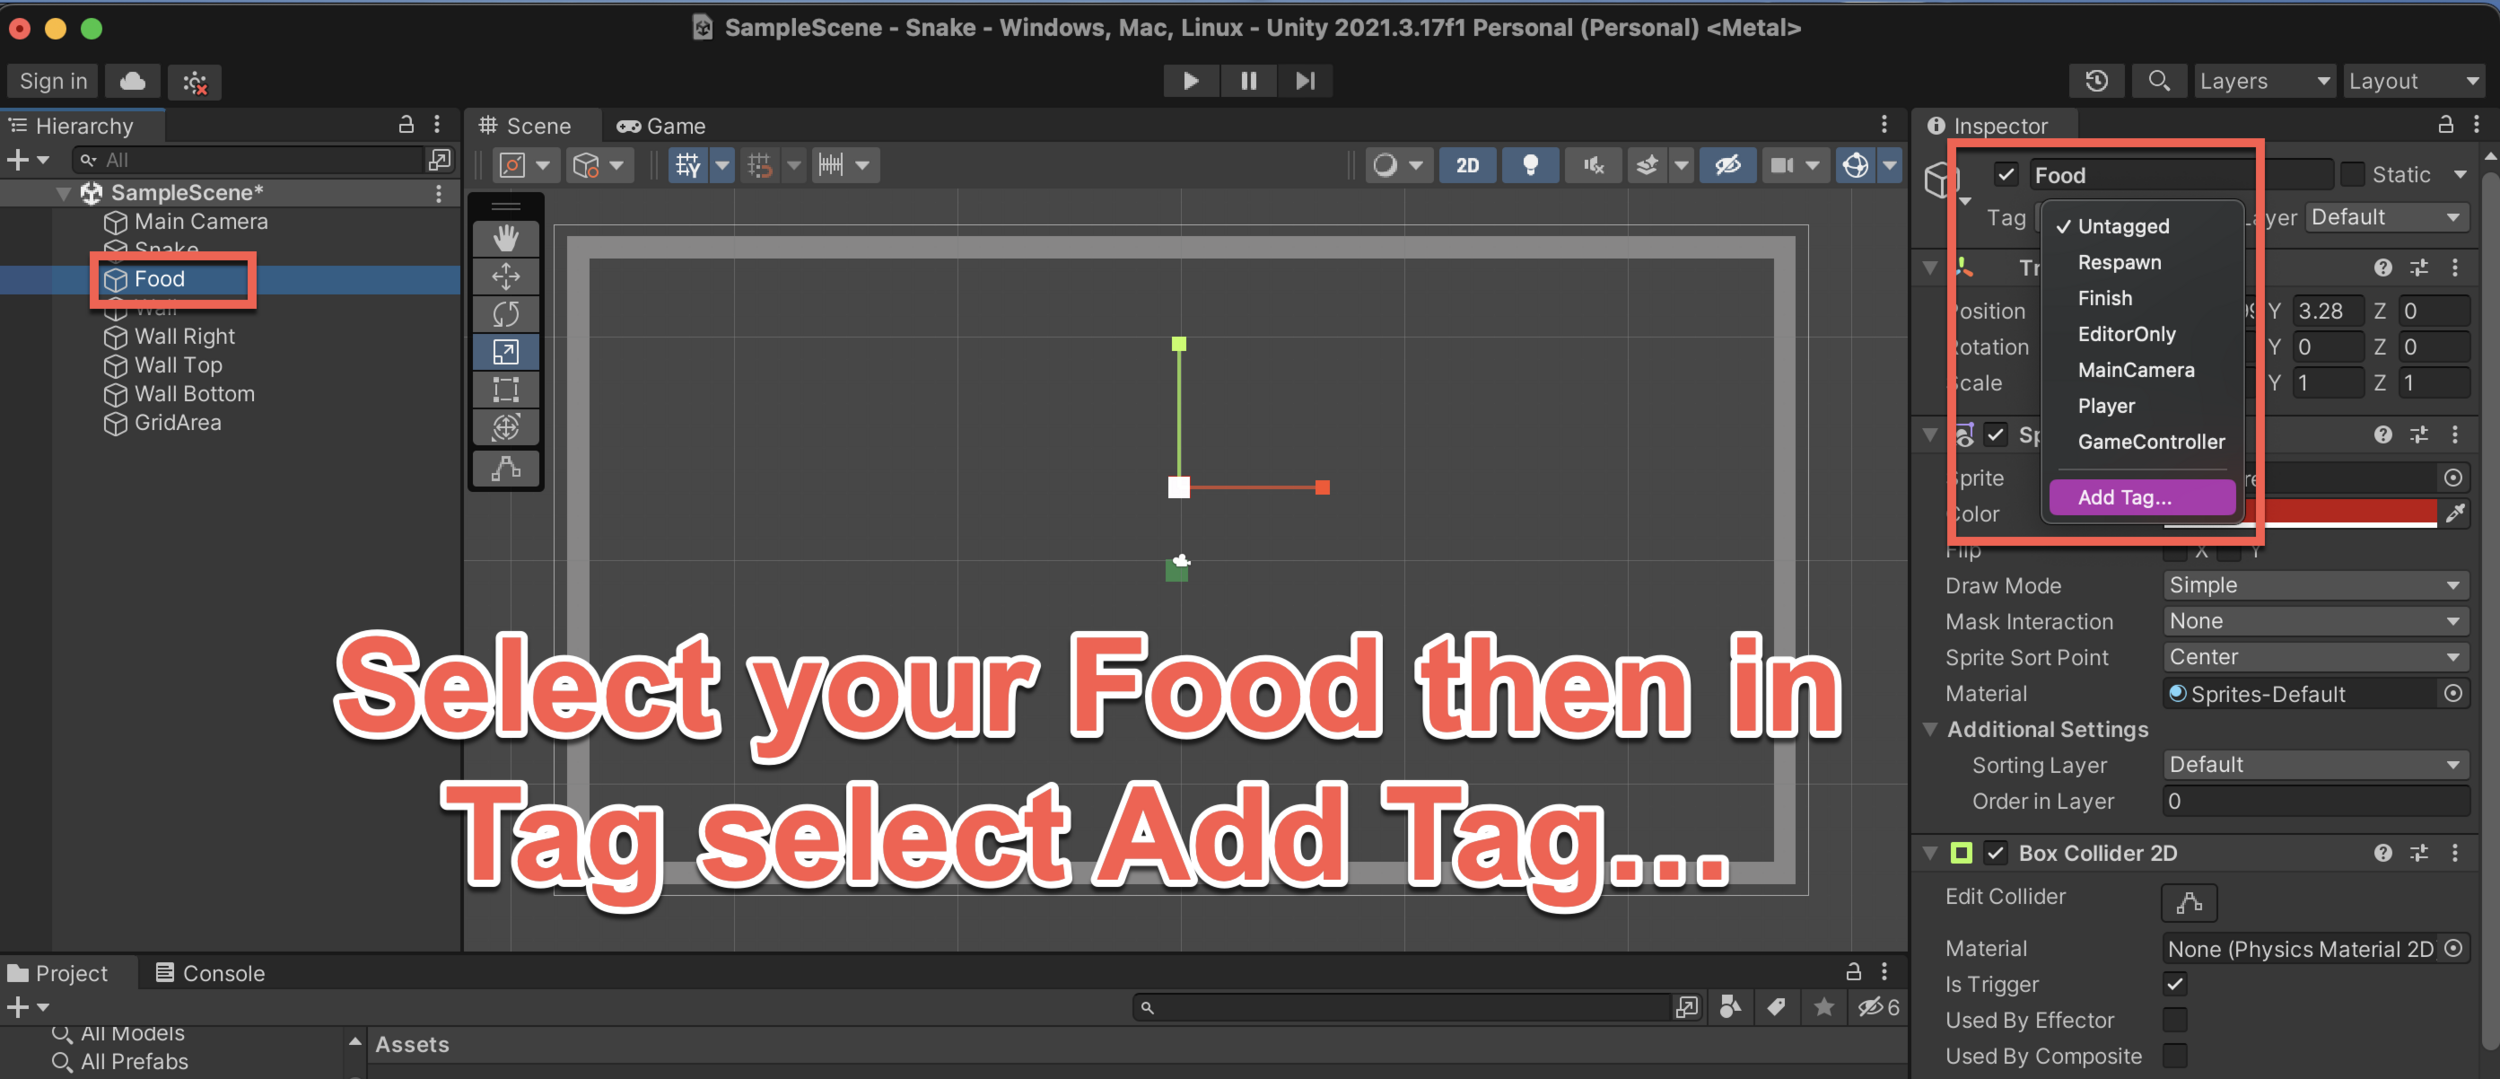
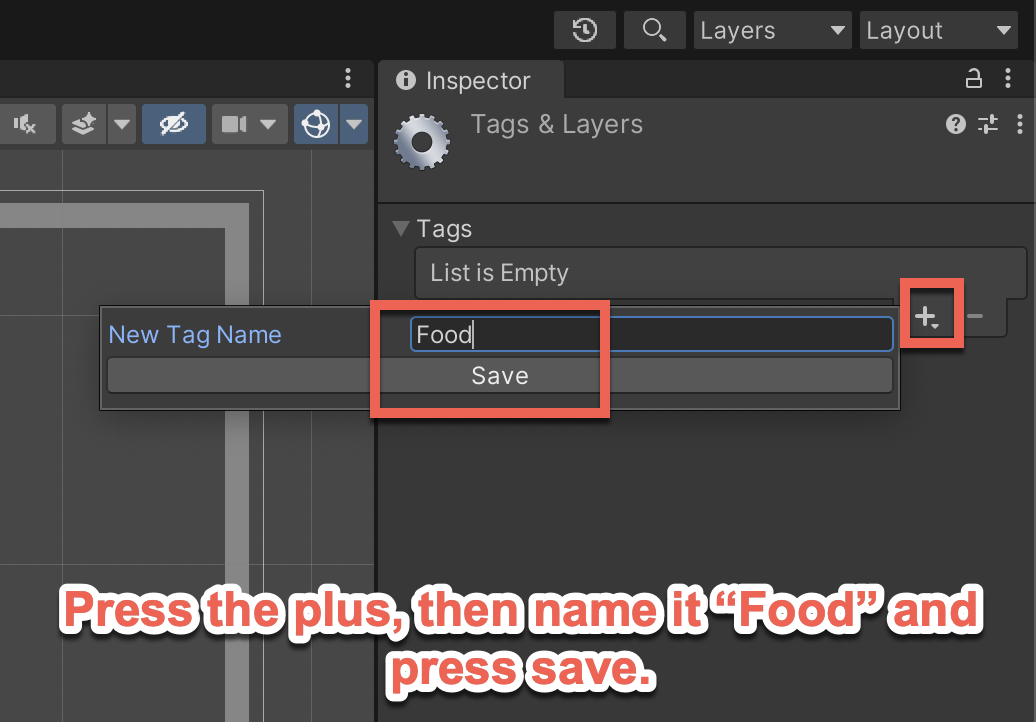
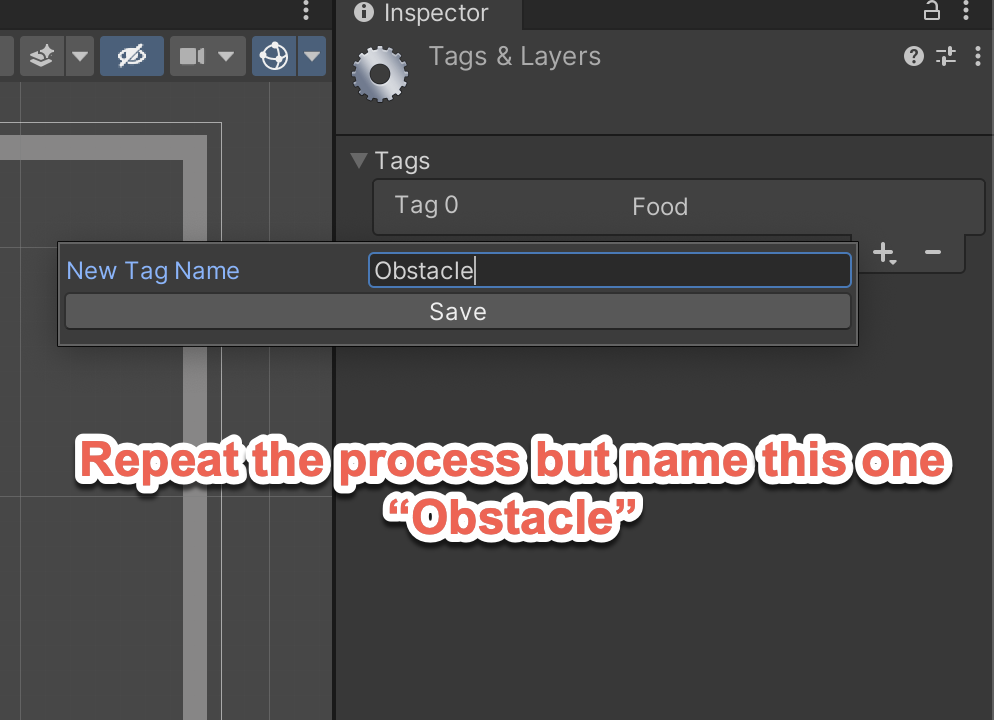
Detecting Collisions - Snake & Food
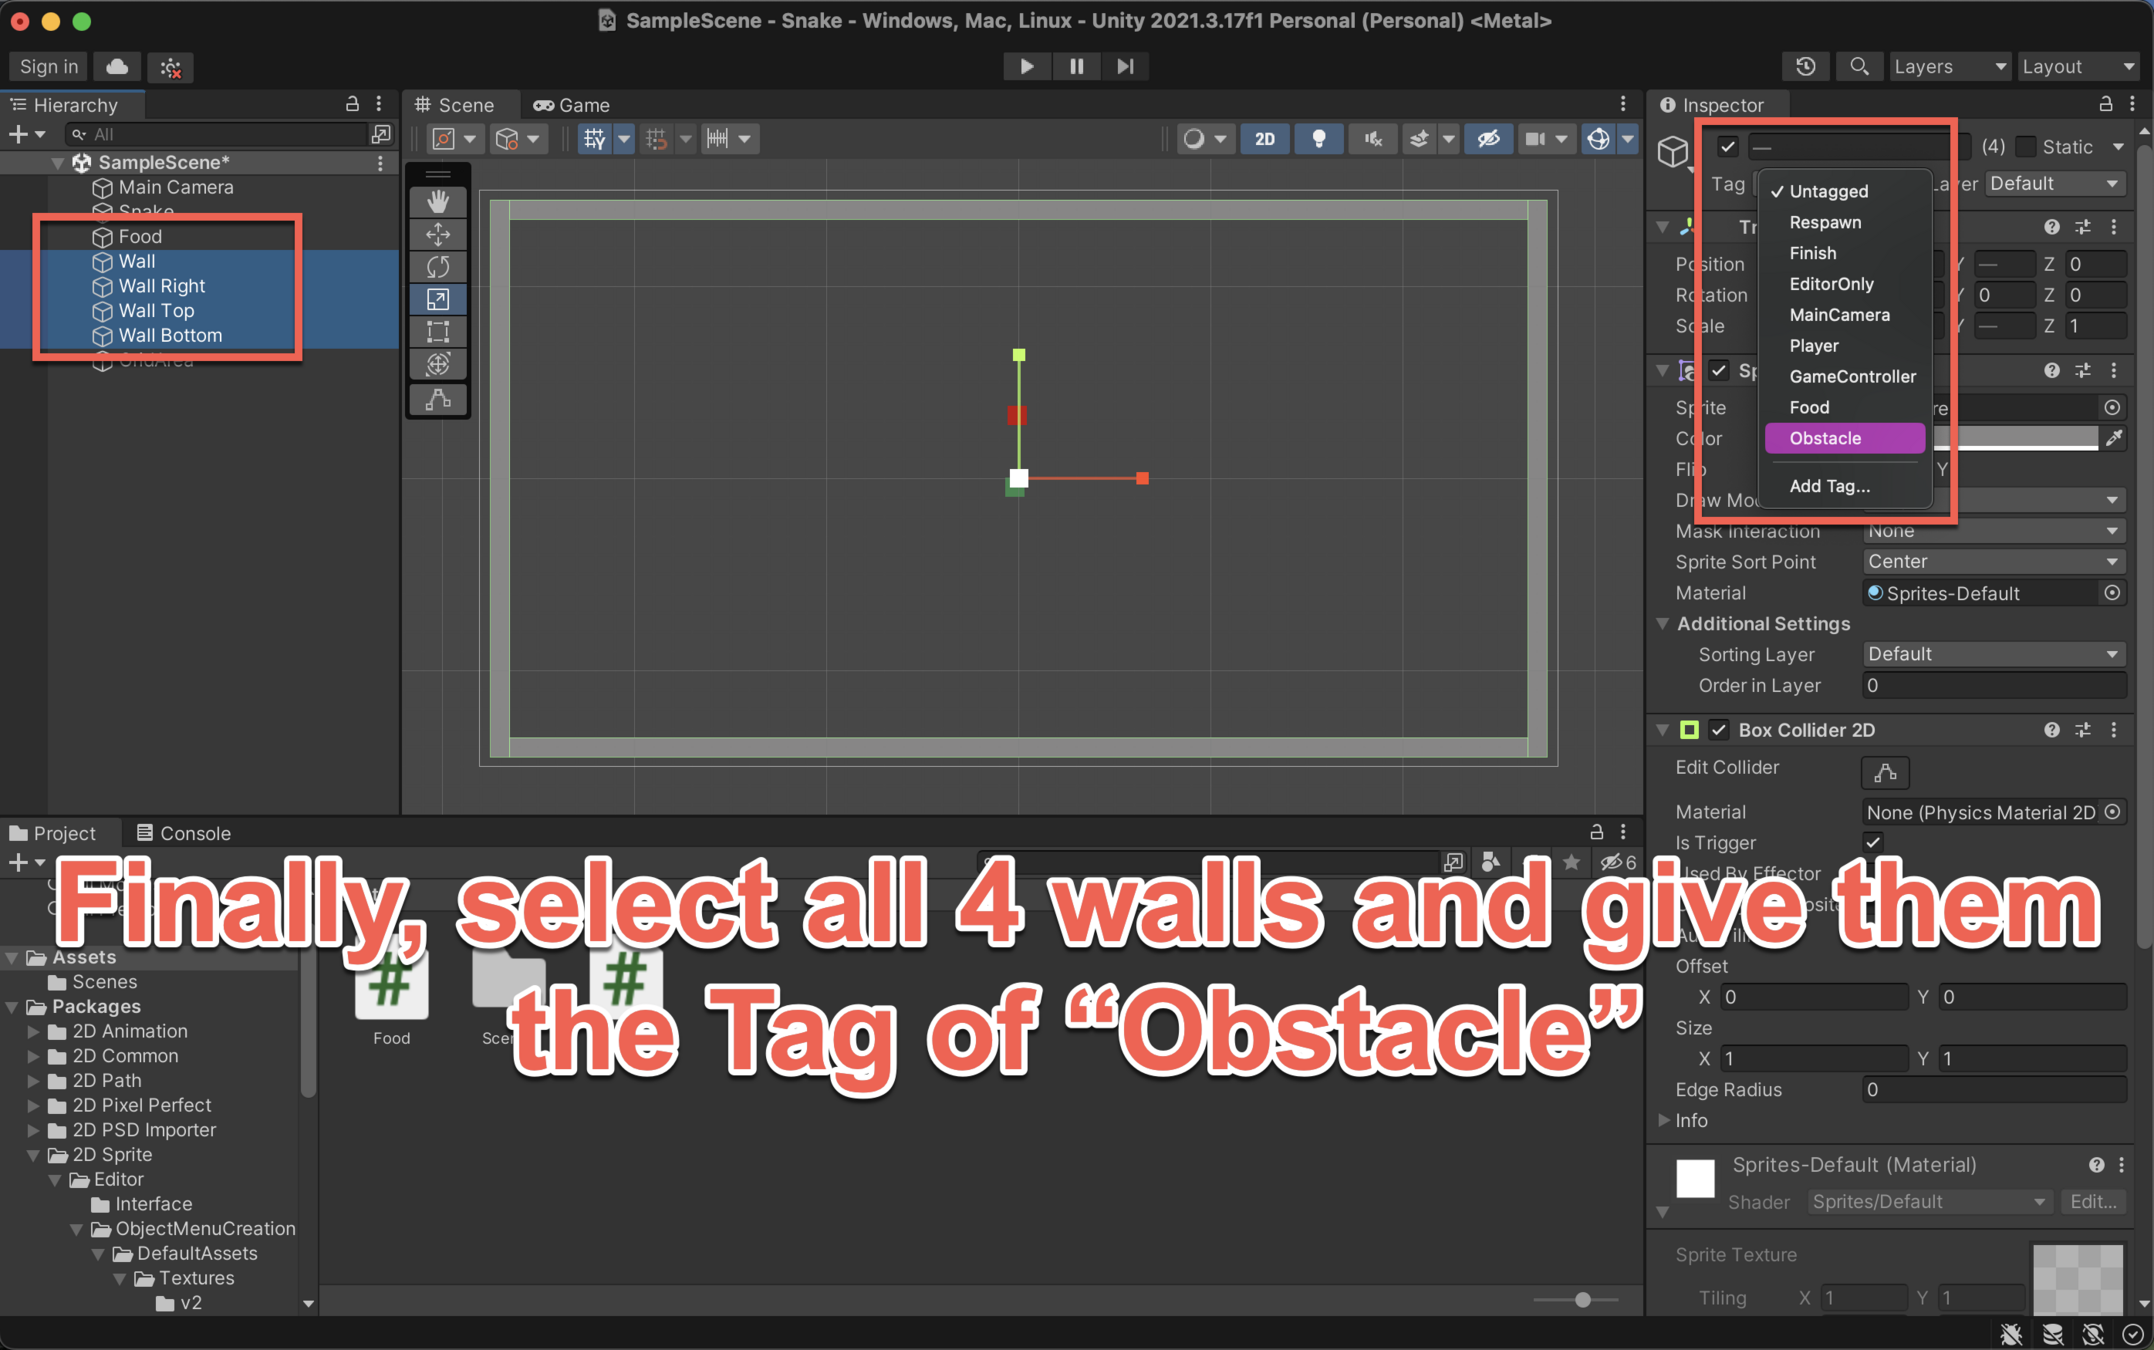
First things first, we need to add some tags to our objects.
Detecting Collisions - Snake & Food
First things first, we need to add some tags to our objects.
Detecting Collisions - Snake & Food
First things first, we need to add some tags to our objects.
Detecting Collisions - Snake & Food
First things first, we need to add some tags to our objects.
Detecting Collisions - Snake & Food
First things first, we need to add some tags to our objects.
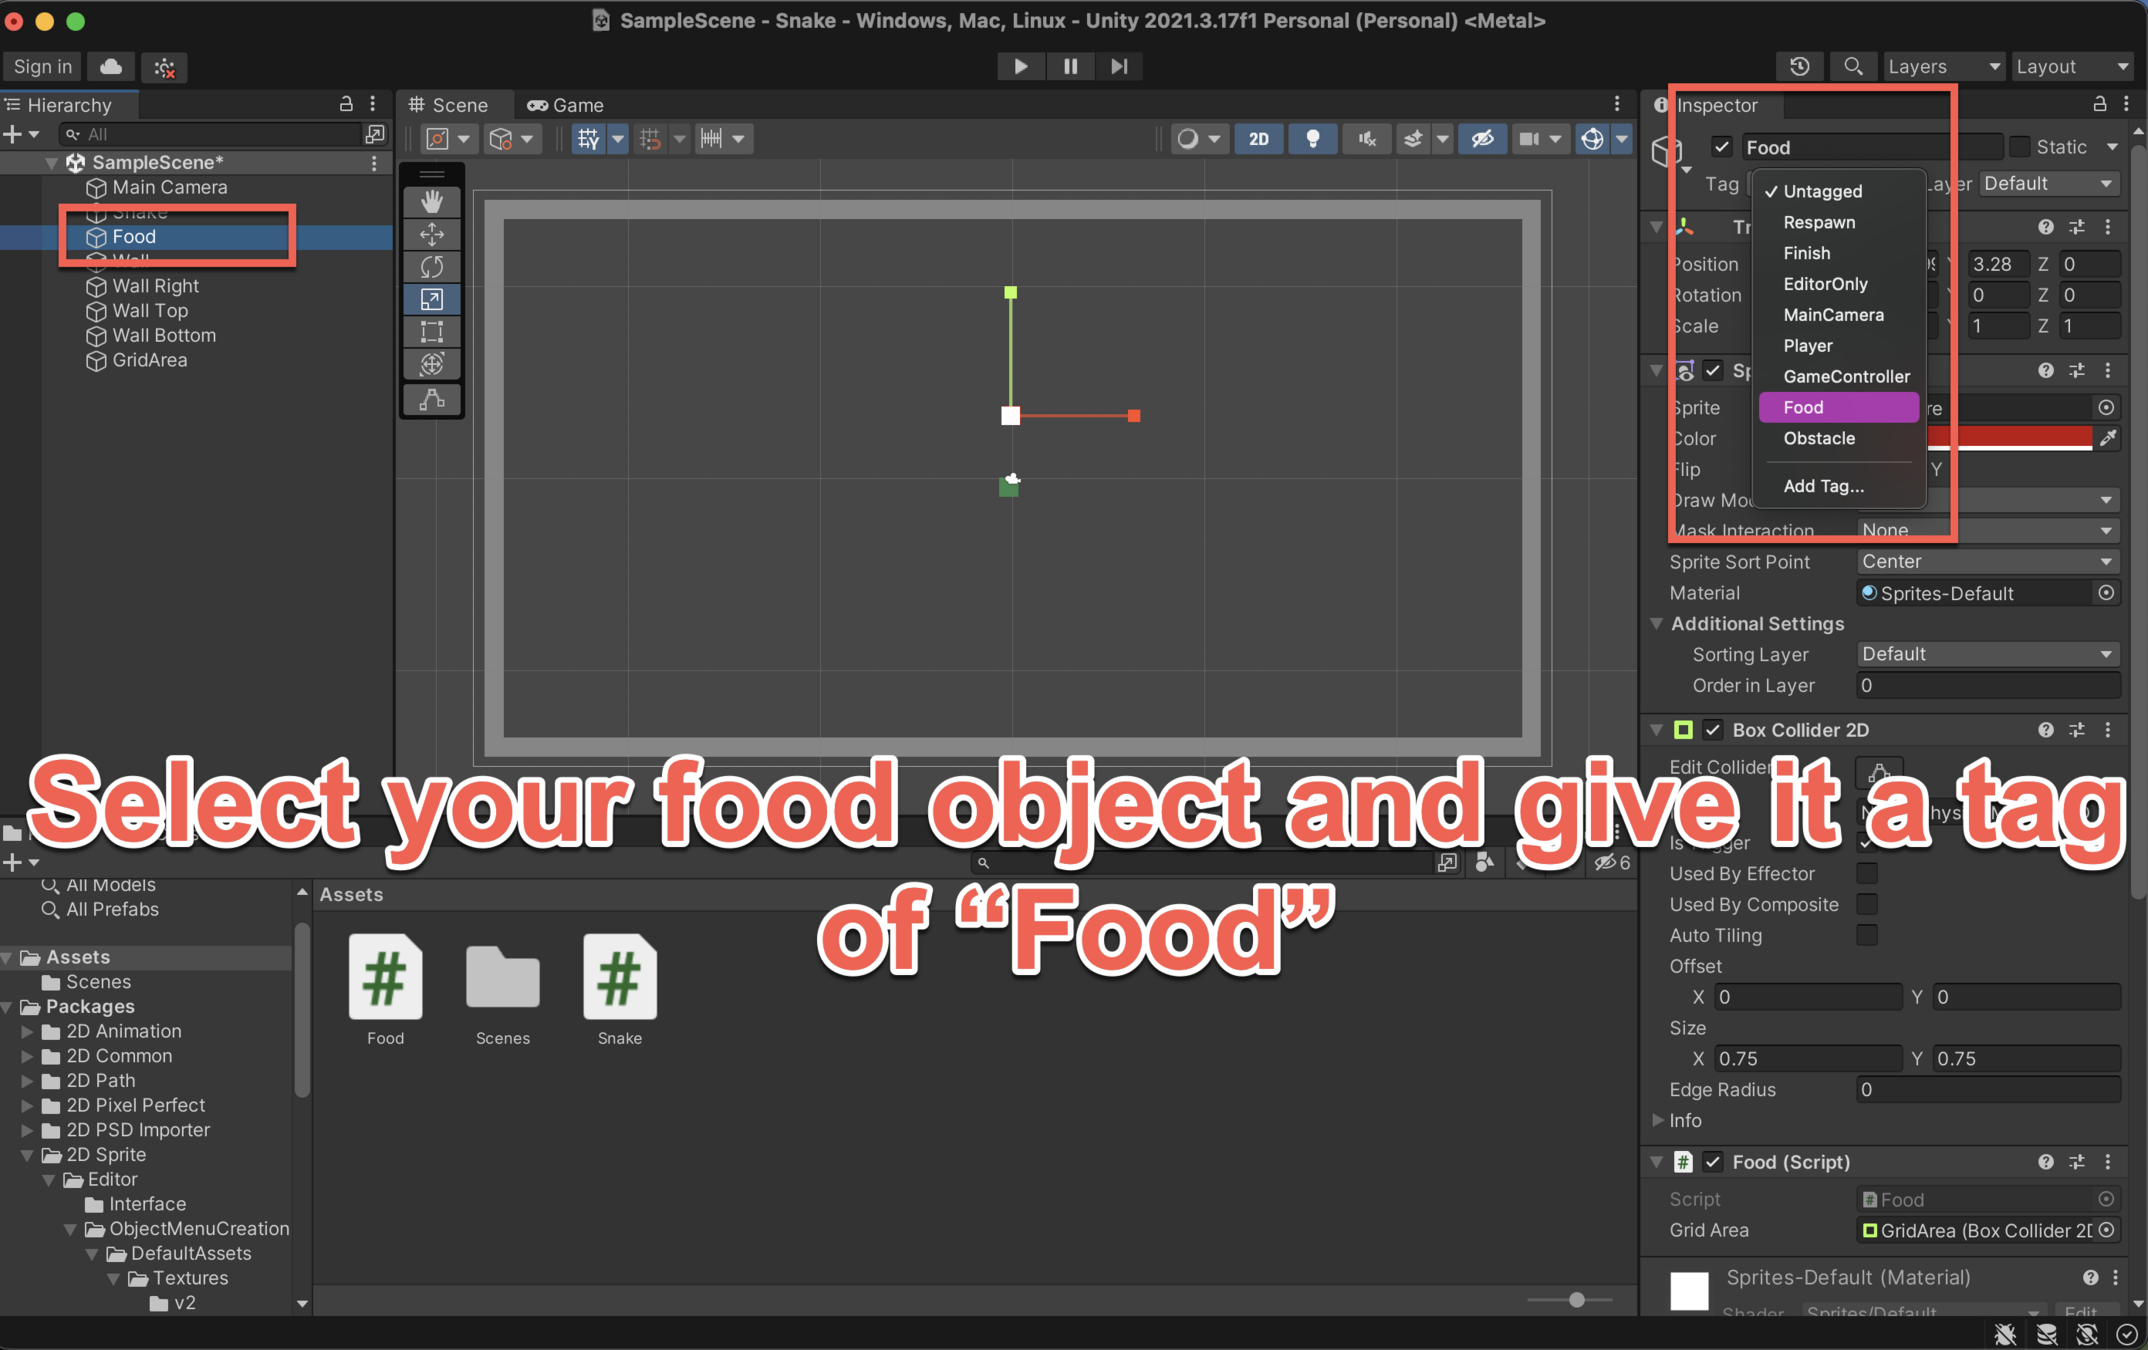
Detecting Collisions - Snake & Food
First things first, we need to add some tags to our objects.
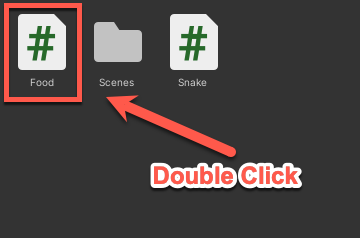
Detecting Collisions - Snake & Food
Re-Open your Food Script by double clicking Food in the Assets Area
using System.Collections;
using System.Collections.Generic;
using UnityEngine;

public class Food : MonoBehaviour
{
    public BoxCollider2D gridArea;

    // Start is called before the first frame update
    void Start()
    {

    }

    private void RandomisePosition()
    {
    	// Generate the boundaries of the invisible grid
    	Bounds bounds = this.gridArea.bounds;

        // Generate a random x and y position within the grid
        float x = Random.Range(bounds.min.x, bounds.max.x);
        float y = Random.Range(bounds.min.y, bounds.max.y);

        // Give the random position above to our food pellet
        this.transform.position = new Vector3(Mathf.Round(x), Mathf.Round(y), 0.0f);
    }
}
Detecting Collisions - Snake & Food
We are going to add a new function below line 26 (above line 27)
I will still show RandomisePosition() to help you see where to place your new code, everything above will disappear for now.
DO NOT DELETE IT FROM YOUR CODE!
using System.Collections;
using System.Collections.Generic;
using UnityEngine;

public class Food : MonoBehaviour
{
    public BoxCollider2D gridArea;

    // Start is called before the first frame update
    void Start()
    {

    }

    private void RandomisePosition()
    {
    	// Generate the boundaries of the invisible grid
    	Bounds bounds = this.gridArea.bounds;

        // Generate a random x and y position within the grid
        float x = Random.Range(bounds.min.x, bounds.max.x);
        float y = Random.Range(bounds.min.y, bounds.max.y);

        // Give the random position above to our food pellet
        this.transform.position = new Vector3(Mathf.Round(x), Mathf.Round(y), 0.0f);
    }
}
Detecting Collisions - Snake & Food
    private void RandomisePosition()
    {
    	// Generate the boundaries of the invisible grid
    	Bounds bounds = this.gridArea.bounds;

        // Generate a random x and y position within the grid
        float x = Random.Range(bounds.min.x, bounds.max.x);
        float y = Random.Range(bounds.min.y, bounds.max.y);

        // Give the random position above to our food pellet
        this.transform.position = new Vector3(Mathf.Round(x), Mathf.Round(y), 0.0f);
    }

    private void OnTriggerEnter2D(Collider2D other)
    {
    	if (other.tag == "Player"){
        	RandomisePosition();
        }
    }
}
This new function, OnTriggerEnter2D() looks for a collision and checks to see what has hit our food pellet, if it was a Player then it will call RandomisePosition(); and therefore moves our pellet to a new location.
Make sure to press
CTRL + S
Detecting Collisions - Snake & Food
Detecting Collisions - Snake & Walls
using System.Collections;
using System.Collections.Generic;
using UnityEngine;

public class Snake : MonoBehaviour
{
    private Vector2 _direction = Vector2.right;

    // Update is called once per frame
    private void Update()
    {
        if (Input.GetKeyDown(KeyCode.UpArrow)) {
            _direction = Vector2.up;
        } else if (Input.GetKeyDown(KeyCode.LeftArrow)) {
            _direction = Vector2.left;
        } else if (Input.GetKeyDown(KeyCode.DownArrow)) {
            _direction = Vector2.down;
        } else if (Input.GetKeyDown(KeyCode.RightArrow)) {
            _direction = Vector2.right;
        }
    }

    private void FixedUpdate()
    {
        this.transform.position = new Vector3(
            Mathf.Round(this.transform.position.x) + _direction.x,
            Mathf.Round(this.transform.position.y) + _direction.y,
            0.0f
        );
    }
}
Now we need to do the same inside our Snake script, so double click your Snake script to open it and we will add a similar function underneath FixedUpdate()
Detecting Collisions - Snake & Walls
    private void FixedUpdate()
    {
        this.transform.position = new Vector3(
            Mathf.Round(this.transform.position.x) + _direction.x,
            Mathf.Round(this.transform.position.y) + _direction.y,
            0.0f
        );
    }
    private void OnTriggerEnter2D(Collider2D other)
    {
        if (other.tag == "Obstacle"){
            this.transform.position = new Vector3(0.0f, 0.0f, 0.0f);
        }
    }
}
This time in our IF statement, we are checking to see if the character has hit a wall.
If it has hit a wall then we are going to give the snake a new position,
"this.transform.position = new Vector3(0.0f, 0.0f, 0.0f)"
Once you have added this, press CTRL + S to save your code.
Detecting Collisions - Snake & Walls
Congratulations! You have successfully made a game of Snake
Extension on the next slide(s)
Extension
Now that we have got the basis of the game working, we need to add a function or two to give the snake an extra block when it eats a food pellet.
Instructions are as follows:
Creating a Prefab of our snake object
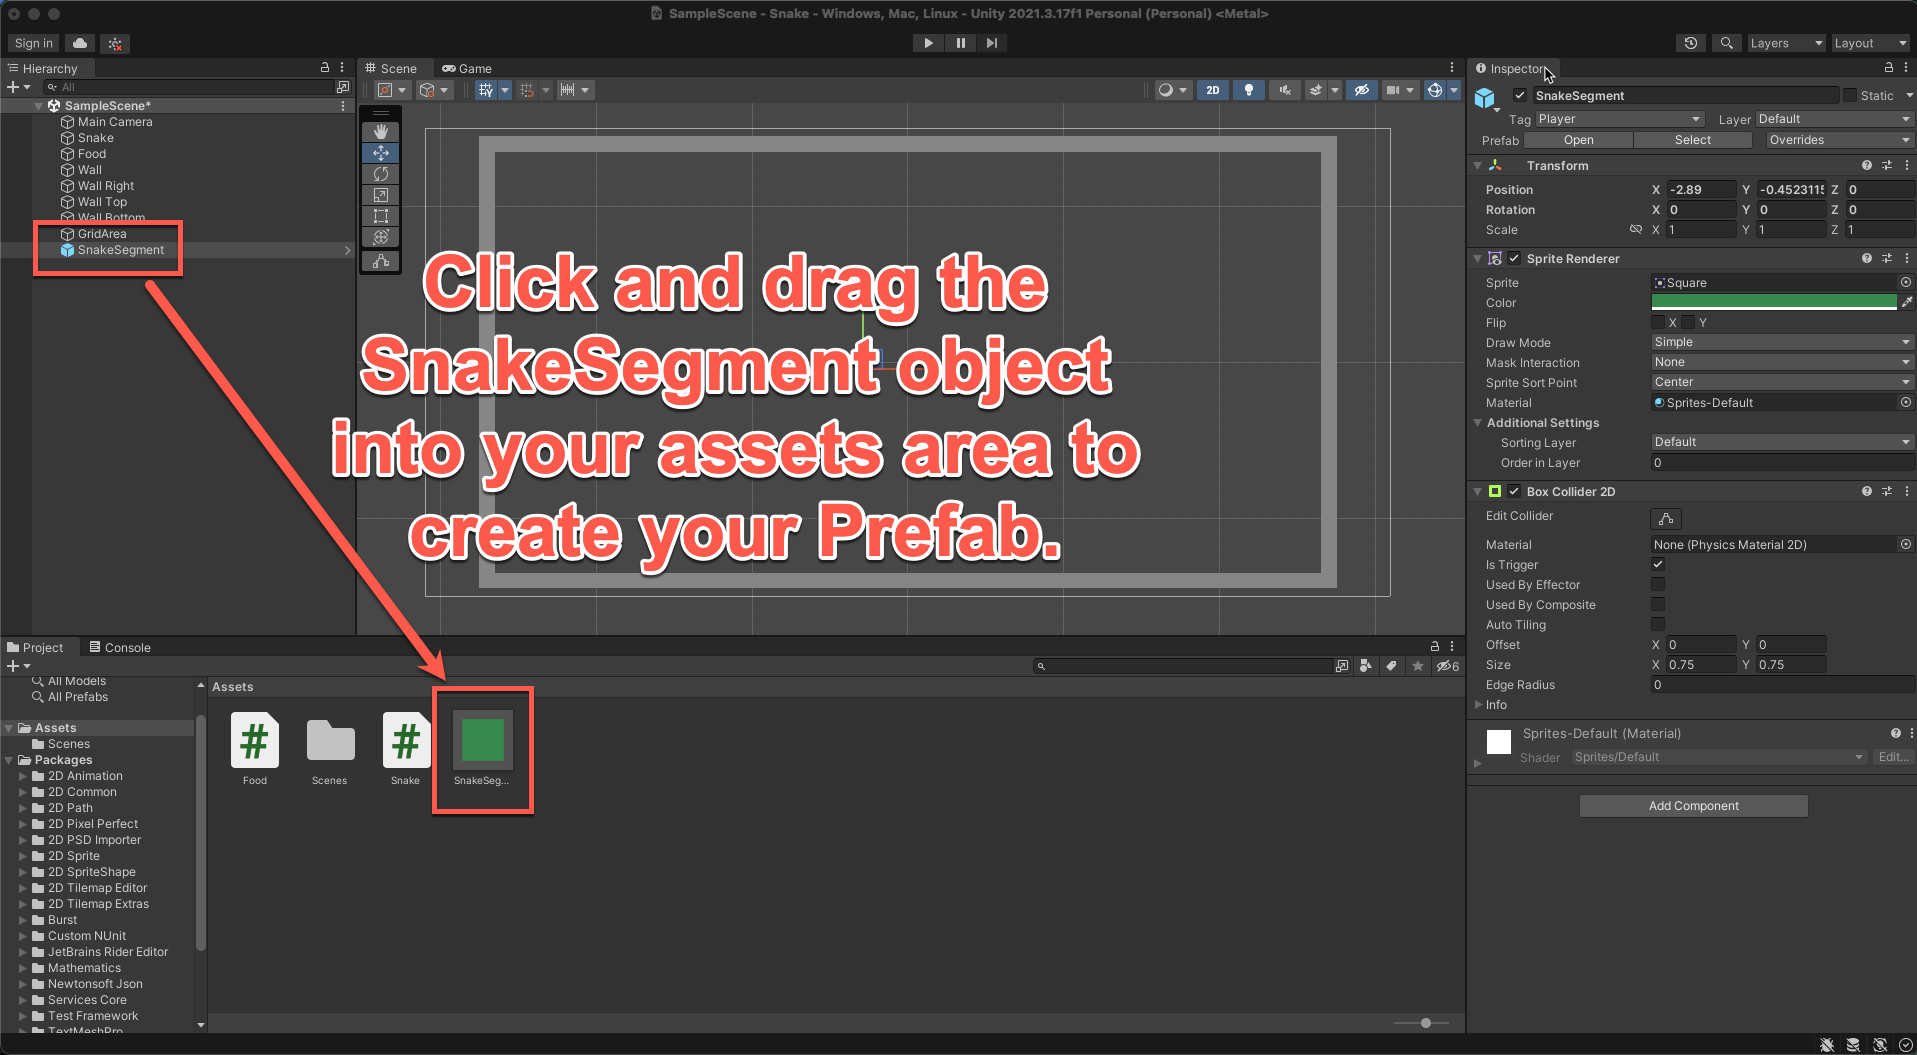
When we drag our object into the assets, we create what's called a "prefab", a recreation of our object ready to be called upon to create a new object exactly the same as the original.
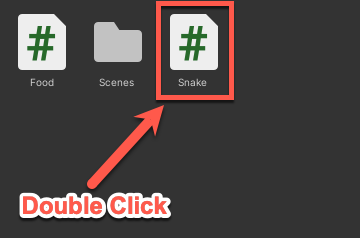
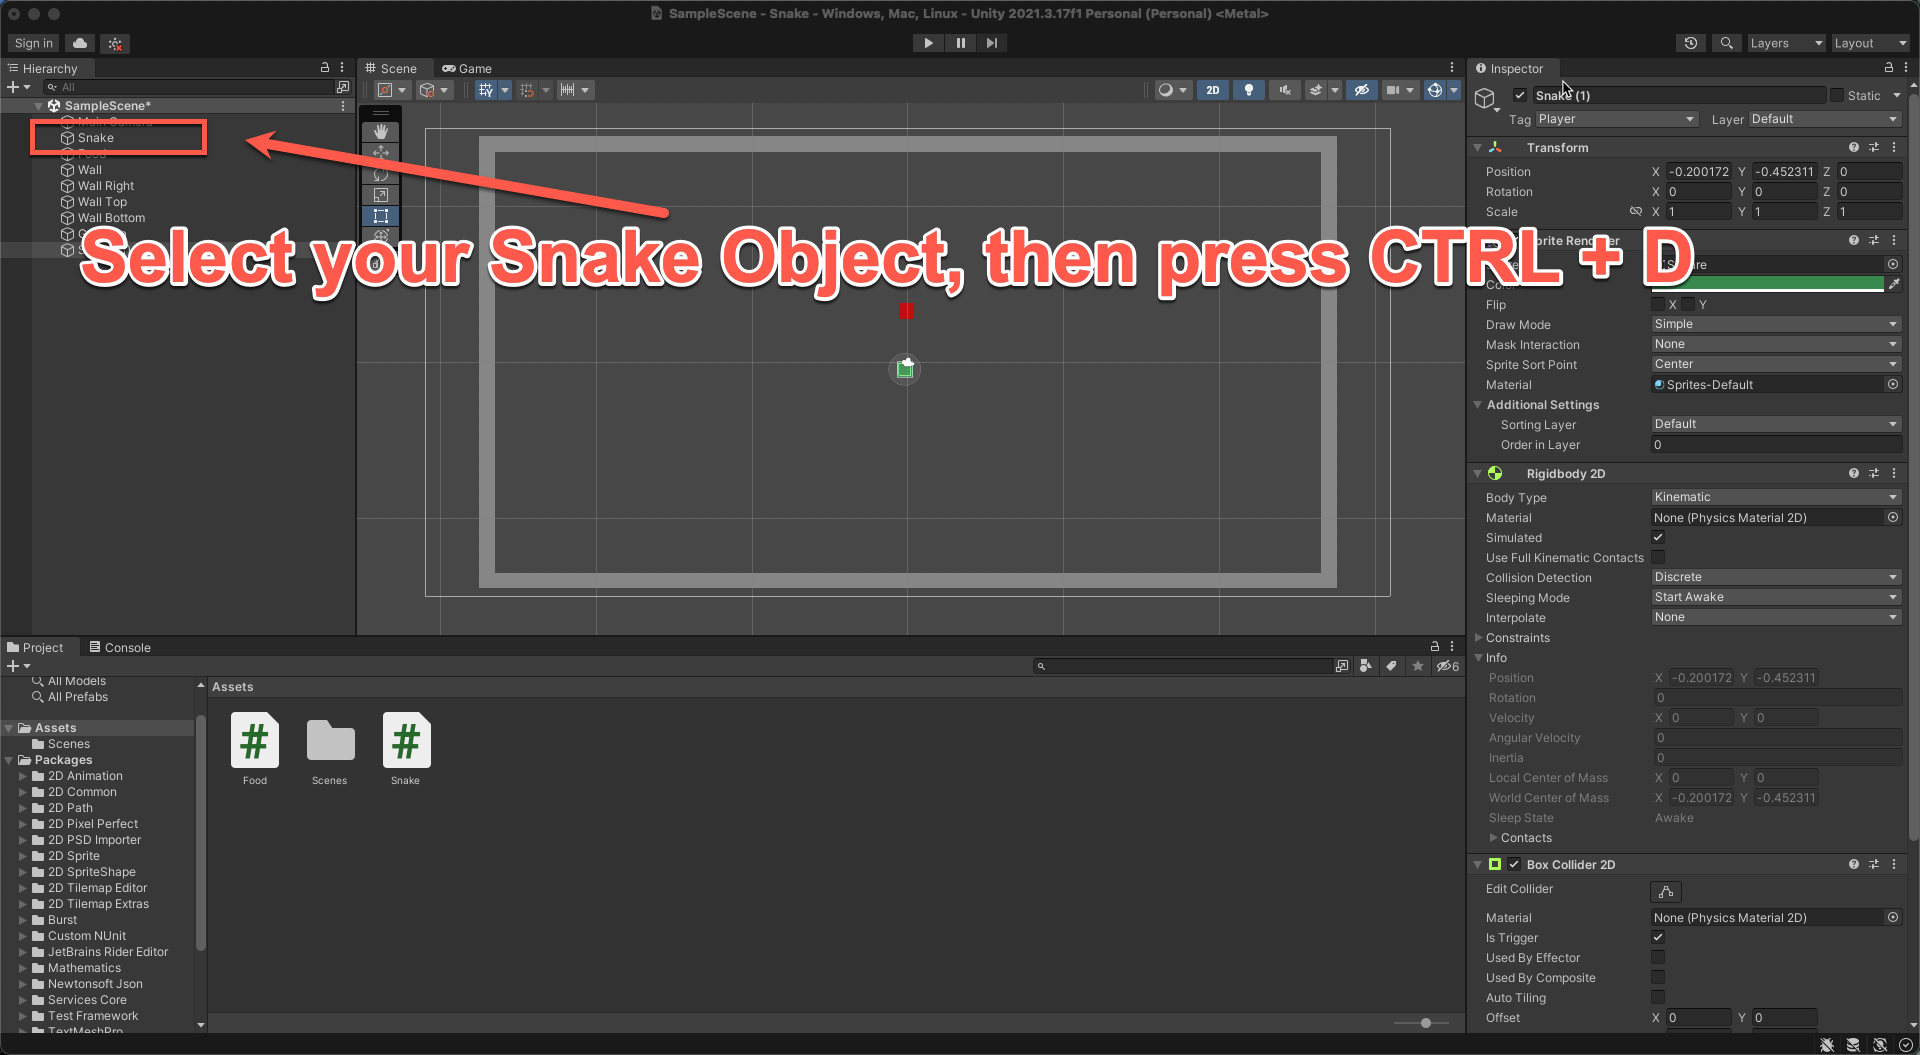
So step 1, duplicate your Snake object by pressing CTRL + D
Creating a Prefab of our snake object
Creating a Prefab of our snake object

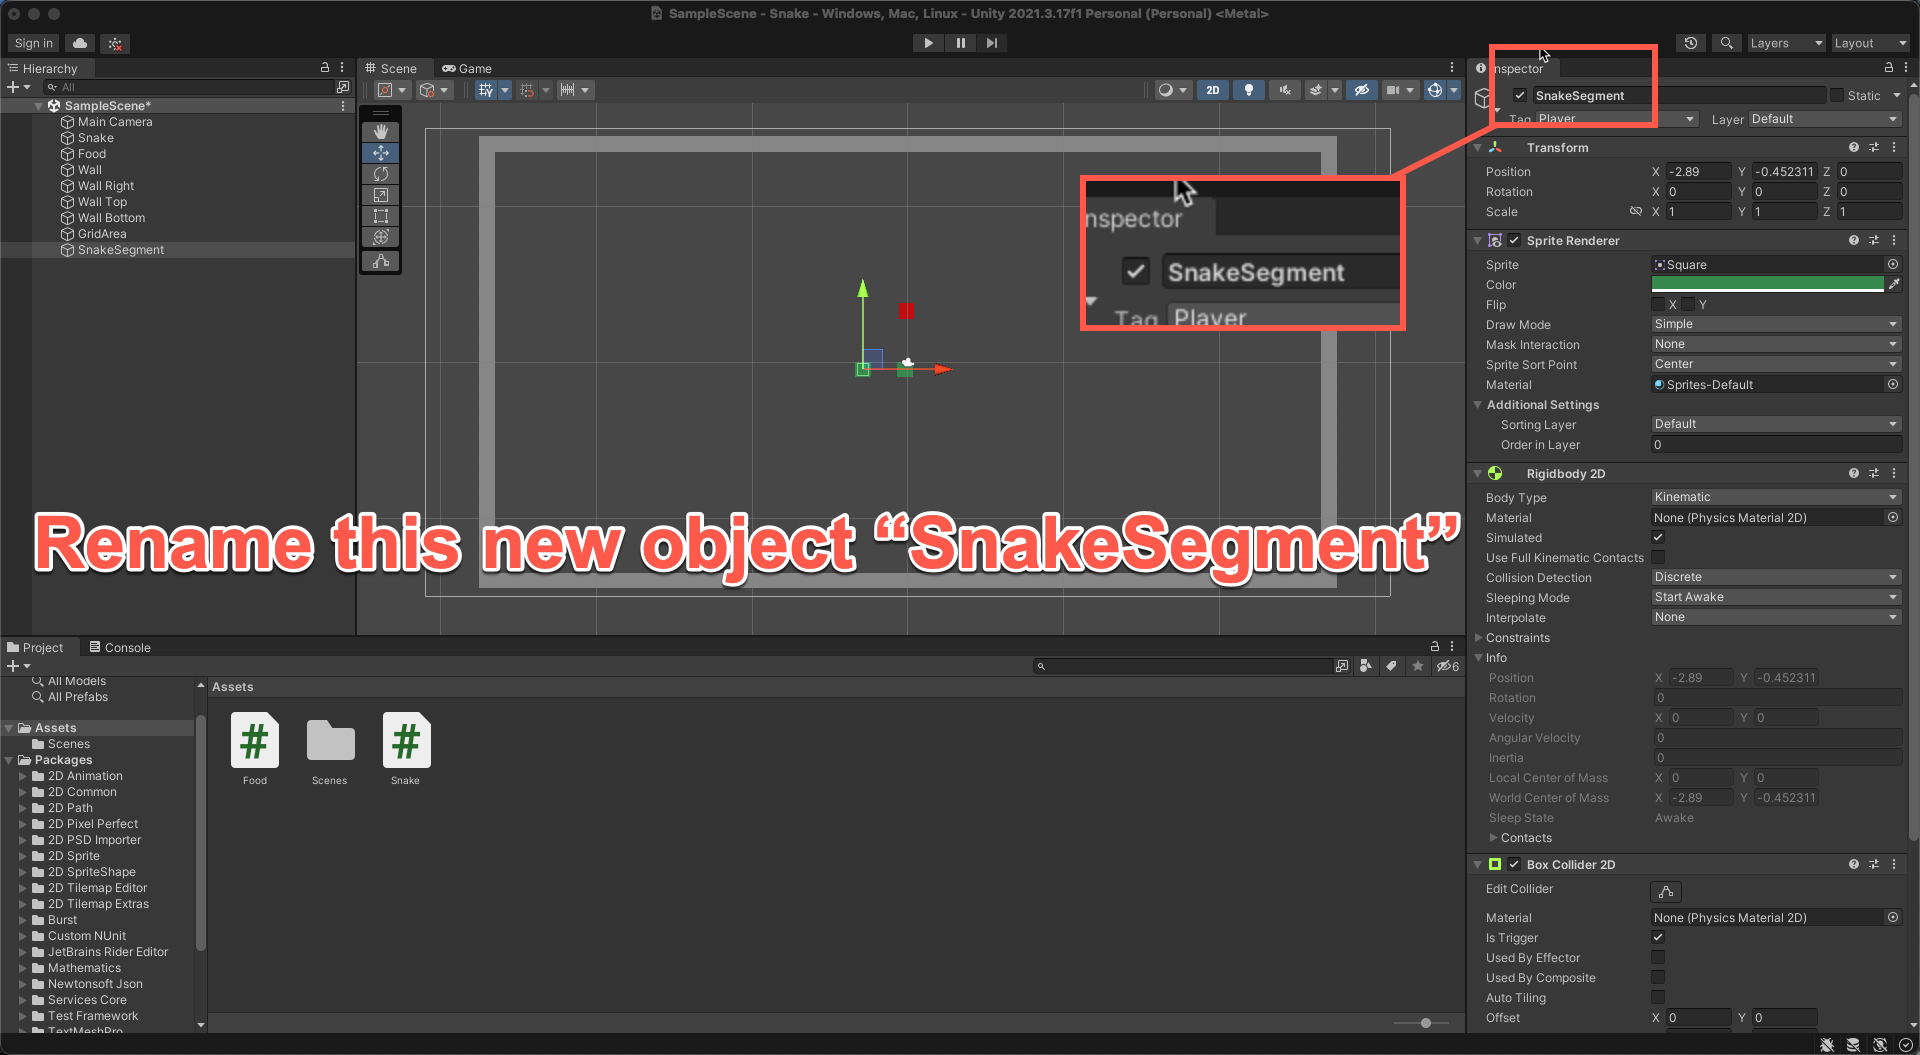
Because the SnakeSegment isn't the head of the snake, it won't need a RigidBody2D or Snake Script attached to them.
Only delete these in the Inspector of SnakeSegment, Don't delete them from your assets.
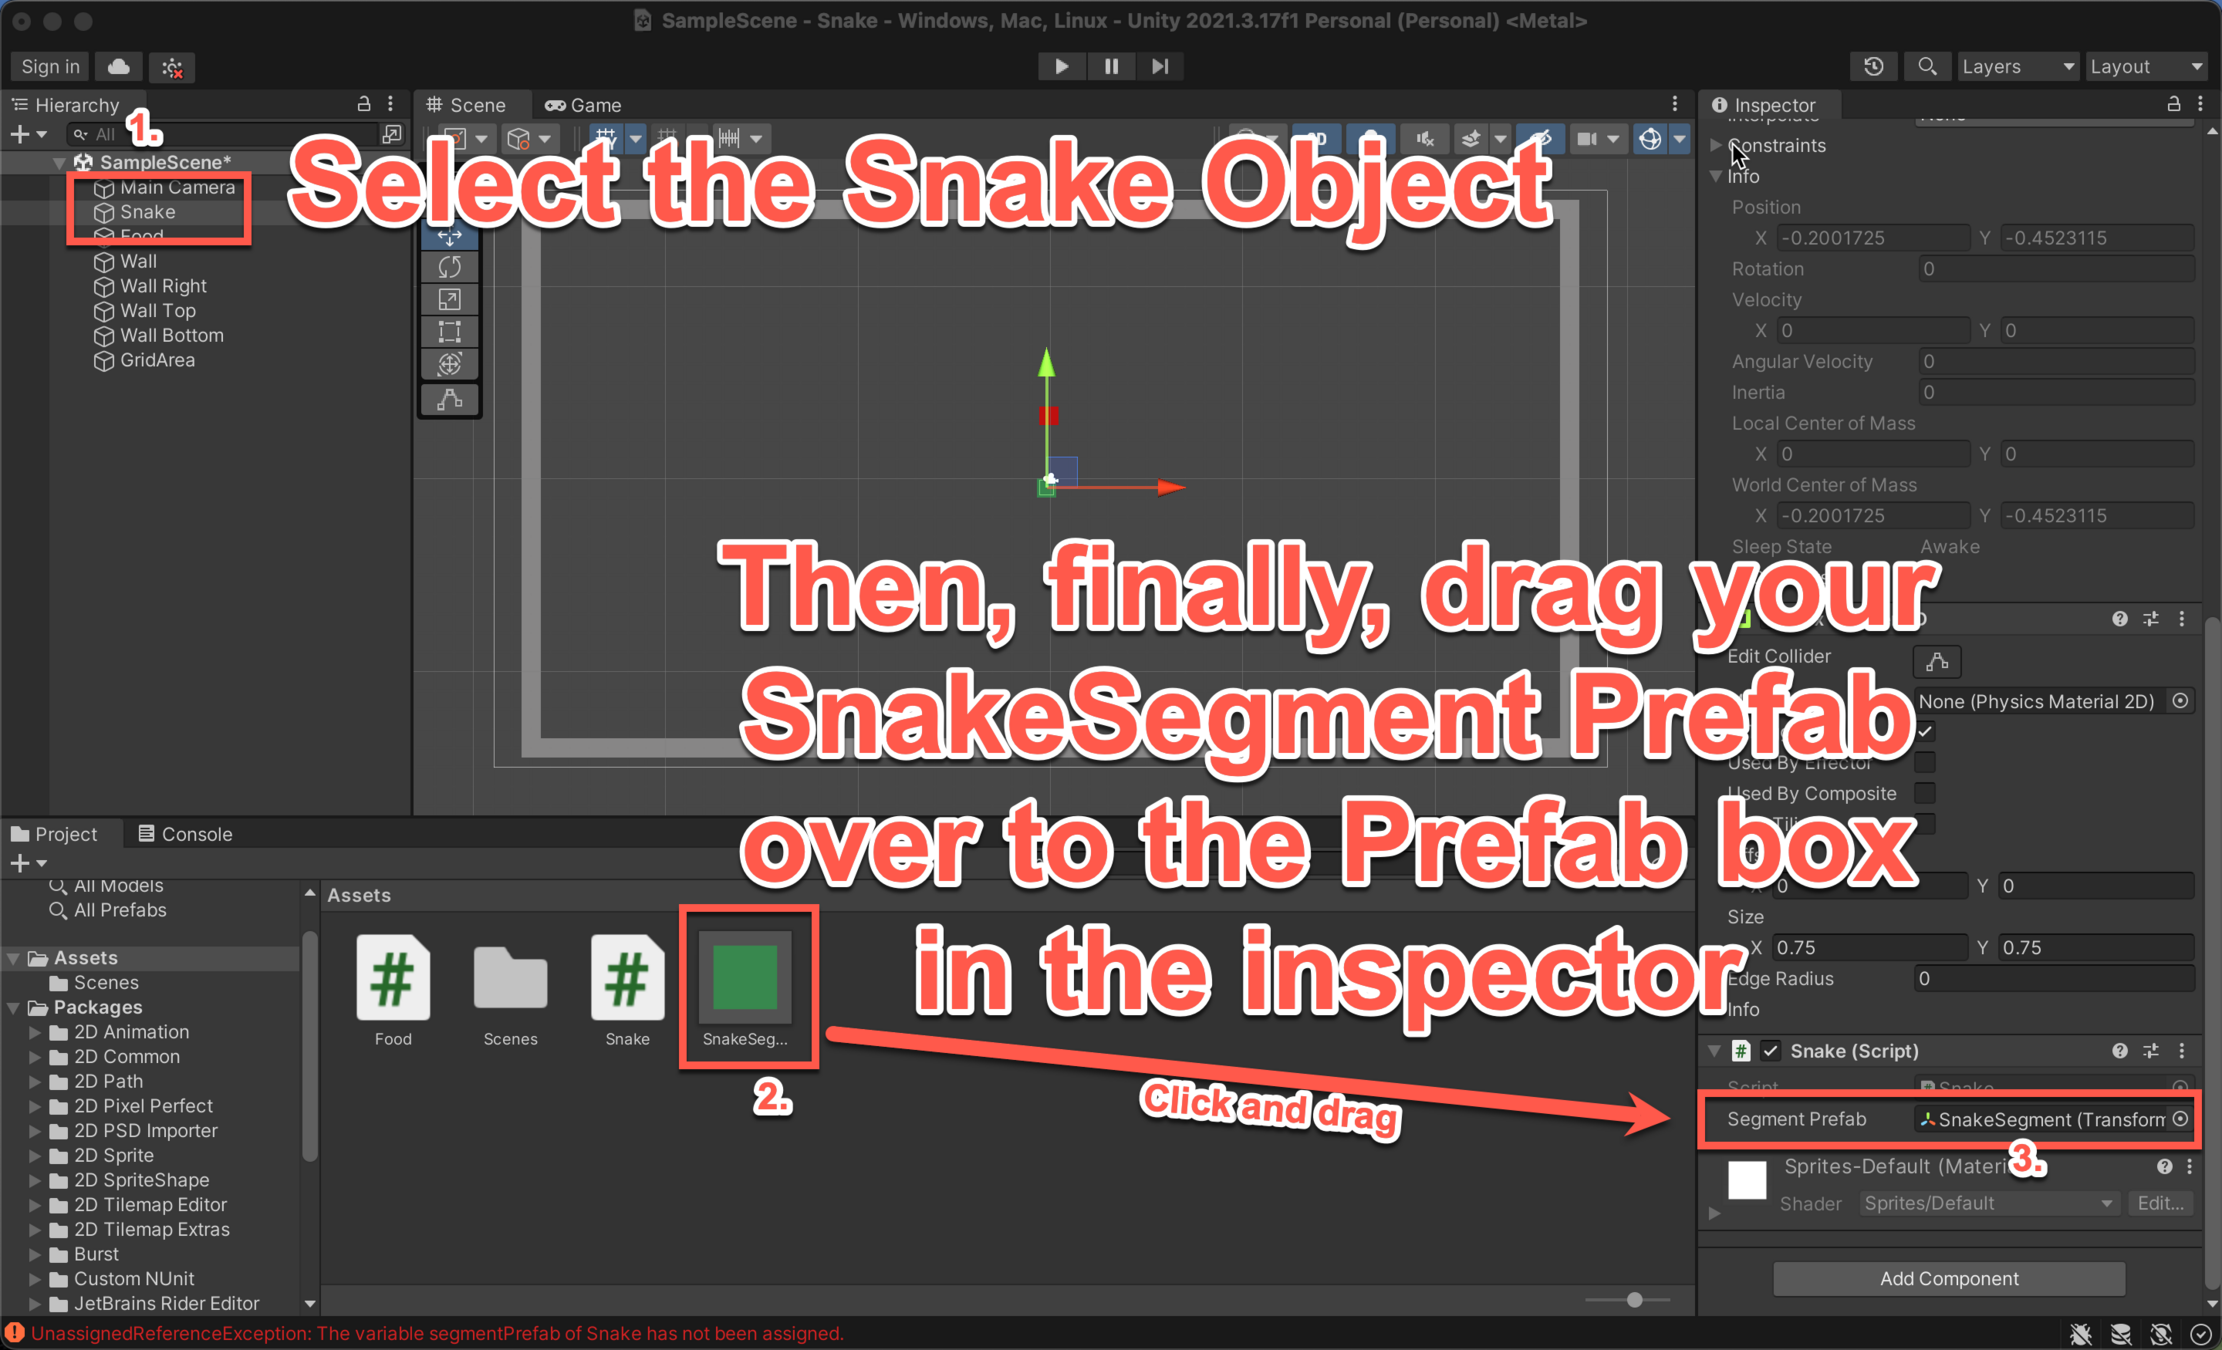
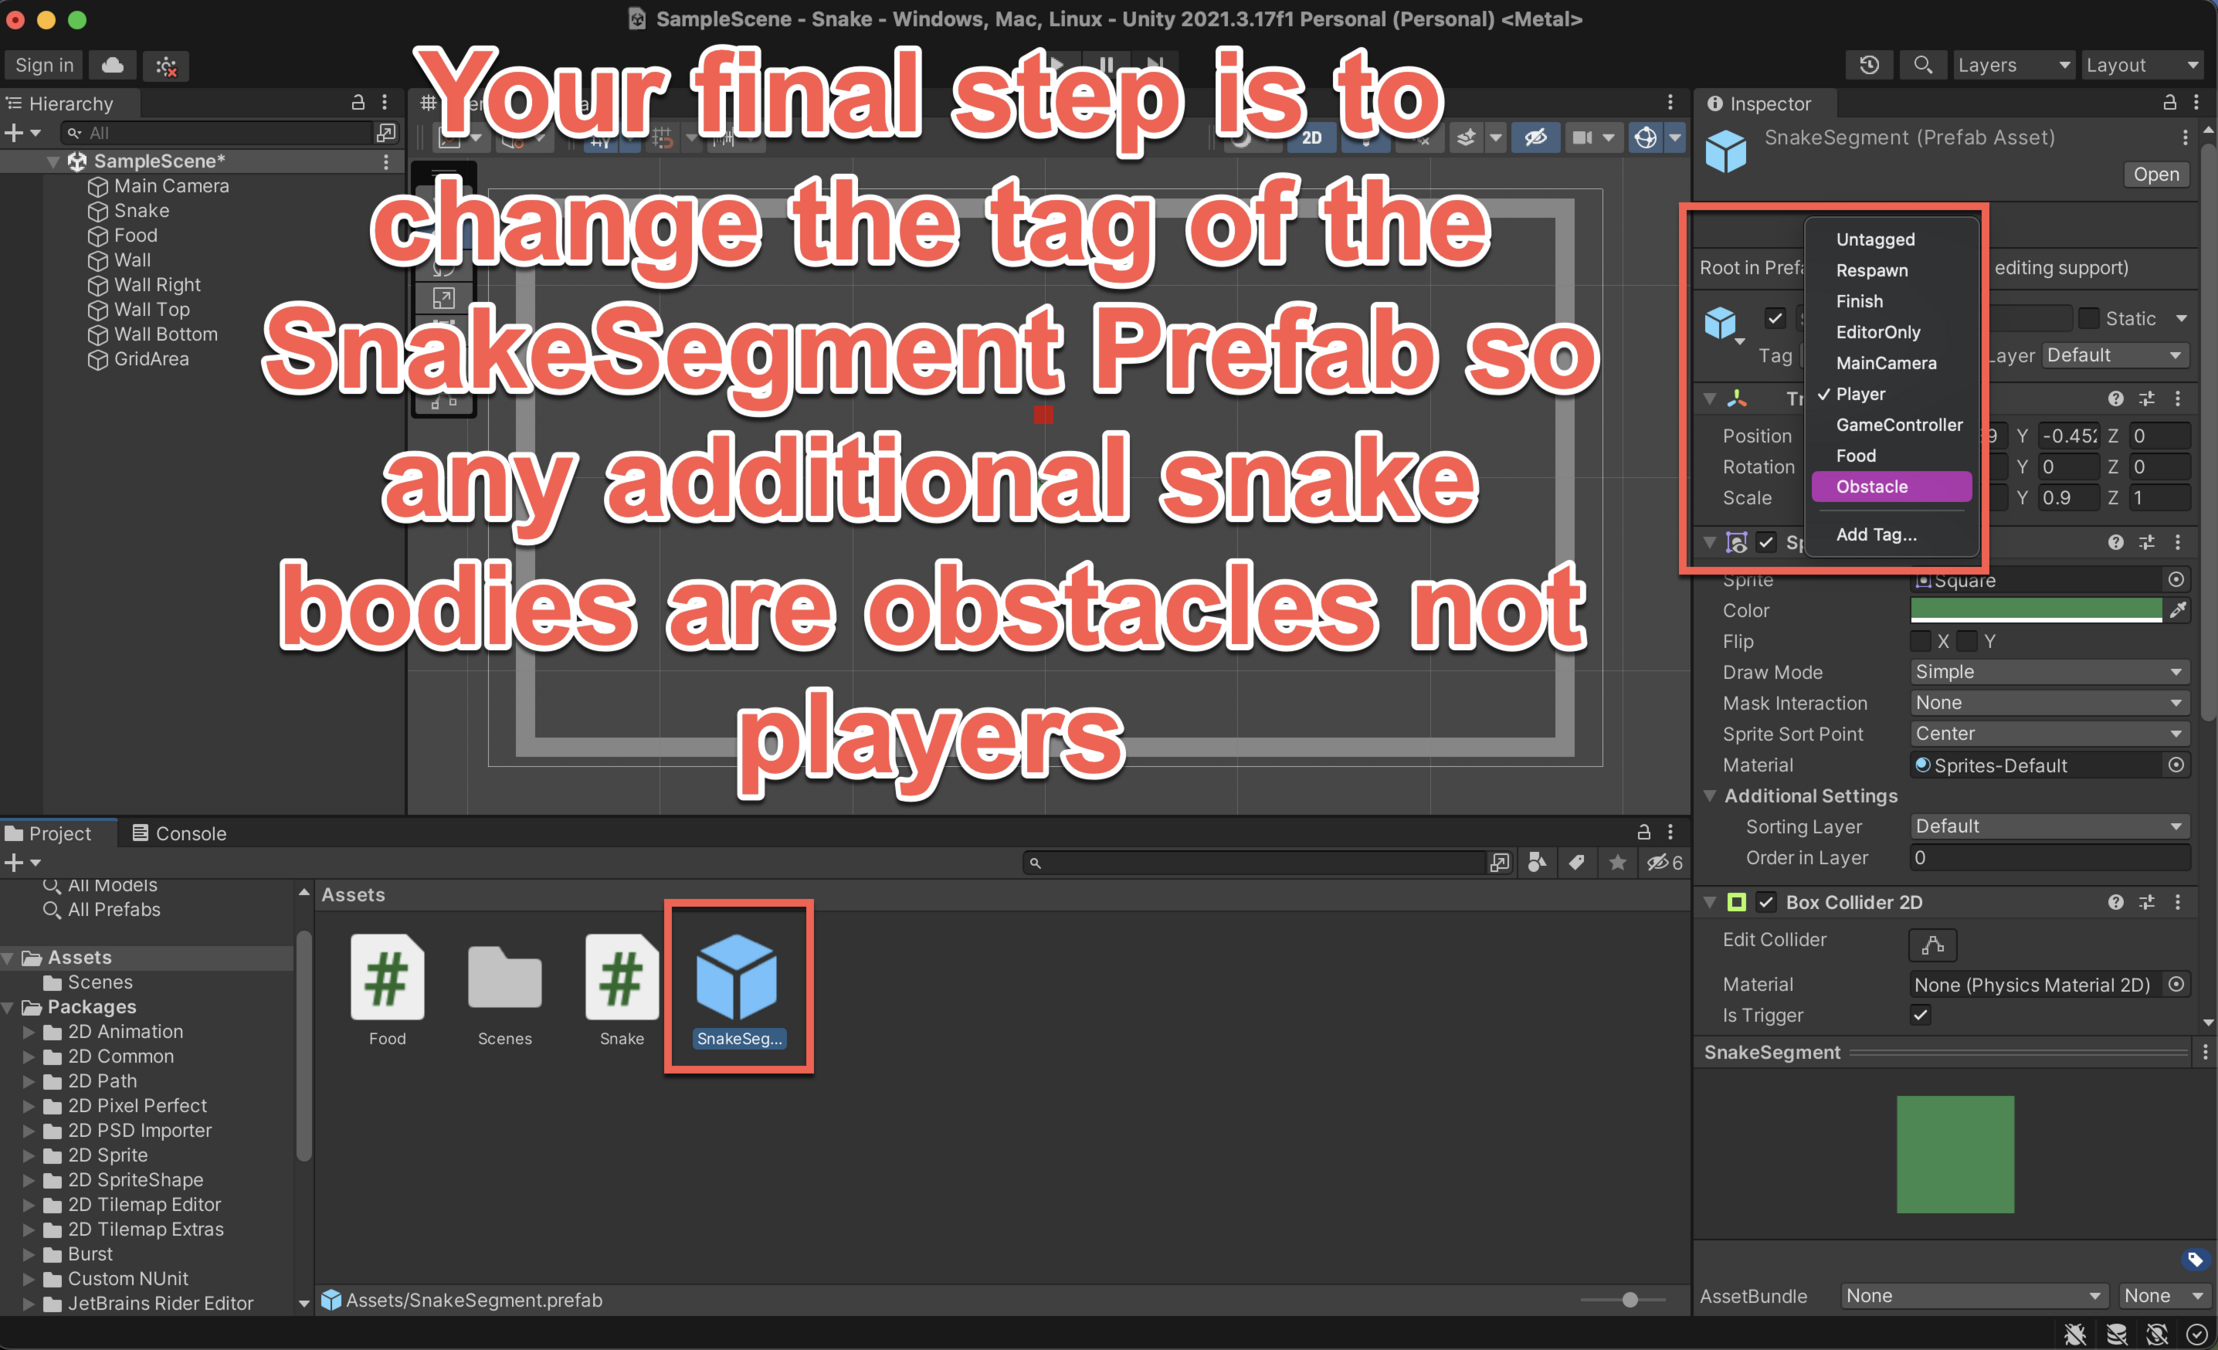
Creating a Prefab of our snake object
Creating a Prefab of our snake object

Character Growth
Now we have the ability to add in new segments of our character, we need to write the code that will create a new segment when we eat an apple. This we are going to do in our Snake Script.
Character Growth
using System.Collections;
using System.Collections.Generic;
using UnityEngine;

public class Snake : MonoBehaviour
{
    private Vector2 _direction = Vector2.right;

    private List<Transform> _segments;

    public Transform segmentPrefab;

    private void Start()
    {
    	_segments = new List<Transform>();
        _segments.Add(this.transform);
    }

    // Update is called once per frame
    private void Update()
    {
At the top of your document above the Update() function we need to add lines 9-17.
This code will generate a list of items that will hold the length of our main character.
We have also created a reference to our prefab on line 11. This will then allow us to create new snake objects when we eat.
Character Growth
  private void FixedUpdate()
    {
        this.transform.position = new Vector3(
            Mathf.Round(this.transform.position.x) + _direction.x,
            Mathf.Round(this.transform.position.y) + _direction.y,
            0.0f
        );
    }

    private void Grow()
    {
    	Transform segment = Instantiate(this.segmentPrefab);

        // Set the position of this new segment to the position of the previous
		segment.position = _segments[_segments.Count - 1].position;

        // Add the segment to the list of available segments
		_segments.Add(segment);
    }

    private void OnTriggerEnter2D(Collider2D other)
    {
        if (other.tag == "Obstacle"){
            this.transform.position = new Vector3(0.0f, 0.0f, 0.0f);
        }
    }
}
In the script below FixedUpdate() we have added a new function called Grow()
This new function creates a new segment, gives it a position, then adds the segment to our list so we have a reference of its existence.
Character Growth
  private void FixedUpdate()
    {
        this.transform.position = new Vector3(
            Mathf.Round(this.transform.position.x) + _direction.x,
            Mathf.Round(this.transform.position.y) + _direction.y,
            0.0f
        );
    }

    private void Grow()
    {
    	Transform segment = Instantiate(this.segmentPrefab);

        // Set the position of this new segment to the position of the previous
		segment.position = _segments[_segments.Count - 1].position;

        // Add the segment to the list of available segments
		_segments.Add(segment);
    }

    private void OnTriggerEnter2D(Collider2D other)
    {
        if (other.tag == "Obstacle"){
            this.transform.position = new Vector3(0.0f, 0.0f, 0.0f);
        } elif (other.tag == "Food") {
        	Grow();
        }
    }
}
In our OnTriggerEnter2D() function we need to add another IF statement to check for if we have eaten food, and when we do we need to call Grow()
Character Growth
  private void FixedUpdate()
    {
        for (int i = _segments.Count - 1; i > 0; i--){
            _segments[i].position = _segments[i - 1].position;
        }

        this.transform.position = new Vector3(
            Mathf.Round(this.transform.position.x) + _direction.x,
            Mathf.Round(this.transform.position.y) + _direction.y,
            0.0f
        );
    }

    private void Grow()
    {
    	Transform segment = Instantiate(this.segmentPrefab);

        // Set the position of this new segment to the position of the previous
		segment.position = _segments[_segments.Count - 1].position;

        // Add the segment to the list of available segments
		_segments.Add(segment);
    }
The last step of our character growth is to create a loop that will ensure the new segments follow the head of our character.
To do this we are going to add a loop at the beginning of the FixedUpdate() function.
Character Growth
Character Growth
You may notice that your snake won't reset if you hit a wall yet, nor will it break if you cross over yourself.
We will fix that on the next slide.
Character Reset
Continuing in our Snake Script, we are going to add a ResetState() function after Grow() and before OnTriggerEnter2D()
We also need to make a change on line 27 so that we call ResetState() instead of resetting the position.
Don't forget to press CTRL + S to save your work.
    private void Grow()
    {
    	Transform segment = Instantiate(this.segmentPrefab);

        // Set the position of this new segment to the position of the previous
		segment.position = _segments[_segments.Count - 1].position;

        // Add the segment to the list of available segments
		_segments.Add(segment);
    }

    private void ResetState()
    {
        for (int i = 1; i < _segments.Count; i++){
            Destroy(_segments[i].gameObject);
        }

        _segments.Clear();
        _segments.Add(this.transform);

        this.transform.position = Vector3.zero;
    }

    private void OnTriggerEnter2D(Collider2D other)
    {
        if (other.tag == "Obstacle"){
            ResetState();
        } else if (other.tag == "Food"){
            Grow();
        }
    }
}
Character Reset
You now have a fully functioning game of snake!
Unity Lesson 2
By CJackson


