


Youcef Madadi
Web and game development teacher
React is an open-source JavaScript library for building user interfaces. It was created by Facebook (now Meta) and is widely used for building single-page applications (SPAs) and dynamic web apps
Think of React as a LEGO set for building UIs: you create small, reusable pieces (components) and snap them together to build something amazing.
const UserCard = ({ user }) => {
  return (
    <div className="user-card">
      <img src={user.avatar} alt={user.name} className="avatar" />
      <div className="user-details">
        <h2>{user.name}</h2>
        <p>Email: {user.email}</p>
      </div>
    </div>
  );
};
Efficiently updates only necessary parts of the UI
Everything in React is a component!
Modular building blocks for UI
Widely adopted by major companies and developers worldwide
Imagine you're building a restaurant review app. Instead of writing HTML for every restaurant review, React allows you to create a Review Component, which you can reuse for multiple reviews. This makes development faster and more efficient.
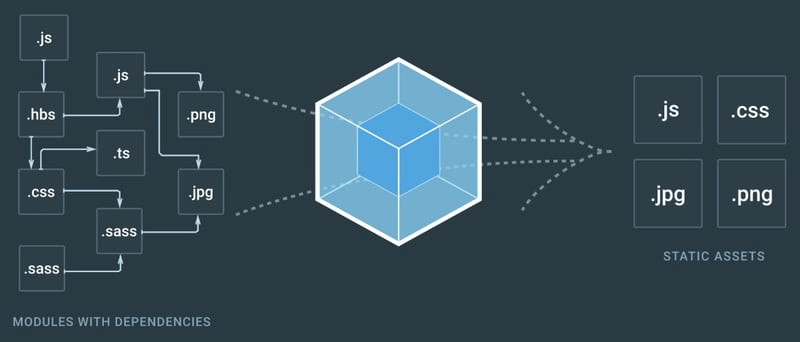
A bundler takes all your code and resource files, transforms and optimizes them, then bundles them into one or more files ready to be loaded into the browser.
Vite is a next-generation build tool for frontend development. It focuses on speed and efficiency by leveraging ES Module imports and server-side rendering (SSR) capabilities.
Create React App is the traditional way to create single-page React applications. It sets up a new React project with a pre-configured build setup using webpack and Babel.
SWC excels in performance and modern JavaScript/TypeScript support, making it ideal for projects that require fast compilation times and support for the latest ECMAScript features.
Babel, while slightly slower in compilation speed compared to SWC, offers unparalleled flexibility, extensive plugin support, and broad compatibility across different JavaScript environments and syntax versions.
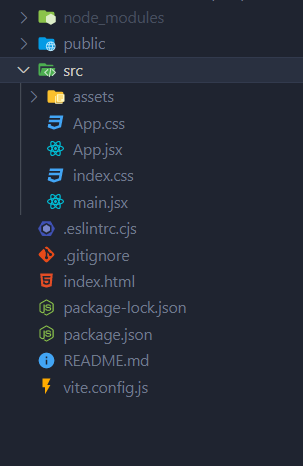
npm create vite@latest Let’s create a React project using Vite. Open your terminal and run:
In React, a component is a reusable, self-contained piece of code that encapsulates the structure (HTML), behavior (JavaScript), and styling (CSS) of a part of the user interface.
There are two types:
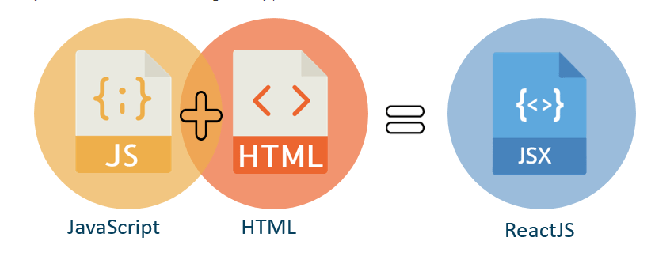
React.Component.JSX (JavaScript XML) is a syntax extension for JavaScript that allows you to write HTML-like code directly in your JavaScript files.
{}.<div>
<h1>Hello, {fullName}!</h1>
<p>Welcome to my React app.</p>
</div>const fullName="Naruto UZUMAKI"Class components are ES6 classes that extend the React.Component class. They can have state and lifecycle methods, making them more suitable for complex logic and interactions.
import React from 'react';

class Header extends React.Component {
  render() {
    return <header>Welcome to My React App ! 🎉</header>;
  }
}
The Header component is a class component that returns a <header> element using JSX.
import React from 'react';

class Counter extends React.Component {
  constructor(props) {
    super(props);
    this.state = { count: 0 };
  }

  handleIncrement = () => {
    this.setState({ count: this.state.count + 1 });
  };

  render() {
    return (
      <div>
        <p>Count: {this.state.count}</p>
        <button onClick={this.handleIncrement}>Increment</button>
      </div>
    );
  }
}
Functional components are JavaScript functions that return JSX (JavaScript XML) to describe what should be rendered on the screen. They are simpler and modern approach to building components. They are stateless, meaning they don't have internal state or lifecycle methods.
However, with the introduction of React Hooks, functional components can now handle state and side effects effectively, reducing the need for class components in many cases.
function Header() {
  return <header>Welcome to My React App ! 🎉</header>;
}import React from 'react';
const MyComponent = (props) => {
return (
<div>
<h2>Hello, {props.name}!</h2>
<p>{props.message}</p>
</div>
);
};In React, data is typically passed from a parent component to a child component through props. Props (short for "properties") are read-only and allow data to flow in one direction, from parent to child components.
// ParentComponent.js
import React from 'react';
import ChildComponent from './ChildComponent';

const ParentComponent = () => {
  const name = 'John Doe';
  return <ChildComponent name={name} />;
};
// ChildComponent.js
import React from 'react';
const ChildComponent = (props) => {
return <p>Hello, {props.name}!</p>;
};
// ParentComponent.js
import React from 'react';

function UserCard({ name, age }) {
  return (
    <div>
      <h2>{name}</h2>
      <p>Age: {age}</p>
    </div>
  );
}
// ChildComponent.js
import React from 'react';
function Greeting(pops) {
return <h1>Hello, {props.name}!</h1>;
}
function Greeting({ name }) {
return <h1>Hello, {name}!</h1>;
Destructuring is a JavaScript feature that allows you to extract values from objects or arrays into variables. It makes your code cleaner and easier to read.
Exo: Color palette Gallery
// Parent Component
function App() {
  const handleClick = () => {
    alert('Button clicked in the parent component!');
  };

  return <Button onClick={handleClick} />;
}

// Child Component
function Button({ onClick }) {
  return <button onClick={onClick}>Click Me</button>;
}
Sometimes, you need to pass a function from a parent component to a child component to handle events or update the parent’s state. This is a common pattern in React.
npm install prop-typesPropTypes are a way to validate the types of props passed to a component. They help catch bugs by ensuring that the correct data types are used.
import PropTypes from 'prop-types';
function UserCard({ name, age }) {
  return (
    <div>
      <h2>{name}</h2>
      <p>Age: {age}</p>
    </div>
  );
}
UserCard.propTypes = { // Define PropTypes
  name: PropTypes.string.isRequired,
  age: PropTypes.number.isRequired,
};Common PropTypes
PropTypes.string: The prop must be a string.
PropTypes.number: The prop must be a number.
PropTypes.bool: The prop must be a boolean.
PropTypes.func: The prop must be a function.
PropTypes.node: The prop must be a renderable value (e.g., string, number, element).
PropTypes.element: The prop must be a React element.
The children prop is a special prop that allows you to pass content between the opening and closing tags of a component. It’s like a placeholder for nested content.
function App() {
  return (
    <Card>
      <h2>Hello, World!</h2>
      <p>This is a card component.</p>
    </Card>
  );
}

// Child Component
function Card({ children }) {
  return <div style={styles.card}>{children}</div>;
}State is a built-in React object that stores data or information about the component. It allows components to manage dynamic data and re-render when the state changes. Think of state as the memory of a component.
class Counter extends React.Component {
  constructor(props) {
    super(props);
    this.state = { count: 0 }; // Initialize state
  }
  increment = () => {  // Method to increment count
    this.setState({ count: this.state.count + 1 });
  };
  decrement = () => {  // Method to decrement count
    this.setState({ count: this.state.count - 1 });
  };
  render() {
    return (
      <div>
        <p>Count: {this.state.count}</p>
        <button onClick={this.increment}>Increment</button>
        <button onClick={this.decrement}>Decrement</button>
      </div>
    );
  }
}
export default Counter;
In class components, state is initialized in the constructor and updated using the setState method.
increment = () => {
  this.setState(
    { count: this.state.count + 1 },
    () => {
      console.log('State updated! New count:', this.state.count);
    }
  );
};
Sometimes, you need to perform an action after the state has been updated. You can pass a callback function as the second argument to setState.
function Greeting({ name }) {
  return <h1>Hello, {name}!</h1>;
}
Functional components are stateless, doesn’t use state. It only receives data via props and renders UI.
React Hooks are special functions that were introduced to address some of the limitations of functional components and to provide a more cohesive way to handle state and side effects in React applications.
Simplified Component Logic: Hooks allow you to write functional components without needing to convert them into class components just for state management.
Throw Classes
Improved Readability: Functional components using Hooks often have cleaner and more readable code.
Widely adopted by major companies and developers worldwide
The useState hook is the simplest and most commonly used hook. It lets you manage data that can change in your component.
const [state, setState] = useState(initialState);import React, { useState } from 'react';
export function Counter() {
const [count, setCount] = useState(0);
return (
<div>
<p>Count: {count}</p>
<button onClick={() => setCount(count + 1)}>Increment</button>
</div>
);
}Exo : Add the decrement and reset buttons !
import React, { useState } from 'react';

function ToggleButton() {
  const [isOn, setIsOn] = useState(false);

  const toggle = () => {
    setIsOn(!isOn);
  };

  return (
    <div>
      <button onClick={toggle}>
        {isOn ? 'Turn Off' : 'Turn On'}
      </button>
      <p>Switch is {isOn ? 'on' : 'off'}.</p>
    </div>
  );
}import React, { useState } from 'react';
function InputField() {
const [inputValue, setInputValue] = useState('');
const handleInputChange = (event) => {
setInputValue(event.target.value);
};
return (
<div>
<input
type="text"
value={inputValue}
onChange={handleInputChange}
placeholder="Type something..."
/>
<p>You typed: {inputValue}</p>
</div>
);
}Exo : Dynamic progress bar
import React, { useState } from 'react';

function TemperatureConverter() {
  const [celsius, setCelsius] = useState(0);
  const [fahrenheit, setFahrenheit] = useState(32);

  const handleCelsiusChange = (event) => {
    const newCelsius = event.target.value;
    const newFahrenheit = (newCelsius * 9) / 5 + 32;
    setCelsius(newCelsius);
    setFahrenheit(newFahrenheit);
  };

  const handleFahrenheitChange = (event) => {
    const newFahrenheit = event.target.value;
    const newCelsius = ((newFahrenheit - 32) * 5) / 9;
    setFahrenheit(newFahrenheit);
    setCelsius(newCelsius);
  };
  // return part
}return (
<div>
<label>
Celsius:
<input type="number"
value={celsius}
onChange={handleCelsiusChange}/>
</label>
<br />
<label>
Fahrenheit:
<input type="number"
value={fahrenheit}
onChange={handleFahrenheitChange}/>
</label>
</div>
);import React, { useState } from 'react';
function UserProfile() {
const [user, setUser] = useState({
firstName: '',
lastName: '',
email: '',
});
const handleInputChange = (event) => {
const { name, value } = event.target;
setUser({ ...user, [name]: value });
};
// return part
}
  return (
    <div>
      <input type="text" name="firstName" value={user.firstName}
  		onChange={handleInputChange} placeholder="First Name" />
      <input type="text" name="lastName" value={user.lastName}
		onChange={handleInputChange} placeholder="Last Name"/>
      <input type="email" name="email" value={user.email}
		onChange={handleInputChange} placeholder="Email" />
      <p>{`Hello, ${user.firstName} ${user.lastName}`}</p>
      <p>Email: {user.email}</p>
    </div>
);The useEffect Hook in React is used to manage side effects in functional components. It allows you to perform tasks that can't or shouldn't happen within the regular rendering process. Such as :
Fetching data from an API.
useEffect tells React: "Do something after the component renders or when certain data changes."
useEffect(() => {
  // Code to run after rendering or
  //  when dependencies change
  return () => {
    // Cleanup code (optional)
  };
}, [dependencies]); // Dependency array (optional)useEffect(() => {
// Your side effect code here
}, [dependencies]);import { useEffect } from 'react';
function MyComponent() {
useEffect(() => {
console.log('Component is mounted.');
return () => {
console.log('Component is unmounted.');
};
}, []); // An empty dependency array means this effect runs only on mount
return <div>My Component Content</div>;
}
export default MyComponent;import { useState, useEffect } from 'react';
function App() {
const [count, setCount] = useState(0);
useEffect(() => {
document.title = `You clicked ${count} times`;
}, [count]); // Dependency: `count`
return (
<div>
<p>You clicked {count} times</p>
<button onClick={() => setCount(count + 1)}>Click me</button>
</div>
);
}
export default App;import { useState, useEffect } from 'react';
function App() {
const [data, setData] = useState(null);
const [loading, setLoading] = useState(true);
useEffect(() => {
fetch('https://jsonplaceholder.typicode.com/posts/1')
.then((response) => response.json())
.then((data) => {
setData(data);
setLoading(false);
})
.catch((error) => {
console.error('Error:', error);
setLoading(false);
});
}, []); // Empty array: runs only once
if (loading) {
return <p>Loading...</p>;
}
return (
<div>
<h1>{data.title}</h1>
<p>{data.body}</p>
</div>
);
}
export default App;import { useState, useEffect } from 'react';
function App() {
const [position, setPosition] = useState({ x: 0, y: 0 });
// Add an event listener to track mouse position
useEffect(() => {
const handleMouseMove = (event) => {
setPosition({ x: event.clientX, y: event.clientY });
};
window.addEventListener('mousemove', handleMouseMove);
// Clean up the event listener when the component unmounts
return () => {
window.removeEventListener('mousemove', handleMouseMove);
};
}, []); // Empty array: runs only once
return (
<div>
<p>Mouse position:</p>
<p>X: {position.x}, Y: {position.y}</p>
</div>
);
}
export default App;This prevents errors if the component is removed from the DOM and avoid memory leaks.
import { useState, useEffect } from 'react';

function App() {
  const [count, setCount] = useState(0);
  const [message, setMessage] = useState('');
  // Change the page title
  useEffect(() => {
    document.title = `Count: ${count}`;
  }, [count]);
  // Show a message when the counter reaches 10
  useEffect(() => {
    if (count === 10) {
      setMessage('Congratulations, you reached 10!');
    }
  }, [count]);

  return (
    <div>
      <p>Count: {count}</p>
      <button onClick={() => setCount(count + 1)}>Increment</button>
      {message && <p>{message}</p>}
    </div>
  );
}

export default App;const [count, setCount] = useState(0);
useEffect(() => {
setCount(count + 1); // Infinite loop!
}, [count]); // `count` changes on every renderForgetting Cleanup: If you subscribe to an event or timer, don’t forget to clean it up to avoid memory leaks.
By Youcef Madadi


