
Tim Carlson
I'm a lecturer at University of Washington
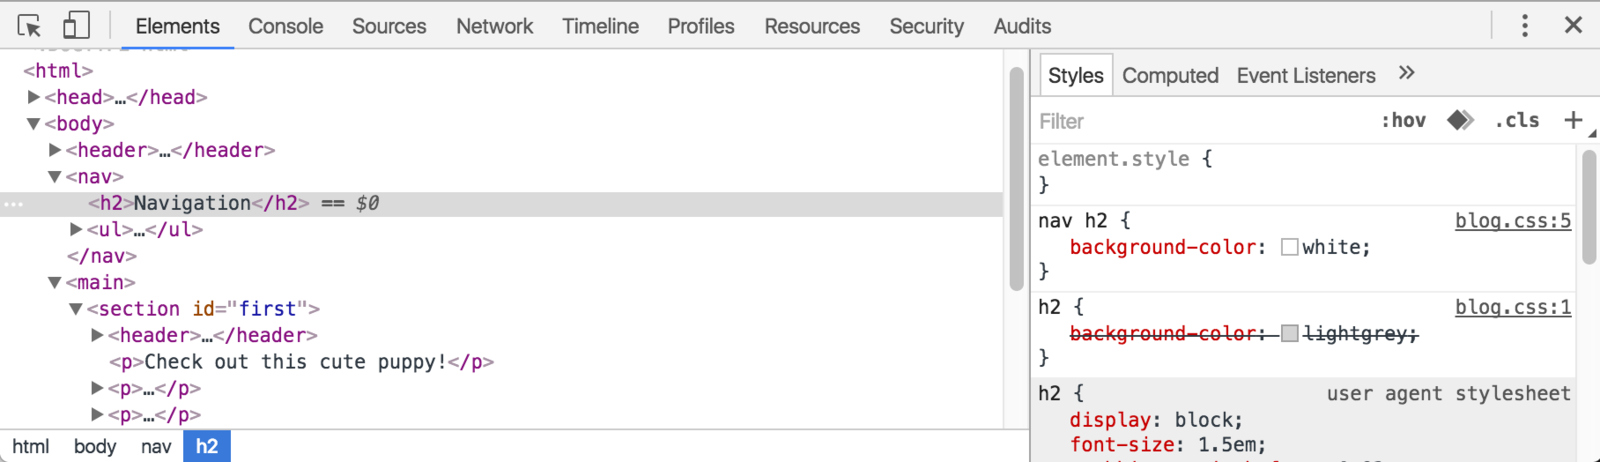
A
structural model of information represented by HTML.
The model is
a tree of element nodes.
The DOM provides functions that allows computer programs (e.g., JavaScript) to access and manipulate it.
The DOM
Which should we use, html.onclick(), or element.addEventListener()?
Try and keep your interaction in your jscript file rather than in the html file.
Use the document.querySelector() function to get a reference to DOM (HTML) elements, which you can assign to a variable.
The function's argument is a string (in quotes!) of a CSS selector for those elements.
//select the <h1> element
//returned value is an HTML Element
const headingElement = document.querySelector('h1');

/* can use any valid CSS selector */
//selects the first element with `class="alert"`
const alertElement = document.querySelector('.alert');

/* querySelectorAll() will select multiple elements */
/* returns a NodeSet, which is like an array */
//select all hyperlinks <a> within the <nav>
const buttonElementsSet = document.querySelectorAll('nav a');The DOM has an API which can interact with elements of the DOM
To manipulate DOM elements, a variable is needed to refer to element
//paragraph element with id="foo"
let pElem = document.getElementById('foo');

//elements with class="row"
let rowElems = document.getElementsByClassName('row'); //note the plural!

//<li> elements
let liElems = document.getElementsByTagName('li'); //note the plural!

/*easiest to select by reusing CSS selectors! */
let cssSelector = 'header p, .title > p';  //a string of a CSS selector

//selects FIRST element that matches css selector
let p2elem = document.querySelector(cssSelector);

//matches ALL elements that match css selector
let elems = document.querySelectorAll(cssSelector);// Example:
let elem = document.querySelector('p');
console.log (elem); // will log the first 'p' element
let text = elem.textContent; //the text content of elem
elem.textContent = "This is different content!"; //change content
let html = elem.innerHTML; //content including HTML
document.querySelector(cssSelector) is recommended method
const paragraph = document.querySelector('p');
const image = document.querySelector('img');
const input = document.querySelector('input');

//change the paragraph's content.
paragraph.textContent = "This is new content!";

//change the content (including HTML)
paragraph.innerHTML = "This is <em>new</em> content!";

//change element attributes
image.src = 'path/to/different_picture.png'; //change src

//access element properties
const inputttedValue = input.value;

//change element class(es)
paragraph.classList.add('bg-dark'); //give it the `bg-dark` class
paragraph.classList.toggle('bg-dark'); //remove if there, add if not

//add specific CSS property (but better to use a class!)
//note that property names are camelCase
paragraph.style.fontSize = '2rem'; //change font-size
Access element properties to modify the element.
//Slide 13 - change h1 element and add additional highlighted text
// aquire the h1 element

let theH1 = document.querySelector('h1');
console.log(theH1)

let puppyImg = document.querySelector('#puppySection img')
console.log(puppyImg);

// querySelectorAll will select multiple elements rather than just the 1st element
// that matches the selector

//change content of an element
let subtitle = document.querySelector('main h2');

subtitle.innerHTML = subtitle.textContent + " <em>(Husky)</em>";
// Change an Attribute

const h1Elem = document.querySelector('h1');

h1Elem.textContent = "DOM Demo";


const dogImg = document.querySelector('#puppySection img')

dogImg.src = 'img/husky.jpg';
dogImg.alt = 'a husky';// Change a style. Notice you use "classList.add" to
// add an additional style to the existing list of applied styles
//show the current style list (classList) for the header element
console.log(document.querySelector('header').classList);
//make the padding really big
document.querySelector('header').classList.add('py-5')
const theImg = document.querySelector('img');
theImg.classList.add('anim') //adds a new style
// In the console type: "theImg.classList.toggle('scale-out');"Create new elements using document.createElement()
New elements need to be added to the existing DOM tree with e.g., appendChild()
//create an element
const newParagraphElem = document.createElement('p');

//give it content/etc
newParagraphElement.textContent = "new content";

//get refefrence to element already on the page
const mainElem = document.querySelector('main');

//append the new element as last child
mainElem.appendChild(newParagraphElem);
<main>
  <p>old content</p>
</main>
<main>
<p>old content</p>
<p>new content</p>
</main>//create the new element
const newLi = document.createElement('li');
//set the html using .innerHTML method
newLi.innerHTML = '<a href="https://www.youtube.com/watch?v=BHOevX4DlGk">
The Police - Spirits In The Material World</a>';
//add to the appropriate place in DOM
const songListElem = document.querySelector('#dataSection ol');
songListElem.appendChild(newLi);
//create the new elements
const newLi = document.createElement('li');
const newAnchor = document.createElement('a');

//fill out the attributes for the anchor
newAnchor.href = "https://www.youtube.com/watch?v=BHOevX4DlGk";
newAnchor.textContent = "The Police - Spirits In The Material World";

newLi.appendChild(newAnchor);

//add to the appropriate place in DOM
const songListElem = document.querySelector('#dataSection ol');
songListElem.appendChild(newLi);
Example A. Using innerHTML
Example B. Build up Anchor tag and append to 'li'
//Take in a song object and return a formatted <li> object
function createSongListItem(songObj) {
  //make this into a url
  const aElem = document.createElement('a');
  aElem.textContent = songObj.artist + " - " + songObj.title;
  aElem.href = songObj.youtubeUrl;

  // create the newLi and make
  const newLi = document.createElement('li');
  newLi.append(aElem);
  return newLi;
}

function renderSongList(aSongArray) {
  const songListElem = document.querySelector('#dataSection ol');
  for (const songObj of aSongArray) {
    const songLiElem = createSongListItem(songObj);
    songListElem.appendChild(songLiElem);
  }

}

renderSongList(songArray);
Best practice is to define functions (e.g., named create____ or render____) that will create and return elements.
function createLinkItem(text, url) {
  const aElem = document.createElement('a');
  aElem.textContent = text;
  aElem.src = url;
  return aElem; //returns an element!
}

const linkArray= [{url: 'https://info340.github.io/', title: 'Course Textbook'},
                  {url: 'https://ischool.uw.edu/', title: 'iSchool'},
                  {url: 'https://www.google.com/search?q=puppies&tbm=isch', title: 'Puppies'}];

function createLinkList(linkObjList) {
  const ulElem = document.createElement('ul');
  for(const linkObj of linkObjList) {
    //call the render function to create the child element
    const linkELem = createLinkItem(linkObj.title, linkObj.url);

    const liElem = document.createElement('li');
    liElem.appendChild(linkElem); //include the rendered element
    ulElem.appendChild(liElem);
  }
  return ulElem; //returns an element!
}
document.querySelector('nav').appendChild(createLinkList(linkArray));We add interactivity by listening for and responding to "events" created by the computer.
Use the addEventListener() function to register a "listener". The function takes 2 arguments: the type of event to listen for (a string), and a callback function to run when the event occurs.
the event that occurred
const button = document.querySelector('button');

button.addEventListener('click', function(event) {

  //what to do when button is pressed!
  console.log("you clicked on", event.target);

});
which element
cause the event
Registering an Event Listener (example 1)
const hideButton = document.querySelector('#puppySection button');

function whatToDoWhenClicked(event){
  console.log("you clicked me!");
  console.log(event); //the event object
  console.log(event.target); //tells you which element got clicked
}

hideButton.addEventListener('click', whatToDoWhenClicked )
const hideButton = document.querySelector('#puppySection button');
function whatToDoWhenClicked(){
console.log("you clicked me!");
}
hideButton.addEventListener('click', whatToDoWhenClicked )Event listener with literal function that hides the section
//STATE (should be at top of file)
let puppyShown = true;

function renderPuppy() {
  const imgElement = document.createElement('img');
  imgElement.src = 'img/puppy.jpg';
  imgElement.alt = 'a cute puppy';

  if (!puppyShown) {
    imgElement.classList.add('d-none')
  }

  document.querySelector('#puppySection div').appendChild(imgElement);

}
renderPuppy();

const hideButton = document.querySelector('#puppySection button');

hideButton.addEventListener('click', function (event) {
  //change the state
  puppyShown = !puppyShown;
  //rerender
  renderPuppy();
});//STATE (should be at top of file)
let puppyShown = true;
const hideButton = document.querySelector('#puppySection button');
function renderPuppy() {
//clear out the previous content befor rendering
const puppyContainer = document.querySelector('#puppySection div');
puppyContainer.innerHTML = '';
if (puppyShown) {
const imgElement = document.createElement('img');
imgElement.src = 'img/puppy.jpg';
imgElement.alt = 'a cute puppy';
puppyContainer.appendChild(imgElement);
document.querySelector('#puppySection button').textContent = 'Hide';
}
else { //not shown
document.querySelector('#puppySection button').textContent = 'Show';
}
}
renderPuppy();
hideButton.addEventListener('click', function (event) {
//change the state
puppyShown = !puppyShown;
//rerender
renderPuppy();
});To develop a web app, think about your page as "displaying dynamic content", not "responding to user actions".
//define data
const state = {
  data: [ {}, {}, {} ],
  ...
}

//define presentation - lots of these kinds of functions
function renderData() {
  //render all the data
  for(let datum of state.data){
    //call helper functions to break things up!
    const dataCardElement = renderDataCard(datum);
    document.querySelector('#main').appendChild(dataCardElement);
  }
}

//define user interaction
button.addEventListener('click', function(event) {
  state.data[i] = ...; //MODIFY THE STATE
  document.querySelector('#main').innerHTML = ''; //CLEAR OLD VIEW
  renderData(); //RE-RENDER CONTENT
})

renderData() //show initial content!In order to respond to a form submission, you will need to "stop" the normal HTTP request being sent by calling preventDefault() on the event.
const formElement = document.querySelector('#myForm');

//listen for submit events
formElement.addEventListener('submit', function(event) {
  //stop normal behavior (going to a new site)
  event.preventDefault();

  //access what value the user typed in
  const inputElement = document.querySelector('#name-input')
  const userValue = inputElement.value;

  //... do something with that value!
});Review Chapter 1-12
Read Ch 14: ES6+ Features (we skip Ch13)
Problem Set 05 due Friday
Problem Set 06 is larger; due week from Friday
Do not put this off!
Next time: ES6 syntax
By Tim Carlson


